Raspberry Pi - Knop - Piezo Buzzer
Deze tutorial legt uit hoe u een Raspberry Pi en een knop gebruikt om een piezo buzzer te bedienen. De volgende functies worden uitvoerig besproken:
- Wanneer de knop wordt ingedrukt, maakt de piezo buzzer een geluid.
- Wanneer de knop niet wordt ingedrukt, stopt de piezo buzzer met geluid geven.
- Wanneer de knop wordt ingedrukt, speelt de piezo buzzer een melodie.
Hardware benodigd
Of u kunt de volgende kits kopen:
| 1 | × | DIYables Sensorkit (30 sensoren/displays) | |
| 1 | × | DIYables Sensorkit (18 sensoren/displays) |
Over Piezo Buzzer en Knop
Als u niet vertrouwd bent met piezo buzzer en knop (inclusief pinout, werking en programmering), kunnen de volgende tutorials u helpen:
Bedradingsschema
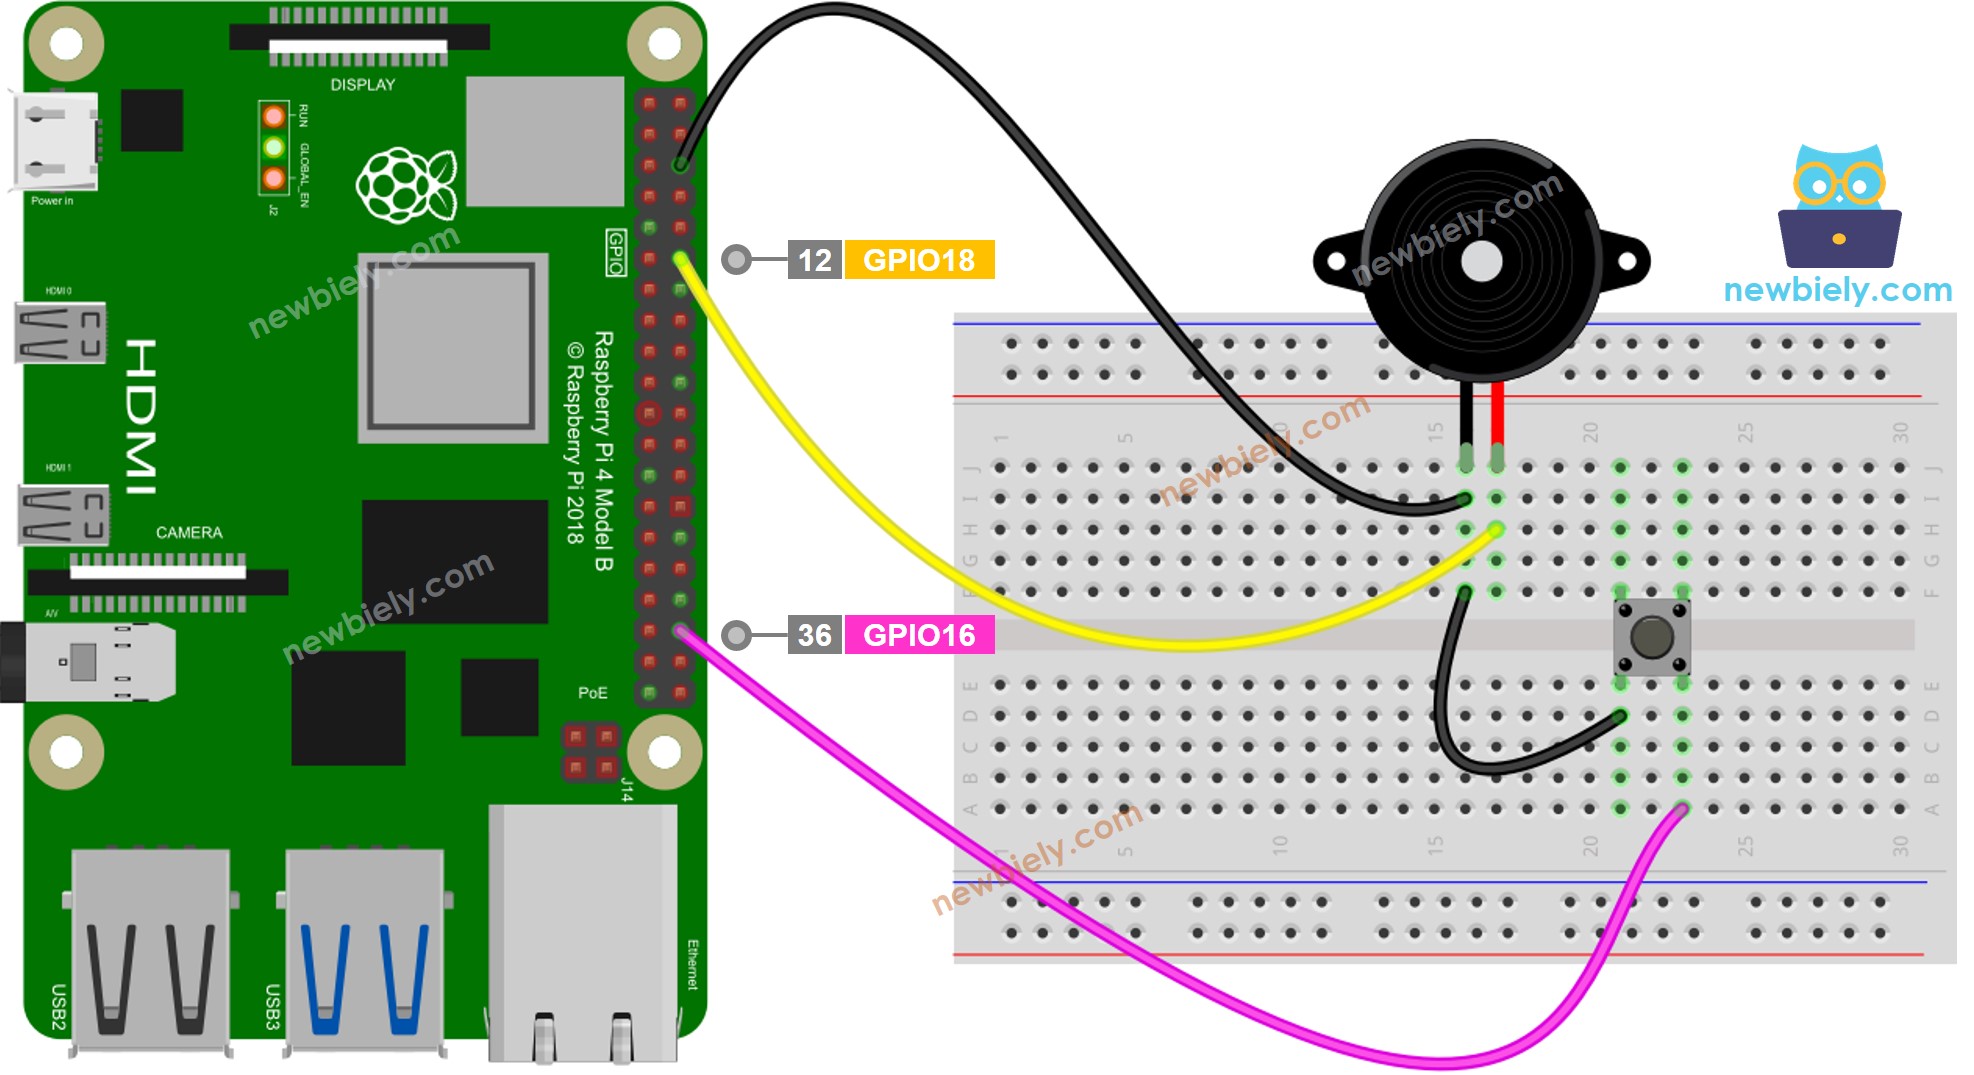
Deze afbeelding is gemaakt met Fritzing. Klik om de afbeelding te vergroten.
Raspberry Pi code - Eenvoudig geluid
In dit deel leert u hoe u een piezo buzzer kunt gebruiken om een eenvoudig geluid te maken wanneer de knop wordt ingedrukt met behulp van Raspberry Pi.
Snel aan de slag
- Zorg dat u Raspbian of een ander Raspberry Pi-compatible besturingssysteem op uw Pi heeft geïnstalleerd.
- Zorg dat uw Raspberry Pi verbonden is met hetzelfde lokale netwerk als uw pc.
- Zorg dat uw Raspberry Pi met internet verbonden is als u libraries moet installeren.
- Als dit de eerste keer is dat u Raspberry Pi gebruikt, zie hoe u de Raspberry Pi instelt.
- Verbind uw pc via SSH met de Raspberry Pi met behulp van de ingebouwde SSH-client op Linux en macOS of PuTTY op Windows. Zie hoe u pc verbindt met Raspberry Pi via SSH.
- Controleer of u de RPi.GPIO library geïnstalleerd heeft. Zo niet, installeer die dan met het volgende commando:
- Maak een Python scriptbestand button_buzzer.py en voeg de volgende code toe:
- Sla het bestand op en voer het Python-script uit door het volgende commando in de terminal te typen:
- Houd de knop enkele seconden ingedrukt.
- Luister naar het geluid van de piezo buzzer.
Het script draait in een oneindige lus totdat u Ctrl + C indrukt in de terminal.
Code uitleg
Lees de regel-voor-regel uitleg die in de commentaren van de broncode staat!
Raspberry Pi speelt de melodie van het liedje
In dit deel laten we de Raspberry Pi de piezo buzzer aansturen om het liedje "Jingle Bells" te spelen wanneer de knop wordt ingedrukt.
Snel aan de slag
- Maak een Python scriptbestand button_buzzer_Jingle_Bells.py en voeg de volgende code toe:
- Sla het bestand op en voer het Python-script uit met het volgende commando in de terminal:
- Druk op de knop
- Luister naar de melodie van de piezo buzzer.
Code uitleg
Lees de regel-voor-regel uitleg die in de commentaren van de broncode staat!
Video Tutorial
We overwegen het maken van videotutorials. Als u videotutorials belangrijk vindt, abonneer u dan op ons YouTube-kanaal om ons te motiveren de video's te maken.
Bekijk onze video tutorial voor een visuele begeleiding bij dit project! De video biedt extra inzichten en helpt u stap voor stap bij de uitvoering.