Raspberry Pi - Piezo Buzzer
Deze handleiding leert u hoe u een Raspberry Pi gebruikt om een piezo buzzer te besturen. In detail leert u:
- Hoe een piezo buzzer werkt
- Hoe u een piezo buzzer aansluit op een Raspberry Pi bord
- Hoe u de Raspberry Pi programmeert zodat de piezo buzzer geluid produceert
- Hoe u de Raspberry Pi programmeert om een melodie van een lied af te spelen met de piezo buzzer
Hardware Benodigdheden
Of u kunt de volgende kits kopen:
| 1 | × | DIYables Sensorkit (30 sensoren/displays) | |
| 1 | × | DIYables Sensorkit (18 sensoren/displays) |
Over de Piezo Buzzer
Een Piezo Buzzer wordt gebruikt om geluid, pieptonen, of zelfs een melodie van een lied te produceren.
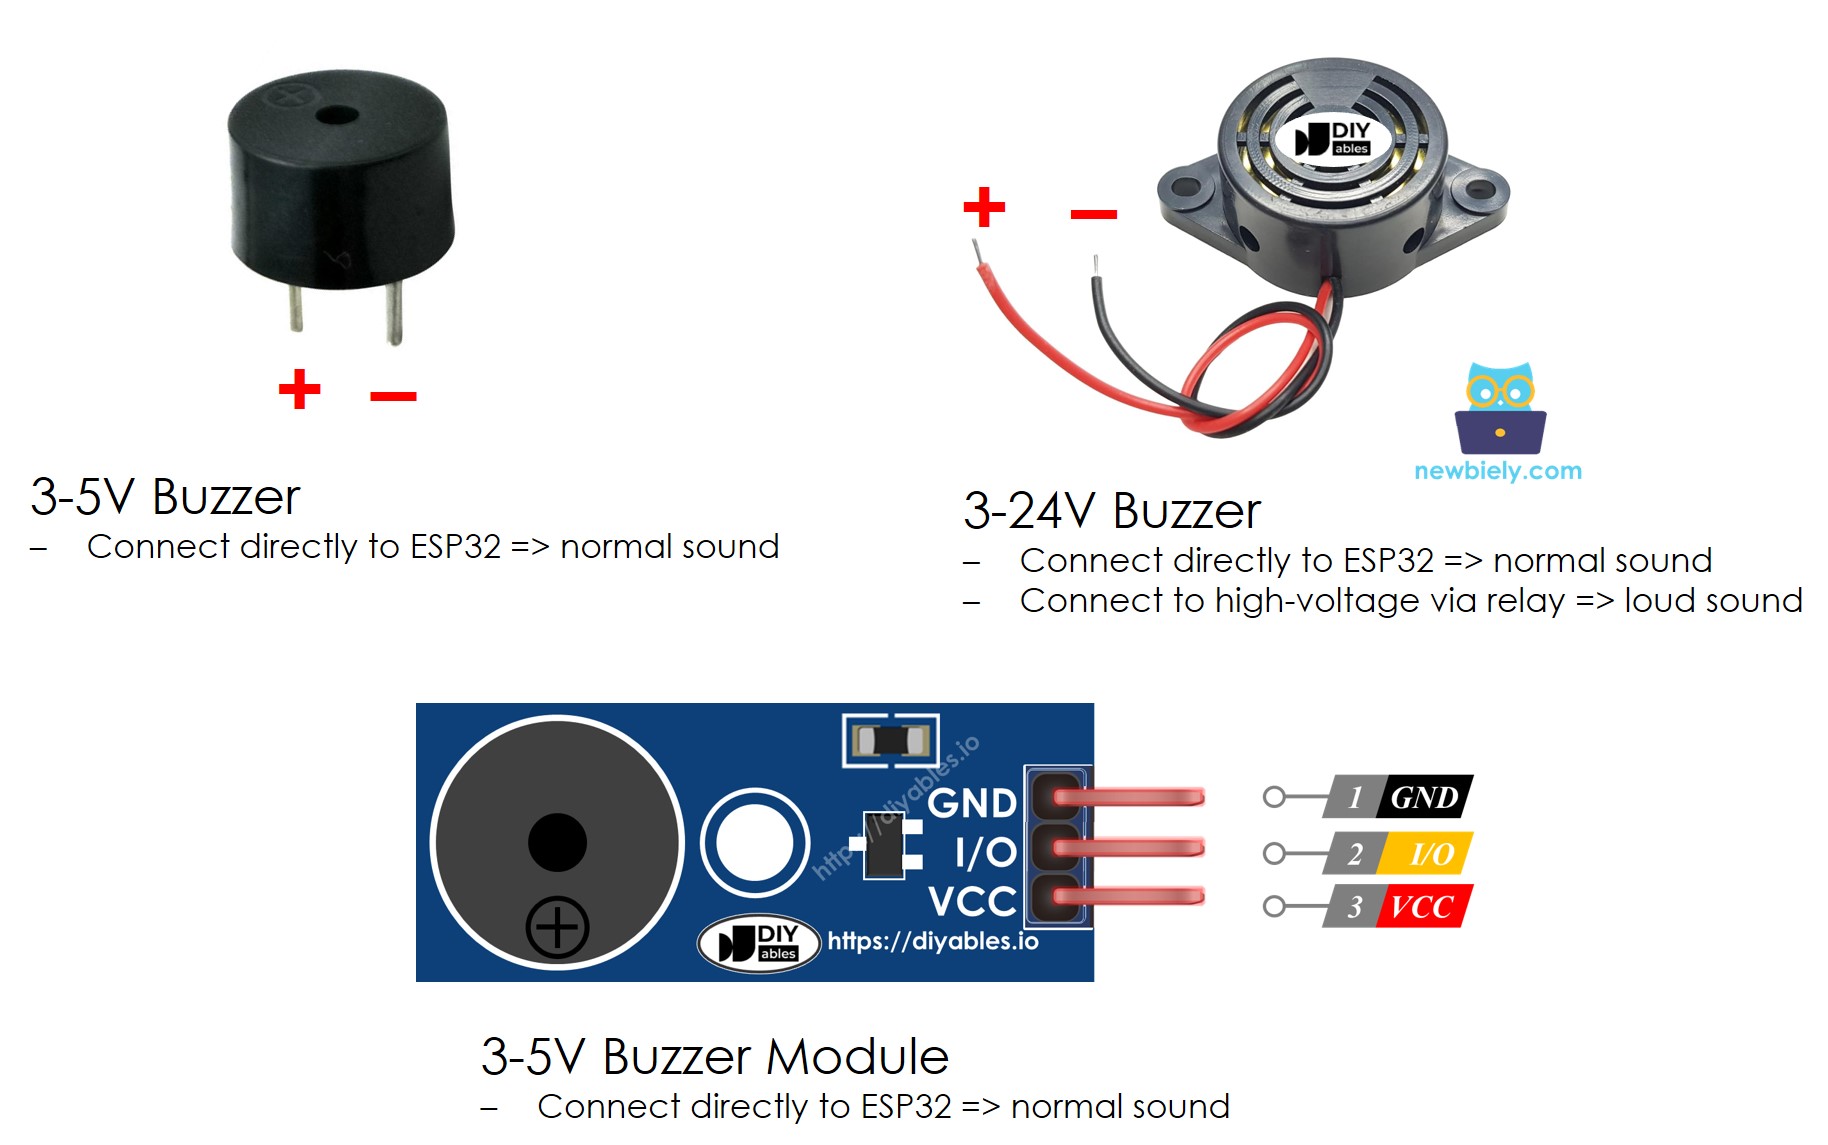
Op de markt is een 3V-24V actieve buzzer verkrijgbaar die dubbel gebruikt kan worden: zowel als een 3-5V actieve buzzer als een buzzer voor hogere spanning (12V en hoger).
- Wanneer deze buzzer rechtstreeks wordt aangesloten op een Arduino-pin, produceert hij een standaard geluid, ideaal voor toepassingen zoals geluidsindicatoren, bijvoorbeeld toetsgeluiden.
- Wanneer hij via een relais op een hoge spanning wordt aangesloten, maakt de buzzer een luid geluid, wat geschikt is voor waarschuwingssignalen.
De Pinout van de Piezo Buzzer
Een Piezo Buzzer heeft doorgaans twee pinnen:
- De Negatieve (-) pin moet worden aangesloten op GND (0V)
- De Positieve (+) pin ontvangt het stuursignaal van de Raspberry Pi (direct of via een relais)
Hoe een Piezo Buzzer Werkt
Aansluitschema
- Het aansluitschema tussen Raspberry Pi en Piezo Buzzer
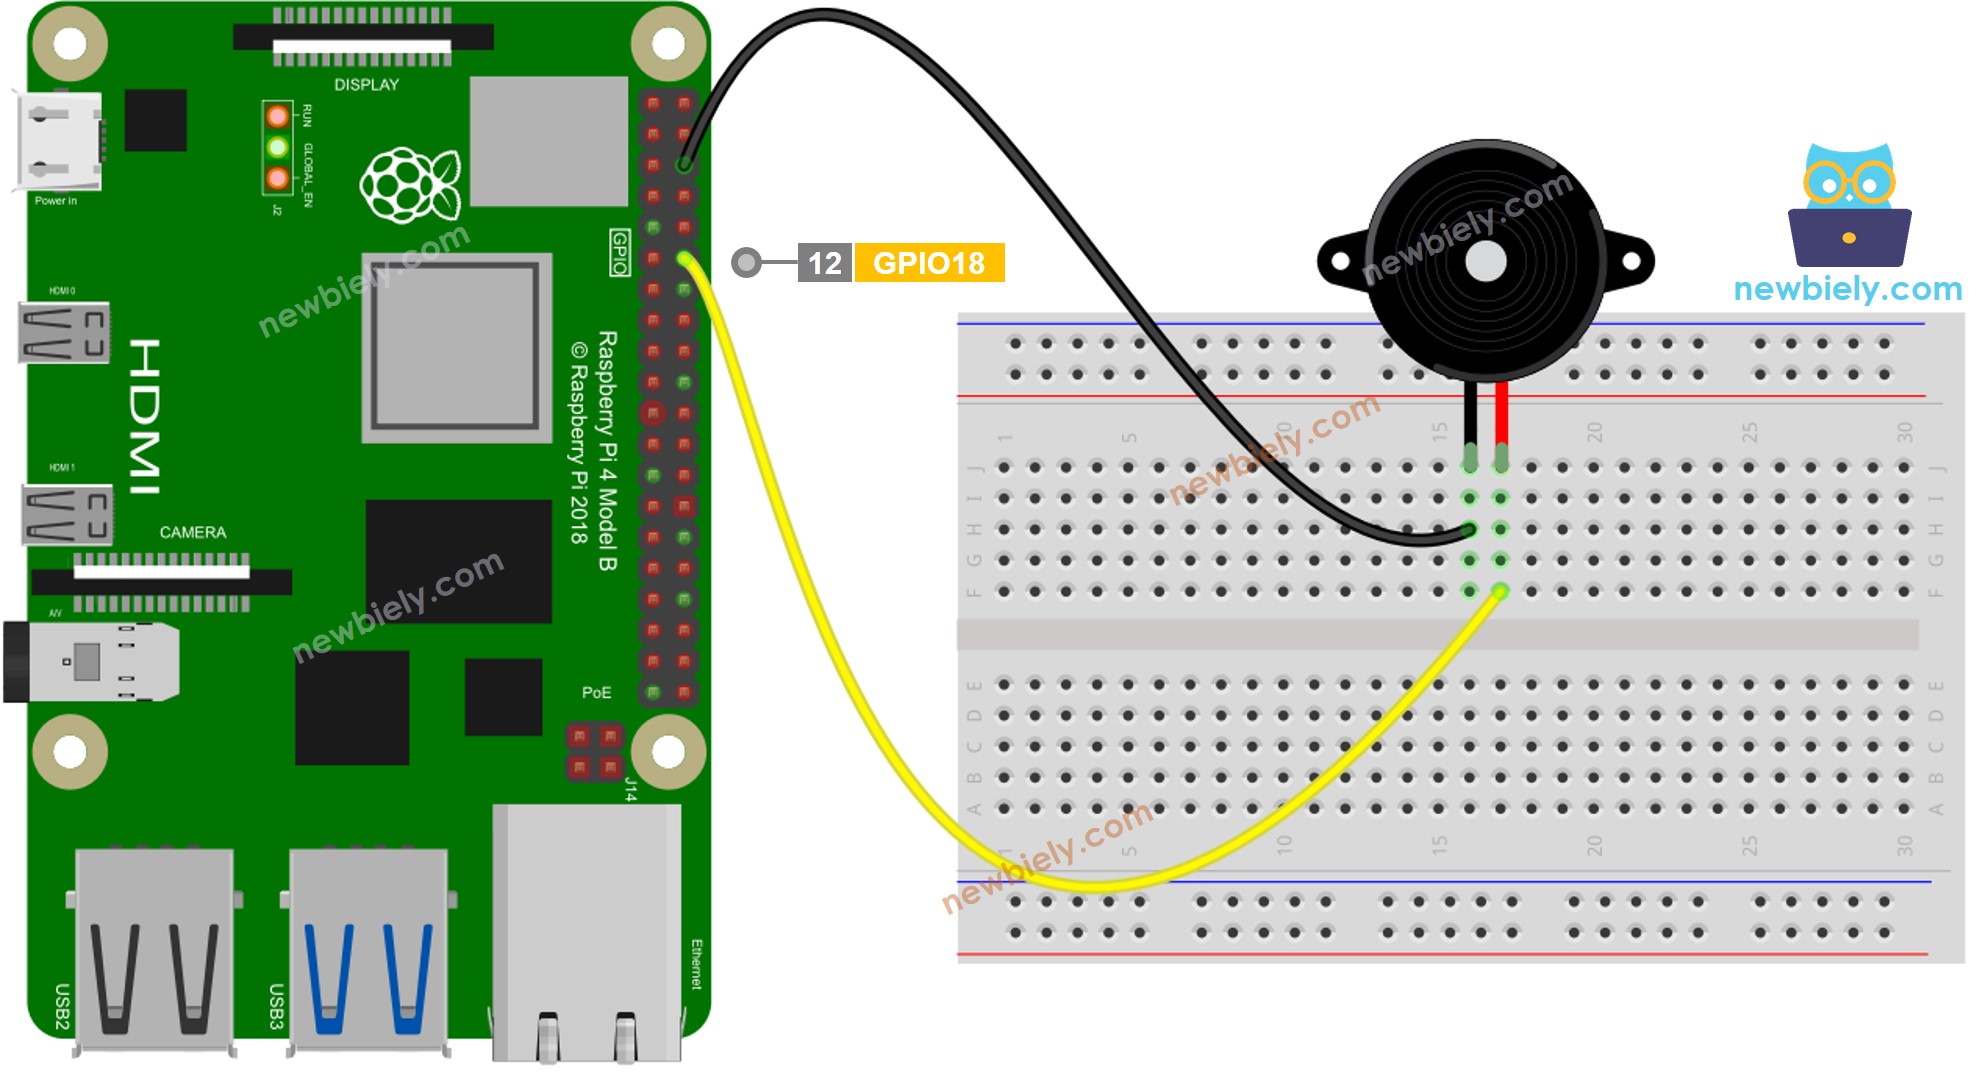
Deze afbeelding is gemaakt met Fritzing. Klik om de afbeelding te vergroten.
- Het aansluitschema tussen Raspberry Pi en Piezo Buzzer module
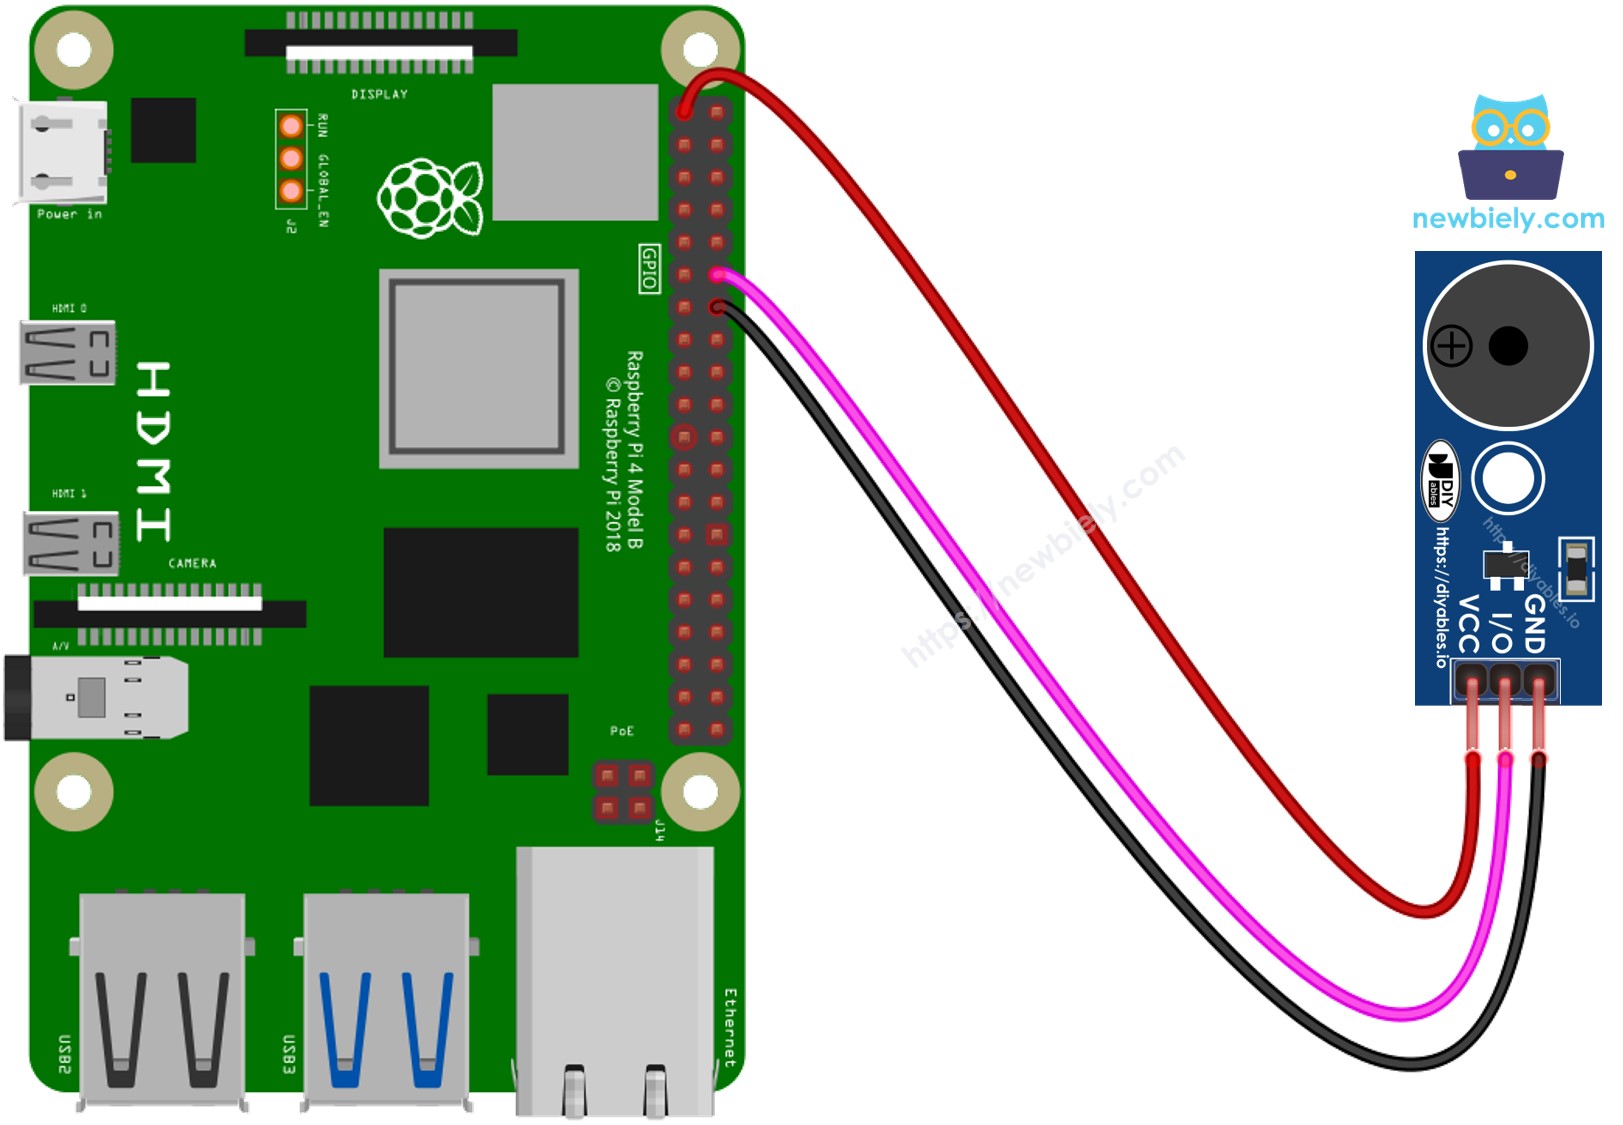
Deze afbeelding is gemaakt met Fritzing. Klik om de afbeelding te vergroten.
Raspberry Pi Code
Snel aan de slag
- Zorg dat u Raspbian of een ander Raspberry Pi compatibel besturingssysteem hebt geïnstalleerd op uw Pi.
- Zorg dat uw Raspberry Pi verbonden is met hetzelfde lokale netwerk als uw pc.
- Zorg dat uw Raspberry Pi verbonden is met internet als u benodigde libraries wilt installeren.
- Als dit uw eerste keer met Raspberry Pi is, bekijk dan hoe u de Raspberry Pi instelt
- Verbind uw pc met de Raspberry Pi via SSH met behulp van de ingebouwde SSH-client op Linux en macOS of PuTTY op Windows. Zie hoe u uw pc via SSH verbindt met Raspberry Pi.
- Controleer of u de RPi.GPIO library geïnstalleerd hebt. Zo niet, installeer deze met onderstaande opdracht:
- Maak een Python scriptbestand buzzer.py en voeg de volgende code toe:
- Sla het bestand op en voer het Python script uit met de volgende opdracht in de terminal:
- Luister naar de melodie die door de piezo buzzer wordt afgespeeld.
Het script draait in een oneindige lus totdat u Ctrl + C indrukt in de terminal.
Raspberry Pi Code Aanpassen
Nu gaan we de code aanpassen om het lied "Jingle Bells" af te spelen.
- Maak een Python scriptbestand buzzer_Jingle_Bells.py en voeg de volgende code toe:
- Sla het bestand op en voer het Python script uit met de volgende opdracht in de terminal:
- U kunt deze code vergelijken met de vorige om de verschillen te zien.
Met deze aanpassing speelt de code nu de melodie van "Jingle Bells" af via de piezo buzzer aangesloten op de Raspberry Pi. Geniet van de feestelijke klanken!
Video Tutorial
We overwegen het maken van videotutorials. Als u videotutorials belangrijk vindt, abonneer u dan op ons YouTube-kanaal om ons te motiveren de video's te maken.
Bekijk onze video-tutorial voor een visuele begeleiding bij dit project! De video biedt extra inzichten en begeleiding om u te helpen het efficiënt en eenvoudig te begrijpen.
Daag uzelf uit
- Gebruik een Piezo Buzzer om uw favoriete liedje te spelen.
- Gebruik een Raspberry Pi bewegingssensor om automatisch een alarm te laten afgaan wanneer iemand in de buurt komt van uw waardevolle spullen. Raadpleeg Raspberry Pi - Motion Sensor voor meer informatie.