Raspberry Pi - Stappenmotor en Limietschakelaar

Deze handleiding legt uit hoe u een Raspberry Pi kunt gebruiken om een stappenmotor aan te sturen via een limietschakelaar en een L298N driver. Specifiek behandelen we:

Hardware Benodigd

1×Raspberry Pi 5
1×Limietschakelaar (KW12-3)
1×Limietschakelaar (V-156-1C25)
1×Stappenmotor Nema 17
1×L298N Motordriver Module
1×12V Voeding
1×DC-Stroomaansluiting
1×Jumper Kabels
1×(Aanbevolen) Schroefklem Block Shield voor Raspberry Pi
1×(Aanbevolen) Raspberry Pi Prototyping Basisplaat & Breadboard Kit
1×(Aanbevolen) HDMI-Touchscreen-Monitor voor Raspberry Pi

Of u kunt de volgende kits kopen:

1×DIYables Sensorkit (30 sensoren/displays)
1×DIYables Sensorkit (18 sensoren/displays)
Openbaarmaking: Sommige van de links in deze sectie zijn Amazon-affiliate links. We kunnen een commissie ontvangen voor aankopen die via deze links worden gedaan, zonder extra kosten voor u. We waarderen uw steun.

Over Stappenmotor en Limietschakelaar

Als u niet vertrouwd bent met de stappenmotor en limietschakelaar (inclusief pinout, functionaliteit, programmering, enz.), kunnen de volgende tutorials u helpen:

Bekabelingsschema

Deze handleiding bevat het bekabelingsschema voor twee gevallen: één stappenmotor + één limietschakelaar, één stappenmotor + twee limietschakelaars.

  • Bekabelingsschema tussen Raspberry Pi, stappenmotor en één limietschakelaar
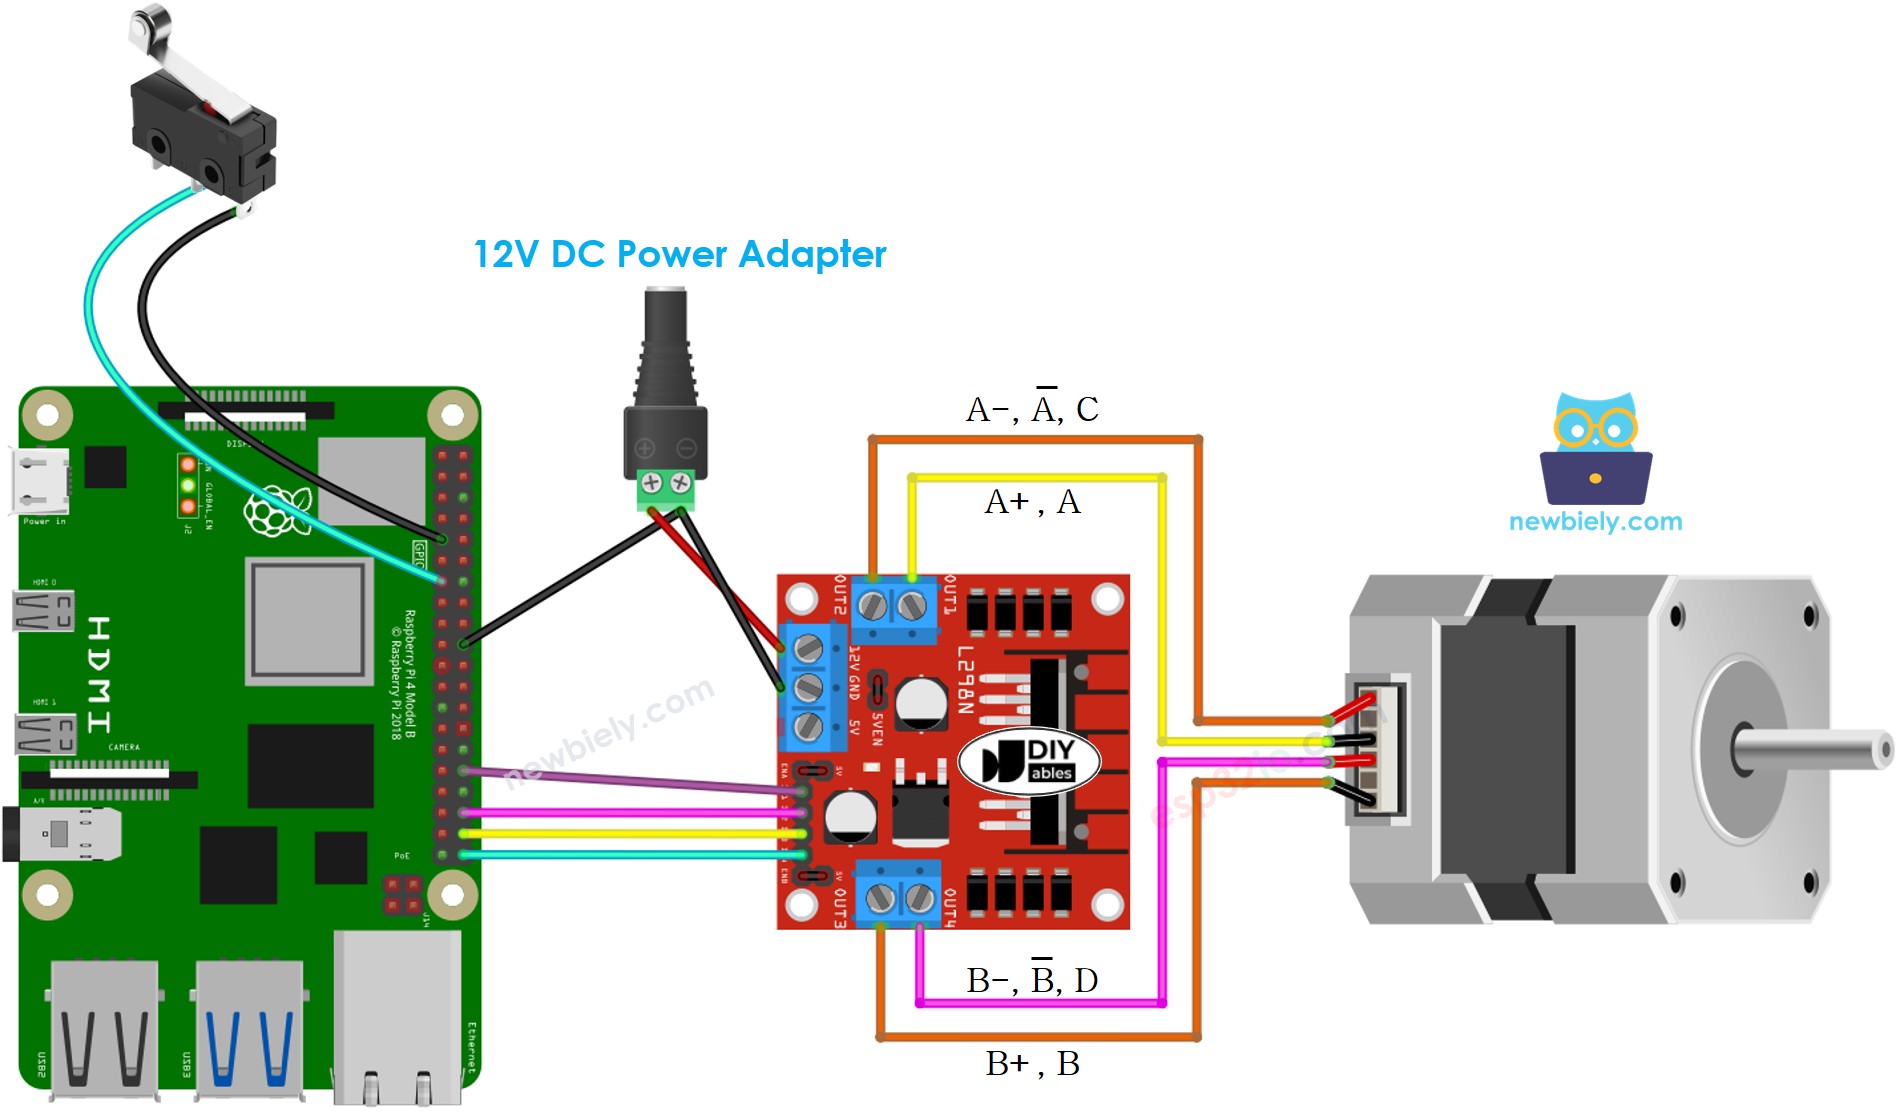
Raspberry Pi stappenmotor en limietschakelaar bekabelingsschema

This image is created using Fritzing. Click to enlarge image

  • Bekabelingsschema tussen Raspberry Pi, stappenmotor en twee limietschakelaars
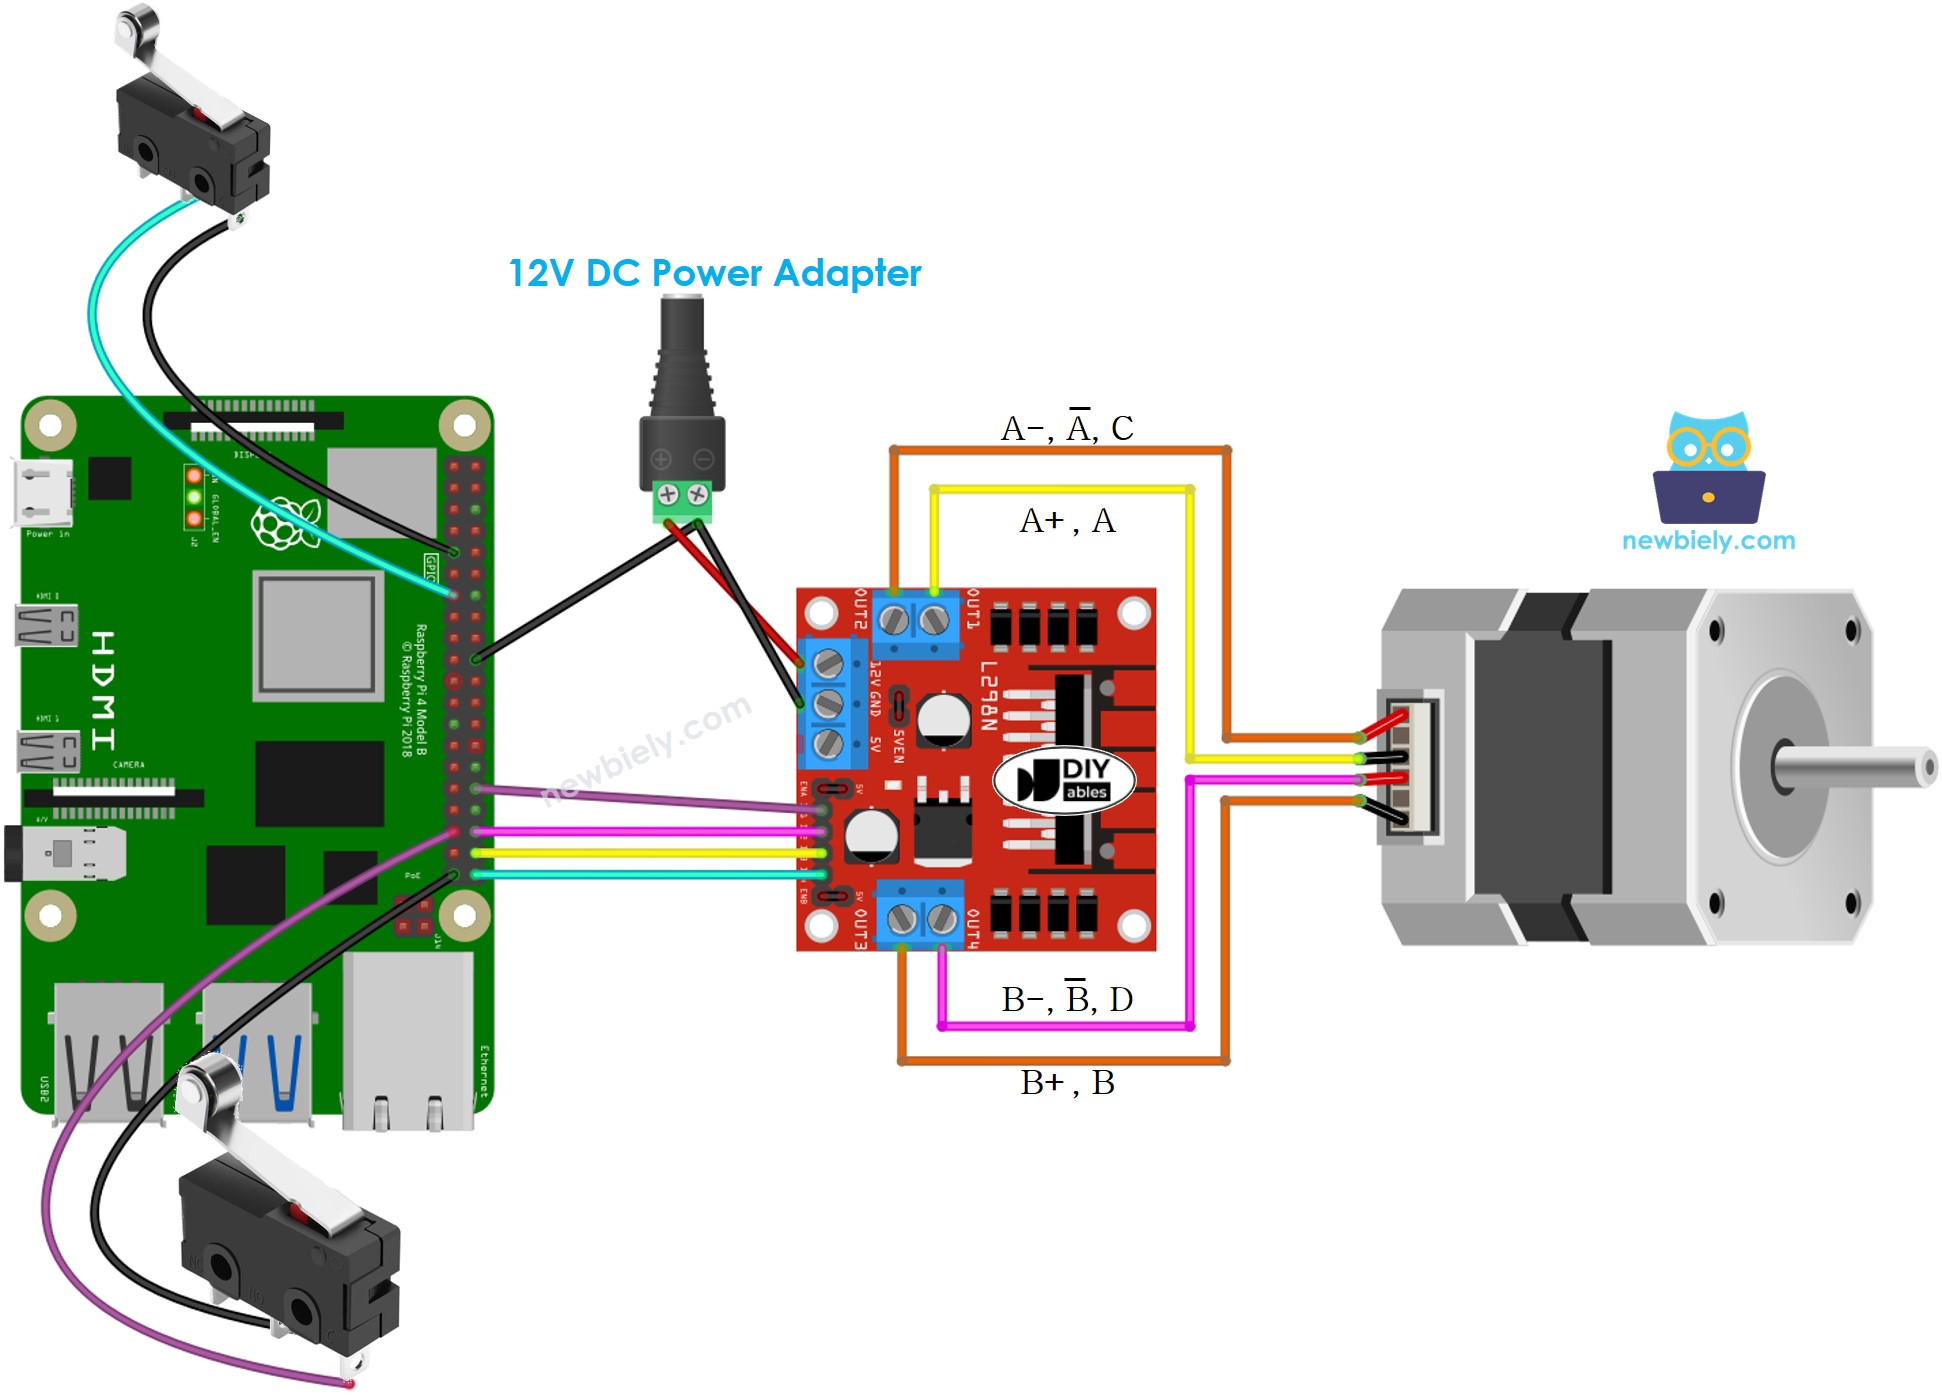
Raspberry Pi stappenmotor en twee limietschakelaars bekabelingsschema

This image is created using Fritzing. Click to enlarge image

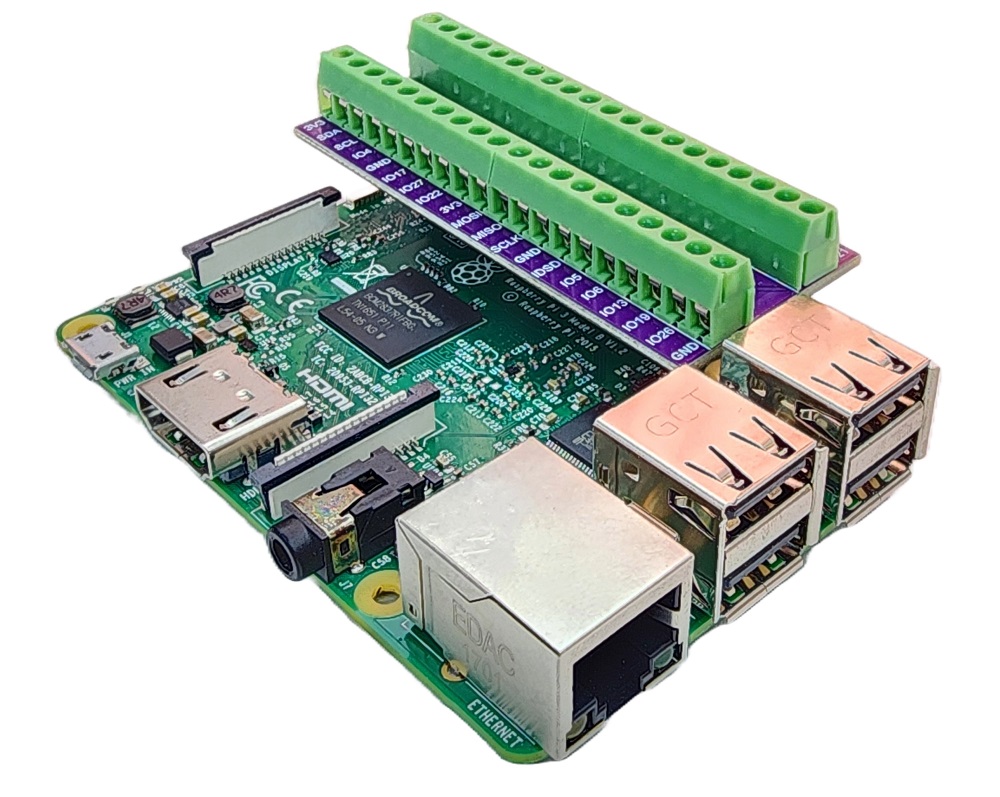
Om uw bekabelingsopstelling te vereenvoudigen en te organiseren, raden we het gebruik van een Schroevenklemaansluiting-shield voor Raspberry Pi aan. Deze shield zorgt voor veiligere en beter beheerbare verbindingen, zoals hieronder weergegeven:

Raspberry Pi Schroevenklemaansluiting-Shield

※ Notiz:

De bekabeling tussen de stappenmotor en de L298N kan verschillen afhankelijk van het type stappenmotor. Bestudeer zorgvuldig de Raspberry Pi - Stappenmotor tutorial om te leren hoe u de stappenmotor correct aansluit op de L298N motor driver.

Raspberry Pi Code - Stappenmotor Stoppen met een Limietschakelaar

Een stappenmotor wordt met de volgende code geprogrammeerd om continu te draaien, en zal onmiddellijk stoppen wanneer een limietschakelaar wordt aangeraakt. De motor hervat de beweging zodra de limietschakelaar wordt losgelaten.

Snel Starten

  • Zorg dat u Raspbian of een ander Raspberry Pi compatibel besturingssysteem op uw Pi geïnstalleerd heeft.
  • Zorg dat uw Raspberry Pi verbonden is met hetzelfde lokale netwerk als uw pc.
  • Zorg dat uw Raspberry Pi toegang tot internet heeft indien u bibliotheken moet installeren.
  • Als dit de eerste keer is dat u een Raspberry Pi gebruikt, zie hoe u de Raspberry Pi installeert
  • Verbind uw pc met de Raspberry Pi via SSH met behulp van de ingebouwde SSH-client op Linux en macOS of PuTTY op Windows. Zie hoe u uw pc via SSH verbindt met Raspberry Pi.
  • Zorg dat de RPi.GPIO bibliotheek geïnstalleerd is. Zo niet, installeer die met het volgende commando:
sudo apt-get update sudo apt-get install python3-rpi.gpio
  • Maak een Python-scriptbestand stepper_limit_switch.py aan en voeg de volgende code toe:
# Deze Raspberry Pi code is ontwikkeld door newbiely.nl # Deze Raspberry Pi code wordt zonder enige beperking aan het publiek beschikbaar gesteld. # Voor volledige instructies en schema's, bezoek: # https://newbiely.nl/tutorials/raspberry-pi/raspberry-pi-stepper-motor-limit-switch import RPi.GPIO as GPIO import time # Define GPIO pins for L298N driver and limit switch IN1 = 12 IN2 = 16 IN3 = 20 IN4 = 21 LIMIT_SWITCH_PIN = 27 # Set GPIO mode and configure pins GPIO.setmode(GPIO.BCM) GPIO.setup(IN1, GPIO.OUT) GPIO.setup(IN2, GPIO.OUT) GPIO.setup(IN3, GPIO.OUT) GPIO.setup(IN4, GPIO.OUT) GPIO.setup(LIMIT_SWITCH_PIN, GPIO.IN, pull_up_down=GPIO.PUD_UP) # Define constants DEG_PER_STEP = 1.8 STEPS_PER_REVOLUTION = int(360 / DEG_PER_STEP) # Function to move the stepper motor one step forward def step_forward(delay): GPIO.output(IN1, GPIO.HIGH) GPIO.output(IN2, GPIO.HIGH) GPIO.output(IN3, GPIO.LOW) GPIO.output(IN4, GPIO.LOW) time.sleep(delay) GPIO.output(IN1, GPIO.LOW) GPIO.output(IN2, GPIO.HIGH) GPIO.output(IN3, GPIO.HIGH) GPIO.output(IN4, GPIO.LOW) time.sleep(delay) # Function to check the limit switch status def is_limit_switch_pressed(): return GPIO.input(LIMIT_SWITCH_PIN) == GPIO.LOW try: # Set the delay between steps delay = 0.001 while not is_limit_switch_pressed(): # Move the stepper motor forward endlessly step_forward(delay) except KeyboardInterrupt: print("\nExiting the script.") finally: # Clean up GPIO settings GPIO.cleanup()
  • Sla het bestand op en start het Python-script door het volgende commando in de terminal uit te voeren:
python3 stepper_limit_switch.py
  • Als de bekabeling correct is, zal de motor klokwijs draaien.
  • Zodra de limietschakelaar wordt aangeraakt, stopt de motor direct.
  • Laat u de limietschakelaar los, dan draait de motor weer verder.

Het script loopt in een oneindige lus totdat u in de terminal Ctrl + C indrukt.

Door de waarde van de variabele delay in de code te veranderen kunt u de snelheid van de stappenmotor aanpassen.

Code Uitleg

Bekijk de stapsgewijze uitleg in de commentaren van de broncode!

Raspberry Pi Code - Draairichting Stappenmotor Wijzigen met een Limietschakelaar

Een stappenmotor wordt continu in beweging gezet en de draairichting verandert zodra een limietschakelaar wordt aangeraakt.

Snel Starten

  • Maak een Python-scriptbestand stepper_direction.py aan en voeg de volgende code toe:
# Deze Raspberry Pi code is ontwikkeld door newbiely.nl # Deze Raspberry Pi code wordt zonder enige beperking aan het publiek beschikbaar gesteld. # Voor volledige instructies en schema's, bezoek: # https://newbiely.nl/tutorials/raspberry-pi/raspberry-pi-stepper-motor-limit-switch import RPi.GPIO as GPIO import time # Define GPIO pins for L298N driver and limit switch IN1 = 12 IN2 = 16 IN3 = 20 IN4 = 21 LIMIT_SWITCH_PIN = 27 # Set GPIO mode and configure pins GPIO.setmode(GPIO.BCM) GPIO.setup(IN1, GPIO.OUT) GPIO.setup(IN2, GPIO.OUT) GPIO.setup(IN3, GPIO.OUT) GPIO.setup(IN4, GPIO.OUT) GPIO.setup(LIMIT_SWITCH_PIN, GPIO.IN, pull_up_down=GPIO.PUD_UP) # Define constants DEG_PER_STEP = 1.8 STEPS_PER_REVOLUTION = int(360 / DEG_PER_STEP) # Global variable to store the previous state of the limit switch prev_limit_switch_state = GPIO.HIGH # Function to move the stepper motor one step forward def step_forward(delay): GPIO.output(IN1, GPIO.HIGH) GPIO.output(IN2, GPIO.HIGH) GPIO.output(IN3, GPIO.LOW) GPIO.output(IN4, GPIO.LOW) time.sleep(delay) GPIO.output(IN1, GPIO.LOW) GPIO.output(IN2, GPIO.HIGH) GPIO.output(IN3, GPIO.HIGH) GPIO.output(IN4, GPIO.LOW) time.sleep(delay) # Function to move the stepper motor one step backward def step_backward(delay): GPIO.output(IN1, GPIO.LOW) GPIO.output(IN2, GPIO.LOW) GPIO.output(IN3, GPIO.HIGH) GPIO.output(IN4, GPIO.HIGH) time.sleep(delay) GPIO.output(IN1, GPIO.HIGH) GPIO.output(IN2, GPIO.LOW) GPIO.output(IN3, GPIO.LOW) GPIO.output(IN4, GPIO.HIGH) time.sleep(delay) try: # Set the delay between steps delay = 0.001 # Set the initial direction direction = 'forward' while True: # Check if the limit switch state changes limit_switch_state = GPIO.input(LIMIT_SWITCH_PIN) # Change direction if the limit switch changes from HIGH to LOW if limit_switch_state == GPIO.LOW and prev_limit_switch_state == GPIO.HIGH: direction = 'backward' if direction == 'forward' else 'forward' # Move the stepper motor based on the direction if direction == 'forward': step_forward(delay) elif direction == 'backward': step_backward(delay) # Update the previous state of the limit switch prev_limit_switch_state = limit_switch_state except KeyboardInterrupt: print("\nExiting the script.") finally: # Clean up GPIO settings GPIO.cleanup()
  • Sla het bestand op en start het Python-script door het volgende commando in de terminal uit te voeren:
python3 stepper_direction.py
  • Als de bekabeling correct is, draait de motor met de klok mee.
  • Wanneer u de limietschakelaar indrukt, verandert de draairichting van de stappenmotor naar tegen de klok in.
  • Druk nogmaals op de limietschakelaar en de stappenmotor draait weer met de klok mee.

Raspberry Pi Code - Draairichting Stappenmotor Wijzigen met twee Limietschakelaars

Hier volgt code die een stappenmotor continu laat draaien, en bij aanraking van één van de twee limietschakelaars de draairichting van de motor wijzigt.

Snel Starten

  • Maak een Python-scriptbestand stepper_two_limit_switches.py aan en voeg de volgende code toe:
# Deze Raspberry Pi code is ontwikkeld door newbiely.nl # Deze Raspberry Pi code wordt zonder enige beperking aan het publiek beschikbaar gesteld. # Voor volledige instructies en schema's, bezoek: # https://newbiely.nl/tutorials/raspberry-pi/raspberry-pi-stepper-motor-limit-switch import RPi.GPIO as GPIO import time # Define GPIO pins for L298N driver and limit switches IN1 = 12 IN2 = 16 IN3 = 20 IN4 = 21 LIMIT_SWITCH1_PIN = 27 LIMIT_SWITCH2_PIN = 19 # Set GPIO mode and configure pins GPIO.setmode(GPIO.BCM) GPIO.setup(IN1, GPIO.OUT) GPIO.setup(IN2, GPIO.OUT) GPIO.setup(IN3, GPIO.OUT) GPIO.setup(IN4, GPIO.OUT) GPIO.setup(LIMIT_SWITCH1_PIN, GPIO.IN, pull_up_down=GPIO.PUD_UP) GPIO.setup(LIMIT_SWITCH2_PIN, GPIO.IN, pull_up_down=GPIO.PUD_UP) # Define constants DEG_PER_STEP = 1.8 STEPS_PER_REVOLUTION = int(360 / DEG_PER_STEP) # Global variables to store the previous state of the limit switches prev_limit_switch_1 = GPIO.HIGH prev_limit_switch_2 = GPIO.HIGH # Function to move the stepper motor one step forward def step_forward(delay): GPIO.output(IN1, GPIO.HIGH) GPIO.output(IN2, GPIO.HIGH) GPIO.output(IN3, GPIO.LOW) GPIO.output(IN4, GPIO.LOW) time.sleep(delay) GPIO.output(IN1, GPIO.LOW) GPIO.output(IN2, GPIO.HIGH) GPIO.output(IN3, GPIO.HIGH) GPIO.output(IN4, GPIO.LOW) time.sleep(delay) # Function to move the stepper motor one step backward def step_backward(delay): GPIO.output(IN1, GPIO.LOW) GPIO.output(IN2, GPIO.LOW) GPIO.output(IN3, GPIO.HIGH) GPIO.output(IN4, GPIO.HIGH) time.sleep(delay) GPIO.output(IN1, GPIO.HIGH) GPIO.output(IN2, GPIO.LOW) GPIO.output(IN3, GPIO.LOW) GPIO.output(IN4, GPIO.HIGH) time.sleep(delay) try: # Set the delay between steps delay = 0.001 # Set the initial direction direction = 'forward' while True: # Check if limit switch 1 state changes limit_switch_1 = GPIO.input(LIMIT_SWITCH1_PIN) if limit_switch_1 == GPIO.LOW and prev_limit_switch_1 == GPIO.HIGH: direction = 'backward' # Check if limit switch 2 state changes limit_switch_2 = GPIO.input(LIMIT_SWITCH2_PIN) if limit_switch_2 == GPIO.LOW and prev_limit_switch_2 == GPIO.HIGH: direction = 'forward' # Move the stepper motor based on the direction if direction == 'forward': step_forward(delay) elif direction == 'backward': step_backward(delay) # Update the previous states of the limit switches prev_limit_switch_1 = limit_switch_1 prev_limit_switch_2 = limit_switch_2 except KeyboardInterrupt: print("\nExiting the script.") finally: # Clean up GPIO settings GPIO.cleanup()
  • Sla het bestand op en start het Python-script door het volgende commando in de terminal uit te voeren:
python3 stepper_two_limit_switches.py

Het script blijft continu draaien totdat u in de terminal Ctrl + C indrukt.

  • Als de bekabeling correct is, draait de motor met de klok mee.
  • Wanneer u limietschakelaar 1 indrukt, verandert de draairichting van de stappenmotor naar tegen de klok in.
  • Het indrukken van limietschakelaar 2 zorgt ervoor dat de stappenmotor weer met de klok mee draait.

※ ONZE BERICHTEN

  • U bent welkom om de link naar deze tutorial te delen. Gebruik onze inhoud echter niet op andere websites. We hebben veel moeite en tijd gestoken in het maken van de inhoud, respecteer alstublieft ons werk!