Raspberry Pi - Bewegingssensor - Piezo Buzzer
Deze handleiding legt uit hoe u een Raspberry Pi en een HC-SR501 bewegingssensor gebruikt om een piezo buzzer aan te sturen. In detail:
- Raspberry Pi produceert geluid wanneer beweging wordt gedetecteerd
- Raspberry Pi stopt het geluid wanneer er geen beweging is
- Raspberry Pi speelt een melodie van een nummer af wanneer beweging wordt waargenomen
Dit kan worden toegepast in een automatiseringsproces dat acties activeert bij het detecteren van menselijke aanwezigheid.
Hardware Benodigdheden
Of u kunt de volgende kits kopen:
| 1 | × | DIYables Sensorkit (30 sensoren/displays) | |
| 1 | × | DIYables Sensorkit (18 sensoren/displays) |
Over Piezo Buzzer en Bewegingssensor
Als u niet bekend bent met piezo buzzer en bewegingssensor (inclusief pinout, werking en programmeren), helpen de volgende tutorials u op weg:
Bedradingsschema
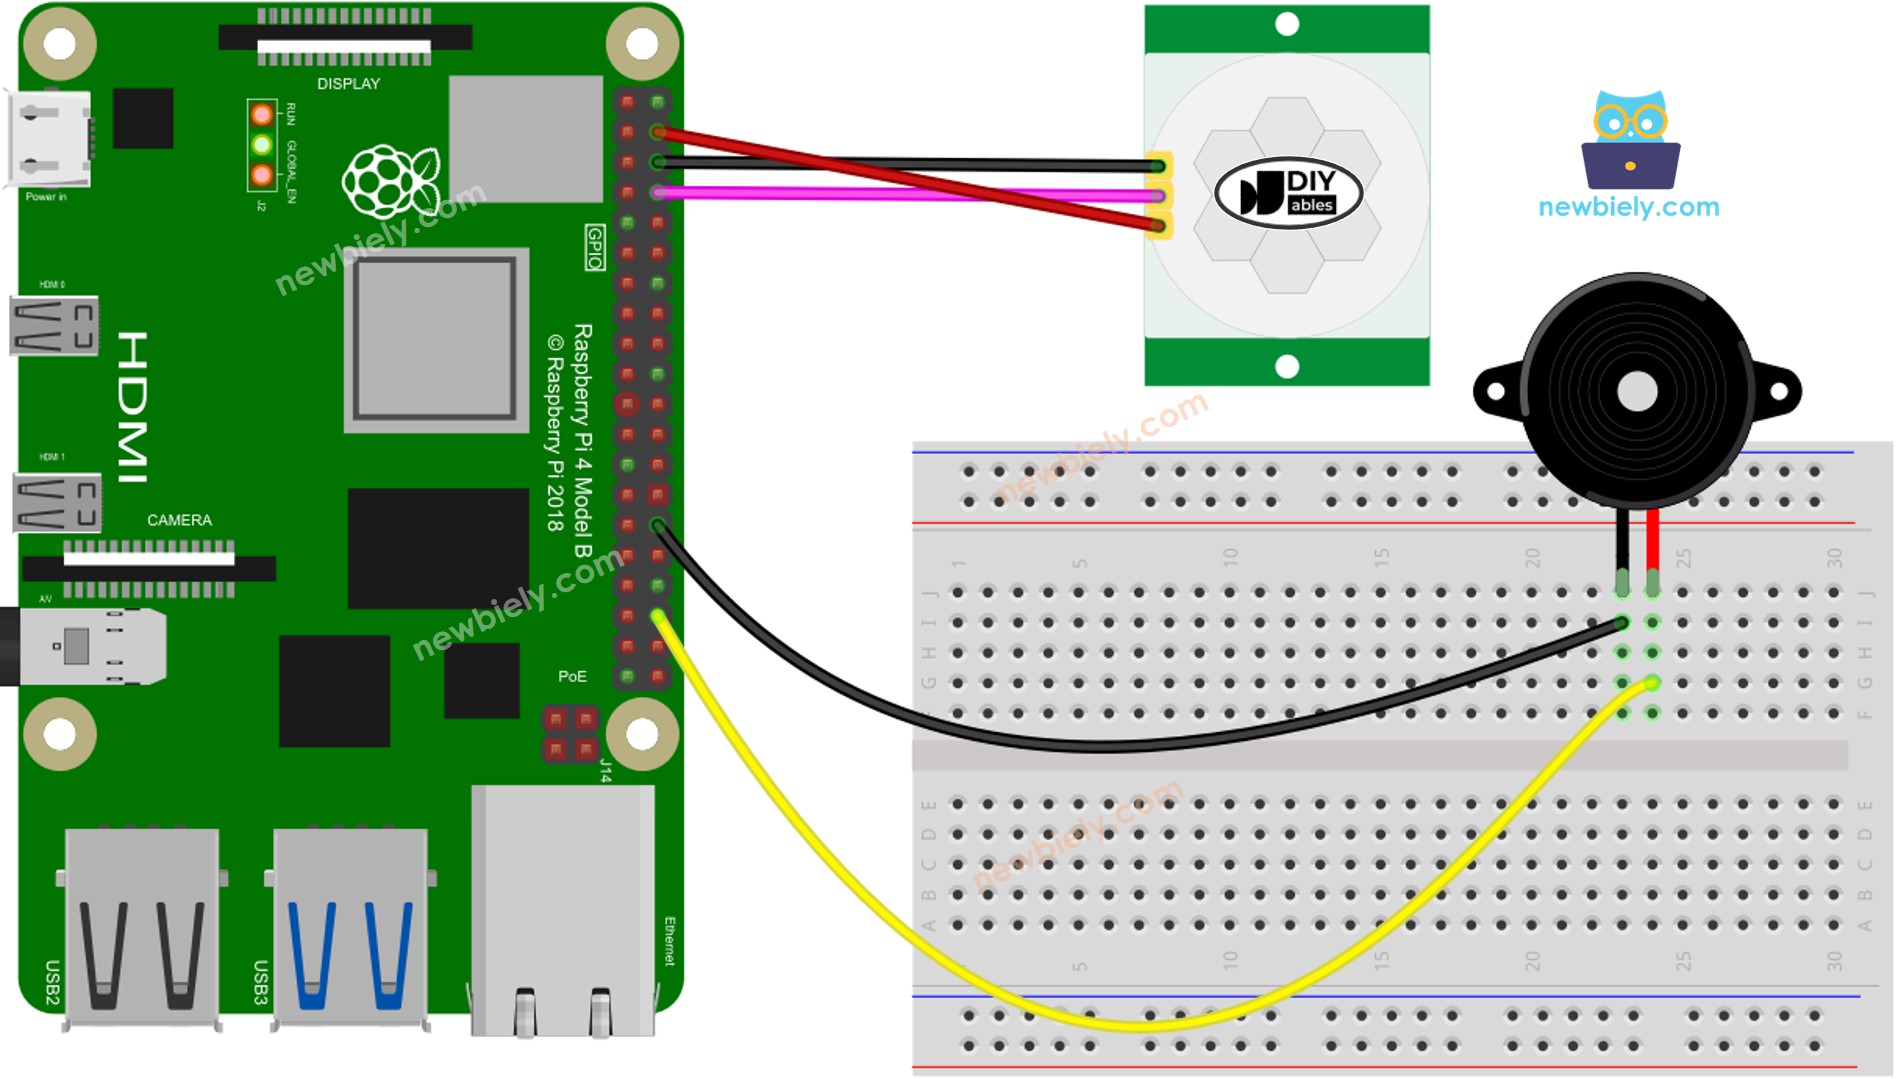
Deze afbeelding is gemaakt met Fritzing. Klik om de afbeelding te vergroten.
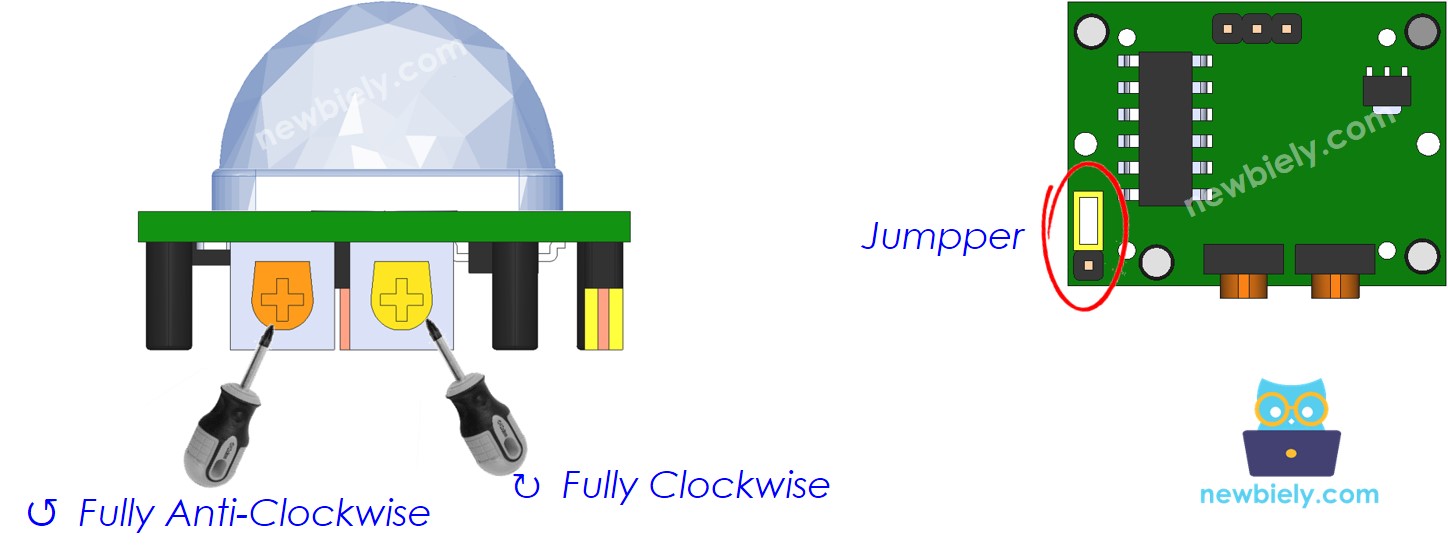
Eerste Instellingen
| Time Delay Adjuster | Draai deze volledig tegen de klok in. |
| Detection Range Adjuster | Draai deze volledig met de klok mee. |
| Repeat Trigger Selector | Plaats de jumper zoals afgebeeld in de afbeelding. |
Raspberry Pi Code - Eenvoudig Geluid
In dit gedeelte gebruiken we een piezo buzzer met de Raspberry Pi om een eenvoudig geluid te produceren telkens wanneer beweging wordt gedetecteerd.
Snelle Stappen
- Zorg dat u Raspbian of een ander Raspberry Pi compatibel besturingssysteem op uw Pi heeft geïnstalleerd.
- Zorg dat uw Raspberry Pi verbonden is met hetzelfde lokale netwerk als uw pc.
- Zorg dat uw Raspberry Pi verbonden is met het internet indien u nog libraries moet installeren.
- Gebruikt u voor het eerst een Raspberry Pi? Zie hoe u de Raspberry Pi instelt
- Verbind uw pc met de Raspberry Pi via SSH gebruikmakend van de ingebouwde SSH-client op Linux en macOS of PuTTY op Windows. Zie hoe u uw pc verbindt met Raspberry Pi via SSH.
- Zorg dat u de RPi.GPIO library geïnstalleerd heeft. Zo niet, installeer deze dan met de volgende opdracht:
- Maak een Python scriptbestand aan genaamd motion_sensor_buzzer.py en voeg de volgende code toe:
- Sla het bestand op en voer het Python-script uit door de volgende opdracht in de terminal te typen:
- Beweeg uw hand voor de sensor.
- Luister naar het geluid van de piezo buzzer.
Het script loopt in een oneindige lus door totdat u Ctrl + C indrukt in de terminal.
Code Uitleg
Bekijk de regel-voor-regel uitleg in de comments van de broncode!
Raspberry Pi speelt een melodie af
In dit gedeelte zorgen we dat de Raspberry Pi de piezo buzzer laat spelen van het nummer "Jingle Bells" wanneer beweging gedetecteerd wordt.
Snelle Stappen
- Maak een Python scriptbestand aan genaamd motion_sensor_buzzer_Jingle_Bells.py en voeg de volgende code toe:
- Sla het bestand op en voer het Python-script uit door de volgende opdracht in de terminal te typen:
- Beweeg uw hand voor de sensor.
- Luister naar de melodie die de piezo buzzer afspeelt.
Code Uitleg
Bekijk de regel-voor-regel uitleg in de comments van de broncode!
Video Tutorial
We overwegen het maken van videotutorials. Als u videotutorials belangrijk vindt, abonneer u dan op ons YouTube-kanaal om ons te motiveren de video's te maken.