Raspberry Pi - Ultrasone Sensor - OLED
Deze tutorial legt uit hoe u de afstand meet met een ultrasone sensor en deze vervolgens op een OLED-display weergeeft.
Hardware Benodigd
Of u kunt de volgende kits kopen:
| 1 | × | DIYables Sensorkit (30 sensoren/displays) | |
| 1 | × | DIYables Sensorkit (18 sensoren/displays) |
Over OLED en Ultrasone Sensor
Als u niet bekend bent met OLED en ultrasone sensor (inclusief pinout, werking, programmeren, enz.), kunnen de volgende tutorials helpen:
- Raspberry Pi - OLED tutorial
- Raspberry Pi - Ultrasone Sensor tutorial
Bedradingsschema
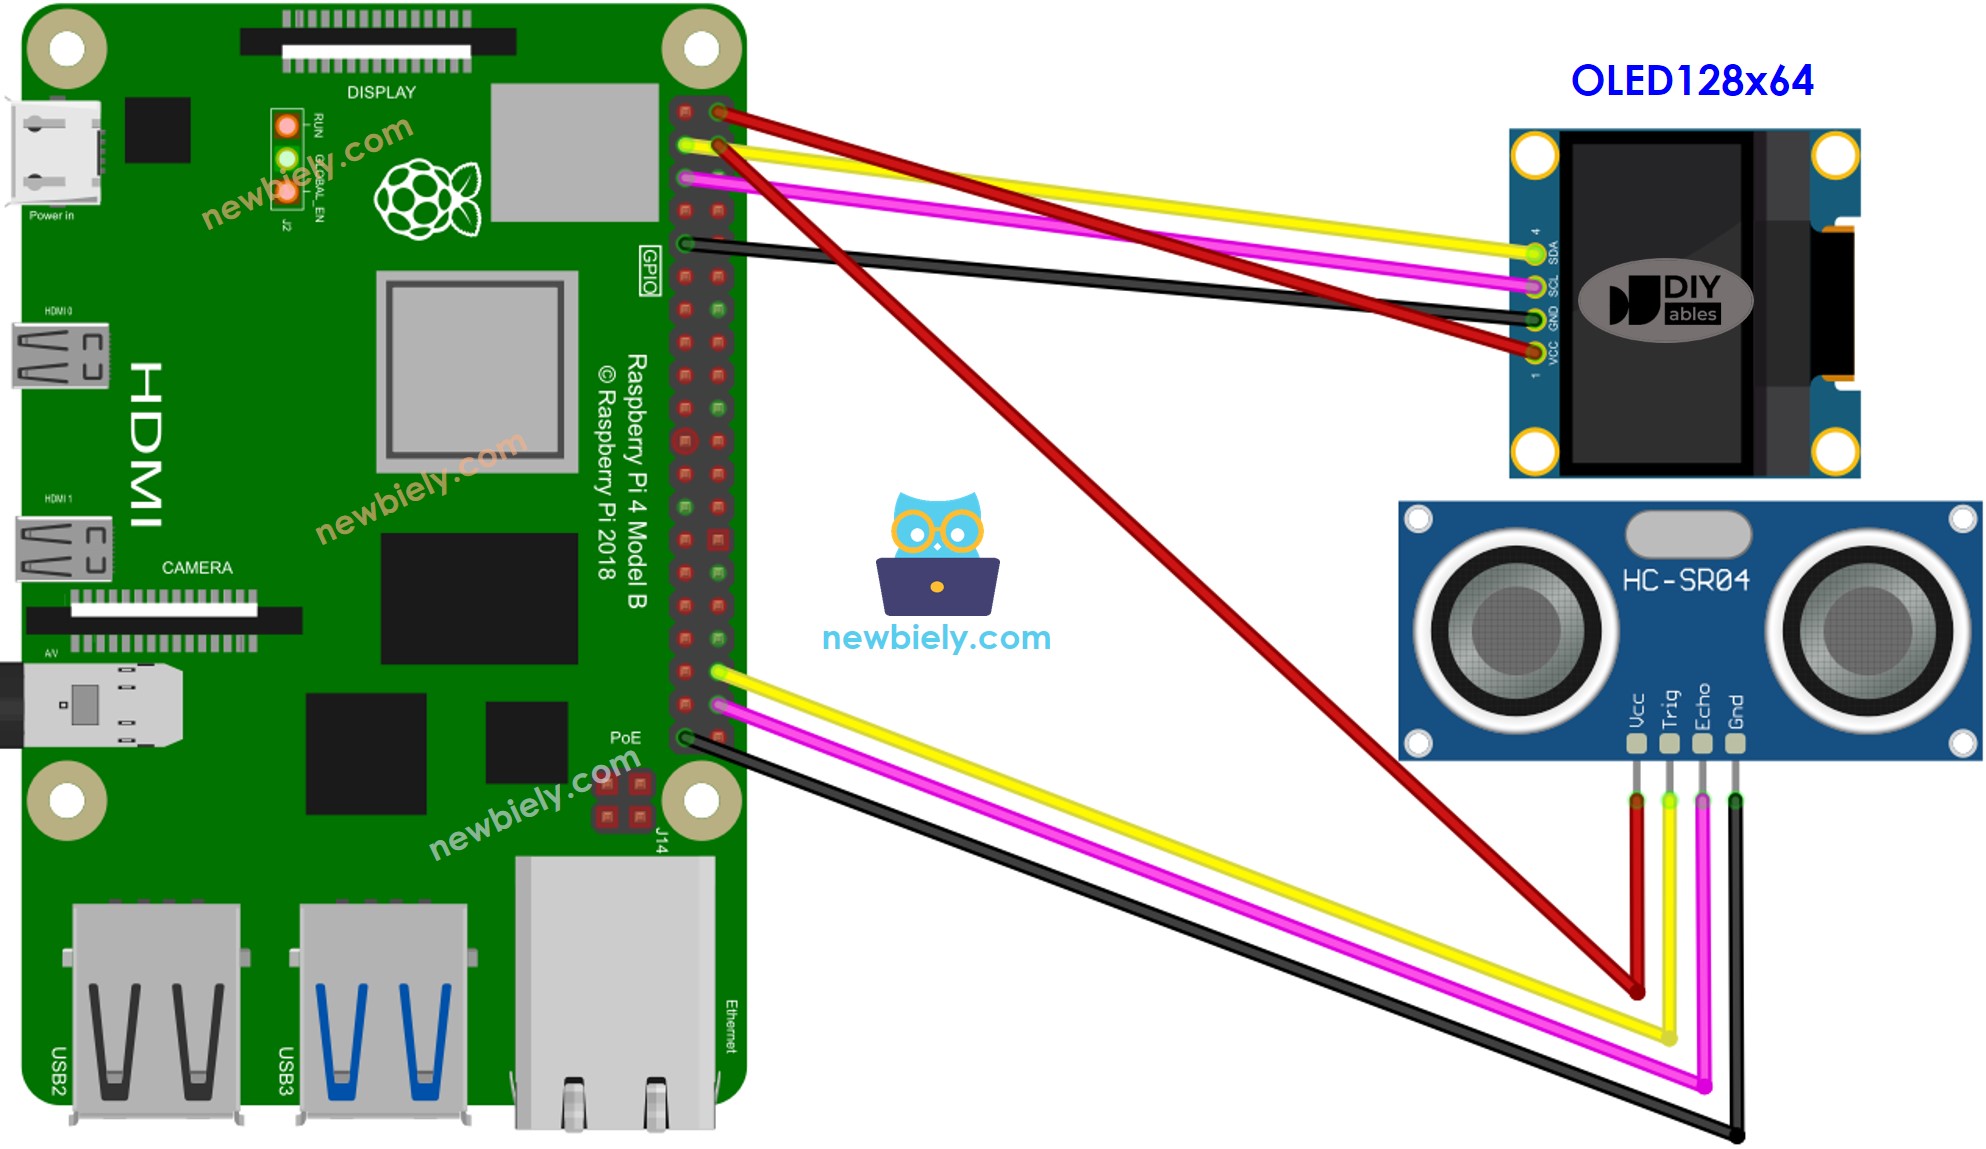
Deze afbeelding is gemaakt met Fritzing. Klik om de afbeelding te vergroten.
Raspberry Pi Code - Ultrasone Sensor - OLED
Snelle Stappen
- Zorg dat u Raspbian of een ander Raspberry Pi compatibel besturingssysteem op uw Pi geïnstalleerd heeft.
- Zorg dat uw Raspberry Pi verbonden is met hetzelfde lokale netwerk als uw pc.
- Zorg dat uw Raspberry Pi verbinding heeft met internet als u nog bibliotheken moet installeren.
- Als dit de eerste keer is dat u een Raspberry Pi gebruikt, zie hoe u de Raspberry Pi instelt
- Verbind uw pc via SSH met de Raspberry Pi door gebruik te maken van de ingebouwde SSH-client op Linux en macOS of PuTTY op Windows. Zie hoe u uw pc via SSH met de Raspberry Pi verbindt.
- Controleer of u de RPi.GPIO bibliotheek geïnstalleerd heeft. Zo niet, installeer deze dan met het volgende commando:
- Voordat u het OLED-display gebruikt met de Raspberry Pi, moet u de I2C-interface op de Raspberry Pi inschakelen. Zie Hoe u de I2C-interface op de Raspberry Pi inschakelt
- Installeer de OLED bibliotheek door het volgende commando uit te voeren:
- Maak een Python-scriptbestand aan met de naam ultrasonic_oled.py en voeg de volgende code toe:
- Sla het bestand op en start het Python-script door het volgende commando in de terminal uit te voeren:
Het script loopt continu in een oneindige lus totdat u Ctrl + C indrukt in de terminal.
- Beweeg uw hand voor de sensor.
- Bekijk het resultaat op het OLED-display en in de Seriële Monitor.
※ Notiz:
Deze code centreert de tekst zowel horizontaal als verticaal op het OLED-display. Voor meer informatie, zie Hoe tekst verticaal/horizontaal centreren op OLED.
Video Tutorial
We overwegen het maken van videotutorials. Als u videotutorials belangrijk vindt, abonneer u dan op ons YouTube-kanaal om ons te motiveren de video's te maken.
Bekijk onze video-tutorial voor een visuele begeleiding bij dit project! De video biedt extra inzichten en helpt u stap voor stap.