Raspberry Pi - OLED Display

Deze handleiding leert u hoe u Raspberry Pi kunt gebruiken met een OLED-display. We zullen in detail leren:

Hardware Required

1×Raspberry Pi 5
1×SSD1306 I2C OLED-Display 128x64
1×SSD1306 I2C OLED-Display 128x32
1×Jumper Wires (verbindingsdraden)
1×(Aanbevolen) Schroefklem Block Shield voor Raspberry Pi
1×(Aanbevolen) Raspberry Pi Prototyping Basisplaat & Breadboard Kit
1×(Aanbevolen) HDMI-Touchscreen-Monitor voor Raspberry Pi

Of u kunt de volgende kits kopen:

1×DIYables Sensorkit (30 sensoren/displays)
1×DIYables Sensorkit (18 sensoren/displays)
Openbaarmaking: Sommige van de links in deze sectie zijn Amazon-affiliate links. We kunnen een commissie ontvangen voor aankopen die via deze links worden gedaan, zonder extra kosten voor u. We waarderen uw steun.

Over het OLED Display

Er zijn verschillende soorten OLED-displays beschikbaar. De meest gebruikte OLED bij Raspberry Pi is het SSD1306 I2C OLED 128x64 en 128x32 display.

OLED display

I2C OLED Display Pinout

  • GND pin: moet verbonden worden met de ground (aarde) van de Raspberry Pi.
  • VCC pin: levert de voeding voor het display en moet aangesloten worden op de 5 volt pin van de Raspberry Pi.
  • SCL pin: is de seriële klokpin voor de I2C-interface.
  • SDA pin: is de seriële datapin voor de I2C-interface.
OLED pinout

※ Notiz:

  • De pin-uitvoering van een OLED-module kan verschillen per fabrikant en type module. Het is ZEER BELANGRIJK om altijd de labels te controleren die op de OLED-module gedrukt staan. Let goed op!
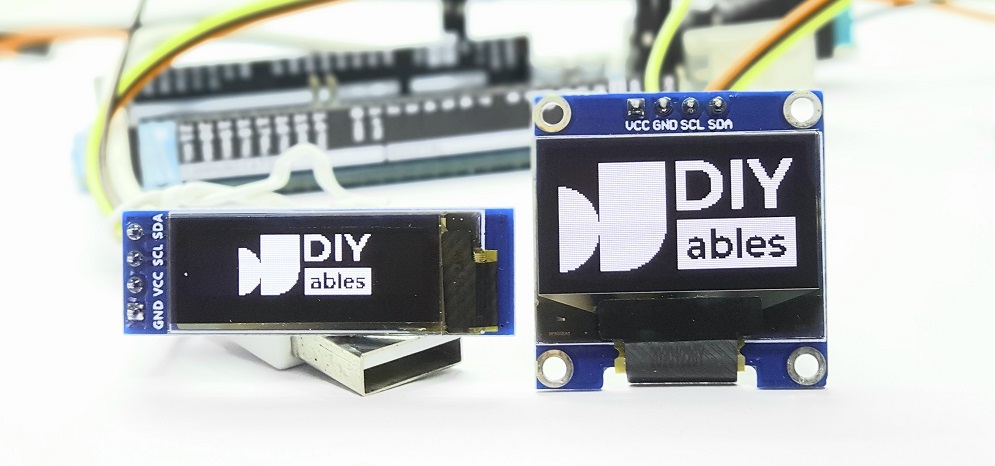
  • Deze handleiding gebruikt een OLED-display met de SSD1306 I2C driver. We hebben het getest met het OLED-display van DIYables en het werkt perfect.

Bedradingsschema

  • Bedradingsschema tussen Raspberry Pi en OLED 128x64
Raspberry Pi OLED wiring diagram

This image is created using Fritzing. Click to enlarge image

  • Bedradingsschema tussen Raspberry Pi en OLED 128x32
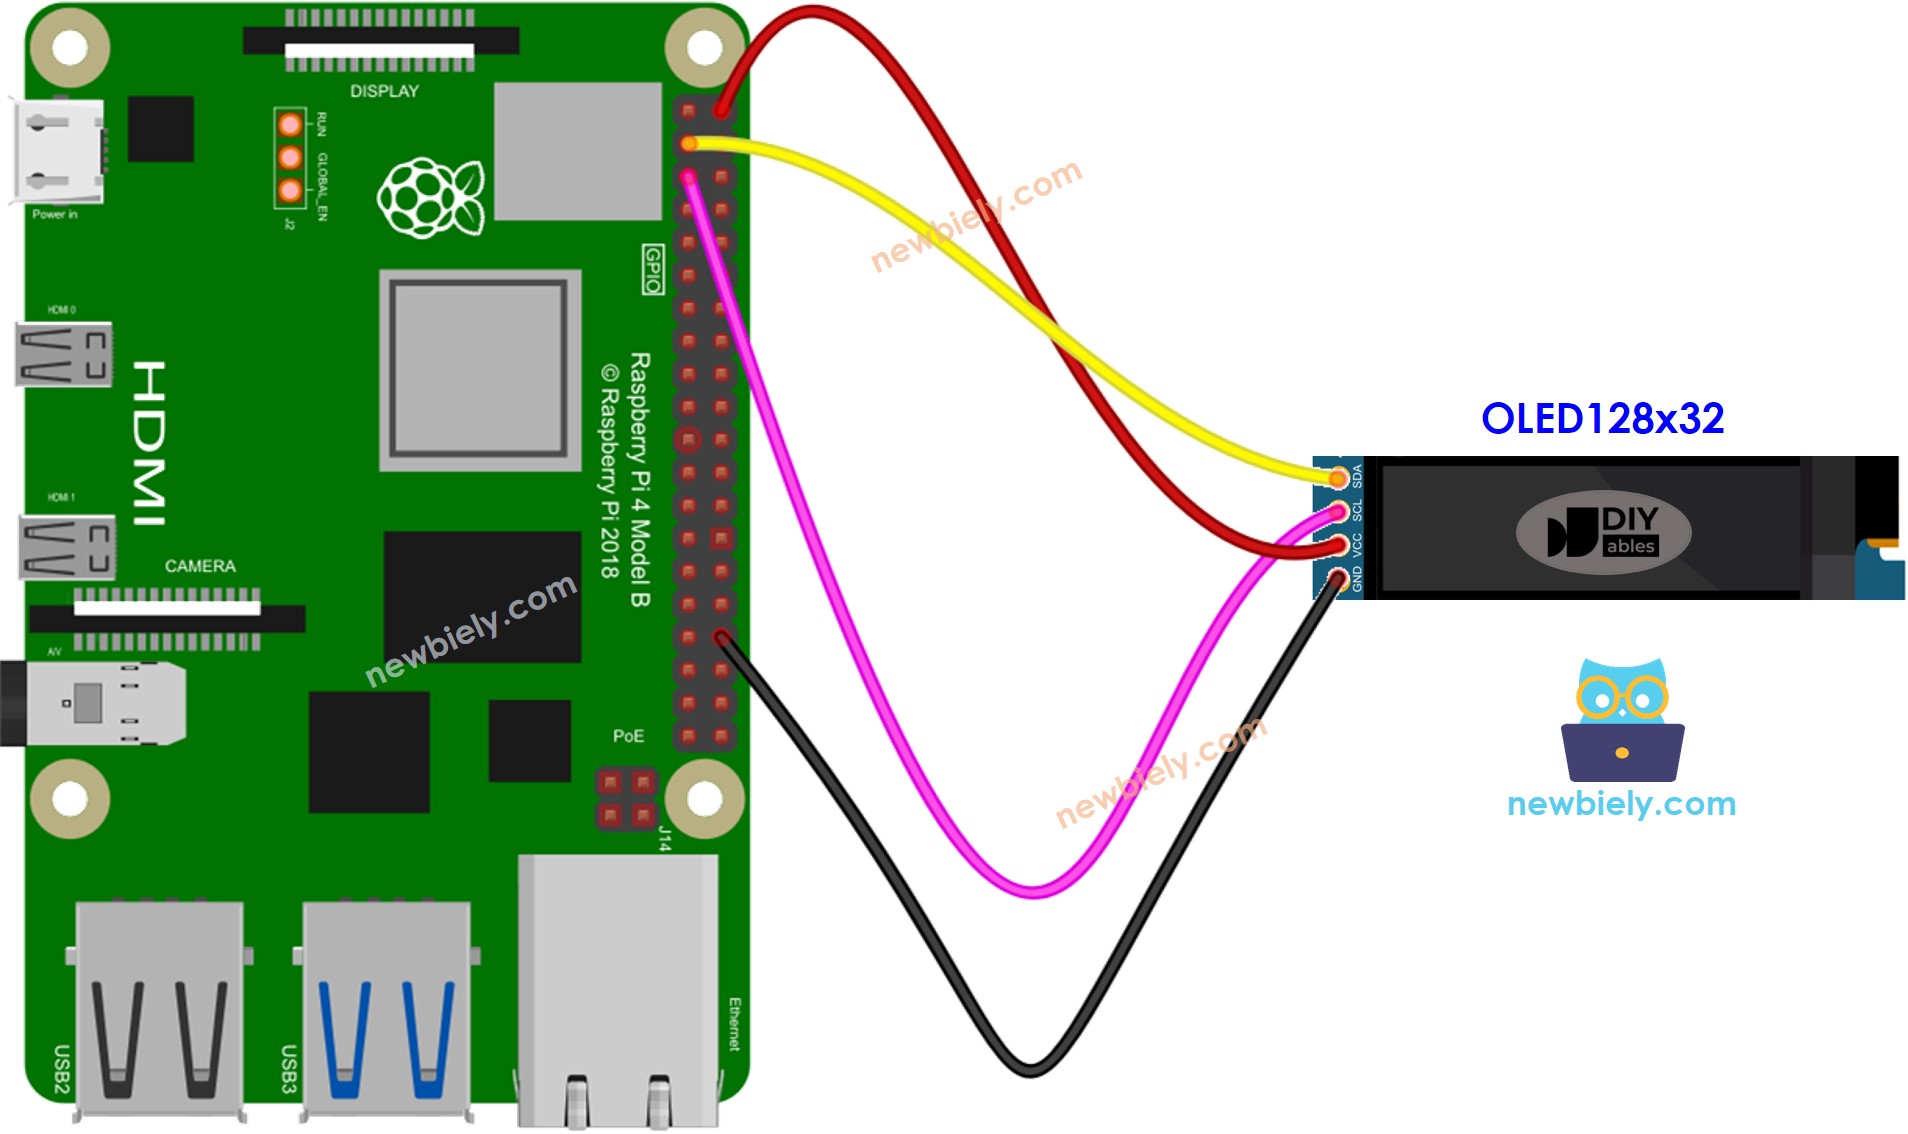
Raspberry Pi OLED 128x64 wiring diagram

This image is created using Fritzing. Click to enlarge image

De bedradingstabel tussen Raspberry Pi en OLED-display:

OLED Module Raspberry Pi
Vin 5V
GND GND
SDA GPIO2 (pin 3)
SCL GPIO3 (pin 5)

Raspberry Pi Code – Tekst weergeven op OLED

Snelle Stappen

  • Zorg dat u Raspbian of een ander compatibel Raspberry Pi-besturingssysteem op uw Pi hebt geïnstalleerd.
  • Zorg dat uw Raspberry Pi verbonden is met hetzelfde lokale netwerk als uw pc.
  • Zorg dat uw Raspberry Pi verbonden is met het internet als u bibliotheken moet installeren.
  • Als dit de eerste keer is dat u Raspberry Pi gebruikt, zie hoe Raspberry Pi op te zetten
  • Verbind uw pc met de Raspberry Pi via SSH met de ingebouwde SSH-client op Linux en macOS of PuTTY op Windows. Zie hoe uw pc via SSH te verbinden met Raspberry Pi.
  • Controleer of u de RPi.GPIO bibliotheek geïnstalleerd hebt. Zo niet, installeer deze met het volgende commando:
sudo apt-get update sudo apt-get install python3-rpi.gpio
pip install Adafruit-SSD1306
  • Maak een Python-scriptbestand aan met de naam oled.py en voeg de volgende code toe:
# Deze Raspberry Pi code is ontwikkeld door newbiely.nl # Deze Raspberry Pi code wordt zonder enige beperking aan het publiek beschikbaar gesteld. # Voor volledige instructies en schema's, bezoek: # https://newbiely.nl/tutorials/raspberry-pi/raspberry-pi-oled import time import RPi.GPIO as GPIO import Adafruit_SSD1306 # GPIO pin configuration for the OLED display OLED_RESET_PIN = None # Set to GPIO pin if your display has a reset pin OLED = Adafruit_SSD1306.SSD1306_128_64(rst=OLED_RESET_PIN) # Initialize the OLED display OLED.begin() # Clear the display OLED.clear() OLED.display() try: while True: # Clear the display OLED.clear() # Display "Hello World!" on OLED OLED.draw.text((0, 0), "Hello World!", font=None, fill=255) # Display on OLED OLED.display() # Delay for readability time.sleep(1) except KeyboardInterrupt: print("Program terminated by user.") finally: GPIO.cleanup()
  • Sla het bestand op en start het Python-script door het volgende commando in de terminal uit te voeren:
python3 oled.py
  • Controleer het OLED-display.

Het script draait in een oneindige lus totdat u Ctrl + C indrukt in de terminal.

Raspberry Pi Code – Afbeelding Weergeven

Om een afbeelding op het OLED weer te geven, moeten we deze eerst converteren (ongeacht het formaat) naar een bitmap-array. Dit kunt u doen met behulp van deze online tool. Raadpleeg de afbeelding hieronder voor instructies hoe dit te doen. Ik heb het Raspberry Pi icoon al geconverteerd naar een bitmap-array.

image to bitmap array

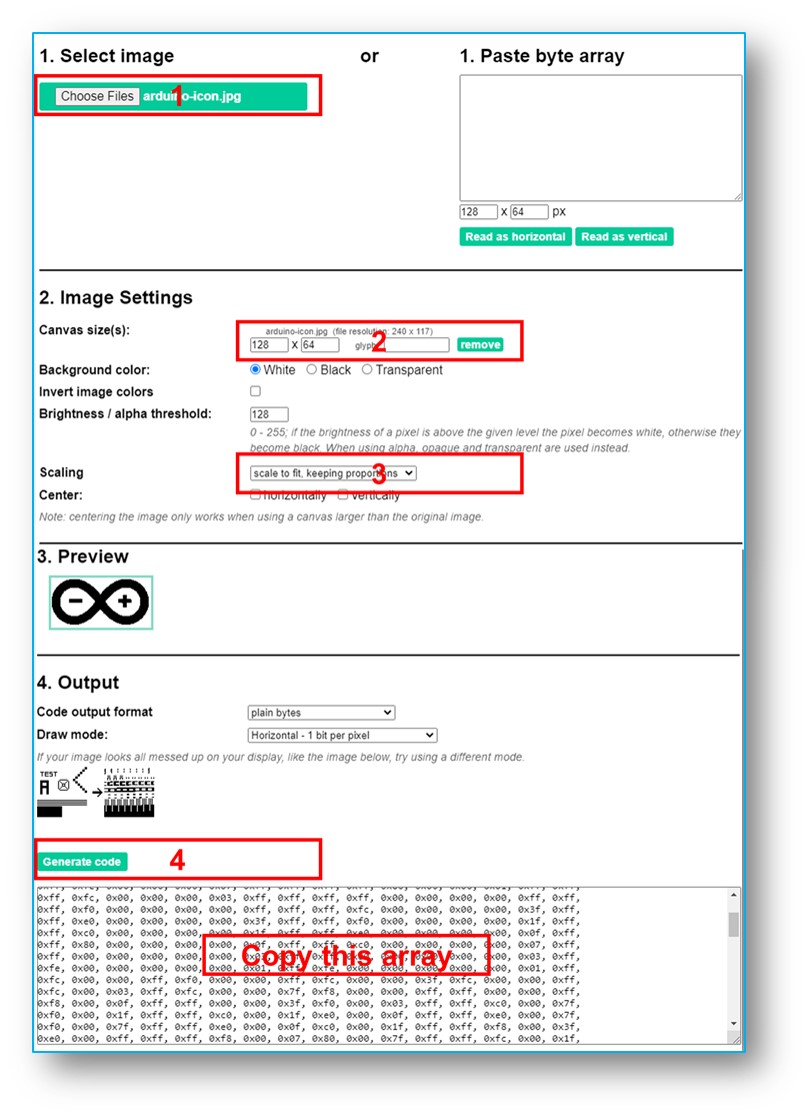
Zodra de conversie is voltooid, neemt u de array-code en vervangt u de bestaande ArduinoIcon array-code in de volgende codefragmenten.

# Deze Raspberry Pi code is ontwikkeld door newbiely.nl # Deze Raspberry Pi code wordt zonder enige beperking aan het publiek beschikbaar gesteld. # Voor volledige instructies en schema's, bezoek: # https://newbiely.nl/tutorials/raspberry-pi/raspberry-pi-oled import time import Adafruit_SSD1306 from PIL import Image # GPIO pin configuration for the OLED display OLED_RESET_PIN = None # Set to GPIO pin if your display has a reset pin DISP = Adafruit_SSD1306.SSD1306_128_64(rst=OLED_RESET_PIN) # Bitmap of DIYable-icon image bitmap_width = 128 # MUST match the bitmap image size bitmap_height = 57 # MUST match the bitmap image size bitmap_DIYables = [ # 'DIYables Icon', 128x57px 0x00, 0x00, 0x03, 0xff, 0xff, 0xff, 0xff, 0xc0, 0xff, 0xfe, 0x00, 0x03, 0xf1, 0xf8, 0x00, 0x3e, 0x00, 0x00, 0x03, 0xff, 0xff, 0xff, 0xff, 0xc0, 0xff, 0xff, 0xc0, 0x03, 0xf1, 0xf8, 0x00, 0x7e, 0x00, 0x00, 0x03, 0xff, 0xff, 0xff, 0xff, 0xc0, 0xff, 0xff, 0xf0, 0x03, 0xf0, 0xfc, 0x00, 0x7c, 0x00, 0x00, 0x03, 0xff, 0xff, 0xff, 0xff, 0xc0, 0xff, 0xff, 0xf8, 0x03, 0xf0, 0xfc, 0x00, 0xfc, 0x00, 0x00, 0x03, 0xff, 0xff, 0xff, 0xff, 0xc0, 0xff, 0xff, 0xfc, 0x03, 0xf0, 0x7e, 0x00, 0xf8, 0x00, 0x00, 0x03, 0xff, 0xff, 0xff, 0xff, 0xc0, 0xf8, 0x01, 0xfe, 0x03, 0xf0, 0x3f, 0x01, 0xf8, 0x00, 0x00, 0x03, 0xff, 0xff, 0xff, 0xff, 0xc0, 0xf8, 0x00, 0x7f, 0x03, 0xf0, 0x3f, 0x03, 0xf0, 0x00, 0x00, 0x03, 0xff, 0xff, 0xff, 0xff, 0xc0, 0xf8, 0x00, 0x3f, 0x03, 0xf0, 0x1f, 0x83, 0xe0, 0x00, 0x00, 0x03, 0xff, 0xff, 0xff, 0xff, 0xc0, 0xf8, 0x00, 0x3f, 0x83, 0xf0, 0x1f, 0x87, 0xe0, 0x00, 0x00, 0x03, 0xff, 0xff, 0xff, 0xff, 0xc0, 0xf8, 0x00, 0x1f, 0x83, 0xf0, 0x0f, 0xc7, 0xc0, 0x00, 0x00, 0x03, 0xff, 0xff, 0xff, 0xff, 0xc0, 0xf8, 0x00, 0x1f, 0x83, 0xf0, 0x07, 0xef, 0xc0, 0x00, 0x00, 0x03, 0xff, 0xff, 0xff, 0xff, 0xc0, 0xf8, 0x00, 0x1f, 0x83, 0xf0, 0x07, 0xff, 0x80, 0xf0, 0x00, 0x03, 0xff, 0xff, 0xff, 0xff, 0xc0, 0xf8, 0x00, 0x1f, 0x83, 0xf0, 0x03, 0xff, 0x00, 0xfe, 0x00, 0x03, 0xff, 0xff, 0xff, 0xff, 0xc0, 0xf8, 0x00, 0x1f, 0x83, 0xf0, 0x03, 0xff, 0x00, 0xff, 0xc0, 0x03, 0xff, 0xff, 0xff, 0xff, 0xc0, 0xf8, 0x00, 0x1f, 0x83, 0xf0, 0x01, 0xfe, 0x00, 0xff, 0xe0, 0x03, 0xff, 0xff, 0xff, 0xff, 0xc0, 0xf8, 0x00, 0x1f, 0x83, 0xf0, 0x00, 0xfe, 0x00, 0xff, 0xf8, 0x03, 0xff, 0xff, 0xff, 0xff, 0xc0, 0xf8, 0x00, 0x1f, 0x83, 0xf0, 0x00, 0xfc, 0x00, 0xff, 0xfc, 0x03, 0xff, 0xff, 0xff, 0xff, 0xc0, 0xf8, 0x00, 0x3f, 0x03, 0xf0, 0x00, 0xfc, 0x00, 0xff, 0xfe, 0x03, 0xff, 0xff, 0xff, 0xff, 0xc0, 0xf8, 0x00, 0x7f, 0x03, 0xf0, 0x00, 0xfc, 0x00, 0xff, 0xff, 0x03, 0xff, 0xff, 0xff, 0xff, 0xc0, 0xf8, 0x00, 0xff, 0x03, 0xf0, 0x00, 0xfc, 0x00, 0xff, 0xff, 0x83, 0xff, 0xff, 0xff, 0xff, 0xc0, 0xf8, 0x03, 0xfe, 0x03, 0xf0, 0x00, 0xfc, 0x00, 0xff, 0xff, 0xc3, 0xff, 0xff, 0xff, 0xff, 0xc0, 0xff, 0xff, 0xfc, 0x03, 0xf0, 0x00, 0xfc, 0x00, 0xff, 0xff, 0xc3, 0xff, 0xff, 0xff, 0xff, 0xc0, 0xff, 0xff, 0xf8, 0x03, 0xf0, 0x00, 0xfc, 0x00, 0xff, 0xff, 0xe3, 0xff, 0xff, 0xff, 0xff, 0xc0, 0xff, 0xff, 0xe0, 0x03, 0xf0, 0x00, 0xfc, 0x00, 0xff, 0xff, 0xe3, 0xff, 0xff, 0xff, 0xff, 0xc0, 0xff, 0xff, 0x80, 0x03, 0xf0, 0x00, 0xfc, 0x00, 0xff, 0xff, 0xf3, 0xff, 0xff, 0xff, 0xff, 0xc0, 0xff, 0xf8, 0x00, 0x03, 0xe0, 0x00, 0xfc, 0x00, 0xff, 0xff, 0xf3, 0xff, 0xff, 0xff, 0xff, 0xc0, 0x00, 0x00, 0x00, 0x00, 0x00, 0x00, 0x00, 0x00, 0xff, 0xff, 0xfb, 0xff, 0xff, 0xff, 0xff, 0xc0, 0x00, 0x00, 0x00, 0x00, 0x00, 0x00, 0x00, 0x00, 0xff, 0xff, 0xfb, 0xff, 0xff, 0xff, 0xff, 0xc0, 0x00, 0x00, 0x00, 0x00, 0x00, 0x00, 0x00, 0x00, 0xff, 0xff, 0xfb, 0xff, 0xff, 0xff, 0xff, 0xc0, 0x00, 0x00, 0x00, 0x00, 0x00, 0x00, 0x00, 0x00, 0xff, 0xff, 0xfb, 0xff, 0xff, 0xff, 0xff, 0xc0, 0x00, 0x00, 0x00, 0x00, 0x00, 0x00, 0x00, 0x00, 0xff, 0xff, 0xff, 0xff, 0xff, 0xff, 0xff, 0xc0, 0xff, 0xff, 0xff, 0xff, 0xff, 0xff, 0xff, 0xff, 0xff, 0xff, 0xff, 0xff, 0xff, 0xff, 0xff, 0xc0, 0xff, 0xff, 0xff, 0xff, 0xff, 0xff, 0xff, 0xff, 0xff, 0xff, 0xff, 0xff, 0xff, 0xff, 0xff, 0xc0, 0xff, 0xff, 0xff, 0xff, 0xff, 0xff, 0xff, 0xff, 0xff, 0xff, 0xff, 0xff, 0xff, 0xff, 0xff, 0xc0, 0xff, 0xff, 0xff, 0xff, 0xff, 0xff, 0xff, 0xff, 0xff, 0xff, 0xff, 0xff, 0xff, 0xff, 0xff, 0xc0, 0xff, 0xff, 0xff, 0xff, 0xff, 0xff, 0xff, 0xff, 0xff, 0xff, 0xff, 0xff, 0xff, 0xff, 0xff, 0xc0, 0xff, 0xff, 0xc7, 0xff, 0x1f, 0xff, 0xff, 0xff, 0xff, 0xff, 0xff, 0xff, 0xff, 0xff, 0xff, 0xc0, 0xff, 0xff, 0xc7, 0xff, 0x1f, 0xff, 0xff, 0xff, 0xff, 0xff, 0xfb, 0xff, 0xff, 0xff, 0xff, 0x80, 0xff, 0xff, 0xc7, 0xff, 0x1f, 0xff, 0xff, 0xff, 0xff, 0xff, 0xfb, 0xff, 0xff, 0xff, 0xff, 0x80, 0xff, 0xff, 0xc7, 0xff, 0x1f, 0xff, 0xff, 0xff, 0xff, 0xff, 0xfb, 0xff, 0xff, 0xff, 0xff, 0x80, 0xff, 0x9f, 0xc6, 0x7f, 0x1f, 0xdf, 0xf9, 0xff, 0xff, 0xff, 0xfb, 0xff, 0xff, 0xff, 0xff, 0x00, 0xfc, 0x03, 0xc0, 0x0f, 0x1e, 0x03, 0xe0, 0x3f, 0xff, 0xff, 0xf3, 0xff, 0xff, 0xff, 0xff, 0x00, 0xfc, 0x03, 0xc0, 0x07, 0x1c, 0x01, 0xc0, 0x3f, 0xff, 0xff, 0xf3, 0xff, 0xff, 0xff, 0xfe, 0x00, 0xfd, 0xf1, 0xc3, 0xc7, 0x18, 0xf8, 0x8f, 0xff, 0xff, 0xff, 0xe3, 0xff, 0xff, 0xff, 0xfe, 0x00, 0xff, 0xf1, 0xc7, 0xe3, 0x18, 0xf8, 0x8f, 0xff, 0xff, 0xff, 0xe3, 0xff, 0xff, 0xff, 0xfc, 0x00, 0xfe, 0x01, 0xc7, 0xe3, 0x18, 0x00, 0xc0, 0xff, 0xff, 0xff, 0xc3, 0xff, 0xff, 0xff, 0xfc, 0x00, 0xfc, 0x01, 0xc7, 0xe3, 0x18, 0x00, 0xe0, 0x3f, 0xff, 0xff, 0xc3, 0xff, 0xff, 0xff, 0xf8, 0x00, 0xf8, 0xf1, 0xc7, 0xe3, 0x18, 0xff, 0xfe, 0x1f, 0xff, 0xff, 0x83, 0xff, 0xff, 0xff, 0xf0, 0x00, 0xf8, 0xf1, 0xc3, 0xc7, 0x18, 0xff, 0xff, 0x1f, 0xff, 0xff, 0x03, 0xff, 0xff, 0xff, 0xe0, 0x00, 0xf8, 0x61, 0xc0, 0x07, 0x1c, 0x01, 0xc0, 0x3f, 0xff, 0xfe, 0x03, 0xff, 0xff, 0xff, 0xc0, 0x00, 0xfc, 0x01, 0xc0, 0x0f, 0x1e, 0x01, 0x80, 0x3f, 0xff, 0xfc, 0x03, 0xff, 0xff, 0xff, 0x80, 0x00, 0xfe, 0x19, 0xc4, 0x3f, 0x1f, 0x87, 0xe0, 0xff, 0xff, 0xf8, 0x03, 0xff, 0xff, 0xff, 0x00, 0x00, 0xff, 0xff, 0xff, 0xff, 0xff, 0xff, 0xff, 0xff, 0xff, 0xe0, 0x03, 0xff, 0xff, 0xfc, 0x00, 0x00, 0xff, 0xff, 0xff, 0xff, 0xff, 0xff, 0xff, 0xff, 0xff, 0xc0, 0x03, 0xff, 0xff, 0xf0, 0x00, 0x00, 0xff, 0xff, 0xff, 0xff, 0xff, 0xff, 0xff, 0xff, 0xff, 0x00, 0x03, 0xff, 0xff, 0xc0, 0x00, 0x00, 0xff, 0xff, 0xff, 0xff, 0xff, 0xff, 0xff, 0xff, 0xf0, 0x00, 0x03, 0xff, 0xfc, 0x00, 0x00, 0x00, 0xff, 0xff, 0xff, 0xff, 0xff, 0xff, 0xff, 0xff ] def draw_bitmap(image, bitmap_data, width, height): image.putdata(bitmap_data) return image try: DISP.begin() DISP.clear() DISP.display() # Create a blank image with mode '1' for 1-bit pixels (bitmap) image = Image.new('1', (bitmap_width, bitmap_height)) while True: DISP.clear() # Display bitmap to the center x = (DISP.width - bitmap_width) // 2 y = (DISP.height - bitmap_height) // 2 # Draw the bitmap on the image image = draw_bitmap(image, bitmap_DIYables, bitmap_width, bitmap_height) # Paste the image on the OLED display DISP.image(image) DISP.display() time.sleep(2) except KeyboardInterrupt: print("Program terminated by user.") finally: DISP.clear() DISP.display()

※ Notiz:

  • De grootte van de afbeelding mag niet groter zijn dan de afmetingen van het scherm.
  • Als u de code wilt gebruiken voor een OLED 128x32, moet u de afbeelding verkleinen en de breedte- en hoogteparameters aanpassen in de oled.drawBitmap(); functie.

※ ONZE BERICHTEN

  • U bent welkom om de link naar deze tutorial te delen. Gebruik onze inhoud echter niet op andere websites. We hebben veel moeite en tijd gestoken in het maken van de inhoud, respecteer alstublieft ons werk!