Arduino Nano - LM35 Temperatuursensor OLED
Deze tutorial legt uit hoe u met de Arduino Nano de temperatuur meet met een LM35 sensor en dit vervolgens op een OLED-scherm weergeeft.
Hardware Benodigd
Of u kunt de volgende kits kopen:
| 1 | × | DIYables Sensorkit (30 sensoren/displays) | |
| 1 | × | DIYables Sensorkit (18 sensoren/displays) |
Openbaarmaking: Sommige van de links in deze sectie zijn Amazon-affiliate links. We kunnen een commissie ontvangen voor aankopen die via deze links worden gedaan, zonder extra kosten voor u. We waarderen uw steun.
Over OLED en LM35 Temperatuursensor
Als u niet bekend bent met OLED en de LM35 Temperatuursensor (inclusief pinout, werking, programmeren, enz.), kunnen de volgende tutorials u helpen:
- Arduino Nano - OLED tutorial
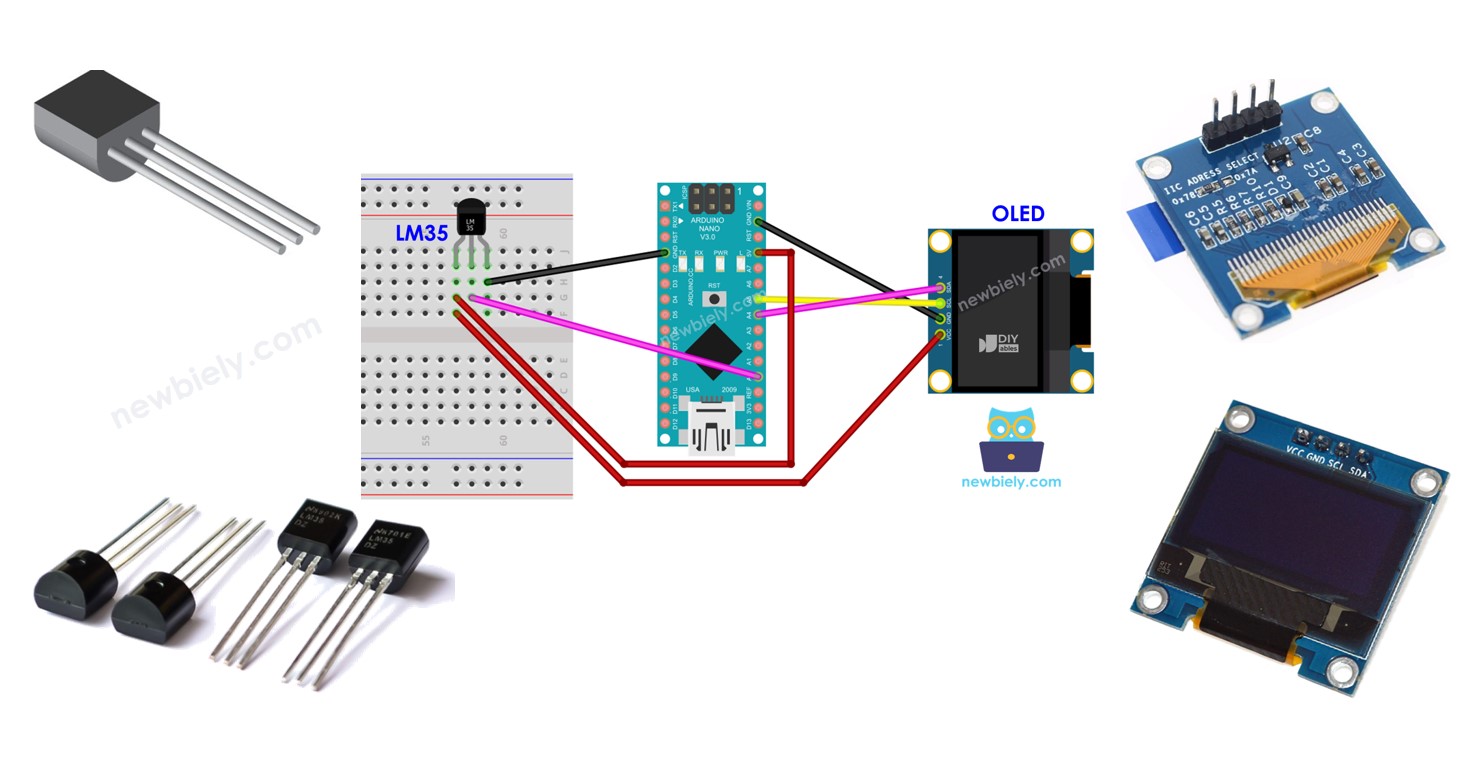
Bedradingsschema
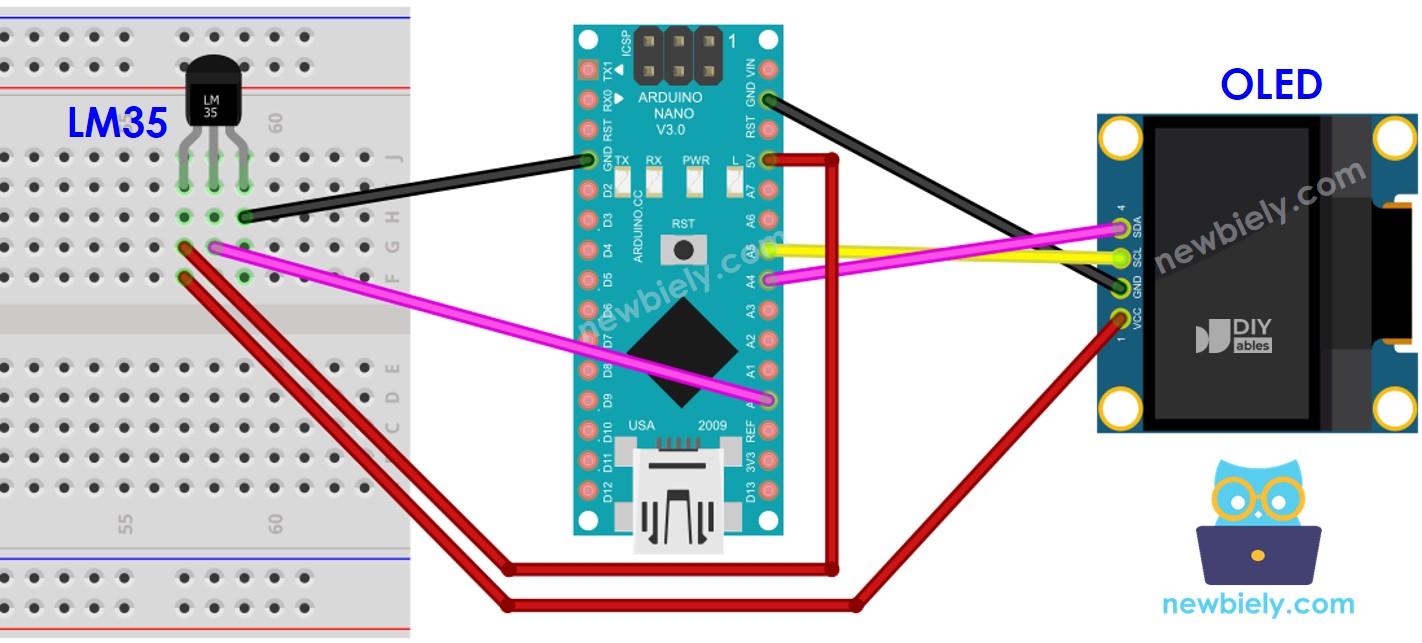
Deze afbeelding is gemaakt met Fritzing. Klik om de afbeelding te vergroten.
Arduino Nano Code - LM35 Temperatuursensor - OLED
/*
* Deze Arduino Nano code is ontwikkeld door newbiely.nl
* Deze Arduino Nano code wordt zonder enige beperking aan het publiek beschikbaar gesteld.
* Voor volledige instructies en schema's, bezoek:
* https://newbiely.nl/tutorials/arduino-nano/arduino-nano-lm35-temperature-sensor-oled
*/
#include <Wire.h>
#include <Adafruit_GFX.h>
#include <Adafruit_SSD1306.h>
#define OLED_WIDTH 128 // OLED display width, in pixels
#define OLED_HEIGHT 64 // OLED display height, in pixels
#define ADC_VREF_mV 5000.0 // in millivolt
#define ADC_RESOLUTION 1024.0
#define PIN_LM35 A0 // Arduio Nano pin connected to LM35 temperature sensor
Adafruit_SSD1306 oled(OLED_WIDTH, OLED_HEIGHT, &Wire, -1); // create SSD1306 display object connected to I2C
String temperature_str;
void setup() {
Serial.begin(9600);
// initialize OLED display with address 0x3C for 128x64
if (!oled.begin(SSD1306_SWITCHCAPVCC, 0x3C)) {
Serial.println(F("SSD1306 allocation failed"));
while (true);
}
delay(2000); // wait for initializing
oled.clearDisplay(); // clear display
oled.setTextSize(2); // text size
oled.setTextColor(WHITE); // text color
oled.setCursor(0, 10); // position to display
temperature_str.reserve(10); // to avoid fragmenting memory when using String
}
void loop() {
// get the ADC value from the LM35 temperature sensor
int adcVal = analogRead(PIN_LM35);
// convert the ADC value to voltage in millivolt
float milliVolt = adcVal * (ADC_VREF_mV / ADC_RESOLUTION);
// convert the voltage to the temperature in Celsius
float temperature_C = milliVolt / 10;
temperature_str = String(temperature_C, 2); // two decimal places
temperature_str += char(247) + String("C");
Serial.println(temperature_str); // print the temperature in Celsius to Serial Monitor
oled_display_center(temperature_str); // display temperature on OLED
}
void oled_display_center(String text) {
int16_t x1;
int16_t y1;
uint16_t width;
uint16_t height;
oled.getTextBounds(text, 0, 0, &x1, &y1, &width, &height);
// center the display both horizontally and vertically
oled.clearDisplay(); // clear display
oled.setCursor((OLED_WIDTH - width) / 2, (OLED_HEIGHT - height) / 2);
oled.println(text); // text to display
oled.display();
}
Snelle Stappen
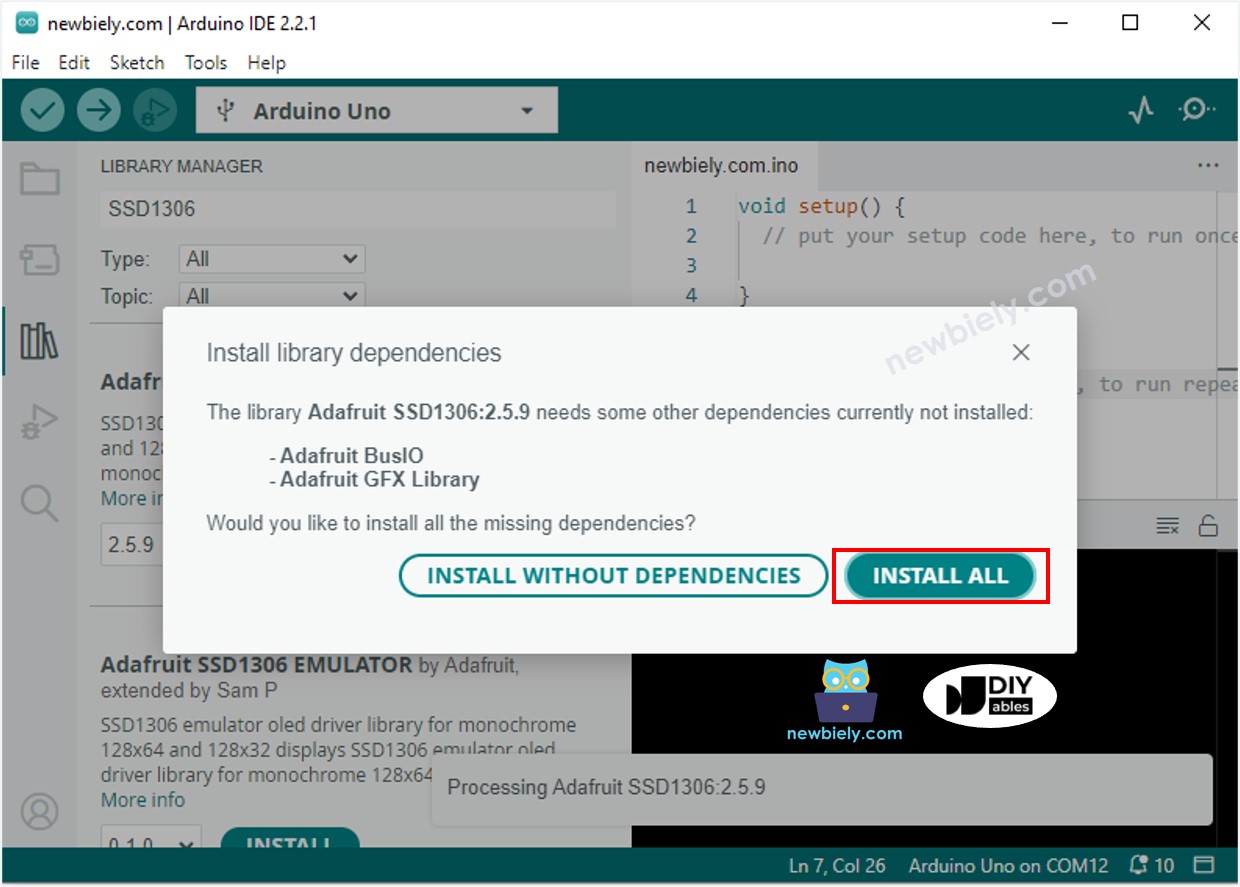
- Klik op het Libraries-icoon in de linkerzijbalk van de Arduino IDE.
- Zoek naar “SSD1306” en vind de SSD1306 bibliotheek van Adafruit.
- Druk vervolgens op de Install-knop om de installatie te voltooien.

- U krijgt een melding om extra bibliotheekafhankelijkheden te installeren.
- Klik op de Install All-knop om ze allemaal te installeren.
- Kopieer de code en open deze in de Arduino IDE.
- Klik op de Upload-knop in de Arduino IDE om de code naar de Arduino Nano te sturen.
- Plaats de sensor in heet en koud water, of houd hem in uw hand.
- Bekijk het resultaat op het OLED-scherm en in de Serial Monitor.
※ Notiz:
De code centreert de tekst zowel horizontaal als verticaal op het OLED-display.
Video Tutorial
We overwegen het maken van videotutorials. Als u videotutorials belangrijk vindt, abonneer u dan op ons YouTube-kanaal om ons te motiveren de video's te maken.