Arduino Nano - SSD1309 OLED Display 128x64 | 2.42 inch I2C OLED Tutorial

Een OLED (Organic Light-Emitting Diode) display heeft zelfoplichtende pixels die diepe zwartwaarden, hoog contrast en brede kijkhoeken bieden — waardoor het een uitstekende upgrade is ten opzichte van traditionele LCD’s. De SSD1309 is de driver IC die vaak voorkomt op 2.42-inch (soms aangeduid als 2.4-inch) 128×64 I2C OLED-modules.

In deze stapsgewijze handleiding leert u hoe u de SSD1309 OLED 128×64 aansluit en programmeert met een Arduino Nano board met behulp van de DIYables_OLED_SSD1309 bibliotheek. Specifiek behandelen we:

Hardware Benodigdheden

1×Official Arduino Nano
1×Alternatief: DIYables ATMEGA328P Nano Development Board
1×USB A naar Mini-B USB kabel
1×SSD1309 I2C OLED Display 128x64 (2.42 inch)
1×Jumper Draden
1×(Aanbevolen) Schroefklem Uitbreidingsboard voor Arduino Nano
1×(Aanbevolen) Breakout Uitbreidingsboard voor Arduino Nano
1×(Aanbevolen) Stromsplitter voor Arduino Nano

Of u kunt de volgende kits kopen:

1×DIYables Sensorkit (30 sensoren/displays)
1×DIYables Sensorkit (18 sensoren/displays)
Openbaarmaking: Sommige van de links in deze sectie zijn Amazon-affiliate links. We kunnen een commissie ontvangen voor aankopen die via deze links worden gedaan, zonder extra kosten voor u. We waarderen uw steun.

Over het SSD1309 2.42 inch OLED Display

De SSD1309 is een single-chip CMOS OLED driver IC, ontworpen voor 128×64 dot-matrix panelen. Het is register-compatibel met de veelgebruikte SSD1306, wat betekent dat veel bestaande codevoorbeelden met minimale aanpassingen bruikbaar zijn. De belangrijkste hardwareverschillen zijn:

  • Geen ingebouwde charge pump — de SSD1309 vereist een externe VCC-voeding; vrijwel alle breakout boards (inclusief 2.42-inch en 2.4-inch modules) bevatten echter een onboard boost converter, dus dit merkt u als gebruiker niet.
  • Hogere spannings-tolerantie — de SSD1309 accepteert tot 16 V aan VCC, terwijl de SSD1306 beperkt is tot ongeveer 4,2 V.

Het 2.42 inch (2.4 inch) OLED-module gebruikt doorgaans de SSD1309-driver en heeft een resolutie van 128×64 pixels met I2C-interface. De paneelkleur (wit, blauw, geel, groen of dual-zone) wordt bepaald door het fysieke OLED-materiaal en is niet via software aan te passen.

Deze handleiding communiceert met het display via de I2C-bus, die slechts twee signaaldraadjes (SDA en SCL) nodig heeft en gedeeld kan worden met andere I2C-onderdelen.

SSD1309 OLED Pinout (I2C Module)

  • GND pin: Verbind met de aarde (ground) van de Arduino Nano.
  • VCC pin: Voedingsspanning voor het display, verbind met 5V.
  • SCL pin: Seriële klokpin voor I2C. Verbind met A5.
  • SDA pin: Seriële datapin voor I2C. Verbind met A4.
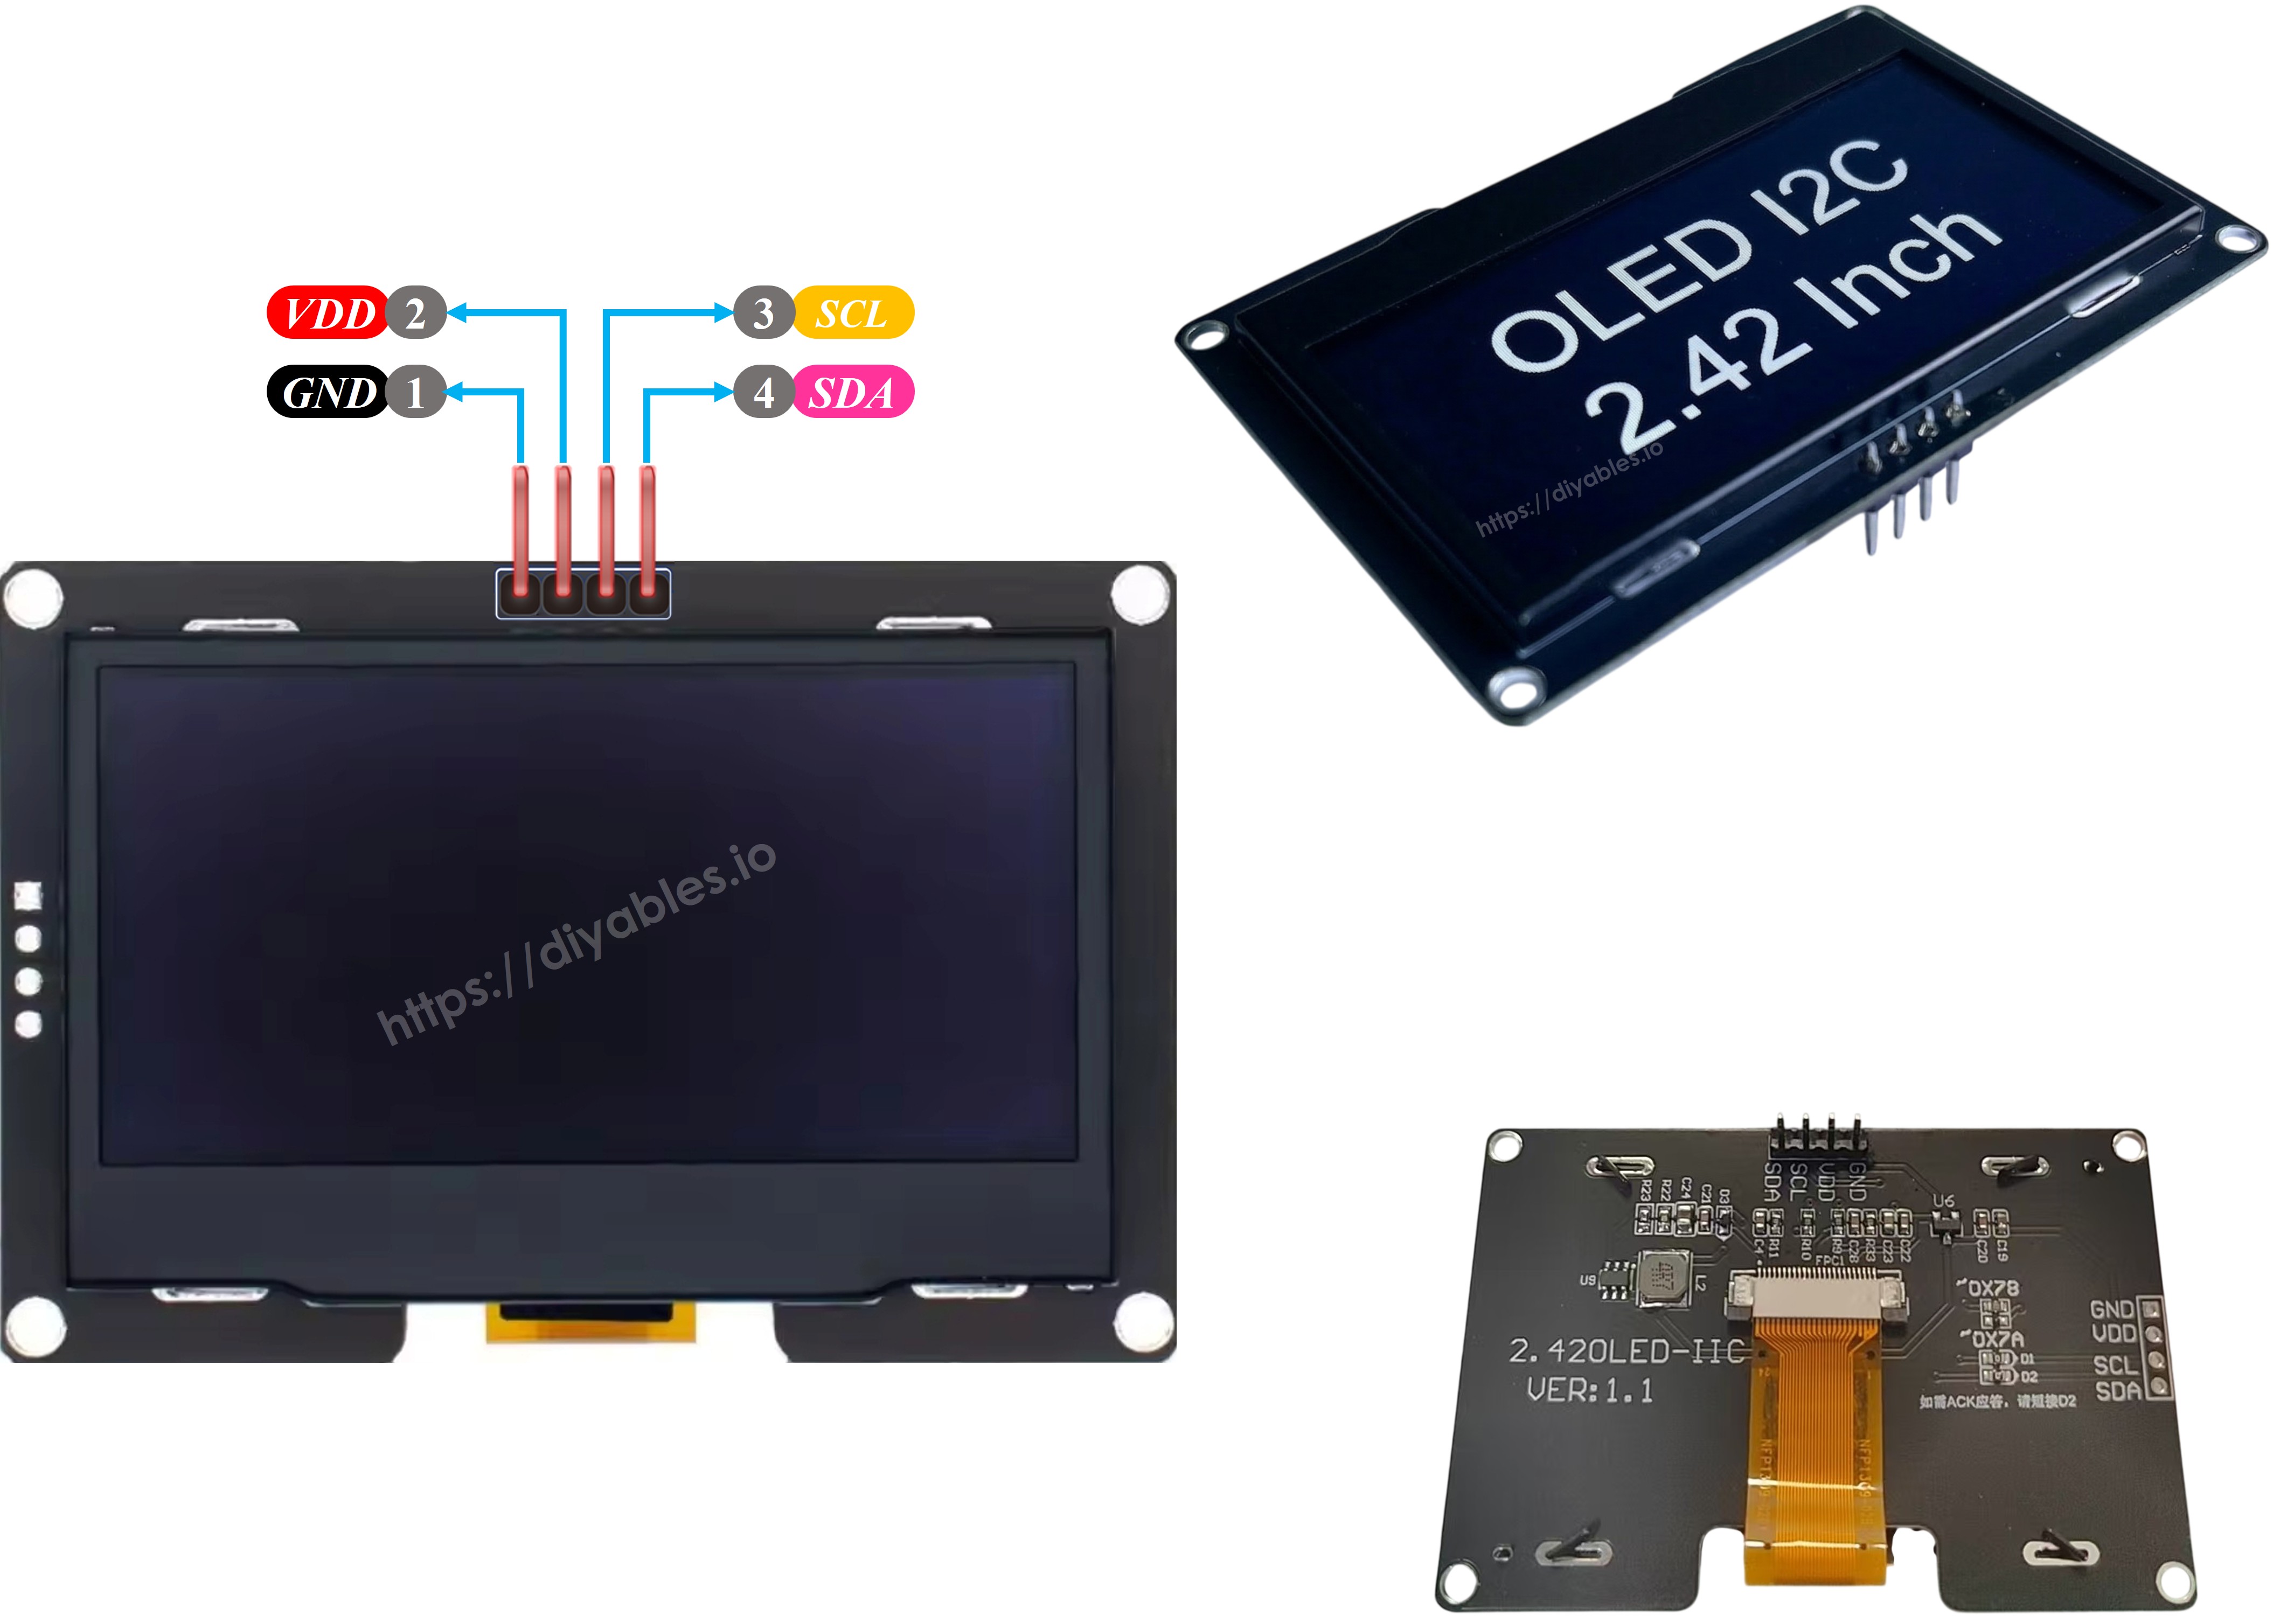
SSD1309 OLED Pinout

※ Notiz:

  • De pinnen van het OLED-module kunnen verschillen per fabrikant en type. Gebruik altijd de op het OLED-module gedrukt labels. Let hier goed op!
  • Deze handleiding gebruikt een OLED-display aangestuurd door de SSD1309 I2C driver. We hebben getest met het OLED-display van DIYables en het werkt perfect.

Aansluitschema

  • Aansluitschema tussen Arduino Nano en SSD1309 OLED 128x64
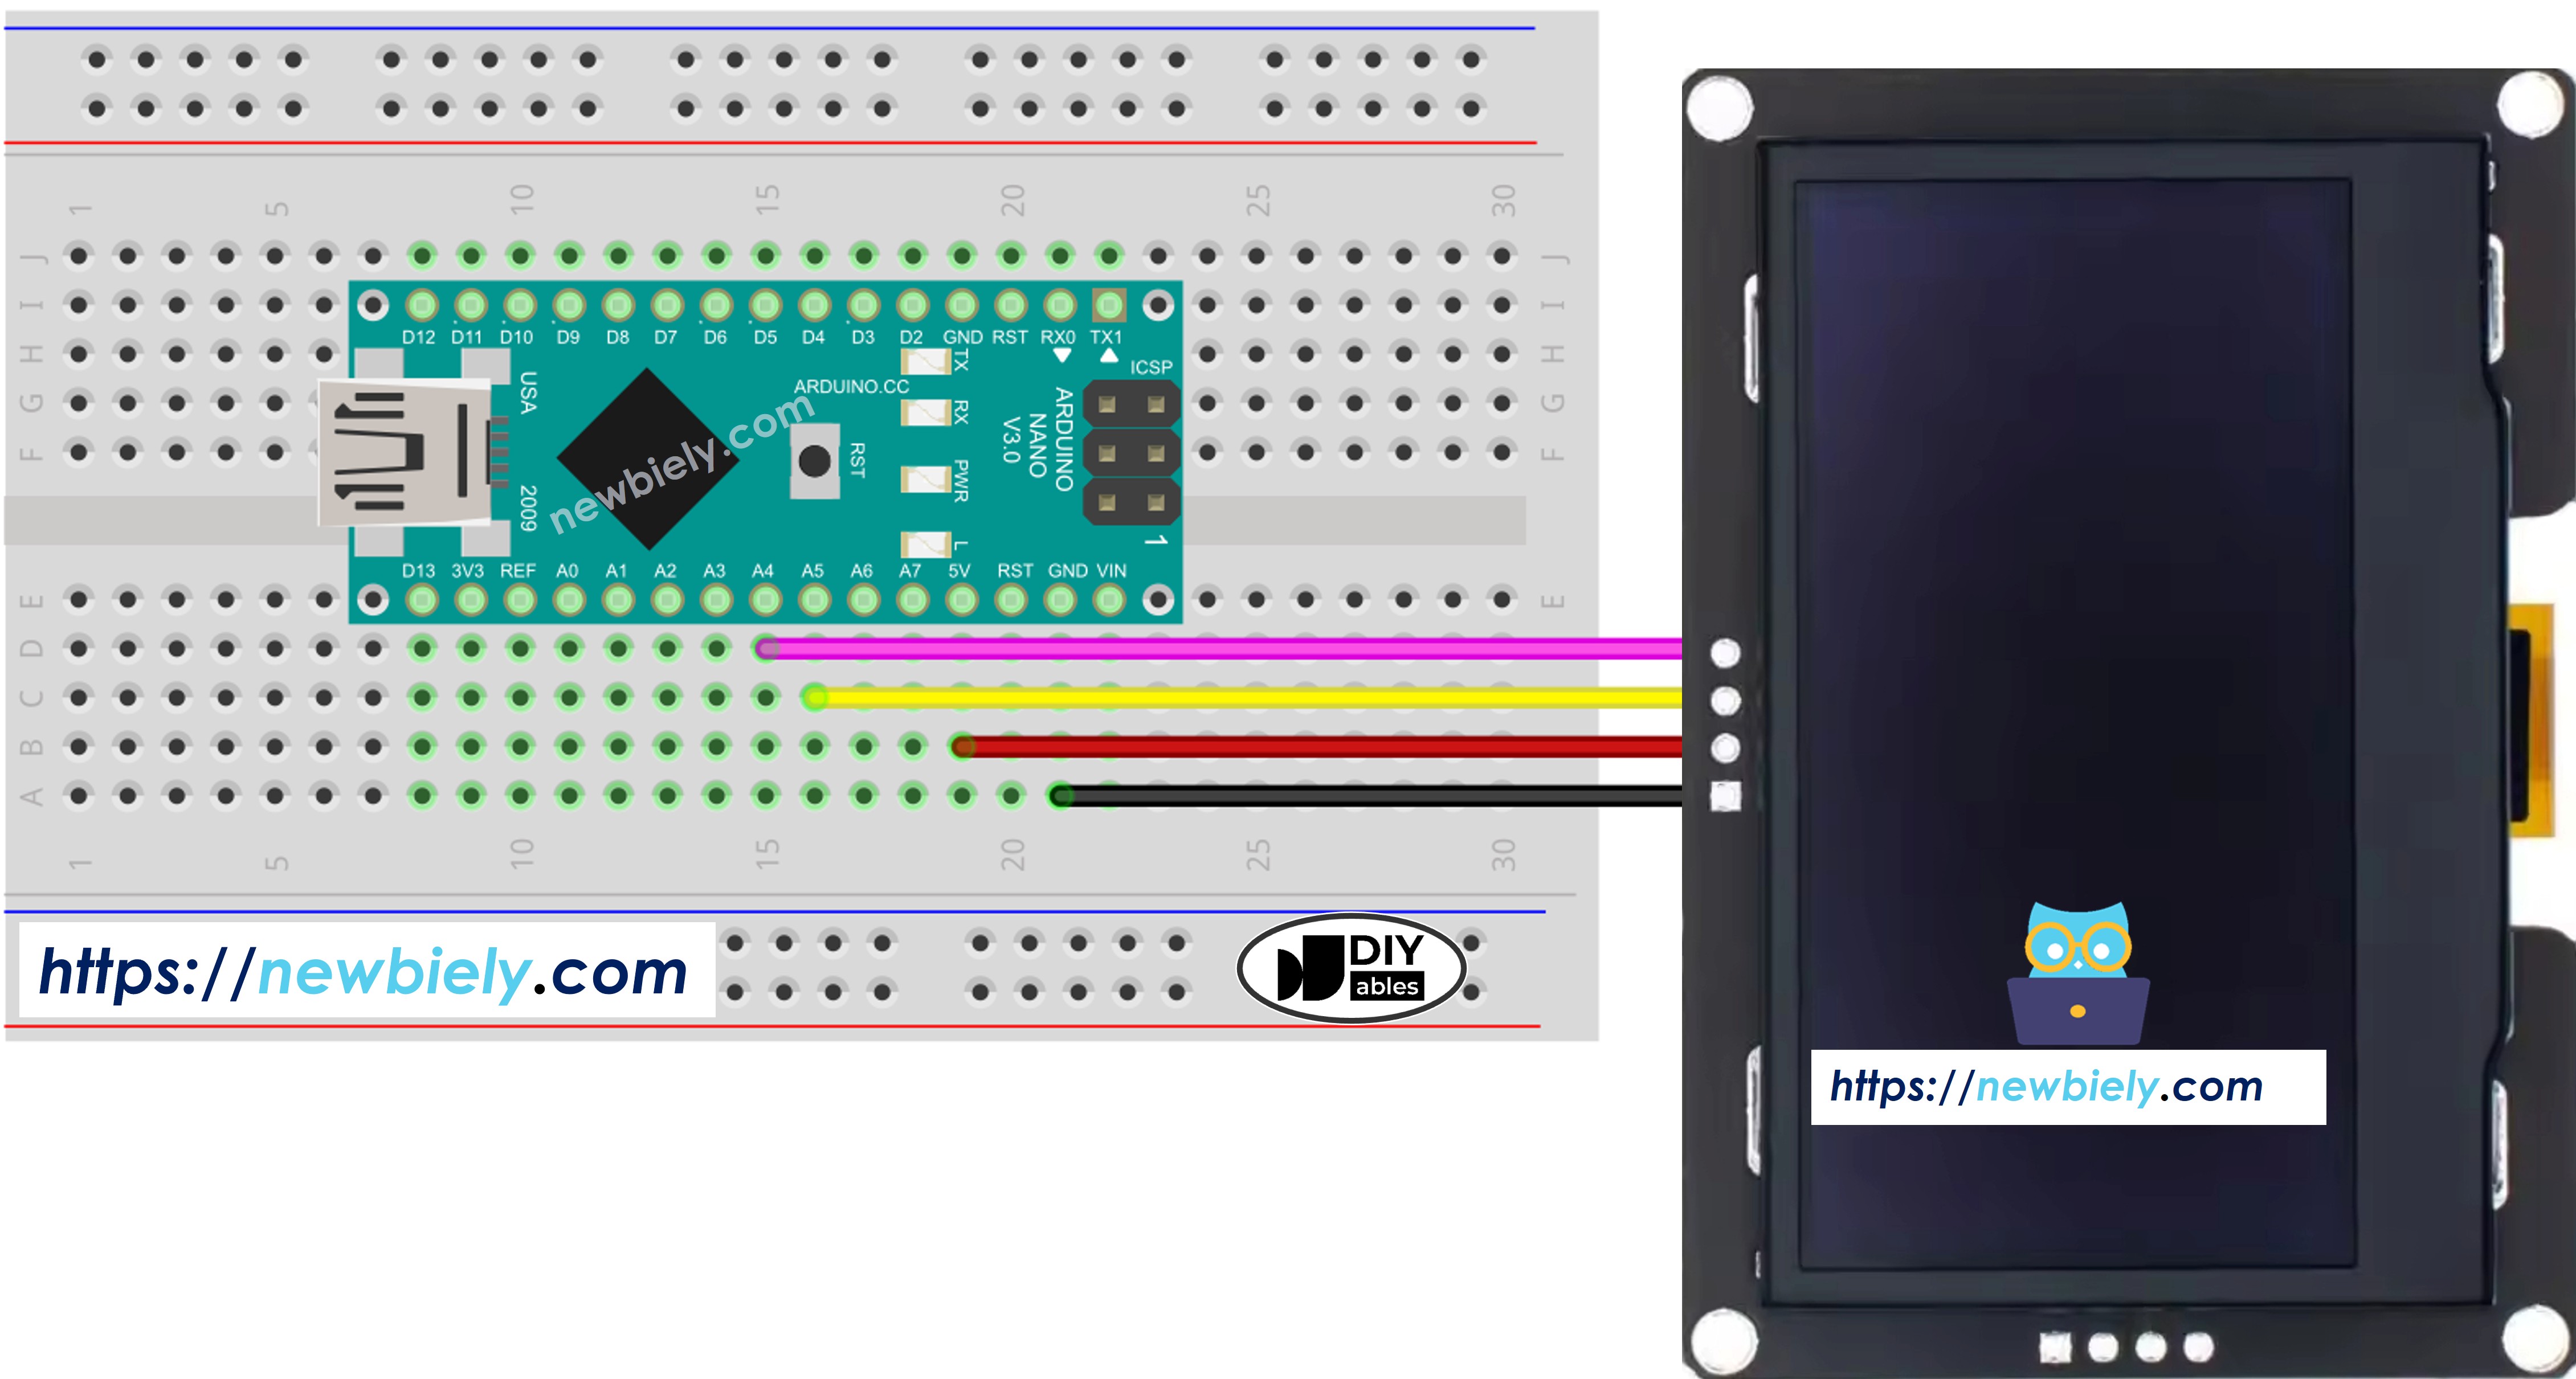
Arduino Nano SSD1309 OLED aansluitdiagram

This image is created using Fritzing. Click to enlarge image

De aansluittafel tussen Arduino Nano en SSD1309 OLED display:

OLED Module Arduino Nano
VCC 5V
GND GND
SDA A4
SCL A5

Arduino Nano programmeren voor SSD1309 OLED

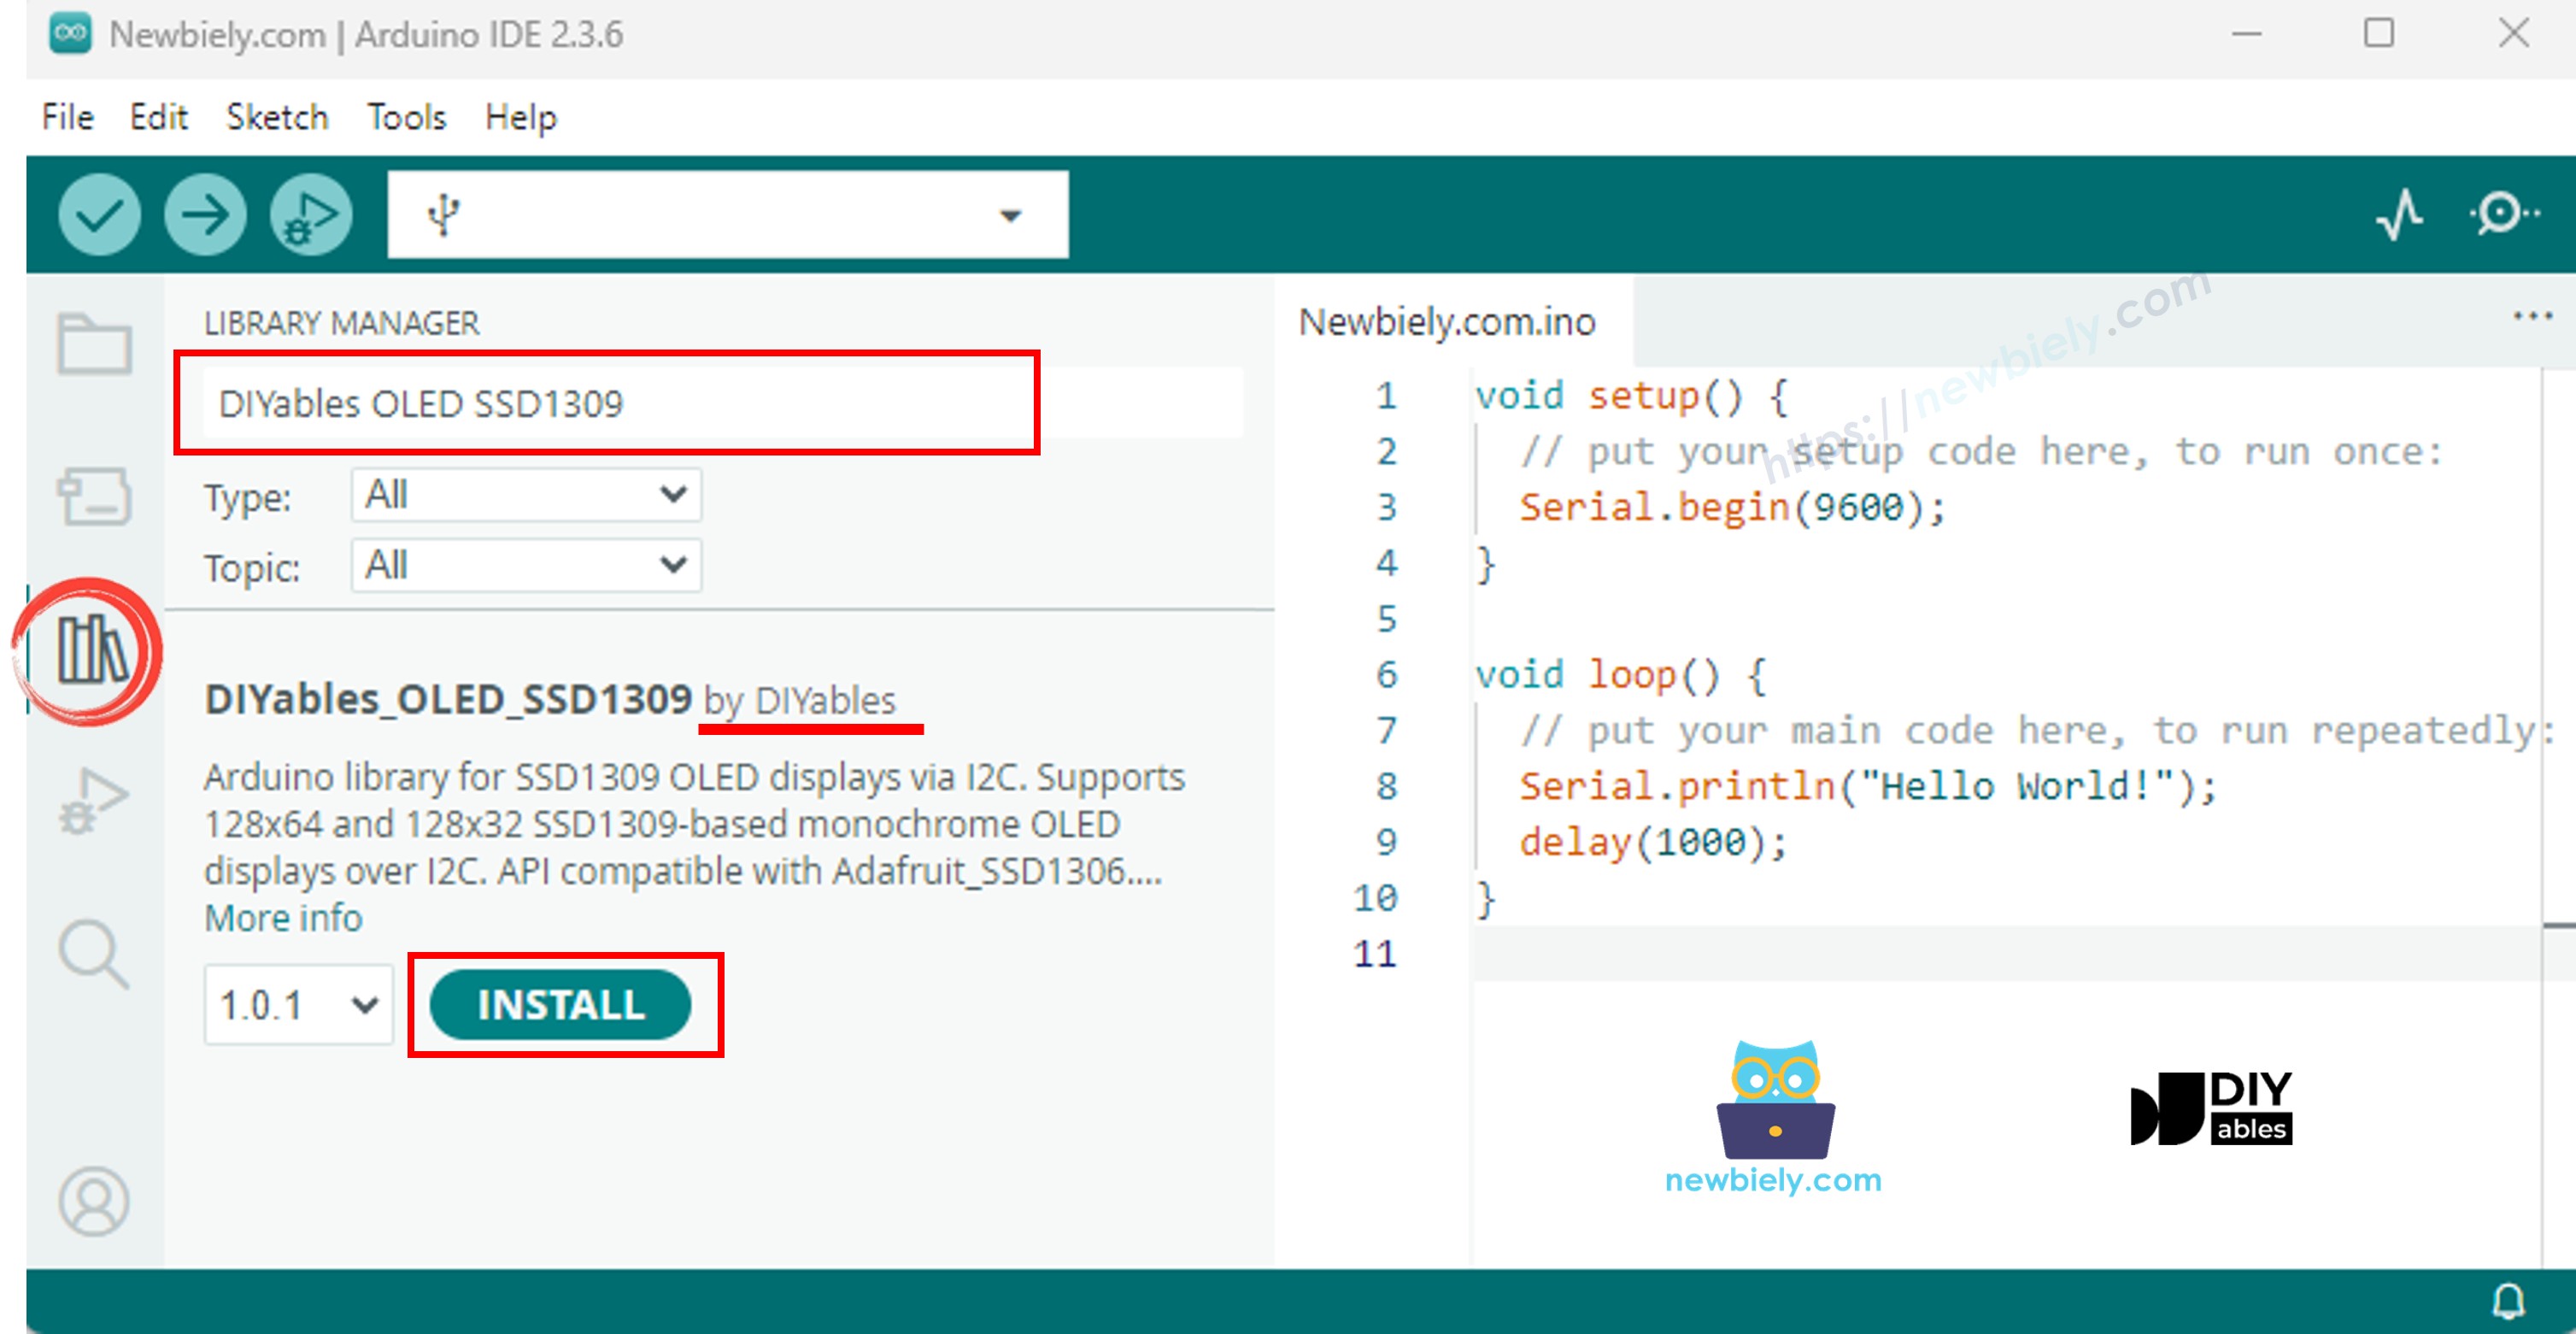
Installeer de DIYables_OLED_SSD1309 Bibliotheek

De DIYables_OLED_SSD1309 bibliotheek is speciaal aangepast voor SSD1309 displays en breidt Adafruit_GFX uit voor uitgebreidere grafische ondersteuning.

  • Klik op het Libraries icoon in de linker balk van de Arduino IDE.
  • Zoek op DIYables_OLED_SSD1309 en selecteer de DIYables OLED SSD1309 bibliotheek door DIYables.
  • Klik op de Install knop om de DIYables_OLED_SSD1309 bibliotheek te installeren.
Arduino Nano SSD1309 OLED bibliotheek
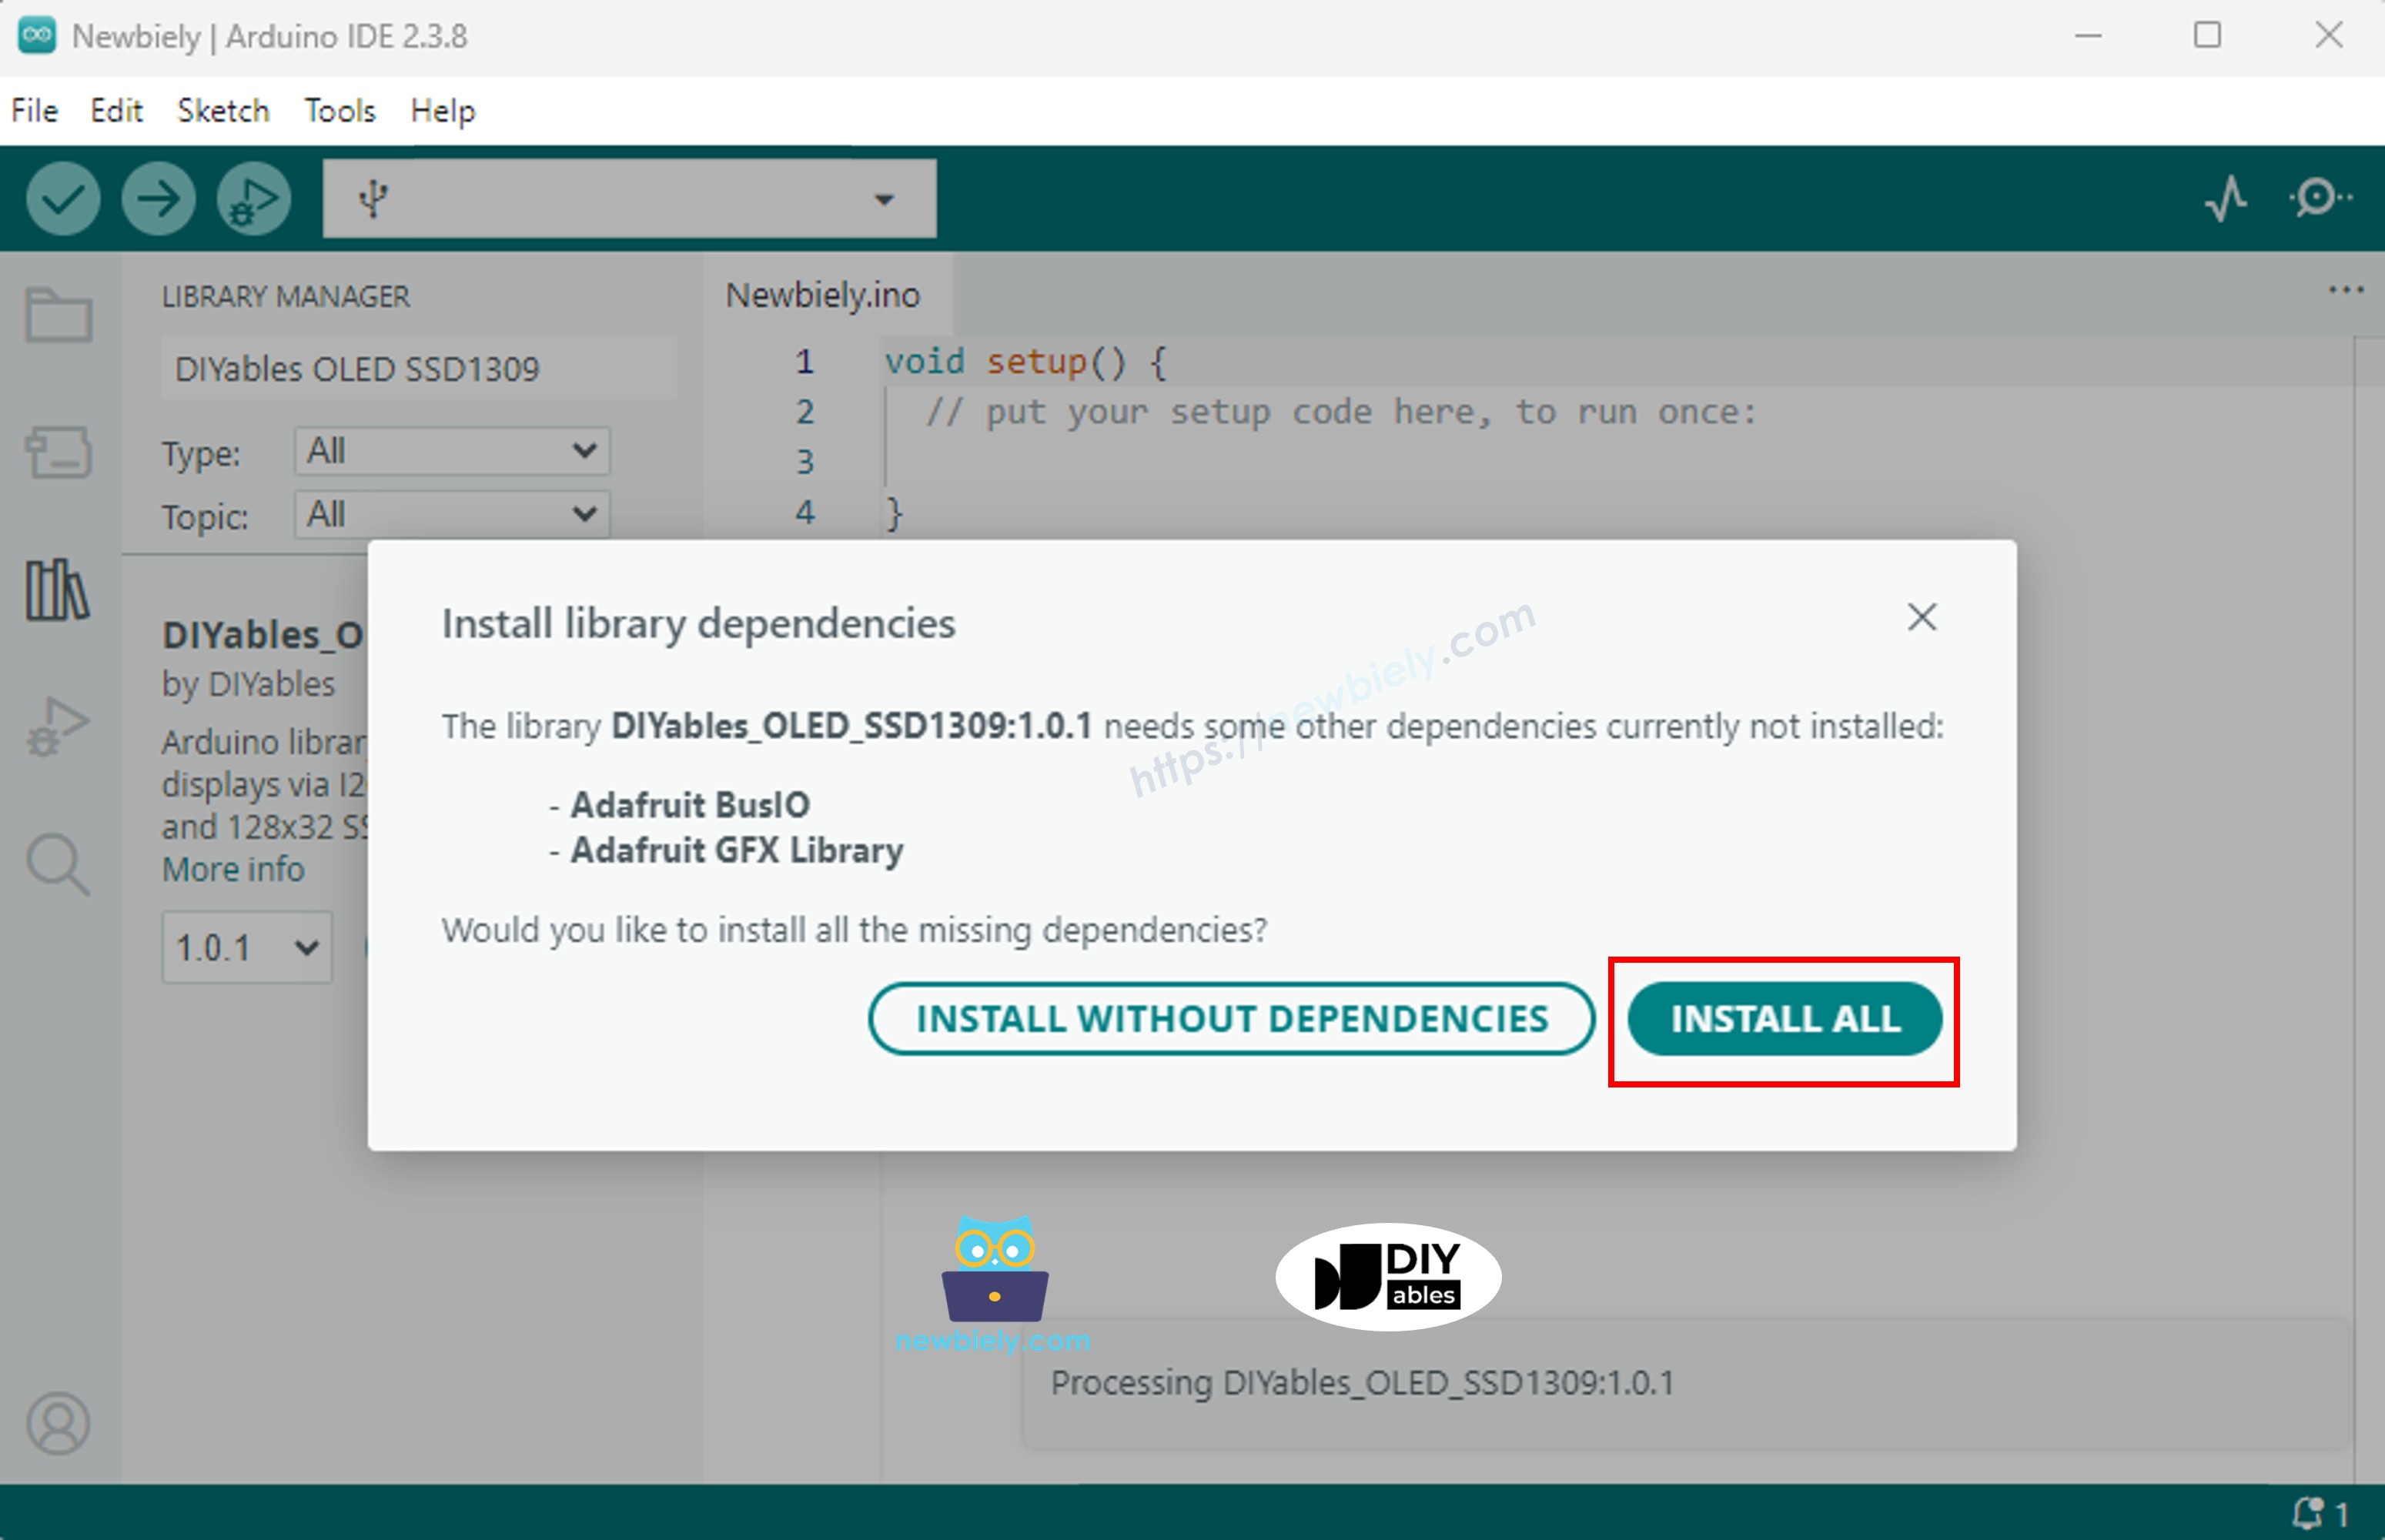
  • U wordt gevraagd om afhankelijkheden te installeren.
  • Installeer alle afhankelijkheden door te klikken op de Install All knop.
Arduino Nano Adafruit GFX bibliotheek

Programmeerstappen

  1. Include de benodigde bibliotheken
#include <Wire.h> #include <Adafruit_GFX.h> #include <DIYables_OLED_SSD1309.h>
  1. Definieer de schermafmetingen
#define SCREEN_WIDTH 128 #define SCREEN_HEIGHT 64
  1. Declareer het display-object
#define OLED_RESET -1 // Reset-pin wordt meestal niet gebruikt op I2C-modules #define SCREEN_ADDRESS 0x3C DIYables_OLED_SSD1309 display(SCREEN_WIDTH, SCREEN_HEIGHT, &Wire, OLED_RESET);
  1. Initialiseer de OLED in setup()
if (!display.begin(SSD1309_SWITCHCAPVCC, SCREEN_ADDRESS)) { Serial.println(F("SSD1309 allocatie mislukt")); for (;;); // stop }
  1. Toon content
display.clearDisplay(); display.setTextSize(2); display.setTextColor(SSD1309_PIXEL_ON); display.setCursor(0, 20); display.println(F("Hello Nano")); display.display(); // stuur buffer naar scherm

Arduino Nano Code — Hello World op SSD1309 OLED

Het eenvoudigste beginpunt: een paar regels tekst tonen in verschillende groottes.

/* * Deze Arduino Nano code is ontwikkeld door newbiely.nl * Deze Arduino Nano code wordt zonder enige beperking aan het publiek beschikbaar gesteld. * Voor volledige instructies en schema's, bezoek: * https://newbiely.nl/tutorials/arduino-nano/arduino-nano-ssd1309-oled-display */ /* * DIYables OLED SSD1309 – Hello World * Prints text in two sizes on the 2.42 inch 128x64 I2C OLED with Arduino Nano. */ #include <Wire.h> #include <Adafruit_GFX.h> #include <DIYables_OLED_SSD1309.h> #define SCREEN_WIDTH 128 #define SCREEN_HEIGHT 64 #define OLED_RESET -1 #define SCREEN_ADDRESS 0x3C DIYables_OLED_SSD1309 display(SCREEN_WIDTH, SCREEN_HEIGHT, &Wire, OLED_RESET); void setup() { Serial.begin(9600); if (!display.begin(SSD1309_SWITCHCAPVCC, SCREEN_ADDRESS)) { Serial.println(F("SSD1309 allocation failed")); for (;;); } display.clearDisplay(); display.setTextSize(1); // 6x8 pixels per character display.setTextColor(SSD1309_PIXEL_ON); // turn pixels on display.setCursor(0, 0); display.println(F("Hello, World!")); display.println(); display.setTextSize(2); // 12x16 pixels per character display.println(F("DIYables")); display.setTextSize(1); display.println(); display.println(F("SSD1309 OLED 128x64")); display.display(); // push buffer to screen } void loop() { }

Arduino Nano Code — Tekst Weergeven op SSD1309 OLED

Het volgende voorbeeld toont uitgebreidere tekstmogelijkheden — meerdere groottes, getalnotatie en het F() macro om RAM te besparen.

/* * Deze Arduino Nano code is ontwikkeld door newbiely.nl * Deze Arduino Nano code wordt zonder enige beperking aan het publiek beschikbaar gesteld. * Voor volledige instructies en schema's, bezoek: * https://newbiely.nl/tutorials/arduino-nano/arduino-nano-ssd1309-oled-display */ /* * DIYables OLED SSD1309 – Display Text * Displays text in various sizes and formats on the 2.42" SSD1309 OLED with Arduino Nano. */ #include <Wire.h> #include <Adafruit_GFX.h> #include <DIYables_OLED_SSD1309.h> #define SCREEN_WIDTH 128 #define SCREEN_HEIGHT 64 #define OLED_RESET -1 #define SCREEN_ADDRESS 0x3C DIYables_OLED_SSD1309 display(SCREEN_WIDTH, SCREEN_HEIGHT, &Wire, OLED_RESET); void setup() { Serial.begin(9600); if (!display.begin(SSD1309_SWITCHCAPVCC, SCREEN_ADDRESS)) { Serial.println(F("SSD1309 allocation failed")); for (;;); } display.clearDisplay(); // Various text sizes display.setTextSize(1); display.setTextColor(SSD1309_PIXEL_ON); display.setCursor(0, 0); display.println(F("Size 1 - DIYables")); display.setTextSize(2); display.println(F("Size 2")); display.setTextSize(3); display.println(F("Sz3")); display.display(); delay(3000); // Number formatting display.clearDisplay(); display.setTextSize(1); display.setCursor(0, 0); int value = 42; float pi = 3.14159; display.print(F("Integer: ")); display.println(value); display.print(F("Float: ")); display.println(pi, 2); // 2 decimal places display.print(F("Hex: 0x")); display.println(value, HEX); display.print(F("Binary: 0b")); display.println(value, BIN); display.display(); } void loop() { }

Handige Display Functies Referentie

Hieronder een snelle referentielijst van de meest gebruikte functies bij het werken met de SSD1309 OLED via de DIYables bibliotheek:

  • oled.clearDisplay() — wist de frame buffer (alle pixels uit).
  • oled.display() — stuurt de buffer naar de OLED zodat wijzigingen zichtbaar worden.
  • oled.drawPixel(x, y, color) — zet of wist een individuele pixel.
  • oled.setTextSize(n) — schaalt het lettertype met factor *n* (1 = 6×8, 2 = 12×16, …, tot 8).
  • oled.setCursor(x, y) — verplaatst de tekstcursor naar pixelcoördinaten *(x, y)*.
  • oled.setTextColor(SSD1309_PIXEL_ON) — tekst met alleen een voorgrondkleur (achtergrond is transparant).
  • oled.setTextColor(SSD1309_PIXEL_OFF, SSD1309_PIXEL_ON) — tekst met expliciete achtergrondkleur.
  • oled.println("message") — print een string en gaat naar de volgende regel.
  • oled.println(number) — print een geheel getal in decimaal.
  • oled.println(number, HEX) — print een geheel getal in hexadecimaal.
  • oled.startscrollright(start, stop) — hardware scroll naar rechts tussen pagina *start* en *stop*.
  • oled.startscrollleft(start, stop) — hardware scroll naar links.
  • oled.startscrolldiagright(start, stop) — hardware scroll diagonaal naar rechts.
  • oled.startscrolldiagleft(start, stop) — hardware scroll diagonaal naar links.
  • oled.stopscroll() — stopt actieve hardware-scroll.
  • oled.setContrast(value) — stelt de helderheid van het display in (0–255).
  • oled.dim(true/false) — dimt snel het display tot minimum of herstelt het vorige contrastniveau.
  • oled.invertDisplay(true/false) — hardwarekleurinvertie (aan pixels ↔ uit pixels).

Tekst Verticaal en Horizontaal Centreren op de SSD1309 OLED

Zie Hoe tekst verticaal/horizontaal centreren op OLED

Arduino Nano Code — Vormen Tekenen op SSD1309 OLED

Omdat de DIYables_OLED_SSD1309 bibliotheek Adafruit_GFX uitbreidt, krijgt u een compleet pakket aan vormtekenfuncties: pixels, lijnen, rechthoeken, gevulde rechthoeken, cirkels, gevulde cirkels, driehoeken, gevulde driehoeken en afgeronde rechthoeken. Onderstaand sketch toont ze allemaal in een animatie.

/* * Deze Arduino Nano code is ontwikkeld door newbiely.nl * Deze Arduino Nano code wordt zonder enige beperking aan het publiek beschikbaar gesteld. * Voor volledige instructies en schema's, bezoek: * https://newbiely.nl/tutorials/arduino-nano/arduino-nano-ssd1309-oled-display */ /* * DIYables OLED SSD1309 – Draw Shapes * Demonstrates drawing pixels, lines, rectangles, circles, and triangles on the 2.42" OLED with Arduino Nano. */ #include <Wire.h> #include <Adafruit_GFX.h> #include <DIYables_OLED_SSD1309.h> #define SCREEN_WIDTH 128 #define SCREEN_HEIGHT 64 #define OLED_RESET -1 #define SCREEN_ADDRESS 0x3C DIYables_OLED_SSD1309 display(SCREEN_WIDTH, SCREEN_HEIGHT, &Wire, OLED_RESET); void setup() { Serial.begin(9600); if (!display.begin(SSD1309_SWITCHCAPVCC, SCREEN_ADDRESS)) { Serial.println(F("SSD1309 allocation failed")); for (;;); } display.clearDisplay(); display.display(); } void loop() { // Draw pixels display.clearDisplay(); for (int i = 0; i < 20; i++) { display.drawPixel(random(SCREEN_WIDTH), random(SCREEN_HEIGHT), SSD1309_PIXEL_ON); } display.display(); delay(2000); // Draw lines display.clearDisplay(); for (int y = 0; y < SCREEN_HEIGHT; y += 8) { display.drawLine(0, 0, SCREEN_WIDTH - 1, y, SSD1309_PIXEL_ON); } display.display(); delay(2000); // Draw rectangles display.clearDisplay(); display.drawRect(10, 10, 40, 30, SSD1309_PIXEL_ON); // outline display.fillRect(60, 10, 40, 30, SSD1309_PIXEL_ON); // filled display.drawRoundRect(10, 45, 40, 15, 5, SSD1309_PIXEL_ON); // rounded corners display.display(); delay(2000); // Draw circles display.clearDisplay(); display.drawCircle(32, 32, 20, SSD1309_PIXEL_ON); // outline display.fillCircle(96, 32, 20, SSD1309_PIXEL_ON); // filled display.display(); delay(2000); // Draw triangles display.clearDisplay(); display.drawTriangle(20, 10, 10, 50, 30, 50, SSD1309_PIXEL_ON); // outline display.fillTriangle(90, 10, 70, 50, 110, 50, SSD1309_PIXEL_ON); // filled display.display(); delay(2000); }

Arduino Nano Code — Hardware Scrollen op SSD1309 OLED

De SSD1309 heeft een ingebouwde scroll engine die de inhoud van het scherm verschuift zonder CPU-belasting. De DIYables bibliotheek biedt vier scrollrichtingen: rechts, links, diagonaal naar rechts en diagonaal naar links. Elke functie neemt een start- en stop-pagina parameter (pagina’s zijn horizontale stroken van 8 pixels hoog, genummerd 0–7 op dit 64-pixel-tall display).

※ Notiz:

Roep altijd display() aan om de content naar de OLED te sturen voordat u scrollen start. Vermijd het tekenen van nieuwe content tijdens het scrollen — roep eerst stopscroll() aan.

/* * Deze Arduino Nano code is ontwikkeld door newbiely.nl * Deze Arduino Nano code wordt zonder enige beperking aan het publiek beschikbaar gesteld. * Voor volledige instructies en schema's, bezoek: * https://newbiely.nl/tutorials/arduino-nano/arduino-nano-ssd1309-oled-display */ /* * DIYables OLED SSD1309 – Scroll Text * Demonstrates all four hardware scroll directions on the 2.42" OLED with Arduino Nano. */ #include <Wire.h> #include <Adafruit_GFX.h> #include <DIYables_OLED_SSD1309.h> #define SCREEN_WIDTH 128 #define SCREEN_HEIGHT 64 #define OLED_RESET -1 #define SCREEN_ADDRESS 0x3C DIYables_OLED_SSD1309 display(SCREEN_WIDTH, SCREEN_HEIGHT, &Wire, OLED_RESET); void setup() { Serial.begin(9600); if (!display.begin(SSD1309_SWITCHCAPVCC, SCREEN_ADDRESS)) { Serial.println(F("SSD1309 allocation failed")); for (;;); } display.clearDisplay(); display.setTextSize(2); display.setTextColor(SSD1309_PIXEL_ON); display.setCursor(10, 24); display.println(F("DIYables")); display.display(); delay(2000); } void loop() { // Scroll right across all pages display.startscrollright(0x00, 0x07); delay(3000); display.stopscroll(); delay(500); // Scroll left display.startscrollleft(0x00, 0x07); delay(3000); display.stopscroll(); delay(500); // Diagonal scroll right display.startscrolldiagright(0x00, 0x07); delay(3000); display.stopscroll(); delay(500); // Diagonal scroll left display.startscrolldiagleft(0x00, 0x07); delay(3000); display.stopscroll(); delay(500); }

Arduino Nano Code — Bitmap Afbeelding Tonen op SSD1309 OLED

Om een bitmap op de SSD1309 OLED te tonen moet u eerst uw afbeelding converteren naar een C-byte-array. Gebruik hiervoor de gratis image2cpp online tool:

  1. Upload uw afbeelding (PNG, JPG, BMP, etc.).
  2. Stel het canvasformaat in op 128×64 (of kleiner).
  3. Kies Arduino code als uitvoerformaat.
  4. Kopieer de gegenereerde array in uw sketch.
image to bitmap array

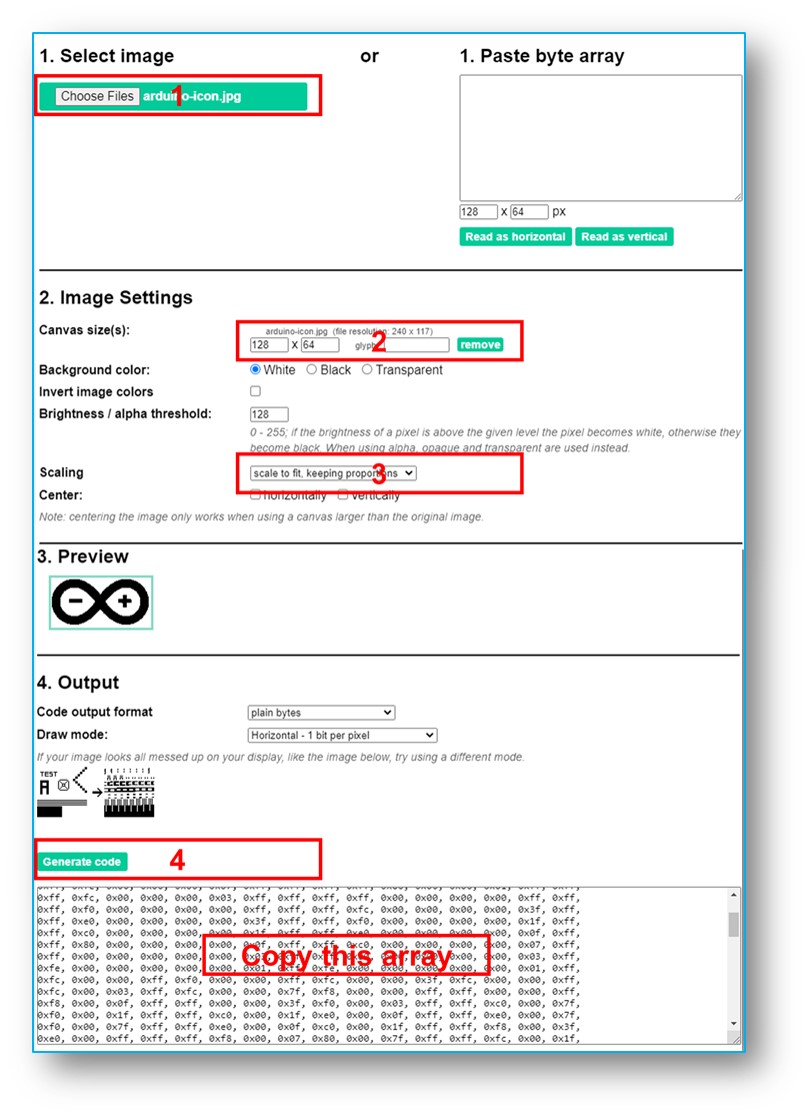
Het onderstaande voorbeeld wisselt af tussen een 16×16 hart-icoontje en een logo van DIYables over de volle breedte:

/* * Deze Arduino Nano code is ontwikkeld door newbiely.nl * Deze Arduino Nano code wordt zonder enige beperking aan het publiek beschikbaar gesteld. * Voor volledige instructies en schema's, bezoek: * https://newbiely.nl/tutorials/arduino-nano/arduino-nano-ssd1309-oled-display */ /* * DIYables OLED SSD1309 – Display Bitmap Image * Shows a 16x16 heart icon and 128x64 DIYables logo on the 2.42" OLED with Arduino Nano. */ #include <Wire.h> #include <Adafruit_GFX.h> #include <DIYables_OLED_SSD1309.h> #define SCREEN_WIDTH 128 #define SCREEN_HEIGHT 64 #define OLED_RESET -1 #define SCREEN_ADDRESS 0x3C DIYables_OLED_SSD1309 display(SCREEN_WIDTH, SCREEN_HEIGHT, &Wire, OLED_RESET); // 16x16 heart icon bitmap const unsigned char heart_icon[] PROGMEM = { 0x00, 0x00, 0x0c, 0x30, 0x1e, 0x78, 0x3f, 0xfc, 0x7f, 0xfe, 0xff, 0xff, 0xff, 0xff, 0xff, 0xff, 0xff, 0xff, 0xff, 0xff, 0x7f, 0xfe, 0x3f, 0xfc, 0x1f, 0xf8, 0x0f, 0xf0, 0x03, 0xc0, 0x00, 0x00 }; // 128x64 DIYables logo bitmap const unsigned char diyables_logo[] PROGMEM = { 0xff, 0xff, 0xff, 0xff, 0xff, 0xff, 0xff, 0xff, 0xff, 0xff, 0xff, 0xff, 0xff, 0xff, 0xff, 0xff, 0xff, 0xff, 0xff, 0xff, 0xff, 0xff, 0xff, 0xff, 0xff, 0xff, 0xff, 0xff, 0xff, 0xff, 0xff, 0xff, 0xff, 0xff, 0xff, 0xff, 0xff, 0xff, 0xff, 0xff, 0xff, 0xff, 0xff, 0xff, 0xff, 0xff, 0xff, 0xff, 0xff, 0xff, 0xff, 0xff, 0xff, 0xff, 0xff, 0xff, 0xff, 0xff, 0xff, 0xff, 0xff, 0xff, 0xff, 0xff, 0xff, 0xff, 0xff, 0xff, 0xff, 0xff, 0xff, 0xff, 0xff, 0xff, 0xff, 0xff, 0xff, 0xff, 0xff, 0xff, 0xff, 0xff, 0xff, 0xff, 0xff, 0xff, 0xff, 0xff, 0xff, 0xff, 0xff, 0xff, 0xff, 0xff, 0xff, 0xff, 0xff, 0xff, 0xff, 0xff, 0xff, 0xff, 0xff, 0xff, 0xff, 0xff, 0xff, 0xff, 0xff, 0xff, 0xff, 0xff, 0xff, 0xff, 0xff, 0xff, 0xff, 0xff, 0xff, 0xff, 0xff, 0xff, 0xff, 0xff, 0xff, 0xff, 0xff, 0xff, 0xff, 0xff, 0xff, 0xff, 0xff, 0xff, 0xff, 0xff, 0xff, 0xff, 0xff, 0xff, 0xff, 0xff, 0xff, 0xff, 0xff, 0xff, 0xff, 0xff, 0xff, 0xff, 0xff, 0xff, 0xff, 0xff, 0xff, 0xff, 0xff, 0xff, 0xff, 0xff, 0xff, 0xff, 0xff, 0xff, 0xff, 0xff, 0xff, 0xff, 0xff, 0xff, 0xff, 0xff, 0xff, 0xff, 0xff, 0xff, 0xff, 0xff, 0xff, 0xff, 0xff, 0xff, 0xff, 0xff, 0xff, 0xff, 0xff, 0xff, 0xff, 0xff, 0xff, 0xff, 0xff, 0xff, 0xff, 0xff, 0xff, 0xff, 0xff, 0xff, 0xff, 0xff, 0xff, 0xff, 0xff, 0xff, 0xff, 0xff, 0xff, 0xff, 0xff, 0xff, 0xff, 0xff, 0xff, 0xff, 0xff, 0xff, 0xff, 0xff, 0xff, 0xff, 0xff, 0xff, 0xff, 0xff, 0xff, 0xff, 0xff, 0xff, 0xff, 0xff, 0xff, 0xff, 0xff, 0xff, 0xff, 0xff, 0xff, 0xff, 0xff, 0xff, 0xff, 0xff, 0xff, 0xff, 0xff, 0xff, 0xff, 0xff, 0xff, 0xff, 0xff, 0xff, 0xff, 0xff, 0xff, 0xff, 0xff, 0xf0, 0x00, 0x00, 0x00, 0x00, 0x00, 0x00, 0x00, 0x00, 0x00, 0x00, 0x0f, 0xff, 0xff, 0xff, 0xff, 0x80, 0x00, 0x00, 0x00, 0x00, 0x00, 0x00, 0x00, 0x00, 0x00, 0x00, 0x01, 0xff, 0xff, 0xff, 0xff, 0x00, 0x00, 0x00, 0x00, 0x00, 0x00, 0x00, 0x00, 0x00, 0x00, 0x00, 0x00, 0xff, 0xff, 0xff, 0xfe, 0x00, 0x07, 0xff, 0xc1, 0xff, 0xe0, 0x7f, 0xf0, 0x1f, 0xfc, 0x03, 0x00, 0x7f, 0xff, 0xff, 0xfc, 0x00, 0x1f, 0xff, 0xf7, 0xff, 0xf9, 0xff, 0xfc, 0x7f, 0xff, 0x0f, 0x80, 0x3f, 0xff, 0xff, 0xf8, 0x00, 0x3f, 0xff, 0xff, 0xff, 0xfd, 0xff, 0xfe, 0xff, 0xff, 0x9f, 0xc0, 0x1f, 0xff, 0xff, 0xf8, 0x00, 0x7f, 0x80, 0xff, 0x00, 0x7f, 0xc0, 0x3f, 0xf0, 0x0f, 0xfc, 0x00, 0x1f, 0xff, 0xff, 0xf0, 0x00, 0xfe, 0x00, 0x7f, 0x00, 0x3f, 0x80, 0x1f, 0xe0, 0x07, 0xf8, 0x00, 0x0f, 0xff, 0xff, 0xe0, 0x01, 0xfc, 0x00, 0x3e, 0x00, 0x1f, 0x00, 0x0f, 0xc0, 0x03, 0xf0, 0x00, 0x0f, 0xff, 0xff, 0xe0, 0x03, 0xf8, 0x00, 0x3e, 0x00, 0x1f, 0x00, 0x0f, 0xc0, 0x03, 0xf0, 0x00, 0x07, 0xff, 0xff, 0xc0, 0x07, 0xf8, 0x00, 0x3e, 0x00, 0x1f, 0x00, 0x0f, 0xc0, 0x03, 0xf0, 0x00, 0x03, 0xff, 0xff, 0xc0, 0x0f, 0xf8, 0x00, 0x3e, 0x00, 0x1f, 0x00, 0x0f, 0xc0, 0x03, 0xf0, 0x00, 0x03, 0xff, 0xff, 0x80, 0x0f, 0xf8, 0x00, 0x3e, 0x00, 0x1f, 0x00, 0x0f, 0xc0, 0x03, 0xf0, 0x00, 0x01, 0xff, 0xff, 0x80, 0x1f, 0xf8, 0x00, 0x3e, 0x00, 0x1f, 0x00, 0x0f, 0xc0, 0x03, 0xf0, 0x00, 0x01, 0xff, 0xff, 0x00, 0x3f, 0xf8, 0x00, 0x3e, 0x00, 0x1f, 0x00, 0x0f, 0xc0, 0x03, 0xf0, 0x00, 0x00, 0xff, 0xff, 0x00, 0x3f, 0xf8, 0x00, 0x3e, 0x00, 0x1f, 0x00, 0x0f, 0xc0, 0x03, 0xf0, 0x00, 0x00, 0xff, 0xfe, 0x00, 0x7f, 0xf8, 0x00, 0x3e, 0x00, 0x1f, 0x00, 0x0f, 0xc0, 0x03, 0xf0, 0x00, 0x00, 0xff, 0xfe, 0x00, 0x7f, 0xf8, 0x00, 0x3e, 0x00, 0x1f, 0x00, 0x0f, 0xc0, 0x03, 0xf0, 0x00, 0x00, 0xff, 0xfc, 0x00, 0xff, 0xf8, 0x00, 0x3e, 0x00, 0x1f, 0x00, 0x0f, 0xc0, 0x03, 0xf0, 0x00, 0x00, 0xff, 0xfc, 0x00, 0xff, 0xf8, 0x00, 0x3e, 0x00, 0x1f, 0x00, 0x0f, 0xc0, 0x03, 0xf0, 0x00, 0x00, 0xff, 0xfc, 0x01, 0xff, 0xf8, 0x00, 0x3e, 0x00, 0x1f, 0x00, 0x0f, 0xc0, 0x03, 0xf0, 0x00, 0x00, 0xff, 0xf8, 0x01, 0xff, 0xf8, 0x00, 0x3e, 0x00, 0x1f, 0x00, 0x0f, 0xc0, 0x03, 0xf0, 0x00, 0x00, 0xff, 0xf8, 0x03, 0xff, 0xf8, 0x00, 0x3e, 0x00, 0x1f, 0x00, 0x0f, 0xc0, 0x03, 0xf0, 0x00, 0x00, 0xff, 0xf0, 0x03, 0xff, 0xfc, 0x00, 0x7e, 0x00, 0x1f, 0x80, 0x1f, 0xe0, 0x07, 0xf8, 0x00, 0x00, 0xff, 0xf0, 0x07, 0xff, 0x7f, 0x80, 0xff, 0x00, 0x7f, 0xc0, 0x3f, 0xf0, 0x0f, 0xfc, 0x00, 0x00, 0xff, 0xf0, 0x07, 0xfe, 0x3f, 0xff, 0xff, 0xff, 0xfd, 0xff, 0xfe, 0xff, 0xff, 0x9f, 0xc0, 0x00, 0xff, 0xe0, 0x0f, 0xfc, 0x1f, 0xff, 0xf7, 0xff, 0xf9, 0xff, 0xfc, 0x7f, 0xff, 0x0f, 0x80, 0x00, 0xff, 0xe0, 0x0f, 0xf8, 0x07, 0xff, 0xc1, 0xff, 0xe0, 0x7f, 0xf0, 0x1f, 0xfc, 0x03, 0x00, 0x00, 0xff, 0xe0, 0x1f, 0xf0, 0x00, 0x00, 0x00, 0x00, 0x00, 0x00, 0x00, 0x00, 0x00, 0x00, 0x00, 0x00, 0xff, 0xc0, 0x1f, 0xe0, 0x00, 0x00, 0x00, 0x00, 0x00, 0x00, 0x00, 0x00, 0x00, 0x00, 0x00, 0x00, 0xff, 0xc0, 0x3f, 0xc0, 0x00, 0x00, 0x00, 0x00, 0x00, 0x00, 0x00, 0x00, 0x00, 0x00, 0x00, 0x00, 0xff, 0xc0, 0x3f, 0x80, 0x00, 0x00, 0x00, 0x00, 0x00, 0x00, 0x00, 0x00, 0x00, 0x00, 0x00, 0x00, 0xff, 0x80, 0x7f, 0x00, 0xff, 0xff, 0xff, 0xff, 0xff, 0xff, 0xff, 0xff, 0xff, 0xff, 0xff, 0xff, 0xff, 0x80, 0x7f, 0x00, 0xff, 0xff, 0xff, 0xff, 0xff, 0xff, 0xff, 0xff, 0xff, 0xff, 0xff, 0xff, 0xff, 0x80, 0xfe, 0x00, 0xff, 0xff, 0xff, 0xff, 0xff, 0xff, 0xff, 0xff, 0xff, 0xff, 0xff, 0xff, 0xff, 0x00, 0xfc, 0x00, 0xff, 0xff, 0xff, 0xff, 0xff, 0xff, 0xff, 0xff, 0xff, 0xff, 0xff, 0xff, 0xff, 0x01, 0xf8, 0x00, 0xff, 0xff, 0xff, 0xff, 0xff, 0xff, 0xff, 0xff, 0xff, 0xff, 0xff, 0xff, 0xff, 0x01, 0xf0, 0x00, 0xff, 0xff, 0xff, 0xff, 0xff, 0xff, 0xff, 0xff, 0xff, 0xff, 0xff, 0xff, 0xfe, 0x03, 0xe0, 0x00, 0xff, 0xff, 0xff, 0xff, 0xff, 0xff, 0xff, 0xff, 0xff, 0xff, 0xff, 0xff, 0xfe, 0x07, 0xc0, 0x00, 0xff, 0xff, 0xff, 0xff, 0xff, 0xff, 0xff, 0xff, 0xff, 0xff, 0xff, 0xff, 0xfc, 0x0f, 0x80, 0x00, 0xff, 0xff, 0xff, 0xff, 0xff, 0xff, 0xff, 0xff, 0xff, 0xff, 0xff, 0xff, 0xf8, 0x1f, 0x00, 0x00, 0xff, 0xff, 0xff, 0xff, 0xff, 0xff, 0xff, 0xff, 0xff, 0xff, 0xff, 0xff, 0xf0, 0x3e, 0x00, 0x00, 0xff, 0xff, 0xff, 0xff, 0xff, 0xff, 0xff, 0xff, 0xff, 0xff, 0xff, 0xff, 0xe0, 0x7c, 0x00, 0x00, 0xff, 0xff, 0xff, 0xff, 0xff, 0xff, 0xff, 0xff, 0xff, 0xff, 0xff, 0xff, 0xc0, 0xf8, 0x00, 0x00, 0xff, 0xff, 0xff, 0xff, 0xff, 0xff, 0xff, 0xff, 0xff, 0xff, 0xff, 0xff, 0x81, 0xf0, 0x00, 0x00, 0xff, 0xff, 0xff, 0xff, 0xff, 0xff, 0xff, 0xff, 0xff, 0xff, 0xff, 0xff, 0x03, 0xe0, 0x00, 0x00, 0xff, 0xff, 0xff, 0xff, 0xff, 0xff, 0xff, 0xff, 0xff, 0xff, 0xff, 0xff }; void setup() { Serial.begin(9600); if (!display.begin(SSD1309_SWITCHCAPVCC, SCREEN_ADDRESS)) { Serial.println(F("SSD1309 allocation failed")); for (;;); } display.clearDisplay(); display.display(); } void loop() { // Display small heart icon centered display.clearDisplay(); display.drawBitmap((SCREEN_WIDTH - 16) / 2, (SCREEN_HEIGHT - 16) / 2, heart_icon, 16, 16, SSD1309_PIXEL_ON); display.display(); delay(3000); // Display full-screen DIYables logo display.clearDisplay(); display.drawBitmap(0, 0, diyables_logo, SCREEN_WIDTH, SCREEN_HEIGHT, SSD1309_PIXEL_ON); display.display(); delay(3000); // Invert display display.invertDisplay(true); delay(2000); display.invertDisplay(false); delay(1000); }

※ Notiz:

  • De bitmap afmetingen mogen niet groter zijn dan de schermresolutie (128×64 voor het 2.42 inch module).

Arduino Nano Code — Contrast en Dim op SSD1309 OLED

De SSD1309 ondersteunt 256 contrastniveaus (0–255). De DIYables bibliotheek heeft setContrast() voor fijnmazige regeling en dim() voor een snelle schakelaar tussen minimale helderheid en de eerder ingestelde waarde.

/* * Deze Arduino Nano code is ontwikkeld door newbiely.nl * Deze Arduino Nano code wordt zonder enige beperking aan het publiek beschikbaar gesteld. * Voor volledige instructies en schema's, bezoek: * https://newbiely.nl/tutorials/arduino-nano/arduino-nano-ssd1309-oled-display */ /* * DIYables OLED SSD1309 – Contrast & Dim * Sweeps contrast from 0→255→0 then toggles dim mode on the 2.42" OLED with Arduino Nano. */ #include <Wire.h> #include <Adafruit_GFX.h> #include <DIYables_OLED_SSD1309.h> #define SCREEN_WIDTH 128 #define SCREEN_HEIGHT 64 #define OLED_RESET -1 #define SCREEN_ADDRESS 0x3C DIYables_OLED_SSD1309 display(SCREEN_WIDTH, SCREEN_HEIGHT, &Wire, OLED_RESET); void setup() { Serial.begin(9600); if (!display.begin(SSD1309_SWITCHCAPVCC, SCREEN_ADDRESS)) { Serial.println(F("SSD1309 allocation failed")); for (;;); } // Draw a test pattern so the contrast changes are visible display.clearDisplay(); display.fillRect(0, 0, 64, 32, SSD1309_PIXEL_ON); display.fillRect(64, 32, 64, 32, SSD1309_PIXEL_ON); display.setTextSize(1); display.setTextColor(SSD1309_PIXEL_INVERSE); display.setCursor(16, 28); display.println(F("Contrast Demo")); display.display(); delay(2000); } void loop() { // Ramp up for (int c = 0; c <= 255; c += 5) { display.setContrast((uint8_t)c); delay(30); } delay(1000); // Ramp down for (int c = 255; c >= 0; c -= 5) { display.setContrast((uint8_t)c); delay(30); } delay(1000); // Quick dim toggle display.dim(true); // minimum brightness delay(2000); display.dim(false); // restore delay(2000); }

Arduino Nano Code — Aangepaste Externe Lettertypen op SSD1309 OLED

De Adafruit GFX bibliotheek bevat tientallen schaalbare FreeFont lettertypen (Serif, Sans, Mono — elk in Regular, Bold, Italic en vier groottes). U activeert ze op het SSD1309 display door de corresponderende header te includen en setFont() te gebruiken.

※ Notiz:

  • Bij het gebruik van een extern lettertype verwijst de cursor Y-coördinaat naar de tekst basislijn in plaats van de linkerbovenhoek. Dit is anders dan bij het ingebouwde 5×7 lettertype.
  • Externe lettertypen worden opgeslagen in flash (PROGMEM). Op Arduino Nano (32 KB flash) is het verstandig deze spaarzaam te gebruiken.
/* * Deze Arduino Nano code is ontwikkeld door newbiely.nl * Deze Arduino Nano code wordt zonder enige beperking aan het publiek beschikbaar gesteld. * Voor volledige instructies en schema's, bezoek: * https://newbiely.nl/tutorials/arduino-nano/arduino-nano-ssd1309-oled-display */ /* * DIYables OLED SSD1309 – External Fonts * Cycles through three FreeFont typefaces on the 2.42" SSD1309 OLED with Arduino Nano. */ #include <Wire.h> #include <Adafruit_GFX.h> #include <DIYables_OLED_SSD1309.h> #include <Fonts/FreeSerif9pt7b.h> #include <Fonts/FreeSansBold12pt7b.h> #include <Fonts/FreeMono9pt7b.h> #define SCREEN_WIDTH 128 #define SCREEN_HEIGHT 64 #define OLED_RESET -1 #define SCREEN_ADDRESS 0x3C DIYables_OLED_SSD1309 display(SCREEN_WIDTH, SCREEN_HEIGHT, &Wire, OLED_RESET); void setup() { Serial.begin(9600); if (!display.begin(SSD1309_SWITCHCAPVCC, SCREEN_ADDRESS)) { Serial.println(F("SSD1309 allocation failed")); for (;;); } display.clearDisplay(); display.display(); } void loop() { // ── Built-in 5×7 font ── display.clearDisplay(); display.setFont(NULL); display.setTextSize(1); display.setTextColor(SSD1309_PIXEL_ON); display.setCursor(0, 0); display.println(F("Built-in 5x7 font")); display.println(); display.setTextSize(2); display.println(F("DIYables")); display.display(); delay(3000); // ── FreeSerif 9pt ── display.clearDisplay(); display.setFont(&FreeSerif9pt7b); display.setTextSize(1); display.setTextColor(SSD1309_PIXEL_ON); display.setCursor(0, 14); // Y = baseline display.println(F("FreeSerif 9pt")); display.setCursor(0, 38); display.println(F("DIYables OLED")); display.setCursor(0, 58); display.println(F("Hello World!")); display.display(); delay(3000); // ── FreeSansBold 12pt ── display.clearDisplay(); display.setFont(&FreeSansBold12pt7b); display.setTextSize(1); display.setTextColor(SSD1309_PIXEL_ON); display.setCursor(0, 20); display.println(F("SansBold")); display.setCursor(0, 52); display.println(F("DIYables")); display.display(); delay(3000); // ── FreeMono 9pt ── display.clearDisplay(); display.setFont(&FreeMono9pt7b); display.setTextSize(1); display.setTextColor(SSD1309_PIXEL_ON); display.setCursor(0, 14); display.println(F("FreeMono 9pt")); display.setCursor(0, 34); display.println(F("0123456789")); display.setCursor(0, 54); display.println(F("!@#$%^&*()")); display.display(); delay(3000); }

SSD1309 OLED Problemen oplossen met Arduino Nano

Als er na het uploaden van uw sketch niets verschijnt op het 2.42 inch SSD1309 OLED-display, doorloopt u de volgende controles:

  • Controleer de bekabeling — zorg dat SDA, SCL, VCC en GND correct zijn aangesloten op de Arduino Nano pins.
  • Controleer de driver chip — deze bibliotheek is ontworpen voor de SSD1309. Gebruik van een andere controller (zoals SH1106) werkt niet correct.
  • Controleer het I2C-adres — de meeste SSD1309 modules gebruiken standaard 0x3C, maar sommige 0x3D. Gebruik onderstaande I2C scanner sketch om het daadwerkelijke adres te vinden:
// I2C adres scanner — toont elk gevonden apparaat in de Serial Monitor #include <Wire.h> void setup() { Wire.begin(); Serial.begin(9600); Serial.println("I2C Scanner"); } void loop() { byte error, address; int nDevices = 0; Serial.println("Scanning..."); for (address = 1; address < 127; address++) { Wire.beginTransmission(address); error = Wire.endTransmission(); if (error == 0) { Serial.print("I2C device found at address 0x"); if (address < 16) Serial.print("0"); Serial.print(address, HEX); Serial.println(" !"); nDevices++; } else if (error == 4) { Serial.print("Onbekende fout op adres 0x"); if (address < 16) Serial.print("0"); Serial.println(address, HEX); } } if (nDevices == 0) Serial.println("Geen I2C apparaten gevonden"); else Serial.println("klaar"); delay(5000); }

Verwachte output in de Serial Monitor als de SSD1309 wordt gedetecteerd:

COM6
Send
Scanning... I2C device found at address 0x3C ! done
Autoscroll Show timestamp
Clear output
9600 baud  
Newline  
  • Zorg ervoor dat display() wordt aangeroepen — de SSD1309 gebruikt een frame buffer. Tekentaken wijzigen alleen de buffer in RAM totdat oled.display() wordt aangeroepen.
  • Controleer de voeding — het 2.42 inch module trekt meer stroom dan kleinere OLED’s. Zorg dat uw voeding voldoende stroom levert (typisch 20–40 mA bij maximale helderheid).

Video Tutorial

Bekijk onze video-tutorial voor een visuele begeleiding bij dit project! De video biedt extra inzichten en praktische tips om snel aan de slag te gaan met uw SSD1309 OLED display en Arduino Nano.

Afronding

Deze handleiding heeft alle basisprincipes behandeld voor het gebruik van het 2.42-inch SSD1309 OLED display (128×64) met Arduino Nano, waaronder:

  • Hardwareverbindingen en I2C bekabeling
  • Tekst- en cijferweergave in meerdere groottes
  • Vormtekenen (rechthoeken, cirkels, driehoeken)
  • Weergave van bitmapafbeeldingen
  • Hardware scrollen in vier richtingen
  • Contrast- en helderheidsregeling
  • Gebruik van aangepaste externe lettertypen

De DIYables_OLED_SSD1309 bibliotheek maakt het programmeren van de SSD1309 eenvoudiger door hoog-niveau functies aan te bieden voor tekst-, grafiek- en displaycontrole, terwijl het Adafruit GFX gebruikt voor uitgebreide tekenmogelijkheden.

Voor meer Arduino Nano projecten en tutorials, bezoek arduinogetstarted.com

※ ONZE BERICHTEN

  • U bent welkom om de link naar deze tutorial te delen. Gebruik onze inhoud echter niet op andere websites. We hebben veel moeite en tijd gestoken in het maken van de inhoud, respecteer alstublieft ons werk!