Dit leuke project combineert de TCS3200D/TCS230 kleur sensor met een web-gebaseerd Minion karakter. De Arduino UNO R4 WiFi leest kleuren van de sensor en stuurt de gedetecteerde kleur naar een webbrowser via WebSocket. De Minion op de webpagina verandert zijn huidkleur in real-time om overeen te komen met welke kleur u ook voor de sensor houdt! Om het eenvoudig te maken om de webinterface te bouwen en real-time communicatie af te handelen, zullen we de DIYables WebApps library gebruiken.
We bieden ook stap-voor-stap video-instructies onderaan deze handleiding.
Deze afbeelding toont hoe u de TCS3200 kleur sensor met Arduino UNO R4 WiFi verbindt:
| TCS3200 Kleur Sensor | Arduino UNO R4 |
|---|
| VCC | 5V |
| GND | GND |
| S0 | Pin 4 |
| S1 | Pin 3 |
| S2 | Pin 6 |
| S3 | Pin 5 |
| OUT | Pin 7 |
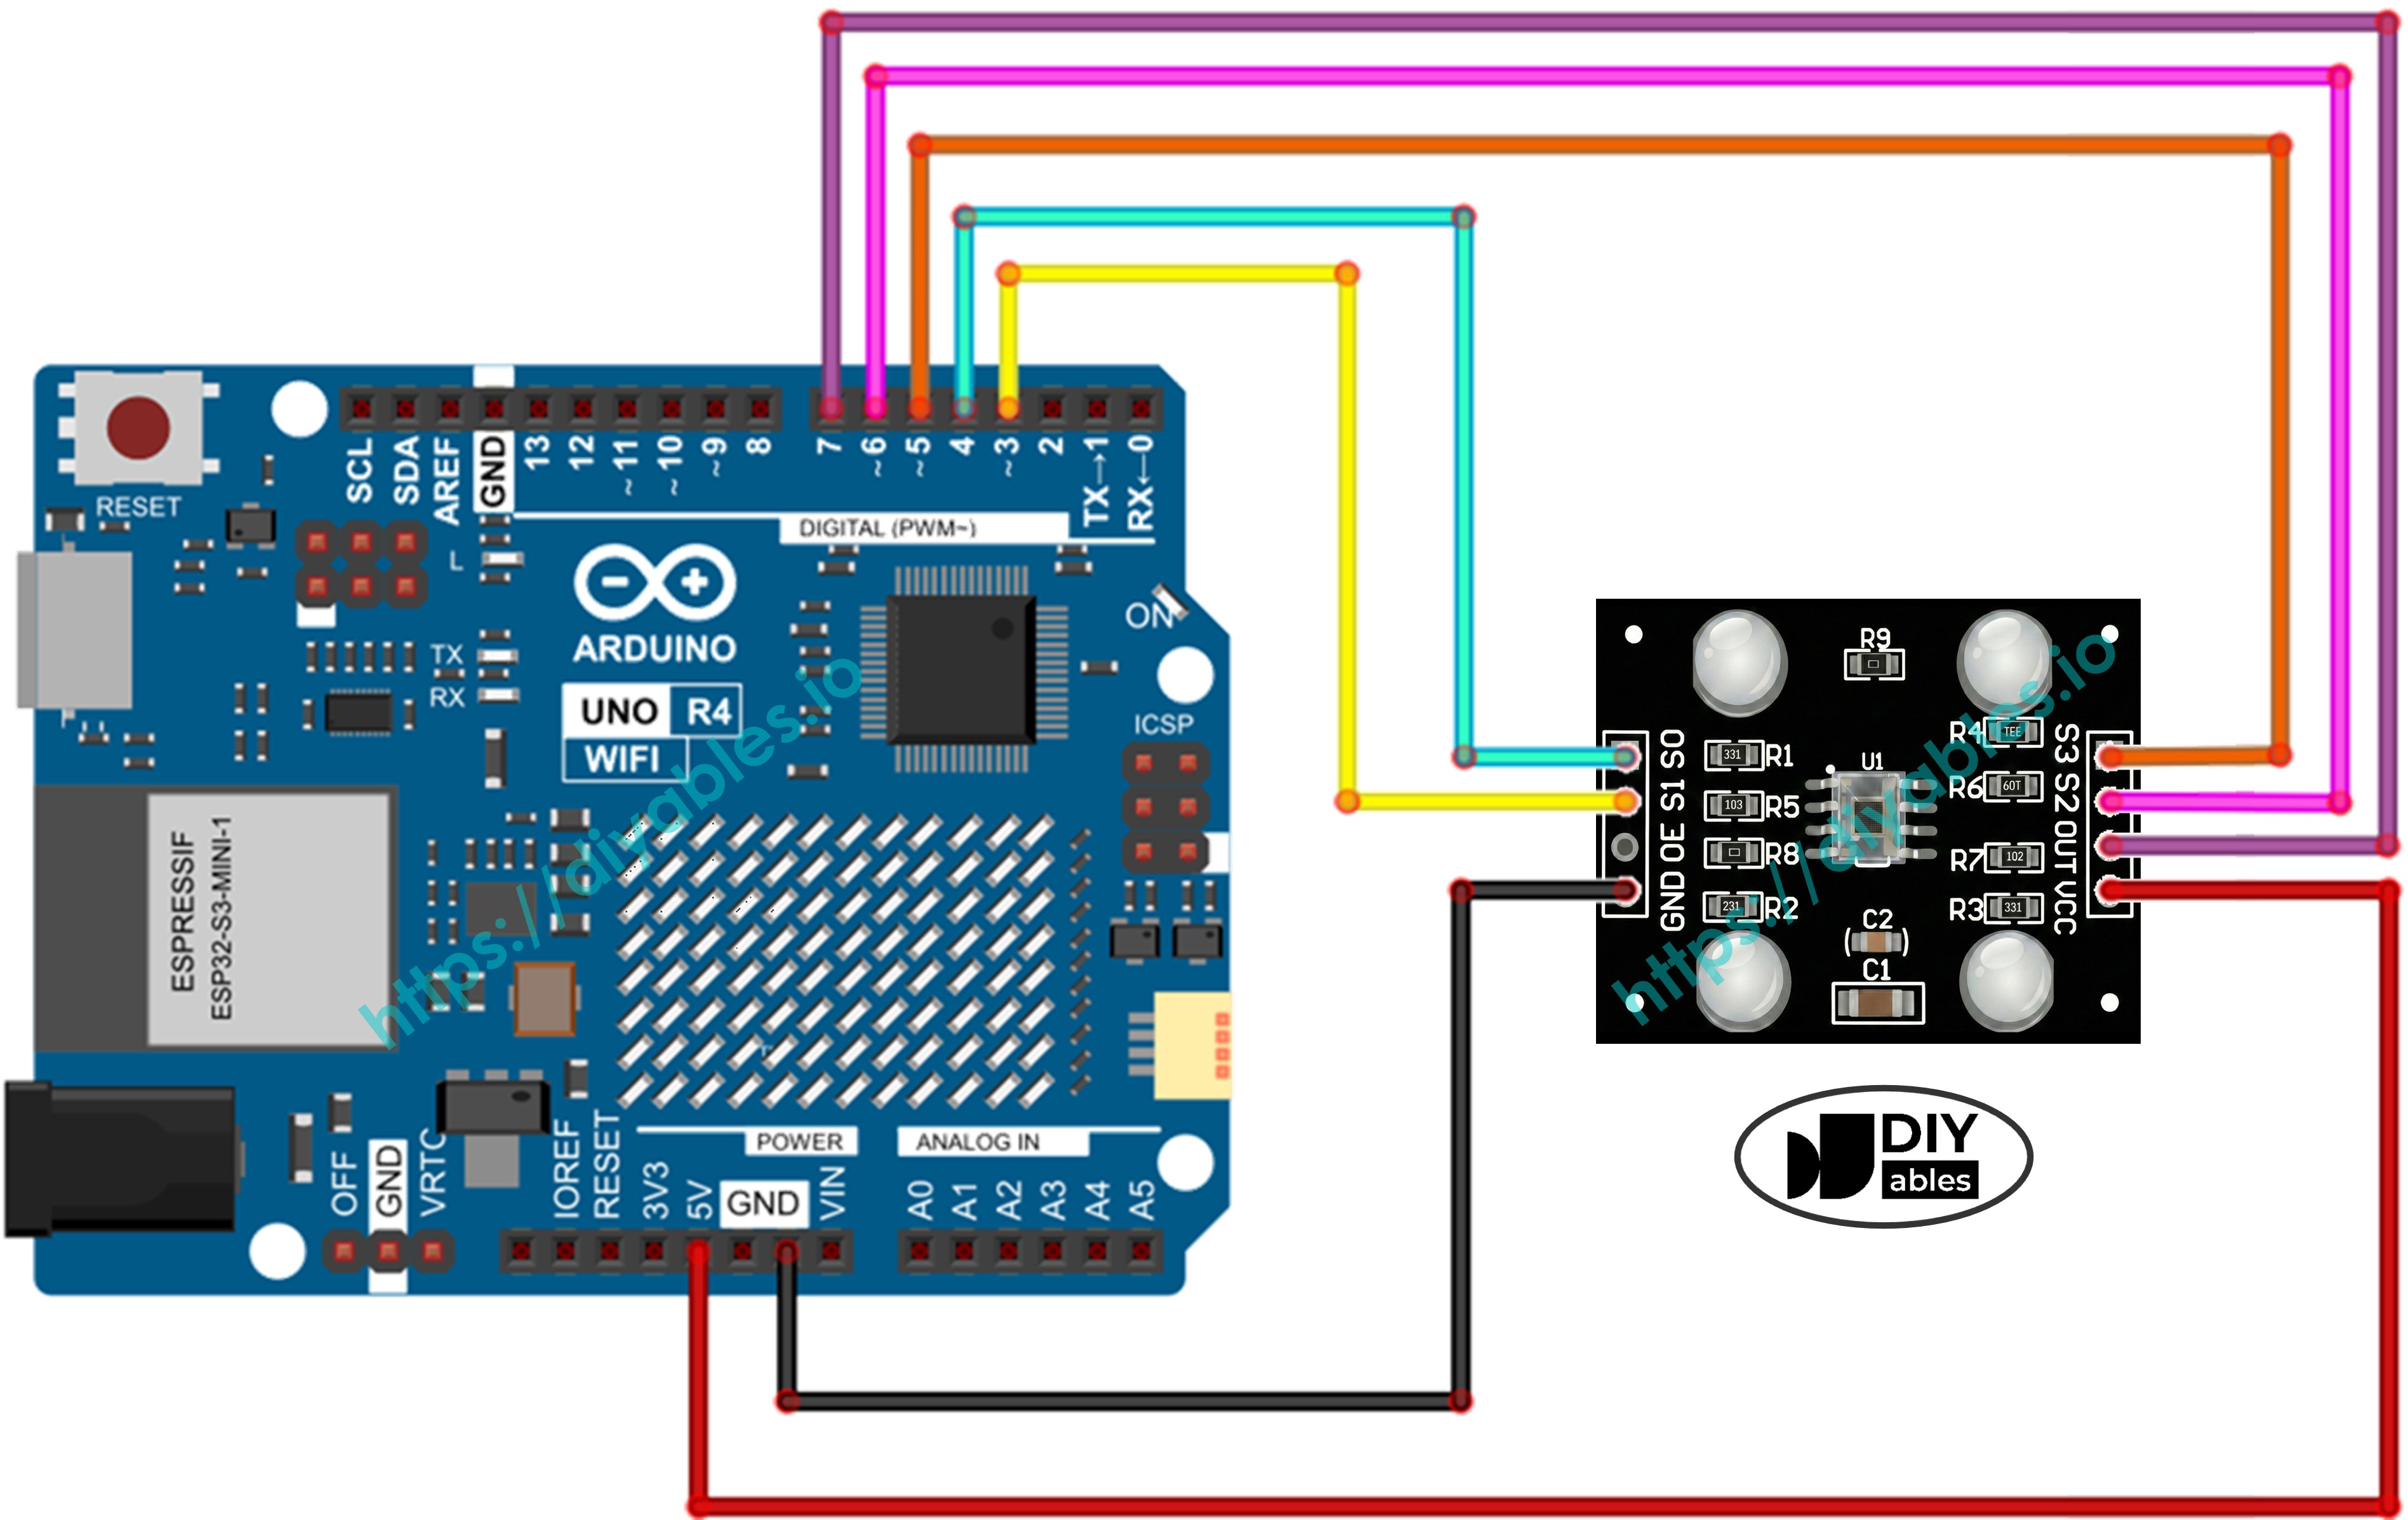
Deze afbeelding is gemaakt met Fritzing. Klik om de afbeelding te vergroten.
Zie De beste manier om Arduino Uno R4 en andere componenten van stroom te voorzien.
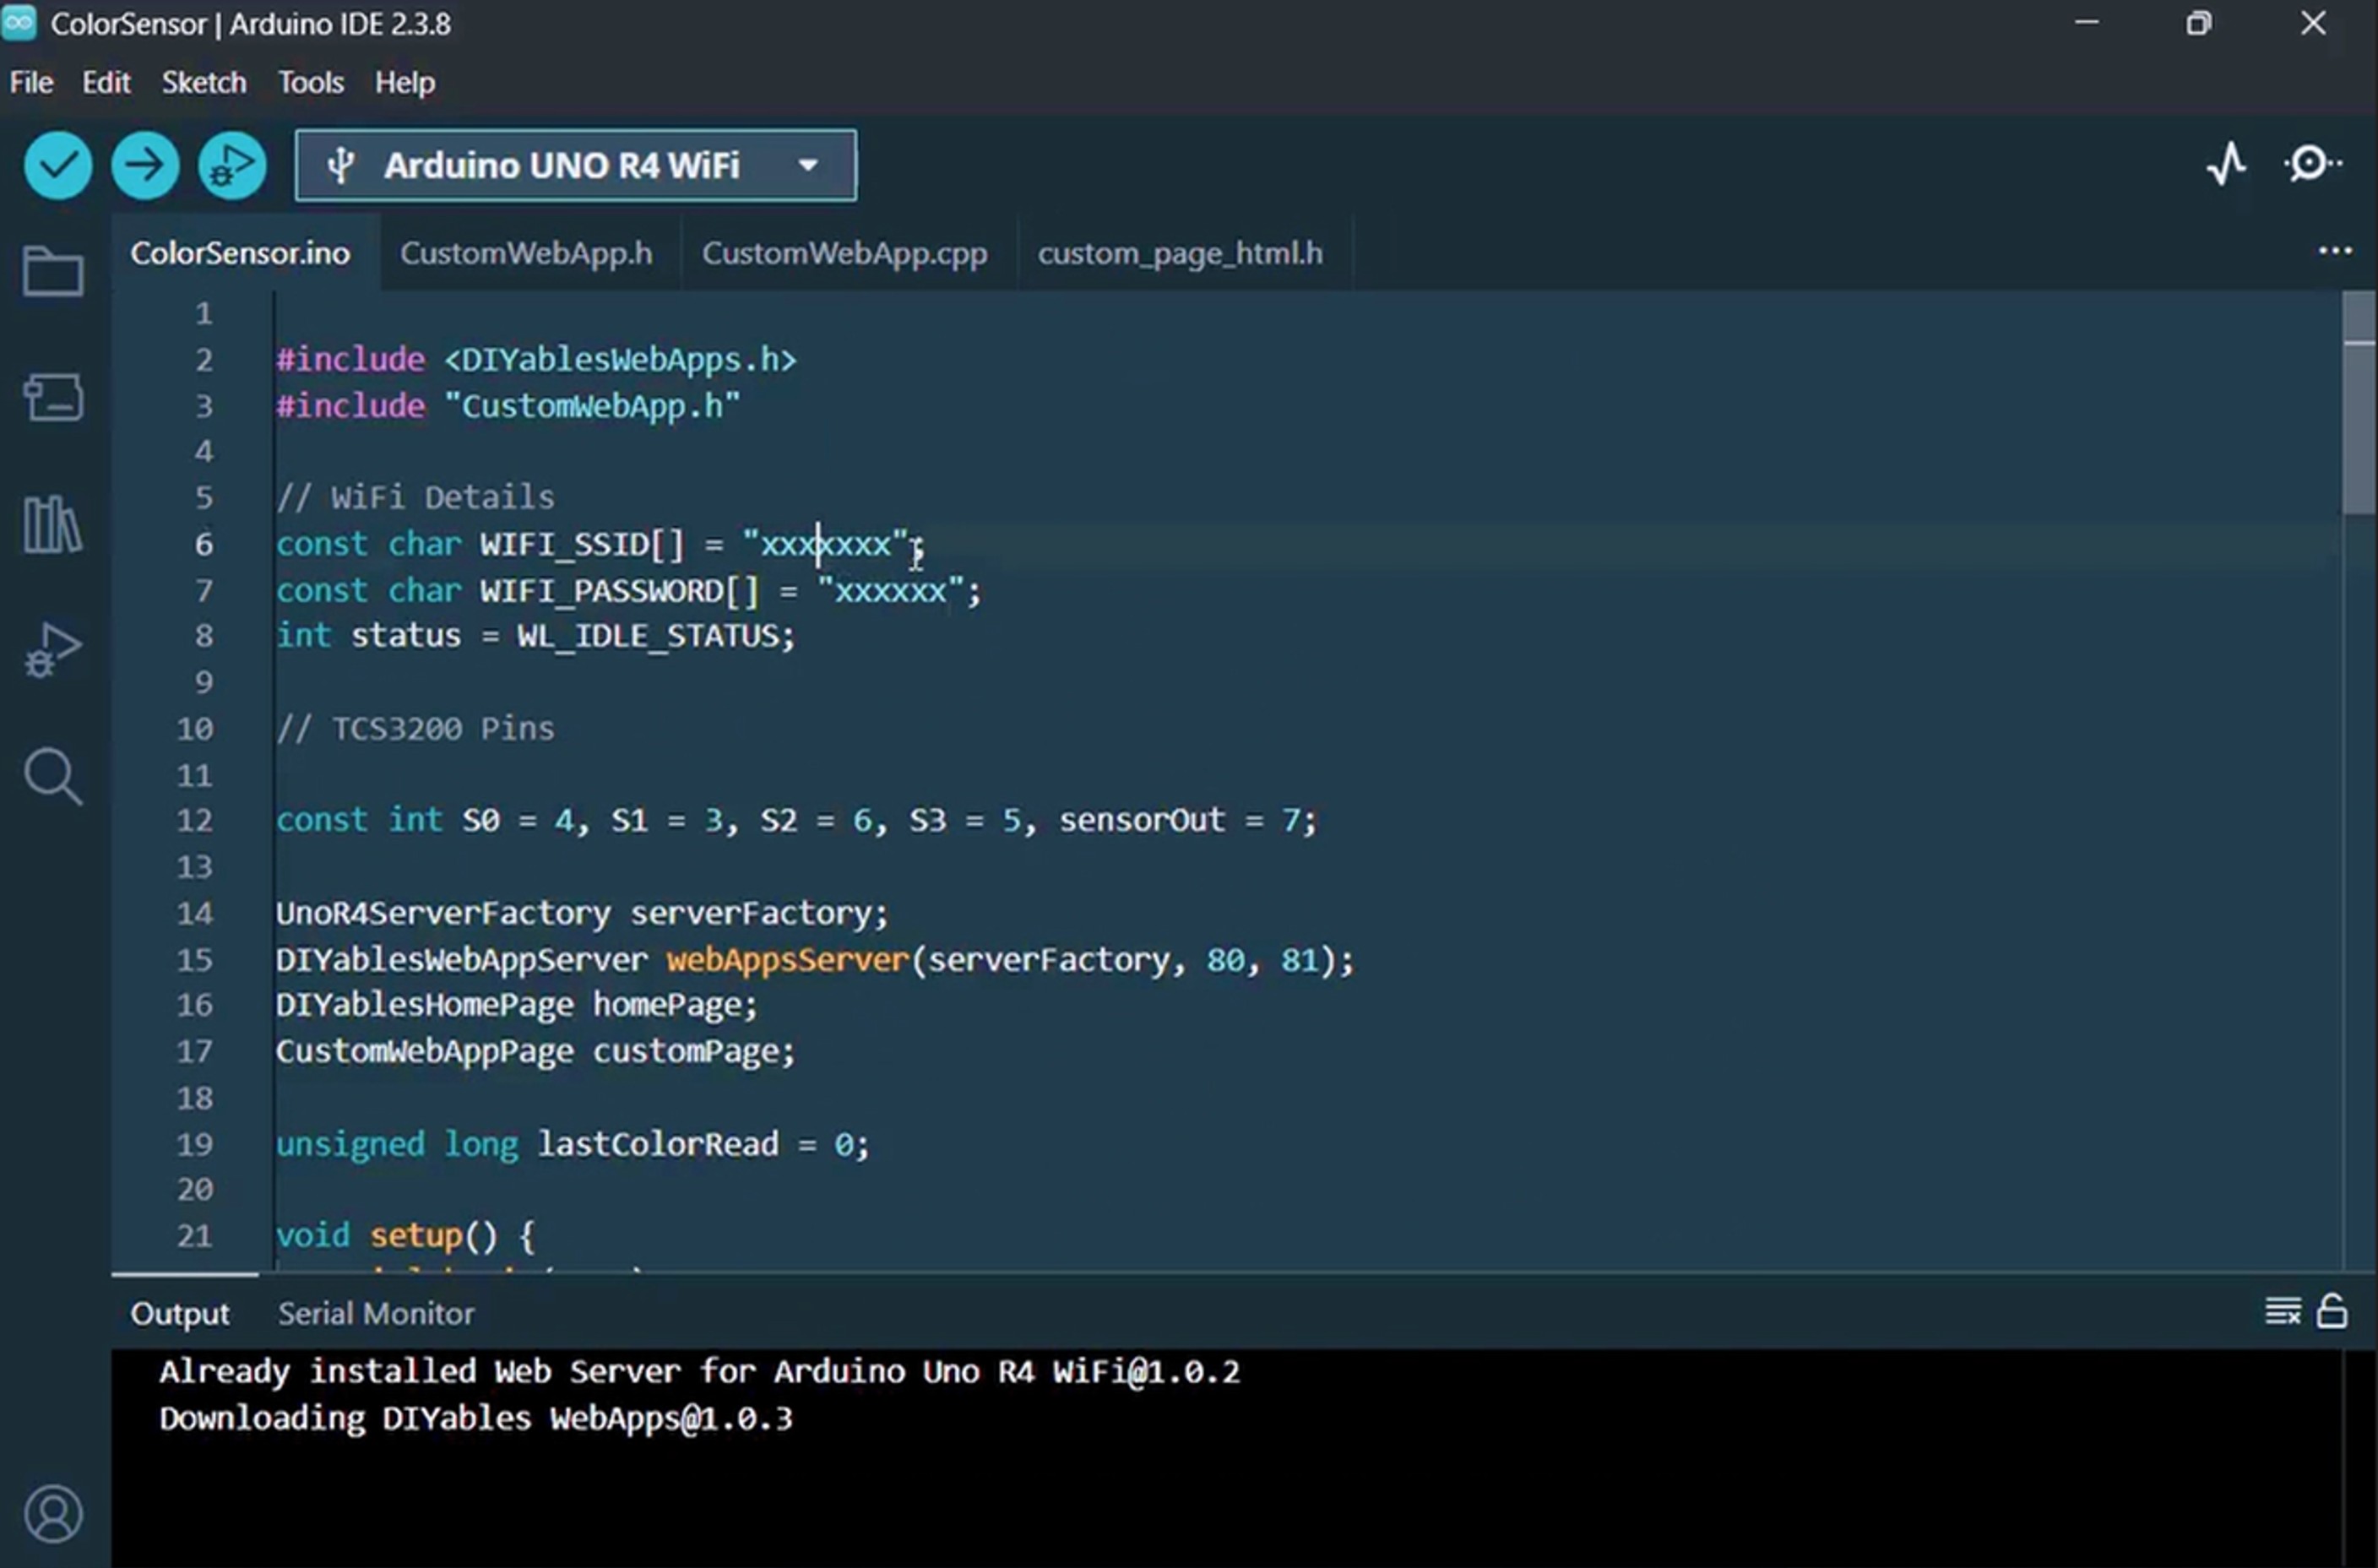
De code bestaat uit 4 bestanden:
ColorSensor.ino - Hoofd Arduino sketch: leest de kleur sensor en stuurt de kleur naar de webpagina
CustomWebApp.h - Header bestand: definieert de aangepaste web app pagina klasse
CustomWebApp.cpp - Implementatie bestand: behandelt WebSocket communicatie met de "Color Sensor:" identifier
custom_page_html.h - Webpagina: bevat de geanimeerde Minion HTML/CSS/JavaScript die kleuren ontvangt en de huid van de Minion bijwerkt
ColorSensor.ino
#include <DIYablesWebApps.h>
#include "CustomWebApp.h"
const char WIFI_SSID[] = "YOUR_WIFI_SSID";
const char WIFI_PASSWORD[] = "YOUR_WIFI_PASSWORD";
int status = WL_IDLE_STATUS;
const int S0 = 4, S1 = 3, S2 = 6, S3 = 5, sensorOut = 7;
UnoR4ServerFactory serverFactory;
DIYablesWebAppServer webAppsServer(serverFactory, 80, 81);
DIYablesHomePage homePage;
CustomWebAppPage customPage;
unsigned long lastColorRead = 0;
void setup() {
Serial.begin(9600);
pinMode(S0, OUTPUT);
pinMode(S1, OUTPUT);
pinMode(S2, OUTPUT);
pinMode(S3, OUTPUT);
pinMode(sensorOut, INPUT);
digitalWrite(S0, HIGH);
digitalWrite(S1, LOW);
webAppsServer.addApp(&homePage);
webAppsServer.addApp(&customPage);
if (WiFi.status() == WL_NO_MODULE) {
Serial.println("Communication with WiFi module failed!");
while (true);
}
String fv = WiFi.firmwareVersion();
if (fv < WIFI_FIRMWARE_LATEST_VERSION) {
Serial.println("Please upgrade the firmware");
}
while (status != WL_CONNECTED) {
status = WiFi.begin(WIFI_SSID, WIFI_PASSWORD);
delay(10000);
}
webAppsServer.begin();
Serial.println("Color Web Server Ready!");
}
void loop() {
webAppsServer.loop();
if (millis() - lastColorRead > 1000) {
digitalWrite(S2, LOW);
digitalWrite(S3, LOW);
int r = map(pulseIn(sensorOut, LOW), 31, 150, 255, 0);
digitalWrite(S2, HIGH);
digitalWrite(S3, HIGH);
int g = map(pulseIn(sensorOut, LOW), 35, 180, 255, 0);
digitalWrite(S2, LOW);
digitalWrite(S3, HIGH);
int b = map(pulseIn(sensorOut, LOW), 30, 150, 255, 0);
char hexColor[8];
sprintf(hexColor, "#%02X%02X%02X", constrain(r, 0, 255), constrain(g, 0, 255), constrain(b, 0, 255));
customPage.sendToWeb(String(hexColor));
Serial.println("Sent to Minion: " + String(hexColor));
lastColorRead = millis();
}
}
CustomWebApp.h
#ifndef CUSTOM_WEBAPP_H
#define CUSTOM_WEBAPP_H
#include <DIYablesWebApps.h>
class CustomWebAppPage : public DIYablesWebAppPageBase {
private:
static const String APP_IDENTIFIER;
public:
CustomWebAppPage();
void handleHTTPRequest(IWebClient& client) override;
void handleWebSocketMessage(IWebSocket& ws, const char* message, uint16_t length) override;
const char* getPageInfo() const override;
String getNavigationInfo() const override;
void onCustomMessageReceived(void (*callback)(const String& payload));
void sendToWeb(const String& message);
};
#endif
CustomWebApp.cpp
#include "CustomWebApp.h"
#include "custom_page_html.h"
const String CustomWebAppPage::APP_IDENTIFIER = "Color Sensor:";
void (*customMessageCallback)(const String& payload) = nullptr;
CustomWebAppPage::CustomWebAppPage() : DIYablesWebAppPageBase("/custom") {
}
void CustomWebAppPage::handleHTTPRequest(IWebClient& client) {
sendHTTPHeader(client);
client.print(CUSTOM_PAGE_HTML);
}
void CustomWebAppPage::handleWebSocketMessage(IWebSocket& ws, const char* message, uint16_t length) {
String messageStr = String(message, length);
Serial.print("Color Sensor WebApp received: ");
Serial.println(messageStr);
if (messageStr.startsWith(APP_IDENTIFIER)) {
String payload = messageStr.substring(APP_IDENTIFIER.length());
if (customMessageCallback) {
customMessageCallback(payload);
}
}
}
void CustomWebAppPage::onCustomMessageReceived(void (*callback)(const String& payload)) {
customMessageCallback = callback;
}
void CustomWebAppPage::sendToWeb(const String& message) {
String fullMessage = APP_IDENTIFIER + message;
broadcastToAllClients(fullMessage.c_str());
}
const char* CustomWebAppPage::getPageInfo() const {
return "🔧 Color Sensor WebApp";
}
String CustomWebAppPage::getNavigationInfo() const {
String result = "<a href=\"";
result += getPagePath();
result += "\" class=\"app-card custom\" style=\"background: linear-gradient(135deg, #007bff 0%, #0056b3 100%);\">";
result += "<h3>🔧 Color Sensor WebApp</h3>";
result += "<p>Simple template for your own apps</p>";
result += "</a>";
return result;
}
custom_page_html.h
#ifndef CUSTOM_PAGE_HTML_H
#define CUSTOM_PAGE_HTML_H
const char CUSTOM_PAGE_HTML[] PROGMEM = R"HTML_WRAPPER(
<!DOCTYPE html>
<html lang="en">
<head>
<meta charset="UTF-8">
<meta name="viewport" content="width=device-width, initial-scale=1.0, maximum-scale=1.0, user-scalable=no">
<title>Mobile Laughing Minion</title>
<style>
body { margin: 0; padding: 20px; box-sizing: border-box; display: flex; flex-direction: column; justify-content: flex-start; align-items: center; background-color: #f0f8ff; font-family: sans-serif; overflow-x: hidden; }
.text { font-size: clamp(16px, 5vw, 24px); font-weight: bold; color: #333; margin-bottom: 20px; text-align: center; z-index: 10; }
.scale-wrapper { transform-origin: top center; display: flex; justify-content: center; align-items: flex-start; }
.minion-container { position: relative; width: 200px; height: 400px; }
.body { position: absolute; top: 20px; left: 25px; width: 150px; height: 300px; background-color: #FFD90F; border-radius: 75px; box-shadow: inset -10px -10px 20px rgba(0,0,0,0.1); overflow: hidden; z-index: 2; transition: background-color 0.5s; }
.overalls { position: absolute; bottom: 0; width: 100%; height: 90px; background-color: #225A94; border-radius: 0 0 75px 75px; box-shadow: inset -10px -10px 20px rgba(0,0,0,0.2); }
.pocket { position: absolute; bottom: 30px; left: 50px; width: 50px; height: 40px; background-color: #1A4674; border-radius: 10px 10px 20px 20px; border: 2px dashed #fce144; }
.strap { position: absolute; top: 65px; left: 0; width: 100%; height: 25px; background-color: #333; z-index: 1; }
.goggles-wrapper { position: absolute; top: 50px; left: -5px; width: 160px; display: flex; justify-content: center; z-index: 3; }
.goggle { position: relative; width: 50px; height: 50px; background-color: white; border: 12px solid #999; border-radius: 50%; box-shadow: 3px 3px 8px rgba(0,0,0,0.2), inset 3px 3px 8px rgba(0,0,0,0.1); margin: 0 -2px; overflow: hidden; }
.pupil { position: absolute; top: 50%; left: 50%; width: 20px; height: 20px; background-color: #4B3621; border-radius: 50%; transform: translate(-50%, -50%); transition: transform 0.2s ease-out; }
.pupil::after { content: ''; position: absolute; top: 4px; left: 4px; width: 6px; height: 6px; background-color: black; border-radius: 50%; }
.catchlight { position: absolute; top: 2px; right: 4px; width: 4px; height: 4px; background-color: white; border-radius: 50%; z-index: 4; }
.eyelid { position: absolute; top: 0; left: 0; width: 100%; height: 100%; background-color: #FFD90F; border-bottom: 3px solid #D4B200; transform-origin: top; transform: scaleY(0); z-index: 5; animation: blink 4s infinite; }
.mouth { position: absolute; top: 145px; left: 35px; width: 80px; height: 45px; background-color: #3E2723; border-radius: 10px 10px 60px 60px; overflow: hidden; z-index: 3; box-shadow: inset 0 5px 10px rgba(0,0,0,0.5); animation: laugh 0.2s infinite alternate ease-in-out; }
.teeth { position: absolute; top: 0; left: 0; width: 100%; height: 14px; background-color: #fff; border-radius: 0 0 5px 5px; }
.tongue { position: absolute; bottom: -5px; left: 20px; width: 40px; height: 25px; background-color: #FF5252; border-radius: 50%; animation: wag 0.2s infinite alternate ease-in-out; }
.arm { position: absolute; top: 140px; width: 25px; height: 80px; background-color: #FFD90F; border-radius: 12px; z-index: 1; transition: background-color 0.5s; }
.arm.left { left: 10px; transform: rotate(35deg); }
.arm.right { right: 15px; transform: rotate(-35deg); }
.glove { position: absolute; bottom: -15px; left: -5px; width: 35px; height: 35px; background-color: #333; border-radius: 50%; }
.leg { position: absolute; bottom: 50px; width: 25px; height: 40px; background-color: #225A94; z-index: 1; }
.leg.left { left: 60px; }
.leg.right { left: 115px; }
.shoe { position: absolute; bottom: -15px; left: -10px; width: 45px; height: 20px; background-color: #222; border-radius: 20px 20px 5px 5px; border-bottom: 5px solid #111; }
@keyframes blink { 0%, 94%, 100% { transform: scaleY(0); } 97% { transform: scaleY(1); } }
@keyframes laugh { 0% { height: 40px; transform: scaleX(1); } 100% { height: 55px; transform: scaleX(1.05); } }
@keyframes wag { 0% { transform: translateY(0); } 100% { transform: translateY(-3px); } }
</style>
</head>
<body>
<div class="text" id="status-text">Just watch him look around! 👀</div>
<div class="scale-wrapper" id="minionWrapper">
<div class="minion-container">
<div class="arm left" id="armL"><div class="glove"></div></div>
<div class="arm right" id="armR"><div class="glove"></div></div>
<div class="leg left"><div class="shoe"></div></div>
<div class="leg right"><div class="shoe"></div></div>
<div class="body" id="minionBody">
<div class="overalls">
<div class="pocket"></div>
</div>
<div class="strap"></div>
<div class="goggles-wrapper">
<div class="goggle"><div class="pupil"><div class="catchlight"></div></div><div class="eyelid" id="eyelidL"></div></div>
<div class="goggle"><div class="pupil"><div class="catchlight"></div></div><div class="eyelid" id="eyelidR"></div></div>
</div>
<div class="mouth">
<div class="teeth"></div>
<div class="tongue"></div>
</div>
</div>
</div>
</div>
<script>
const APP_IDENTIFIER = 'Color Sensor:';
let ws = null;
function connectWebSocket() {
ws = new WebSocket('ws:
ws.onopen = () => document.getElementById('status-text').textContent = "Arduino Uno R4 - Color Sensor";
ws.onclose = () => setTimeout(connectWebSocket, 2000);
ws.onmessage = (event) => {
if (event.data.startsWith(APP_IDENTIFIER)) {
let color = event.data.substring(APP_IDENTIFIER.length);
document.getElementById('minionBody').style.backgroundColor = color;
document.getElementById('armL').style.backgroundColor = color;
document.getElementById('armR').style.backgroundColor = color;
document.getElementById('eyelidL').style.backgroundColor = color;
document.getElementById('eyelidR').style.backgroundColor = color;
document.getElementById('status-text').style.color = color;
}
};
}
function resizeMinion() {
const wrapper = document.getElementById('minionWrapper');
const availableWidth = window.innerWidth - 40;
const minionTrueWidth = 260;
const minionHeight = 400;
let scaleFactor = availableWidth / minionTrueWidth;
if (scaleFactor > 1.5) scaleFactor = 1.5;
wrapper.style.transform = `scale(${scaleFactor})`;
wrapper.style.height = `${minionHeight * scaleFactor}px`;
}
window.addEventListener('resize', resizeMinion);
resizeMinion();
connectWebSocket();
const pupils = document.querySelectorAll('.pupil');
function moveEyesAutomatically() {
const angle = Math.random() * Math.PI * 2;
const distance = Math.random() * 15;
const pupilX = Math.cos(angle) * distance;
const pupilY = Math.sin(angle) * distance;
pupils.forEach(pupil => {
pupil.style.transform = `translate(calc(-50% + ${pupilX}px), calc(-50% + ${pupilY}px))`;
});
}
setInterval(moveEyesAutomatically, 600);
</script>
</body>
</html>
)HTML_WRAPPER";
#endif
Volg deze instructies stap voor stap:
Kalibreer eerst uw kleur sensor door de
TCS3200D/TCS230 kalibratie gids te volgen. Noteer uw kalibratie waarden (redMin, redMax, greenMin, greenMax, blueMin, blueMax).
Bedraad de componenten volgens het bedradingsschema hierboven.
Verbind het Arduino Uno R4 WiFi board met uw computer via een USB kabel.
Start de Arduino IDE op uw computer.
Selecteer het juiste Arduino Uno R4 board (bijv., Arduino Uno R4 WiFi) en COM poort.
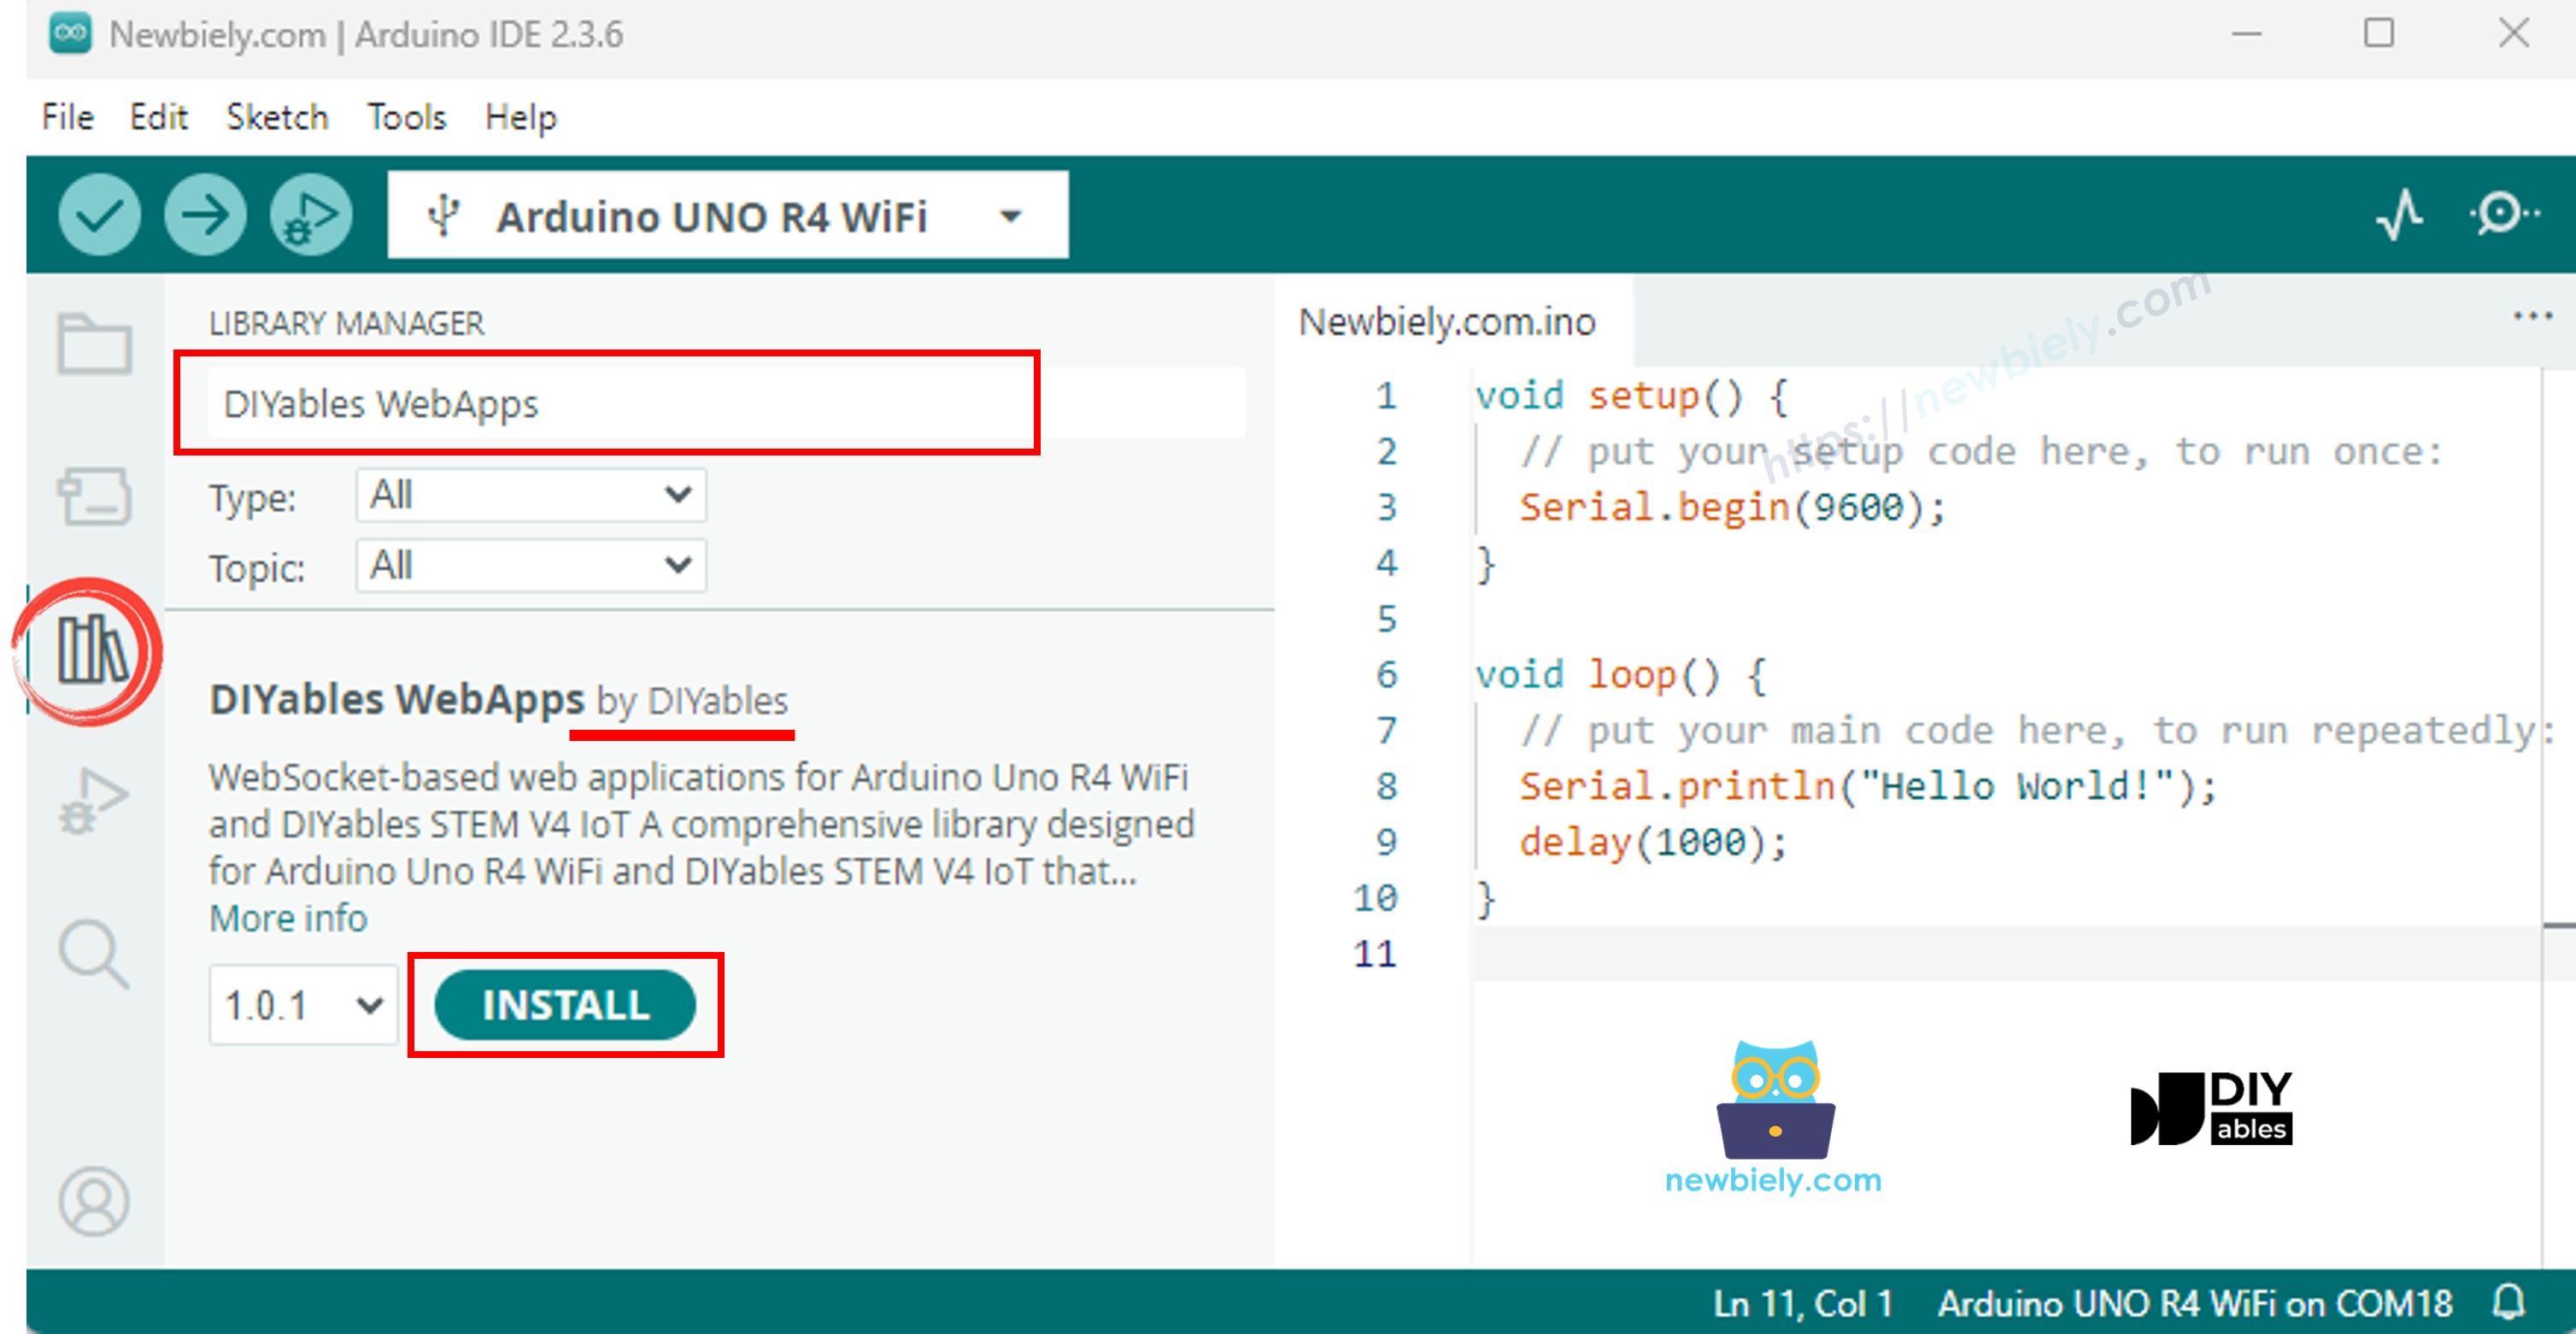
Navigeer naar het Libraries icoon in de linker balk van de Arduino IDE.
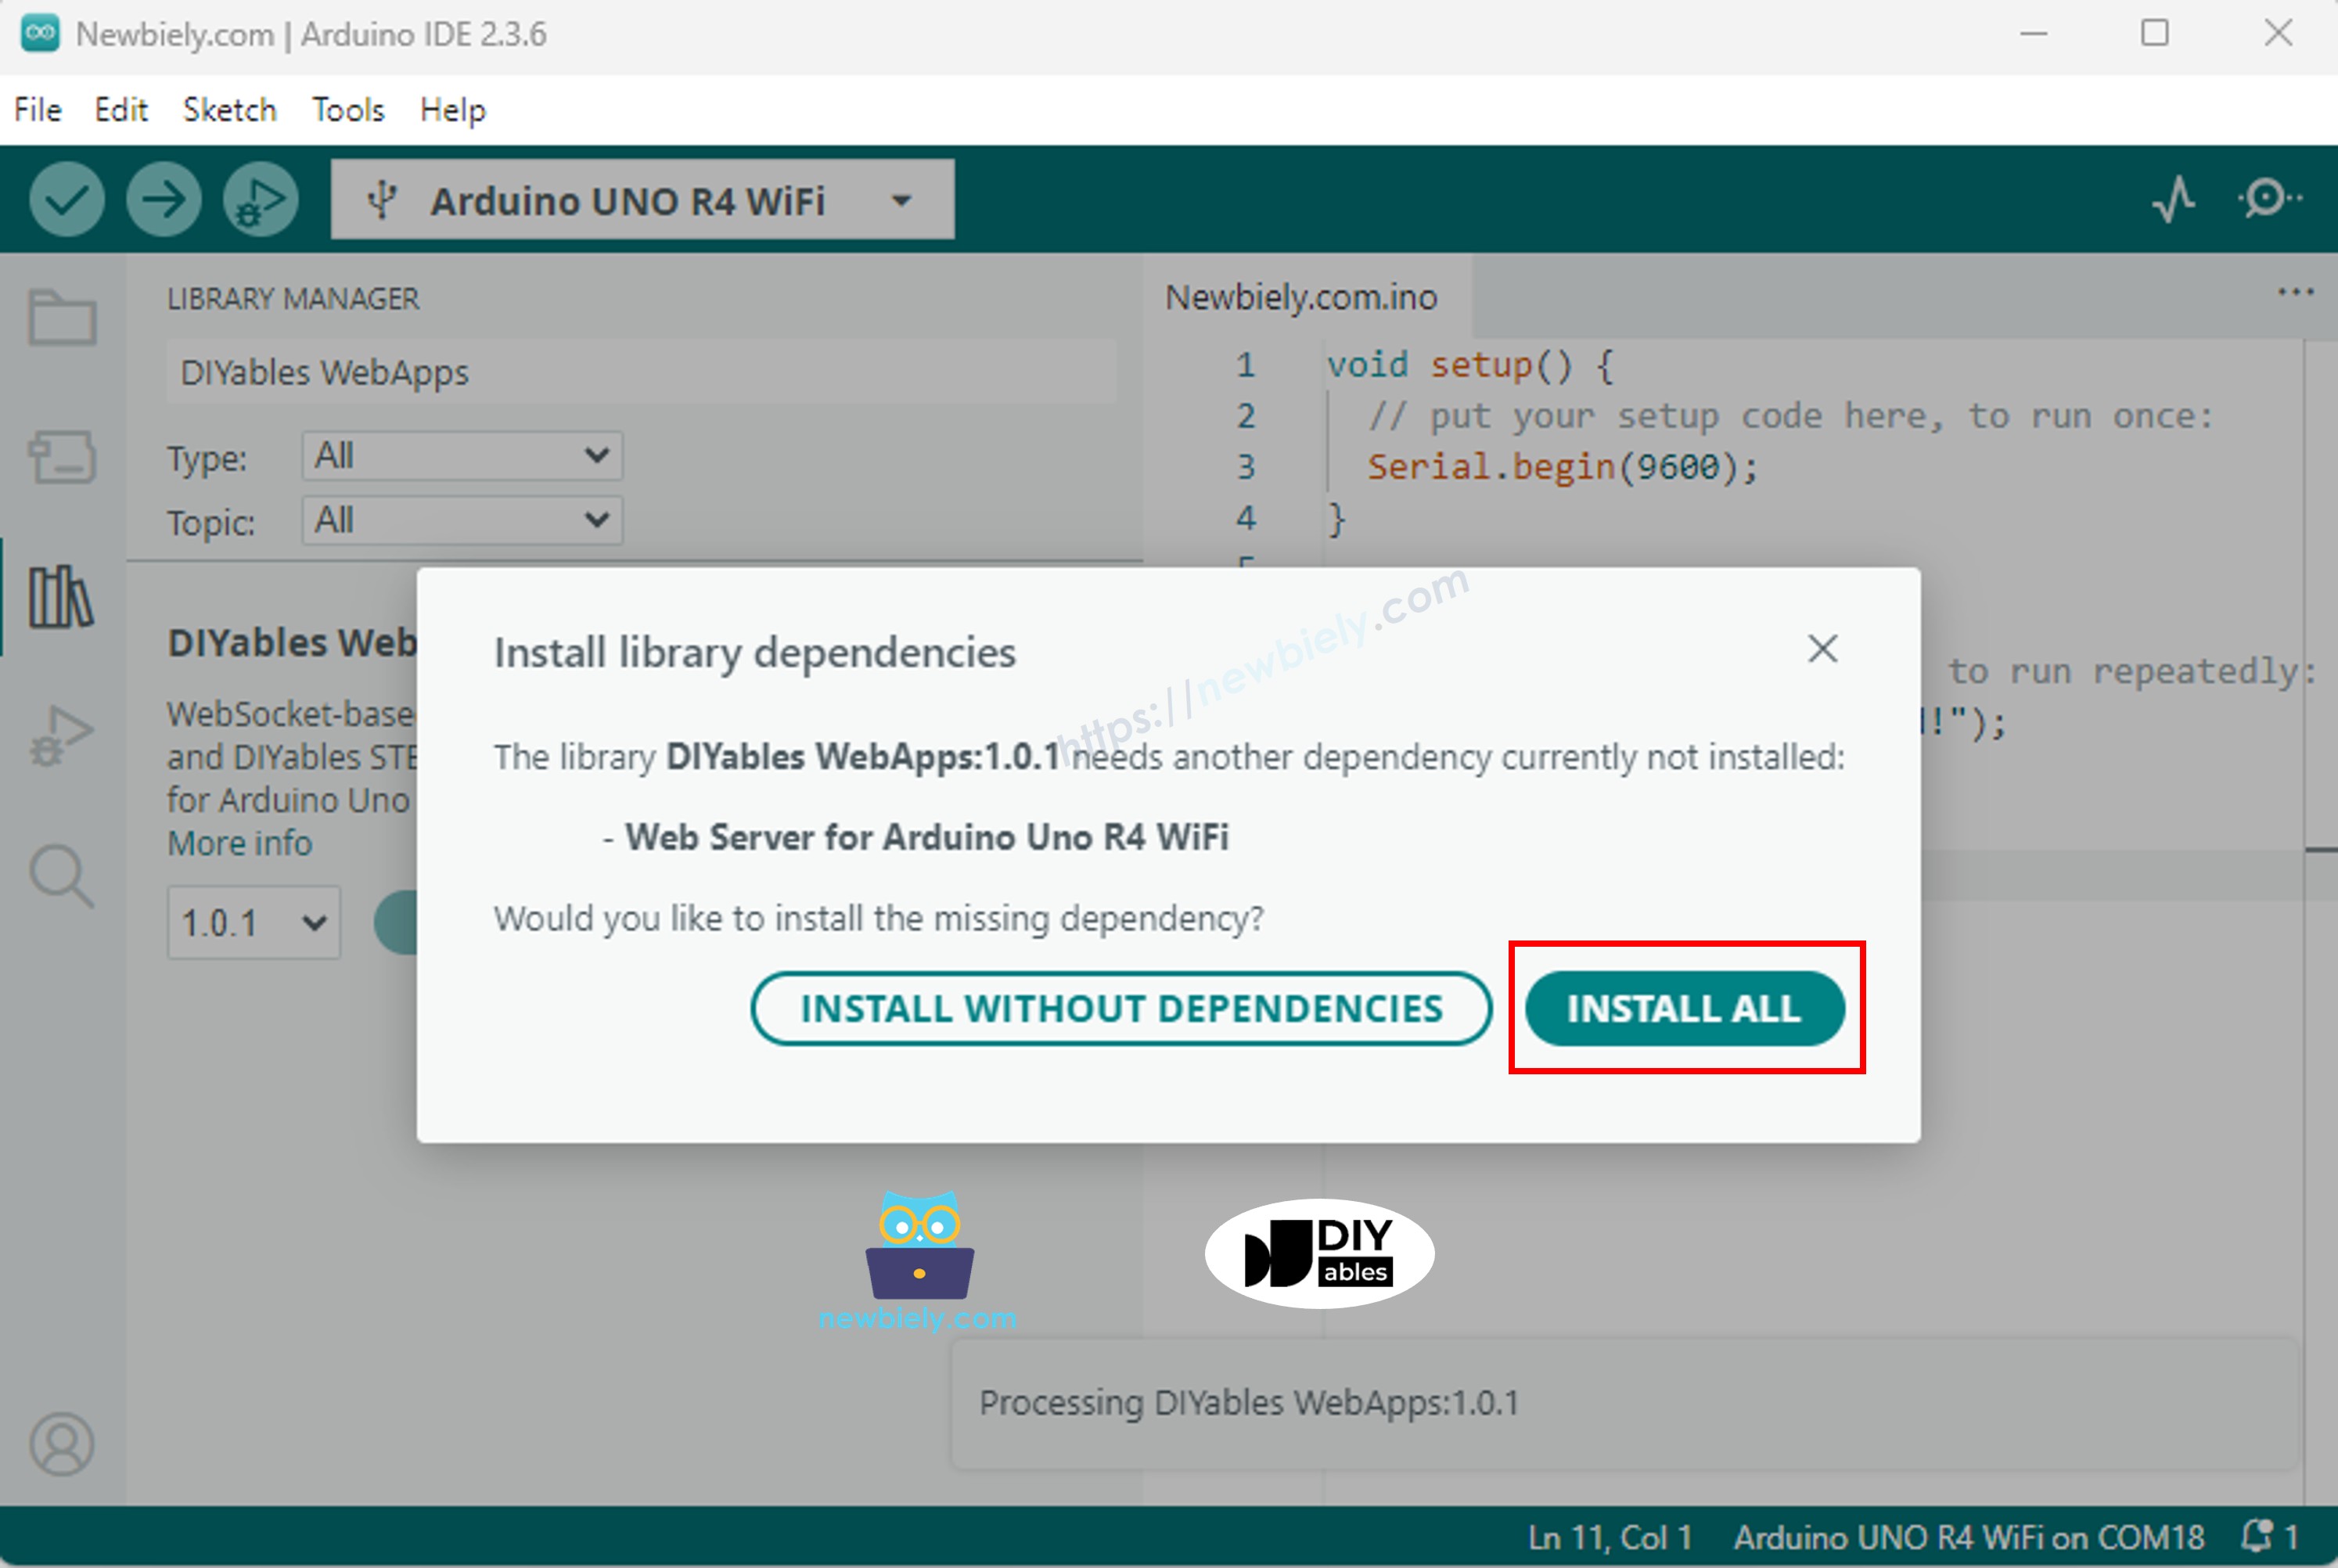
Zoek "DIYables WebApps", vind vervolgens de DIYables WebApps library van DIYables.
Klik op de Install knop om de library te installeren.
U wordt gevraagd om enkele andere library afhankelijkheden te installeren.
Klik op de Install All knop om alle library afhankelijkheden te installeren.
Maak een nieuwe sketch in Arduino IDE en noem deze ColorSensor.
Kopieer en plak alle 4 bestanden hierboven in het Arduino IDE project. Het Arduino IDE project moet 4 bestanden hebben zoals hieronder getoond:
const char WIFI_SSID[] = "YOUR_WIFI_NAME";
const char WIFI_PASSWORD[] = "YOUR_WIFI_PASSWORD";
Werk de kalibratie waarden bij in de map() aanroepen binnen loop() met uw eigen kalibratie waarden van de kalibratie stap. Bijvoorbeeld, als uw kalibratie u redMin = 42, redMax = 210, greenMin = 55, greenMax = 185, blueMin = 60, blueMax = 172 heeft gegeven, verander de regels naar:
int r = map(pulseIn(sensorOut, LOW), 42, 210, 255, 0);
int g = map(pulseIn(sensorOut, LOW), 55, 185, 255, 0);
int b = map(pulseIn(sensorOut, LOW), 60, 172, 255, 0);
Color Web Server Ready!
INFO: Added app /
INFO: Added app /custom
DIYables WebApp Library
Platform: Arduino Uno R4 WiFi
Network connected!
IP address: 192.168.0.2
HTTP server started on port 80
WebSocket server started on port 81
==========================================
DIYables WebApp Ready!
==========================================
📱 Web Interface: http://192.168.0.2
🔗 WebSocket: ws://192.168.0.2:81
📋 Available Applications:
🏠 Home Page: http://192.168.0.2/
🔧 Color Sensor WebApp: http://192.168.0.2/custom
==========================================
Sent to Minion: #FFD200
Sent to Minion: #00C832
Sent to Minion: #0028FF
Als u niets ziet, herstart dan het Arduino board.
Noteer het weergegeven IP-adres en voer dit adres in de adresbalk van een webbrowser in op uw smartphone of PC.
Bijvoorbeeld: http://192.168.0.2
U zult de homepagina zien. Klik op de Color Sensor WebApp link.
Of u kunt de Minion pagina direct bereiken door het IP-adres gevolgd door /custom. Bijvoorbeeld: http://192.168.0.2/custom
U zult het geanimeerde Minion karakter op de webpagina zien.
Plaats een gekleurd object voor de TCS3200 sensor — de huidkleur van de Minion zal in real-time veranderen om overeen te komen met de gedetecteerde kleur!
U kunt de stap-voor-stap instructies in de onderstaande video bekijken.
De hoofd sketch doet het volgende:
Initialiseert de TCS3200 sensor pins: S0, S1 zijn ingesteld voor 20% frequentie schaling. S2, S3 worden gebruikt om kleurfilters te selecteren.
Leest kleur elke 1 seconde: In de loop(), selecteert de Arduino de rode, groene en blauwe filters één voor één, leest de pulsbreedte met pulseIn(), en wijst de ruwe waarden toe aan 0-255 RGB waarden met behulp van uw kalibratie nummers.
Converteert naar HEX: De RGB waarden worden geformatteerd tot een HEX kleur string zoals #FF8000 met behulp van sprintf().
Stuurt naar webbrowser: De HEX string wordt naar alle verbonden web clients gestuurd via customPage.sendToWeb().
De HTML pagina bevat:
Een geanimeerd Minion karakter volledig gebouwd met CSS — inclusief knipperende ogen, een lachende mond, en willekeurig bewegende pupillen.
WebSocket verbinding: De JavaScript verbindt met de Arduino's WebSocket server (poort 81) en luistert naar inkomende kleur berichten.
Kleur update: Wanneer een bericht zoals #FF8000 wordt ontvangen, maken het lichaam, armen en oogleden van de Minion een vloeiende overgang naar de nieuwe kleur met behulp van CSS transition.
Automatisch herverbinden: Als de WebSocket verbinding wegvalt, probeert de pagina automatisch elke 2 seconden opnieuw verbinding te maken.
Responsive design: De Minion schaalt automatisch om te passen bij verschillende schermformaten (telefoons, tablets, desktops).
Dit project gebruikt het DIYables WebApps aangepaste web app framework met de identifier "Color Sensor:":
Voor meer details over het communicatie protocol en hoe u de web app kunt aanpassen, zie de DIYables WebApps Aangepaste WebApp handleiding.