Arduino UNO R4 - GPS

Deze handleiding laat u zien hoe u Arduino Uno R4 met GPS-module gebruikt. In detail leren we hoe u GPS-coördinaten (lengtegraad, breedtegraad, hoogte), GPS-snelheid (in kilometers per uur) en de huidige datum en tijd kunt verkrijgen van een NEO-6M GPS-module. We leren ook hoe u de afstand berekent van onze huidige GPS-locatie naar specifieke coördinaten, zoals die van Londen.

Arduino UNO R4 GPS module

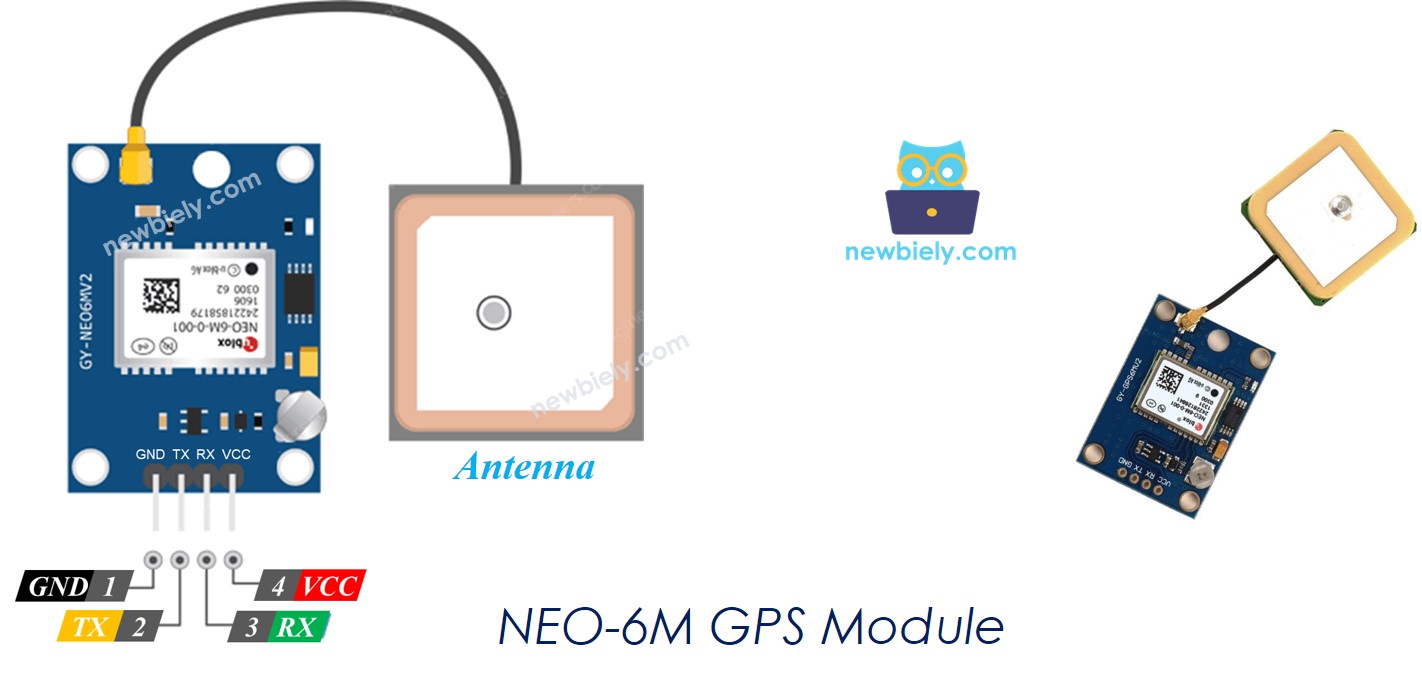
Over de NEO-6M GPS module

Pinout

De NEO-6M GPS-module heeft 4 pinnen:

  • VCC pin: Sluit deze pin aan op VCC (5V).
  • GND pin: Sluit deze pin aan op GND (0V).
  • TX pin: Deze wordt gebruikt voor seriële communicatie. Sluit deze aan op de RX pin van de Serial (of SoftwareSerial) op Arduino UNO R4.
  • RX pin: Deze wordt gebruikt voor seriële communicatie. Sluit deze aan op de TX pin van de Serial (of SoftwareSerial) op Arduino UNO R4.
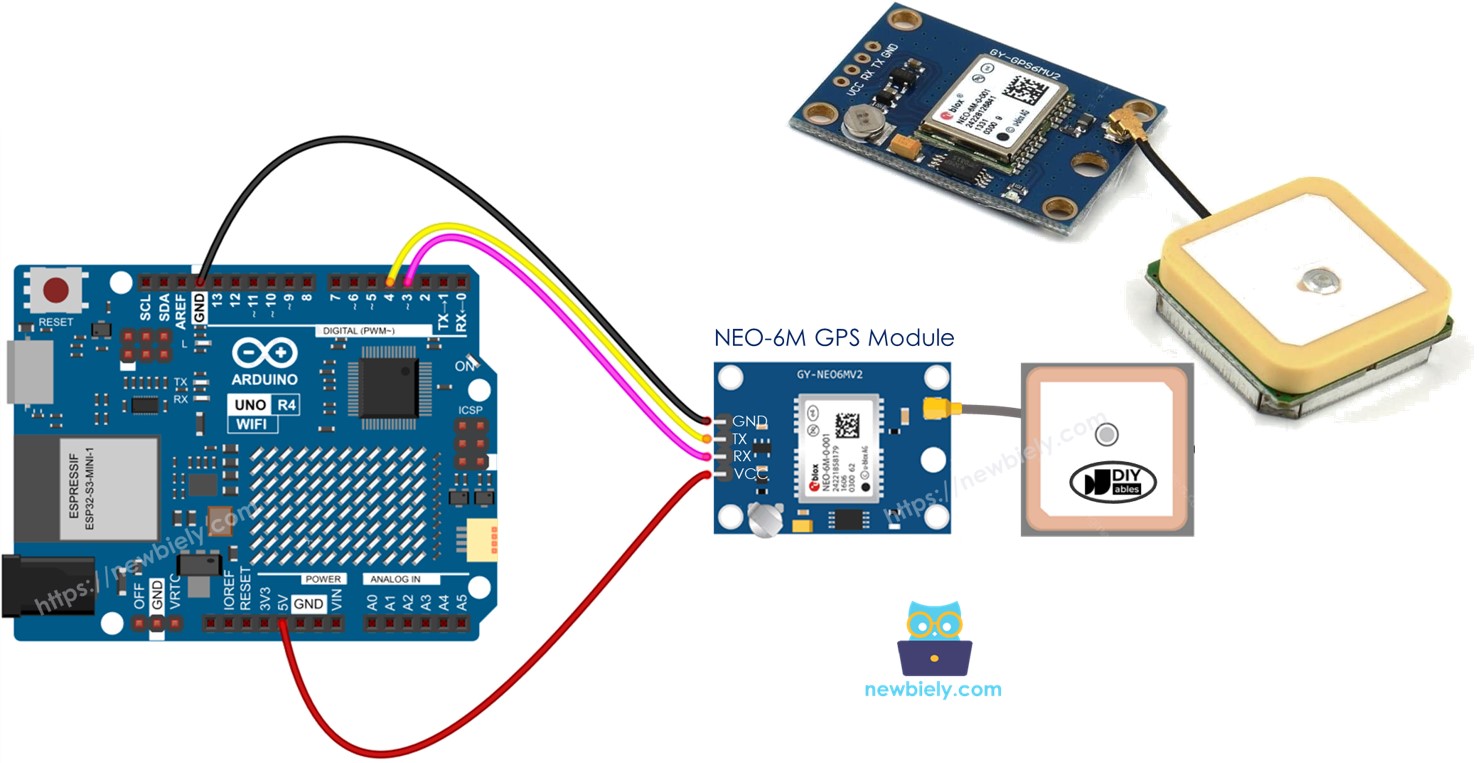
NEO-6M GPS module Pinout

Bekabelingsschema

Arduino UNO R4 GPS module Wiring Diagram

This image is created using Fritzing. Click to enlarge image

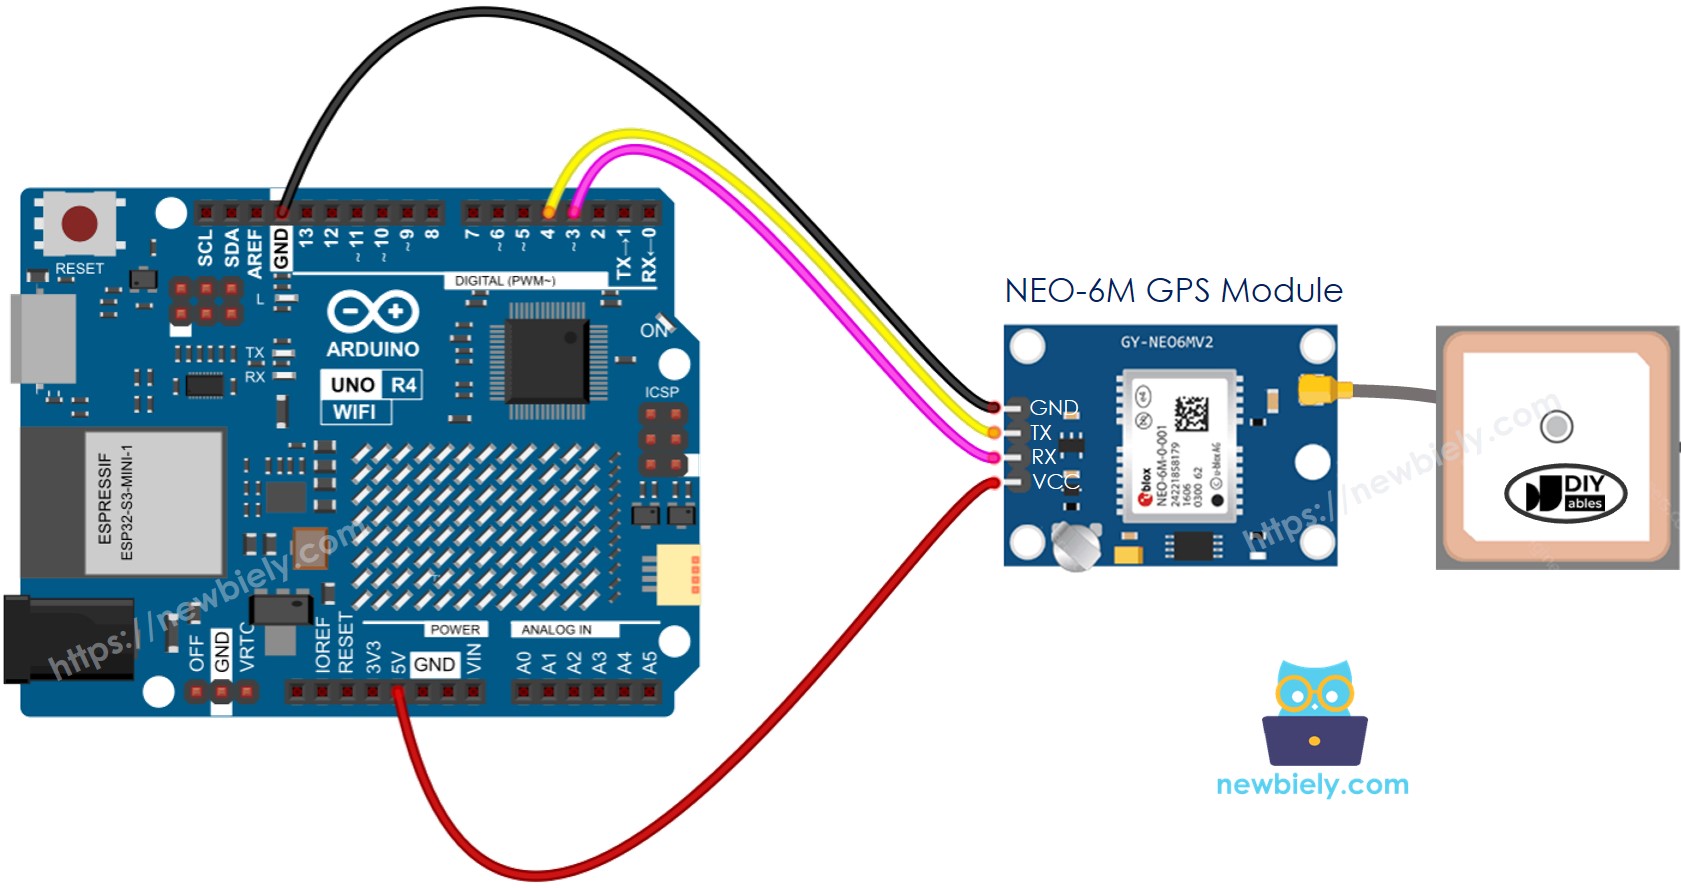
Let op dat het hierboven getoonde bekabelingsschema kan functioneren, maar niet wordt aanbevolen. De TX pin van de Arduino UNO R4 zendt een 5V signaal uit, terwijl de RX pin van de GPS-module slechts 3,3V aankan. Voor de veiligheid moet u een spanningsdeler gebruiken tussen de TX pin van de Arduino UNO R4 en de RX pin van de GPS-module. Deze opstelling wordt getoond in het onderstaande diagram.

Arduino UNO R4 GPS Wiring Diagram

This image is created using Fritzing. Click to enlarge image

Zie De beste manier om Arduino Uno R4 en andere componenten van stroom te voorzien.

Arduino UNO R4 Code

GPS-coördinaten, snelheid (km/u) en datum/tijd uitlezen

/* * Deze Arduino UNO R4 code is ontwikkeld door newbiely.nl * Deze Arduino UNO R4 code wordt zonder enige beperking aan het publiek beschikbaar gesteld. * Voor volledige instructies en schema's, bezoek: * https://newbiely.nl/tutorials/arduino-uno-r4/arduino-uno-r4-gps */ #include <TinyGPS++.h> #include <SoftwareSerial.h> #define RX_PIN 4 // The Arduino UNO R4 pin connected to the TX of the GPS module #define TX_PIN 3 // The Arduino UNO R4 pin connected to the RX of the GPS module TinyGPSPlus gps; // the TinyGPS++ object SoftwareSerial gpsSerial(RX_PIN, TX_PIN); // the serial interface to the GPS module void setup() { Serial.begin(9600); gpsSerial.begin(9600); // Default baud of NEO-6M GPS module is 9600 Serial.println(F("Arduino - GPS module")); } void loop() { if (gpsSerial.available() > 0) { if (gps.encode(gpsSerial.read())) { if (gps.location.isValid()) { Serial.print(F("- latitude: ")); Serial.println(gps.location.lat()); Serial.print(F("- longitude: ")); Serial.println(gps.location.lng()); Serial.print(F("- altitude: ")); if (gps.altitude.isValid()) Serial.println(gps.altitude.meters()); else Serial.println(F("INVALID")); } else { Serial.println(F("- location: INVALID")); } Serial.print(F("- speed: ")); if (gps.speed.isValid()) { Serial.print(gps.speed.kmph()); Serial.println(F(" km/h")); } else { Serial.println(F("INVALID")); } Serial.print(F("- GPS date&time: ")); if (gps.date.isValid() && gps.time.isValid()) { Serial.print(gps.date.year()); Serial.print(F("-")); Serial.print(gps.date.month()); Serial.print(F("-")); Serial.print(gps.date.day()); Serial.print(F(" ")); Serial.print(gps.time.hour()); Serial.print(F(":")); Serial.print(gps.time.minute()); Serial.print(F(":")); Serial.println(gps.time.second()); } else { Serial.println(F("INVALID")); } Serial.println(); } } if (millis() > 5000 && gps.charsProcessed() < 10) Serial.println(F("No GPS data received: check wiring")); }

Snelle Stappen

Volg deze instructies stap voor stap:

  • Als dit uw eerste keer is met de Arduino Uno R4 WiFi/Minima, raadpleeg dan de handleiding over het instellen van de omgeving voor Arduino Uno R4 WiFi/Minima in de Arduino IDE.
  • Sluit de Arduino Uno R4 aan op de GPS-module volgens het bijgeleverde diagram.
  • Verbind het Arduino Uno R4 board met uw computer via een USB-kabel.
  • Start de Arduino IDE op uw computer.
  • Selecteer het juiste Arduino Uno R4 board (bijv. Arduino Uno R4 WiFi) en COM-poort.
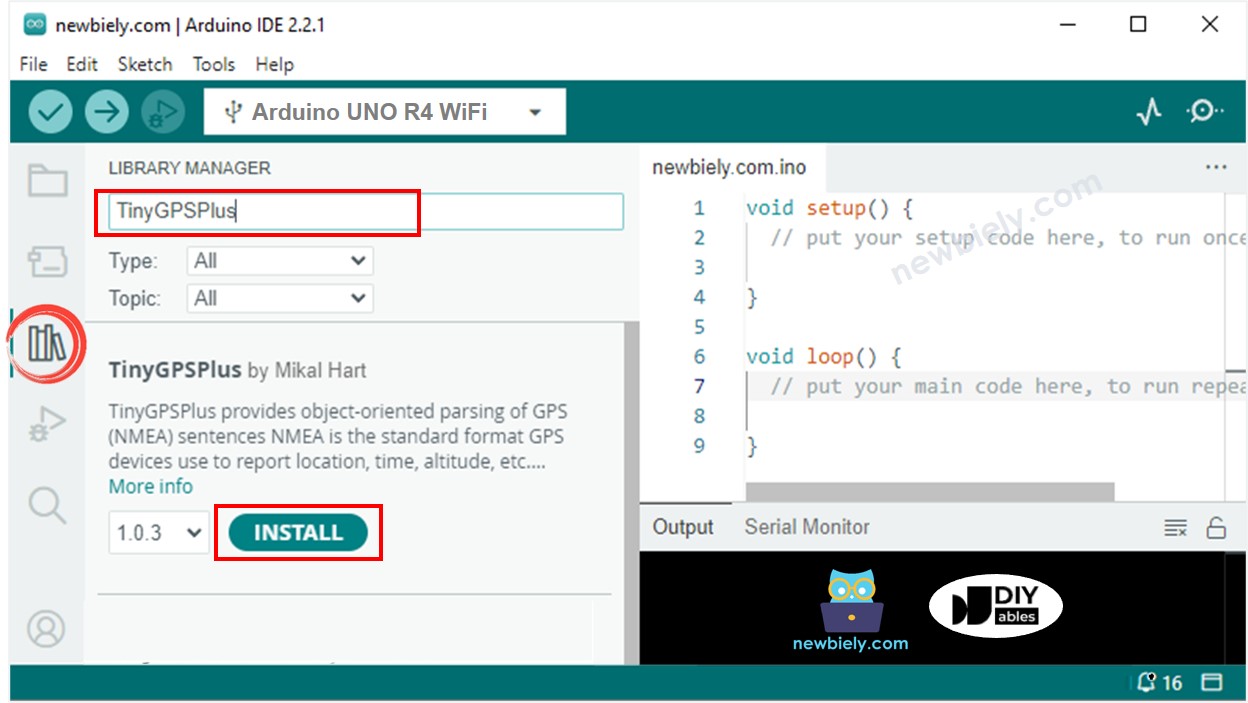
  • Ga naar het Libraries icoon aan de linkerkant van de Arduino IDE.
  • Type TinyGPSPlus in het zoekvak en zoek naar de TinyGPSPlus library van Mikal Hart.
  • Klik op de Install knop om de TinyGPSPlus library toe te voegen.
Arduino UNO R4 TinyGPS++ library
  • Kopieer de code en open deze in Arduino IDE.
  • Klik op de Upload knop in Arduino IDE om de code naar Arduino UNO R4 te uploaden.
  • Controleer het resultaat in de Serial Monitor.
COM6
Send
Autoscroll Show timestamp
Clear output
9600 baud  
Newline  

Afstand berekenen van huidige locatie naar vooraf gedefinieerde locatie

Deze code berekent hoe ver u bent van Londen (breedtegraad: 51.508131, lengtegraad: -0.128002).

/* * Deze Arduino UNO R4 code is ontwikkeld door newbiely.nl * Deze Arduino UNO R4 code wordt zonder enige beperking aan het publiek beschikbaar gesteld. * Voor volledige instructies en schema's, bezoek: * https://newbiely.nl/tutorials/arduino-uno-r4/arduino-uno-r4-gps */ #include <TinyGPS++.h> #include <SoftwareSerial.h> #define RX_PIN 4 // The Arduino UNO R4 pin connected to the TX of the GPS module #define TX_PIN 3 // The Arduino UNO R4 pin connected to the RX of the GPS module TinyGPSPlus gps; // the TinyGPS++ object SoftwareSerial gpsSerial(RX_PIN, TX_PIN); // the serial interface to the GPS module const double LONDON_LAT = 51.508131; const double LONDON_LON = -0.128002; void setup() { Serial.begin(9600); gpsSerial.begin(9600); // Default baud of NEO-6M GPS module is 9600 Serial.println(F("Arduino - GPS module")); } void loop() { if (gpsSerial.available() > 0) { if (gps.encode(gpsSerial.read())) { if (gps.location.isValid()) { double latitude = gps.location.lat(); double longitude = gps.location.lng(); unsigned long distanceKm = TinyGPSPlus::distanceBetween(latitude, longitude, LONDON_LAT, LONDON_LON) / 1000; Serial.print(F("- latitude: ")); Serial.println(latitude); Serial.print(F("- longitude: ")); Serial.println(longitude); Serial.print(F("- distance to London: ")); Serial.println(distanceKm); } else { Serial.println(F("- location: INVALID")); } Serial.println(); } } if (millis() > 5000 && gps.charsProcessed() < 10) Serial.println(F("No GPS data received: check wiring")); }

Snelle Stappen

  • Kopieer de code en open deze in de Arduino IDE.
  • Klik op de Upload knop in de Arduino IDE om de code naar de Arduino UNO R4 te verzenden.
  • Controleer het resultaat in de Serial Monitor.
COM6
Send
Autoscroll Show timestamp
Clear output
9600 baud  
Newline  

Video Tutorial

We overwegen het maken van videotutorials. Als u videotutorials belangrijk vindt, abonneer u dan op ons YouTube-kanaal om ons te motiveren de video's te maken.

Gerelateerde Tutorials

※ ONZE BERICHTEN

  • U bent welkom om de link naar deze tutorial te delen. Gebruik onze inhoud echter niet op andere websites. We hebben veel moeite en tijd gestoken in het maken van de inhoud, respecteer alstublieft ons werk!