Arduino UNO R4 WiFi Bluetooth Meerdere Apps Voorbeeld - All-in-One BLE Tutorial
Het Bluetooth Meerdere Apps voorbeeld toont hoe u 9 Bluetooth apps tegelijkertijd kunt uitvoeren op een enkele Arduino UNO R4 WiFi met behulp van BLE. Ontworpen voor Arduino UNO R4 WiFi met gebruik van BLE (Bluetooth Low Energy) om Monitor, Chat, Slider, Joystick, Temperature, Plotter, Table, Analog Gauge en Rotator te combineren in één krachtige sketch. Alle apps delen een enkele BLE-verbinding en kunnen met elkaar communiceren. Perfect voor uitgebreide dashboards, complexe IoT-projecten en het leren van meerdere app-types tegelijk.
Opmerking: De Arduino UNO R4 WiFi ondersteunt alleen BLE (Bluetooth Low Energy). Het ondersteunt geen Classic Bluetooth. De DIYables Bluetooth App ondersteunt zowel BLE als Classic Bluetooth op Android, en BLE op iOS. Omdat dit board BLE gebruikt, werkt de app op zowel Android als iOS.
9 Apps in één: Monitor, Chat, Slider, Joystick, Temperature, Plotter, Table, Analog Gauge, Rotator
Cross-App Interactie: Slider-waarde werkt gauge en tabel bij, joystick werkt tabel bij, etc.
Enkele BLE-verbinding: Alle apps delen efficiënt één verbinding
Real-Time Updates: Elke app werkt bij op zijn eigen interval
Uitgebreid Dashboard: Bekijk alle data van één apparaat
Werkt op Android & iOS: BLE wordt ondersteund op beide platforms
Geen koppeling vereist: BLE maakt automatisch verbinding zonder handmatige koppeling
| App | Beschrijving | Update Interval |
|---|
| Monitor | Tekstgebaseerde statusweergave | 5 seconden |
| Chat | Bidirectionele tekstberichten | Op verzoek |
| Slider | Waarde-instelling (0-255) | Bij wijziging |
| Joystick | 2D positie-besturing | Bij wijziging |
| Temperature | Temperatuur gauge (-10 tot 50°C) | 2 seconden |
| Plotter | Real-time data grafiek | 100ms |
| Table | Gestructureerde data (10 rijen) | 5 seconden |
| Analog Gauge | Wijzerplaat-stijl gauge (0-100%) | 3 seconden |
| Rotator | Hoek-besturing (continue) | Bij wijziging |
Of u kunt de volgende kits kopen:
Openbaarmaking: Sommige van de links in deze sectie zijn Amazon-affiliate links. We kunnen een commissie ontvangen voor aankopen die via deze links worden gedaan, zonder extra kosten voor u. We waarderen uw steun.
Volg deze instructies stap voor stap:
Sluit de Arduino UNO R4 WiFi aan op uw computer met behulp van een USB-kabel.
Start de Arduino IDE op uw computer.
Selecteer het Arduino UNO R4 WiFi board en de juiste COM-poort.
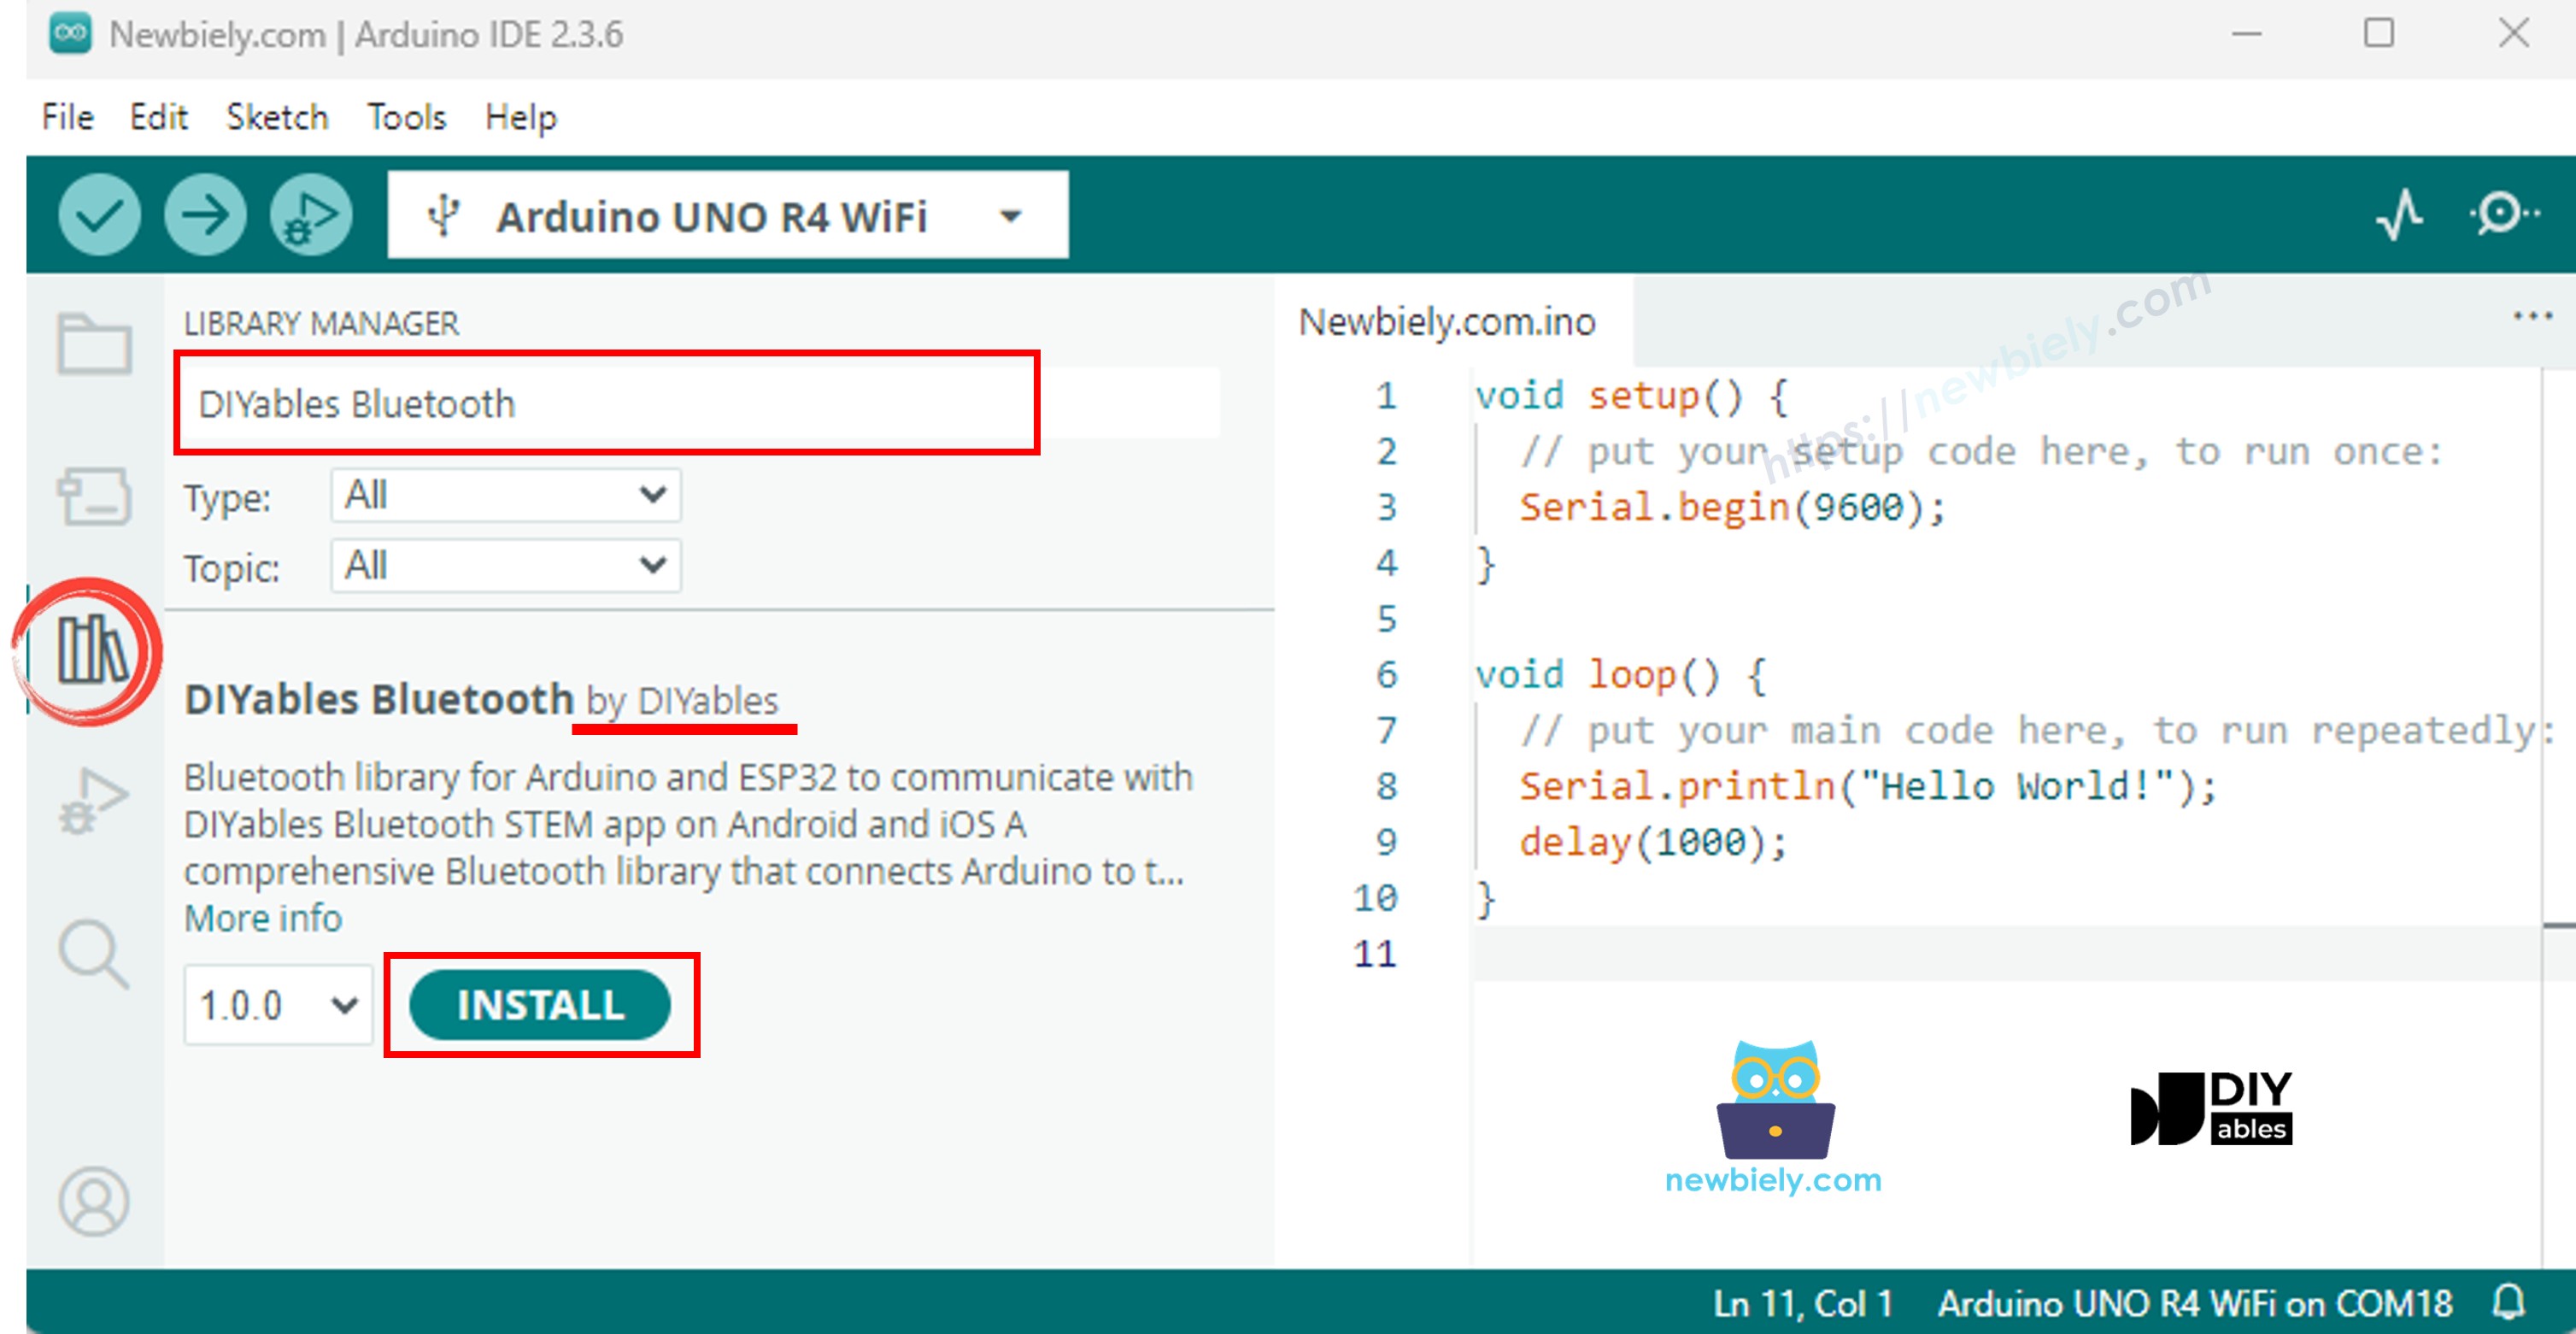
Navigeer naar het Libraries icoon in de linkerbalk van de Arduino IDE.
Zoek naar "DIYables Bluetooth", vind vervolgens de DIYables Bluetooth library door DIYables
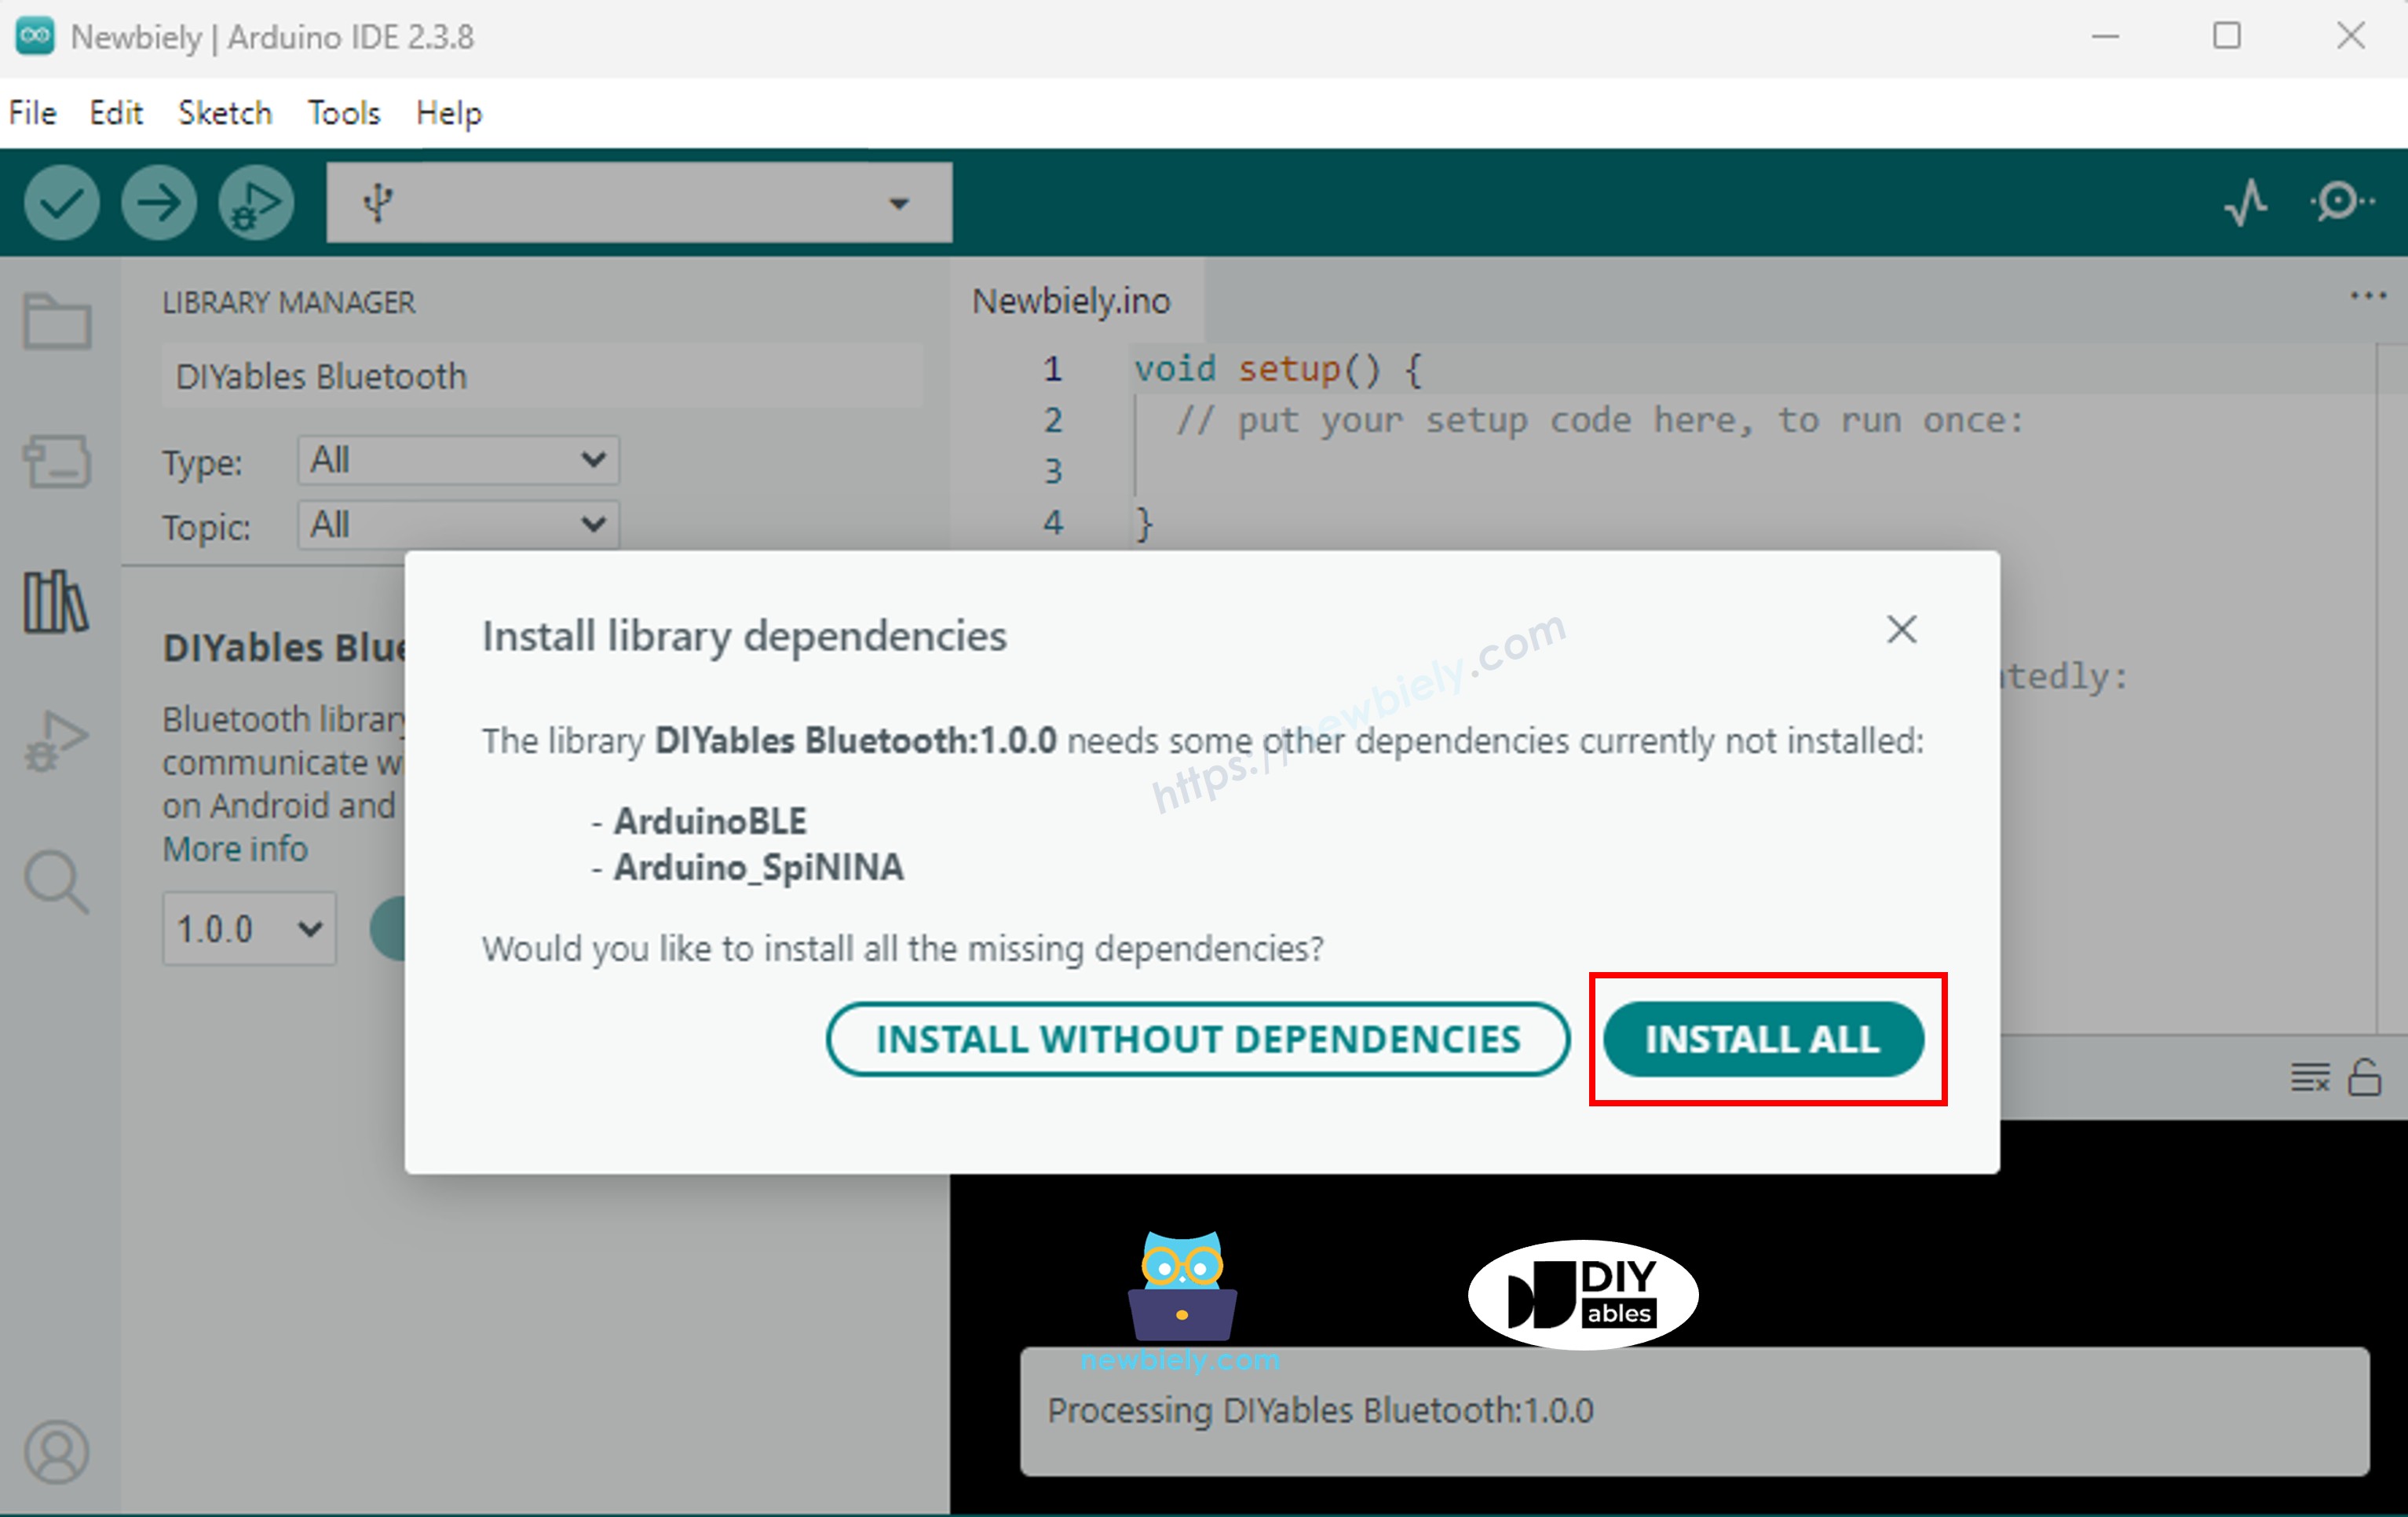
Klik op de Install knop om de library te installeren.
#include <DIYables_BluetoothServer.h>
#include <DIYables_BluetoothMonitor.h>
#include <DIYables_BluetoothChat.h>
#include <DIYables_BluetoothSlider.h>
#include <DIYables_BluetoothJoystick.h>
#include <DIYables_BluetoothTemperature.h>
#include <DIYables_BluetoothPlotter.h>
#include <DIYables_BluetoothTable.h>
#include <DIYables_BluetoothAnalogGauge.h>
#include <DIYables_BluetoothRotator.h>
#include <platforms/DIYables_ArduinoBLE.h>
const char* DEVICE_NAME = "DIYables Multi-App";
const char* SERVICE_UUID = "19B10000-E8F2-537E-4F6C-D104768A1214";
const char* TX_UUID = "19B10001-E8F2-537E-4F6C-D104768A1214";
const char* RX_UUID = "19B10002-E8F2-537E-4F6C-D104768A1214";
DIYables_ArduinoBLE bluetooth(DEVICE_NAME, SERVICE_UUID, TX_UUID, RX_UUID);
DIYables_BluetoothServer bluetoothServer(bluetooth);
DIYables_BluetoothMonitor bluetoothMonitor;
DIYables_BluetoothChat bluetoothChat;
DIYables_BluetoothSlider bluetoothSlider(0, 255, 1);
DIYables_BluetoothJoystick bluetoothJoystick(false, 5);
DIYables_BluetoothTemperature bluetoothTemperature(-10.0, 50.0, "°C");
DIYables_BluetoothPlotter bluetoothPlotter;
DIYables_BluetoothTable bluetoothTable;
DIYables_BluetoothAnalogGauge bluetoothGauge(0.0, 100.0, "%");
DIYables_BluetoothRotator bluetoothRotator(ROTATOR_MODE_CONTINUOUS);
int currentSlider1 = 128;
int currentSlider2 = 64;
int currentJoystickX = 0;
int currentJoystickY = 0;
float currentTemperature = 25.0;
float currentGaugeValue = 50.0;
float currentRotatorAngle = 0.0;
int messageCount = 0;
unsigned long lastMonitorUpdate = 0;
unsigned long lastTempUpdate = 0;
unsigned long lastPlotUpdate = 0;
unsigned long lastTableUpdate = 0;
unsigned long lastGaugeUpdate = 0;
float plotPhase = 0;
void setup() {
Serial.begin(9600);
delay(1000);
Serial.println("DIYables Bluetooth - Multiple Apps Example");
pinMode(LED_BUILTIN, OUTPUT);
digitalWrite(LED_BUILTIN, LOW);
bluetoothServer.begin();
bluetoothServer.addApp(&bluetoothMonitor);
bluetoothServer.addApp(&bluetoothChat);
bluetoothServer.addApp(&bluetoothSlider);
bluetoothServer.addApp(&bluetoothJoystick);
bluetoothServer.addApp(&bluetoothTemperature);
bluetoothServer.addApp(&bluetoothPlotter);
bluetoothServer.addApp(&bluetoothTable);
bluetoothServer.addApp(&bluetoothGauge);
bluetoothServer.addApp(&bluetoothRotator);
Serial.print("Registered apps: ");
Serial.println(bluetoothServer.getAppCount());
bluetoothPlotter.setPlotTitle("Sensor Data");
bluetoothPlotter.setAxisLabels("Time", "Value");
bluetoothPlotter.setYAxisRange(-1.5, 1.5);
bluetoothPlotter.setMaxSamples(100);
bluetoothPlotter.setLegendLabels("Sine", "Cosine", "Random");
bluetoothTable.addRow("Status");
bluetoothTable.addRow("Uptime");
bluetoothTable.addRow("Slider 1");
bluetoothTable.addRow("Slider 2");
bluetoothTable.addRow("Joystick X");
bluetoothTable.addRow("Joystick Y");
bluetoothTable.addRow("Temperature");
bluetoothTable.addRow("Gauge Value");
bluetoothTable.addRow("Rotator Angle");
bluetoothTable.addRow("Messages");
setupCallbacks();
Serial.println("Waiting for Bluetooth connection...");
}
void setupCallbacks() {
bluetoothServer.setOnConnected([]() {
Serial.println("Bluetooth connected!");
digitalWrite(LED_BUILTIN, HIGH);
bluetoothMonitor.send("=== DIYables Multi-App Connected ===");
bluetoothMonitor.send("All apps are ready!");
bluetoothChat.send("Hello! Arduino Multi-App is connected.");
});
bluetoothServer.setOnDisconnected([]() {
Serial.println("Bluetooth disconnected!");
digitalWrite(LED_BUILTIN, LOW);
});
bluetoothMonitor.onMonitorMessage([](const String& message) {
Serial.println("Monitor cmd: " + message);
if (message == "HELP") {
bluetoothMonitor.send("Commands: STATUS, HELP, LED_ON, LED_OFF");
} else if (message == "STATUS") {
bluetoothMonitor.send("Slider1=" + String(currentSlider1) + " Slider2=" + String(currentSlider2));
bluetoothMonitor.send("Joystick X=" + String(currentJoystickX) + " Y=" + String(currentJoystickY));
bluetoothMonitor.send("Temp=" + String(currentTemperature, 1) + "°C");
bluetoothMonitor.send("Gauge=" + String(currentGaugeValue, 1) + "%");
bluetoothMonitor.send("Rotator=" + String(currentRotatorAngle, 0) + "°");
} else if (message == "LED_ON") {
digitalWrite(LED_BUILTIN, HIGH);
bluetoothMonitor.send("LED turned ON");
} else if (message == "LED_OFF") {
digitalWrite(LED_BUILTIN, LOW);
bluetoothMonitor.send("LED turned OFF");
} else {
bluetoothMonitor.send("Unknown: " + message + " (type HELP)");
}
});
bluetoothChat.onChatMessage([](const String& message) {
Serial.println("Chat: " + message);
bluetoothChat.send("Echo: " + message);
if (message.equalsIgnoreCase("ping")) {
bluetoothChat.send("pong!");
} else if (message.equalsIgnoreCase("status")) {
bluetoothChat.send("Uptime: " + String(millis() / 1000) + "s, Apps: " + String(bluetoothServer.getAppCount()));
}
});
bluetoothSlider.onSliderValue([](int slider1, int slider2) {
currentSlider1 = slider1;
currentSlider2 = slider2;
Serial.print("Slider 1: "); Serial.print(slider1);
Serial.print(", Slider 2: "); Serial.println(slider2);
currentGaugeValue = map(slider1, 0, 255, 0, 100);
bluetoothGauge.send(currentGaugeValue);
bluetoothTable.sendValueUpdate("Slider 1", String(slider1));
bluetoothTable.sendValueUpdate("Slider 2", String(slider2));
bluetoothTable.sendValueUpdate("Gauge Value", String(currentGaugeValue, 1) + "%");
});
bluetoothSlider.onGetConfig([]() {
bluetoothSlider.send(currentSlider1, currentSlider2);
});
bluetoothJoystick.onJoystickValue([](int x, int y) {
currentJoystickX = x;
currentJoystickY = y;
Serial.print("Joystick X: "); Serial.print(x);
Serial.print(", Y: "); Serial.println(y);
bluetoothTable.sendValueUpdate("Joystick X", String(x));
bluetoothTable.sendValueUpdate("Joystick Y", String(y));
});
bluetoothJoystick.onGetConfig([]() {
bluetoothJoystick.send(currentJoystickX, currentJoystickY);
});
bluetoothTemperature.onTemperatureRequest([]() {
bluetoothTemperature.send(currentTemperature);
});
bluetoothPlotter.onDataRequest([]() {
Serial.println("Plotter data requested");
});
bluetoothTable.onDataRequest([]() {
Serial.println("Table data requested");
bluetoothTable.sendTableStructure();
updateAllTableValues();
});
bluetoothGauge.onValueRequest([]() {
bluetoothGauge.send(currentGaugeValue);
});
bluetoothRotator.onRotatorAngle([](float angle) {
currentRotatorAngle = angle;
Serial.print("Rotator: "); Serial.print(angle); Serial.println("°");
bluetoothTable.sendValueUpdate("Rotator Angle", String(angle, 0) + "°");
});
}
void updateAllTableValues() {
bluetoothTable.sendValueUpdate("Status", "Running");
unsigned long uptime = millis() / 1000;
String uptimeStr;
if (uptime >= 60) {
uptimeStr = String(uptime / 60) + "m " + String(uptime % 60) + "s";
} else {
uptimeStr = String(uptime) + "s";
}
bluetoothTable.sendValueUpdate("Uptime", uptimeStr);
bluetoothTable.sendValueUpdate("Slider 1", String(currentSlider1));
bluetoothTable.sendValueUpdate("Slider 2", String(currentSlider2));
bluetoothTable.sendValueUpdate("Joystick X", String(currentJoystickX));
bluetoothTable.sendValueUpdate("Joystick Y", String(currentJoystickY));
bluetoothTable.sendValueUpdate("Temperature", String(currentTemperature, 1) + " °C");
bluetoothTable.sendValueUpdate("Gauge Value", String(currentGaugeValue, 1) + "%");
bluetoothTable.sendValueUpdate("Rotator Angle", String(currentRotatorAngle, 0) + "°");
bluetoothTable.sendValueUpdate("Messages", String(messageCount));
}
void loop() {
bluetoothServer.loop();
if (!bluetooth.isConnected()) {
delay(10);
return;
}
if (millis() - lastMonitorUpdate >= 5000) {
lastMonitorUpdate = millis();
messageCount++;
bluetoothMonitor.send("[INFO] Heartbeat #" + String(messageCount) + " - Uptime: " + String(millis() / 1000) + "s");
}
if (millis() - lastTempUpdate >= 2000) {
lastTempUpdate = millis();
static float tempOffset = 0;
tempOffset += random(-10, 11) / 10.0;
if (tempOffset > 5.0) tempOffset = 5.0;
if (tempOffset < -5.0) tempOffset = -5.0;
currentTemperature = 25.0 + tempOffset;
bluetoothTemperature.send(currentTemperature);
bluetoothTable.sendValueUpdate("Temperature", String(currentTemperature, 1) + " °C");
}
if (millis() - lastPlotUpdate >= 100) {
lastPlotUpdate = millis();
float sine = sin(plotPhase);
float cosine = cos(plotPhase);
float noise = random(-50, 51) / 100.0;
bluetoothPlotter.send(sine, cosine, noise);
plotPhase += 0.1;
if (plotPhase > 2 * PI) plotPhase = 0;
}
if (millis() - lastTableUpdate >= 5000) {
lastTableUpdate = millis();
unsigned long uptime = millis() / 1000;
String uptimeStr;
if (uptime >= 60) {
uptimeStr = String(uptime / 60) + "m " + String(uptime % 60) + "s";
} else {
uptimeStr = String(uptime) + "s";
}
bluetoothTable.sendValueUpdate("Uptime", uptimeStr);
bluetoothTable.sendValueUpdate("Messages", String(messageCount));
}
if (millis() - lastGaugeUpdate >= 3000) {
lastGaugeUpdate = millis();
float sensorValue = 50.0 + 30.0 * sin(millis() / 10000.0);
currentGaugeValue = sensorValue;
bluetoothGauge.send(currentGaugeValue);
bluetoothTable.sendValueUpdate("Gauge Value", String(currentGaugeValue, 1) + "%");
}
delay(10);
}
DIYables Bluetooth - Multiple Apps Example
Waiting for Bluetooth connection...
Installeer de DIYables Bluetooth App op uw smartphone:
Android |
iOS
Opmerking: De DIYables Bluetooth App ondersteunt zowel BLE als Classic Bluetooth op Android, en BLE op iOS. Omdat de Arduino UNO R4 WiFi BLE gebruikt, werkt de app op zowel Android als iOS. Handmatige koppeling is niet nodig voor BLE — gewoon scannen en verbinden.
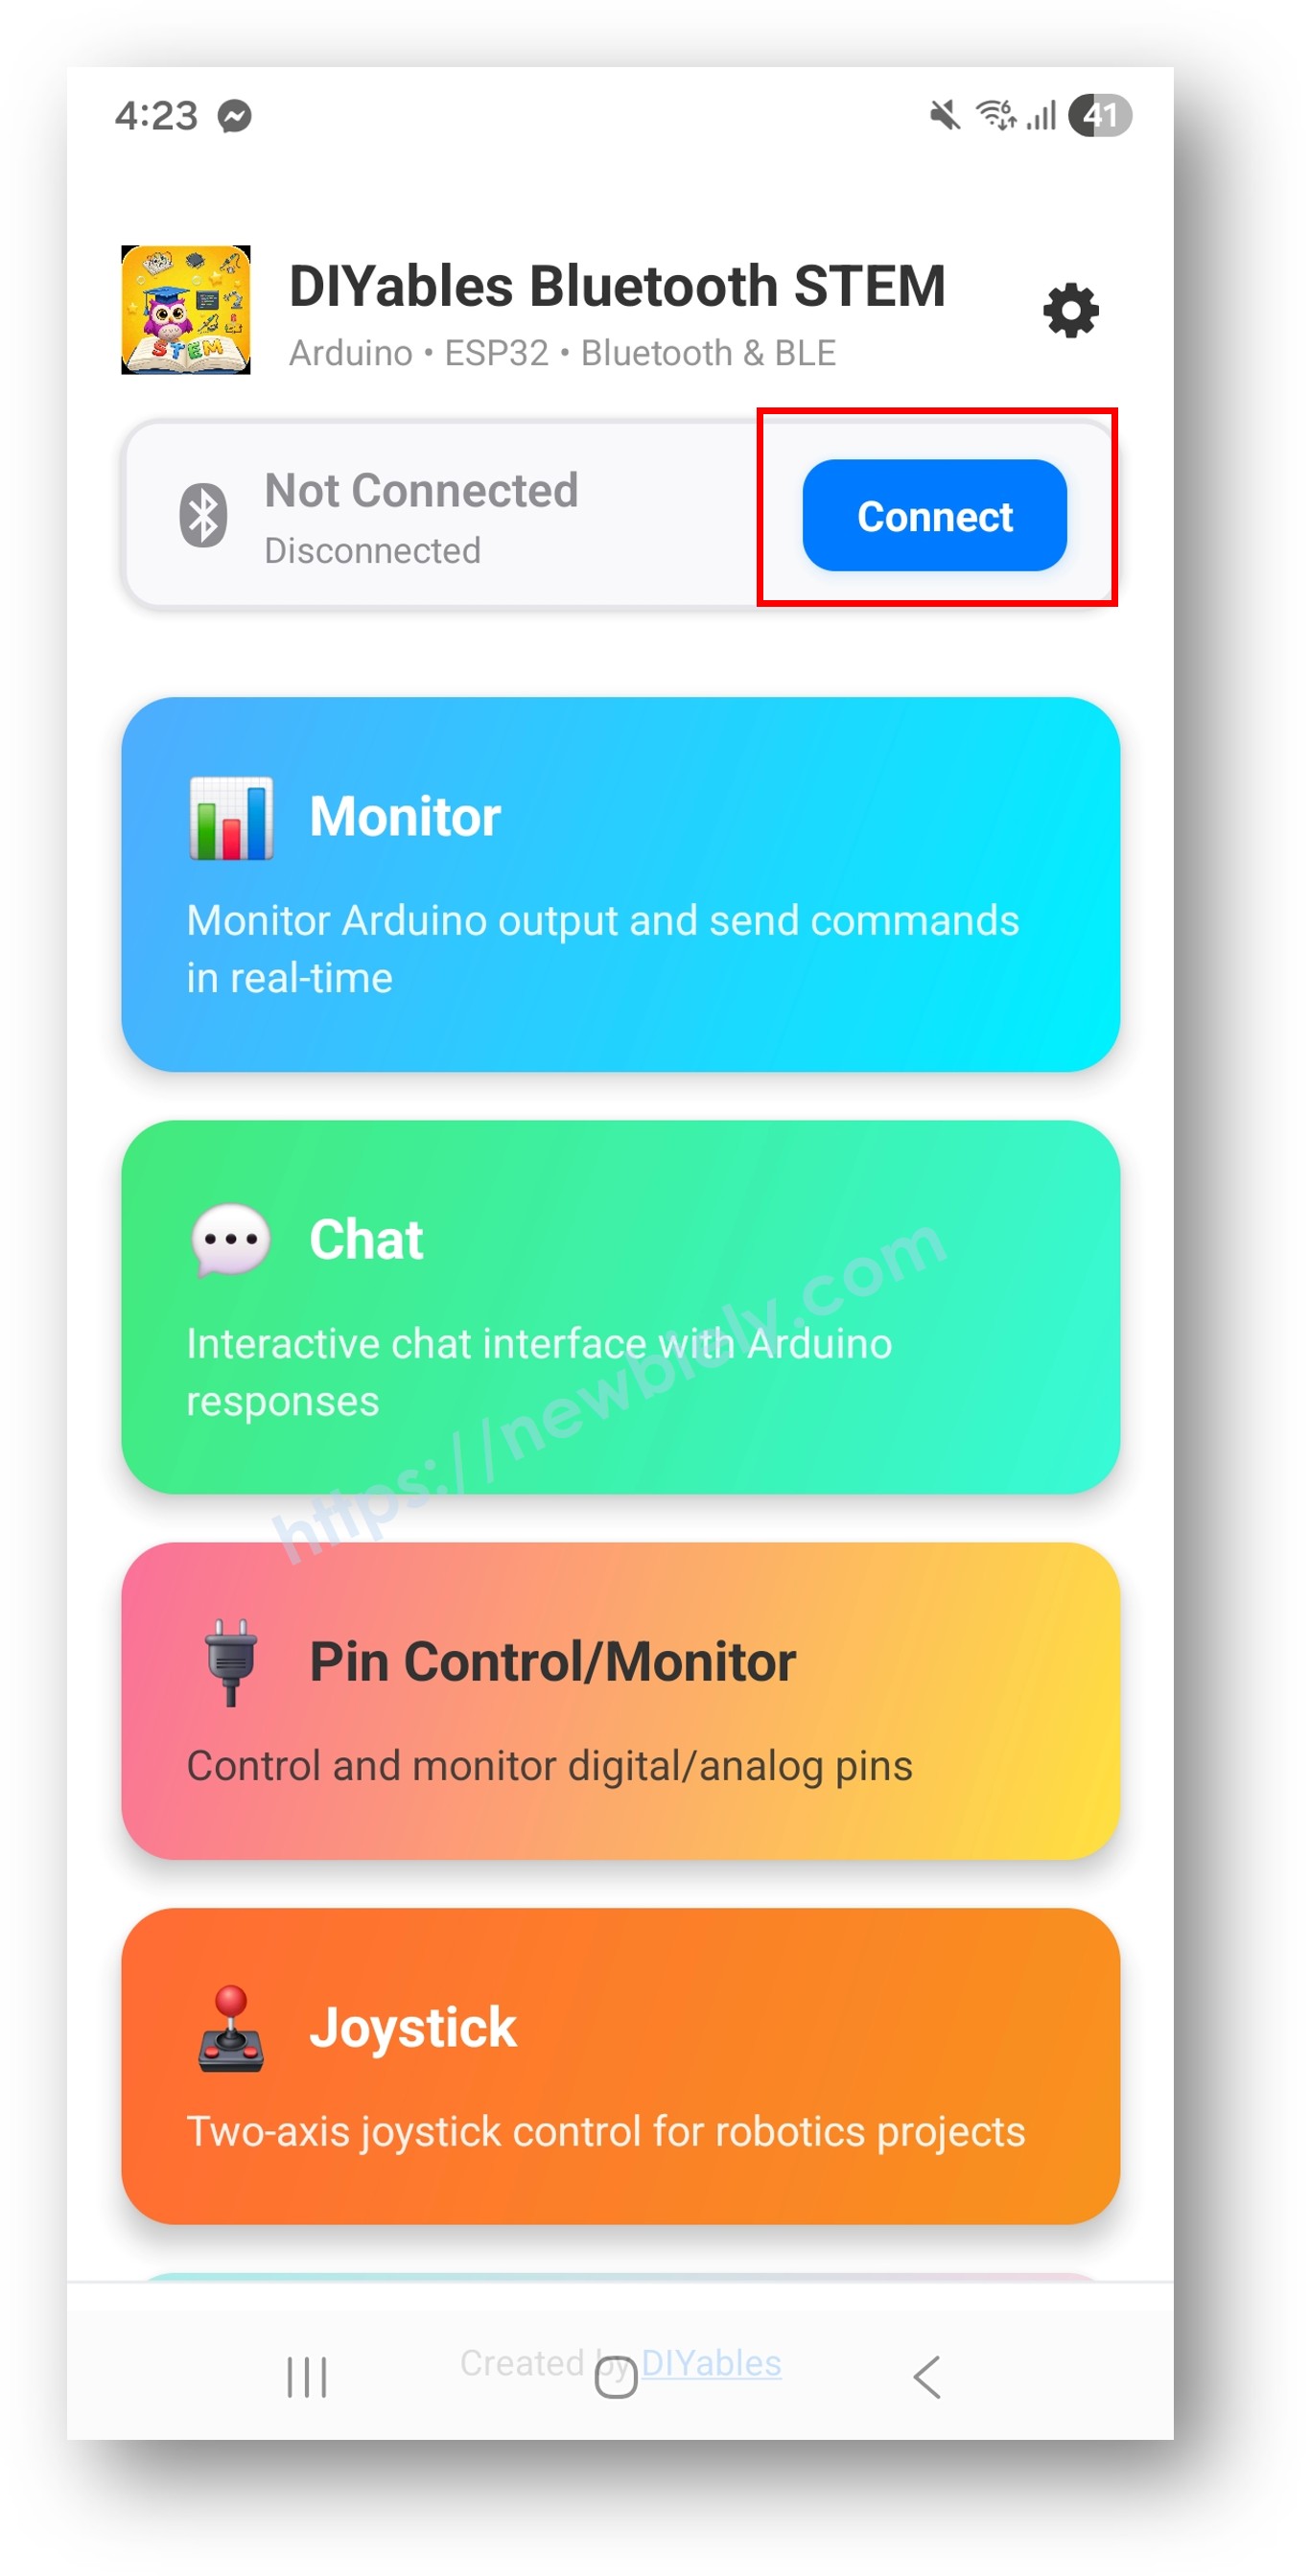
Open de DIYables Bluetooth App
Wanneer u de app voor de eerste keer opent, zal deze om machtigingen vragen. Verleen de volgende machtigingen:
Nearby Devices machtiging (Android 12+) / Bluetooth machtiging (iOS) - vereist om Bluetooth-apparaten te scannen en verbinding te maken
Location machtiging (alleen Android 11 en lager) - vereist door oudere Android-versies om BLE-apparaten te scannen
Zorg ervoor dat Bluetooth is ingeschakeld op uw telefoon
Tik op het startscherm op de Connect knop. De app scant naar BLE-apparaten.
Zoek en tik op "DIYables Multi-App" in de scanresultaten om verbinding te maken.
Eenmaal verbonden, gaat de app automatisch terug naar het startscherm. Het startscherm toont alle beschikbare apps. De 9 apps die in de Arduino-code zijn geïnitialiseerd zullen reageren en werken — andere apps op het startscherm zullen verschijnen maar zullen niet functioneren met deze sketch.
Opmerking: U kunt op het instellingen-icoon op het startscherm tikken om apps op het startscherm te verbergen/tonen. Voor meer details, zie de DIYables Bluetooth App Gebruikershandleiding.
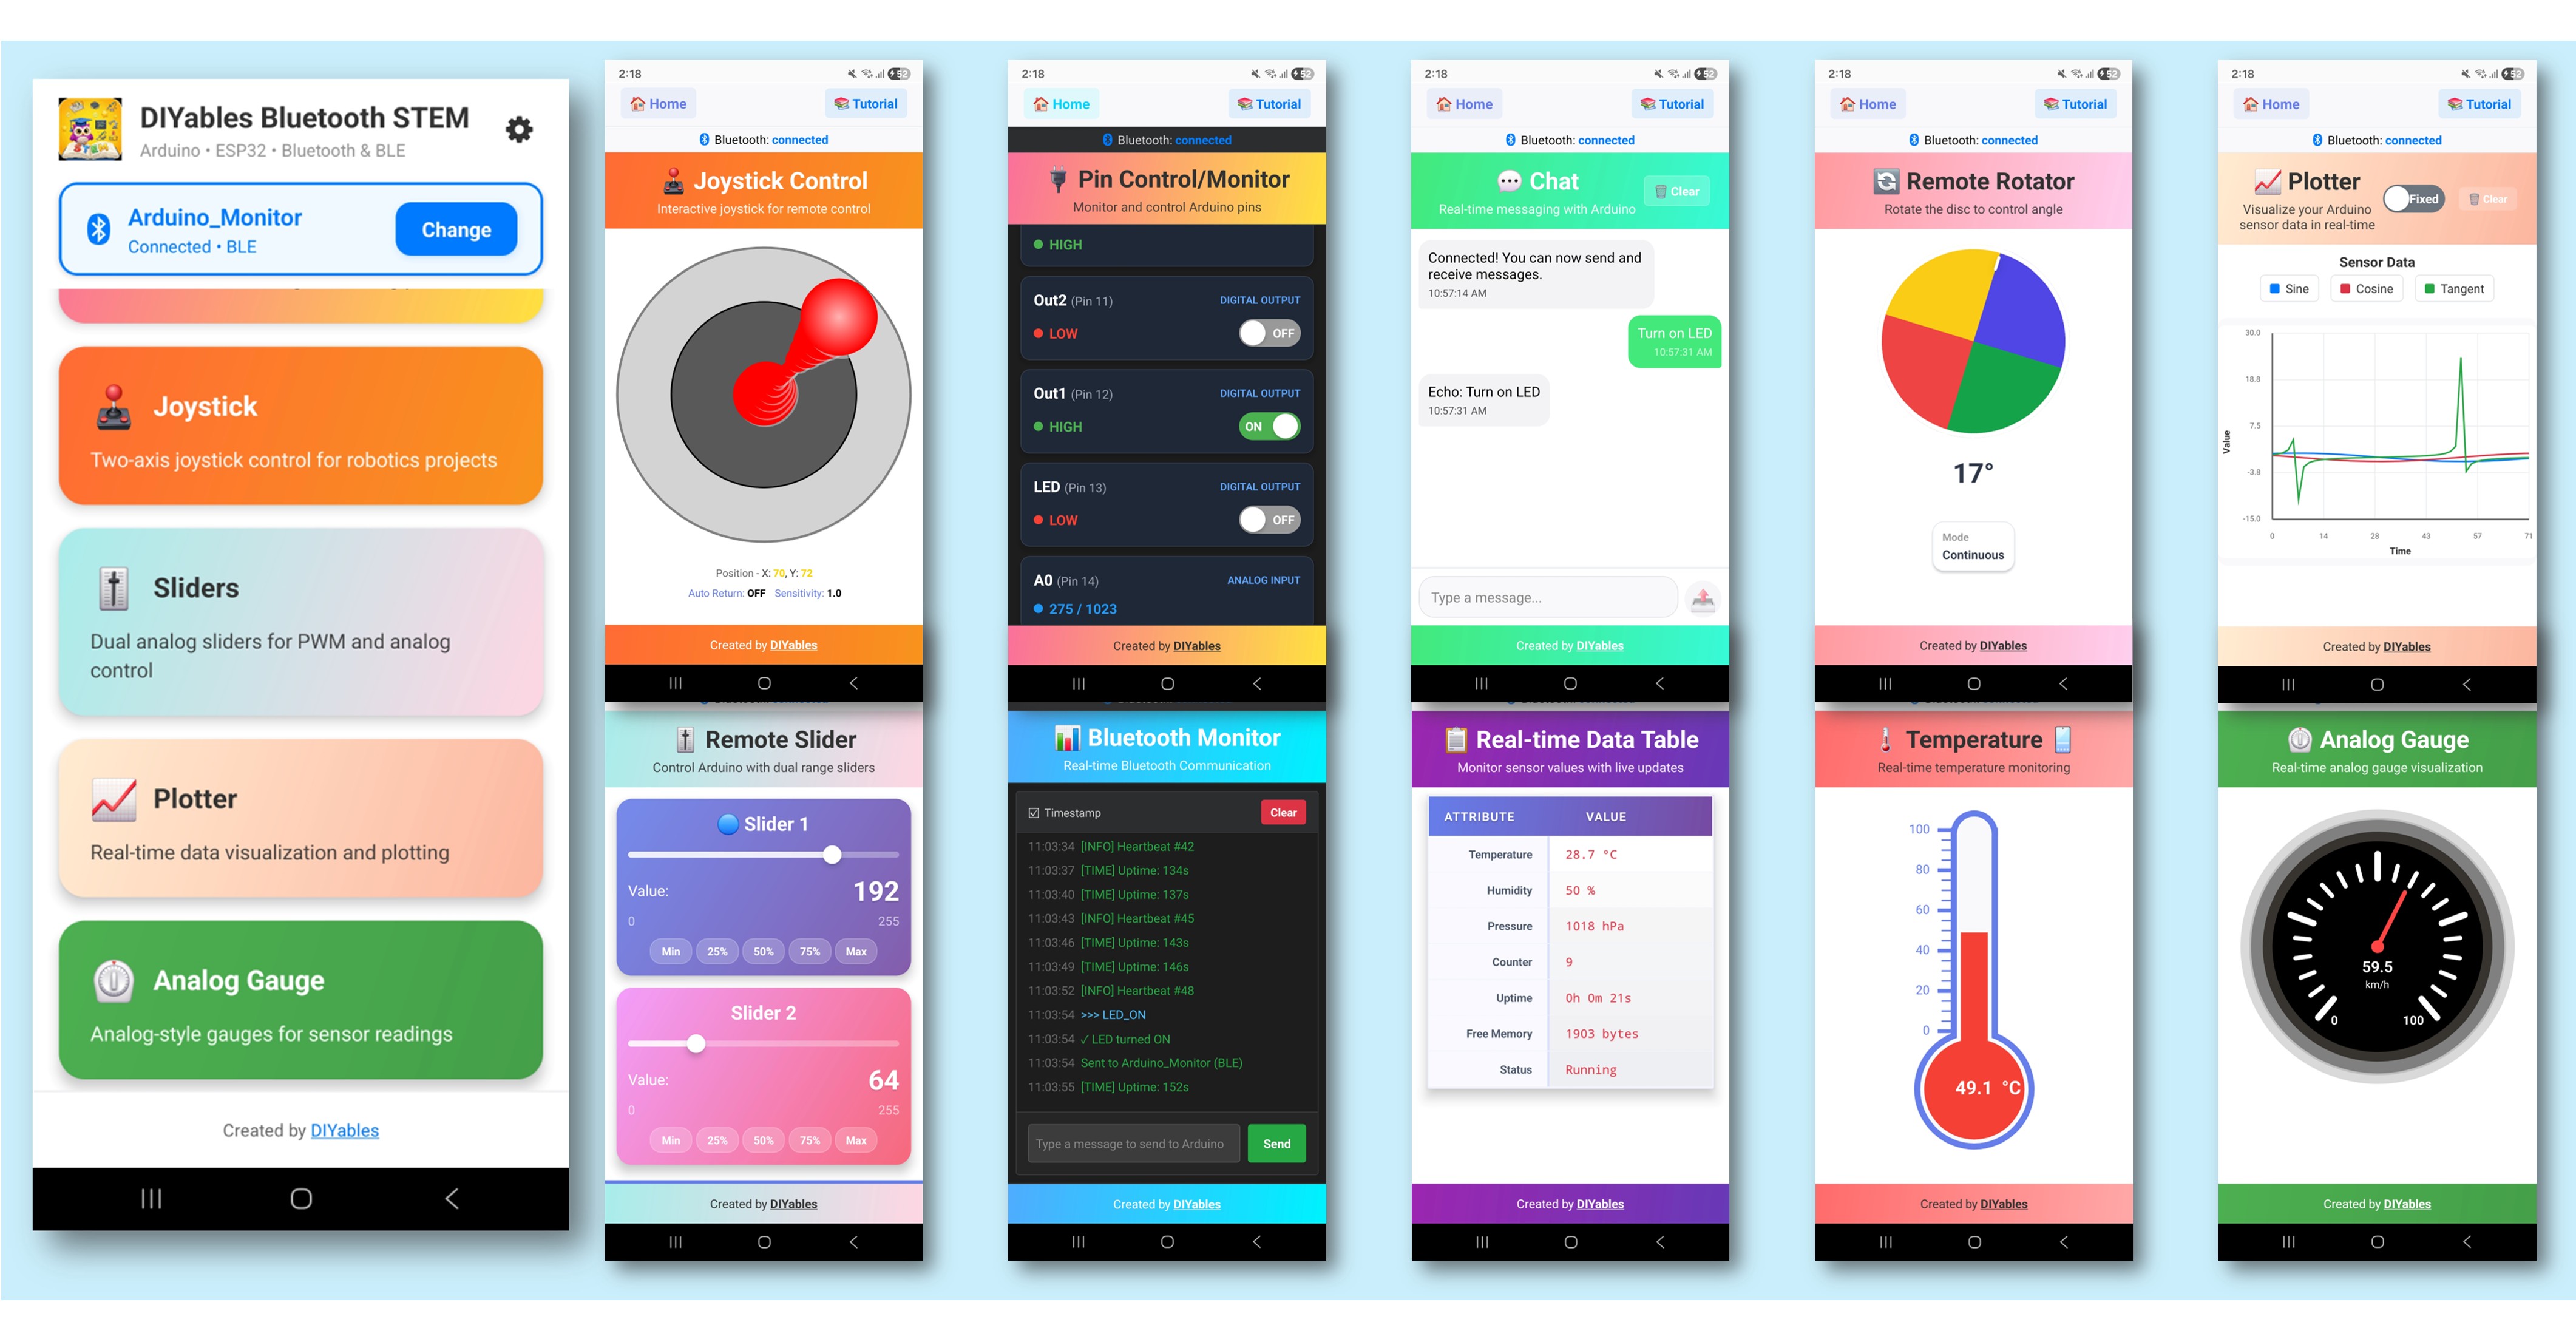
Tik op enkele van de volgende apps om te openen en te communiceren met de Arduino: Monitor, Chat, Slider, Joystick, Temperature, Plotter, Table, Analog Gauge, Rotator
Wissel vrij tussen apps — ze delen allemaal dezelfde BLE-verbinding
Kijk nu terug naar de Serial Monitor in Arduino IDE. U zult zien:
Bluetooth connected!
Monitor: System running, uptime: 5s
Chat message: Hello
Slider value: 128
Joystick: X=0.50, Y=-0.30
Temperature: 22.50 °C
Elke app wordt gemaakt met zijn eigen configuratie en callbacks:
DIYables_BluetoothServer bluetoothServer(bluetooth);
DIYables_BluetoothMonitor bluetoothMonitor(bluetoothServer);
DIYables_BluetoothChat bluetoothChat(bluetoothServer);
DIYables_BluetoothSlider bluetoothSlider(bluetoothServer, 0, 255, 1);
DIYables_BluetoothJoystick bluetoothJoystick(bluetoothServer, false, 5);
DIYables_BluetoothTemperature bluetoothTemp(bluetoothServer, -10.0, 50.0, "°C");
DIYables_BluetoothPlotter bluetoothPlotter(bluetoothServer);
DIYables_BluetoothTable bluetoothTable(bluetoothServer);
DIYables_BluetoothAnalogGauge bluetoothGauge(bluetoothServer, 0.0, 100.0, "%");
DIYables_BluetoothRotator bluetoothRotator(bluetoothServer, ROTATOR_MODE_CONTINUOUS);
Apps kunnen met elkaar communiceren — wanneer één app invoer ontvangt, kan deze andere apps bijwerken:
bluetoothSlider.onSliderValue([](int value) {
float percent = value * 100.0 / 255.0;
bluetoothGauge.send(percent);
bluetoothTable.sendValueUpdate("Slider 1", String(value));
});
bluetoothJoystick.onJoystickValue([](float x, float y) {
bluetoothTable.sendValueUpdate("Joystick X", String(x, 2));
bluetoothTable.sendValueUpdate("Joystick Y", String(y, 2));
});
bluetoothRotator.onRotatorAngle([](float angle) {
bluetoothTable.sendValueUpdate("Rotator Angle", String(angle, 1) + "°");
});
Elke app heeft zijn eigen update-interval om responsiviteit en bandbreedte in balans te houden:
void loop() {
bluetoothServer.loop();
unsigned long now = millis();
if (now - lastPlotterTime >= 100) { ... }
if (now - lastTempTime >= 2000) { ... }
if (now - lastGaugeTime >= 3000) { ... }
if (now - lastMonitorTime >= 5000) { ... }
if (now - lastTableTime >= 5000) { ... }
}
Het voorbeeld creëert een tabel met 10 rijen die data van alle apps toont:
| Rij | Label | Beschrijving |
|---|
| 0 | Status | Verbinding/uitvoering status |
| 1 | Uptime | Tijd sinds opstarten |
| 2 | Slider 1 | Huidige slider waarde |
| 3 | Slider 2 | Tweede slider waarde |
| 4 | Joystick X | Joystick X positie |
| 5 | Joystick Y | Joystick Y positie |
| 6 | Temperature | Huidige temperatuur |
| 7 | Gauge Value | Huidig gauge percentage |
| 8 | Rotator Angle | Huidige rotatie hoek |
| 9 | Messages | Chat berichten aantal |
U heeft niet alle 9 apps nodig. Voeg simpelweg alleen de apps toe die u nodig heeft:
DIYables_BluetoothMonitor bluetoothMonitor(bluetoothServer);
DIYables_BluetoothSlider bluetoothSlider(bluetoothServer, 0, 100, 1);
void checkTemperatureAlarm(float temp) {
if (temp > 40.0) {
bluetoothMonitor.send("⚠️ HOGE TEMP ALARM: " + String(temp, 1) + "°C");
bluetoothChat.send("Temperatuur alarm geactiveerd!");
}
}
1. Kan het apparaat niet vinden in de app
Zorg ervoor dat de Arduino UNO R4 WiFi is ingeschakeld en de sketch is geüpload
Controleer of Bluetooth is ingeschakeld op uw telefoon
Op Android 11 en lager, schakel ook Locatiediensten in
2. Sommige apps worden niet getoond in het menu
Alle apps die zijn geïnitialiseerd verschijnen automatisch
Controleer dat elk app-object correct is aangemaakt
De app ontdekt beschikbare apps van de Arduino
3. Updates lijken langzaam
Elke app heeft verschillende update-intervallen — dit is zo ontworpen
BLE heeft beperkte bandbreedte; te veel snelle updates kunnen congestie veroorzaken
Verminder update-frequentie voor apps die geen real-time data nodig hebben
4. Cross-app updates werken niet
Controleer dat de callback-functies correct zijn ingesteld
Controleer dat tabelrijnamen exact overeenkomen (hoofdlettergevoelig)
Zorg ervoor dat het doel-app-object toegankelijk is in de callback scope
5. Geheugenproblemen of crashes
Het uitvoeren van 9 apps gebruikt aanzienlijk geheugen
Verwijder ongebruikte apps om resources vrij te maken
Verminder het aantal tabelrijen indien nodig
6. Upload mislukt of board niet herkend
Uitgebreid IoT dashboard
Robot besturingspaneel (joystick + monitor + sliders)
Weerstation (temperature + gauge + plotter + table)
Huisautomatisering hub (sliders + pins + monitor + chat)
STEM leerplatform (alle apps voor experimenteren)
Na het beheersen van het Meerdere Apps voorbeeld, verken individuele app-tutorials voor dieper begrip:
Bluetooth Chat - Voor berichtgeving details
Bluetooth Slider - Voor waarde-besturing details
Bluetooth Plotter - Voor datavisualisatie details
Bluetooth RTC - Voor tijdsynchronisatie (gebruikt ingebouwde hardware RTC)