Arduino WebMonitor Voorbeeld - Web-Gebaseerde Seriële Monitor Tutorial

Overzicht

Het WebMonitor voorbeeld vervangt de traditionele Seriële Monitor met een web-gebaseerde interface die toegankelijk is vanaf elk apparaat op uw netwerk. Ontworpen voor Arduino Uno R4 WiFi en DIYables STEM V4 IoT educatief platform met verbeterde IoT-mogelijkheden, ingebouwde sensor monitoring, en naadloze integratie met het educatieve ecosysteem.

Arduino WebMonitor Voorbeeld - Web-gebaseerde Seriële Monitor Tutorial

Functies

  • Realtime Seriële Uitvoer: Bekijk Arduino berichten direct in browser
  • Commando Invoer: Stuur commando's vanaf web interface naar Arduino
  • Donker Thema: Oogvriendelijke terminal-stijl interface
  • Automatisch Scrollen: Scrolt automatisch naar nieuwste berichten
  • Tijdstempel: Alle berichten bevatten tijdstempels
  • Commando Geschiedenis: Navigeer door vorige commando's met pijltjestoetsen
  • Wis Functie: Wis de monitor weergave
  • Kopiëren/Plakken: Volledige tekstselectie en kopieer ondersteuning
  • Platform Uitbreidbaar: Momenteel geïmplementeerd voor Arduino Uno R4 WiFi, maar kan worden uitgebreid voor andere hardware platforms. Zie DIYables_WebApps_ESP32

Setup Instructies

Snelle Stappen

Volg deze instructies stap voor stap:

  • Als dit uw eerste keer is met de Arduino Uno R4 WiFi/DIYables STEM V4 IoT, raadpleeg de tutorial over het instellen van de omgeving voor Arduino Uno R4 WiFi/DIYables STEM V4 IoT in de Arduino IDE.
  • Verbind het Arduino Uno R4/DIYables STEM V4 IoT board met uw computer via een USB-kabel.
  • Start de Arduino IDE op uw computer.
  • Selecteer het juiste Arduino Uno R4 board (bijv., Arduino Uno R4 WiFi) en COM-poort.
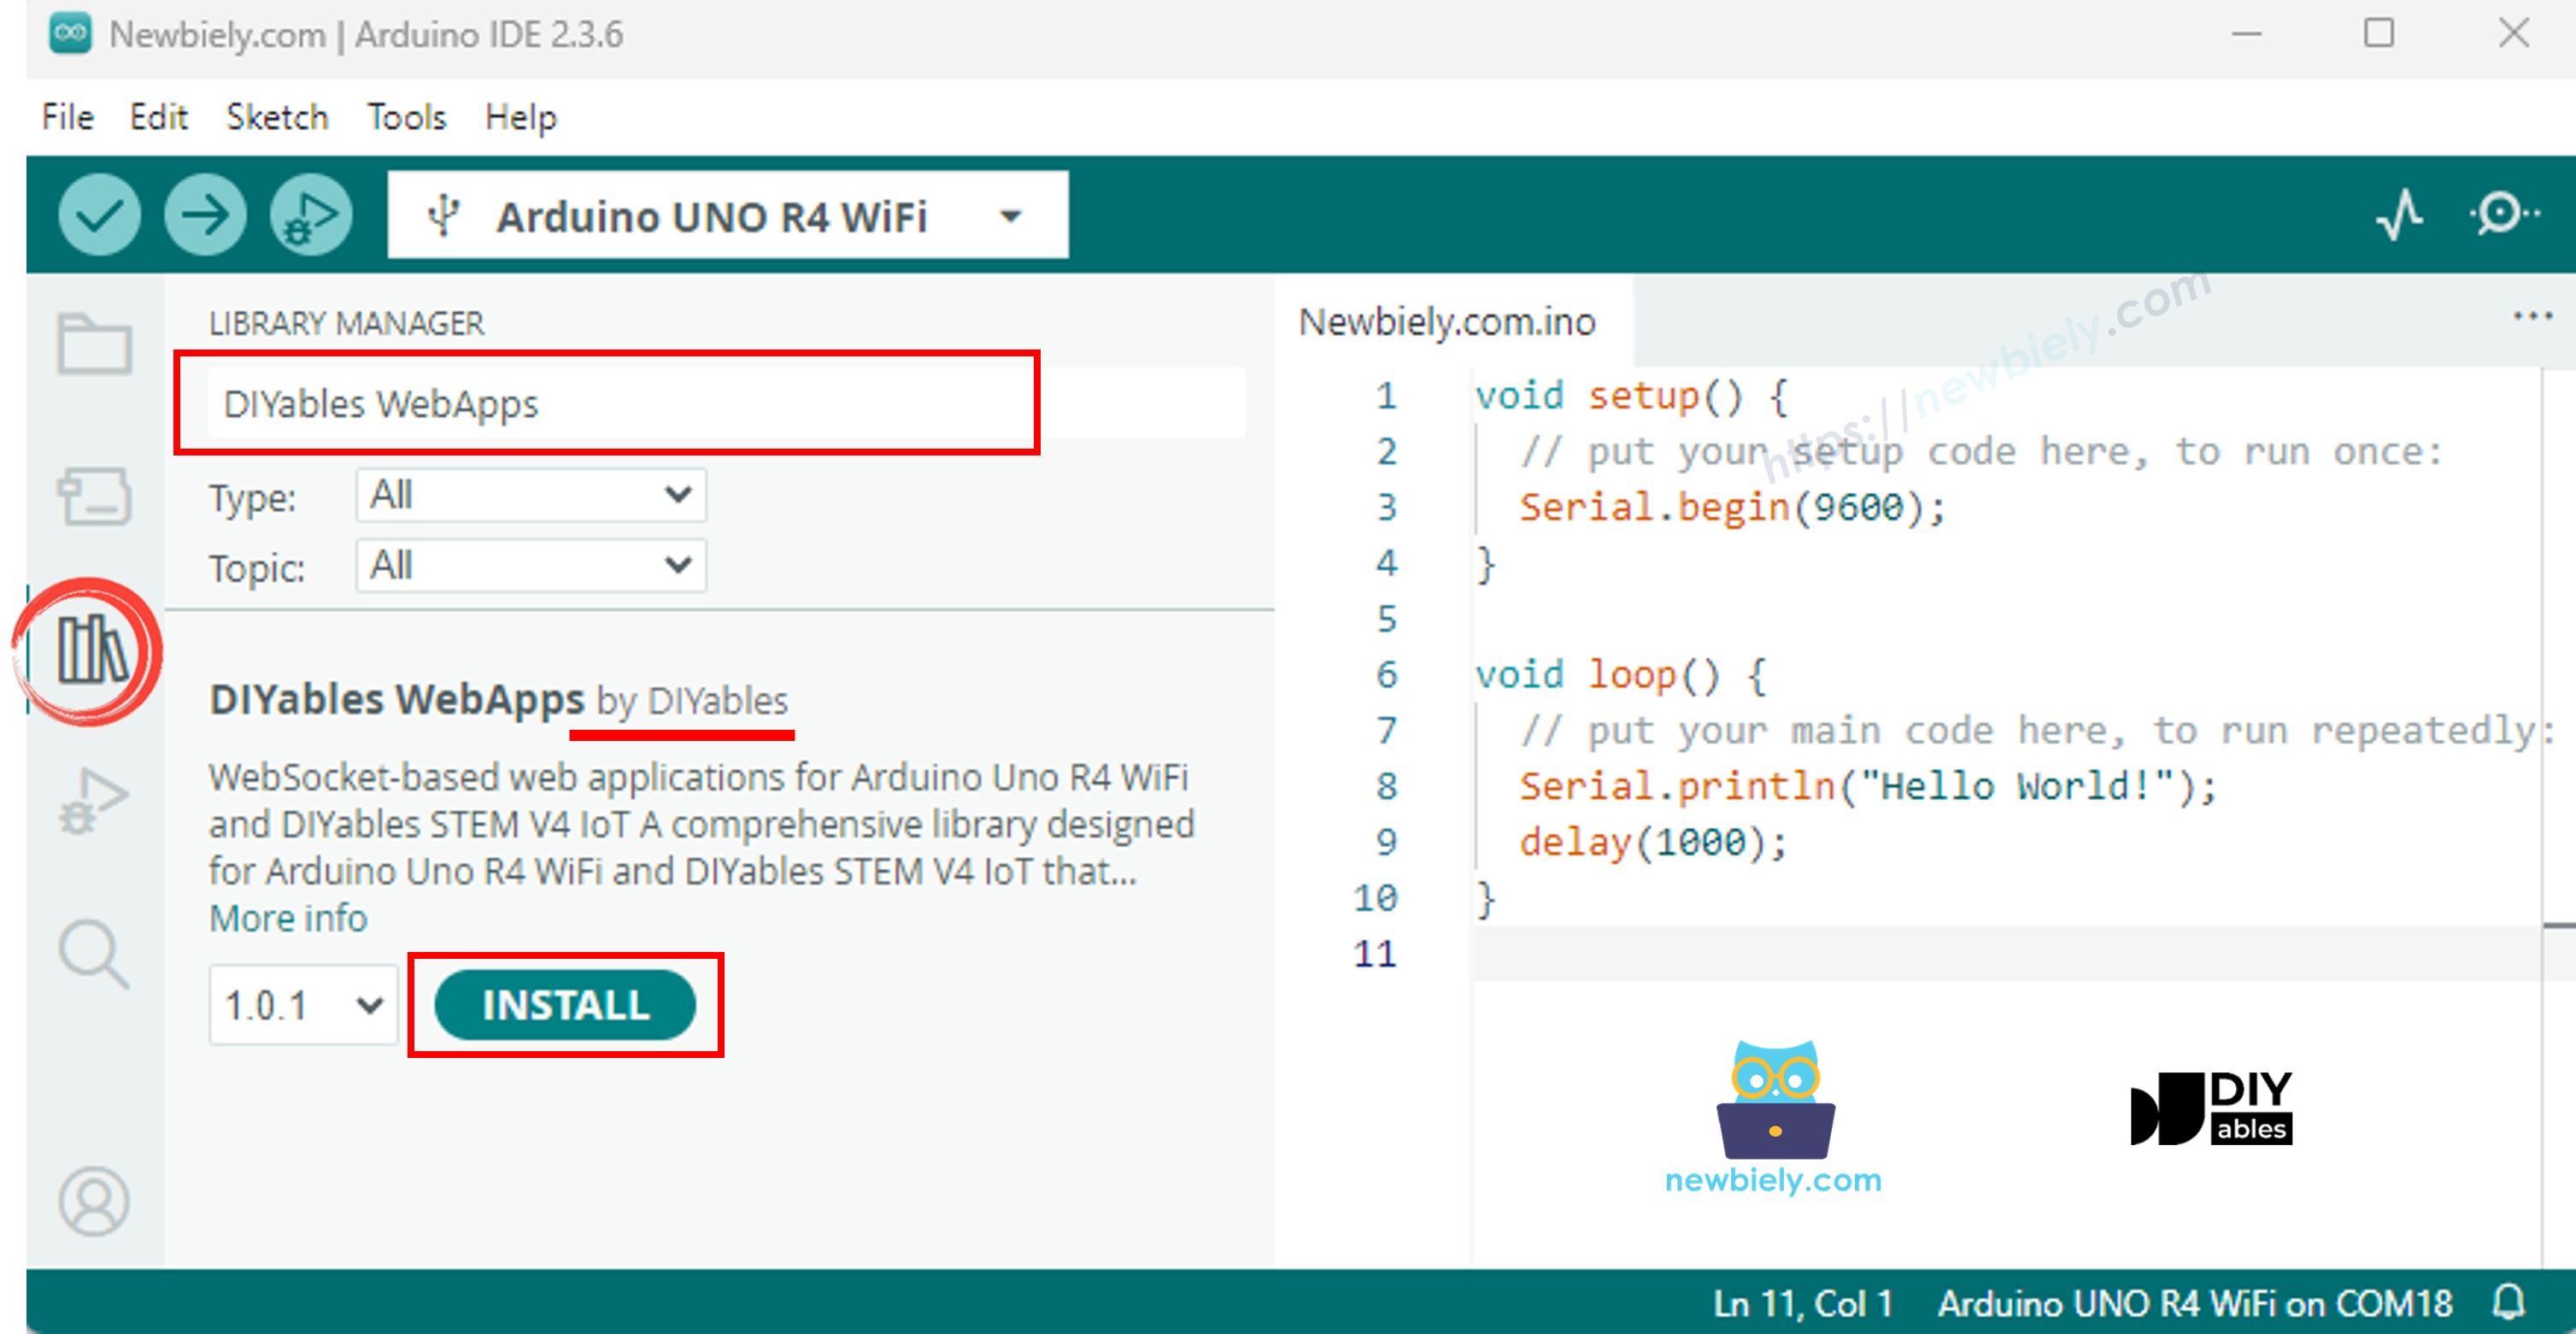
  • Navigeer naar het Libraries pictogram in de linker balk van de Arduino IDE.
  • Zoek "DIYables WebApps", vind dan de DIYables WebApps bibliotheek van DIYables
  • Klik op de Install knop om de bibliotheek te installeren.
Arduino UNO R4 DIYables WebApps bibliotheek
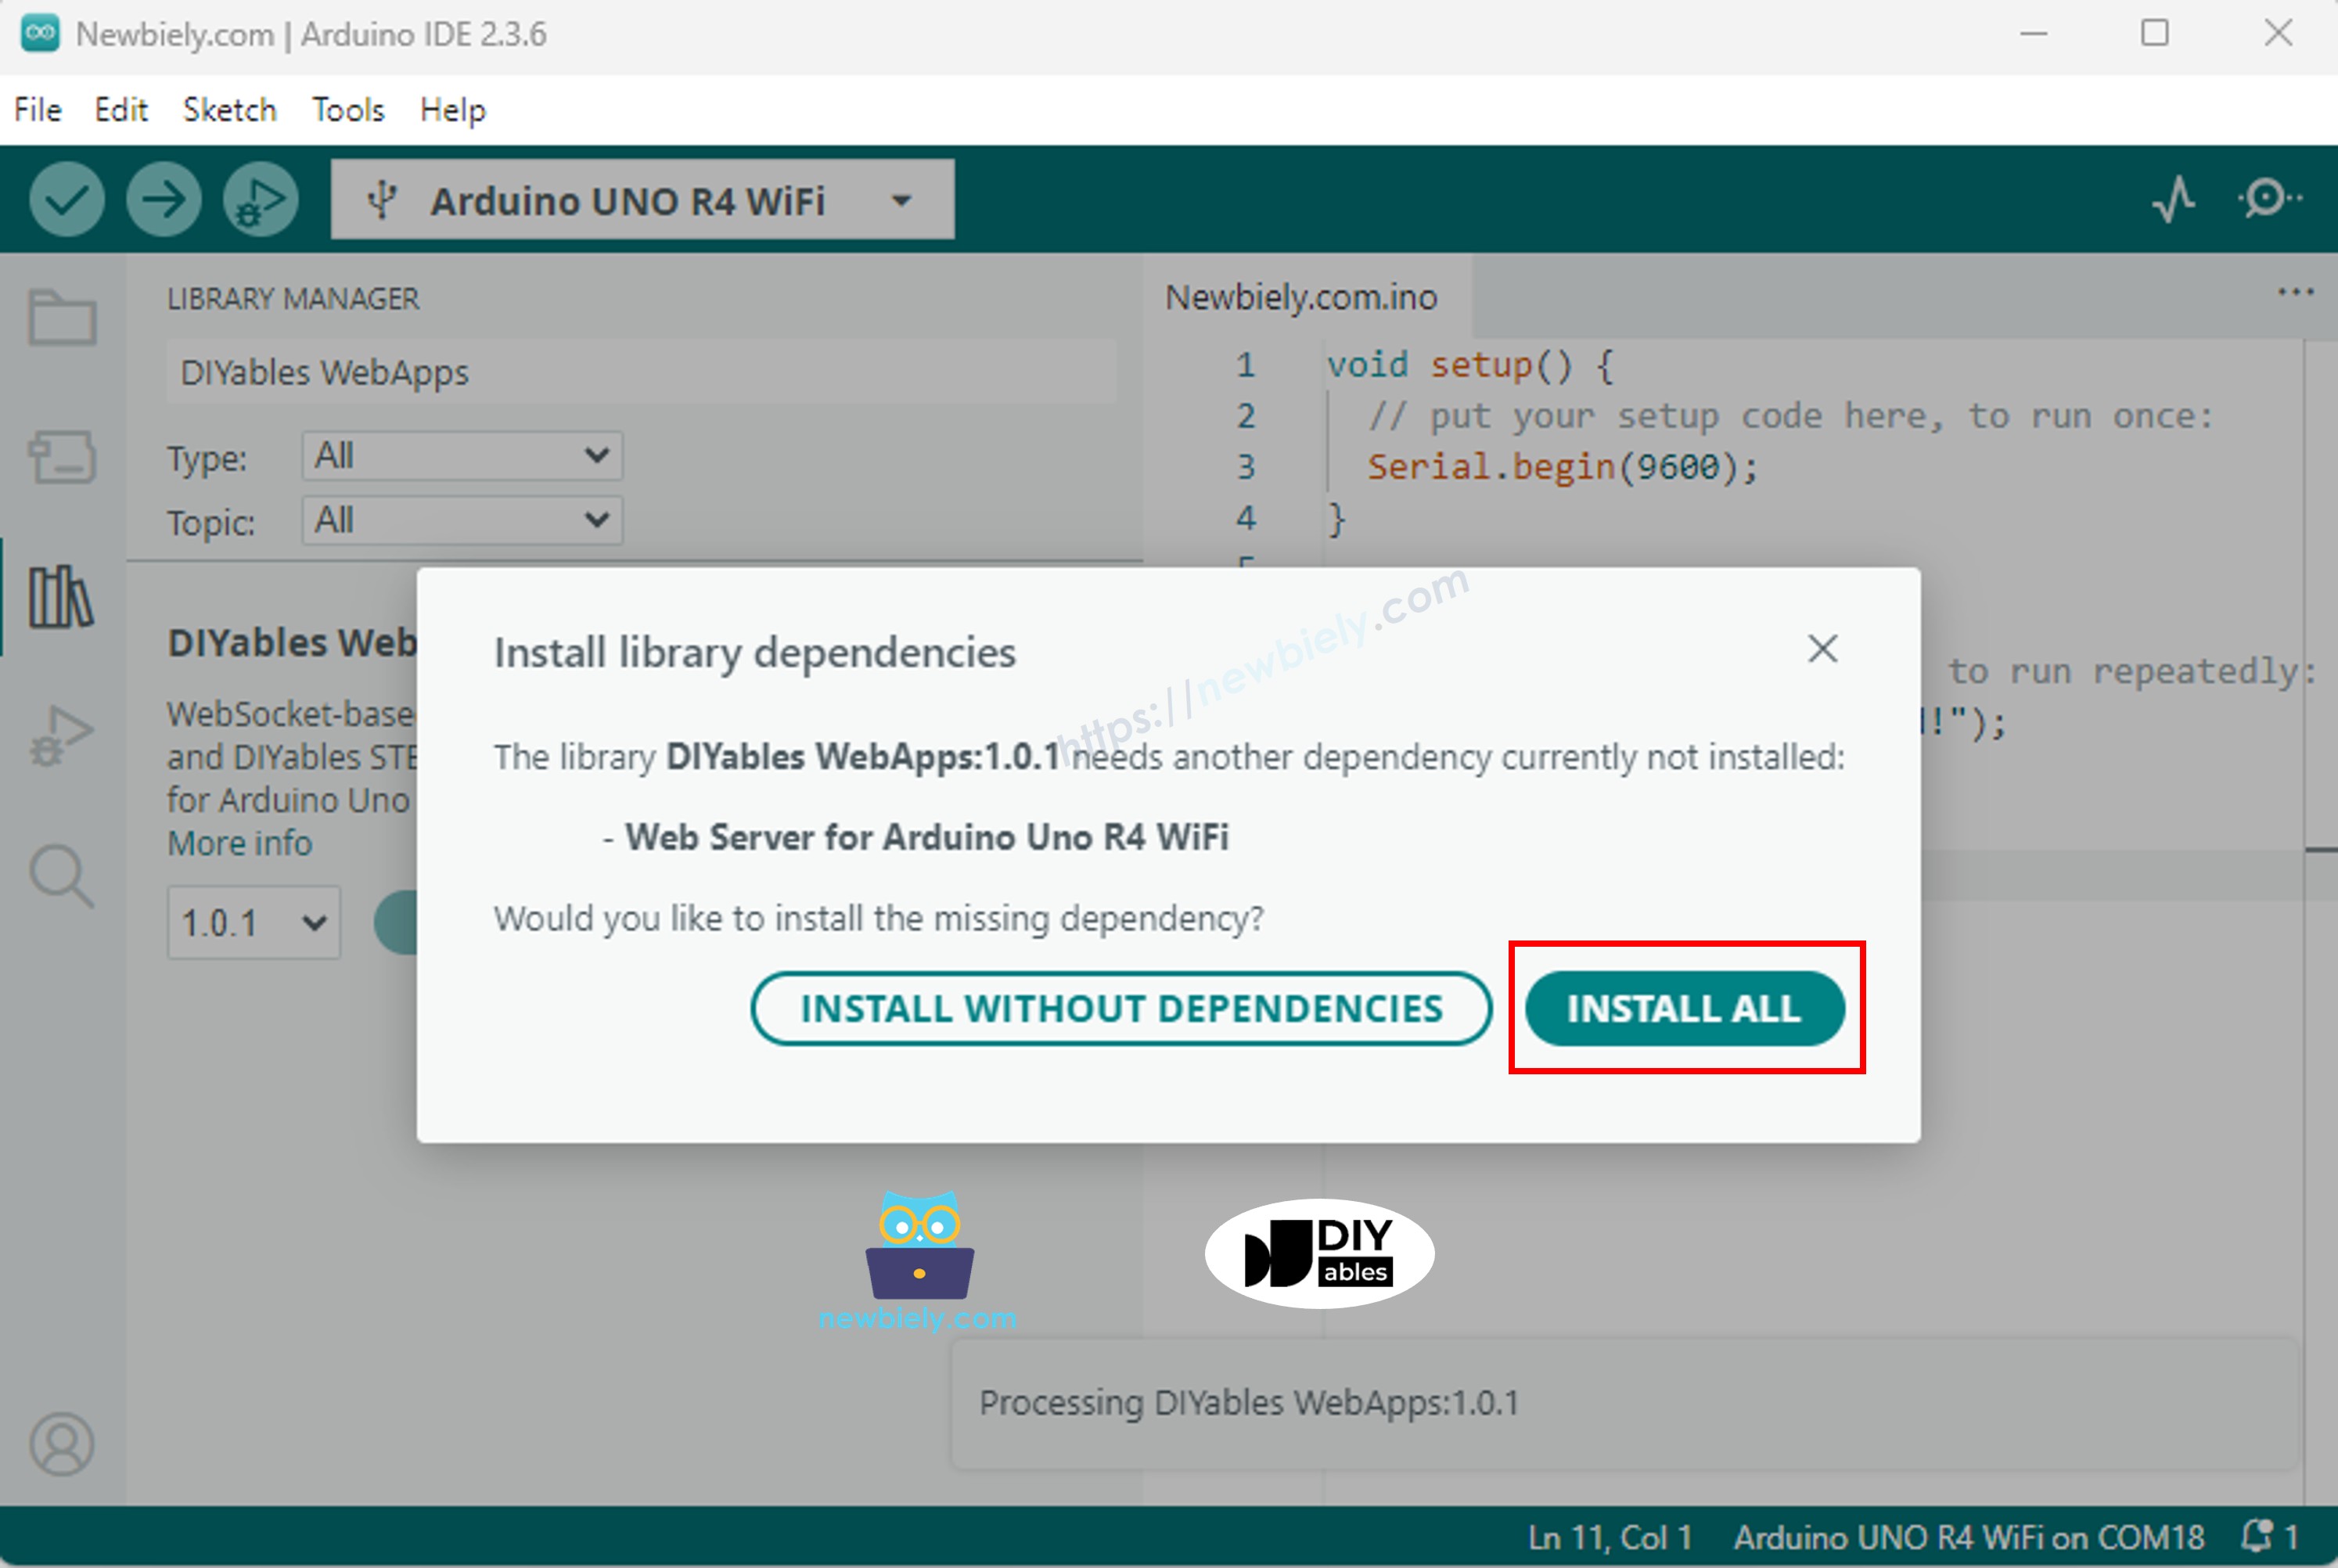
  • U wordt gevraagd om enkele andere bibliotheek afhankelijkheden te installeren
  • Klik op de Install All knop om alle bibliotheek afhankelijkheden te installeren.
Arduino UNO R4 DIYables WebApps afhankelijkheid
  • Ga in Arduino IDE naar File Examples DIYables WebApps WebMonitor voorbeeld, of kopieer de bovenstaande code en plak deze in de editor van Arduino IDE
/* * DIYables WebApp Library - Web Monitor Example * * This example demonstrates the Web Monitor feature: * - Real-time serial monitor in web browser * - Send commands from browser to Arduino * - Automatic message timestamping * * Hardware: Arduino Uno R4 WiFi or DIYables STEM V4 IoT * * Setup: * 1. Update WiFi credentials below * 2. Upload the sketch to your Arduino * 3. Open Serial Monitor to see the IP address * 4. Navigate to http://[IP_ADDRESS]/webmonitor */ #include <DIYablesWebApps.h> // WiFi credentials - UPDATE THESE WITH YOUR NETWORK const char WIFI_SSID[] = "YOUR_WIFI_SSID"; const char WIFI_PASSWORD[] = "YOUR_WIFI_PASSWORD"; // Create WebApp server and page instances UnoR4ServerFactory serverFactory; DIYablesWebAppServer webAppsServer(serverFactory, 80, 81); DIYablesHomePage homePage; DIYablesWebMonitorPage webMonitorPage; // Demo variables unsigned long lastMessage = 0; int messageCount = 0; void setup() { Serial.begin(9600); delay(1000); Serial.println("DIYables WebApp - Web Monitor Example"); // Add home and web monitor pages webAppsServer.addApp(&homePage); webAppsServer.addApp(&webMonitorPage); // Optional: Add 404 page for better user experience webAppsServer.setNotFoundPage(DIYablesNotFoundPage()); // Initialize LED for status indication pinMode(LED_BUILTIN, OUTPUT); // Start the WebApp server if (!webAppsServer.begin(WIFI_SSID, WIFI_PASSWORD)) { while (1) { Serial.println("Failed to start WebApp server!"); delay(1000); } } // Set up monitor callback for incoming commands webMonitorPage.onWebMonitorMessage([](const String& message) { Serial.println("Command from web: " + message); // Process simple commands if (message == "LED_ON") { digitalWrite(LED_BUILTIN, HIGH); webMonitorPage.sendToWebMonitor("LED turned ON"); return; } if (message == "LED_OFF") { digitalWrite(LED_BUILTIN, LOW); webMonitorPage.sendToWebMonitor("LED turned OFF"); return; } if (message == "STATUS") { String status = "Arduino Status: LED=" + String(digitalRead(LED_BUILTIN) ? "ON" : "OFF"); webMonitorPage.sendToWebMonitor(status); return; } if (message == "HELP") { webMonitorPage.sendToWebMonitor("Available commands: LED_ON, LED_OFF, STATUS, HELP"); return; } webMonitorPage.sendToWebMonitor("Unknown command: " + message); }); // Send welcome message webMonitorPage.sendToWebMonitor("Arduino Web Monitor ready!"); webMonitorPage.sendToWebMonitor("Type HELP for available commands"); } void loop() { // Handle WebApp server communications webAppsServer.loop(); // Send periodic updates to web monitor if (millis() - lastMessage > 5000) { // Every 5 seconds messageCount++; // Send sensor readings or status updates String message = "Message #" + String(messageCount) + " - Uptime: " + String(millis() / 1000) + "s"; webMonitorPage.sendToWebMonitor(message); lastMessage = millis(); } // Add your main application code here delay(10); }
  • Configureer WiFi-inloggegevens in de code door deze regels bij te werken:
const char WIFI_SSID[] = "YOUR_WIFI_NETWORK"; const char WIFI_PASSWORD[] = "YOUR_WIFI_PASSWORD";
  • Klik op de Upload knop in Arduino IDE om code naar Arduino UNO R4/DIYables STEM V4 IoT te uploaden
  • Open de Seriële Monitor
  • Bekijk het resultaat in Seriële Monitor. Het ziet er als volgt uit
COM6
Send
DIYables WebApp - Web Monitor Example INFO: Added app / INFO: Added app /web-monitor DIYables WebApp Library Platform: Arduino Uno R4 WiFi Network connected! IP address: 192.168.0.2 HTTP server started on port 80 Configuring WebSocket server callbacks... WebSocket server started on port 81 WebSocket URL: ws://192.168.0.2:81 WebSocket server started on port 81 ========================================== DIYables WebApp Ready! ========================================== 📱 Web Interface: http://192.168.0.2 🔗 WebSocket: ws://192.168.0.2:81 📋 Available Applications: 🏠 Home Page: http://192.168.0.2/ 📊 Web Monitor: http://192.168.0.2/web-monitor ==========================================
Autoscroll Show timestamp
Clear output
9600 baud  
Newline  
  • Als u niets ziet, herstart het Arduino board.
  • Noteer het weergegeven IP-adres en voer dit adres in de adresbalk van een webbrowser op uw smartphone of PC in.
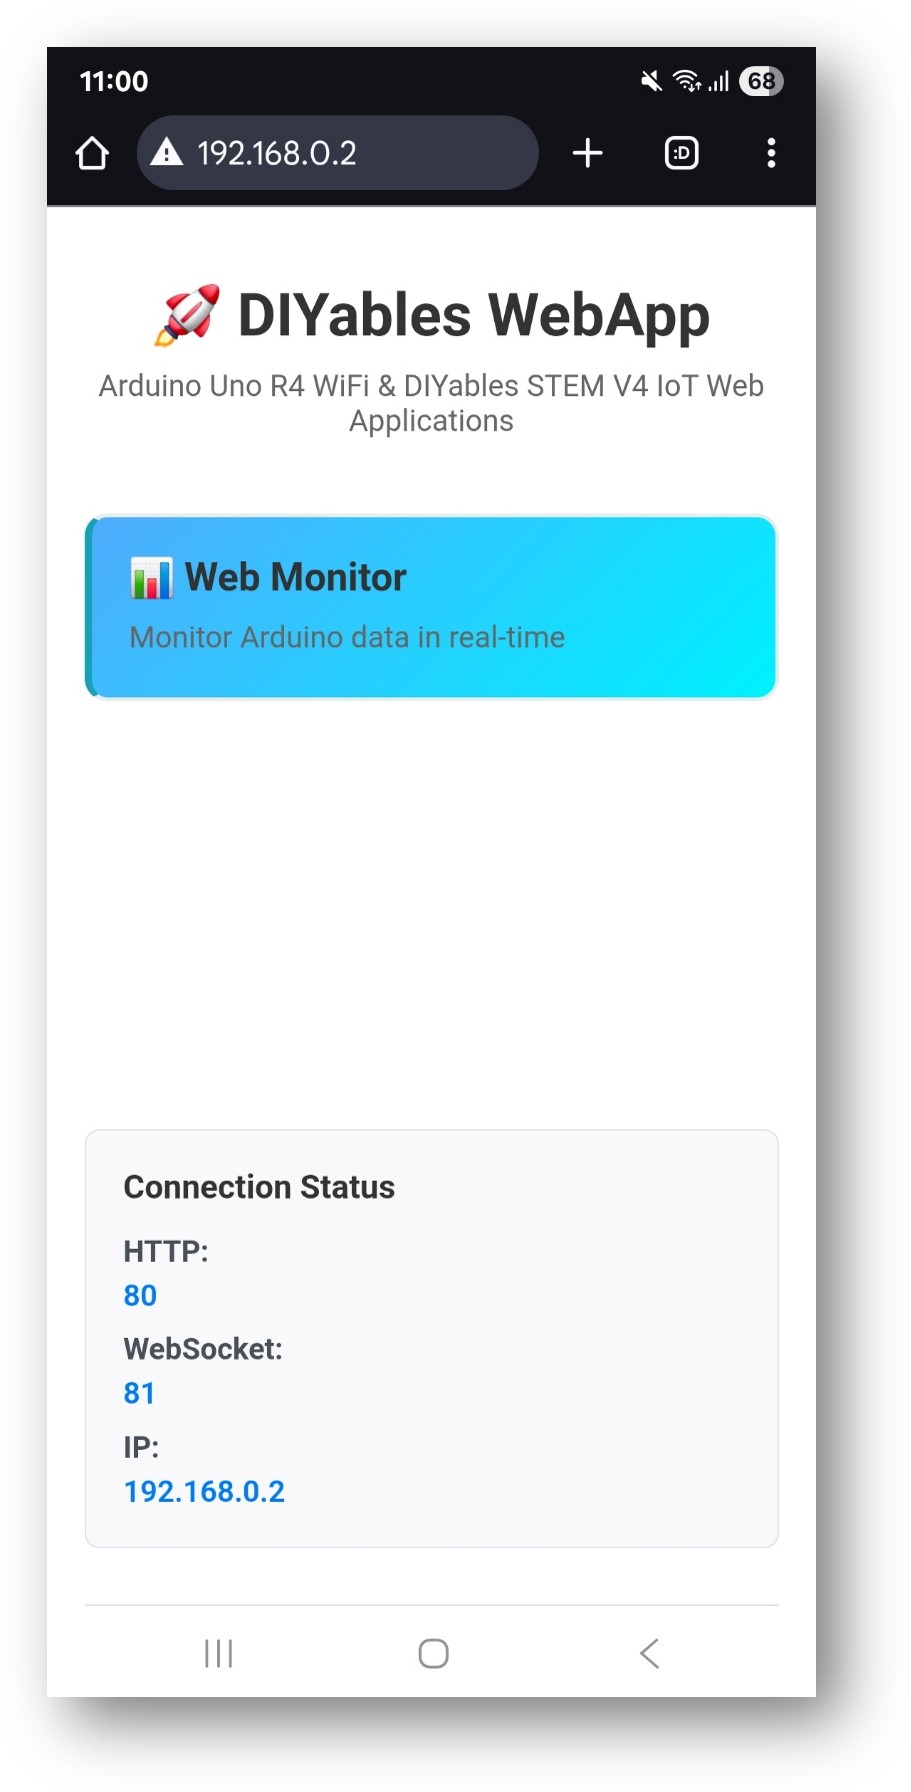
  • Voorbeeld: http://192.168.0.2
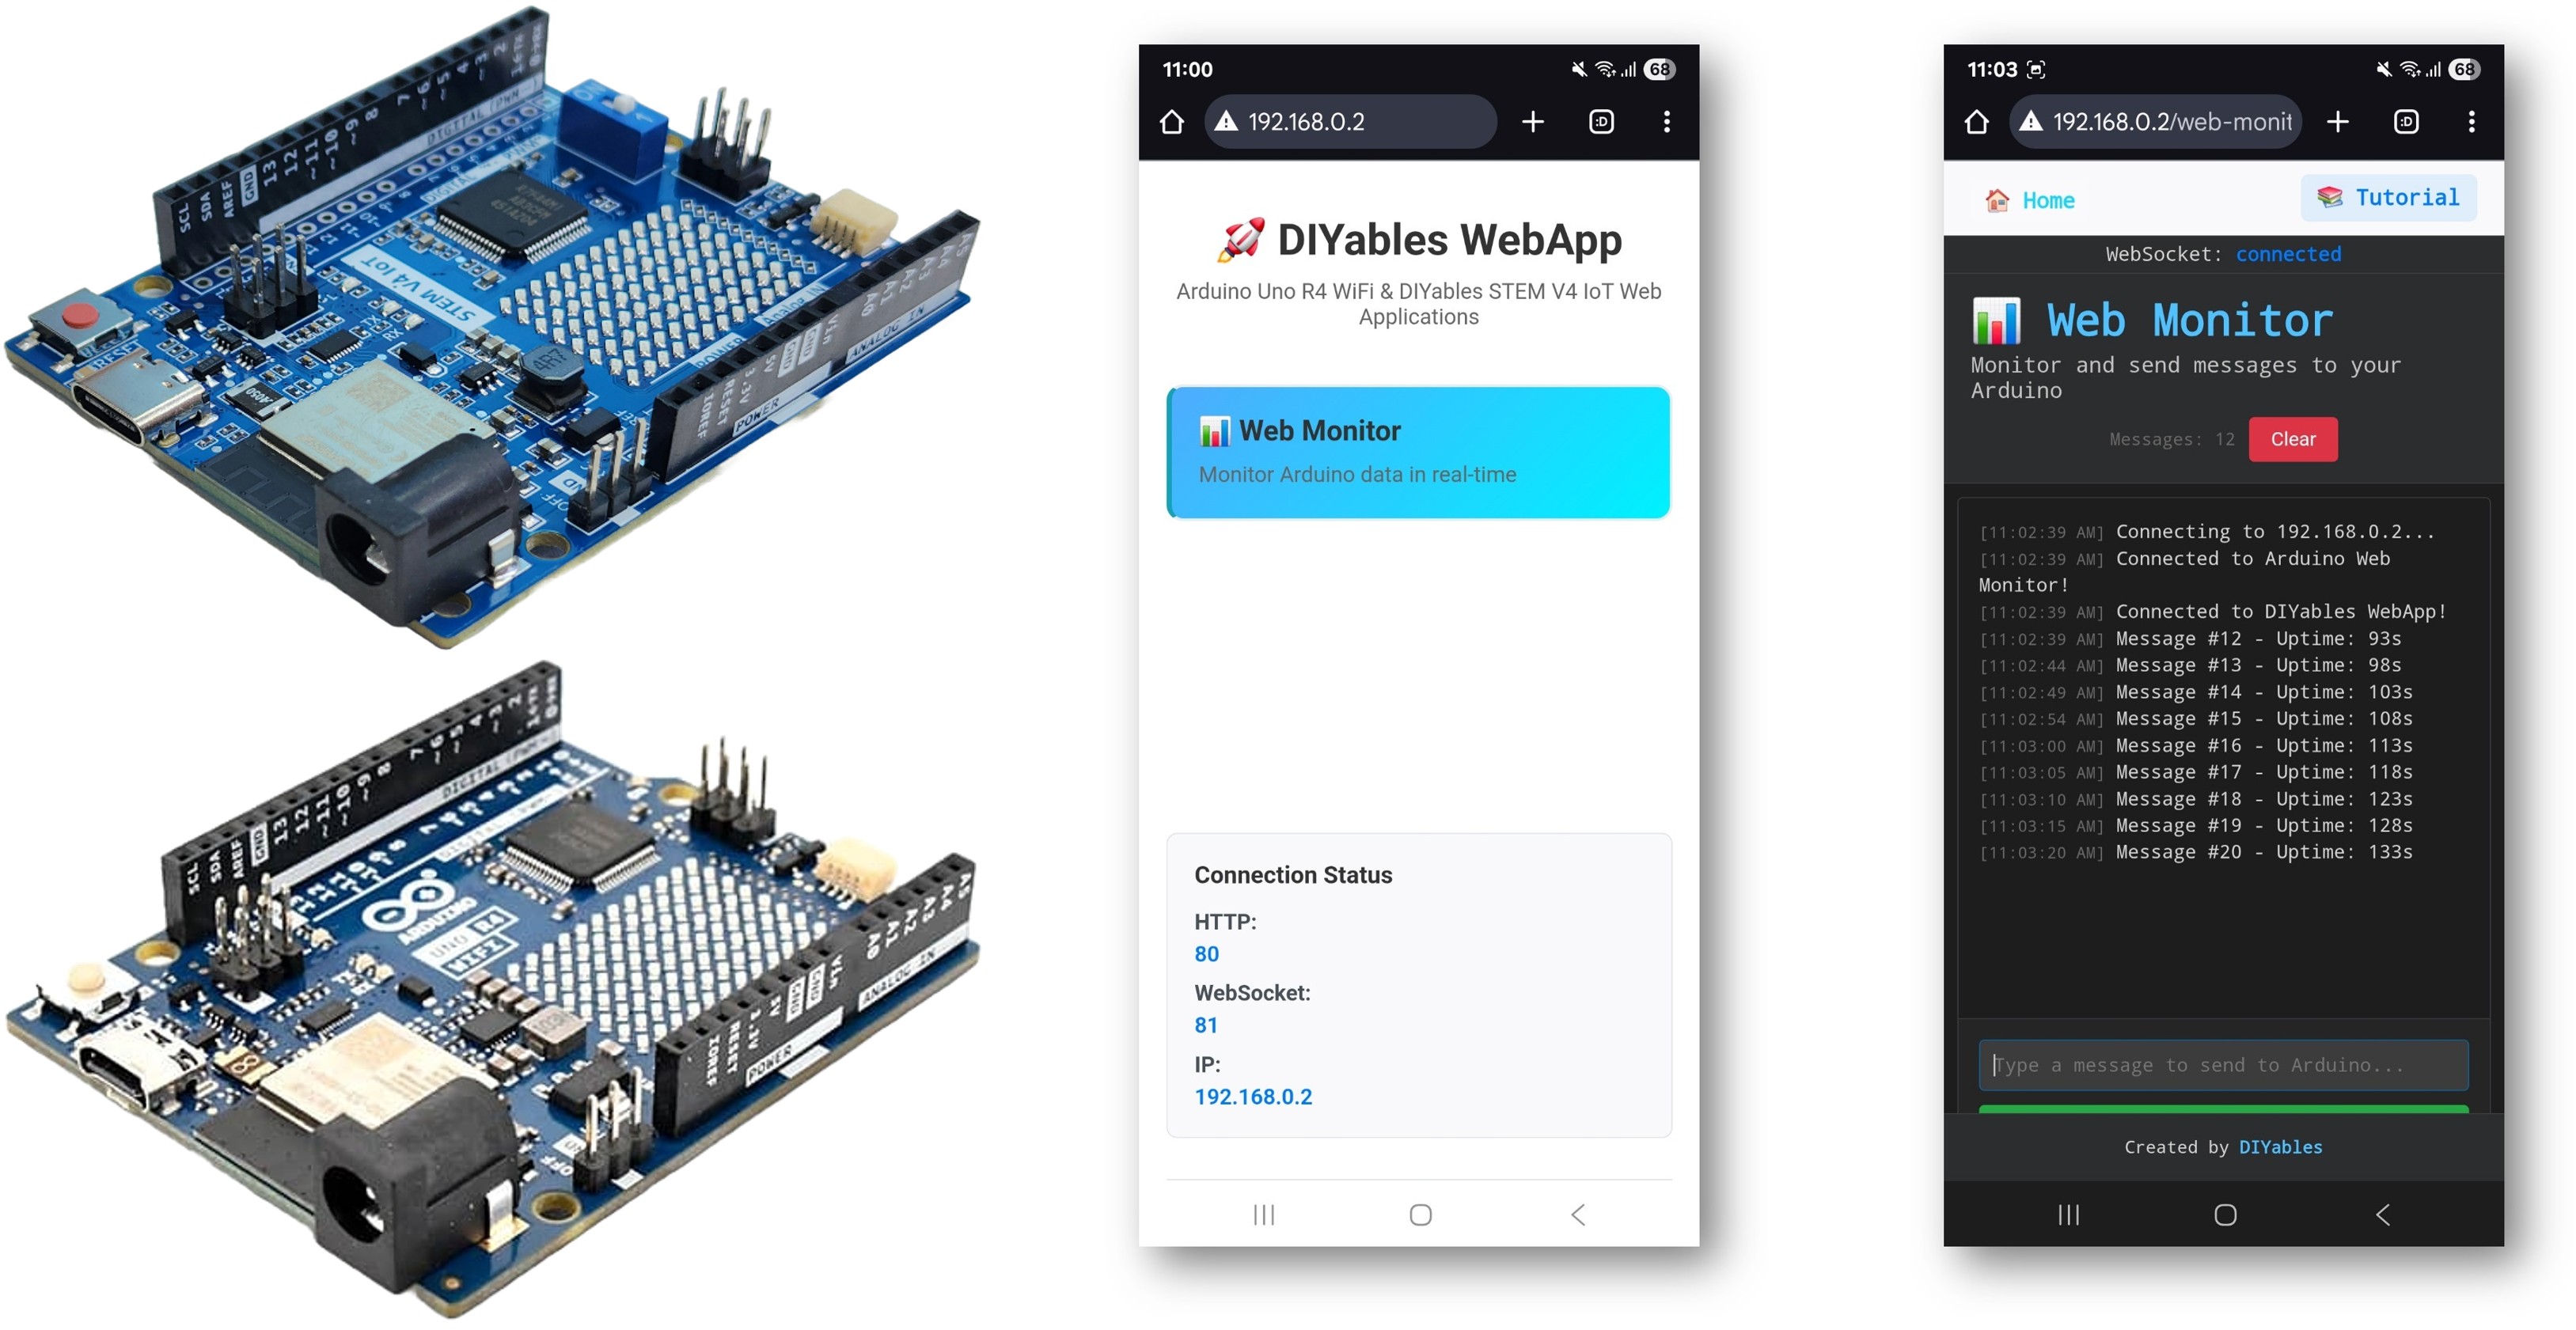
  • U ziet de homepagina zoals onderstaande afbeelding:
Arduino UNO R4 DIYables WebApp Home pagina met Web Monitor app
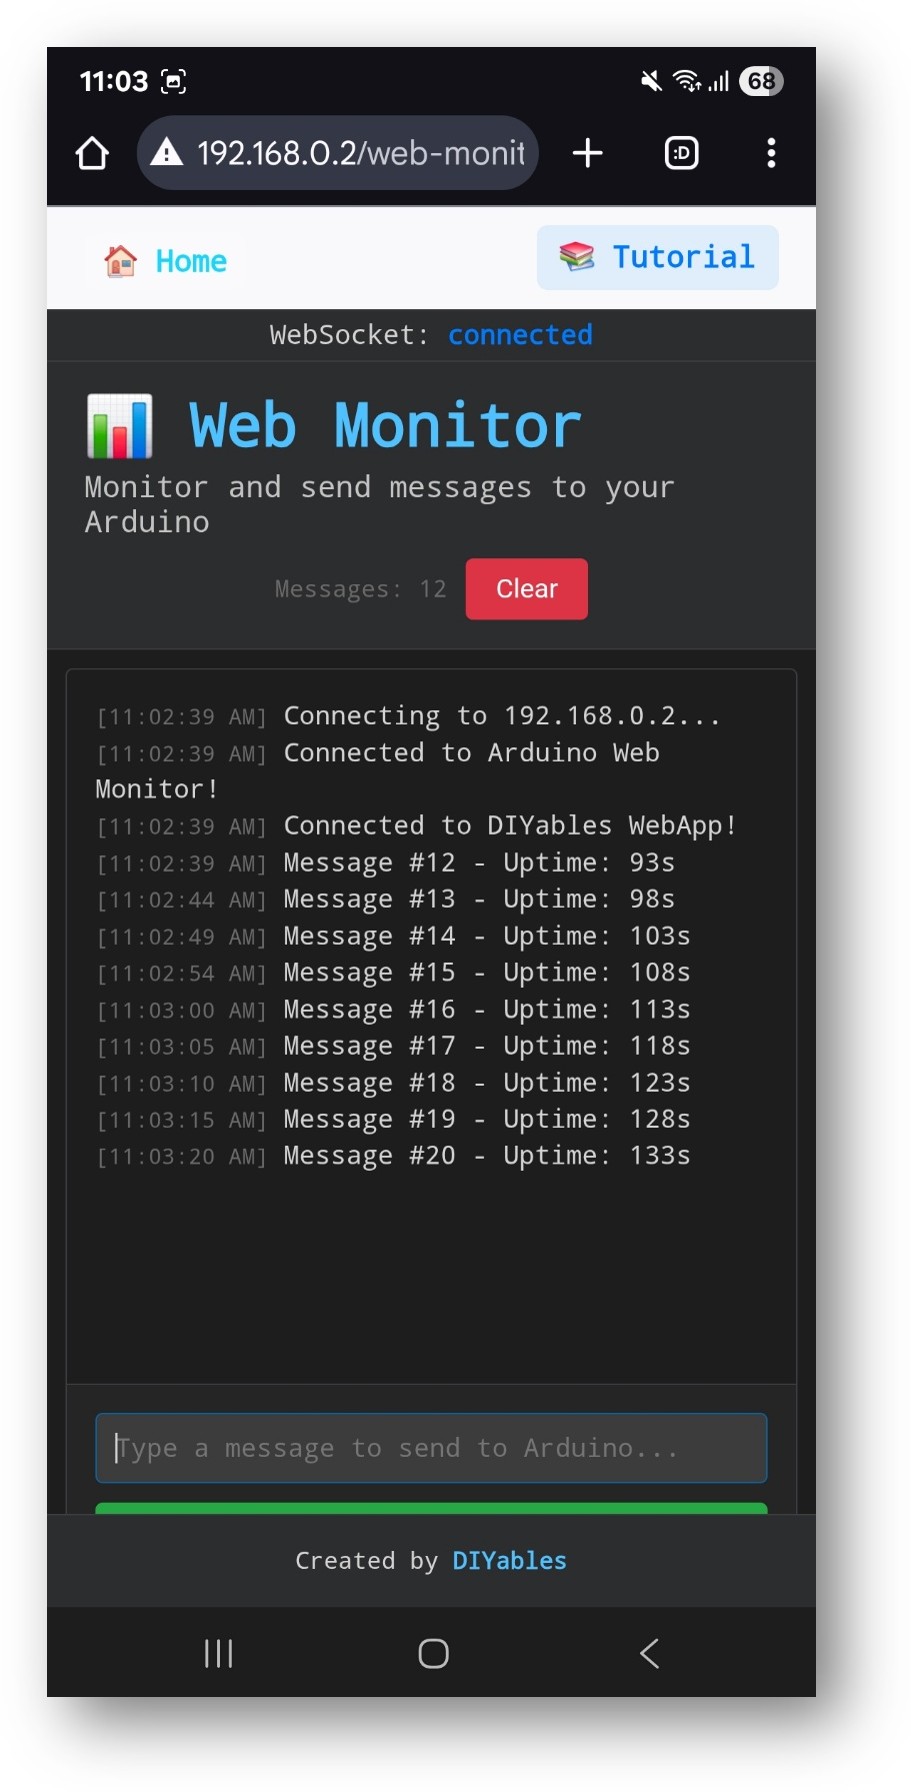
  • Klik op de Web Monitor link, u ziet de Web Monitor app's UI zoals hieronder:
Arduino UNO R4 DIYables WebApp Web Monitor app
  • Of u kunt ook direct toegang krijgen tot de pagina via IP-adres gevolgd door /web-monitor. Bijvoorbeeld: http://192.168.0.2/web-monitor
  • Probeer commando's naar uw Arduino te sturen via de web monitor interface en bekijk realtime seriële uitvoer van uw Arduino.

Hoe Te Gebruiken

Seriële Uitvoer Bekijken

  1. Open de web monitor interface
  2. Arduino stuurt automatisch statusberichten elke 5 seconden
  3. Alle Serial.println() uitvoer verschijnt in de monitor
  4. Berichten krijgen automatisch tijdstempels

Commando's Sturen

  1. Typ commando's in het invoerveld onderaan
  2. Druk op Enter of klik op Send knop
  3. Arduino verwerkt het commando en reageert

Ingebouwde Commando's

Het voorbeeld bevat deze demonstratie commando's:

LED Besturing

  • "led on" → Zet ingebouwde LED aan
  • "led off" → Zet ingebouwde LED uit
  • "led toggle" → Schakelt LED status om
  • "blink" → Knippert LED 3 keer

Systeem Commando's

  • "status" → Toont Arduino status en uptime
  • "help" → Toont beschikbare commando's
  • "reset counter" → Reset berichtenteller
  • "memory" → Toont vrije geheugen informatie

Debug Commando's

  • "test" → Stuurt testbericht
  • "echo [bericht]" → Stuurt uw bericht terug
  • "repeat [n] [bericht]" → Herhaalt bericht n keer

Interface Functies

Toetsenbord Snelkoppelingen

  • Enter → Stuur commando
  • ↑/↓ Pijltjestoetsen → Navigeer door commando geschiedenis
  • Ctrl+L → Wis monitor (indien geïmplementeerd)
  • Ctrl+A → Selecteer alle tekst

Monitor Besturingselementen

  • Auto-scroll → Scrolt automatisch naar nieuwe berichten
  • Clear → Wist de monitor weergave
  • Copy → Kopieer geselecteerde tekst naar klembord

Creatieve Aanpassing - Bouw Uw Geavanceerde Debugging Tool

Breid dit web monitor voorbeeld uit om een krachtige debugging en besturingsinterface voor uw projecten te creëren! Voeg aangepaste commando's, sensor monitoring, en realtime data visualisatie toe om aan uw creatieve behoeften te voldoen.

Code Structuur

Hoofdcomponenten

  1. WebApp Server: Behandelt HTTP en WebSocket verbindingen
  2. Monitor Pagina: Biedt terminal-stijl web interface
  3. Bericht Handler: Verwerkt inkomende commando's
  4. Seriële Bridge: Stuurt Seriële uitvoer door naar web interface

Belangrijke Functies

// Handle commands from web interface void handleWebCommand(String command, String clientId) { // Process command and execute actions } // Send message to web monitor void sendToWebMonitor(String message) { // Forward message via WebSocket }

Aangepaste Commando's Toevoegen

Om nieuwe commando's toe te voegen, wijzig de handleWebCommand functie:

if (command.startsWith("your_command")) { // Extract parameters String param = command.substring(12); // After "your_command" // Execute your action digitalWrite(LED_BUILTIN, HIGH); // Send response sendToWebMonitor("Command executed: " + param); }

Praktische Toepassingen

Ontwikkeling en Debugging

void loop() { // Debug sensor readings int sensorValue = analogRead(A0); sendToWebMonitor("Sensor A0: " + String(sensorValue)); // Debug variables sendToWebMonitor("Loop count: " + String(loopCount++)); delay(1000); }

Externe Systeem Monitoring

void checkSystemHealth() { // Monitor memory int freeMemory = getFreeMemory(); sendToWebMonitor("Free memory: " + String(freeMemory) + " bytes"); // Monitor sensors float temperature = getTemperature(); sendToWebMonitor("Temperature: " + String(temperature) + "°C"); // Monitor connectivity if (WiFi.status() == WL_CONNECTED) { sendToWebMonitor("WiFi: Connected (RSSI: " + String(WiFi.RSSI()) + ")"); } else { sendToWebMonitor("WiFi: Disconnected"); } }

Configuratie Beheer

// Handle configuration commands if (command.startsWith("config ")) { String setting = command.substring(7); if (setting.startsWith("interval ")) { int interval = setting.substring(9).toInt(); updateInterval = interval * 1000; // Convert to milliseconds sendToWebMonitor("Update interval set to " + String(interval) + " seconds"); } if (setting == "save") { saveConfigToEEPROM(); sendToWebMonitor("Configuration saved to EEPROM"); } }

Geavanceerde Functies

Bericht Filtering

Voeg berichttypen en filtering toe:

enum MessageType { INFO, WARNING, ERROR, DEBUG }; void sendToWebMonitor(String message, MessageType type = INFO) { String prefix; switch(type) { case WARNING: prefix = "[WARN] "; break; case ERROR: prefix = "[ERROR] "; break; case DEBUG: prefix = "[DEBUG] "; break; default: prefix = "[INFO] "; } webMonitorPage.sendMessage(prefix + message); }

Commando Parsing

Implementeer geavanceerde commando parsing:

struct Command { String name; String parameters[5]; int paramCount; }; Command parseCommand(String input) { Command cmd; int spaceIndex = input.indexOf(' '); if (spaceIndex > 0) { cmd.name = input.substring(0, spaceIndex); // Parse parameters... } else { cmd.name = input; cmd.paramCount = 0; } return cmd; }

Data Logging

Log monitor data naar SD-kaart of EEPROM:

#include <SD.h> void logMessage(String message) { File logFile = SD.open("monitor.log", FILE_WRITE); if (logFile) { logFile.print(millis()); logFile.print(": "); logFile.println(message); logFile.close(); } }

Probleemoplossing

Veelvoorkomende Problemen

1. Geen uitvoer in web monitor

  • Controleer of Serial.begin() wordt aangeroepen in setup()
  • Verifieer WebSocket verbinding (groene status indicator)
  • Controleer browser console voor fouten

2. Commando's werken niet

  • Zorg ervoor dat commando's exact zijn zoals gespecificeerd
  • Controleer hoofdlettergevoeligheid van commando's
  • Zoek naar antwoordberichten in monitor

3. Interface laadt langzaam

  • Controleer WiFi signaalsterkte
  • Reduceer berichtfrequentie
  • Wis browser cache

4. WebSocket verbindingsonderbrekingen

  • Controleer netwerkstabiliteit
  • Reduceer berichtgrootte
  • Implementeer herverbindingslogica

Debug Tips

Schakel gedetailleerde debugging in:

#define DEBUG_WEBMONITOR 1 #if DEBUG_WEBMONITOR #define DEBUG_PRINT(x) Serial.print(x) #define DEBUG_PRINTLN(x) Serial.println(x) #else #define DEBUG_PRINT(x) #define DEBUG_PRINTLN(x) #endif

Monitor WebSocket status:

void checkWebSocketStatus() { if (server.getClientCount() > 0) { sendToWebMonitor("WebSocket clients connected: " + String(server.getClientCount())); } }

Beveiligingsoverwegingen

Commando Validatie

Valideer altijd inkomende commando's:

bool isValidCommand(String command) { // Check command length if (command.length() > 100) return false; // Check for dangerous characters if (command.indexOf("\\") >= 0 || command.indexOf("/") >= 0) return false; // Check against whitelist String allowedCommands[] = {"led", "status", "help", "test"}; String cmdName = command.substring(0, command.indexOf(' ')); for (String allowed : allowedCommands) { if (cmdName.equals(allowed)) return true; } return false; }

Toegangscontrole

Implementeer basis authenticatie:

bool isAuthorized(String clientId) { // Check client authorization return authorizedClients.indexOf(clientId) >= 0; }

Integratie Voorbeelden

Sensor Monitoring Systeem

void monitorSensors() { static unsigned long lastSensorRead = 0; if (millis() - lastSensorRead > 5000) { // Read multiple sensors int light = analogRead(A0); int temp = analogRead(A1); int humidity = analogRead(A2); // Send formatted data String data = "Sensors - Light: " + String(light) + ", Temp: " + String(temp) + ", Humidity: " + String(humidity); sendToWebMonitor(data); lastSensorRead = millis(); } }

Huisautomatisering Monitor

void monitorHome() { // Door sensors if (digitalRead(DOOR_SENSOR) == HIGH) { sendToWebMonitor("ALERT: Front door opened"); } // Motion detection if (digitalRead(PIR_SENSOR) == HIGH) { sendToWebMonitor("Motion detected in living room"); } // Environmental monitoring float temp = dht.readTemperature(); if (temp > 25.0) { sendToWebMonitor("WARNING: Temperature high (" + String(temp) + "°C)"); } }

Volgende Stappen

Na het beheersen van het WebMonitor voorbeeld, probeer:

  1. Chat - Voor interactieve communicatie
  2. DigitalPins - Voor het besturen van uitgangen
  3. Slider - Voor analoge waarde controle
  4. MultipleWebApps - Combinatie van monitoring met besturing

Ondersteuning

Voor extra hulp:

  • Bekijk de API Reference documentatie
  • Bezoek DIYables tutorials: https://newbiely.com/tutorials/arduino-uno-r4/arduino-uno-r4-diyables-webapps
  • Arduino community forums

※ ONZE BERICHTEN

  • U bent welkom om de link naar deze tutorial te delen. Gebruik onze inhoud echter niet op andere websites. We hebben veel moeite en tijd gestoken in het maken van de inhoud, respecteer alstublieft ons werk!