Arduino UNO R4 - OLED 128x32
Deze tutorial laat u zien hoe u een Arduino UNO R4 gebruikt met een OLED 128x32 I2C display. U leert:
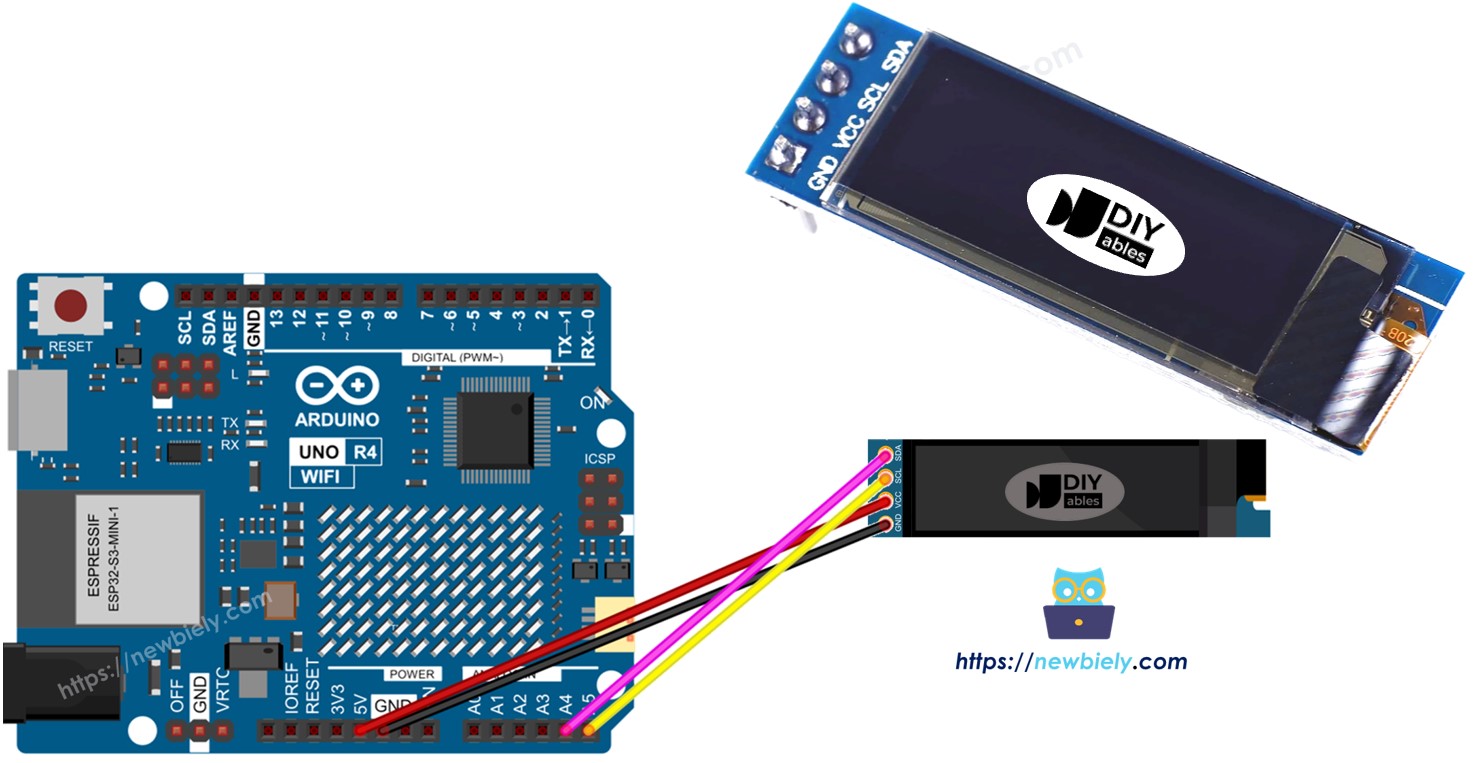
- Hoe u een OLED 128x32 display aansluit op de Arduino UNO R4.
- Hoe u de Arduino UNO R4 programmeert om tekst en cijfers weer te geven op het 128x32 OLED display.
- Hoe u tekeningen maakt op het 128x32 OLED display met de Arduino UNO R4.
- Hoe u afbeeldingen weergeeft op het 128x32 OLED display met de Arduino UNO R4.
- Hoe u tekst en cijfers zowel verticaal als horizontaal centreert op het 128x32 OLED display.
Benodigde Hardware
Of u kunt de volgende kits kopen:
| 1 | × | DIYables STEM V4 IoT Starterskit (Arduino inbegrepen) | |
| 1 | × | DIYables Sensorkit (30 sensoren/displays) | |
| 1 | × | DIYables Sensorkit (18 sensoren/displays) |
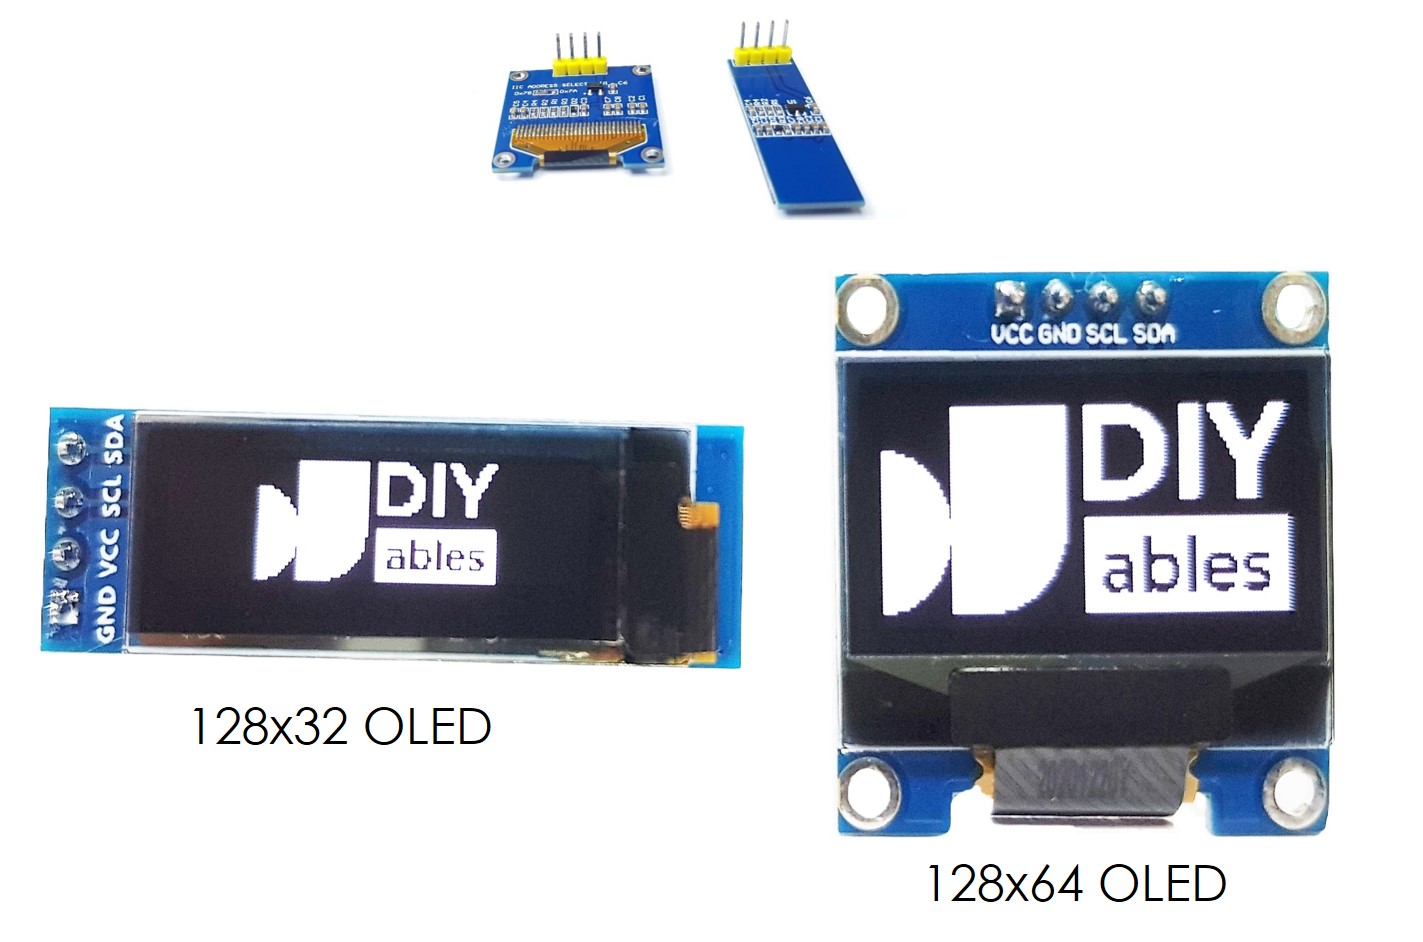
Over OLED Display
I2C OLED Display Pinout
- GND pin: moet worden aangesloten op de grond van Arduino UNO R4
- VCC pin: is de voedingsspanning voor het display die we aansluiten op de 5 volt pin van de Arduino UNO R4.
- SCL pin: is een seriële klokpin voor I2C interface.
- SDA pin: is een seriële datapin voor I2C interface.
※ Notiz:
De rangschikking van pinnen op een OLED module kan verschillen op basis van de fabrikant en het model van de module. Controleer altijd en volg de labels op de OLED module. Wees attent!
Deze handleiding is voor een OLED display dat de SSD1306 I2C driver gebruikt. We hebben het getest met een OLED display van DIYables. Het functioneert perfect zonder problemen.
Bedradingsschema
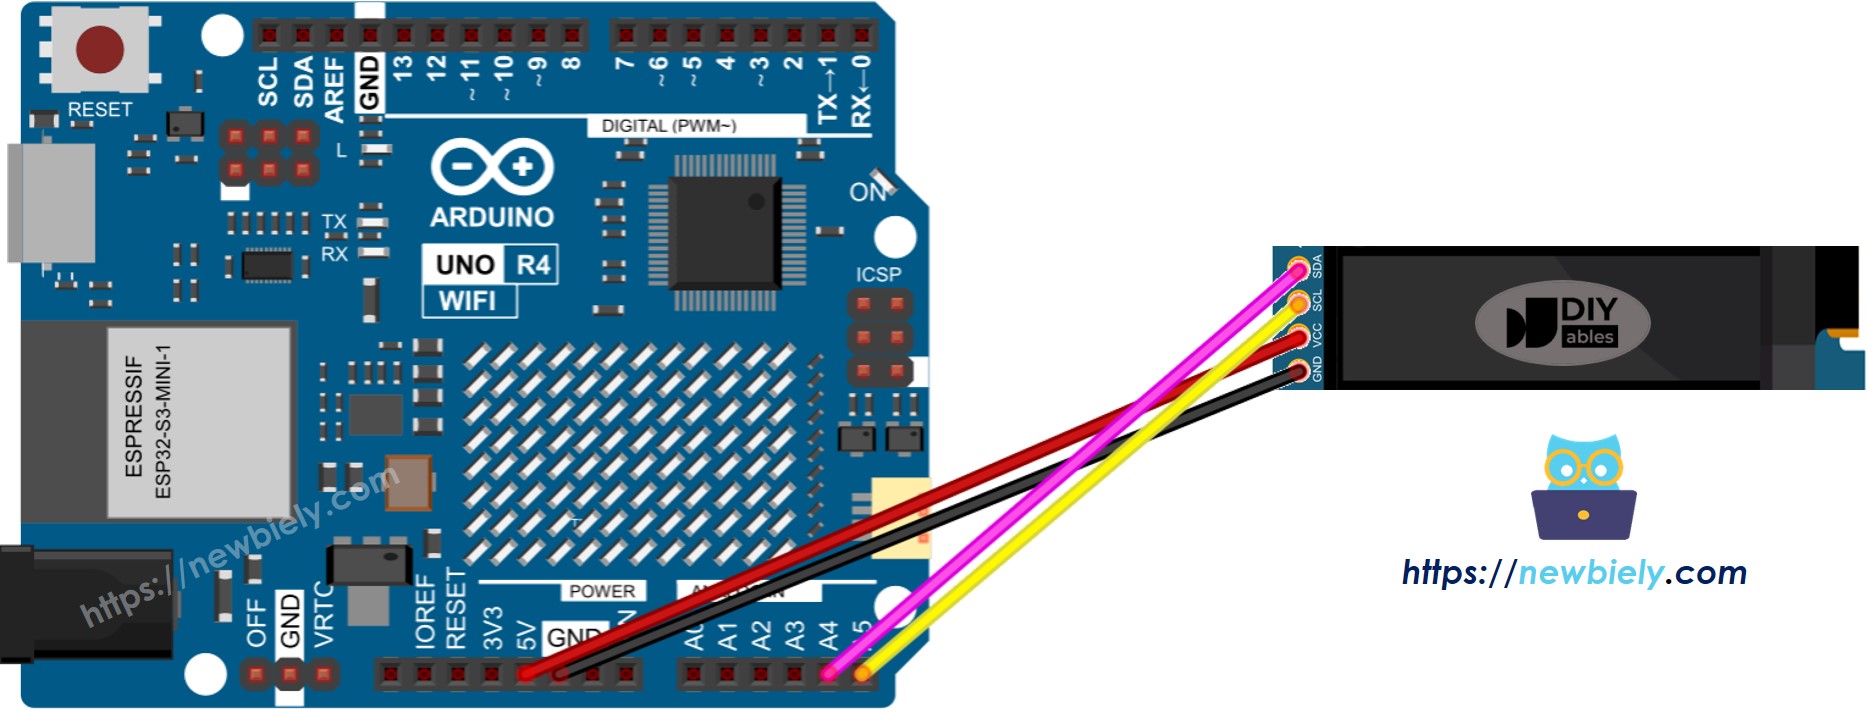
Deze afbeelding is gemaakt met Fritzing. Klik om de afbeelding te vergroten.
Zie De beste manier om Arduino Uno R4 en andere componenten van stroom te voorzien.
Als u een ander type Arduino UNO R4 gebruikt, zal de pin-indeling niet hetzelfde zijn als de Uno. Bekijk de onderstaande tabel voor informatie over andere Arduino UNO R4 modellen.
| 128x32 OLED Module | Arduino UNO R4 |
|---|---|
| Vin | 5V |
| GND | GND |
| SDA | A4 |
| SCL | A5 |
Hoe OLED te gebruiken met Arduino UNO R4
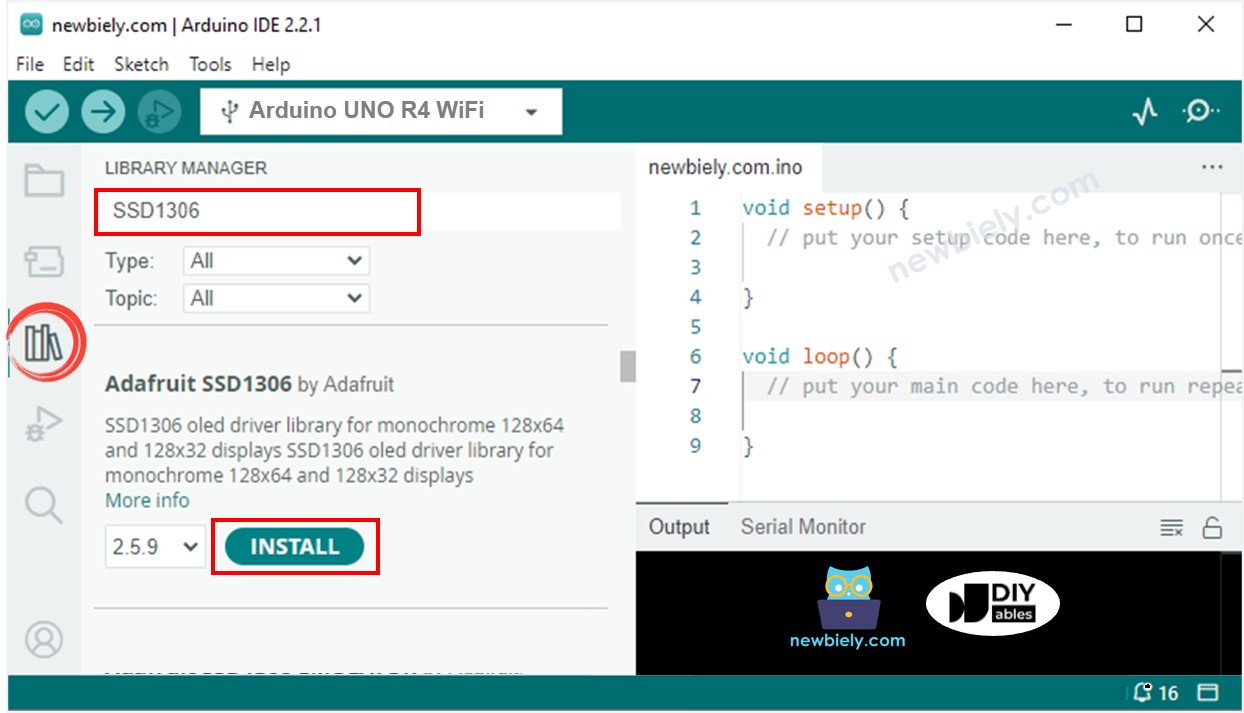
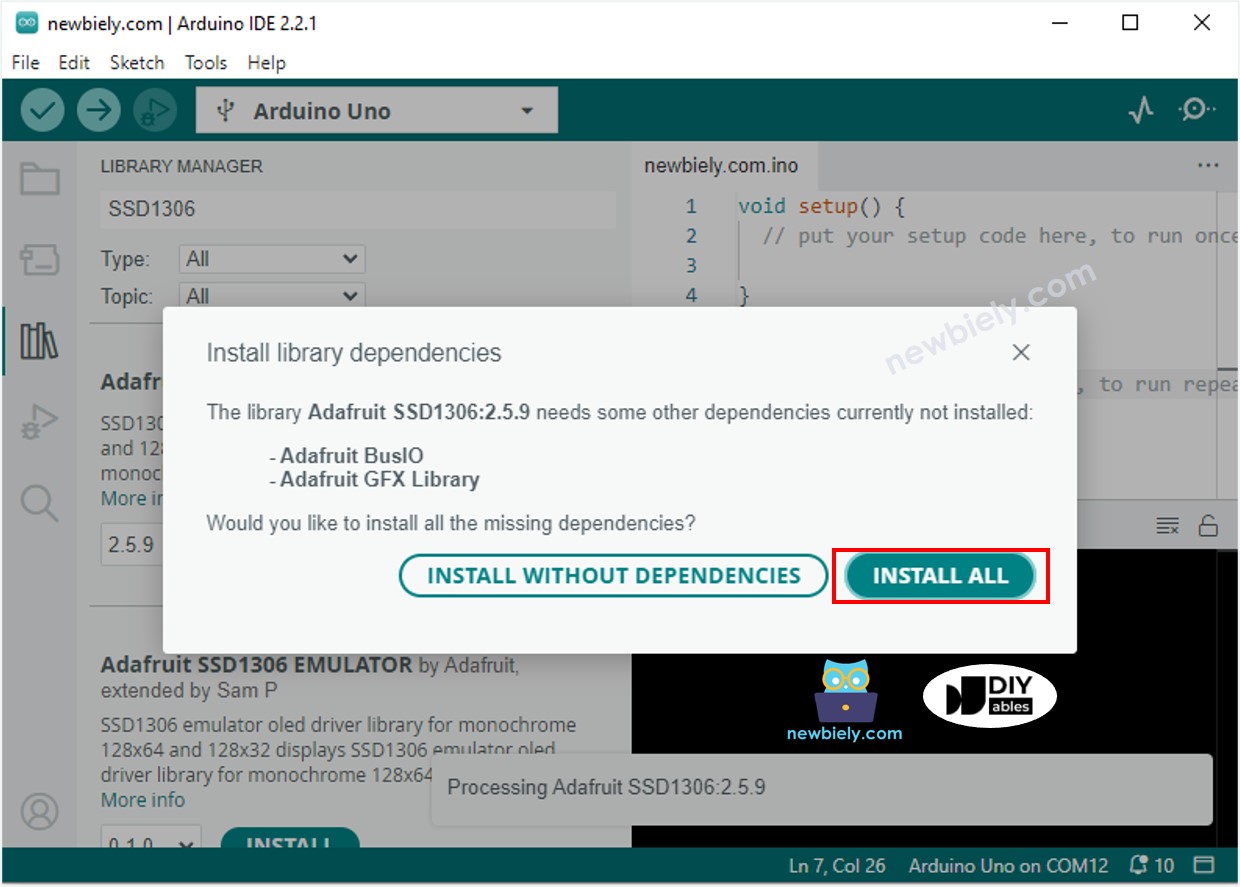
SSD1306 OLED bibliotheek installeren
- Ga naar het Libraries icoon aan de linkerkant van de Arduino IDE.
- Typ "SSD1306" in het zoekvak en zoek naar de SSD1306 bibliotheek gemaakt door Adafruit.
- Druk op de Install knop om de bibliotheek toe te voegen.
- U moet enkele aanvullende bibliotheken installeren.
- Klik op de Install All knop om alle vereiste bibliotheken te installeren.
Hoe te programmeren voor OLED
- Voeg een bibliotheek toe.
- Stel de schermgrootte in op OLED 128x32.
- Maak een SSD1306 OLED object.
- In de setup() functie, stel het OLED scherm in.
- Dan kunt u tekst, afbeeldingen weergeven en lijnen tekenen.
Arduino UNO R4 Code - Tekst weergeven op OLED
Hier zijn enkele functies die u kunt gebruiken om tekst op het OLED weer te geven:
- oled.clearDisplay(): schakelt alle pixels uit.
- oled.drawPixel(x, y, color): tekent een pixel op x, y coördinaten.
- oled.setTextSize(n): wijzigt tekstgrootte, met keuzes van 1 tot 8.
- oled.setCursor(x, y): stelt het startpunt voor tekst in.
- oled.setTextColor(WHITE): maakt de tekstkleur wit.
- oled.setTextColor(BLACK, WHITE): maakt de tekstkleur zwart en achtergrond wit.
- oled.println("message"): toont tekst.
- oled.println(number): toont een cijfer.
- oled.println(number, HEX): toont een cijfer in hexadecimaal formaat.
- oled.display(): werkt het display bij met wijzigingen.
- oled.startscrollright(start, stop): beweegt tekst van links naar rechts.
- oled.startscrollleft(start, stop): beweegt tekst van rechts naar links.
- oled.startscrolldiagright(start, stop): beweegt tekst diagonaal van linksonder naar rechtsboven.
- oled.startscrolldiagleft(start, stop): beweegt tekst diagonaal van rechtsonder naar linksboven.
- oled.stopscroll(): stopt elke scrollende tekst.
Arduino UNO R4 Code - Tekenen op OLED
Arduino UNO R4 Code – Afbeelding weergeven
Om een afbeelding op een OLED scherm weer te geven, zet eerst de afbeelding (elk formaat) om in een bitmap array. U kunt deze online tool gebruiken om het te converteren. Bekijk de onderstaande afbeelding om te zien hoe u een afbeelding omzet in een bitmap array. Ik heb het Arduino icoon omgezet in een bitmap array.
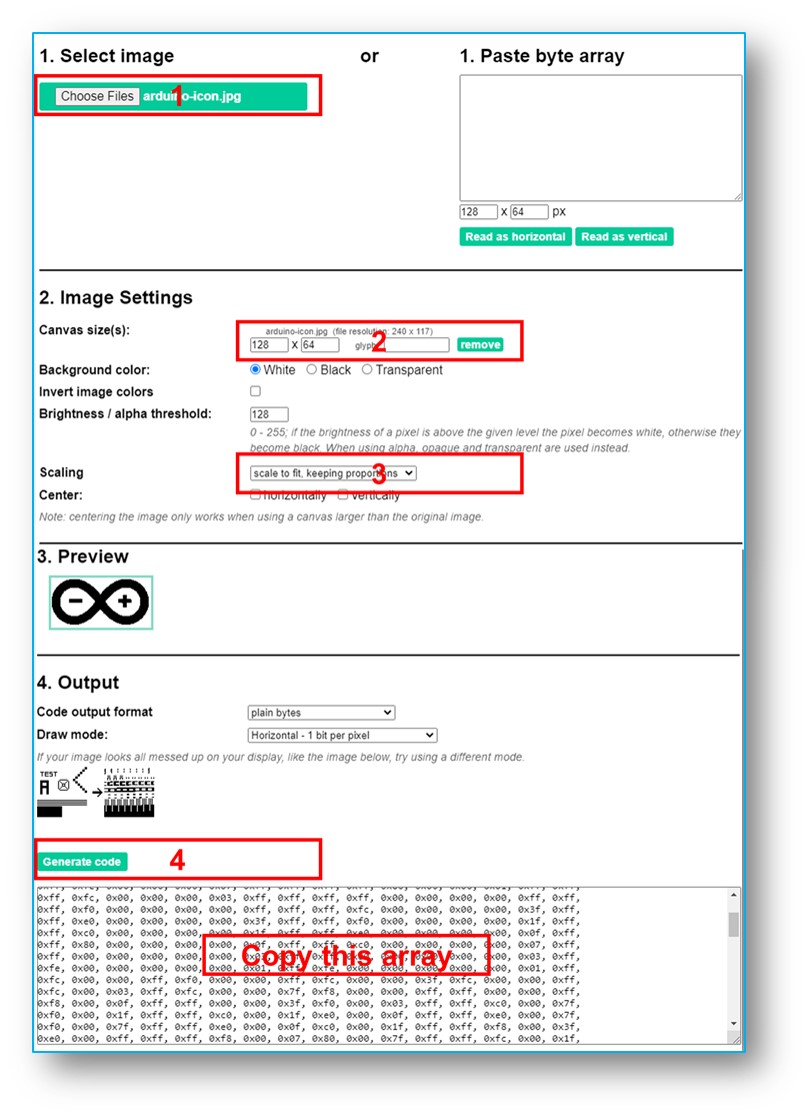
Kopieer de nieuwe array code en werk het bij in de Arduino icoon array in de onderstaande code.
De onderstaande video toont hoe u dit doet met OLED 128x64 display en Arduino Uno en Arduino icoon
We kunnen hetzelfde doen om het te laten werken met Arduino Uno R4 en OLED 128x32. De onderstaande code toont DIYables icoon op OLED 128x32
※ Notiz:
- De afbeeldingsgrootte moet zo klein als of kleiner zijn dan de schermgrootte.
- Om de gegeven code te gebruiken voor een OLED 128x32, moet u de afbeelding verkleinen en de breedte en hoogte aanpassen in de oled.drawBitmap(); functie.
Hoe tekst/cijfers verticaal en horizontaal te centreren op OLED
OLED Probleemoplossing
Als het OLED scherm niets toont, volg dan deze stappen:
- Zorg ervoor dat de bedrading correct is uitgevoerd.
- Bevestig dat uw I2C OLED is uitgerust met een SSD1306 driver.
- Verifieer het I2C adres van uw OLED met behulp van de volgende I2C Address Scanner code op Arduino UNO R4.
De uitvoer op de Serial Monitor: