Dit voorbeeld toont hoe u meerdere webapplicaties tegelijkertijd kunt gebruiken met de DIYables WebApps library. Het demonstreert de integratie van verschillende interactieve webinterfaces—zoals monitoring, besturing en communicatie—binnen een enkel project. Ontworpen voor de Arduino Uno R4 WiFi en DIYables STEM V4 IoT platform, is dit voorbeeld ideaal voor het leren combineren en beheren van meerdere web-gebaseerde functies tegelijkertijd, en biedt het een robuuste basis voor geavanceerde IoT projecten.
Functies
Home Pagina: Centrale navigatiehub met links naar alle webapplicaties
Web Monitor: Real-time seriële communicatie en debugging interface
Chat Interface: Interactief chatsysteem met Arduino response mogelijkheden
Digital Pin Besturing: Web-gebaseerde besturing en monitoring van alle digitale pins
Dual Slider Besturing: Twee onafhankelijke sliders voor analoge waardebesturing
Virtuele Joystick: 2D positiebesturing voor directionele toepassingen
Unified State Management: Alle interfaces delen gesynchroniseerde statusinformatie
Real-time Updates: WebSocket communicatie voor directe respons
Template Structuur: Ready-to-customize basis voor complexe projecten
Platform Uitbreidbaar: Momenteel geïmplementeerd voor Arduino Uno R4 WiFi, maar kan worden uitgebreid voor andere hardware platforms. Zie DIYables_WebApps_ESP32
Openbaarmaking: Sommige van de links in deze sectie zijn Amazon-affiliate links. We kunnen een commissie ontvangen voor aankopen die via deze links worden gedaan, zonder extra kosten voor u. We waarderen uw steun.
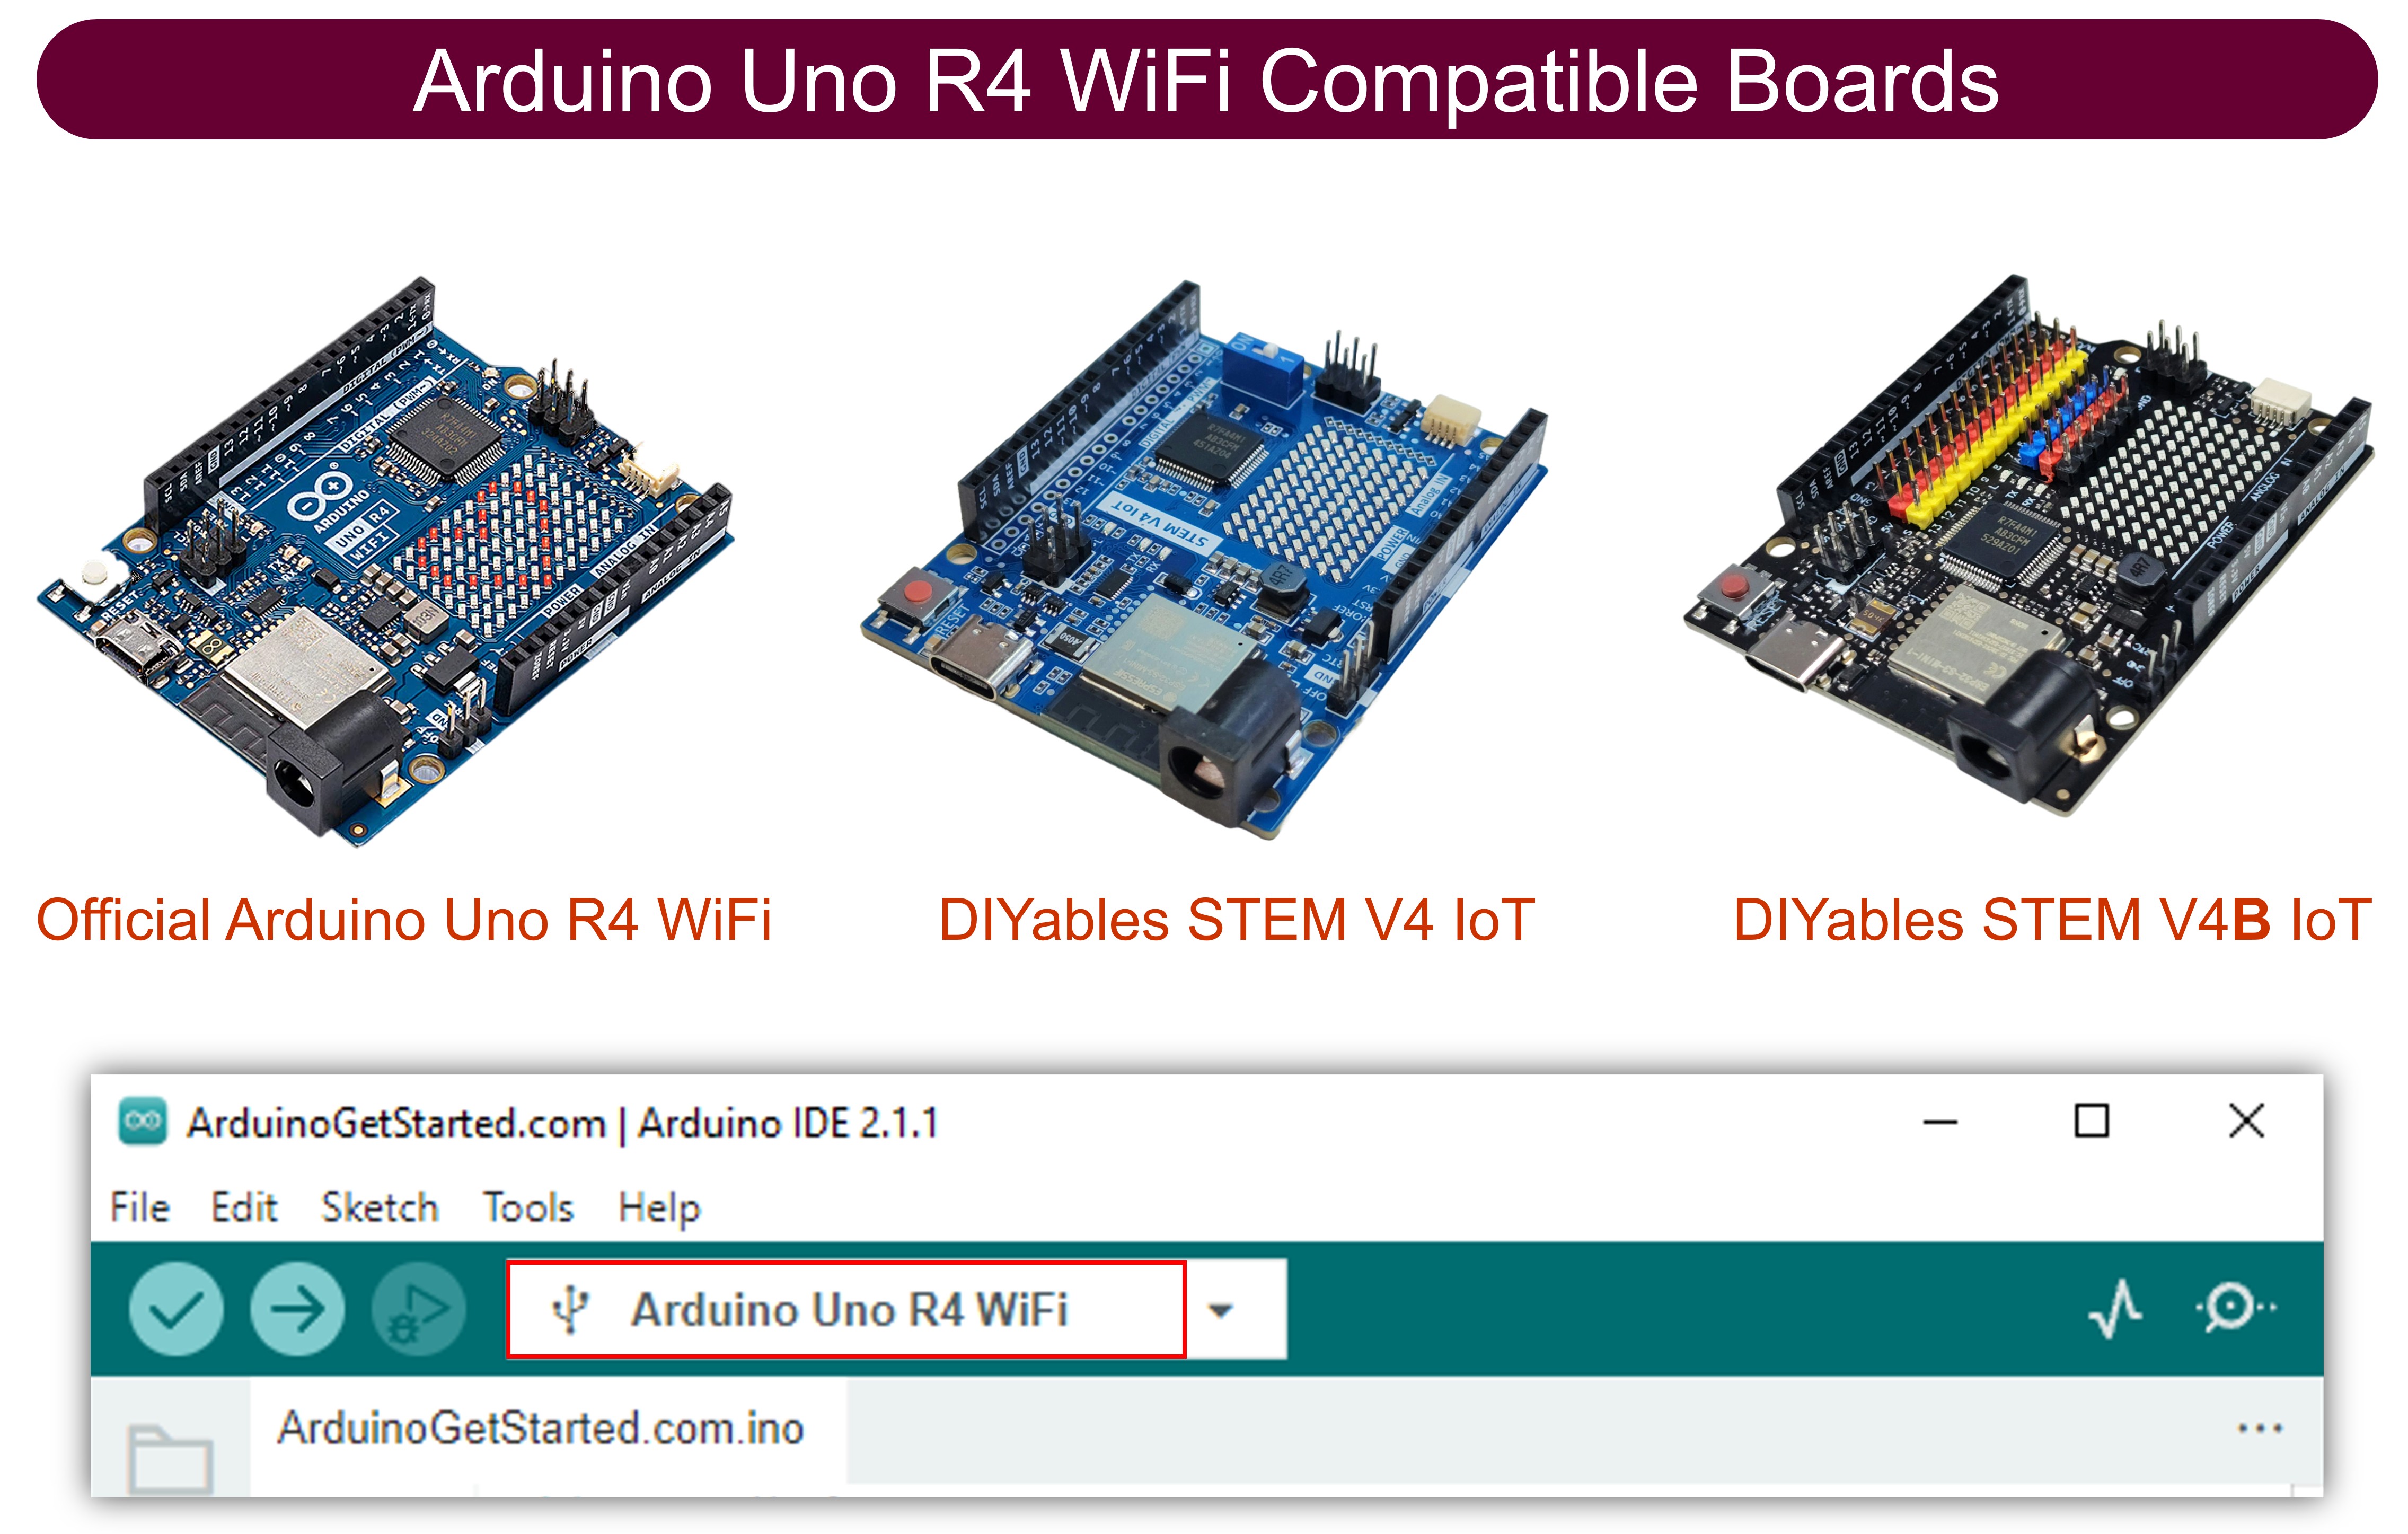
Verbind het Arduino Uno R4/DIYables STEM V4 IoT board met uw computer via een USB kabel.
Start de Arduino IDE op uw computer.
Selecteer het juiste Arduino Uno R4 board (bijv. Arduino Uno R4 WiFi) en COM poort.
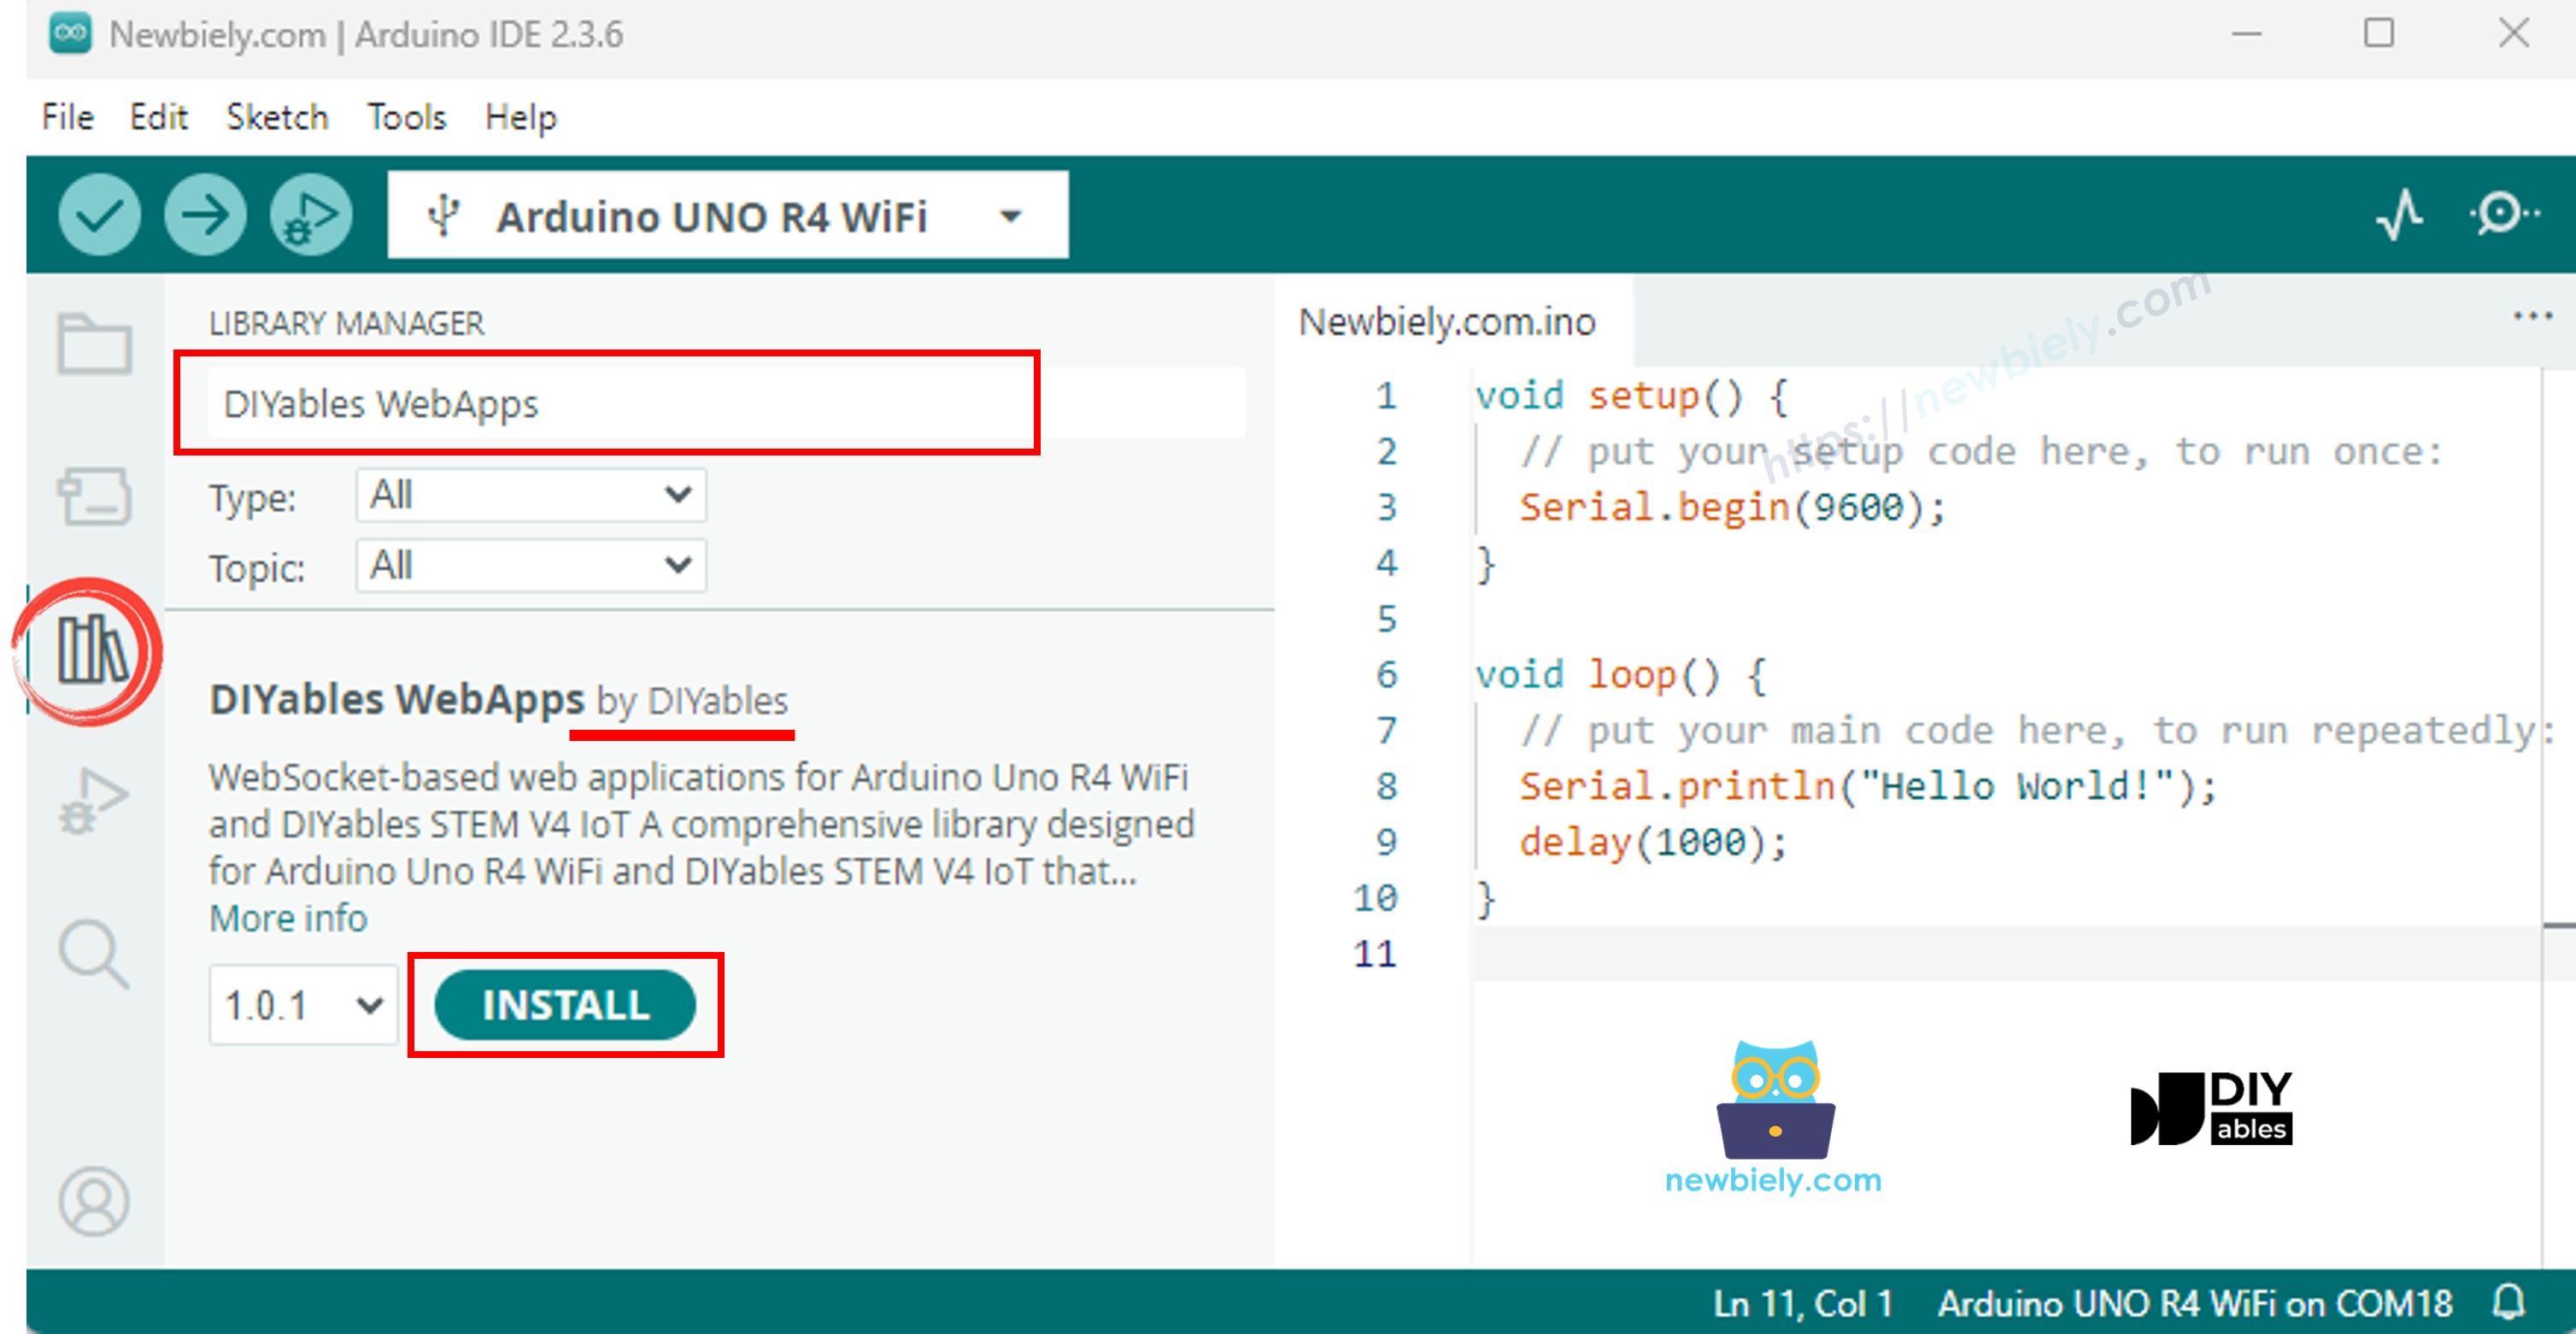
Navigeer naar het Libraries icoon in de linker balk van de Arduino IDE.
Zoek "DIYables WebApps", en vind vervolgens de DIYables WebApps library van DIYables
Klik op de Install knop om de library te installeren.
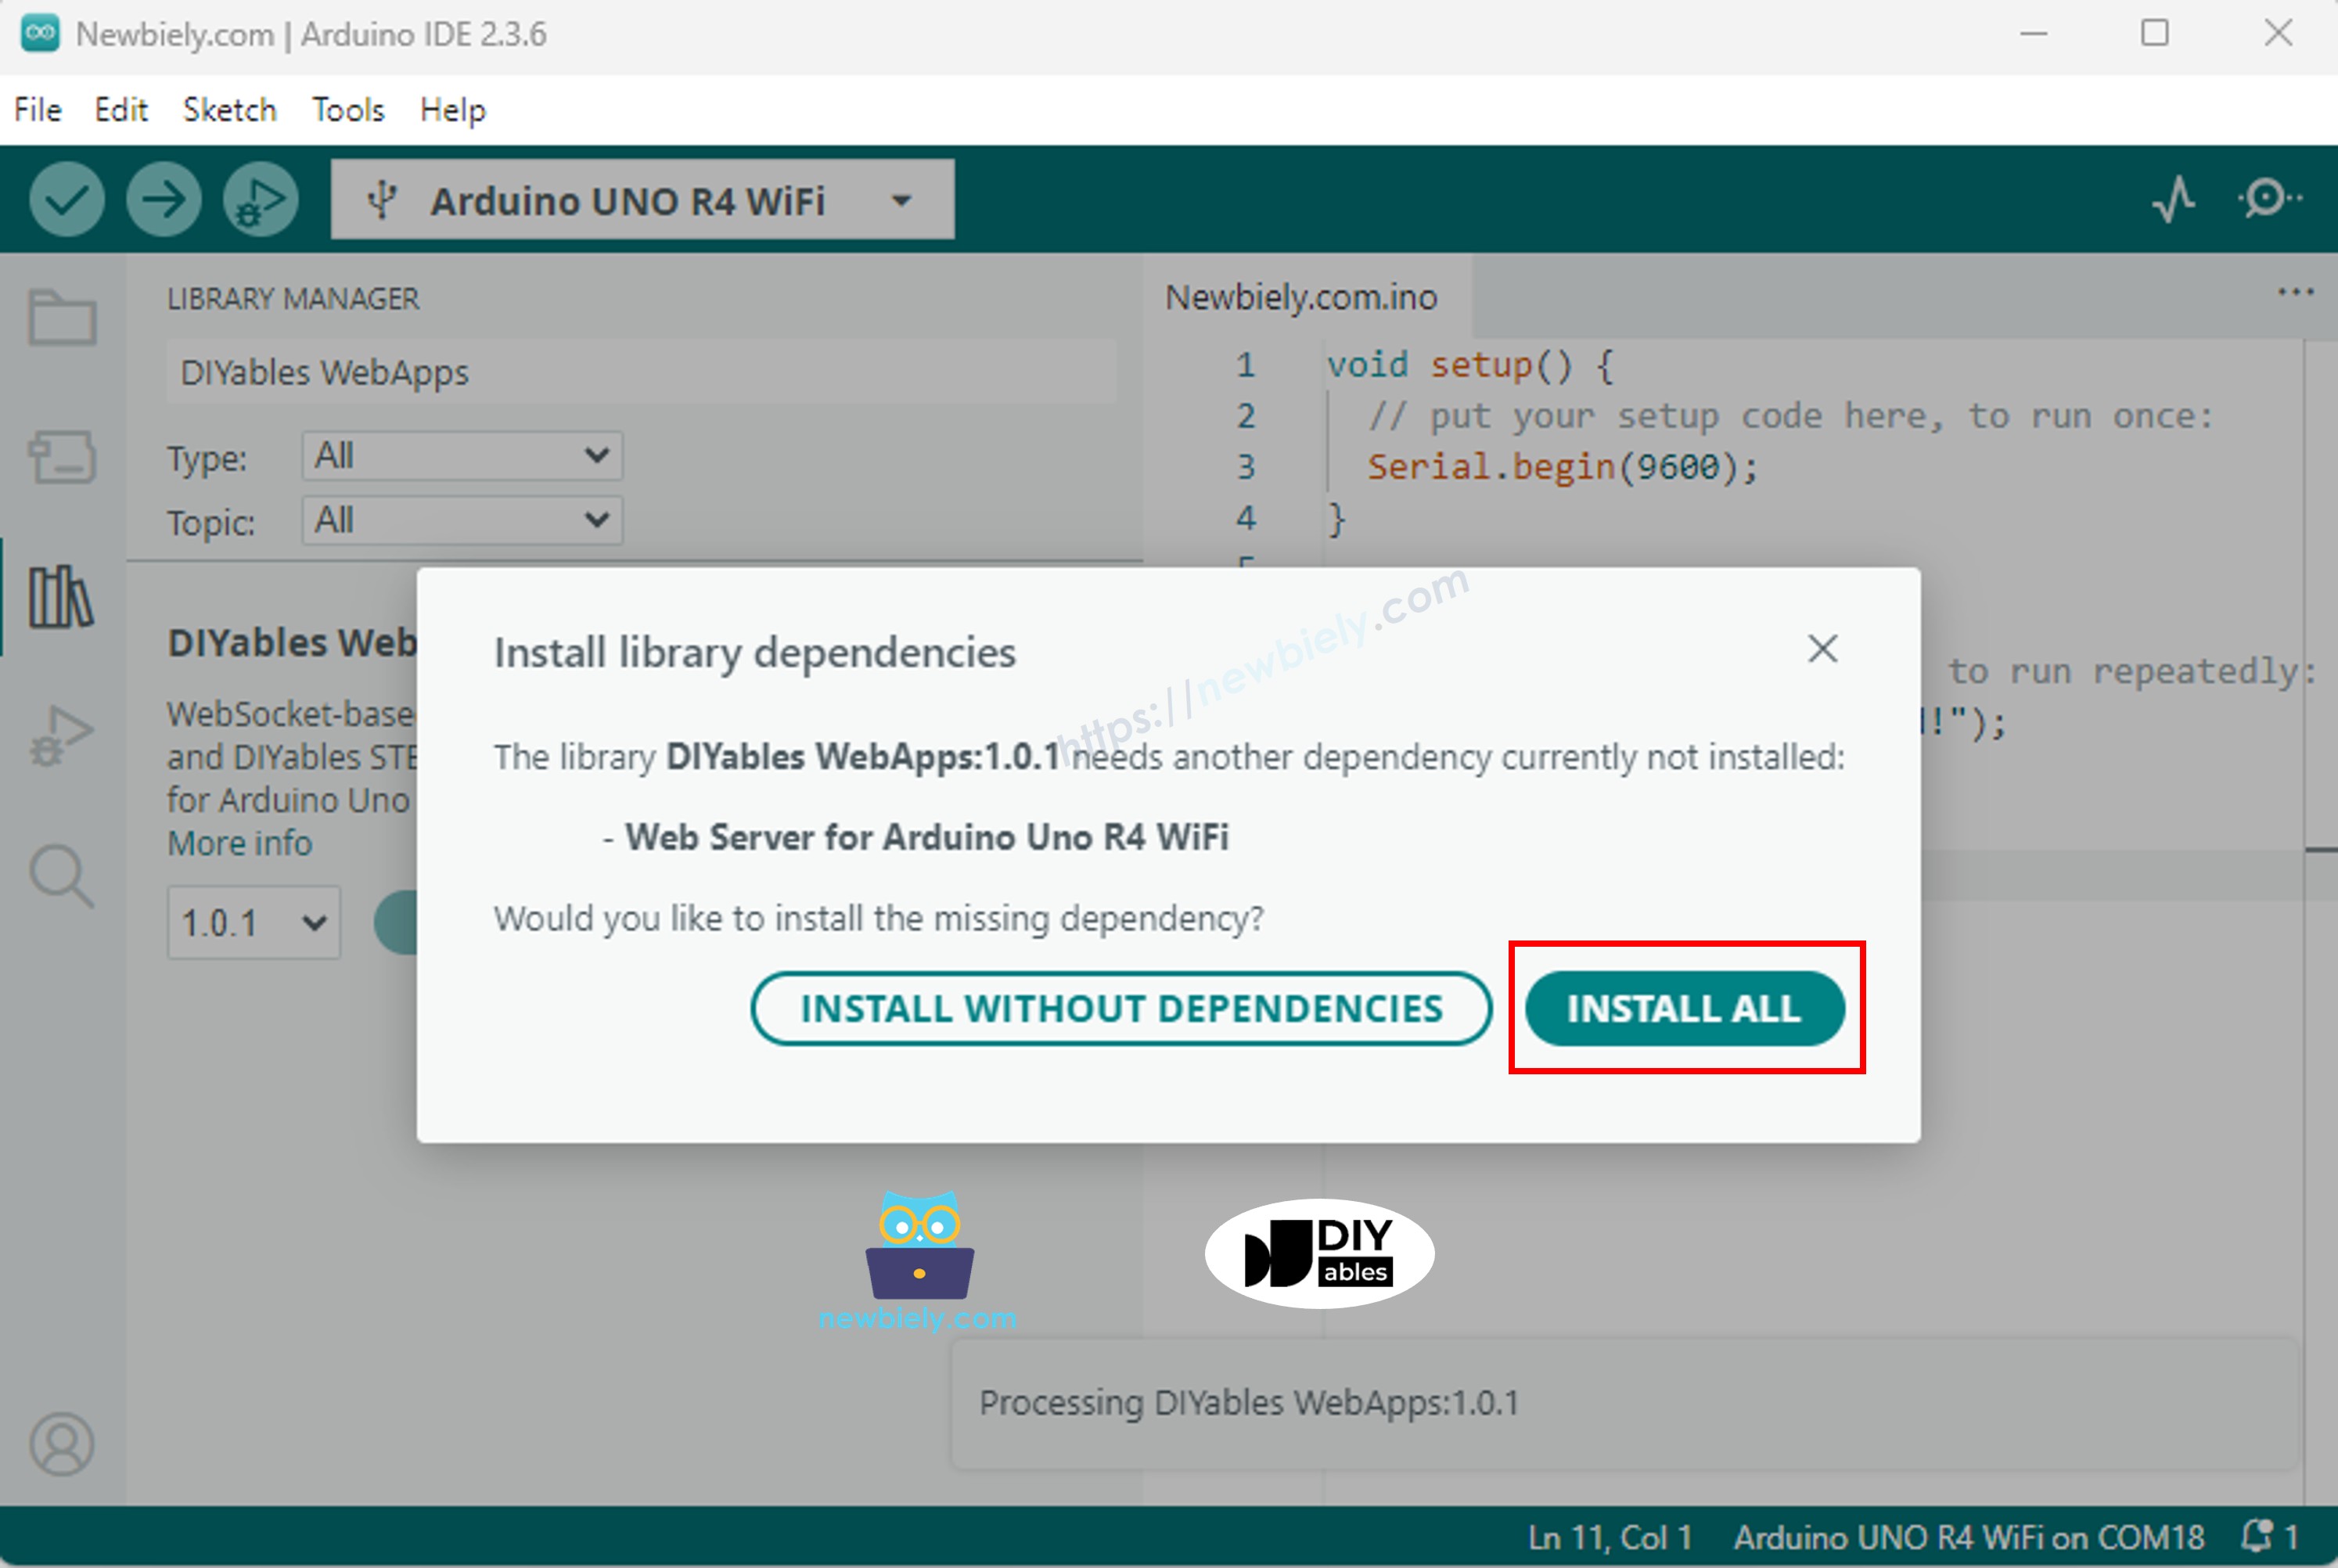
U wordt gevraagd om enkele andere library dependencies te installeren
Klik op de Install All knop om alle library dependencies te installeren.
Ga in Arduino IDE naar File Examples DIYables WebApps MultipleWebApps voorbeeld, of kopieer de bovenstaande code en plak deze in de editor van Arduino IDE
/* * DIYables WebApp Library - Multiple WebApps Example * * This example demonstrates multiple web apps of the DIYables WebApp library: * - Home page with links to multiple web apps * - Web Monitor: Real-time serial monitoring via WebSocket * - Web Slider: Dual slider control * - Web Joystick: Interactive joystick control * - Web Rotator: Interactive rotatable disc control * - Web Analog Gauge: Professional circular gauge for sensor monitoring * - Web Table: Two-column data table with real-time updates * - Web Plotter: See WebPlotter example for real-time data visualization * * Features: * - Simplified callback system - no manual command parsing needed * - Automatic state synchronization and JSON handling * - All protocol details handled by the library * - Template for hardware control * * Hardware: Arduino Uno R4 WiFi or DIYables STEM V4 IoT * * Setup: * 1. Update WiFi credentials below * 2. Upload the sketch to your Arduino * 3. Open Serial Monitor to see the IP address * 4. Navigate to the IP address in your web browser */#include <DIYablesWebApps.h>// WiFi credentials - UPDATE THESE WITH YOUR NETWORKconstchar WIFI_SSID[] = "YOUR_WIFI_SSID";constchar WIFI_PASSWORD[] = "YOUR_WIFI_PASSWORD";// Create WebApp server and page instancesUnoR4ServerFactory factory;DIYablesWebAppServerwebAppsServer(factory, 80, 81);DIYablesHomePage homePage;DIYablesWebMonitorPage webMonitorPage;DIYablesWebSliderPage webSliderPage;DIYablesWebJoystickPage webJoystickPage(false, 5); // autoReturn=false, sensitivity=5DIYablesWebRotatorPage webRotatorPage(ROTATOR_MODE_CONTINUOUS); // Continuous rotation mode (0-360°)DIYablesWebAnalogGaugePage webAnalogGaugePage(0.0, 100.0, "%"); // Range: 0-100%, units: %DIYablesWebTablePage webTablePage;// Variables to track statesint currentSlider1 = 64; // Slider 1 value (0-255)int currentSlider2 = 128; // Slider 2 value (0-255)int currentJoystickX = 0; // Current joystick X value (-100 to 100)int currentJoystickY = 0; // Current joystick Y value (-100 to 100)int currentRotatorAngle = 0; // Current rotator angle (0-360°)float currentGaugeValue = 50.0; // Current gauge value (0.0-100.0)voidsetup() {Serial.begin(9600);delay(1000);// TODO: Initialize your hardware pins hereSerial.println("DIYables WebApp - Multiple Apps Example");// Add all web applications to the serverwebAppsServer.addApp(&homePage);webAppsServer.addApp(&webMonitorPage);webAppsServer.addApp(&webSliderPage);webAppsServer.addApp(&webJoystickPage);webAppsServer.addApp(&webRotatorPage);webAppsServer.addApp(&webAnalogGaugePage);webAppsServer.addApp(&webTablePage);// Add more web apps here (e.g., WebPlotter)// Set 404 Not Found page (optional - for better user experience)webAppsServer.setNotFoundPage(DIYablesNotFoundPage());// Configure table structure (only attribute names, values will be updated dynamically) webTablePage.addRow("Arduino Status"); webTablePage.addRow("WiFi Connected"); webTablePage.addRow("Uptime"); webTablePage.addRow("Slider 1"); webTablePage.addRow("Slider 2"); webTablePage.addRow("Joystick X"); webTablePage.addRow("Joystick Y"); webTablePage.addRow("Rotator Angle"); webTablePage.addRow("Gauge Value");// Start the WebApp serverif (!webAppsServer.begin(WIFI_SSID, WIFI_PASSWORD)) {while (1) {Serial.println("Failed to start WebApp server!");delay(1000); } } setupCallbacks();}void setupCallbacks() {// Web Monitor callback - echo messages back webMonitorPage.onWebMonitorMessage([](const String& message) {Serial.println("Web Monitor: " + message); webMonitorPage.sendToWebMonitor("Arduino received: " + message); });// Web Slider callback - handle slider values webSliderPage.onSliderValueFromWeb([](int slider1, int slider2) {// Store the received values currentSlider1 = slider1; currentSlider2 = slider2;// Print slider values (0-255) without String concatenationSerial.print("Slider 1: ");Serial.print(slider1);Serial.print(", Slider 2: ");Serial.println(slider2);// Update table with new slider values using String() conversion webTablePage.sendValueUpdate("Slider 1", String(slider1)); webTablePage.sendValueUpdate("Slider 2", String(slider2));// TODO: Add your control logic here based on slider values// Examples:// - Control PWM: analogWrite(LED_PIN, slider1);// - Control servos: servo.write(map(slider1, 0, 255, 0, 180));// - Control motor speed: analogWrite(MOTOR_PIN, slider2);// Update gauge based on slider1 value (map 0-255 to 0-100) currentGaugeValue = map(slider1, 0, 255, 0, 100); webAnalogGaugePage.sendToWebAnalogGauge(currentGaugeValue);char gaugeStr[16]; snprintf(gaugeStr, sizeof(gaugeStr), "%.1f%%", currentGaugeValue); webTablePage.sendValueUpdate("Gauge Value", String(gaugeStr)); });// Handle slider value requests webSliderPage.onSliderValueToWeb([]() { webSliderPage.sendToWebSlider(currentSlider1, currentSlider2); });// Web Joystick callback - handle joystick movement webJoystickPage.onJoystickValueFromWeb([](int x, int y) {// Store the received values currentJoystickX = x; currentJoystickY = y;// Print joystick position values (-100 to +100)Serial.print("Joystick - X: ");Serial.print(x);Serial.print(", Y: ");Serial.println(y);Serial.print(x);Serial.print(", Y: ");Serial.println(y);// Update table with new joystick values webTablePage.sendValueUpdate("Joystick X", String(x)); webTablePage.sendValueUpdate("Joystick Y", String(y));// TODO: Add your control logic here based on joystick position// Examples:// - Control motors: if (x > 50) { /* move right */ }// - Control servos: servo.write(map(y, -100, 100, 0, 180));// - Control LEDs: analogWrite(LED_PIN, map(abs(x), 0, 100, 0, 255)); });// Handle joystick values requests (when web page loads/reconnects) webJoystickPage.onJoystickValueToWeb([]() { webJoystickPage.sendToWebJoystick(currentJoystickX, currentJoystickY); });// Web Rotator callback - handle rotation angle changes webRotatorPage.onRotatorAngleFromWeb([](float angle) {// Store the received angle currentRotatorAngle = (int)angle;// Print rotator angle (0-360°)Serial.println("Rotator angle: " + String(angle) + "°");// Update table with new rotator angle webTablePage.sendValueUpdate("Rotator Angle", String(angle, 0) + "°");// TODO: Add your control logic here based on rotator angle// Examples:// - Control servo: servo.write(map(angle, 0, 360, 0, 180));// - Control stepper motor: stepper.moveTo(angle);// - Control directional LED strip: setLEDDirection(angle); });// Handle analog gauge value requests (when web page loads/reconnects) webAnalogGaugePage.onGaugeValueRequest([]() { webAnalogGaugePage.sendToWebAnalogGauge(currentGaugeValue); });// Handle table data requests (when web page loads/reconnects) webTablePage.onTableValueRequest([]() {// Send initial values to the table webTablePage.sendValueUpdate("Arduino Status", "Running"); webTablePage.sendValueUpdate("WiFi Connected", "Yes"); webTablePage.sendValueUpdate("Uptime", "0 seconds"); webTablePage.sendValueUpdate("Slider 1", String(currentSlider1)); webTablePage.sendValueUpdate("Slider 2", String(currentSlider2)); webTablePage.sendValueUpdate("Joystick X", String(currentJoystickX)); webTablePage.sendValueUpdate("Joystick Y", String(currentJoystickY)); webTablePage.sendValueUpdate("Rotator Angle", String(currentRotatorAngle) + "°"); webTablePage.sendValueUpdate("Gauge Value", String(currentGaugeValue, 1) + "%"); });}voidloop() {// Handle WebApp server communicationswebAppsServer.loop();// Update table with current uptime every 5 secondsstaticunsignedlong lastUptimeUpdate = 0;if (millis() - lastUptimeUpdate > 5000) { lastUptimeUpdate = millis();unsignedlong uptimeSeconds = millis() / 1000;String uptimeStr = String(uptimeSeconds) + " seconds";if (uptimeSeconds >= 60) { uptimeStr = String(uptimeSeconds / 60) + "m " + String(uptimeSeconds % 60) + "s"; } webTablePage.sendValueUpdate("Uptime", uptimeStr); }// Simulate sensor data updates every 3 secondsstaticunsignedlong lastSensorUpdate = 0;if (millis() - lastSensorUpdate > 3000) { lastSensorUpdate = millis();// Simulate a sensor reading that varies over timefloat sensorValue = 50.0 + 30.0 * sin(millis() / 10000.0); // Oscillates between 20-80 currentGaugeValue = sensorValue;// Update gauge and table webAnalogGaugePage.sendToWebAnalogGauge(currentGaugeValue); webTablePage.sendValueUpdate("Gauge Value", String(currentGaugeValue, 1) + "%"); }// TODO: Add your main application code heredelay(10);}
Configureer WiFi inloggegevens in de code door deze regels bij te werken:
Klik op de Upload knop in Arduino IDE om de code te uploaden naar Arduino UNO R4/DIYables STEM V4 IoT
Open de Serial Monitor
Bekijk het resultaat in Serial Monitor. Het ziet eruit als onderstaand
Newbiely | Arduino IDE 2.3.8
──
☐
✕
File
Edit
Sketch
Tools
Help
Arduino Uno R4 WiFi
Newbiely.ino
···
8Serial.println("Hello World!");
Output
Serial Monitor
Message (Enter to send message to 'Arduino Uno R4 WiFi' on 'COM15')
New Line
9600 baud
DIYables WebApp - Multiple Apps Example
INFO: Added app /
INFO: Added app /web-monitor
INFO: Added app /web-slider
INFO: Added app /web-joystick
INFO: Added app /web-rotator
INFO: Added app /web-gauge
INFO: Added app /web-table
DIYables WebApp Library
Platform: Arduino Uno R4 WiFi
Network connected!
IP address: 192.168.0.2
HTTP server started on port 80
Configuring WebSocket server callbacks...
WebSocket server started on port 81
WebSocket URL: ws://192.168.0.2:81
WebSocket server started on port 81
==========================================
DIYables WebApp Ready!
==========================================
📱 Web Interface: http://192.168.0.2
🔗 WebSocket: ws://192.168.0.2:81
📋 Available Applications:
🏠 Home Page: http://192.168.0.2/
📊 Web Monitor: http://192.168.0.2/web-monitor
🎚️ Web Slider: http://192.168.0.2/web-slider
🕹️ Web Joystick: http://192.168.0.2/web-joystick
🔄 Web Rotator: http://192.168.0.2/web-rotator
⏲️ Web Analog Gauge: http://192.168.0.2/web-gauge
📊 Web Table: http://192.168.0.2/web-table
==========================================
Ln 11, Col 1
Arduino Uno R4 WiFi on COM15
2
Als u niets ziet, herstart dan het Arduino board.
Noteer het weergegeven IP-adres en voer dit adres in de adresbalk van een webbrowser op uw smartphone of PC in.
Voorbeeld: http://192.168.0.2
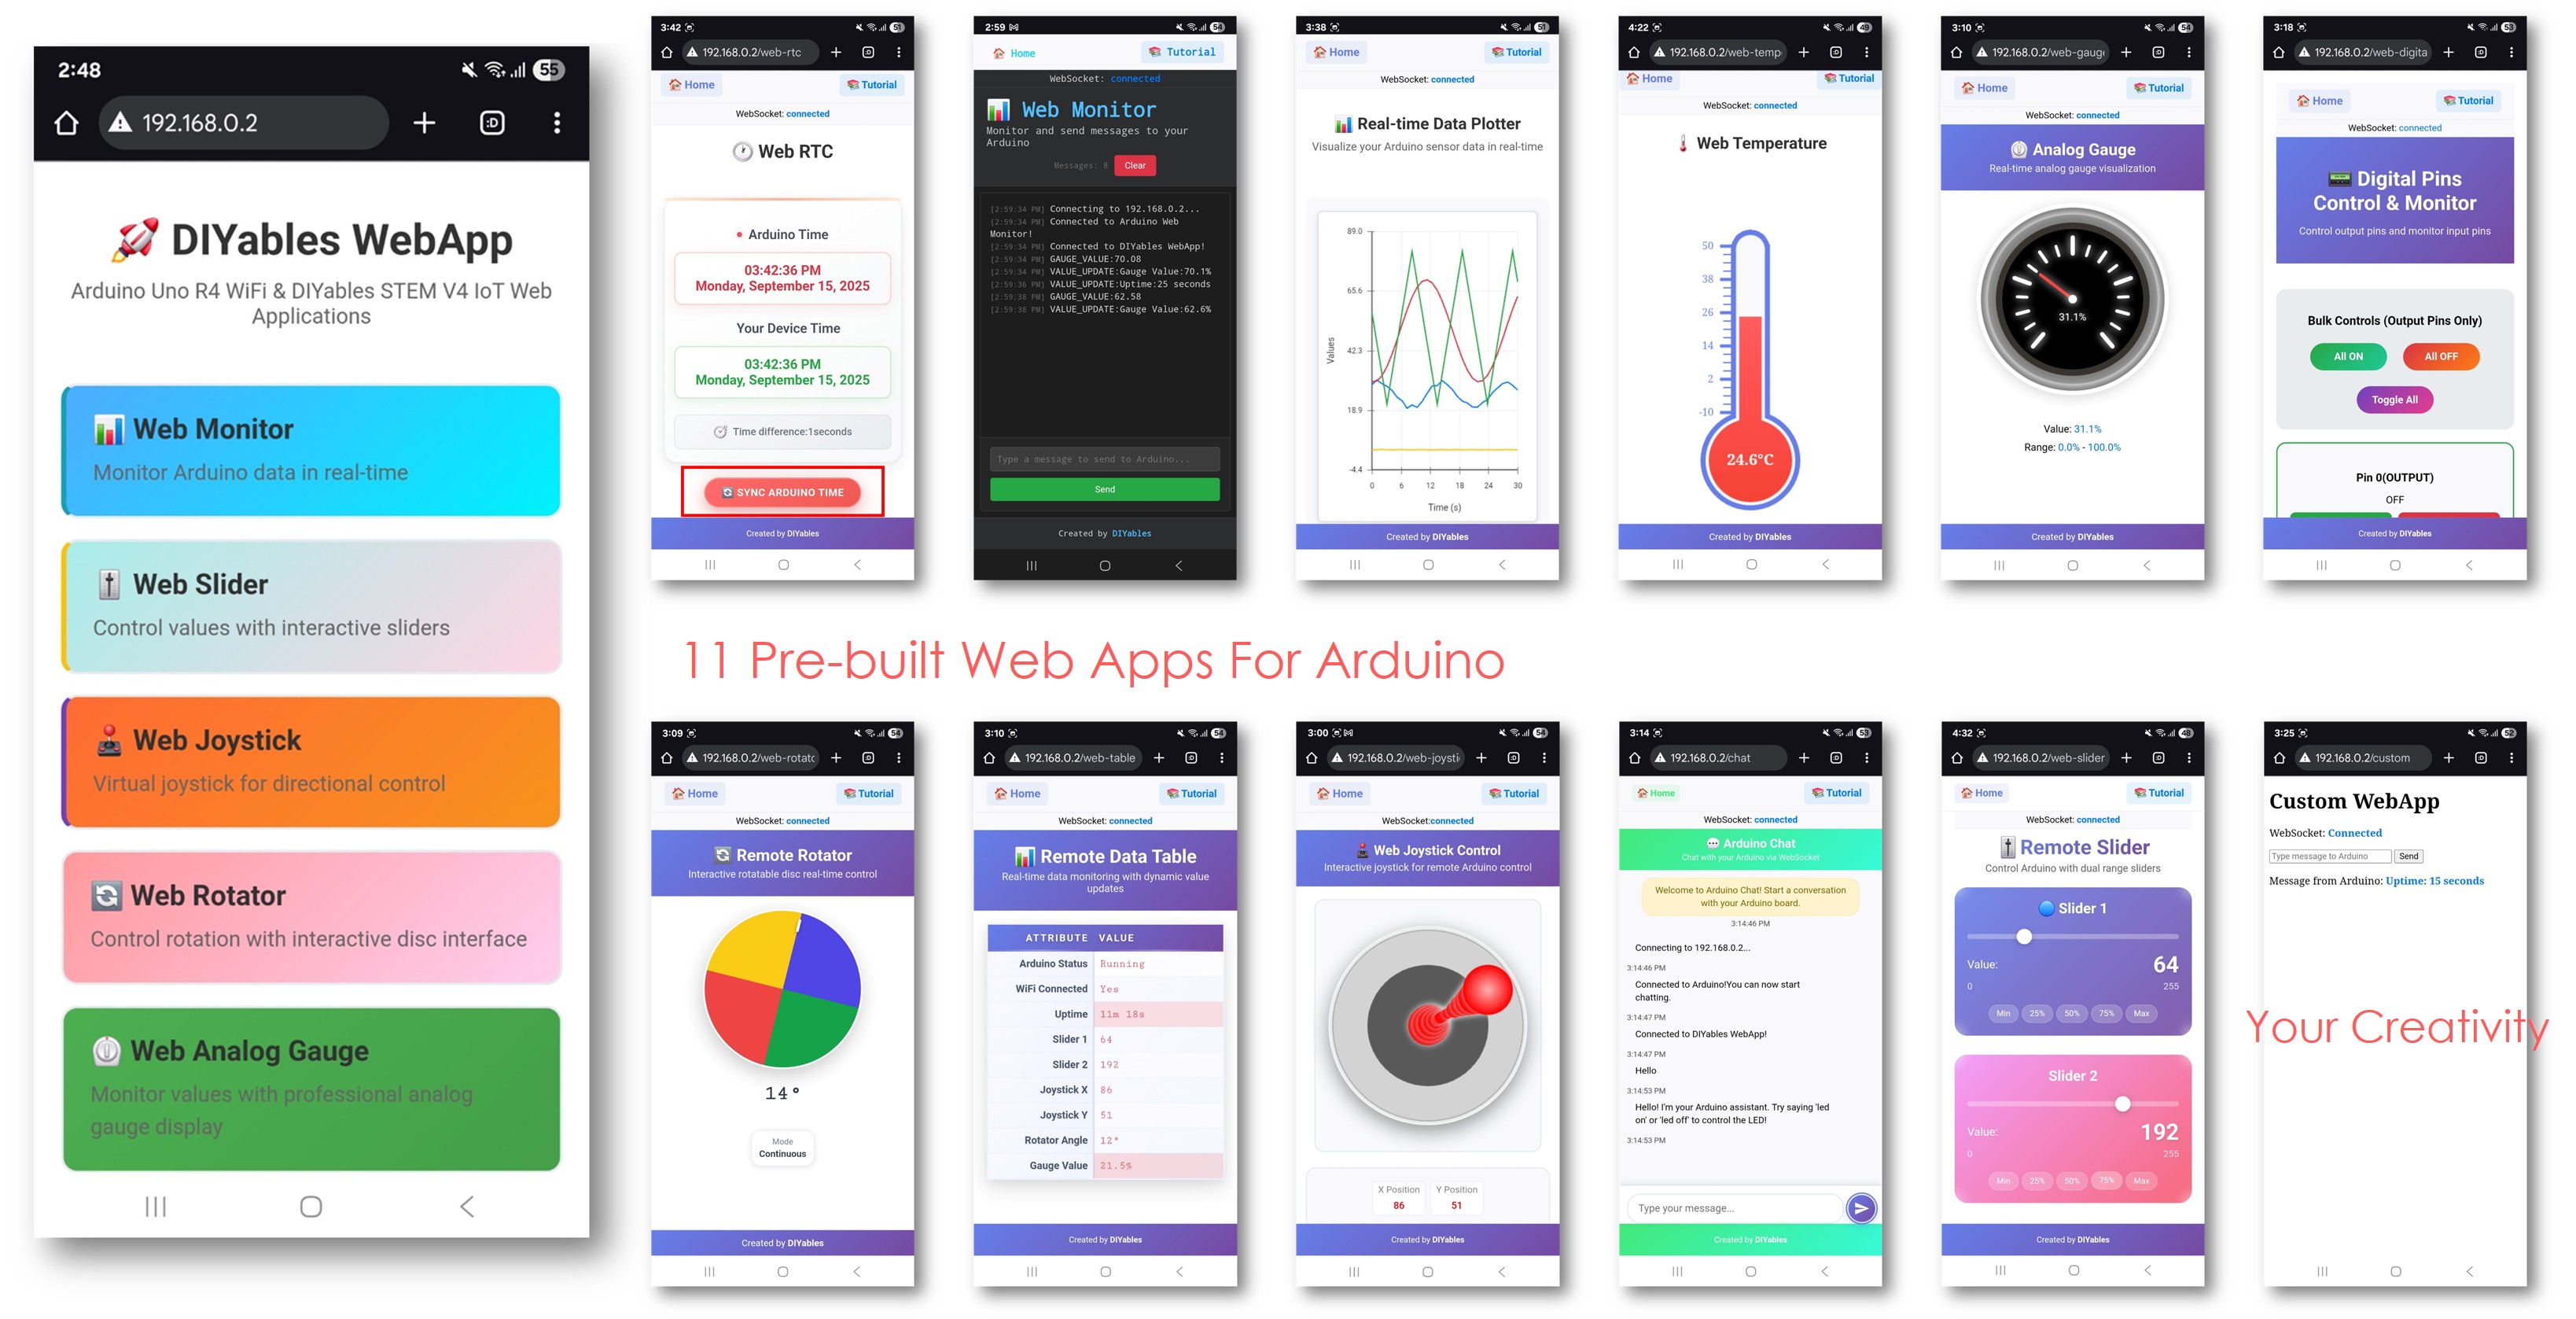
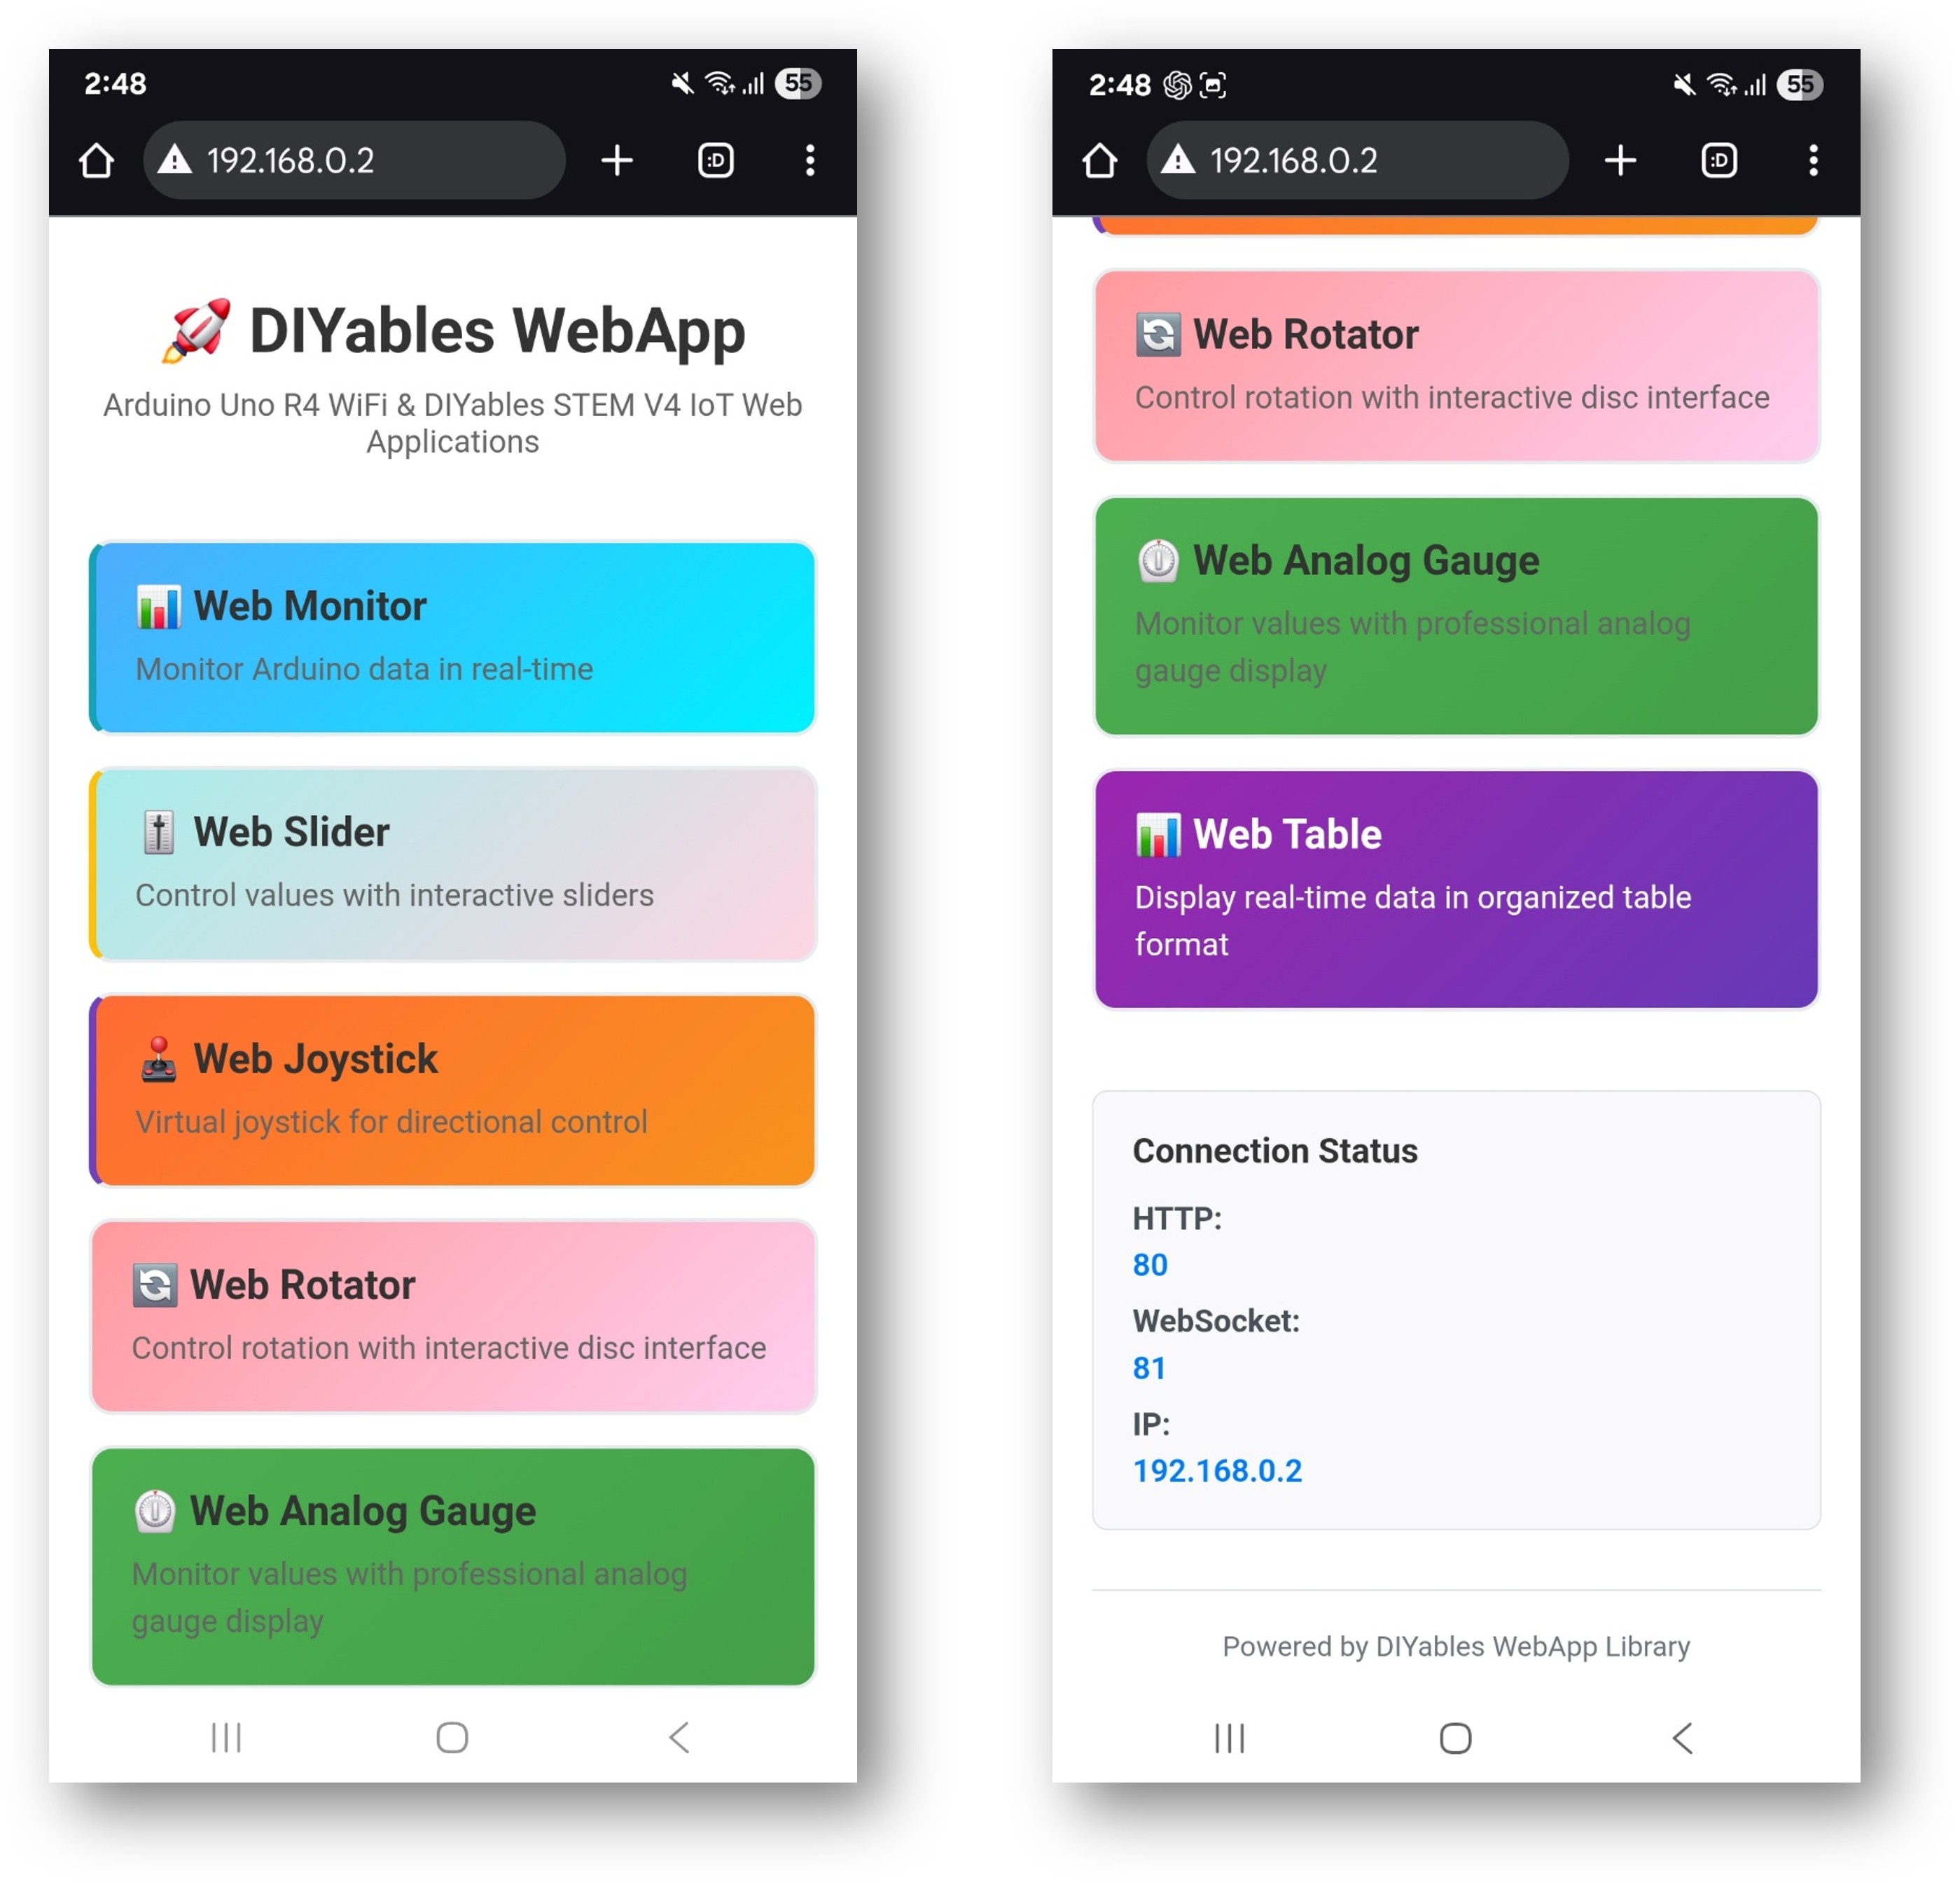
U zult de home pagina zien met alle webapplicaties zoals onderstaande afbeelding:
Klik op elke webapplicatie link (Chat, Web Monitor, Web Digital Pins, Web Slider, Web Joystick, etc.), u zult de bijbehorende web app's UI zien.
Of u kunt ook elke pagina direct bereiken via het IP-adres gevolgd door het app pad. Bijvoorbeeld: http://192.168.0.2/chat, http://192.168.0.2/web-monitor, etc.
Verken alle webapplicaties: probeer te chatten met Arduino, monitor seriële uitvoer, bestuur digitale pins, pas sliders aan, en gebruik de virtuele joystick om de volledige mogelijkheden van de geïntegreerde web interface te ervaren.
Web Interface Navigatie
Home Pagina Dashboard
De home pagina dient als uw controlecentrum met links naar alle applicaties:
Web Monitor: /webmonitor - Seriële communicatie interface
Chat: /chat - Interactieve messaging met Arduino
Digital Pins: /digital-pins - Pin besturing en monitoring
Web Slider: /webslider - Dubbele analoge besturing sliders
Web Joystick: /webjoystick - 2D positiebesturing interface
Applicatie URLs
Benader elke interface direct:
http://[ARDUINO_IP]/ # Home pagina
http://[ARDUINO_IP]/webmonitor # Serial monitor interface
http://[ARDUINO_IP]/chat # Chat interface
http://[ARDUINO_IP]/digital-pins # Pin besturing
http://[ARDUINO_IP]/webslider # Slider besturing
http://[ARDUINO_IP]/webjoystick # Joystick besturing
Creatieve Aanpassing - Ontketenen Uw Innovatie
Dit uitgebreide voorbeeld biedt een basis voor uw creatieve projecten. Wijzig en pas de onderstaande configuraties aan om geweldige IoT applicaties te bouwen die passen bij uw unieke visie.
Digital Pin Configuratie
Het voorbeeld pre-configureert specifieke pins voor verschillende doeleinden:
// Maak joystick met aangepaste instellingen// autoReturn=false: Joystick blijft op laatste positie bij loslaten// sensitivity=5: Stuur alleen updates wanneer beweging > 5%DIYablesWebJoystickPage webJoystickPage(false, 5);
State Variabelen
Het voorbeeld houdt gesynchroniseerde status bij over alle interfaces:
int pinStates[16] = { LOW }; // Volg pin states (pins 0-13)int currentSlider1 = 64; // Slider 1 waarde (0-255) - 25%int currentSlider2 = 128; // Slider 2 waarde (0-255) - 50%int currentJoystickX = 0; // Joystick X waarde (-100 tot 100)int currentJoystickY = 0; // Joystick Y waarde (-100 tot 100)
Ingebouwde Chat Commando's
De chat interface bevat verschillende vooraf geprogrammeerde commando's:
Basis Commando's
hello - Vriendelijke begroeting respons
time - Toont Arduino uptime in seconden
status - Rapporteert Arduino status en LED staat
help - Lijst beschikbare commando's
Besturing Commando's
led on - Zet de ingebouwde LED aan
led off - Zet de ingebouwde LED uit
Voorbeeld Chat Sessie
User: hello
Arduino: Hello! I'm your Arduino. How can I help you?
User: led on
Arduino: Built-in LED is now ON!
User: time
Arduino: I've been running for 1245 seconds.
User: status
Arduino: Status: Running smoothly! LED is ON
U bent welkom om de link naar deze tutorial te delen. Gebruik onze inhoud echter niet op andere websites. We hebben veel moeite en tijd gestoken in het maken van de inhoud, respecteer alstublieft ons werk!

 English for KidsSpelenderwijs Engels leren voor jonge kinderen.Ontdek het opGoogle PlayBeschikbaar in deApp Store
 Bubble NoteZelfverwijderende notities – schrijf ze als berichten.Ontdek het opGoogle PlayBeschikbaar in deApp Store
 Didn't BuyVersla impulsaankopen en bespaar meer.Ontdek het opGoogle PlayBeschikbaar in deApp Store
 Knowledge PathOefentoetsen om alles te leren.Ontdek het opGoogle PlayBeschikbaar in deApp Store