Arduino Uno R4 - SSD1309 OLED Display 128x64 | 2.42 inch I2C OLED Gids

Organic Light-Emitting Diode (OLED) displays beschikken over zelfverlichtende pixels die echte zwarte kleuren, superieure contrastverhoudingen en uitstekende kijkhoeken vanuit alle richtingen produceren — wat aanzienlijke voordelen biedt ten opzichte van conventionele LCD-technologie. De SSD1309 driver chip voedt de 2.42-inch (ook op de markt gebracht als 2.4-inch) 128×64 monochroom OLED modules via I2C communicatie.

Arduino Uno R4 SSD1309 OLED 128x64

Deze praktische gids leidt u door het interfacen van de SSD1309 OLED 128×64 met uw Arduino Uno R4 board via de DIYables_OLED_SSD1309 bibliotheek. U zult ontdekken hoe u:

Hardware Vereisten

1×Arduino Uno R4 WiFi
1×Arduino Uno R4 Minima (Alternatief)
1×USB Kabel Type-C
1×SSD1309 I2C OLED Display 128x64 (2.42 inch)
1×Jumper Draden
1×(Aanbevolen) Schroefklem Block Shield voor Arduino Uno R4
1×(Aanbevolen) Breadboard-Shield voor Arduino Uno R4
1×(Aanbevolen) Behuizing voor Arduino Uno R4
1×(Aanbevolen) Stromsplitter voor Arduino Uno R4
1×(Aanbevolen) Prototyping Basisplaat & Breadboard Kit voor Arduino Uno

Of u kunt de volgende kits kopen:

1×DIYables Sensorkit (30 sensoren/displays)
1×DIYables Sensorkit (18 sensoren/displays)
Openbaarmaking: Sommige van de links in deze sectie zijn Amazon-affiliate links. We kunnen een commissie ontvangen voor aankopen die via deze links worden gedaan, zonder extra kosten voor u. We waarderen uw steun.

Over het SSD1309 2.42-Inch OLED Display

De SSD1309 dient als een speciale CMOS driver IC ontworpen voor 128×64 pixel OLED matrices. De register set behoudt compatibiliteit met de populaire SSD1306, waardoor hergebruik van code mogelijk is met kleine aanpassingen. Opmerkelijke hardware verschillen zijn:

  • Externe voedingsvereiste — anders dan de geïntegreerde charge pump van de SSD1306, vertrouwt de SSD1309 op een externe VCC voeding. Echter, commercieel verkrijgbare breakout boards (inclusief 2.42-inch en 2.4-inch varianten) bevatten onboard boost converters, waardoor dit verschil transparant is tijdens gebruik.
  • Uitgebreid voltage bereik — de SSD1309 kan tot 16 V VCC input aan, terwijl de SSD1306 maximaal ongeveer 4.2 V aankan.

De 2.42 inch (2.4 inch) OLED module gebruikt doorgaans de SSD1309 controller en biedt een 128×64 resolutie display die communiceert via I2C protocol. Display kleur (wit, blauw, geel, groen, of dual-color zones) hangt af van het fysieke OLED substraat en kan niet worden gewijzigd via software commando's.

Deze handleiding interfacet met het display via de I2C bus, waardoor slechts twee signaallijnen (SDA en SCL) nodig zijn en bus deling met extra I2C randapparatuur mogelijk is.

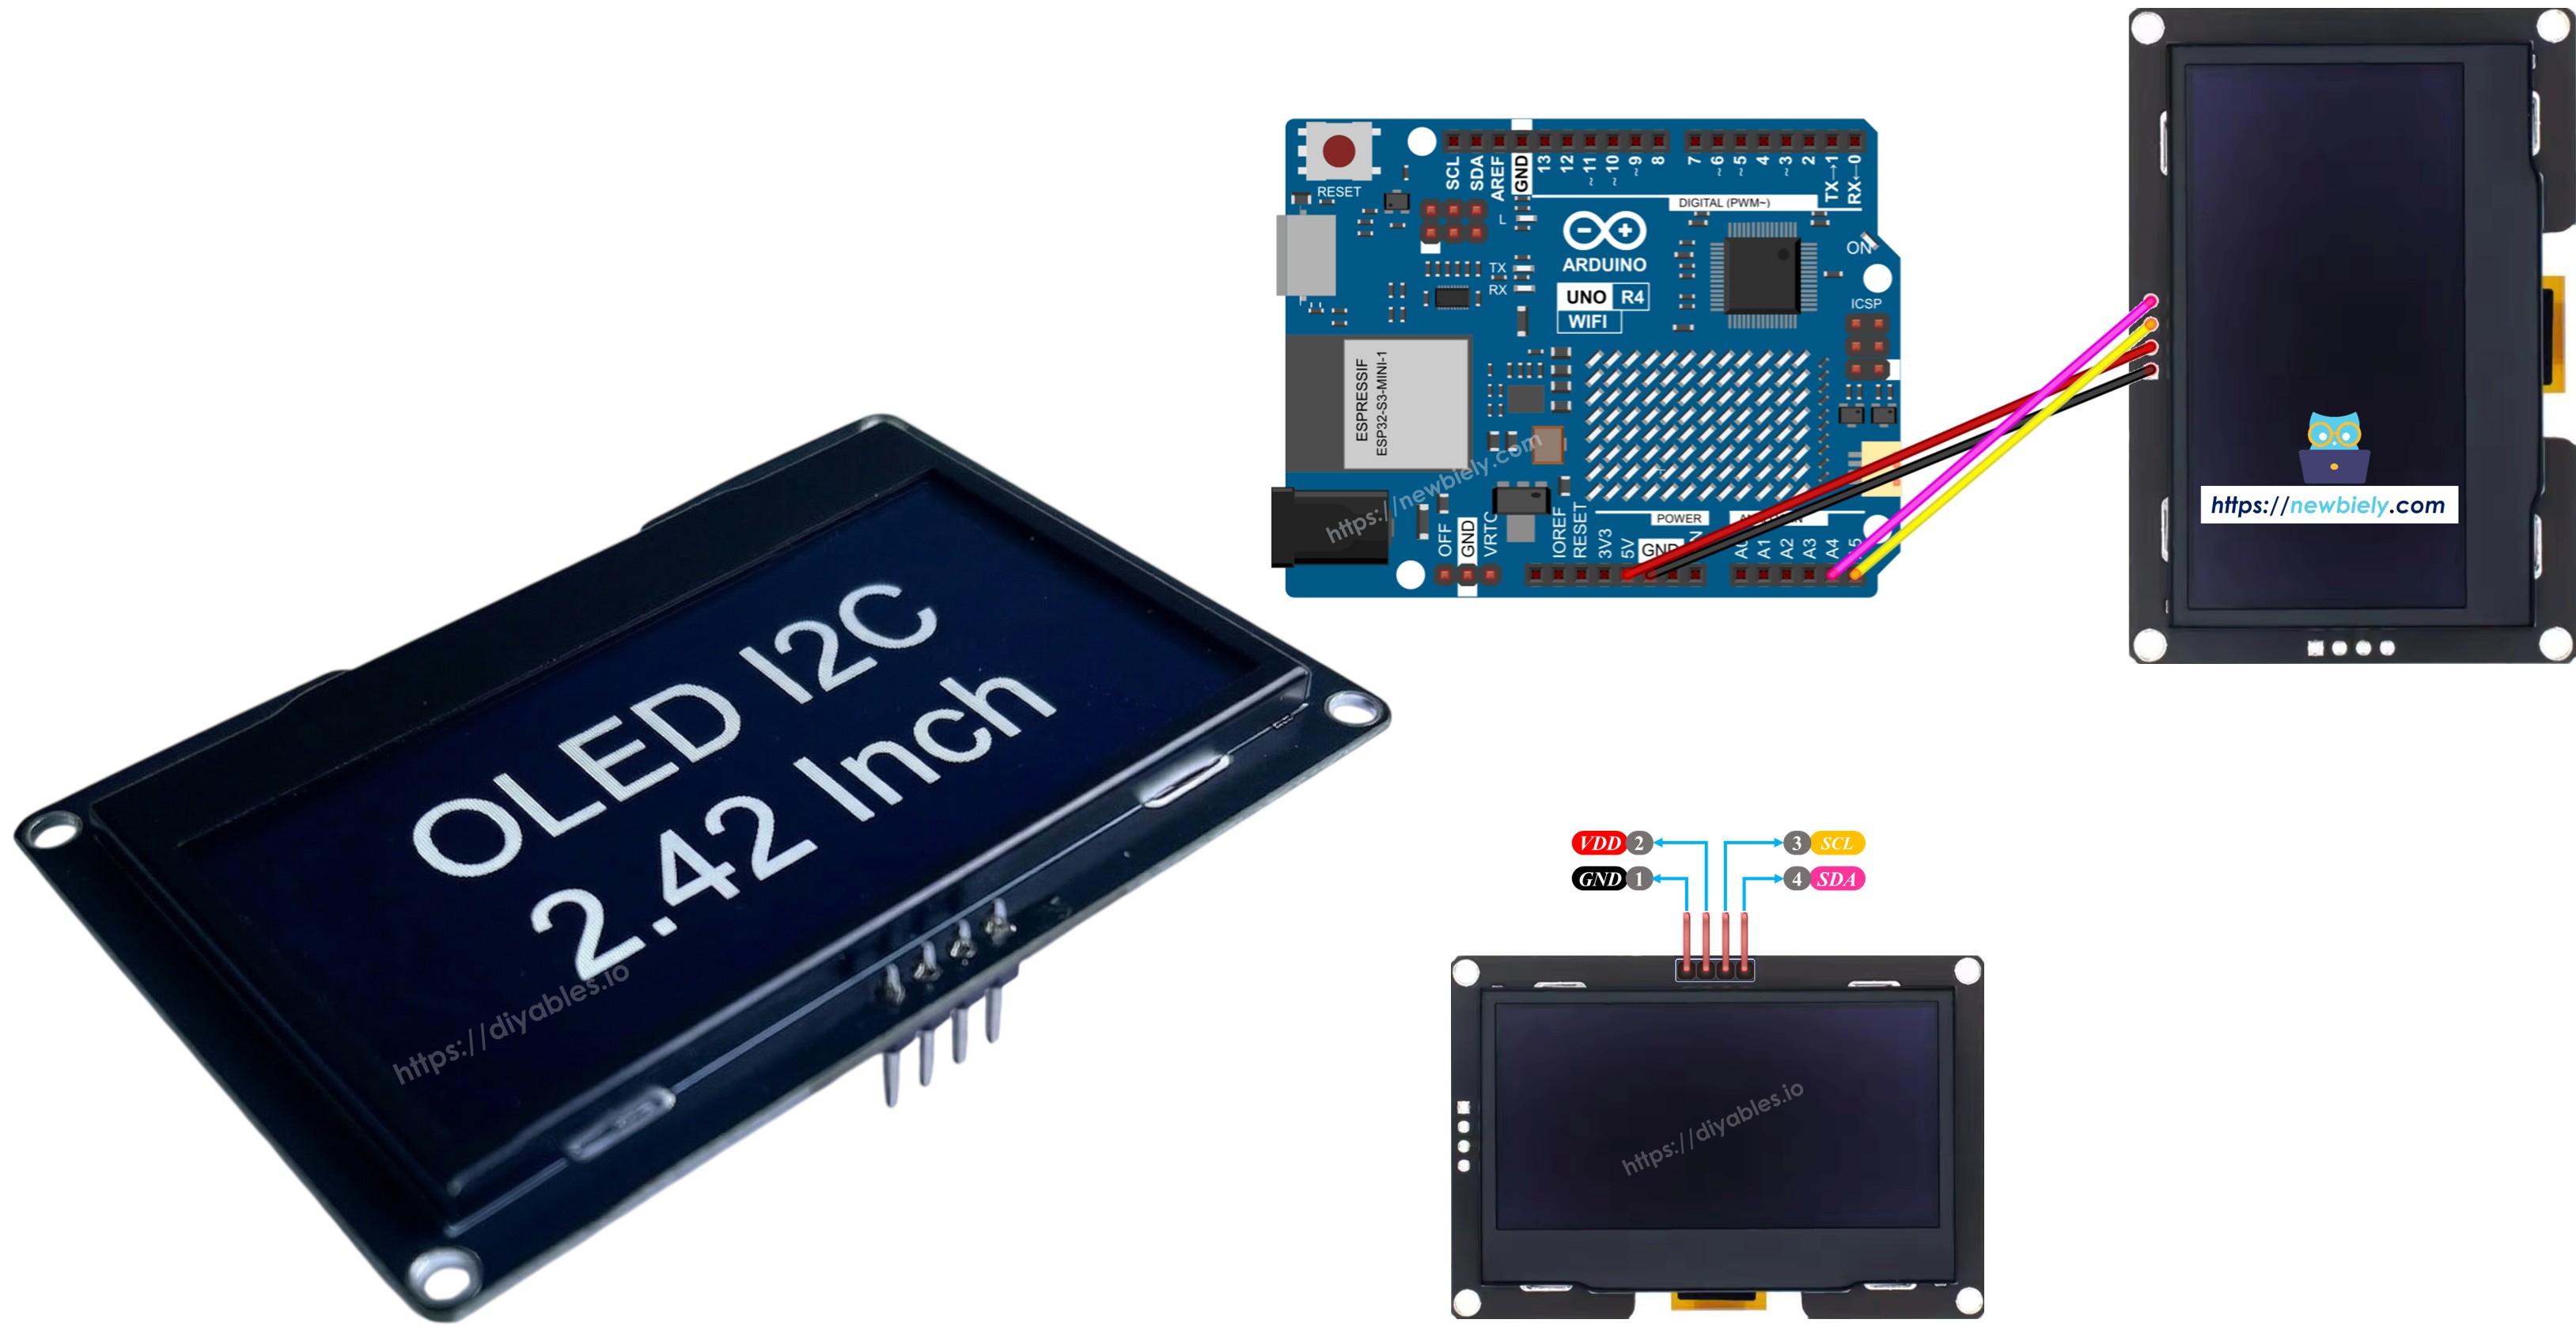
SSD1309 OLED Pinout (I2C Module)

Standaard 2.42-inch SSD1309 I2C OLED modules hebben vier aansluitpinnen:

  • GND — Verbind met Arduino Uno R4 aarde referentie.
  • VCC — Voedingsspanning ingang. Sluit aan op Arduino Uno R4 5 V uitgang (of 3.3 V als module dit ondersteunt).
  • SCL — I2C klok signaallijn.
  • SDA — I2C data signaallijn.
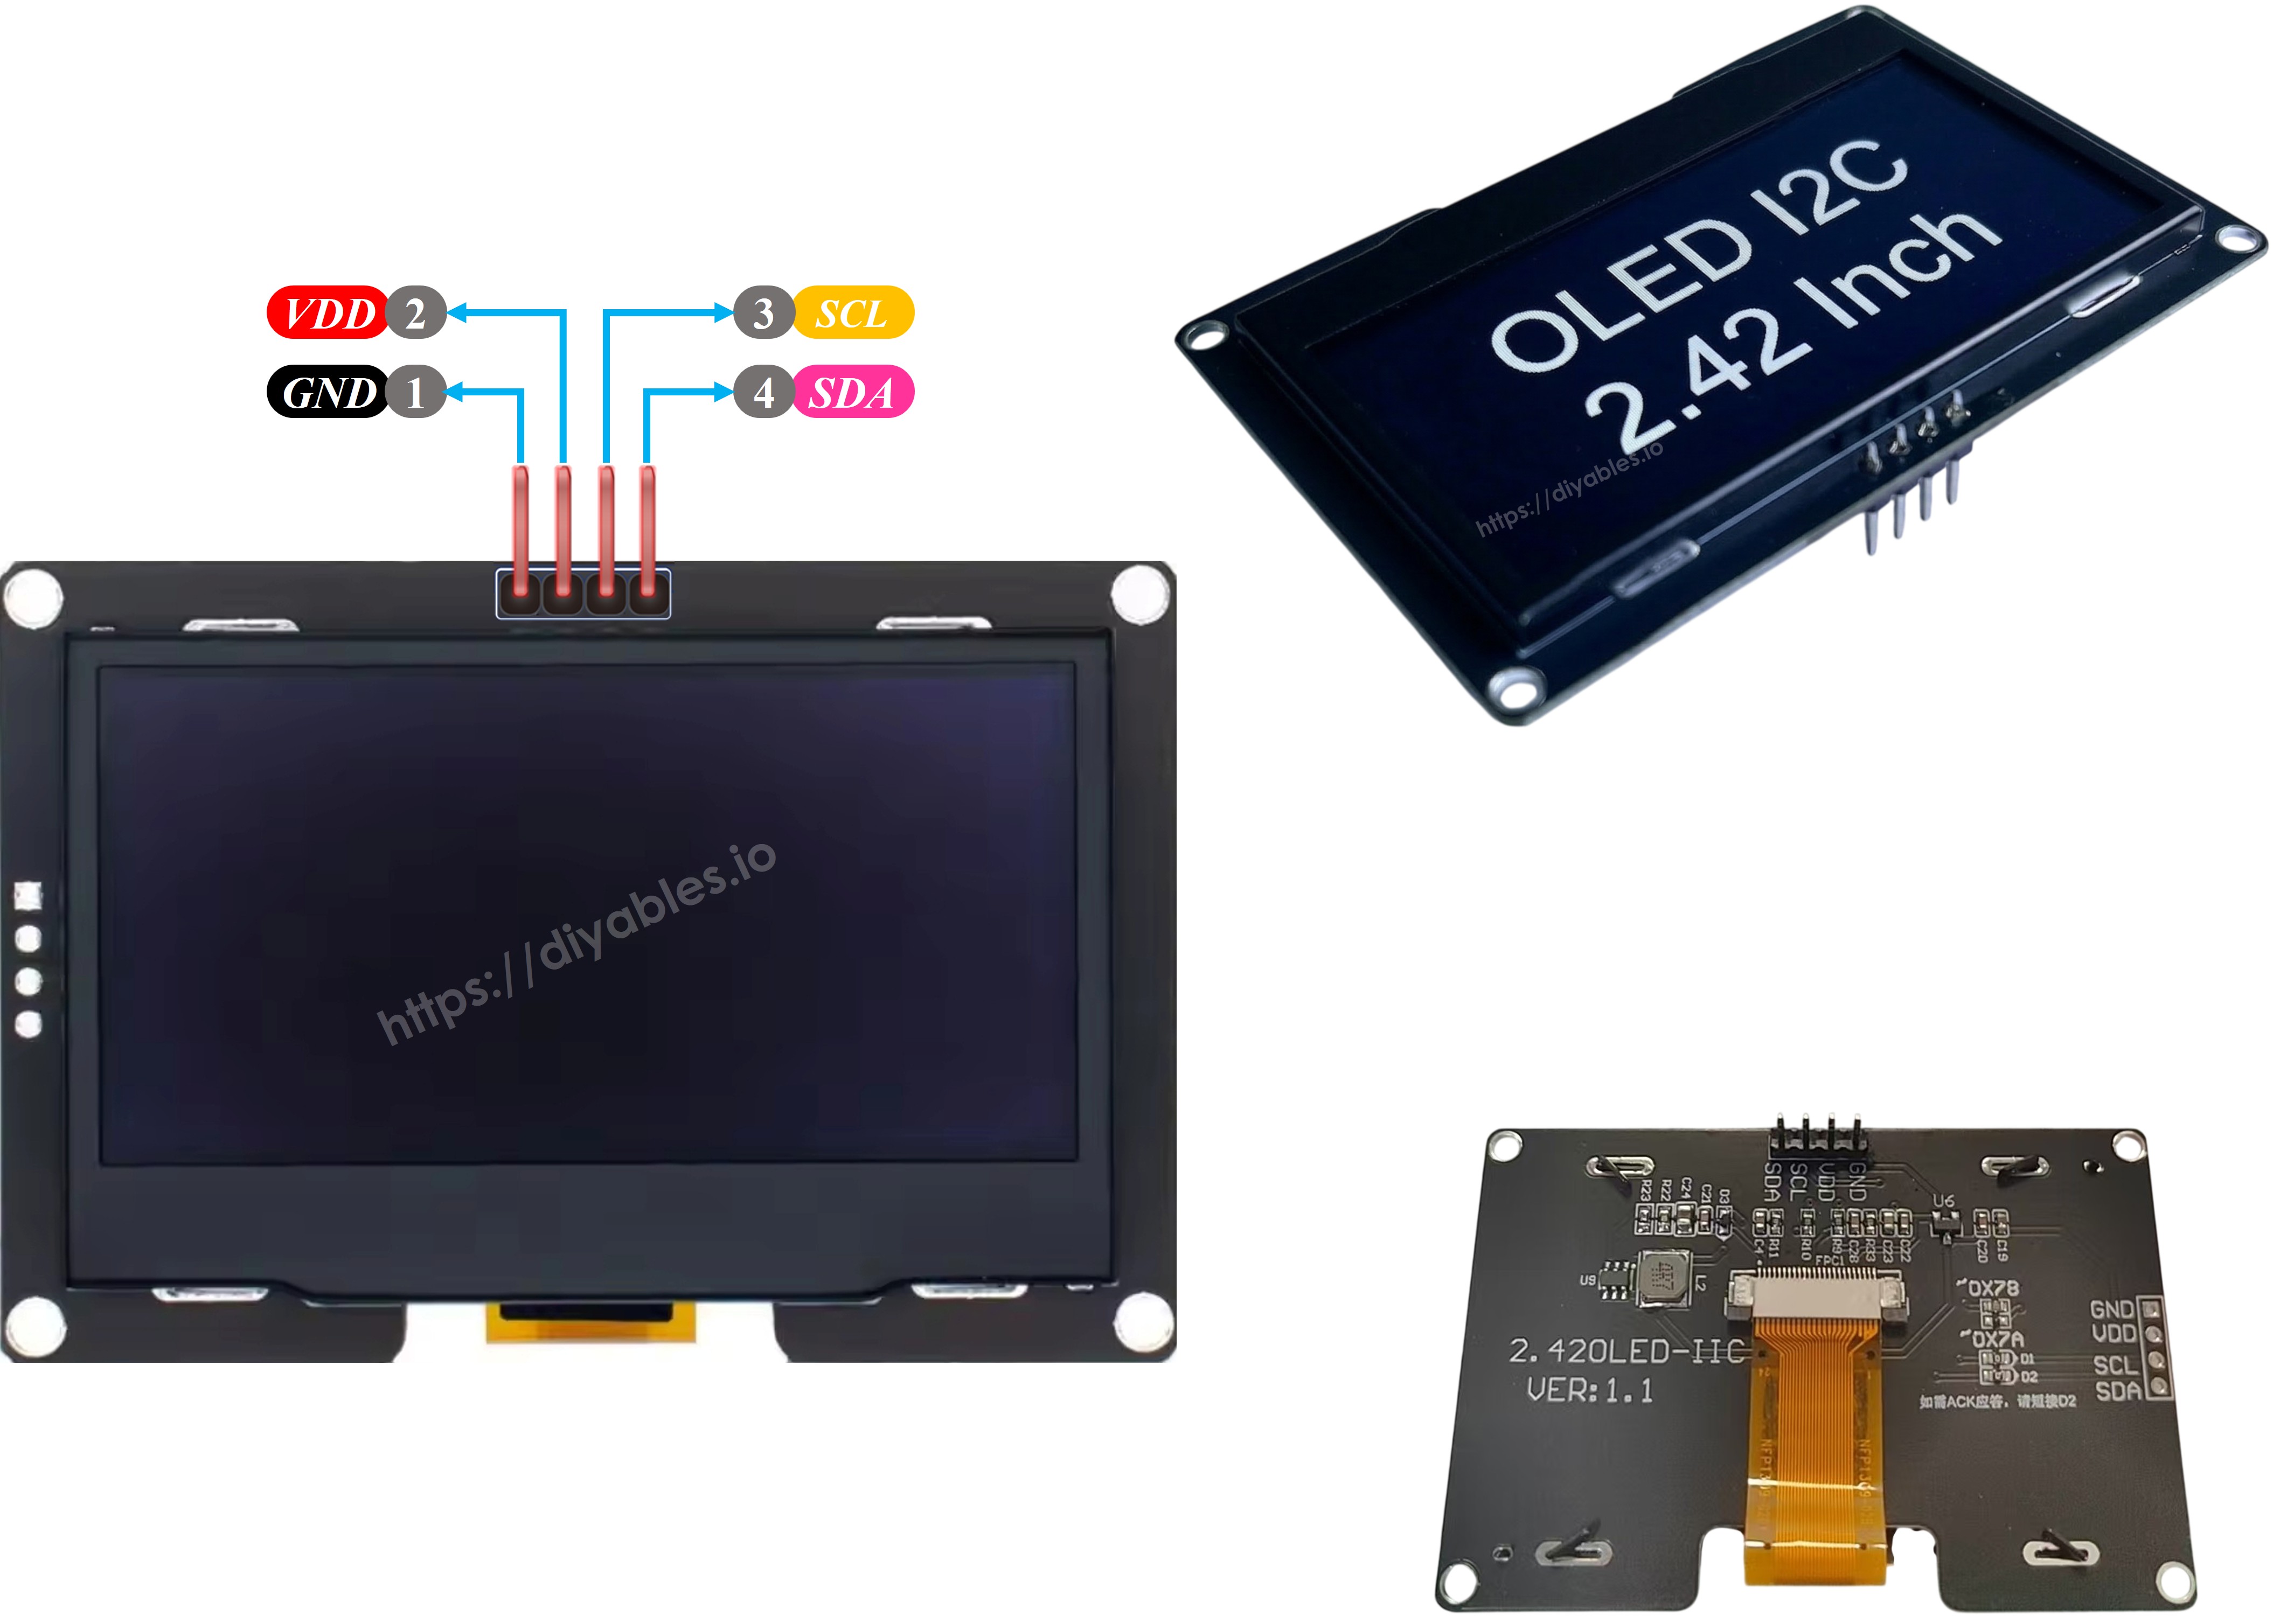
SSD1309 OLED Pinout

※ Notiz:

  • Pin indeling verschilt tussen fabrikanten. Controleer altijd de silkscreen labels op uw specifieke module voordat u verbindingen maakt.
  • Deze gids is gevalideerd met het 2.42 inch SSD1309 OLED display van DIYables. Andere SSD1309-gebaseerde 2.4/2.42-inch modules zouden identiek moeten functioneren.

Bedradingsschema — Arduino Uno R4 & SSD1309 OLED 128×64

  • Schematische verbindingen tussen Arduino Uno R4 en het 2.42 inch SSD1309 OLED 128×64
Arduino Uno R4 SSD1309 OLED 128x64 wiring diagram

This image is created using Fritzing. Click to enlarge image

  • Fysieke bedradings foto tussen Arduino Uno R4 en SSD1309 OLED 128×64
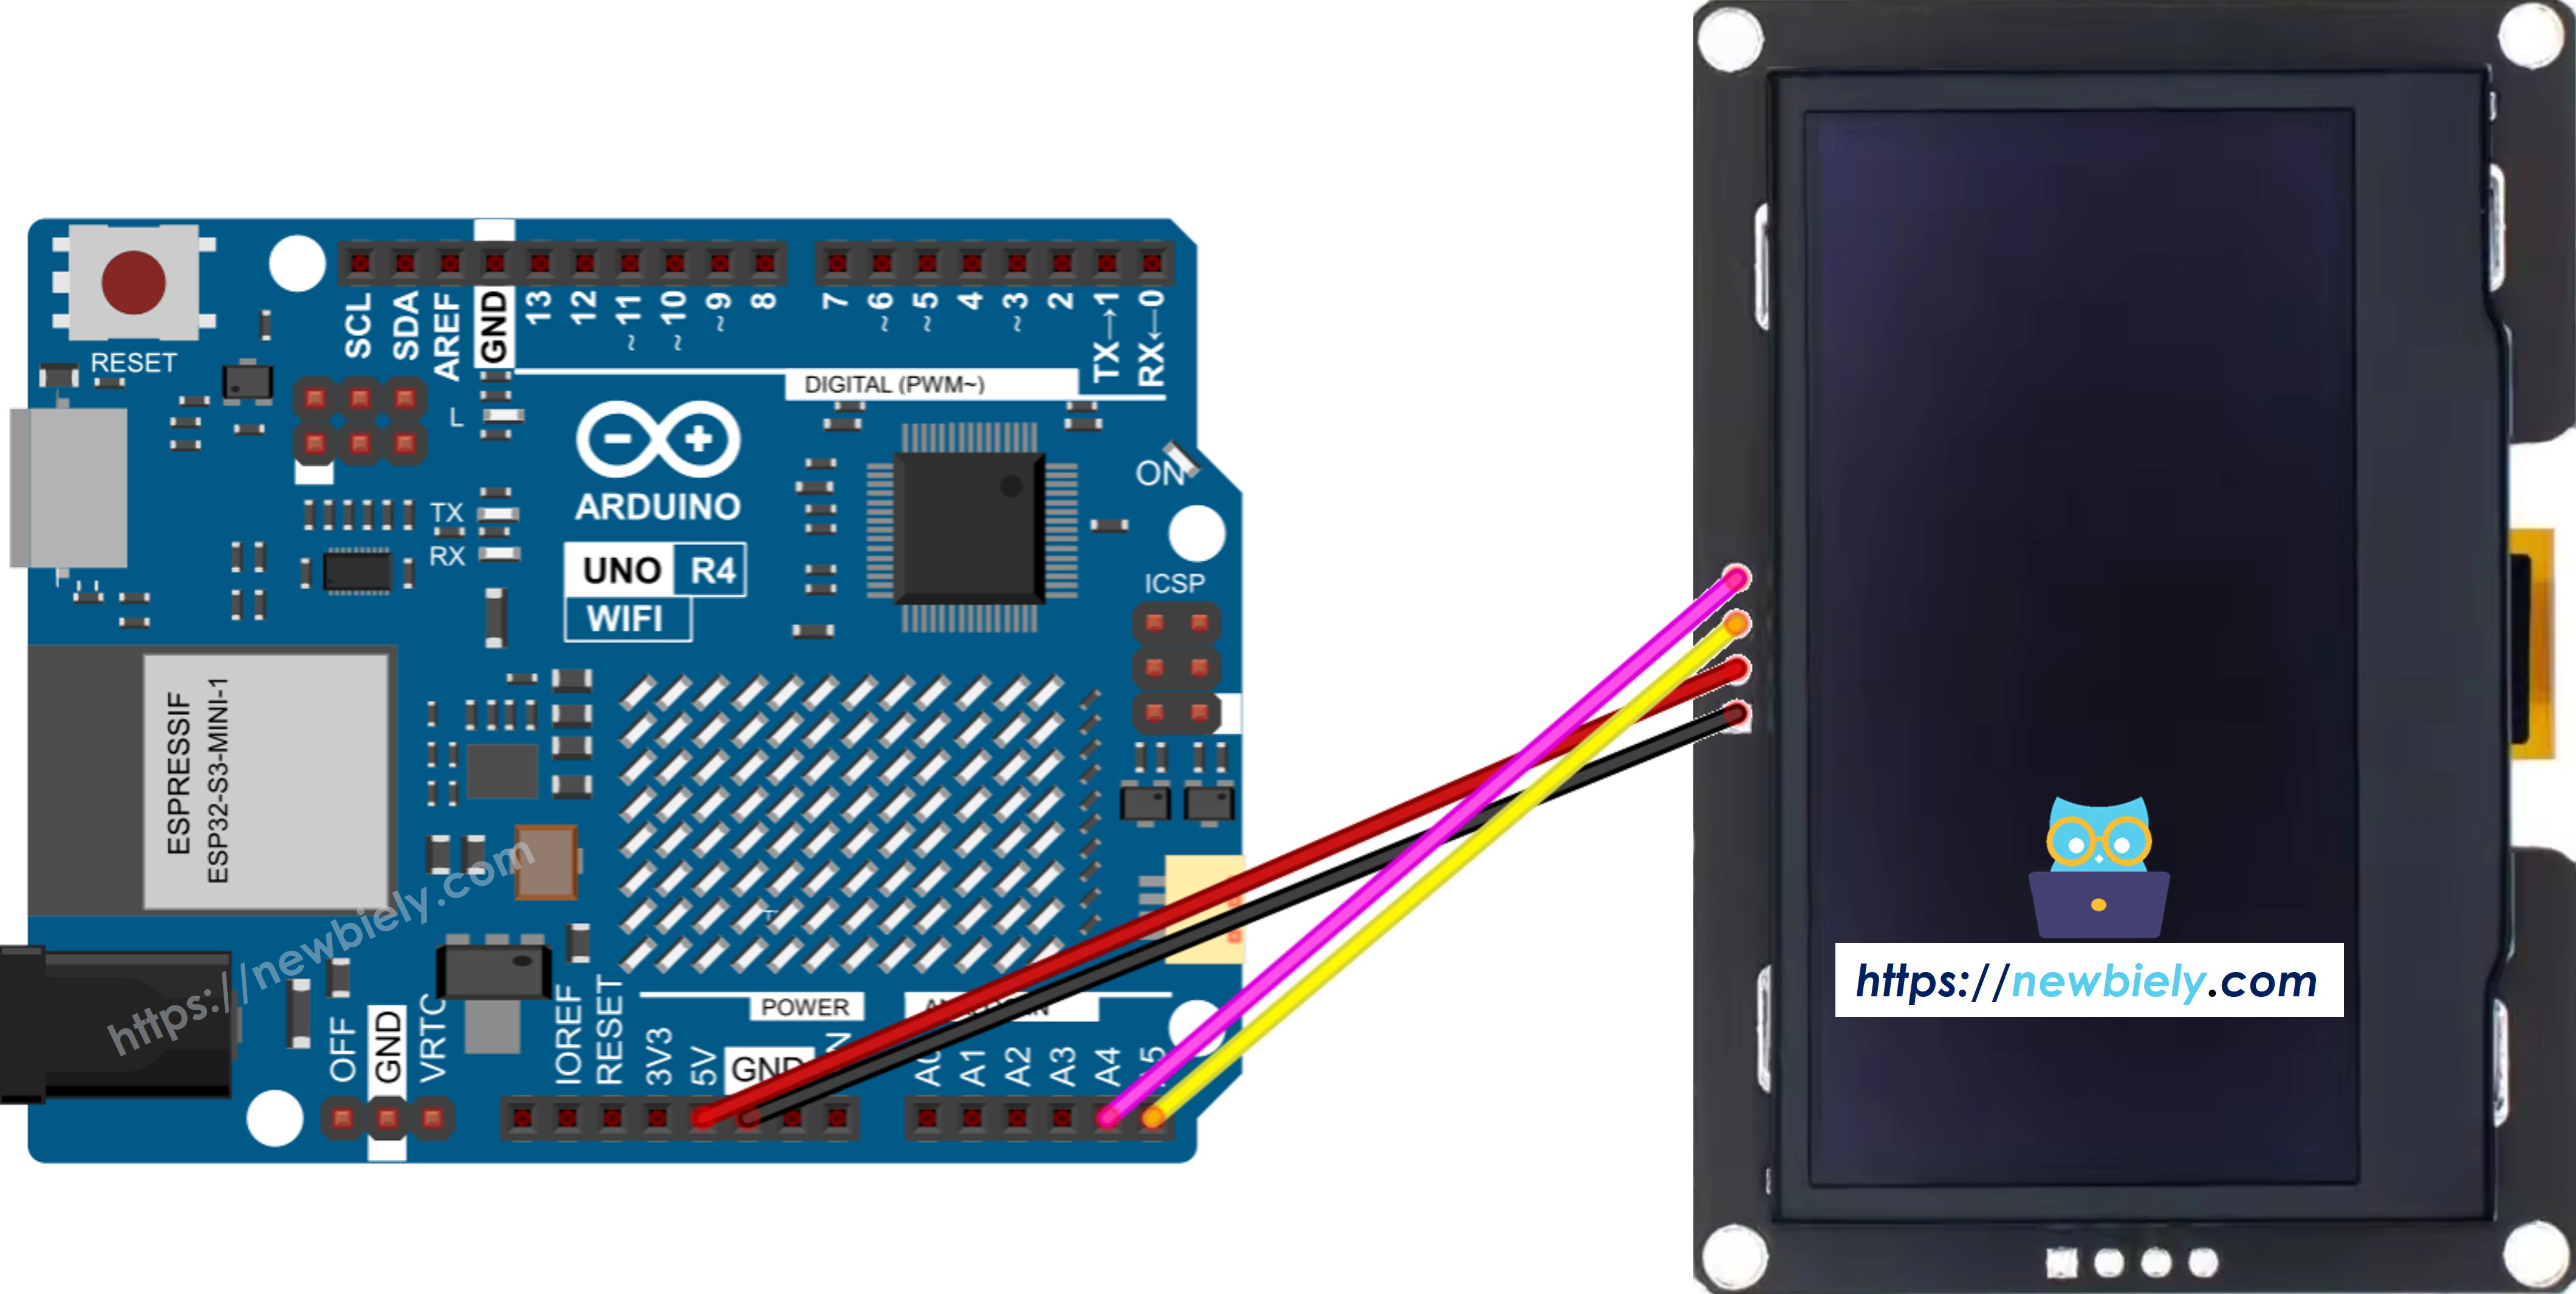
Arduino Uno R4 SSD1309 OLED 128x64 real wiring

This image is created using Fritzing. Click to enlarge image

Zie De beste manier om Arduino Uno R4 en andere componenten van stroom te voorzien.

De Arduino Uno R4 gebruikt dezelfde I2C pin locaties als de klassieke Uno. Verbindingsdetails:

OLED ModuleArduino Uno R4
Vin5V
GNDGND
SDAA4 (of SDA pin)
SCLA5 (of SCL pin)

Aan de Slag — SSD1309 OLED met Arduino Uno R4

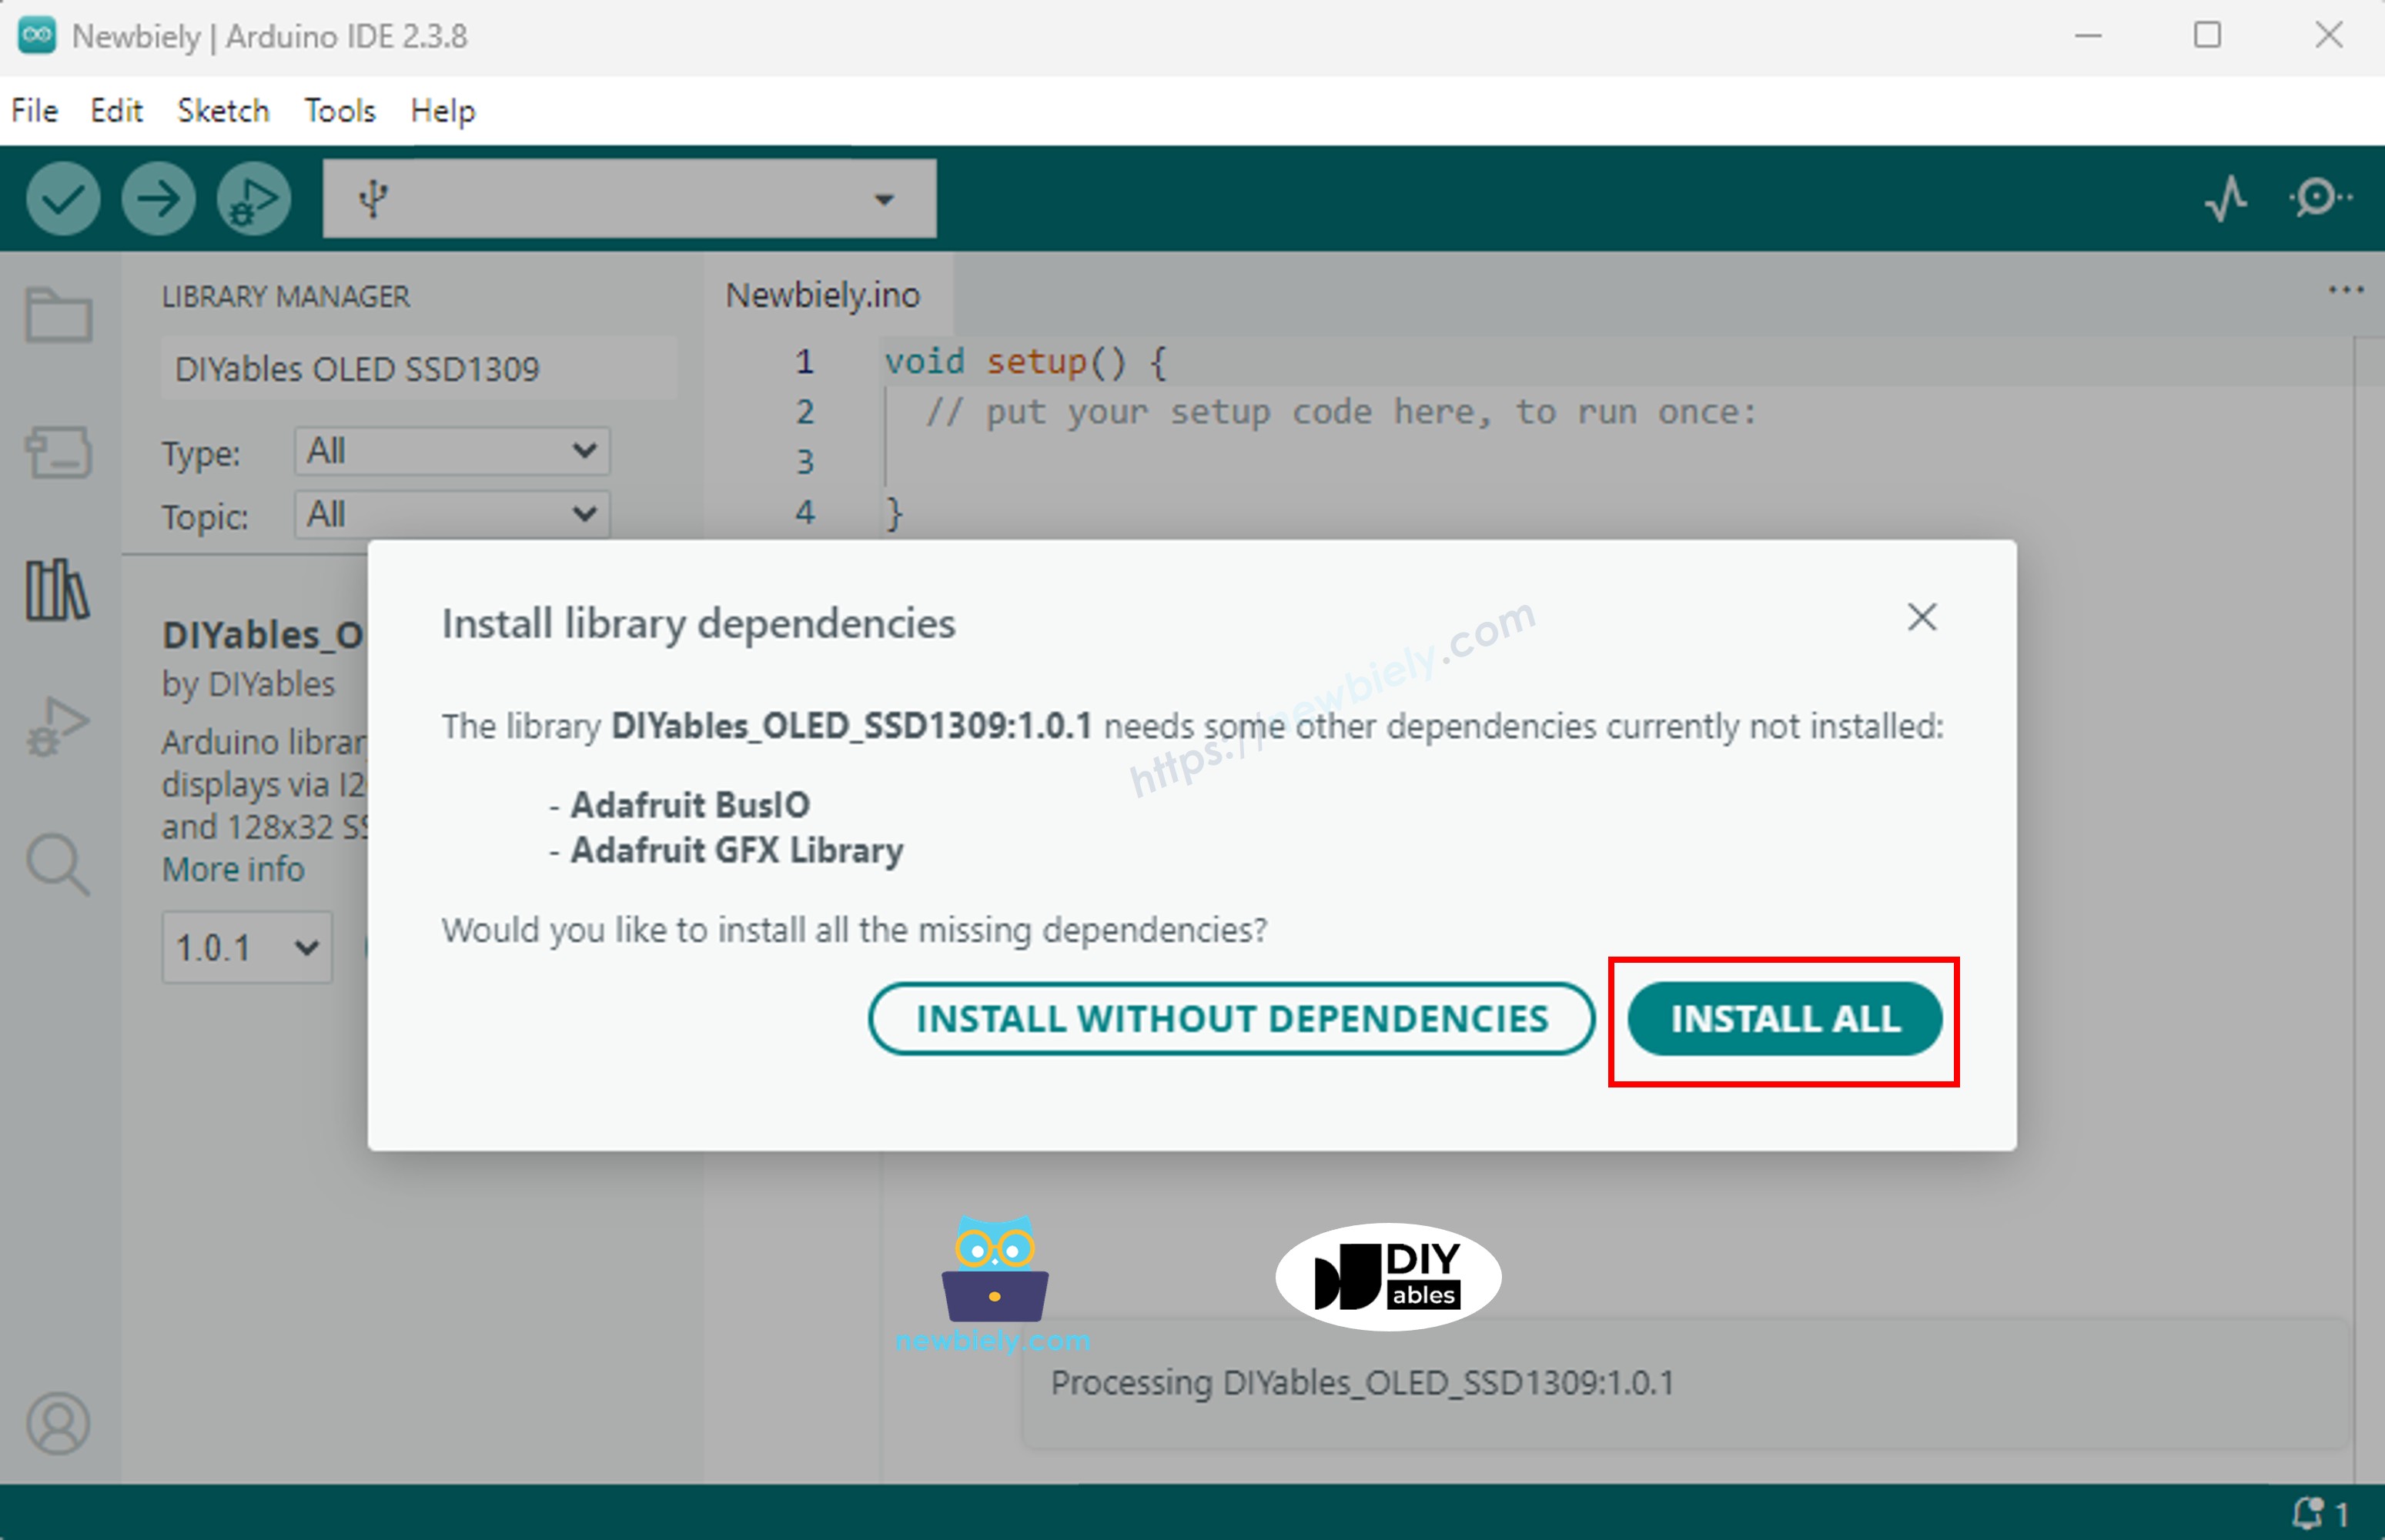
Stap 1: Installeer de DIYables_OLED_SSD1309 Bibliotheek

  • Start de Arduino IDE en klik op het Libraries icoon in de linker zijbalk.
  • Voer "DIYables_OLED_SSD1309" in het zoekveld in en vind de bibliotheek door DIYables.
  • Klik op de Install knop.
Arduino SSD1309 OLED library
  • De IDE zal u vragen om de vereiste afhankelijkheid (Adafruit GFX Library) te installeren. Klik Install All.
Arduino Adafruit GFX library

Stap 2: Basis Programmeerstructuur

Alle SSD1309 sketches volgen deze consistente structuur: include headers, instantieer een display object, initialiseer het in setup(), teken inhoud in de frame buffer, en transfer vervolgens de buffer naar het scherm met display().

  • Include benodigde headers:
#include <Wire.h> #include <Adafruit_GFX.h> #include <DIYables_OLED_SSD1309.h>
  • Definieer de schermafmetingen (128×64 voor de 2.42-inch module):
#define SCREEN_WIDTH 128 // OLED display width, in pixels #define SCREEN_HEIGHT 64 // OLED display height, in pixels
  • Instantieer het display object (gebruik -1 wanneer geen reset pin is verbonden):
// Create an SSD1309 display instance on the default I2C bus DIYables_OLED_SSD1309 oled(SCREEN_WIDTH, SCREEN_HEIGHT, &Wire, -1);
  • Initialiseer het display in setup():
// Initialize the SSD1309 — use address 0x3C (default for most modules) if (!oled.begin(SSD1309_SWITCHCAPVCC, 0x3C)) { Serial.println(F("SSD1309 allocation failed")); while (true); }
  • Na initialisatie, roep tekenoperaties aan (clearDisplay(), drawPixel(), print(), etc.) gevolgd door oled.display() om het scherm te verversen.

※ Notiz:

Alle code voorbeelden in deze gids zijn gericht op de SSD1309 OLED 128×64 (2.42 inch) en gebruiken de DIYables_OLED_SSD1309 bibliotheek met Arduino Uno R4.

Arduino Uno R4 Code — Hello World op SSD1309 OLED

De eenvoudigste demonstratie: tekst weergeven in meerdere groottes.

/* * Deze Arduino UNO R4 code is ontwikkeld door newbiely.nl * Deze Arduino UNO R4 code wordt zonder enige beperking aan het publiek beschikbaar gesteld. * Voor volledige instructies en schema's, bezoek: * https://newbiely.nl/tutorials/arduino-uno-r4/arduino-uno-r4-ssd1309-oled-display */ /* * DIYables OLED SSD1309 – Hello World * Prints text in two sizes on the 2.42 inch 128x64 I2C OLED. * Compatible with Arduino Uno R4 WiFi and Arduino Uno R4 Minima. */ #include <Wire.h> #include <Adafruit_GFX.h> #include <DIYables_OLED_SSD1309.h> #define SCREEN_WIDTH 128 #define SCREEN_HEIGHT 64 #define OLED_RESET -1 #define SCREEN_ADDRESS 0x3C DIYables_OLED_SSD1309 display(SCREEN_WIDTH, SCREEN_HEIGHT, &Wire, OLED_RESET); void setup() { Serial.begin(9600); if (!display.begin(SSD1309_SWITCHCAPVCC, SCREEN_ADDRESS)) { Serial.println(F("SSD1309 allocation failed")); for (;;); } display.clearDisplay(); display.setTextSize(1); // 6x8 pixels per character display.setTextColor(SSD1309_PIXEL_ON); // turn pixels on display.setCursor(0, 0); display.println(F("Hello, World!")); display.println(); display.setTextSize(2); // 12x16 pixels per character display.println(F("DIYables")); display.setTextSize(1); display.println(); display.println(F("SSD1309 OLED 128x64")); display.display(); // push buffer to screen } void loop() { }

Arduino Uno R4 Code — Tekst Weergeven op SSD1309 OLED

Dit voorbeeld toont geavanceerde tekstfuncties — variabele groottes, numerieke opmaak, en de F() macro voor RAM behoud.

/* * Deze Arduino UNO R4 code is ontwikkeld door newbiely.nl * Deze Arduino UNO R4 code wordt zonder enige beperking aan het publiek beschikbaar gesteld. * Voor volledige instructies en schema's, bezoek: * https://newbiely.nl/tutorials/arduino-uno-r4/arduino-uno-r4-ssd1309-oled-display */ /* * DIYables OLED SSD1309 – Display Text Demo for Arduino Uno R4 * Demonstrates text display features on 2.42" SSD1309 128x64 I2C OLED. */ #include <Wire.h> #include <Adafruit_GFX.h> #include <DIYables_OLED_SSD1309.h> #define SCREEN_WIDTH 128 #define SCREEN_HEIGHT 64 #define OLED_RESET -1 #define SCREEN_ADDRESS 0x3C DIYables_OLED_SSD1309 display(SCREEN_WIDTH, SCREEN_HEIGHT, &Wire, OLED_RESET); void setup() { Serial.begin(9600); if (!display.begin(SSD1309_SWITCHCAPVCC, SCREEN_ADDRESS)) { Serial.println(F("SSD1309 allocation failed")); for (;;); } delay(2000); // wait for initializing display.clearDisplay(); // clear display display.setTextSize(1); // text size = 1 display.setTextColor(SSD1309_PIXEL_ON); // set text color display.setCursor(0, 10); // set position to display display.println(F("Text size = 1")); // display text display.display(); // update display delay(2000); display.setTextSize(2); // text size = 2 display.setCursor(0, 30); // set position to display display.println(F("Size = 2")); // display text display.display(); // update display delay(2000); display.clearDisplay(); // clear display display.setTextSize(1); display.setCursor(0, 0); display.println(F("Display integer:")); display.println(12345); display.println(); display.println(F("Display float:")); display.println(1.2345); display.println(); display.println(F("Display HEX:")); display.println(0xABCD, HEX); display.display(); // update display } void loop() { }

Handige Display Functies Referentie

Snelle referentie voor veelgebruikte SSD1309 OLED functies via de DIYables bibliotheek:

  • oled.clearDisplay() — wis de frame buffer (alle pixels uit).
  • oled.display() — transfer de buffer naar de OLED om wijzigingen zichtbaar te maken.
  • oled.drawPixel(x, y, color) — zet of wis een enkele pixel.
  • oled.setTextSize(n) — schaal het lettertype met factor *n* (1 = 6×8, 2 = 12×16, …, tot 8).
  • oled.setCursor(x, y) — positioneer de tekstcursor op pixel coördinaten *(x, y)*.
  • oled.setTextColor(SSD1309_PIXEL_ON) — alleen tekst voorgrond (transparante achtergrond).
  • oled.setTextColor(SSD1309_PIXEL_OFF, SSD1309_PIXEL_ON) — tekst met expliciete achtergrondkleur.
  • oled.println("message") — print een string en ga naar de volgende regel.
  • oled.println(number) — print een geheel getal in decimaal formaat.
  • oled.println(number, HEX) — print een geheel getal in hexadecimaal formaat.
  • oled.startscrollright(start, stop) — hardware-scroll rechts tussen pagina *start* en pagina *stop*.
  • oled.startscrollleft(start, stop) — hardware-scroll links.
  • oled.startscrolldiagright(start, stop) — hardware-scroll diagonaal rechts.
  • oled.startscrolldiagleft(start, stop) — hardware-scroll diagonaal links.
  • oled.stopscroll() — stop elke actieve hardware scroll.
  • oled.setContrast(value) — pas display helderheid aan (0–255).
  • oled.dim(true/false) — dim het display snel naar minimum of herstel vorige contrast.
  • oled.invertDisplay(true/false) — hardware-niveau kleurinversie (aan pixels ↔ uit pixels).

Hoe Tekst Verticaal en Horizontaal te Centreren op de SSD1309 OLED

Zie How to vertical/horizontal center on OLED

Arduino Uno R4 Code — Vormen Tekenen op SSD1309 OLED

De DIYables_OLED_SSD1309 bibliotheek erft van Adafruit_GFX, wat complete vorm-tekenvaardigheden biedt: pixels, lijnen, rechthoeken, gevulde rechthoeken, cirkels, gevulde cirkels, driehoeken, gevulde driehoeken, en afgeronde rechthoeken. De volgende sketch demonstreert ze allemaal met geanimeerde sequenties.

/* * Deze Arduino UNO R4 code is ontwikkeld door newbiely.nl * Deze Arduino UNO R4 code wordt zonder enige beperking aan het publiek beschikbaar gesteld. * Voor volledige instructies en schema's, bezoek: * https://newbiely.nl/tutorials/arduino-uno-r4/arduino-uno-r4-ssd1309-oled-display */ /* * DIYables OLED SSD1309 – Draw Shapes for Arduino Uno R4 * Cycles through every shape primitive on the 2.42" SSD1309 128x64 OLED. */ #include <Wire.h> #include <Adafruit_GFX.h> #include <DIYables_OLED_SSD1309.h> #define SCREEN_WIDTH 128 #define SCREEN_HEIGHT 64 #define OLED_RESET -1 #define SCREEN_ADDRESS 0x3C DIYables_OLED_SSD1309 display(SCREEN_WIDTH, SCREEN_HEIGHT, &Wire, OLED_RESET); void setup() { Serial.begin(9600); if (!display.begin(SSD1309_SWITCHCAPVCC, SCREEN_ADDRESS)) { Serial.println(F("SSD1309 allocation failed")); for (;;); } display.clearDisplay(); } void loop() { // --- Pixels --- display.clearDisplay(); for (int16_t i = 0; i < display.width(); i += 4) { display.drawPixel(i, i * display.height() / display.width(), SSD1309_PIXEL_ON); } display.display(); delay(1500); // --- Lines --- display.clearDisplay(); for (int16_t i = 0; i < display.width(); i += 8) { display.drawLine(0, 0, i, display.height() - 1, SSD1309_PIXEL_ON); } for (int16_t i = 0; i < display.height(); i += 8) { display.drawLine(0, 0, display.width() - 1, i, SSD1309_PIXEL_ON); } display.display(); delay(1500); // --- Rectangles --- display.clearDisplay(); for (int16_t i = 0; i < display.height() / 2; i += 4) { display.drawRect(i, i, display.width() - 2 * i, display.height() - 2 * i, SSD1309_PIXEL_ON); } display.display(); delay(1500); // --- Filled rectangles (inverse) --- display.clearDisplay(); for (int16_t i = 0; i < display.height() / 2; i += 6) { display.fillRect(i, i, display.width() - 2 * i, display.height() - 2 * i, SSD1309_PIXEL_INVERSE); } display.display(); delay(1500); // --- Circles --- display.clearDisplay(); for (int16_t i = max(display.width(), display.height()) / 2; i > 0; i -= 5) { display.drawCircle(display.width() / 2, display.height() / 2, i, SSD1309_PIXEL_ON); } display.display(); delay(1500); // --- Filled circles (inverse) --- display.clearDisplay(); for (int16_t i = max(display.width(), display.height()) / 2; i > 0; i -= 6) { display.fillCircle(display.width() / 2, display.height() / 2, i, SSD1309_PIXEL_INVERSE); } display.display(); delay(1500); // --- Rounded rectangles --- display.clearDisplay(); for (int16_t i = 0; i < display.height() / 2 - 2; i += 4) { display.drawRoundRect(i, i, display.width() - 2 * i, display.height() - 2 * i, display.height() / 4, SSD1309_PIXEL_ON); } display.display(); delay(1500); // --- Filled rounded rectangles (inverse) --- display.clearDisplay(); for (int16_t i = 0; i < display.height() / 2 - 2; i += 4) { display.fillRoundRect(i, i, display.width() - 2 * i, display.height() - 2 * i, display.height() / 4, SSD1309_PIXEL_INVERSE); } display.display(); delay(1500); // --- Triangles --- display.clearDisplay(); for (int16_t i = 0; i < max(display.width(), display.height()) / 2; i += 5) { display.drawTriangle( display.width() / 2, display.height() / 2 - i, display.width() / 2 - i, display.height() / 2 + i, display.width() / 2 + i, display.height() / 2 + i, SSD1309_PIXEL_ON); } display.display(); delay(1500); // --- Filled triangles (inverse) --- display.clearDisplay(); for (int16_t i = max(display.width(), display.height()) / 2; i > 0; i -= 6) { display.fillTriangle( display.width() / 2, display.height() / 2 - i, display.width() / 2 - i, display.height() / 2 + i, display.width() / 2 + i, display.height() / 2 + i, SSD1309_PIXEL_INVERSE); } display.display(); delay(1500); }

Arduino Uno R4 Code — Hardware Scrolling op SSD1309 OLED

De SSD1309 bevat een hardware scrolling engine die display inhoud verplaatst zonder CPU interventie. De DIYables bibliotheek biedt vier scroll modi: rechts, links, diagonaal-rechts, en diagonaal-links. Elk accepteert een start pagina en stop pagina parameter (pagina's zijn 8-pixel-hoge horizontale banden genummerd 0–7 op een 64-pixel-hoog display).

※ Notiz:

Roep altijd display() aan om uw inhoud naar de OLED over te dragen voordat u een scroll initieert. Vermijd het renderen van nieuwe inhoud terwijl scrolling actief is — roep eerst stopscroll() aan.

/* * Deze Arduino UNO R4 code is ontwikkeld door newbiely.nl * Deze Arduino UNO R4 code wordt zonder enige beperking aan het publiek beschikbaar gesteld. * Voor volledige instructies en schema's, bezoek: * https://newbiely.nl/tutorials/arduino-uno-r4/arduino-uno-r4-ssd1309-oled-display */ /* * DIYables OLED SSD1309 – Scroll Text * Demonstrates all four hardware scroll directions on the 2.42" OLED. * Compatible with Arduino Uno R4 WiFi and Arduino Uno R4 Minima. */ #include <Wire.h> #include <Adafruit_GFX.h> #include <DIYables_OLED_SSD1309.h> #define SCREEN_WIDTH 128 #define SCREEN_HEIGHT 64 #define OLED_RESET -1 #define SCREEN_ADDRESS 0x3C DIYables_OLED_SSD1309 display(SCREEN_WIDTH, SCREEN_HEIGHT, &Wire, OLED_RESET); void setup() { Serial.begin(9600); if (!display.begin(SSD1309_SWITCHCAPVCC, SCREEN_ADDRESS)) { Serial.println(F("SSD1309 allocation failed")); for (;;); } display.clearDisplay(); display.setTextSize(2); display.setTextColor(SSD1309_PIXEL_ON); display.setCursor(10, 24); display.println(F("DIYables")); display.display(); delay(2000); } void loop() { // Scroll right across all pages display.startscrollright(0x00, 0x07); delay(3000); display.stopscroll(); delay(500); // Scroll left display.startscrollleft(0x00, 0x07); delay(3000); display.stopscroll(); delay(500); // Diagonal scroll right display.startscrolldiagright(0x00, 0x07); delay(3000); display.stopscroll(); delay(500); // Diagonal scroll left display.startscrolldiagleft(0x00, 0x07); delay(3000); display.stopscroll(); delay(500); }

Arduino Uno R4 Code — Bitmap Afbeelding Weergeven op SSD1309 OLED

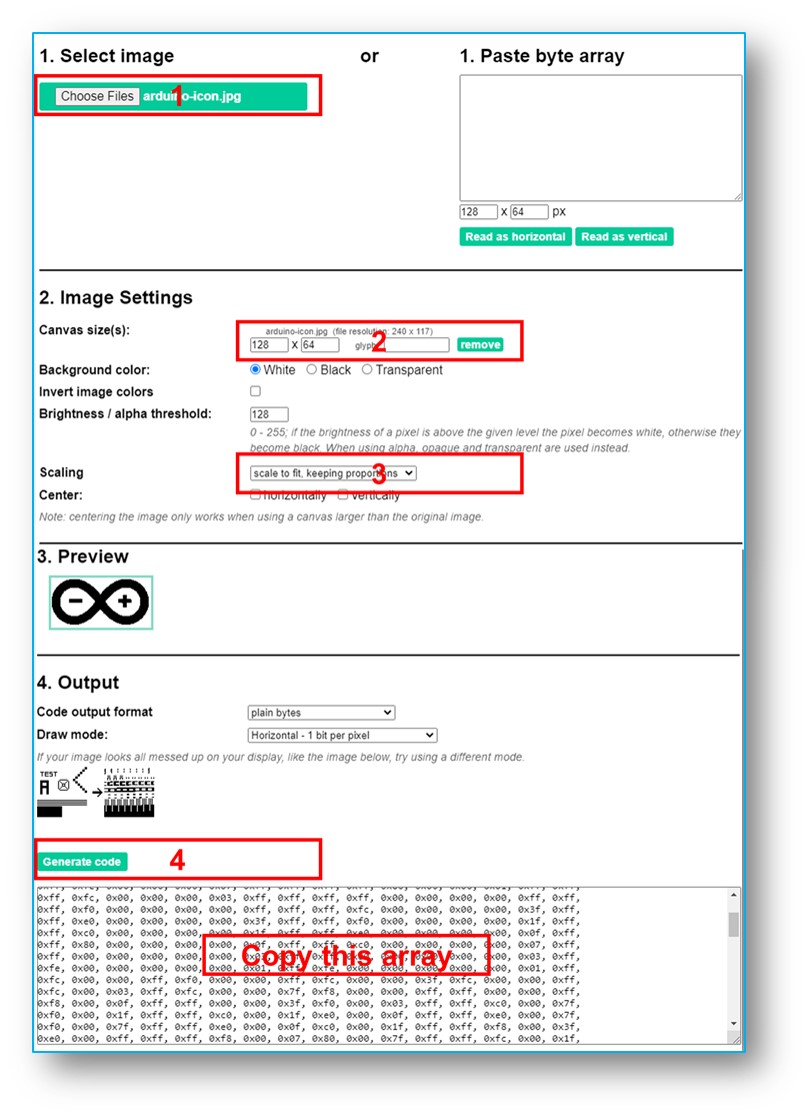
Om een bitmap op de SSD1309 OLED weer te geven moet u eerst uw afbeelding converteren naar een C byte array. Gebruik de gratis image2cpp online tool voor deze conversie:

  1. Upload uw afbeeldingsbestand (PNG, JPG, BMP, etc.).
  2. Configureer de canvas grootte naar 128×64 (of kleiner).
  3. Selecteer Arduino code als uitvoerformaat.
  4. Kopieer de gegenereerde array naar uw sketch.
image to bitmap array

Het onderstaande voorbeeld wisselt tussen een 16×16 hart icoon en een volledig-breed DIYables logo:

/* * Deze Arduino UNO R4 code is ontwikkeld door newbiely.nl * Deze Arduino UNO R4 code wordt zonder enige beperking aan het publiek beschikbaar gesteld. * Voor volledige instructies en schema's, bezoek: * https://newbiely.nl/tutorials/arduino-uno-r4/arduino-uno-r4-ssd1309-oled-display */ /* * DIYables OLED SSD1309 – Display Image Demo for Arduino Uno R4 * Displays bitmap images on the 2.42" SSD1309 128x64 I2C OLED. */ #include <Wire.h> #include <Adafruit_GFX.h> #include <DIYables_OLED_SSD1309.h> #define SCREEN_WIDTH 128 #define SCREEN_HEIGHT 64 #define OLED_RESET -1 #define SCREEN_ADDRESS 0x3C DIYables_OLED_SSD1309 display(SCREEN_WIDTH, SCREEN_HEIGHT, &Wire, OLED_RESET); // 16x16 heart bitmap const unsigned char heart16x16[] PROGMEM = { 0x00, 0x00, 0x03, 0xc0, 0x0f, 0xf0, 0x1f, 0xf8, 0x3f, 0xfc, 0x7f, 0xfe, 0xff, 0xff, 0xff, 0xff, 0xff, 0xff, 0xff, 0xff, 0x7f, 0xfe, 0x3f, 0xfc, 0x1f, 0xf8, 0x0f, 0xf0, 0x03, 0xc0, 0x00, 0x00 }; // 128x64 DIYables logo bitmap const unsigned char diyablesLogo[] PROGMEM = { 0xff, 0xff, 0xff, 0xff, 0xff, 0xff, 0xff, 0xff, 0xff, 0xff, 0xff, 0xff, 0xff, 0xff, 0xff, 0xff, 0xff, 0xff, 0xff, 0xff, 0xff, 0xff, 0xff, 0xff, 0xff, 0xff, 0xff, 0xff, 0xff, 0xff, 0xff, 0xff, 0xff, 0xff, 0xfe, 0x00, 0x07, 0xff, 0xff, 0xff, 0xff, 0xff, 0xff, 0x80, 0x01, 0xff, 0xff, 0xff, 0xff, 0xff, 0xe0, 0x00, 0x00, 0xff, 0xff, 0xff, 0xff, 0xff, 0xfc, 0x00, 0x00, 0x3f, 0xff, 0xff, 0xff, 0xff, 0x80, 0x00, 0x00, 0x1f, 0xff, 0xff, 0xff, 0xff, 0xe0, 0x00, 0x00, 0x07, 0xff, 0xff, 0xff, 0xfe, 0x00, 0x00, 0x00, 0x07, 0xff, 0xff, 0xff, 0xff, 0x80, 0x00, 0x00, 0x01, 0xff, 0xff, 0xff, 0xfc, 0x00, 0x00, 0x00, 0x03, 0xff, 0xff, 0xff, 0xff, 0x00, 0x00, 0x00, 0x00, 0xff, 0xff, 0xff, 0xf0, 0x00, 0x00, 0x00, 0x00, 0xff, 0xff, 0xff, 0xfc, 0x00, 0x00, 0x00, 0x00, 0x3f, 0xff, 0xff, 0xe0, 0x00, 0x00, 0x00, 0x00, 0x3f, 0xff, 0xff, 0xf0, 0x00, 0x00, 0x00, 0x00, 0x1f, 0xff, 0xff, 0xc0, 0x00, 0x00, 0x00, 0x00, 0x1f, 0xff, 0xff, 0xe0, 0x00, 0x00, 0x00, 0x00, 0x0f, 0xff, 0xff, 0x80, 0x00, 0x00, 0x00, 0x00, 0x0f, 0xff, 0xff, 0xc0, 0x00, 0x00, 0x00, 0x00, 0x07, 0xff, 0xff, 0x00, 0x00, 0x00, 0x00, 0x00, 0x03, 0xff, 0xff, 0x80, 0x00, 0x00, 0x00, 0x00, 0x03, 0xff, 0xfe, 0x00, 0x00, 0x00, 0x00, 0x00, 0x01, 0xff, 0xfe, 0x00, 0x00, 0x00, 0x00, 0x00, 0x01, 0xff, 0xfc, 0x00, 0x00, 0xff, 0xf0, 0x00, 0x00, 0xff, 0xfc, 0x00, 0x00, 0x3f, 0xfc, 0x00, 0x00, 0xff, 0xfc, 0x00, 0x03, 0xff, 0xfc, 0x00, 0x00, 0x7f, 0xf8, 0x00, 0x00, 0xff, 0xff, 0x00, 0x00, 0xff, 0xf8, 0x00, 0x0f, 0xff, 0xff, 0x00, 0x00, 0x3f, 0xf0, 0x00, 0x03, 0xff, 0xff, 0xc0, 0x00, 0x7f, 0xf0, 0x00, 0x1f, 0xff, 0xff, 0xc0, 0x00, 0x1f, 0xe0, 0x00, 0x0f, 0xff, 0xff, 0xe0, 0x00, 0x7f, 0xf0, 0x00, 0x7f, 0xff, 0xff, 0xe0, 0x00, 0x0f, 0xc0, 0x00, 0x1f, 0xff, 0xff, 0xf8, 0x00, 0x3f, 0xe0, 0x00, 0xff, 0xff, 0xff, 0xf8, 0x00, 0x07, 0x80, 0x00, 0x7f, 0xff, 0xff, 0xfc, 0x00, 0x1f, 0xe0, 0x00, 0xff, 0xff, 0xff, 0xfc, 0x00, 0x03, 0x80, 0x00, 0xff, 0xff, 0xff, 0xfc, 0x00, 0x1f, 0xc0, 0x01, 0xff, 0xff, 0xff, 0xfe, 0x00, 0x03, 0x00, 0x01, 0xff, 0xff, 0xff, 0xfe, 0x00, 0x1f, 0xc0, 0x03, 0xff, 0xff, 0xff, 0xff, 0x00, 0x00, 0x00, 0x03, 0xff, 0xff, 0xff, 0xff, 0x00, 0x0f, 0xc0, 0x03, 0xff, 0xff, 0xff, 0xff, 0x80, 0x00, 0x00, 0x07, 0xff, 0xf0, 0x7f, 0xff, 0x00, 0x0f, 0xc0, 0x07, 0xff, 0xff, 0xff, 0xff, 0xc0, 0x00, 0x00, 0x0f, 0xff, 0xf0, 0x7f, 0xff, 0x80, 0x0f, 0x80, 0x07, 0xff, 0xff, 0xff, 0xff, 0xe0, 0x00, 0x00, 0x1f, 0xff, 0xf0, 0x7f, 0xff, 0x80, 0x07, 0x80, 0x0f, 0xff, 0xff, 0xff, 0xff, 0xf0, 0x00, 0x00, 0x3f, 0xff, 0xf0, 0x7f, 0xff, 0xc0, 0x07, 0x80, 0x0f, 0xff, 0xff, 0xff, 0xff, 0xf8, 0x00, 0x00, 0x7f, 0xff, 0xf0, 0x7f, 0xff, 0xc0, 0x07, 0x80, 0x0f, 0xfe, 0x00, 0x00, 0xff, 0xfc, 0x00, 0x00, 0xff, 0xfc, 0x00, 0x03, 0xff, 0xc0, 0x07, 0x80, 0x0f, 0xfe, 0x00, 0x00, 0xff, 0xfe, 0x00, 0x01, 0xff, 0xfc, 0x00, 0x01, 0xff, 0xc0, 0x07, 0x80, 0x0f, 0xfe, 0x00, 0x00, 0xff, 0xff, 0x00, 0x03, 0xff, 0xfc, 0x00, 0x01, 0xff, 0xc0, 0x07, 0x80, 0x0f, 0xfe, 0x00, 0x00, 0xff, 0xff, 0x00, 0x03, 0xff, 0xfc, 0x00, 0x01, 0xff, 0xc0, 0x07, 0x80, 0x0f, 0xfe, 0x00, 0x00, 0xff, 0xff, 0x00, 0x03, 0xff, 0xfc, 0x00, 0x01, 0xff, 0xc0, 0x07, 0x80, 0x0f, 0xff, 0xff, 0xff, 0xff, 0xfe, 0x00, 0x01, 0xff, 0xff, 0xe0, 0x7f, 0xff, 0xc0, 0x07, 0x80, 0x0f, 0xff, 0xff, 0xff, 0xff, 0xfc, 0x00, 0x00, 0xff, 0xff, 0xf0, 0x7f, 0xff, 0xc0, 0x07, 0x80, 0x0f, 0xff, 0xff, 0xff, 0xff, 0xfc, 0x00, 0x00, 0xff, 0xff, 0xf0, 0x7f, 0xff, 0xc0, 0x07, 0x80, 0x0f, 0xff, 0xff, 0xff, 0xff, 0xf8, 0x00, 0x00, 0x7f, 0xff, 0xf0, 0x7f, 0xff, 0xc0, 0x07, 0x80, 0x0f, 0xff, 0xff, 0xff, 0xff, 0xf0, 0x00, 0x00, 0x3f, 0xff, 0xf0, 0x7f, 0xff, 0x80, 0x07, 0x80, 0x07, 0xff, 0xff, 0xff, 0xff, 0xe0, 0x00, 0x00, 0x1f, 0xff, 0xf0, 0x7f, 0xff, 0x80, 0x07, 0xc0, 0x07, 0xff, 0xff, 0xff, 0xff, 0xc0, 0x00, 0x00, 0x0f, 0xff, 0xff, 0xff, 0xff, 0x80, 0x0f, 0xc0, 0x03, 0xff, 0xff, 0xff, 0xff, 0x80, 0x00, 0x00, 0x07, 0xff, 0xff, 0xff, 0xff, 0x00, 0x0f, 0xc0, 0x03, 0xff, 0xff, 0xff, 0xff, 0x00, 0x00, 0x00, 0x03, 0xff, 0xff, 0xff, 0xff, 0x00, 0x0f, 0xe0, 0x01, 0xff, 0xff, 0xff, 0xfe, 0x00, 0x03, 0x00, 0x01, 0xff, 0xff, 0xff, 0xfe, 0x00, 0x1f, 0xe0, 0x00, 0xff, 0xff, 0xff, 0xfc, 0x00, 0x07, 0x80, 0x00, 0xff, 0xff, 0xff, 0xfc, 0x00, 0x1f, 0xe0, 0x00, 0x7f, 0xff, 0xff, 0xf0, 0x00, 0x0f, 0xc0, 0x00, 0x3f, 0xff, 0xff, 0xf8, 0x00, 0x3f, 0xf0, 0x00, 0x3f, 0xff, 0xff, 0xe0, 0x00, 0x1f, 0xe0, 0x00, 0x1f, 0xff, 0xff, 0xf0, 0x00, 0x3f, 0xf8, 0x00, 0x1f, 0xff, 0xff, 0x80, 0x00, 0x3f, 0xe0, 0x00, 0x07, 0xff, 0xff, 0xe0, 0x00, 0x7f, 0xf8, 0x00, 0x0f, 0xff, 0xff, 0x00, 0x00, 0x7f, 0xf8, 0x00, 0x03, 0xff, 0xff, 0xc0, 0x00, 0x7f, 0xfc, 0x00, 0x03, 0xff, 0xf8, 0x00, 0x00, 0xff, 0xfc, 0x00, 0x00, 0xff, 0xff, 0x00, 0x00, 0xff, 0xfe, 0x00, 0x00, 0x7f, 0xe0, 0x00, 0x01, 0xff, 0xfe, 0x00, 0x00, 0x1f, 0xf8, 0x00, 0x01, 0xff, 0xfe, 0x00, 0x00, 0x00, 0x00, 0x00, 0x03, 0xff, 0xff, 0x00, 0x00, 0x00, 0x00, 0x00, 0x03, 0xff, 0xff, 0x00, 0x00, 0x00, 0x00, 0x00, 0x07, 0xff, 0xff, 0x80, 0x00, 0x00, 0x00, 0x00, 0x03, 0xff, 0xff, 0x80, 0x00, 0x00, 0x00, 0x00, 0x0f, 0xff, 0xff, 0xc0, 0x00, 0x00, 0x00, 0x00, 0x07, 0xff, 0xff, 0xc0, 0x00, 0x00, 0x00, 0x00, 0x1f, 0xff, 0xff, 0xe0, 0x00, 0x00, 0x00, 0x00, 0x0f, 0xff, 0xff, 0xe0, 0x00, 0x00, 0x00, 0x00, 0x7f, 0xff, 0xff, 0xf8, 0x00, 0x00, 0x00, 0x00, 0x3f, 0xff, 0xff, 0xf8, 0x00, 0x00, 0x00, 0x01, 0xff, 0xff, 0xff, 0xfe, 0x00, 0x00, 0x00, 0x00, 0x7f, 0xff, 0xff, 0xfc, 0x00, 0x00, 0x00, 0x03, 0xff, 0xff, 0xff, 0xff, 0x00, 0x00, 0x00, 0x00, 0xff, 0xff, 0xff, 0xff, 0x00, 0x00, 0x00, 0x0f, 0xff, 0xff, 0xff, 0xff, 0xc0, 0x00, 0x00, 0x03, 0xff, 0xff, 0xff, 0xff, 0xc0, 0x00, 0x00, 0x3f, 0xff, 0xff, 0xff, 0xff, 0xf0, 0x00, 0x00, 0x0f, 0xff, 0xff, 0xff, 0xff, 0xf0, 0x00, 0x01, 0xff, 0xff, 0xff, 0xff, 0xff, 0xfe, 0x00, 0x00, 0x3f, 0xff, 0xff, 0xff, 0xff, 0xff, 0x00, 0x0f, 0xff, 0xff, 0xff, 0xff, 0xff, 0xff, 0xc0, 0x03, 0xff, 0xff, 0xff, 0xff, 0xff, 0xff, 0xff, 0xff, 0xff, 0xff, 0xff, 0xff, 0xff, 0xff, 0xff, 0xff, 0xff, 0xff, 0xff, 0xff, 0xff, 0xff, 0xff, 0xff, 0xff, 0xff, 0xff, 0xff, 0xff, 0xff, 0xff, 0xff, 0xff, 0xff, 0xff, 0xff, 0xff, 0xff, 0xff, 0xff, 0xff, 0xff, 0xff, 0xff, 0xff, 0xff, 0xff, 0xff, 0xff, 0xff, 0xff, 0xff, 0xff, 0xff, 0xff, 0xff, 0xff, 0xff, 0xff, 0xff, 0xff, 0xff, 0xff, 0xff, 0xff, 0xff, 0xff }; void setup() { Serial.begin(9600); if (!display.begin(SSD1309_SWITCHCAPVCC, SCREEN_ADDRESS)) { Serial.println(F("SSD1309 allocation failed")); for (;;); } delay(2000); display.setCursor(0, 0); } void loop() { // Display 16x16 heart icon display.clearDisplay(); display.drawBitmap((SCREEN_WIDTH - 16) / 2, (SCREEN_HEIGHT - 16) / 2, heart16x16, 16, 16, SSD1309_PIXEL_ON); display.display(); delay(2000); // Display full-screen DIYables logo display.clearDisplay(); display.drawBitmap(0, 0, diyablesLogo, 128, 64, SSD1309_PIXEL_ON); display.display(); delay(2000); // Invert display display.invertDisplay(true); delay(2000); display.invertDisplay(false); delay(500); }

※ Notiz:

  • Bitmap afmetingen mogen de schermresolutie niet overschrijden (128×64 voor de 2.42 inch module).

Arduino Uno R4 Code — Contrast en Dim op SSD1309 OLED

De SSD1309 biedt 256 contrast niveaus (0–255). De DIYables bibliotheek biedt setContrast() voor precieze controle en dim() voor snelle omschakeling tussen minimale helderheid en het eerder ingestelde niveau.

/* * Deze Arduino UNO R4 code is ontwikkeld door newbiely.nl * Deze Arduino UNO R4 code wordt zonder enige beperking aan het publiek beschikbaar gesteld. * Voor volledige instructies en schema's, bezoek: * https://newbiely.nl/tutorials/arduino-uno-r4/arduino-uno-r4-ssd1309-oled-display */ /* * DIYables OLED SSD1309 – Contrast & Dim * Sweeps contrast from 0→255→0 then toggles dim mode on the 2.42" OLED. * Compatible with Arduino Uno R4 WiFi and Arduino Uno R4 Minima. */ #include <Wire.h> #include <Adafruit_GFX.h> #include <DIYables_OLED_SSD1309.h> #define SCREEN_WIDTH 128 #define SCREEN_HEIGHT 64 #define OLED_RESET -1 #define SCREEN_ADDRESS 0x3C DIYables_OLED_SSD1309 display(SCREEN_WIDTH, SCREEN_HEIGHT, &Wire, OLED_RESET); void setup() { Serial.begin(9600); if (!display.begin(SSD1309_SWITCHCAPVCC, SCREEN_ADDRESS)) { Serial.println(F("SSD1309 allocation failed")); for (;;); } // Draw a test pattern so the contrast changes are visible display.clearDisplay(); display.fillRect(0, 0, 64, 32, SSD1309_PIXEL_ON); display.fillRect(64, 32, 64, 32, SSD1309_PIXEL_ON); display.setTextSize(1); display.setTextColor(SSD1309_PIXEL_INVERSE); display.setCursor(16, 28); display.println(F("Contrast Demo")); display.display(); delay(2000); } void loop() { // Ramp up for (int c = 0; c <= 255; c += 5) { display.setContrast((uint8_t)c); delay(30); } delay(1000); // Ramp down for (int c = 255; c >= 0; c -= 5) { display.setContrast((uint8_t)c); delay(30); } delay(1000); // Quick dim toggle display.dim(true); // minimum brightness delay(2000); display.dim(false); // restore delay(2000); }

Arduino Uno R4 Code — Aangepaste Externe Lettertypen op SSD1309 OLED

De Adafruit GFX bibliotheek bevat tientallen schaalbare FreeFont lettertypen (Serif, Sans, Mono — elk in Regular, Bold, Italic, en meerdere groottes). U kunt elk van hen gebruiken op het SSD1309 display door de relevante header te includen en setFont() aan te roepen.

※ Notiz:

  • Wanneer een extern lettertype actief is, verwijst de cursor Y coördinaat naar de tekst baseline, niet de linkerbovenhoek. Dit verschilt van het ingebouwde 5×7 font gedrag.
  • Externe lettertypen worden opgeslagen in flash (PROGMEM). Op geheugen-beperkte boards zoals de klassieke Uno (32 KB flash), gebruik ze spaarzaam. De Arduino Uno R4 heeft meer geheugen, wat meer flexibiliteit toestaat.
/* * Deze Arduino UNO R4 code is ontwikkeld door newbiely.nl * Deze Arduino UNO R4 code wordt zonder enige beperking aan het publiek beschikbaar gesteld. * Voor volledige instructies en schema's, bezoek: * https://newbiely.nl/tutorials/arduino-uno-r4/arduino-uno-r4-ssd1309-oled-display */ /* * DIYables OLED SSD1309 – External Fonts * Cycles through three FreeFont typefaces on the 2.42" SSD1309 OLED. * Compatible with Arduino Uno R4 WiFi and Arduino Uno R4 Minima. */ #include <Wire.h> #include <Adafruit_GFX.h> #include <DIYables_OLED_SSD1309.h> #include <Fonts/FreeSerif9pt7b.h> #include <Fonts/FreeSansBold12pt7b.h> #include <Fonts/FreeMono9pt7b.h> #define SCREEN_WIDTH 128 #define SCREEN_HEIGHT 64 #define OLED_RESET -1 #define SCREEN_ADDRESS 0x3C DIYables_OLED_SSD1309 display(SCREEN_WIDTH, SCREEN_HEIGHT, &Wire, OLED_RESET); void setup() { Serial.begin(9600); if (!display.begin(SSD1309_SWITCHCAPVCC, SCREEN_ADDRESS)) { Serial.println(F("SSD1309 allocation failed")); for (;;); } display.clearDisplay(); display.display(); } void loop() { // ── Built-in 5×7 font ── display.clearDisplay(); display.setFont(NULL); display.setTextSize(1); display.setTextColor(SSD1309_PIXEL_ON); display.setCursor(0, 0); display.println(F("Built-in 5x7 font")); display.println(); display.setTextSize(2); display.println(F("DIYables")); display.display(); delay(3000); // ── FreeSerif 9pt ── display.clearDisplay(); display.setFont(&FreeSerif9pt7b); display.setTextSize(1); display.setTextColor(SSD1309_PIXEL_ON); display.setCursor(0, 14); // Y = baseline display.println(F("FreeSerif 9pt")); display.setCursor(0, 38); display.println(F("DIYables OLED")); display.setCursor(0, 58); display.println(F("Hello World!")); display.display(); delay(3000); // ── FreeSansBold 12pt ── display.clearDisplay(); display.setFont(&FreeSansBold12pt7b); display.setTextSize(1); display.setTextColor(SSD1309_PIXEL_ON); display.setCursor(0, 20); display.println(F("SansBold")); display.setCursor(0, 52); display.println(F("DIYables")); display.display(); delay(3000); // ── FreeMono 9pt ── display.clearDisplay(); display.setFont(&FreeMono9pt7b); display.setTextSize(1); display.setTextColor(SSD1309_PIXEL_ON); display.setCursor(0, 14); display.println(F("FreeMono 9pt")); display.setCursor(0, 34); display.println(F("0123456789")); display.setCursor(0, 54); display.println(F("!@#$%^&*()")); display.display(); delay(3000); }

SSD1309 OLED Probleemoplossing met Arduino Uno R4

Als het 2.42 inch SSD1309 OLED leeg blijft na het uploaden van uw sketch, werk deze diagnostische stappen door:

  • Controleer verbindingen — bevestig dat SDA, SCL, VCC en GND zijn aangesloten op de juiste Arduino Uno R4 pinnen.
  • Bevestig de driver chip — deze bibliotheek is ontworpen voor de SSD1309. Als uw module een andere controller gebruikt (bijv. SH1106), zal het niet correct reageren.
  • Controleer het I2C adres — de meeste SSD1309 modules gebruiken standaard 0x3C, maar sommige gebruiken 0x3D. Voer de I2C scanner sketch hieronder uit om het werkelijke adres te detecteren:
// I2C address scanner — prints every detected device to the Serial Monitor #include <Wire.h> void setup() { Wire.begin(); Serial.begin(9600); Serial.println("I2C Scanner"); } void loop() { byte error, address; int nDevices = 0; Serial.println("Scanning..."); for (address = 1; address < 127; address++) { Wire.beginTransmission(address); error = Wire.endTransmission(); if (error == 0) { Serial.print("I2C device found at address 0x"); if (address < 16) Serial.print("0"); Serial.print(address, HEX); Serial.println(" !"); nDevices++; } else if (error == 4) { Serial.print("Unknown error at address 0x"); if (address < 16) Serial.print("0"); Serial.println(address, HEX); } } if (nDevices == 0) Serial.println("No I2C devices found"); else Serial.println("done"); delay(5000); }

Verwachte Serial Monitor uitvoer wanneer de SSD1309 wordt gedetecteerd:

COM6
Send
Scanning... I2C device found at address 0x3C ! done
Autoscroll Show timestamp
Clear output
9600 baud  
Newline  
  • Zorg ervoor dat display() wordt aangeroepen — de SSD1309 gebruikt een frame buffer. Tekenfuncties wijzigen alleen de buffer in RAM; niets verschijnt op het scherm totdat u oled.display() aanroept.
  • Controleer voeding — de 2.42 inch module gebruikt meer stroom dan kleinere OLEDs. Zorg ervoor dat uw voedingsbron voldoende stroom kan leveren (doorgaans 20–40 mA bij volle helderheid).

※ ONZE BERICHTEN

  • U bent welkom om de link naar deze tutorial te delen. Gebruik onze inhoud echter niet op andere websites. We hebben veel moeite en tijd gestoken in het maken van de inhoud, respecteer alstublieft ons werk!