Arduino UNO R4 WiFi Bluetooth Monitor Voorbeeld - Draadloze Seriële Monitor via BLE Tutorial

Overzicht

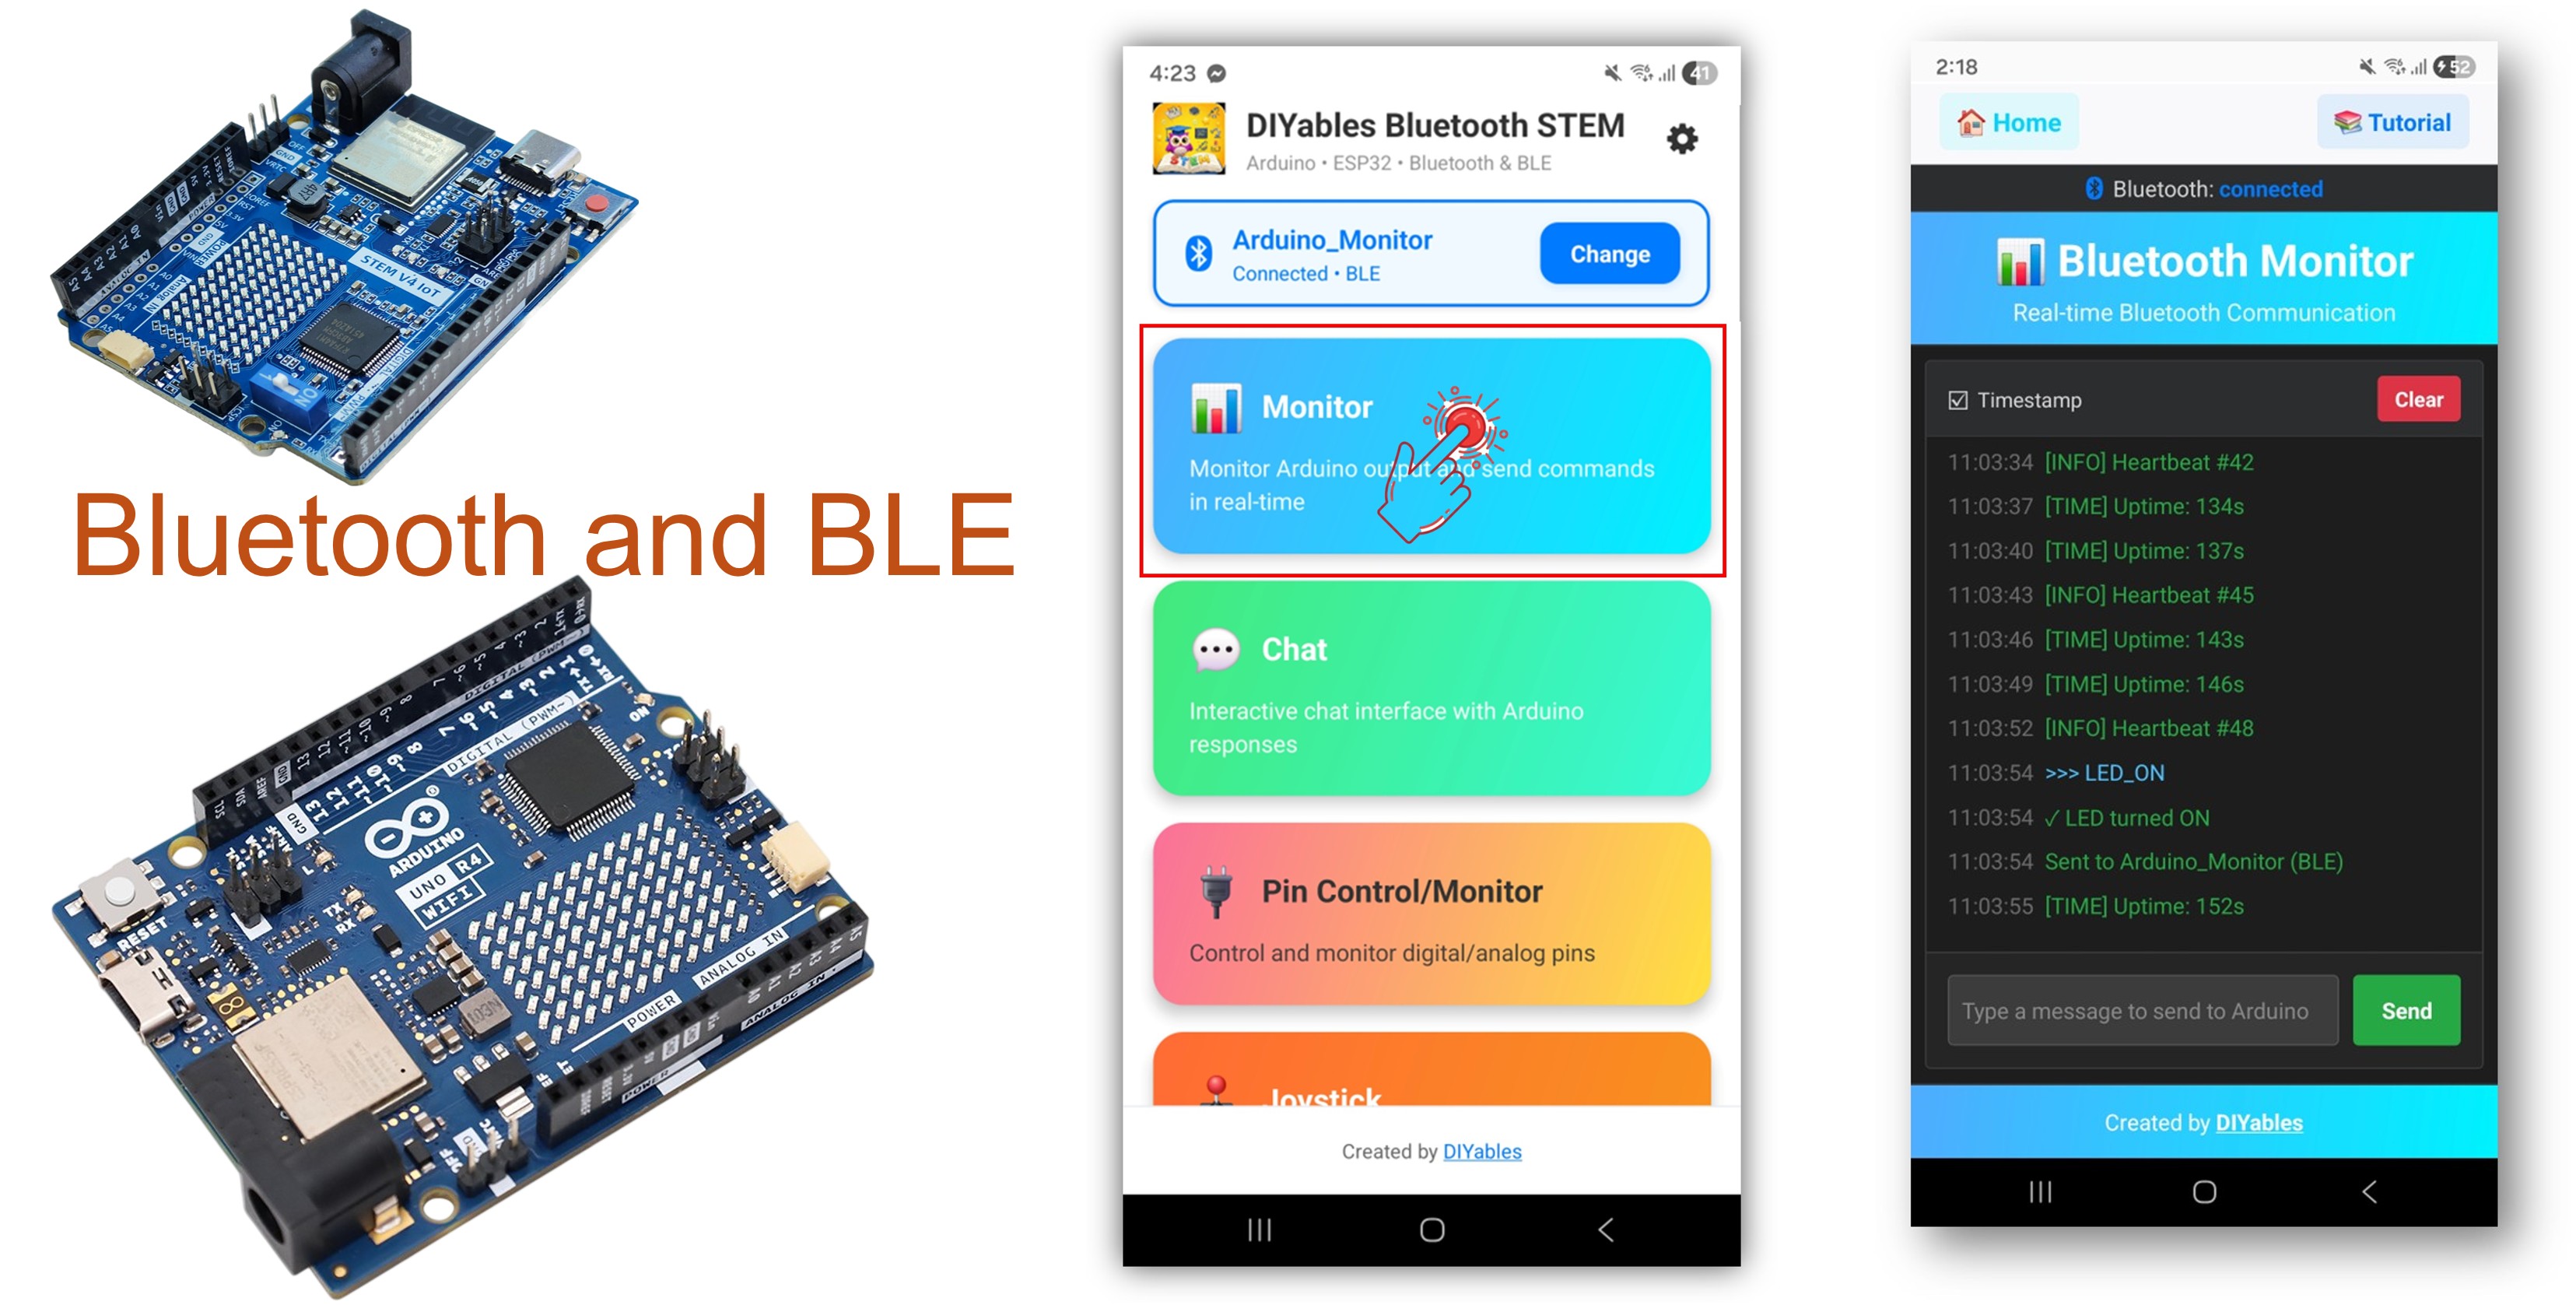
Het Bluetooth Monitor voorbeeld biedt een draadloze seriële monitor die toegankelijk is via de DIYables Bluetooth STEM app. Ontworpen voor Arduino UNO R4 WiFi met behulp van BLE (Bluetooth Low Energy) om real-time statusberichten, debug-uitvoer en sensormetingen draadloos naar uw smartphone te streamen. Ontvang ook tekstcommando's vanuit de app. Perfect voor draadloos debuggen, externe monitoring en systeemlogging.

Opmerking: De Arduino UNO R4 WiFi ondersteunt alleen BLE (Bluetooth Low Energy). Het ondersteunt geen Classic Bluetooth. De DIYables Bluetooth App ondersteunt zowel BLE als Classic Bluetooth op Android, en BLE op iOS. Omdat dit board BLE gebruikt, werkt de app op zowel Android als iOS.

Arduino UNO R4 WiFi Bluetooth Monitor Voorbeeld - Draadloze Seriële Monitor via BLE Tutorial

Kenmerken

  • Draadloze Seriële Monitor: Stream tekstberichten naar uw telefoon
  • Tweerichtingscommunicatie: Verzend commando's van app naar Arduino
  • Real-Time Streaming: Continue uitvoer zoals Seriële Monitor
  • Commando-afhandeling: Verwerk tekstcommando's vanuit de app
  • Werkt op Android & iOS: BLE wordt ondersteund op beide platforms
  • Geen koppeling vereist: BLE verbindt automatisch zonder handmatige koppeling
  • Laag stroomverbruik: BLE verbruikt minder stroom dan Classic Bluetooth

Arduino UNO R4 WiFi Code

Snelle Stappen

Volg deze instructies stap voor stap:

  • Als dit de eerste keer is dat u de Arduino UNO R4 WiFi gebruikt, raadpleeg dan de Arduino UNO R4 WiFi aan de slag gids.
  • Sluit het Arduino UNO R4 WiFi board aan op uw computer met een USB-kabel.
  • Start de Arduino IDE op uw computer.
  • Selecteer Arduino UNO R4 WiFi board en de juiste COM-poort.
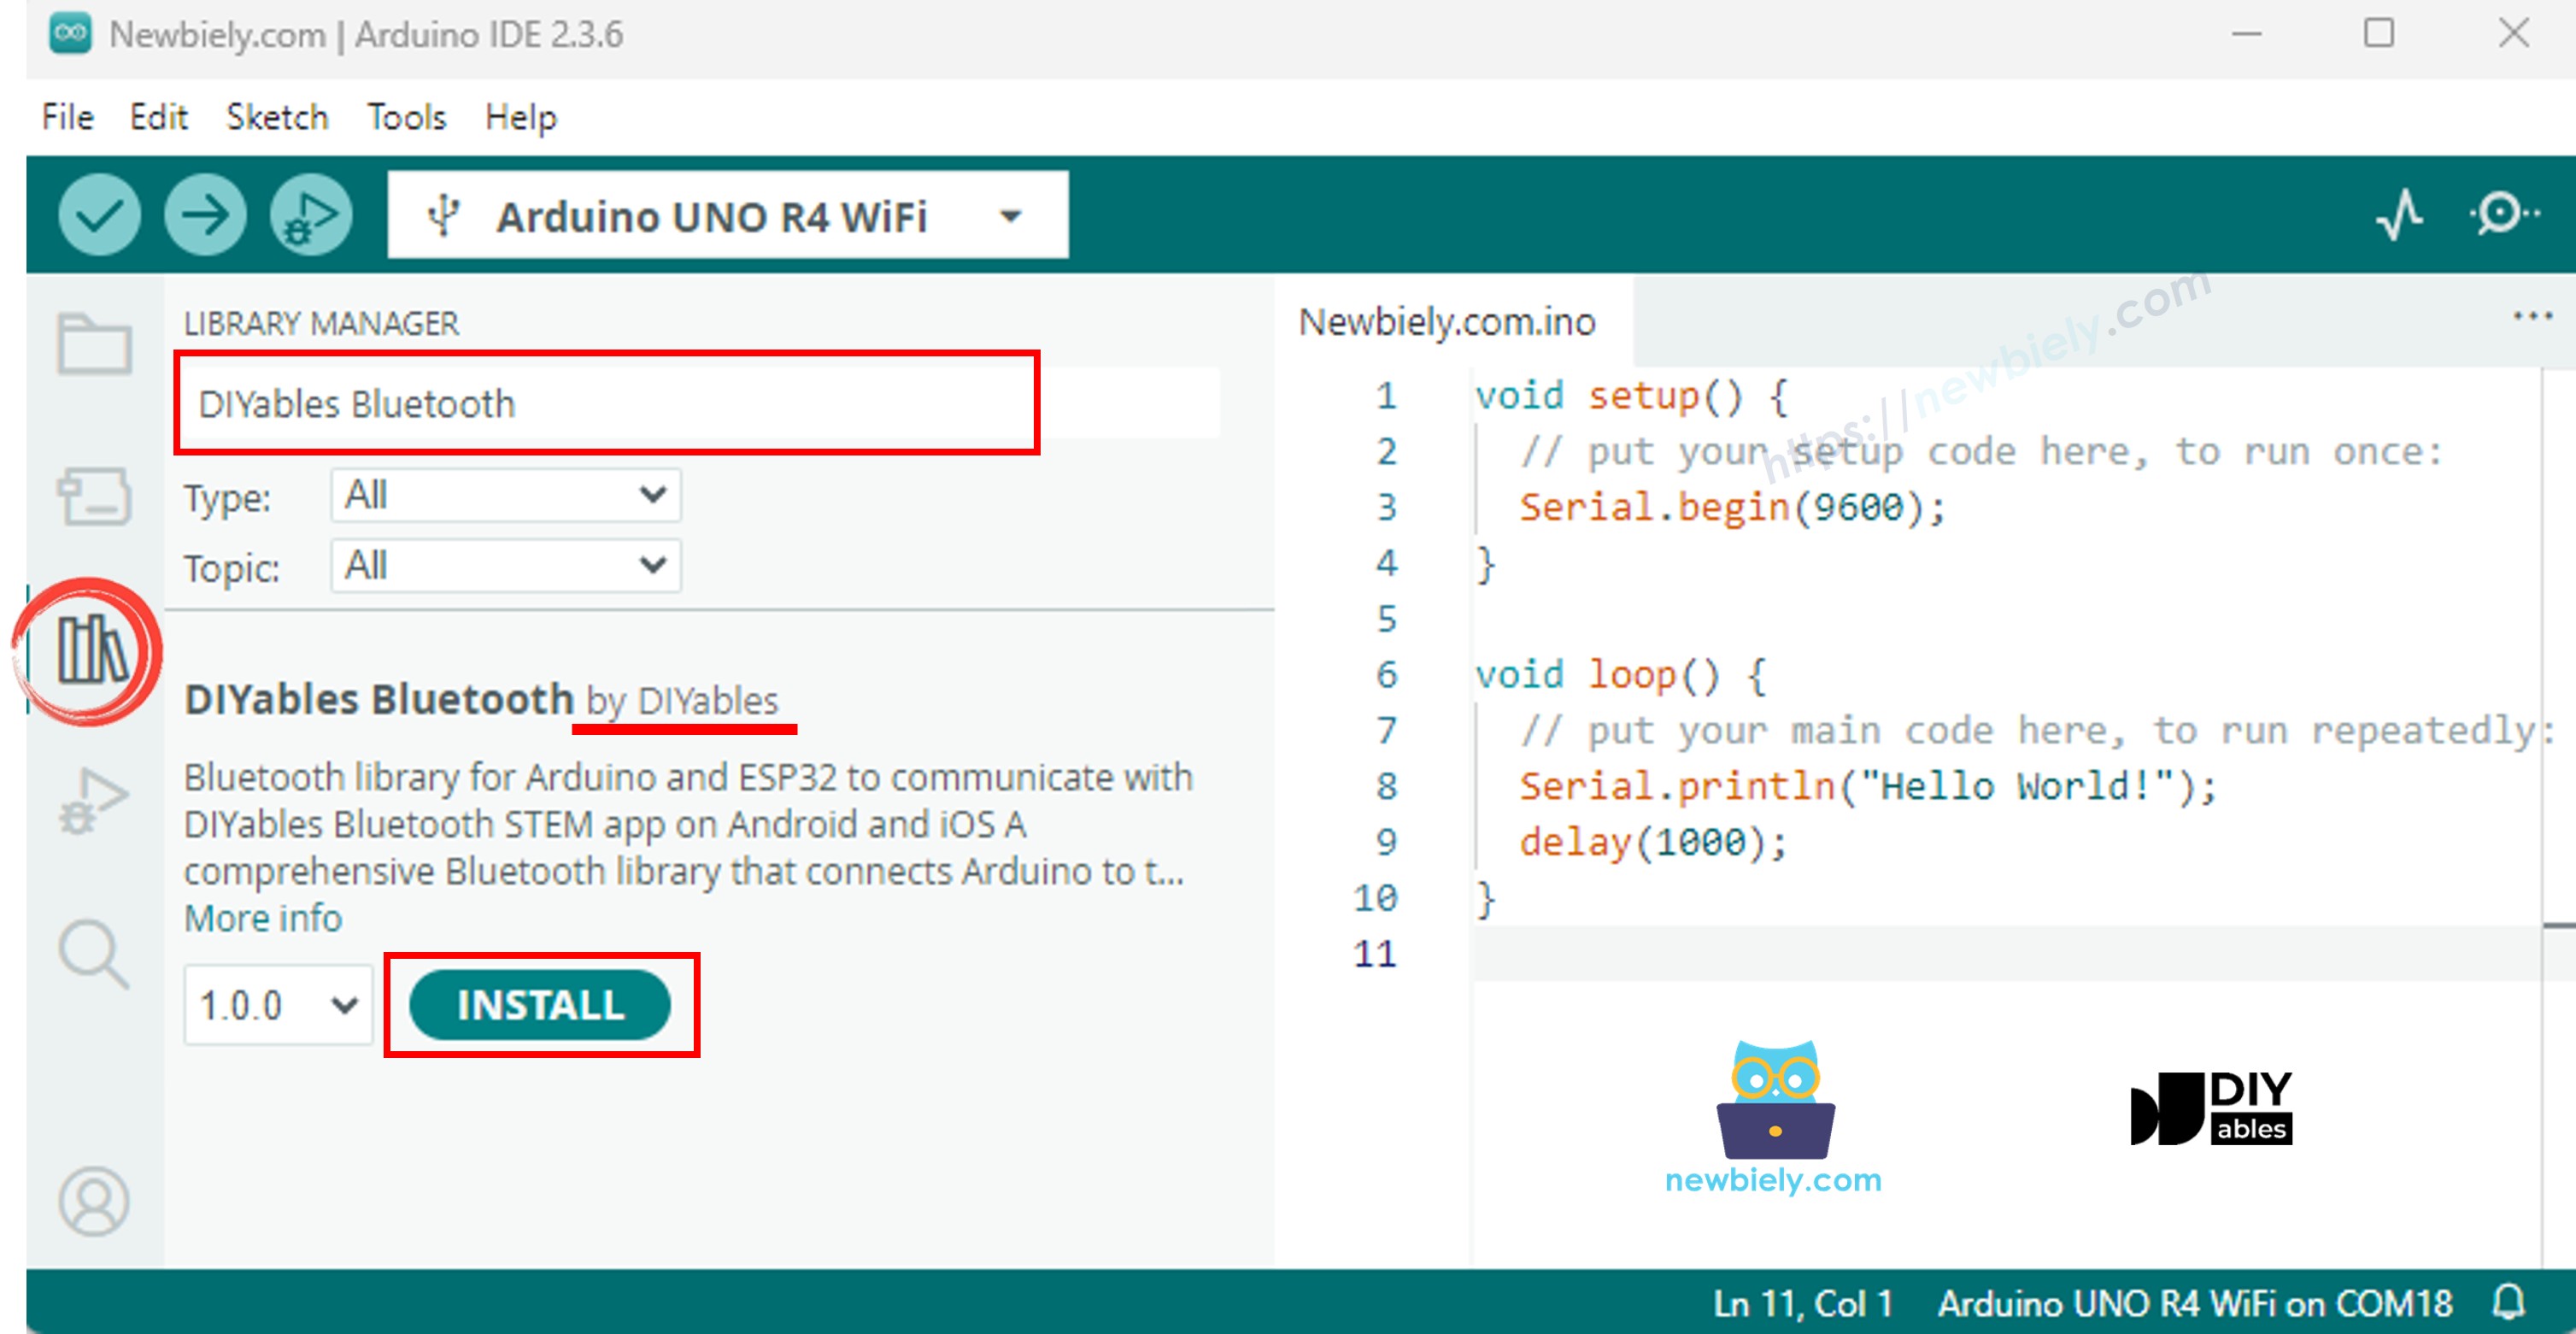
  • Navigeer naar het Libraries pictogram in de linkerbalk van de Arduino IDE.
  • Zoek "DIYables Bluetooth", zoek dan de DIYables Bluetooth bibliotheek van DIYables
  • Klik op de Install knop om de bibliotheek te installeren.
Arduino UNO R4 DIYables Bluetooth bibliotheek
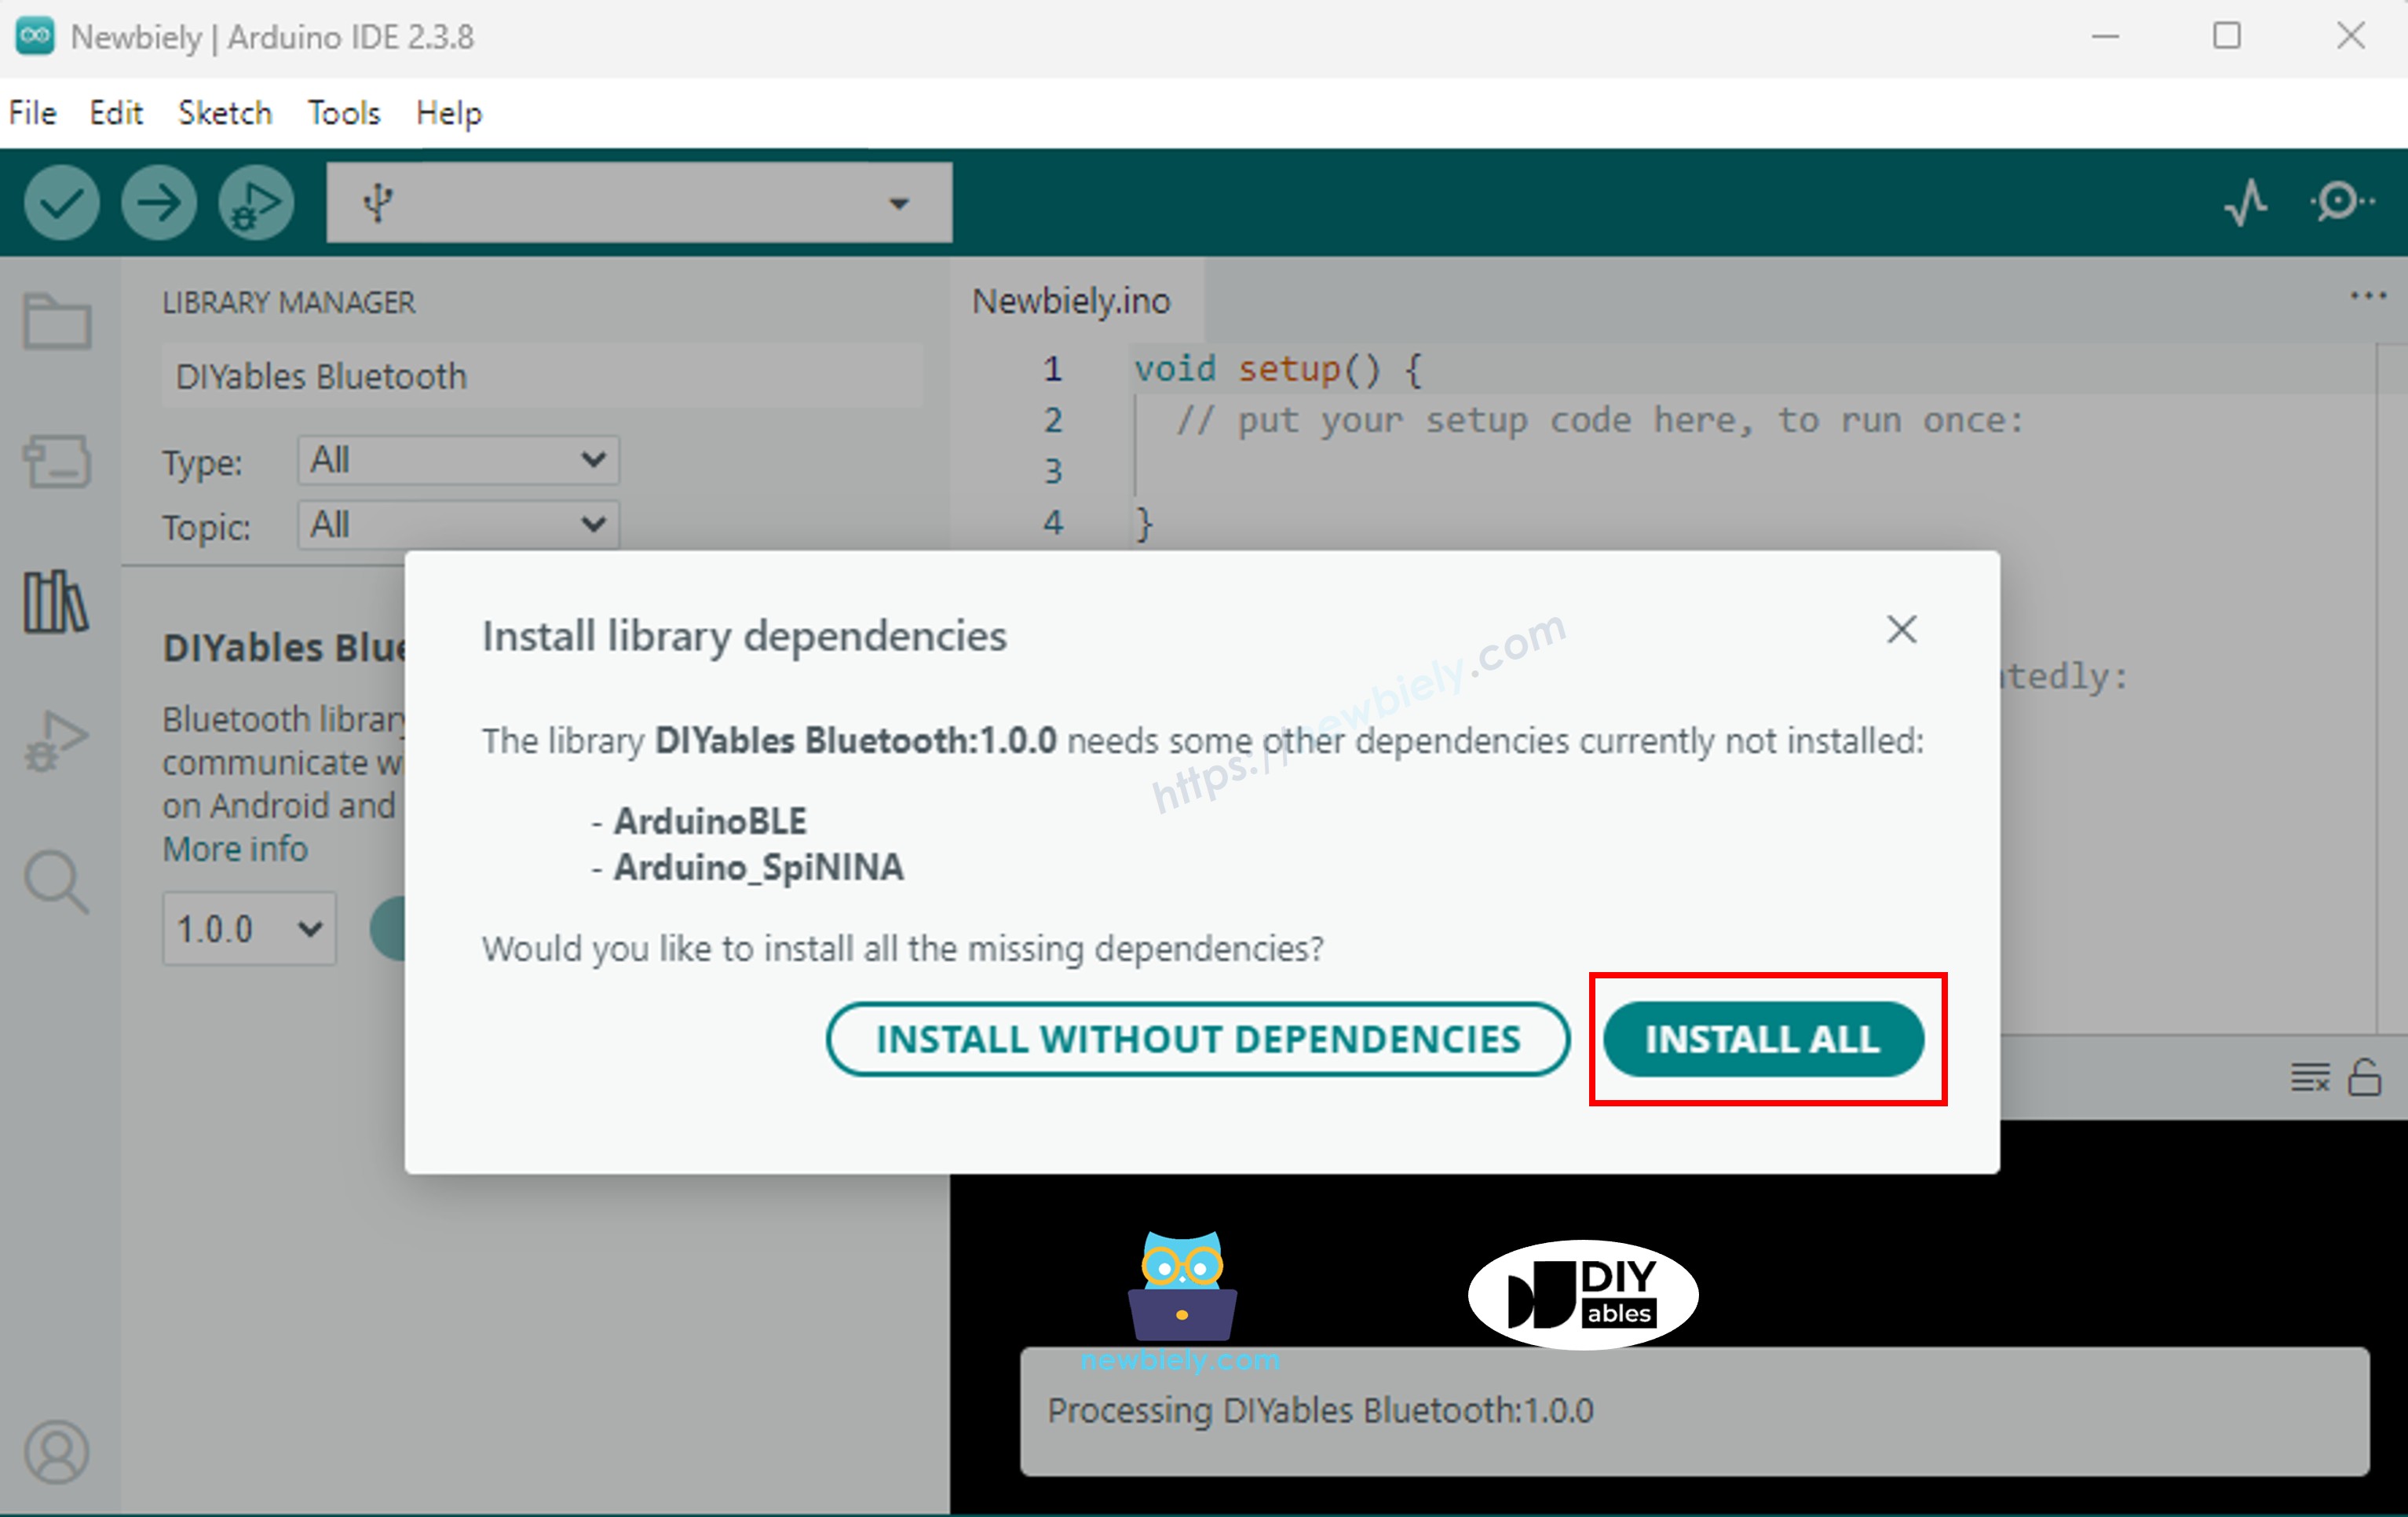
  • U wordt gevraagd om enkele andere bibliotheekafhankelijkheden te installeren
  • Klik op de Install All knop om alle bibliotheekafhankelijkheden te installeren.
Arduino UNO R4 DIYables Bluetooth afhankelijkheid

BLE Code

  • Ga in Arduino IDE naar File Examples DIYables Bluetooth ArduinoBLE_Monitor voorbeeld, of kopieer de bovenstaande code en plak het in de editor van Arduino IDE
/* * DIYables Bluetooth Library - Bluetooth Monitor Example * Works with DIYables Bluetooth STEM app on Android and iOS * * This example demonstrates the Bluetooth Monitor feature: * - Send real-time status messages to the mobile app * - Display system information and sensor readings * - Receive and process commands from the app * - Perfect for debugging and system monitoring * * Compatible Boards: * - Arduino UNO R4 WiFi * - Arduino Nano 33 BLE / BLE Sense * - Arduino Nano 33 IoT * - Arduino MKR WiFi 1010 * - Arduino Nano RP2040 Connect * - Any board supporting the ArduinoBLE library * * Setup: * 1. Upload the sketch to your Arduino * 2. Open Serial Monitor to see connection status * 3. Use DIYables Bluetooth App to connect and view monitor output * * Tutorial: https://diyables.io/bluetooth-app * Author: DIYables */ #include <DIYables_BluetoothServer.h> #include <DIYables_BluetoothMonitor.h> #include <platforms/DIYables_ArduinoBLE.h> // BLE Configuration const char* DEVICE_NAME = "Arduino_Monitor"; const char* SERVICE_UUID = "19B10000-E8F2-537E-4F6C-D104768A1214"; const char* TX_UUID = "19B10001-E8F2-537E-4F6C-D104768A1214"; const char* RX_UUID = "19B10002-E8F2-537E-4F6C-D104768A1214"; // Create Bluetooth instances DIYables_ArduinoBLE bluetooth(DEVICE_NAME, SERVICE_UUID, TX_UUID, RX_UUID); DIYables_BluetoothServer bluetoothServer(bluetooth); // Create Monitor app instance DIYables_BluetoothMonitor bluetoothMonitor; // Variables for demo unsigned long lastUpdate = 0; const unsigned long UPDATE_INTERVAL = 3000; // Send update every 3 seconds int messageCount = 0; bool ledState = false; void setup() { Serial.begin(9600); while (!Serial); Serial.println("DIYables Bluetooth - Monitor Example"); // Initialize built-in LED pinMode(LED_BUILTIN, OUTPUT); digitalWrite(LED_BUILTIN, LOW); // Initialize Bluetooth server with platform-specific implementation bluetoothServer.begin(); // Add monitor app to server bluetoothServer.addApp(&bluetoothMonitor); // Set up connection event callbacks bluetoothServer.setOnConnected([]() { Serial.println("Bluetooth connected!"); bluetoothMonitor.send("=== Arduino Monitor Connected ==="); bluetoothMonitor.send("System Ready"); bluetoothMonitor.send("Type HELP for available commands"); bluetoothMonitor.send(""); }); bluetoothServer.setOnDisconnected([]() { Serial.println("Bluetooth disconnected!"); }); // Set up message handler for incoming commands bluetoothMonitor.onMonitorMessage([](const String& message) { Serial.print("Received command: "); Serial.println(message); handleCommand(message); }); Serial.println("Waiting for Bluetooth connection..."); } void handleCommand(const String& cmd) { if (cmd == "HELP") { bluetoothMonitor.send("Available Commands:"); bluetoothMonitor.send(" LED_ON - Turn LED on"); bluetoothMonitor.send(" LED_OFF - Turn LED off"); bluetoothMonitor.send(" STATUS - Show system status"); bluetoothMonitor.send(" CLEAR - Clear monitor (if supported)"); bluetoothMonitor.send(" HELP - Show this help"); } else if (cmd == "LED_ON") { digitalWrite(LED_BUILTIN, HIGH); ledState = true; bluetoothMonitor.send("✓ LED turned ON"); } else if (cmd == "LED_OFF") { digitalWrite(LED_BUILTIN, LOW); ledState = false; bluetoothMonitor.send("✓ LED turned OFF"); } else if (cmd == "STATUS") { showStatus(); } else if (cmd == "CLEAR") { // App should handle clearing the display bluetoothMonitor.send(""); } else { bluetoothMonitor.send("✗ Unknown command: " + cmd); bluetoothMonitor.send("Type HELP for available commands"); } } void showStatus() { bluetoothMonitor.send("=== System Status ==="); // LED Status bluetoothMonitor.send("LED State: " + String(ledState ? "ON" : "OFF")); // Uptime unsigned long uptime = millis() / 1000; bluetoothMonitor.send("Uptime: " + String(uptime / 3600) + "h " + String((uptime % 3600) / 60) + "m " + String(uptime % 60) + "s"); // Free Memory (approximate for AVR) #ifdef __AVR__ extern int __heap_start, *__brkval; int freeMemory = (int) &freeMemory - (__brkval == 0 ? (int) &__heap_start : (int) __brkval); bluetoothMonitor.send("Free Memory: " + String(freeMemory) + " bytes"); #endif // Messages sent bluetoothMonitor.send("Messages Sent: " + String(messageCount)); bluetoothMonitor.send("===================="); } void sendPeriodicUpdate() { messageCount++; // Example of different message types if (messageCount % 3 == 0) { // Send status update bluetoothMonitor.send("[INFO] Heartbeat #" + String(messageCount)); } else if (messageCount % 5 == 0) { // Send simulated sensor reading int sensorValue = random(0, 1024); bluetoothMonitor.send("[SENSOR] Reading: " + String(sensorValue) + " (random demo value)"); } else { // Send timestamp bluetoothMonitor.send("[TIME] Uptime: " + String(millis() / 1000) + "s"); } // Optionally log to Serial as well Serial.print("Sent update #"); Serial.println(messageCount); } void loop() { // Handle Bluetooth server communications bluetoothServer.loop(); // Send periodic updates (only when connected) if (bluetooth.isConnected() && millis() - lastUpdate >= UPDATE_INTERVAL) { lastUpdate = millis(); sendPeriodicUpdate(); } delay(10); }
  • Klik op de Upload knop in Arduino IDE om de code naar Arduino UNO R4 WiFi te uploaden
  • Open de Seriële Monitor
  • Bekijk het resultaat in de Seriële Monitor. Het ziet eruit zoals hieronder:
COM6
Send
DIYables Bluetooth - Monitor Example Waiting for Bluetooth connection...
Autoscroll Show timestamp
Clear output
9600 baud  
Newline  

Mobiele App

  • Installeer de DIYables Bluetooth App op uw smartphone: Android | iOS

Opmerking: De DIYables Bluetooth App ondersteunt zowel BLE als Classic Bluetooth op Android, en BLE op iOS. Omdat de Arduino UNO R4 WiFi BLE gebruikt, werkt de app op zowel Android als iOS. Handmatige koppeling is niet nodig voor BLE — scannen en verbinden is voldoende.

  • Open de DIYables Bluetooth App
  • Wanneer u de app voor de eerste keer opent, zal het om toestemmingen vragen. Verleen de volgende toestemmingen:
    • Nearby Devices toestemming (Android 12+) / Bluetooth toestemming (iOS) - vereist om Bluetooth-apparaten te scannen en verbinden
    • Location toestemming (alleen Android 11 en lager) - vereist door oudere Android-versies om BLE-apparaten te scannen
  • Zorg ervoor dat Bluetooth is ingeschakeld op uw telefoon
  • Tik op het startscherm op de Connect knop. De app zal scannen naar BLE-apparaten.
DIYables Bluetooth App - Startscherm met Scan Knop
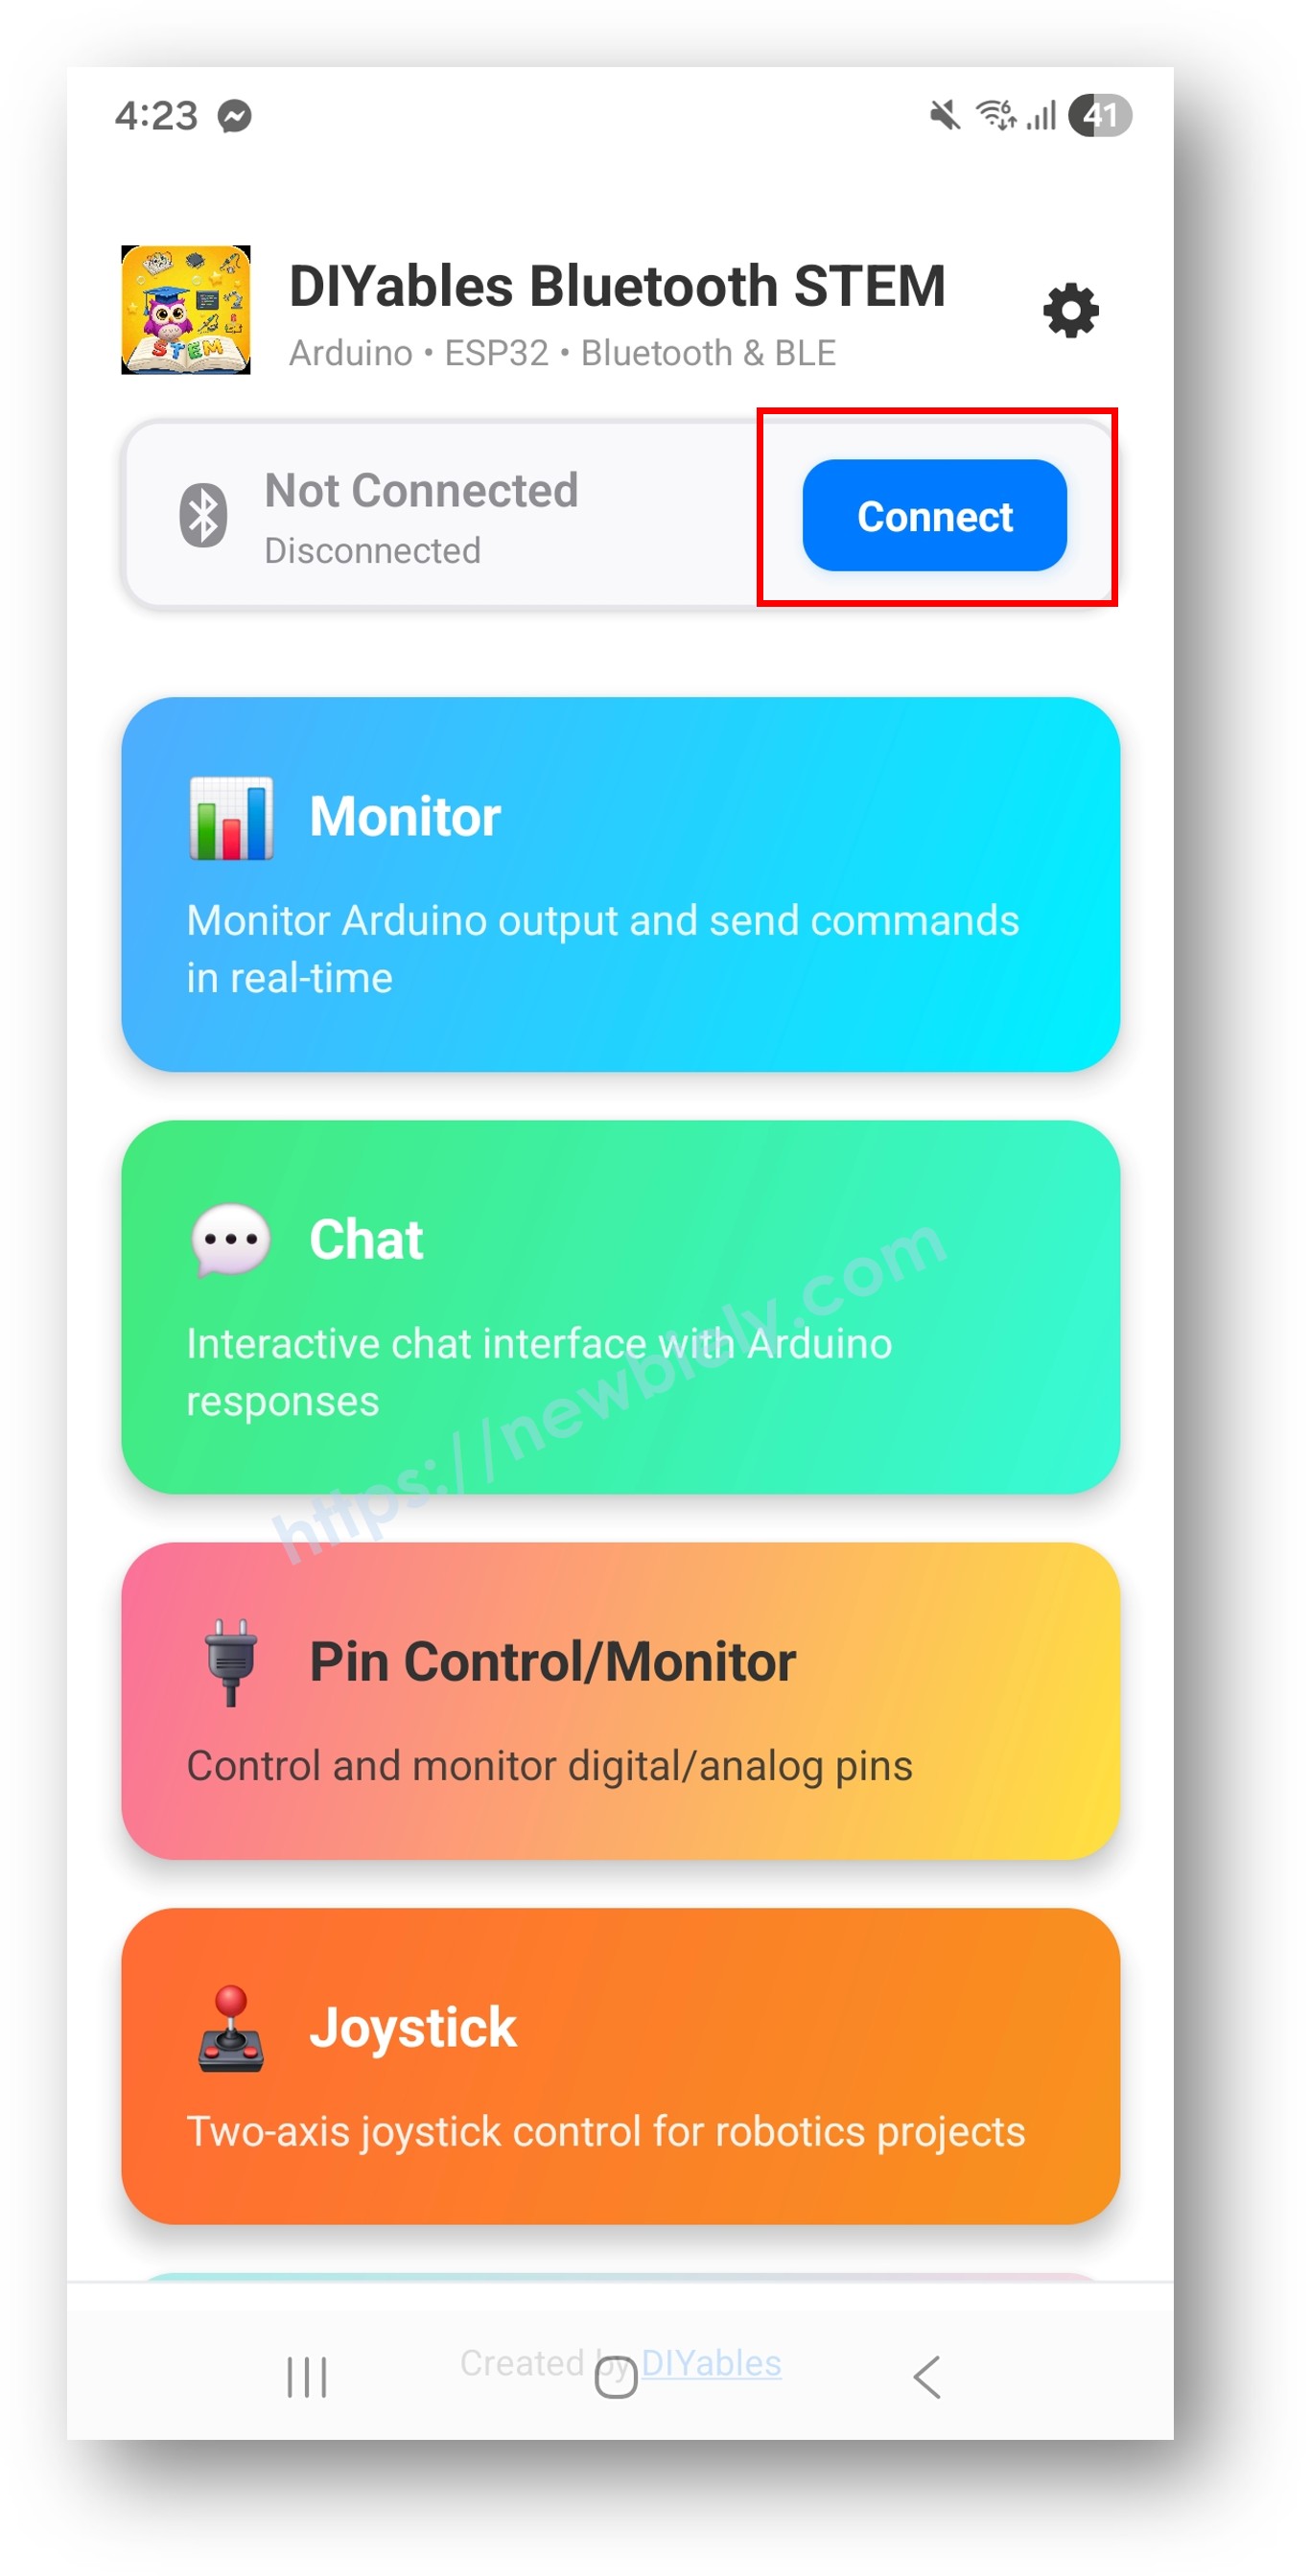
  • Zoek en tik op "Arduino_Monitor" in de scanresultaten om te verbinden.
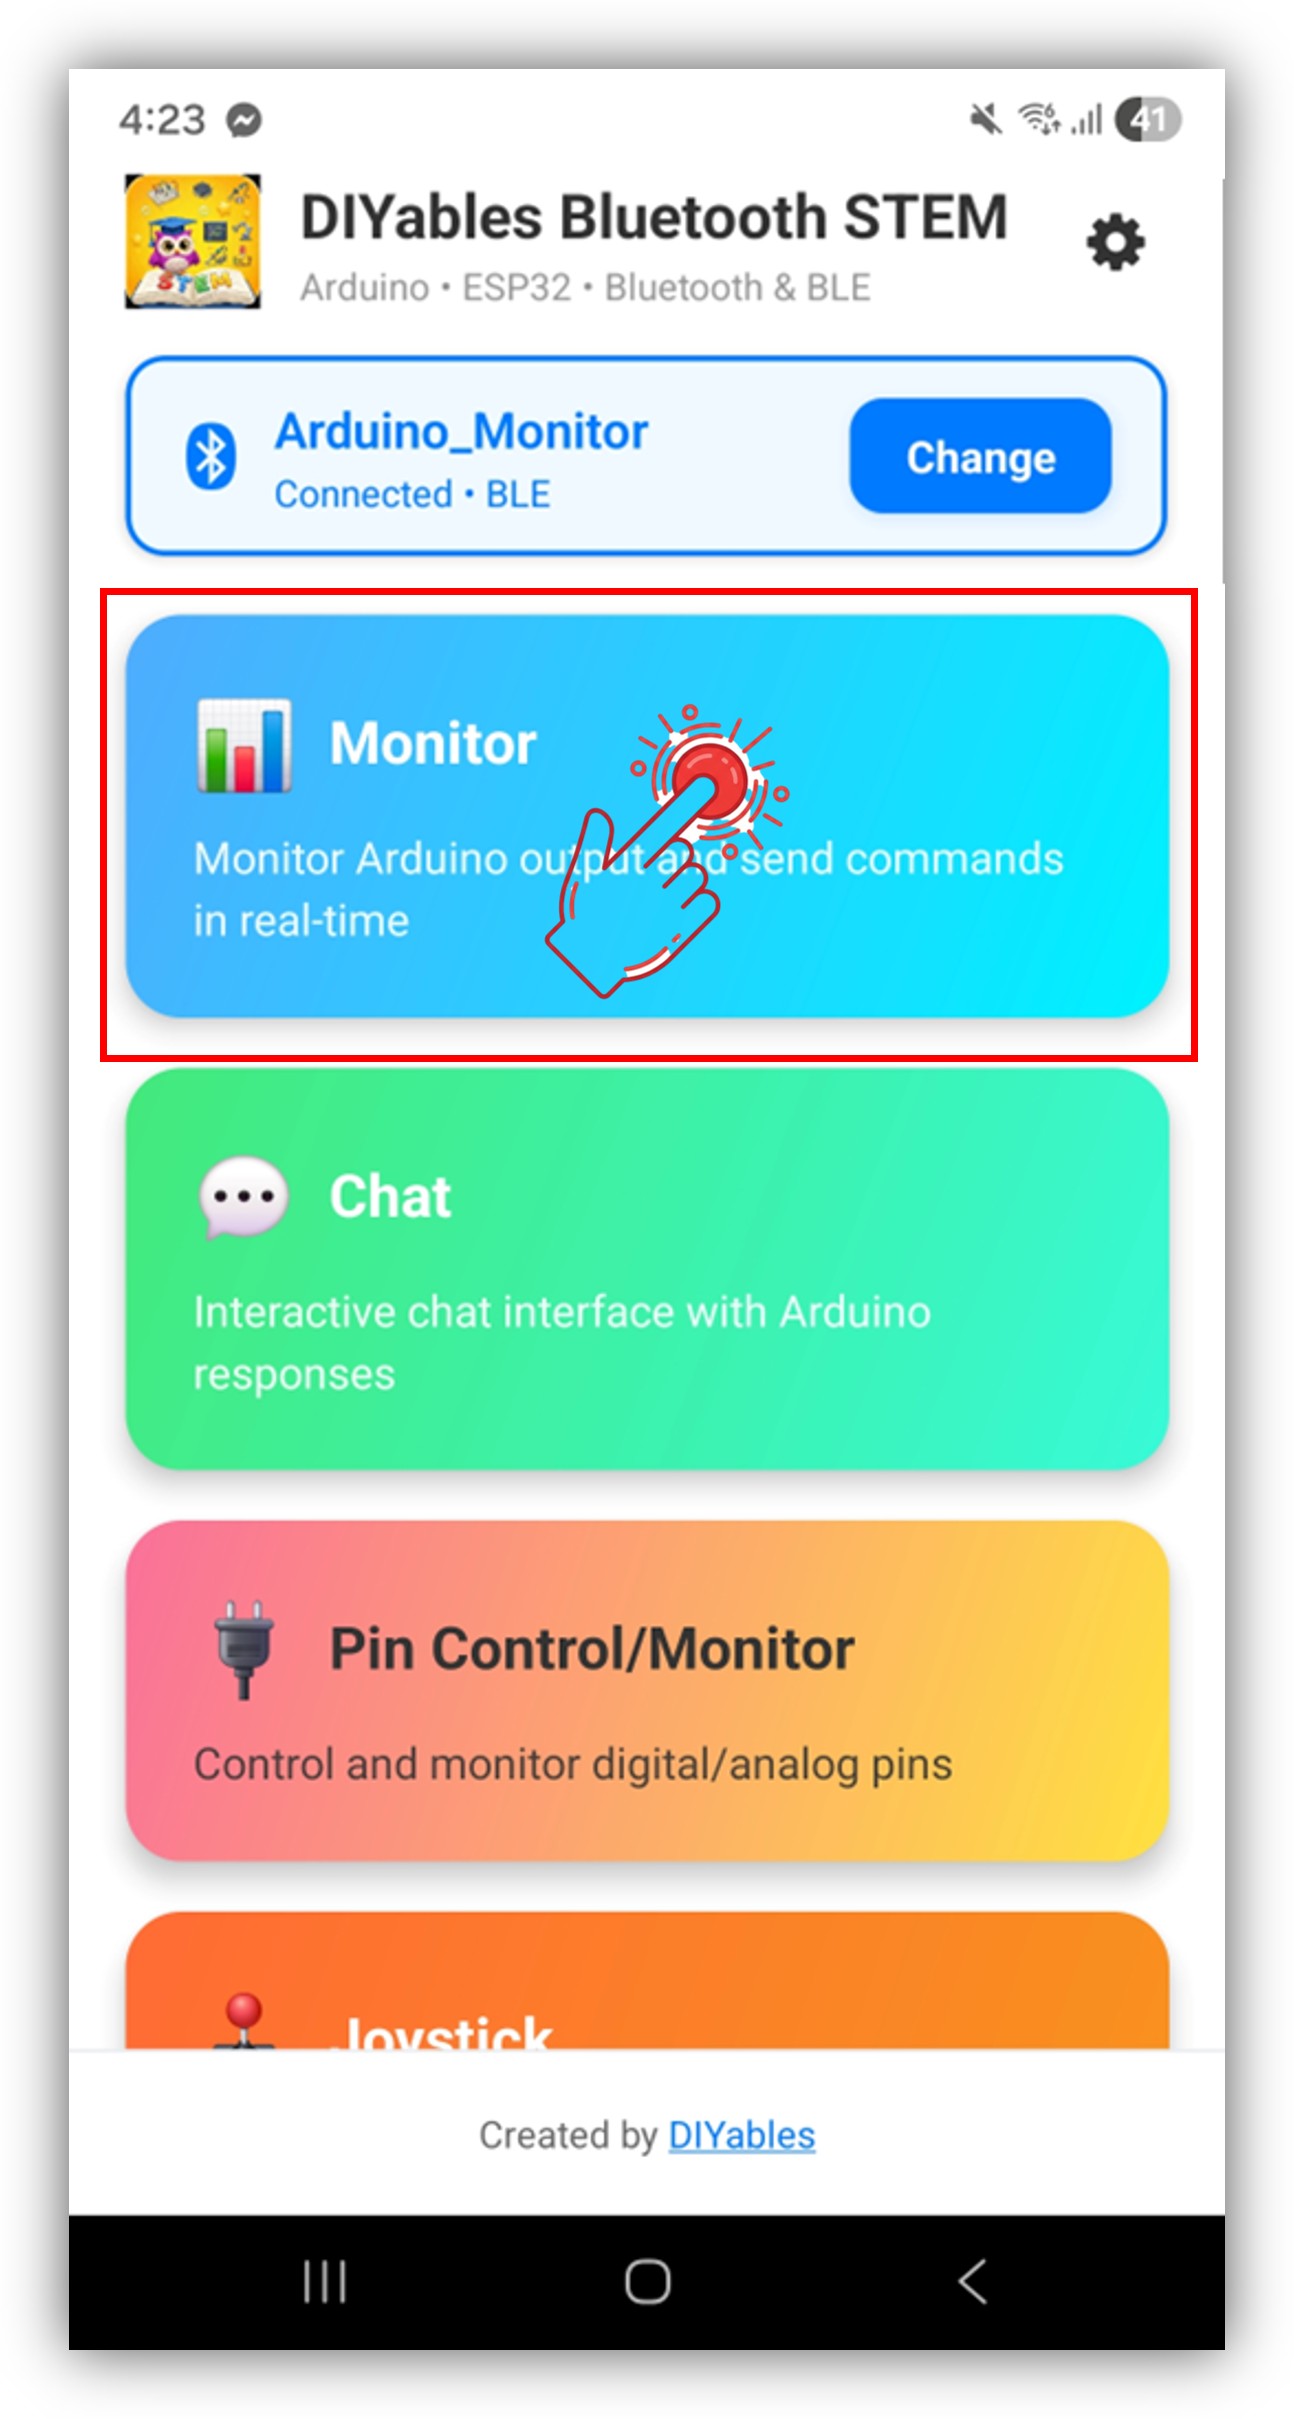
  • Eenmaal verbonden gaat de app automatisch terug naar het startscherm. Selecteer de Monitor app uit het app-menu.
DIYables Bluetooth App - Startscherm met Monitor App

Opmerking: U kunt tikken op het instellingen-icoon op het startscherm om apps te verbergen/tonen op het startscherm. Voor meer details, zie de DIYables Bluetooth App Gebruikershandleiding.

  • U zult statusberichten zien streamen in het monitor-display
  • Typ LED_ON in het invoerveld en tik op Send — de ingebouwde LED op de Arduino UNO R4 WiFi zal INSCHAKELEN, en de monitor toont een bevestigingsbericht
DIYables Bluetooth App - Monitor Scherm

Kijk nu terug naar de Seriële Monitor in Arduino IDE. U zult zien:

COM6
Send
Bluetooth connected! Sent update #1 Sent update #2 Sent update #3
Autoscroll Show timestamp
Clear output
9600 baud  
Newline  

Creatieve Aanpassing - Pas de Code aan voor Uw Project

Berichten Verzenden

// Verzend tekstberichten naar de app bluetoothMonitor.send("System started"); bluetoothMonitor.send("Temperature: " + String(temp, 1) + " °C"); bluetoothMonitor.send("[ERROR] Sensor disconnected!");

Inkomende Commando's Afhandelen

Gebruik de onMonitorMessage() callback om commando's te ontvangen die in de Monitor app zijn getypt en erop te reageren:

bluetoothMonitor.onMonitorMessage([](const String& message) { Serial.print("Received: "); Serial.println(message); if (message == "HELP") { bluetoothMonitor.send("Commands: LED_ON, LED_OFF, STATUS, HELP"); } else if (message == "LED_ON") { digitalWrite(LED_BUILTIN, HIGH); bluetoothMonitor.send("LED turned ON"); } else if (message == "LED_OFF") { digitalWrite(LED_BUILTIN, LOW); bluetoothMonitor.send("LED turned OFF"); } else if (message == "STATUS") { bluetoothMonitor.send("Uptime: " + String(millis() / 1000) + "s"); bluetoothMonitor.send("LED: " + String(digitalRead(LED_BUILTIN) ? "ON" : "OFF")); } else { bluetoothMonitor.send("Unknown command: " + message); } });

U kunt zoveel aangepaste commando's toevoegen als u nodig heeft door meer else if blokken toe te voegen. Voeg bijvoorbeeld RELAY_ON / RELAY_OFF toe om een relais te besturen, of READ om een sensormeting te activeren — elk woord dat u in de app typt wordt een commando.

Programmeervoorbeelden

Sensorstatus Streaming

void loop() { bluetoothServer.loop(); static unsigned long lastUpdate = 0; if (bluetooth.isConnected() && millis() - lastUpdate >= 3000) { lastUpdate = millis(); int light = analogRead(A0); float voltage = analogRead(A1) * 5.0 / 1023.0; bluetoothMonitor.send("[SENSOR] Light: " + String(map(light, 0, 1023, 0, 100)) + "%"); bluetoothMonitor.send("[SENSOR] Voltage: " + String(voltage, 2) + "V"); bluetoothMonitor.send("[INFO] Uptime: " + String(millis() / 1000) + "s"); } delay(10); }

Gebeurtenis-gebaseerde Logging

const int BUTTON_PIN = 7; int lastButtonState = HIGH; void loop() { bluetoothServer.loop(); int buttonState = digitalRead(BUTTON_PIN); if (buttonState != lastButtonState) { lastButtonState = buttonState; if (buttonState == LOW) { bluetoothMonitor.send("[EVENT] Button pressed!"); } else { bluetoothMonitor.send("[EVENT] Button released"); } } delay(10); }

Probleemoplossing

Veelvoorkomende Problemen

1. Kan het apparaat niet vinden in de app

  • Zorg ervoor dat de Arduino UNO R4 WiFi is ingeschakeld en de sketch is geüpload
  • Controleer of de Bluetooth van uw telefoon is ingeschakeld
  • Op Android 11 en lager, schakel ook Locatieservices in

2. Geen berichten verschijnen in de app

  • Verifieer dat bluetoothMonitor.send() wordt aangeroepen
  • Controleer of bluetoothServer.loop() in de hoofdlus staat
  • Bevestig verbinding in Seriële Monitor

3. Berichten zijn vertraagd

  • Verminder het update-interval voor frequentere berichten
  • Vermijd het verzenden van te veel berichten te snel (BLE heeft bandbreedtelimieten)

4. Commando's van app niet ontvangen

  • Verifieer dat de onMonitorMessage callback is ingesteld
  • Controleer Seriële Monitor voor ontvangen commando-uitvoer

5. Verbinding valt regelmatig weg

  • Ga dichter bij de Arduino staan (verminder afstand)
  • Zorg voor stabiele USB-stroomvoorziening

6. Upload mislukt of board niet herkend

  • Installeer het nieuwste Arduino UNO R4 board pakket via Board Manager
  • Probeer een andere USB-kabel of poort

Projectideeën

  • Draadloze debug-console
  • Sensordatalogger
  • Systeemgezondheidsmonitor
  • Gebeurtenismeldsysteem
  • Externe commando-interface

Volgende Stappen

Na het beheersen van het Bluetooth Monitor voorbeeld, probeer:

  1. Bluetooth Chat - Voor interactieve tweerichtingsberichten
  2. Bluetooth Table - Voor gestructureerde gegevensweergave
  3. Bluetooth Plotter - Voor datavisualisatie
  4. Meerdere Bluetooth Apps - Combinatie van monitor met andere apps

Ondersteuning

Voor extra hulp:

  • Controleer de API Reference documentatie
  • Arduino community forums

※ ONZE BERICHTEN

  • U bent welkom om de link naar deze tutorial te delen. Gebruik onze inhoud echter niet op andere websites. We hebben veel moeite en tijd gestoken in het maken van de inhoud, respecteer alstublieft ons werk!