Arduino UNO R4 - Ethernet

Deze handleiding toont u hoe u de Arduino UNO R4 verbindt met internet of uw lokale netwerk met behulp van de W5500 Ethernet-module. We bespreken de volgende details:

Arduino UNO R4 Ethernet

Over de W5500 Ethernet-module

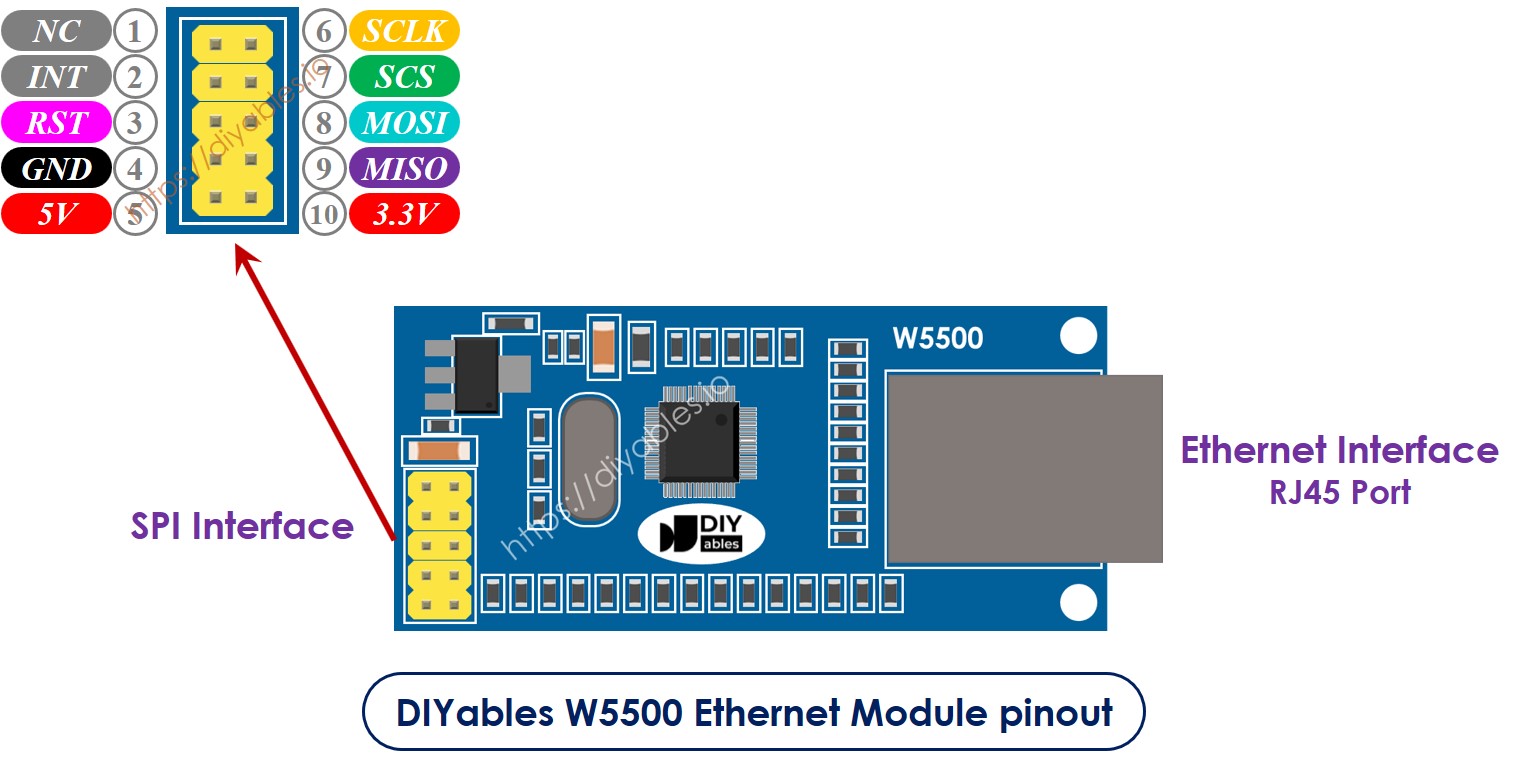
De W5500 Ethernet-module biedt twee interfaces:

  • RJ45 Ethernet interface: Verbind met een router of switch met behulp van een Ethernet-kabel.
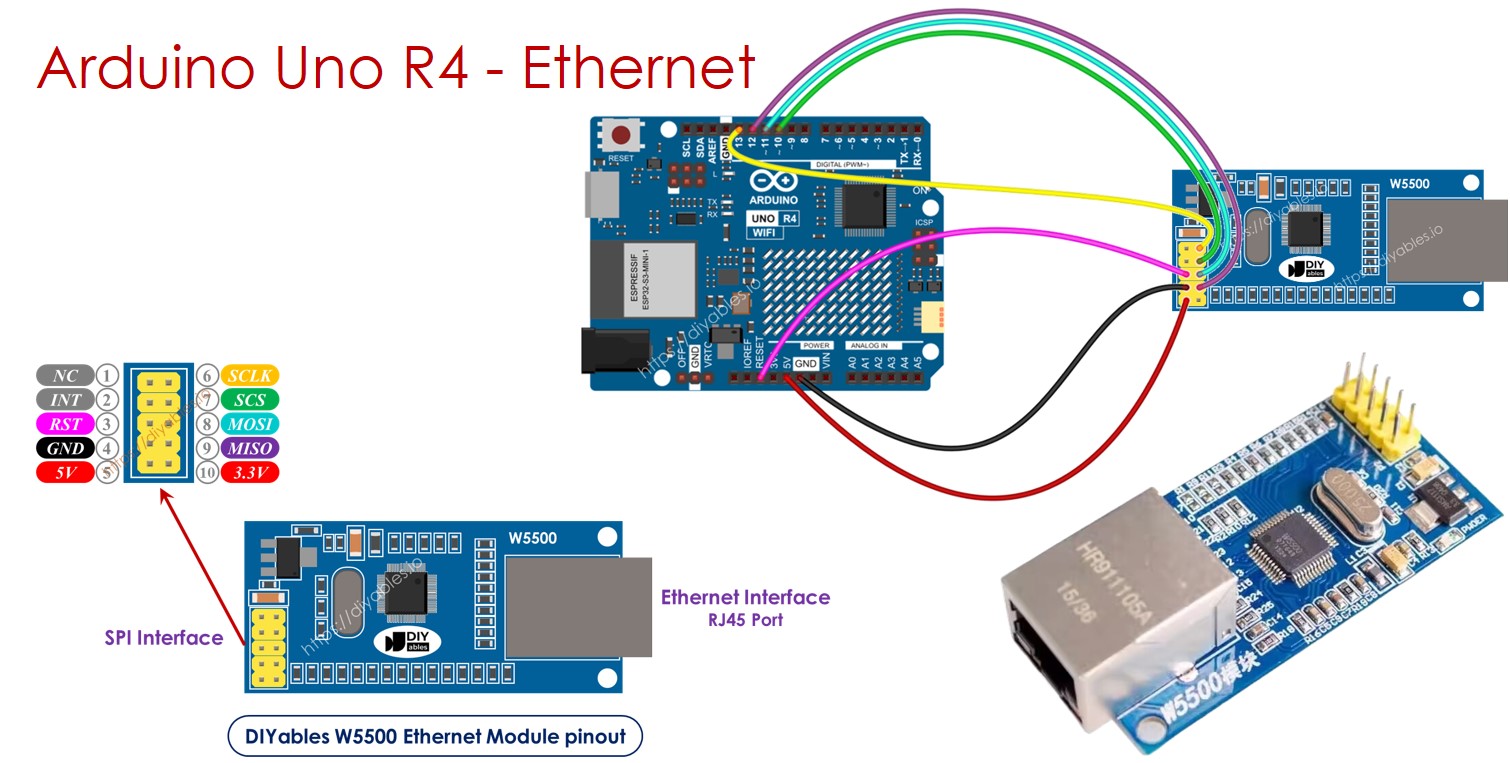
  • SPI interface: Verbind met een Arduino UNO R4 board via deze interface. Het bevat 10 pinnen:
    • NC pin: Laat deze pin onverbonden.
    • INT pin: Laat deze pin onverbonden.
    • RST pin: Dit is de reset-pin. Verbind deze met de EN-pin op de Arduino UNO R4.
    • GND pin: Verbind deze pin met de GND-pin op de Arduino UNO R4.
    • 5V pin: Verbind deze pin met de 5V-pin op de Arduino UNO R4.
    • 3.3V pin: Laat deze pin onverbonden.
    • MISO pin: Verbind deze pin met de SPI MISO-pin op de Arduino UNO R4.
    • MOSI pin: Verbind deze pin met de SPI MOSI-pin op de Arduino UNO R4.
    • SCS pin: Verbind deze pin met de SPI CS-pin op de Arduino UNO R4.
    • SCLK pin: Verbind deze pin met de SPI SCK-pin op de Arduino UNO R4.
    Ethernet module pinout
    image source: diyables.io

Bedradingsdiagram tussen Arduino UNO R4 en W5500 Ethernet-module
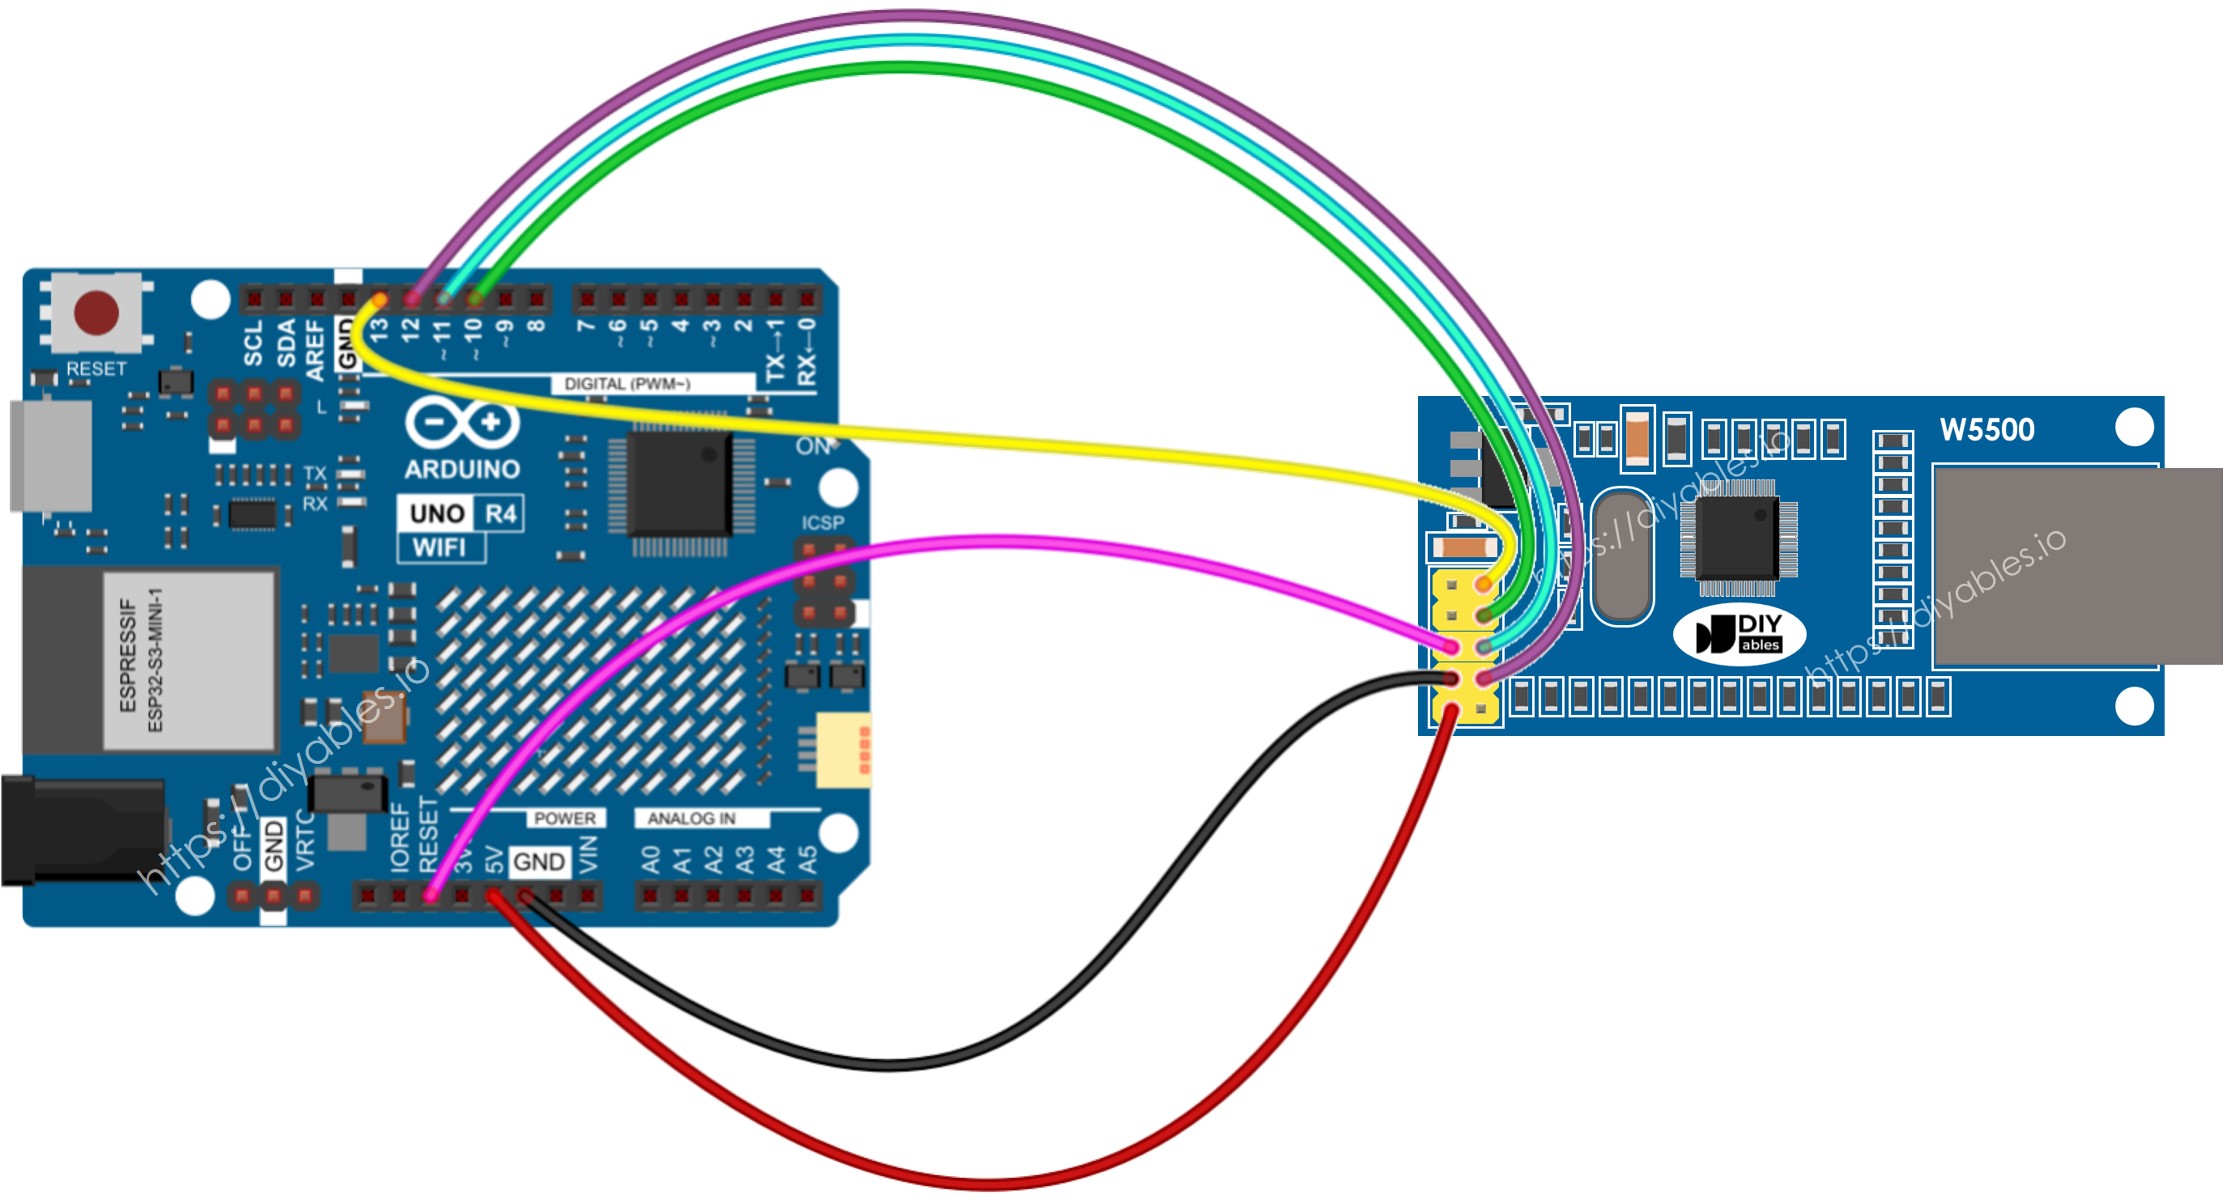
Arduino UNO R4 Ethernet module Bedradingsdiagram

This image is created using Fritzing. Click to enlarge image

Zie De beste manier om Arduino Uno R4 en andere componenten van stroom te voorzien.

Arduino UNO R4 code voor Ethernet-module - HTTP-verzoeken maken via Ethernet

Deze code functioneert als een webclient. Het verzendt HTTP-verzoeken naar de webserver op http://example.com/.

/* * Deze Arduino UNO R4 code is ontwikkeld door newbiely.nl * Deze Arduino UNO R4 code wordt zonder enige beperking aan het publiek beschikbaar gesteld. * Voor volledige instructies en schema's, bezoek: * https://newbiely.nl/tutorials/arduino-uno-r4/arduino-uno-r4-ethernet-module */ #include <SPI.h> #include <Ethernet.h> // replace the MAC address below by the MAC address printed on a sticker on the Arduino Shield 2 byte mac[] = { 0xDE, 0xAD, 0xBE, 0xEF, 0xFE, 0xED }; EthernetClient client; int HTTP_PORT = 80; String HTTP_METHOD = "GET"; // or POST char HOST_NAME[] = "example.com"; String PATH_NAME = "/"; void setup() { Serial.begin(9600); delay(1000); Serial.println("Arduino Uno R4 - Ethernet Tutorial"); // initialize the Ethernet shield using DHCP: if (Ethernet.begin(mac) == 0) { Serial.println("Failed to obtaining an IP address"); // check for Ethernet hardware present if (Ethernet.hardwareStatus() == EthernetNoHardware) Serial.println("Ethernet shield was not found"); // check for Ethernet cable if (Ethernet.linkStatus() == LinkOFF) Serial.println("Ethernet cable is not connected."); while (true) ; } // connect to web server on port 80: if (client.connect(HOST_NAME, HTTP_PORT)) { // if connected: Serial.println("Connected to server"); // make a HTTP request: // send HTTP header client.println(HTTP_METHOD + " " + PATH_NAME + " HTTP/1.1"); client.println("Host: " + String(HOST_NAME)); client.println("Connection: close"); client.println(); // end HTTP header while (client.connected()) { if (client.available()) { // read an incoming byte from the server and print it to serial monitor: char c = client.read(); Serial.print(c); } } // the server's disconnected, stop the client: client.stop(); Serial.println(); Serial.println("disconnected"); } else { // if not connected: Serial.println("connection failed"); } } void loop() { }

Snelle Stappen

Volg deze instructies stap voor stap:

  • Als dit uw eerste keer is met de Arduino Uno R4 WiFi/Minima, raadpleeg dan de tutorial over het instellen van de omgeving voor Arduino Uno R4 WiFi/Minima in de Arduino IDE.
  • Verbind de Ethernet-module met uw Arduino UNO R4 volgens het verstrekte diagram
  • Verbind de Ethernet-module met uw router of switch met behulp van een Ethernet-kabel.
  • Verbind het Arduino Uno R4 board met uw computer met behulp van een USB-kabel.
  • Open de Arduino IDE op uw computer.
  • Selecteer het juiste Arduino Uno R4 board (bijv., Arduino Uno R4 Minima) en COM-poort.
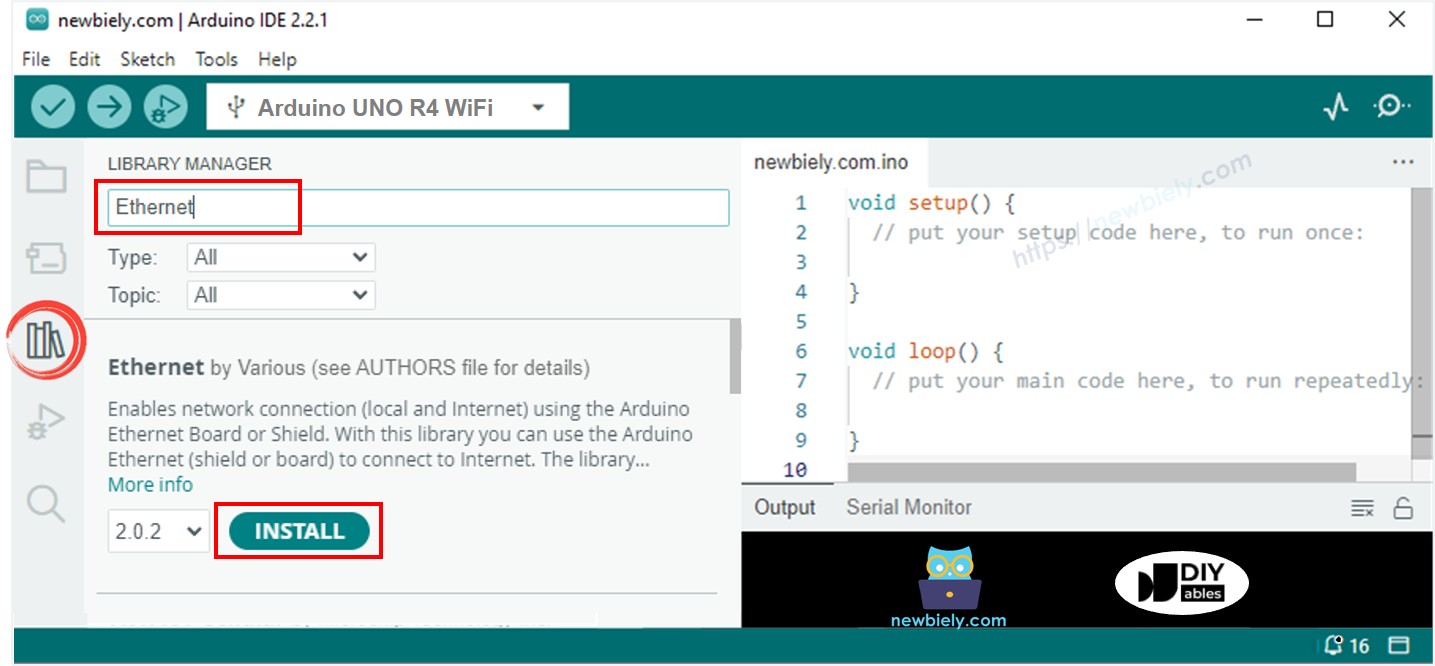
  • Klik op het Libraries icoon aan de linkerkant van de Arduino IDE.
  • In het zoekvak, typ "Ethernet" en zoek de Ethernet library door Various.
  • Druk op de Install knop om de Ethernet library toe te voegen.
Arduino UNO R4 Ethernet library
  • Open de Serial Monitor in de Arduino IDE.
  • Kopieer de gegeven code en plak deze in de Arduino IDE.
  • Klik op de Upload knop in de Arduino IDE om de code naar de Arduino Uno R4 te verzenden.
  • Om de output te bekijken, kijk naar de Serial Monitor waar de resultaten zullen worden weergegeven zoals aangegeven.
COM6
Send
Arduino UNO R4 - Ethernet Tutorial Connected to server HTTP/1.1 200 OK Accept-Ranges: bytes Age: 208425 Cache-Control: max-age=604800 Content-Type: text/html; charset=UTF-8 Date: Fri, 12 Jul 2024 07:08:42 GMT Etag: "3147526947" Expires: Fri, 19 Jul 2024 07:08:42 GMT Last-Modified: Thu, 17 Oct 2019 07:18:26 GMT Server: ECAcc (lac/55B8) Vary: Accept-Encoding X-Cache: HIT Content-Length: 1256 Connection: close <!doctype html> <html> <head> <title>Example Domain</title> <meta charset="utf-8" /> <meta http-equiv="Content-type" content="text/html; charset=utf-8" /> <meta name="viewport" content="width=device-width, initial-scale=1" /> </head> <body> <div> <h1>Example Domain</h1> <p>This domain is for use in illustrative examples in documents. You may use this domain in literature without prior coordination or asking for permission.</p> <p><a href="https://www.iana.org/domains/example">More information...</a></p> </div> </body> </html> disconnected
Autoscroll Show timestamp
Clear output
9600 baud  
Newline  

※ Notiz:

Als een ander apparaat op hetzelfde netwerk uw MAC-adres deelt, kunnen er problemen zijn.

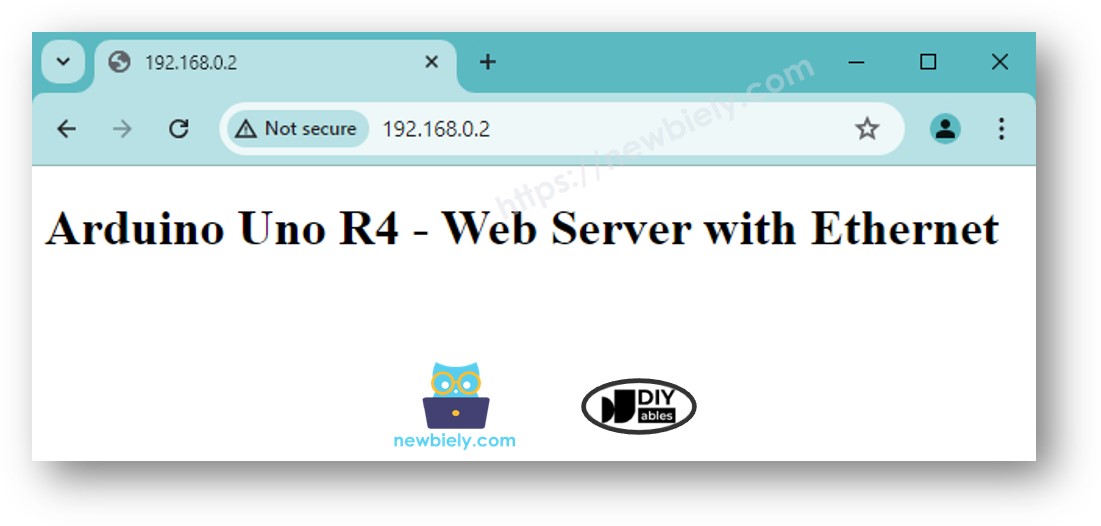
Arduino UNO R4 code voor Ethernet-module - Webserver

De onderstaande code verandert de Arduino UNO R4 in een webserver. Deze server stuurt een eenvoudige webpagina naar internetbrowsers.

/* * Deze Arduino UNO R4 code is ontwikkeld door newbiely.nl * Deze Arduino UNO R4 code wordt zonder enige beperking aan het publiek beschikbaar gesteld. * Voor volledige instructies en schema's, bezoek: * https://newbiely.nl/tutorials/arduino-uno-r4/arduino-uno-r4-ethernet-module */ #include <SPI.h> #include <Ethernet.h> // replace the MAC address below by the MAC address printed on a sticker on the Arduino Shield 2 byte mac[] = { 0xDE, 0xAD, 0xBE, 0xEF, 0xFE, 0xED }; EthernetServer server(80); void setup() { Serial.begin(9600); delay(1000); Serial.println("Arduino Uno R4 - Ethernet Tutorial"); // initialize the Ethernet shield using DHCP: if (Ethernet.begin(mac) == 0) { Serial.println("Failed to obtaining an IP address"); // check for Ethernet hardware present if (Ethernet.hardwareStatus() == EthernetNoHardware) Serial.println("Ethernet shield was not found"); // check for Ethernet cable if (Ethernet.linkStatus() == LinkOFF) Serial.println("Ethernet cable is not connected."); while (true) ; } server.begin(); Serial.print("Arduino Uno R4 - Web Server IP Address: "); Serial.println(Ethernet.localIP()); } void loop() { // listen for incoming clients EthernetClient client = server.available(); if (client) { Serial.println("new client"); // an HTTP request ends with a blank line bool currentLineIsBlank = true; while (client.connected()) { if (client.available()) { char c = client.read(); Serial.write(c); // if you've gotten to the end of the line (received a newline // character) and the line is blank, the HTTP request has ended, // so you can send a reply if (c == '\n' && currentLineIsBlank) { // send a standard HTTP response header client.println("HTTP/1.1 200 OK"); client.println("Content-Type: text/html"); client.println("Connection: close"); // the connection will be closed after completion of the response client.println(); client.println("<!DOCTYPE HTML>"); client.println("<html>"); client.println("<body>"); client.println("<h1>Arduino Uno R4 - Web Server with Ethernet</h1>"); client.println("</body>"); client.println("</html>"); break; } if (c == '\n') { // you're starting a new line currentLineIsBlank = true; } else if (c != '\r') { // you've gotten a character on the current line currentLineIsBlank = false; } } } // give the web browser time to receive the data delay(1); // close the connection: client.stop(); Serial.println("client disconnected"); } }

Snelle Stappen

  • Kopieer de bovenstaande code en plak deze in Arduino IDE.
  • Klik op de Upload knop in Arduino IDE om de code naar Arduino Uno R4 te uploaden.
  • Controleer het resultaat op Serial Monitor, het zal als volgt weergeven:
COM6
Send
Arduino UNO R4 - Ethernet Tutorial Arduino UNO R4 - Web Server IP Address: 192.168.0.2
Autoscroll Show timestamp
Clear output
9600 baud  
Newline  
  • Kopieer het hierboven gegeven IP-adres en voer het in de adresbalk van uw webbrowser in. U zult een eenvoudige webpagina zien die door de Arduino UNO R4 wordt weergegeven.
Arduino UNO R4 Ethernet Web Server

Gerelateerde Tutorials

※ ONZE BERICHTEN

  • U bent welkom om de link naar deze tutorial te delen. Gebruik onze inhoud echter niet op andere websites. We hebben veel moeite en tijd gestoken in het maken van de inhoud, respecteer alstublieft ons werk!