Arduino UNO R4 WiFi Bluetooth Joystick Voorbeeld - 2D Richtingsbesturing via BLE Tutorial

Overzicht

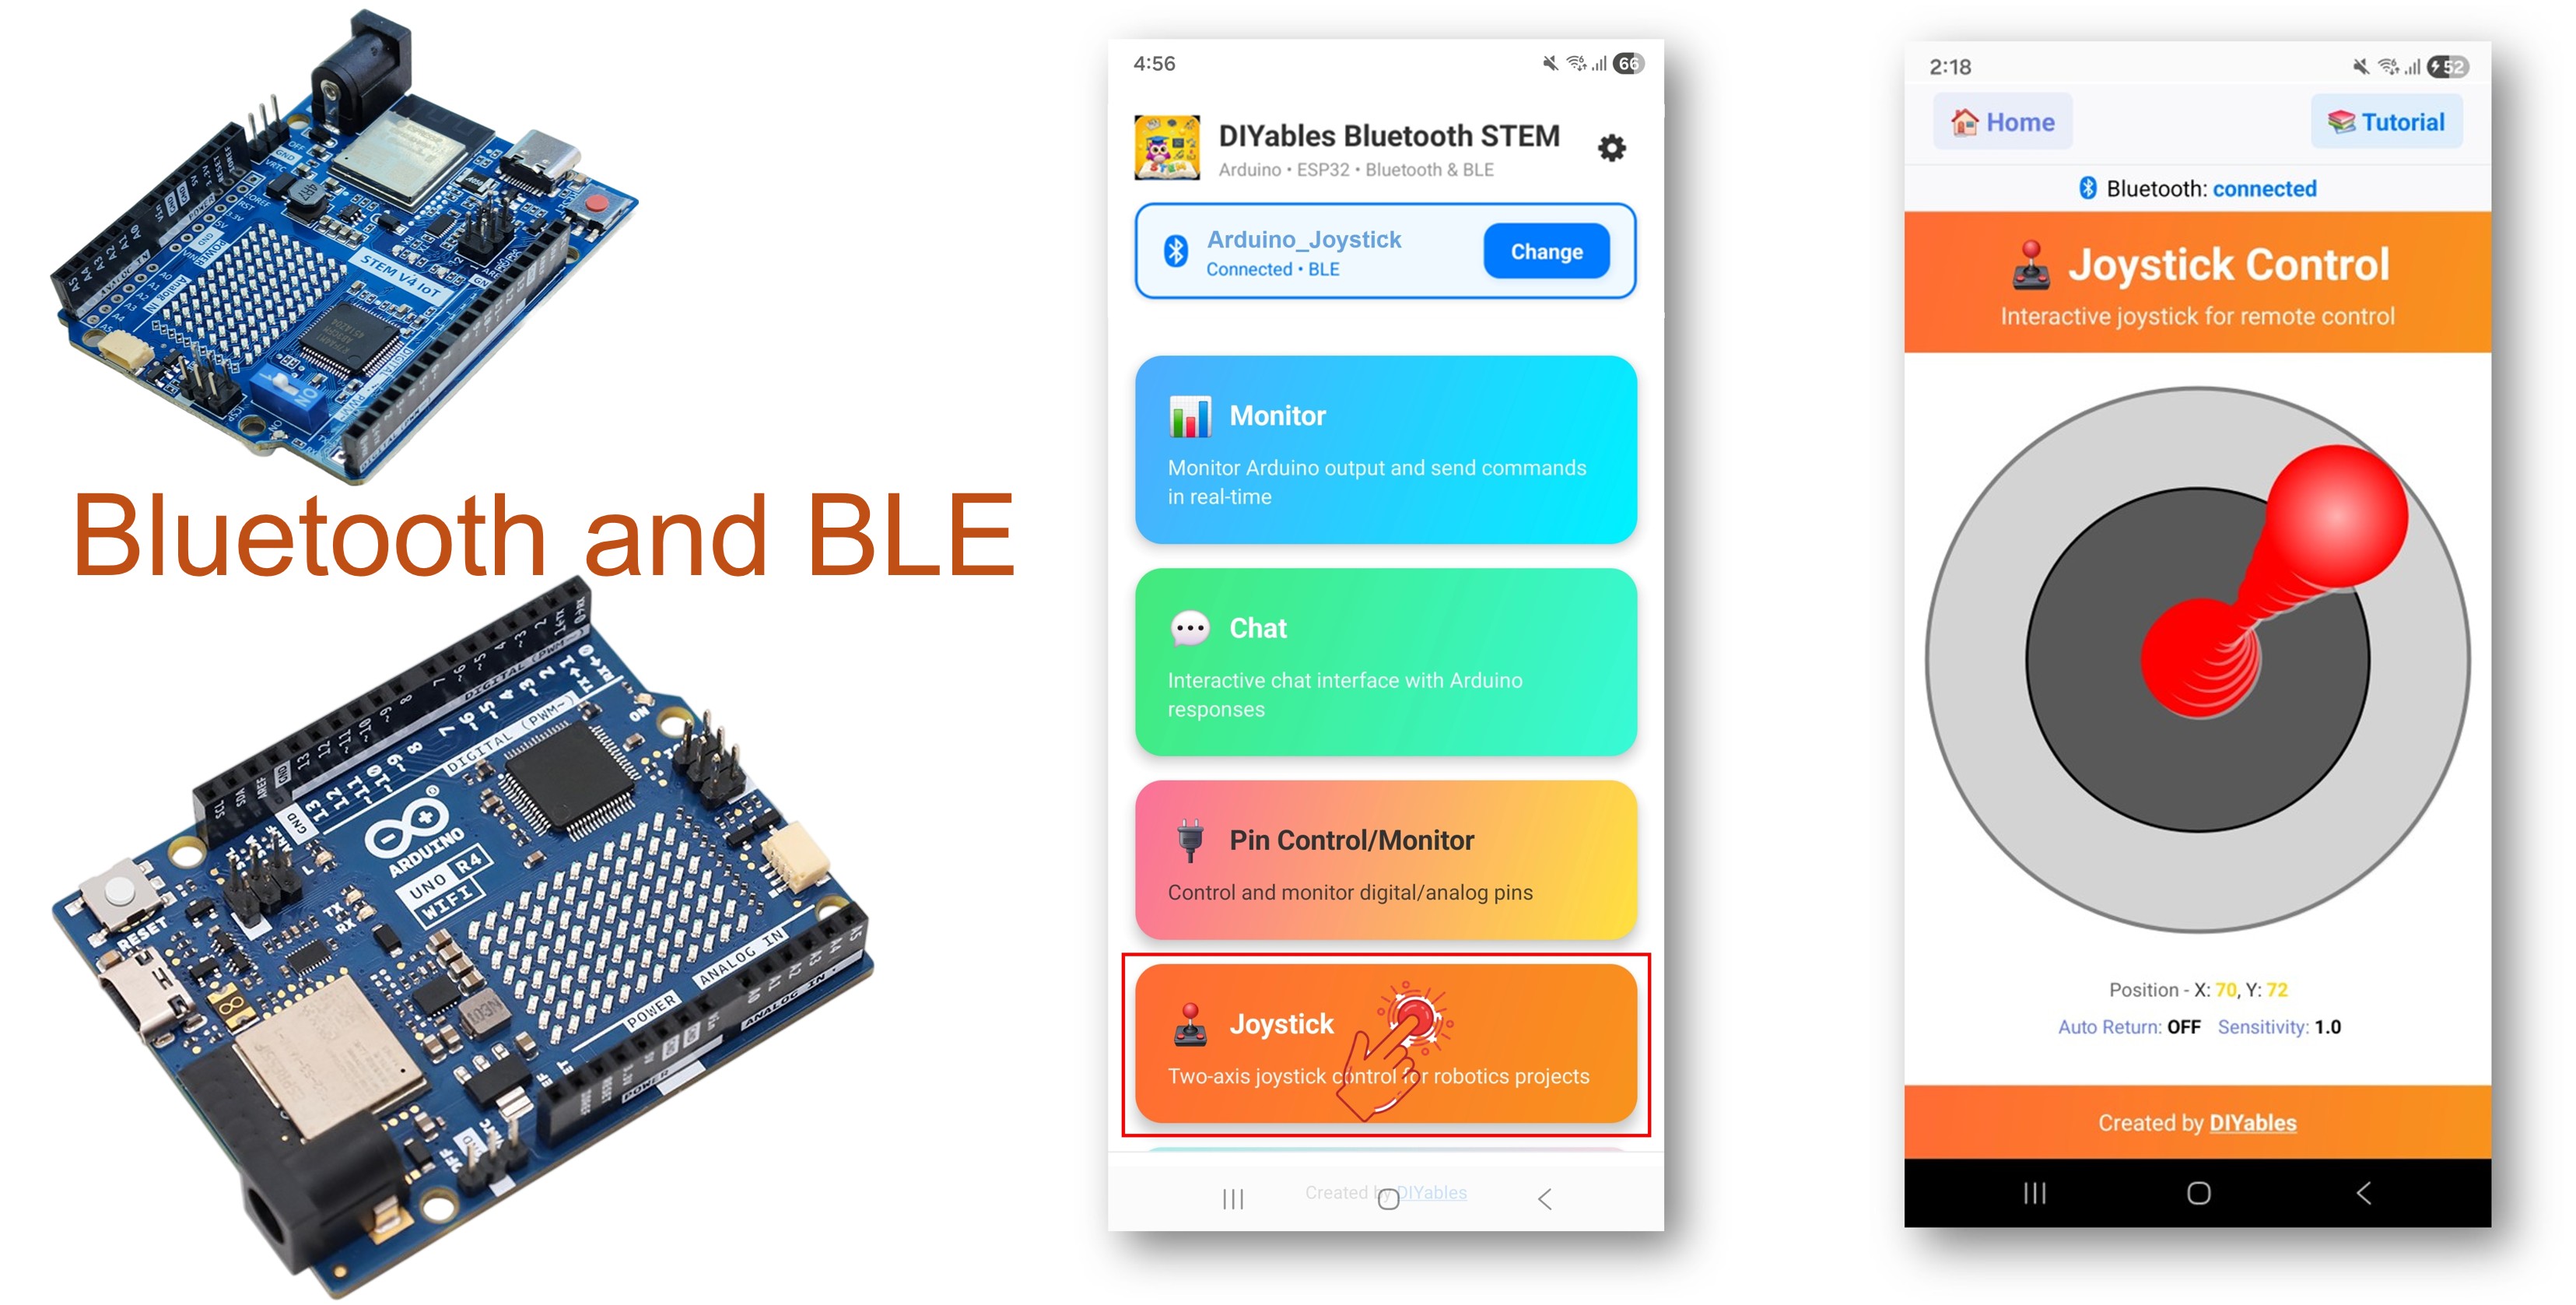
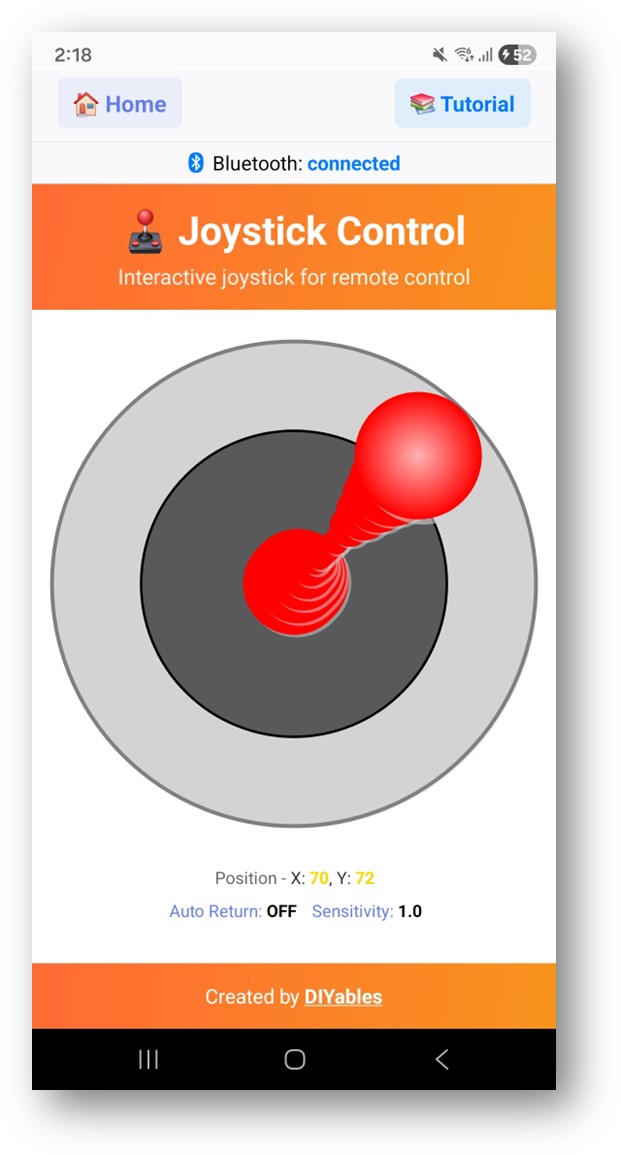
Het Bluetooth Joystick voorbeeld biedt een interactieve 2D joystick besturing toegankelijk via de DIYables Bluetooth STEM app. Ontworpen voor Arduino UNO R4 WiFi met BLE (Bluetooth Low Energy) om real-time X/Y coördinaten (-100 tot +100) te ontvangen voor richtingsbesturing. Perfect voor robotnavigatie, pan-tilt servo's, motorbesturing en gamecontrollers.

Opmerking: De Arduino UNO R4 WiFi ondersteunt alleen BLE (Bluetooth Low Energy). Het ondersteunt geen Classic Bluetooth. De DIYables Bluetooth App ondersteunt zowel BLE als Classic Bluetooth op Android, en BLE op iOS. Omdat dit board BLE gebruikt, werkt de app op zowel Android als iOS.

Arduino UNO R4 WiFi Bluetooth Joystick Voorbeeld - 2D Richtingsbesturing via BLE Tutorial

Functies

  • 2D Besturing: X en Y assen met bereik -100 tot +100
  • Configureerbare Gevoeligheid: Minimale bewegingsdrempel om updates te activeren
  • Auto-Return Optie: Joystick kan automatisch centreren wanneer losgelaten
  • Real-Time Waarden: Continue positie-updates tijdens het slepen
  • Werkt op Android & iOS: BLE wordt ondersteund op beide platforms
  • Geen Koppeling Vereist: BLE maakt automatisch verbinding zonder handmatige koppeling
  • Laag Stroomverbruik: BLE verbruikt minder stroom dan Classic Bluetooth

Arduino UNO R4 WiFi Code

Snelle Stappen

Volg deze instructies stap voor stap:

  • Als dit uw eerste keer is met de Arduino UNO R4 WiFi, raadpleeg dan de Arduino UNO R4 WiFi aan de slag gids.
  • Verbind het Arduino UNO R4 WiFi board met uw computer via een USB-kabel.
  • Start de Arduino IDE op uw computer.
  • Selecteer Arduino UNO R4 WiFi board en de juiste COM-poort.
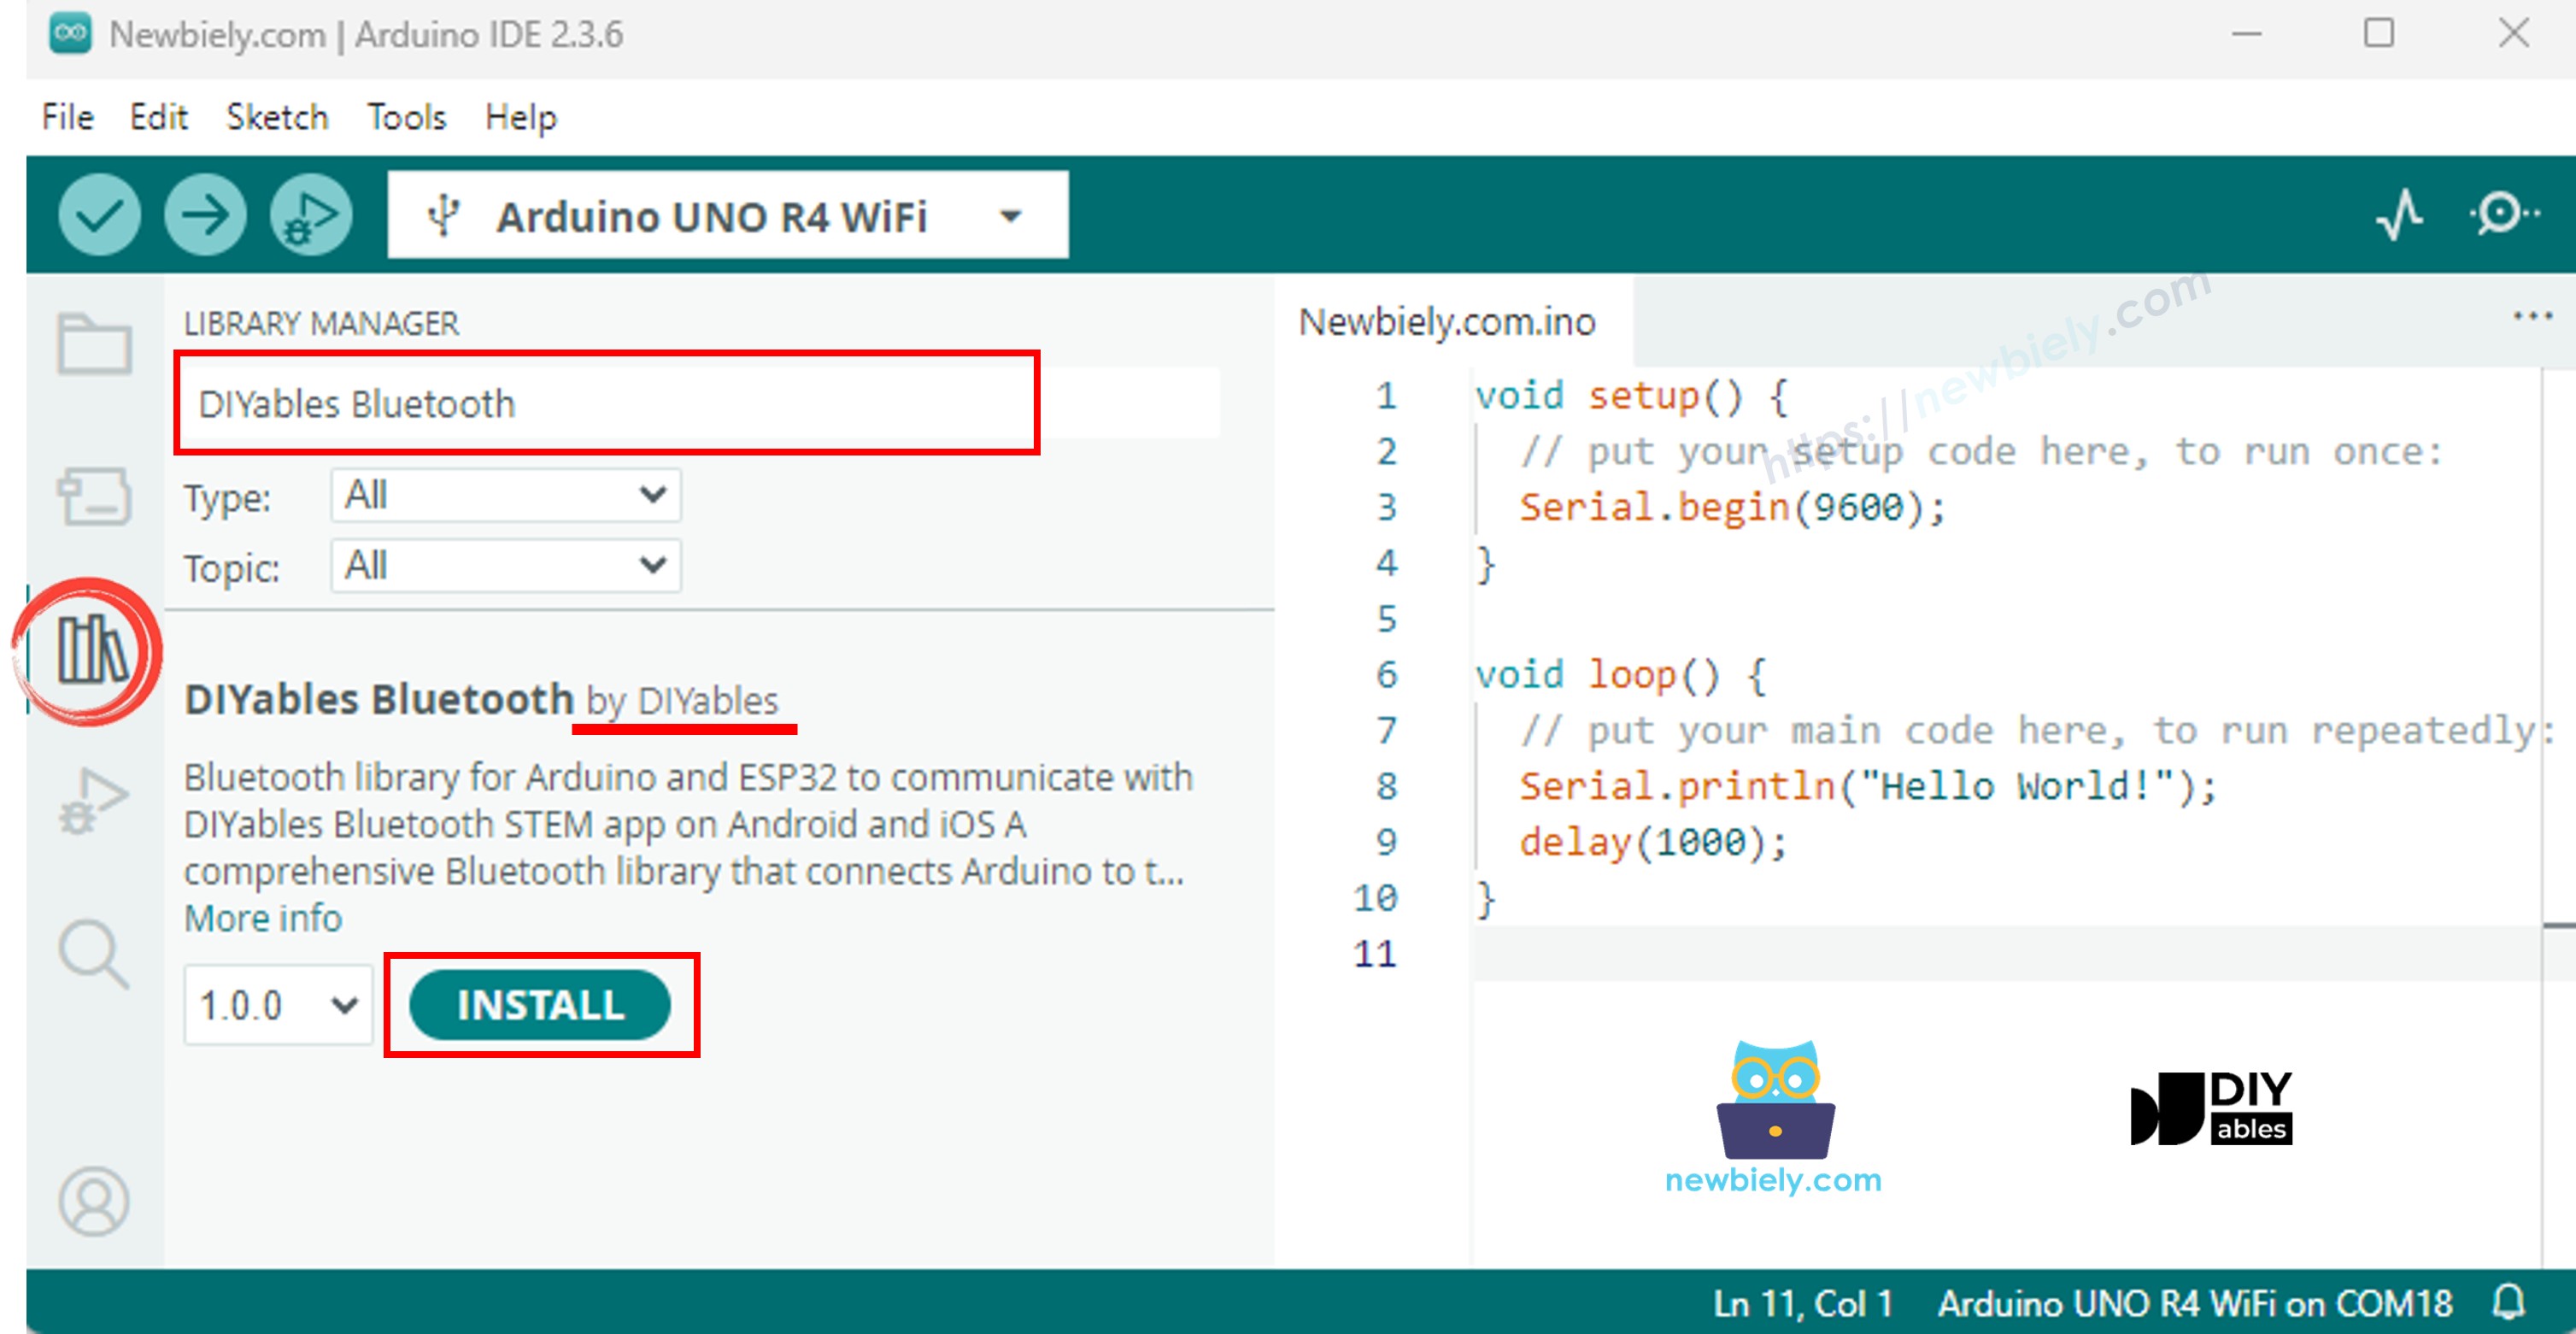
  • Navigeer naar het Libraries icoon in de linker balk van de Arduino IDE.
  • Zoek naar "DIYables Bluetooth", vind dan de DIYables Bluetooth bibliotheek door DIYables
  • Klik op de Install knop om de bibliotheek te installeren.
Arduino UNO R4 DIYables Bluetooth library
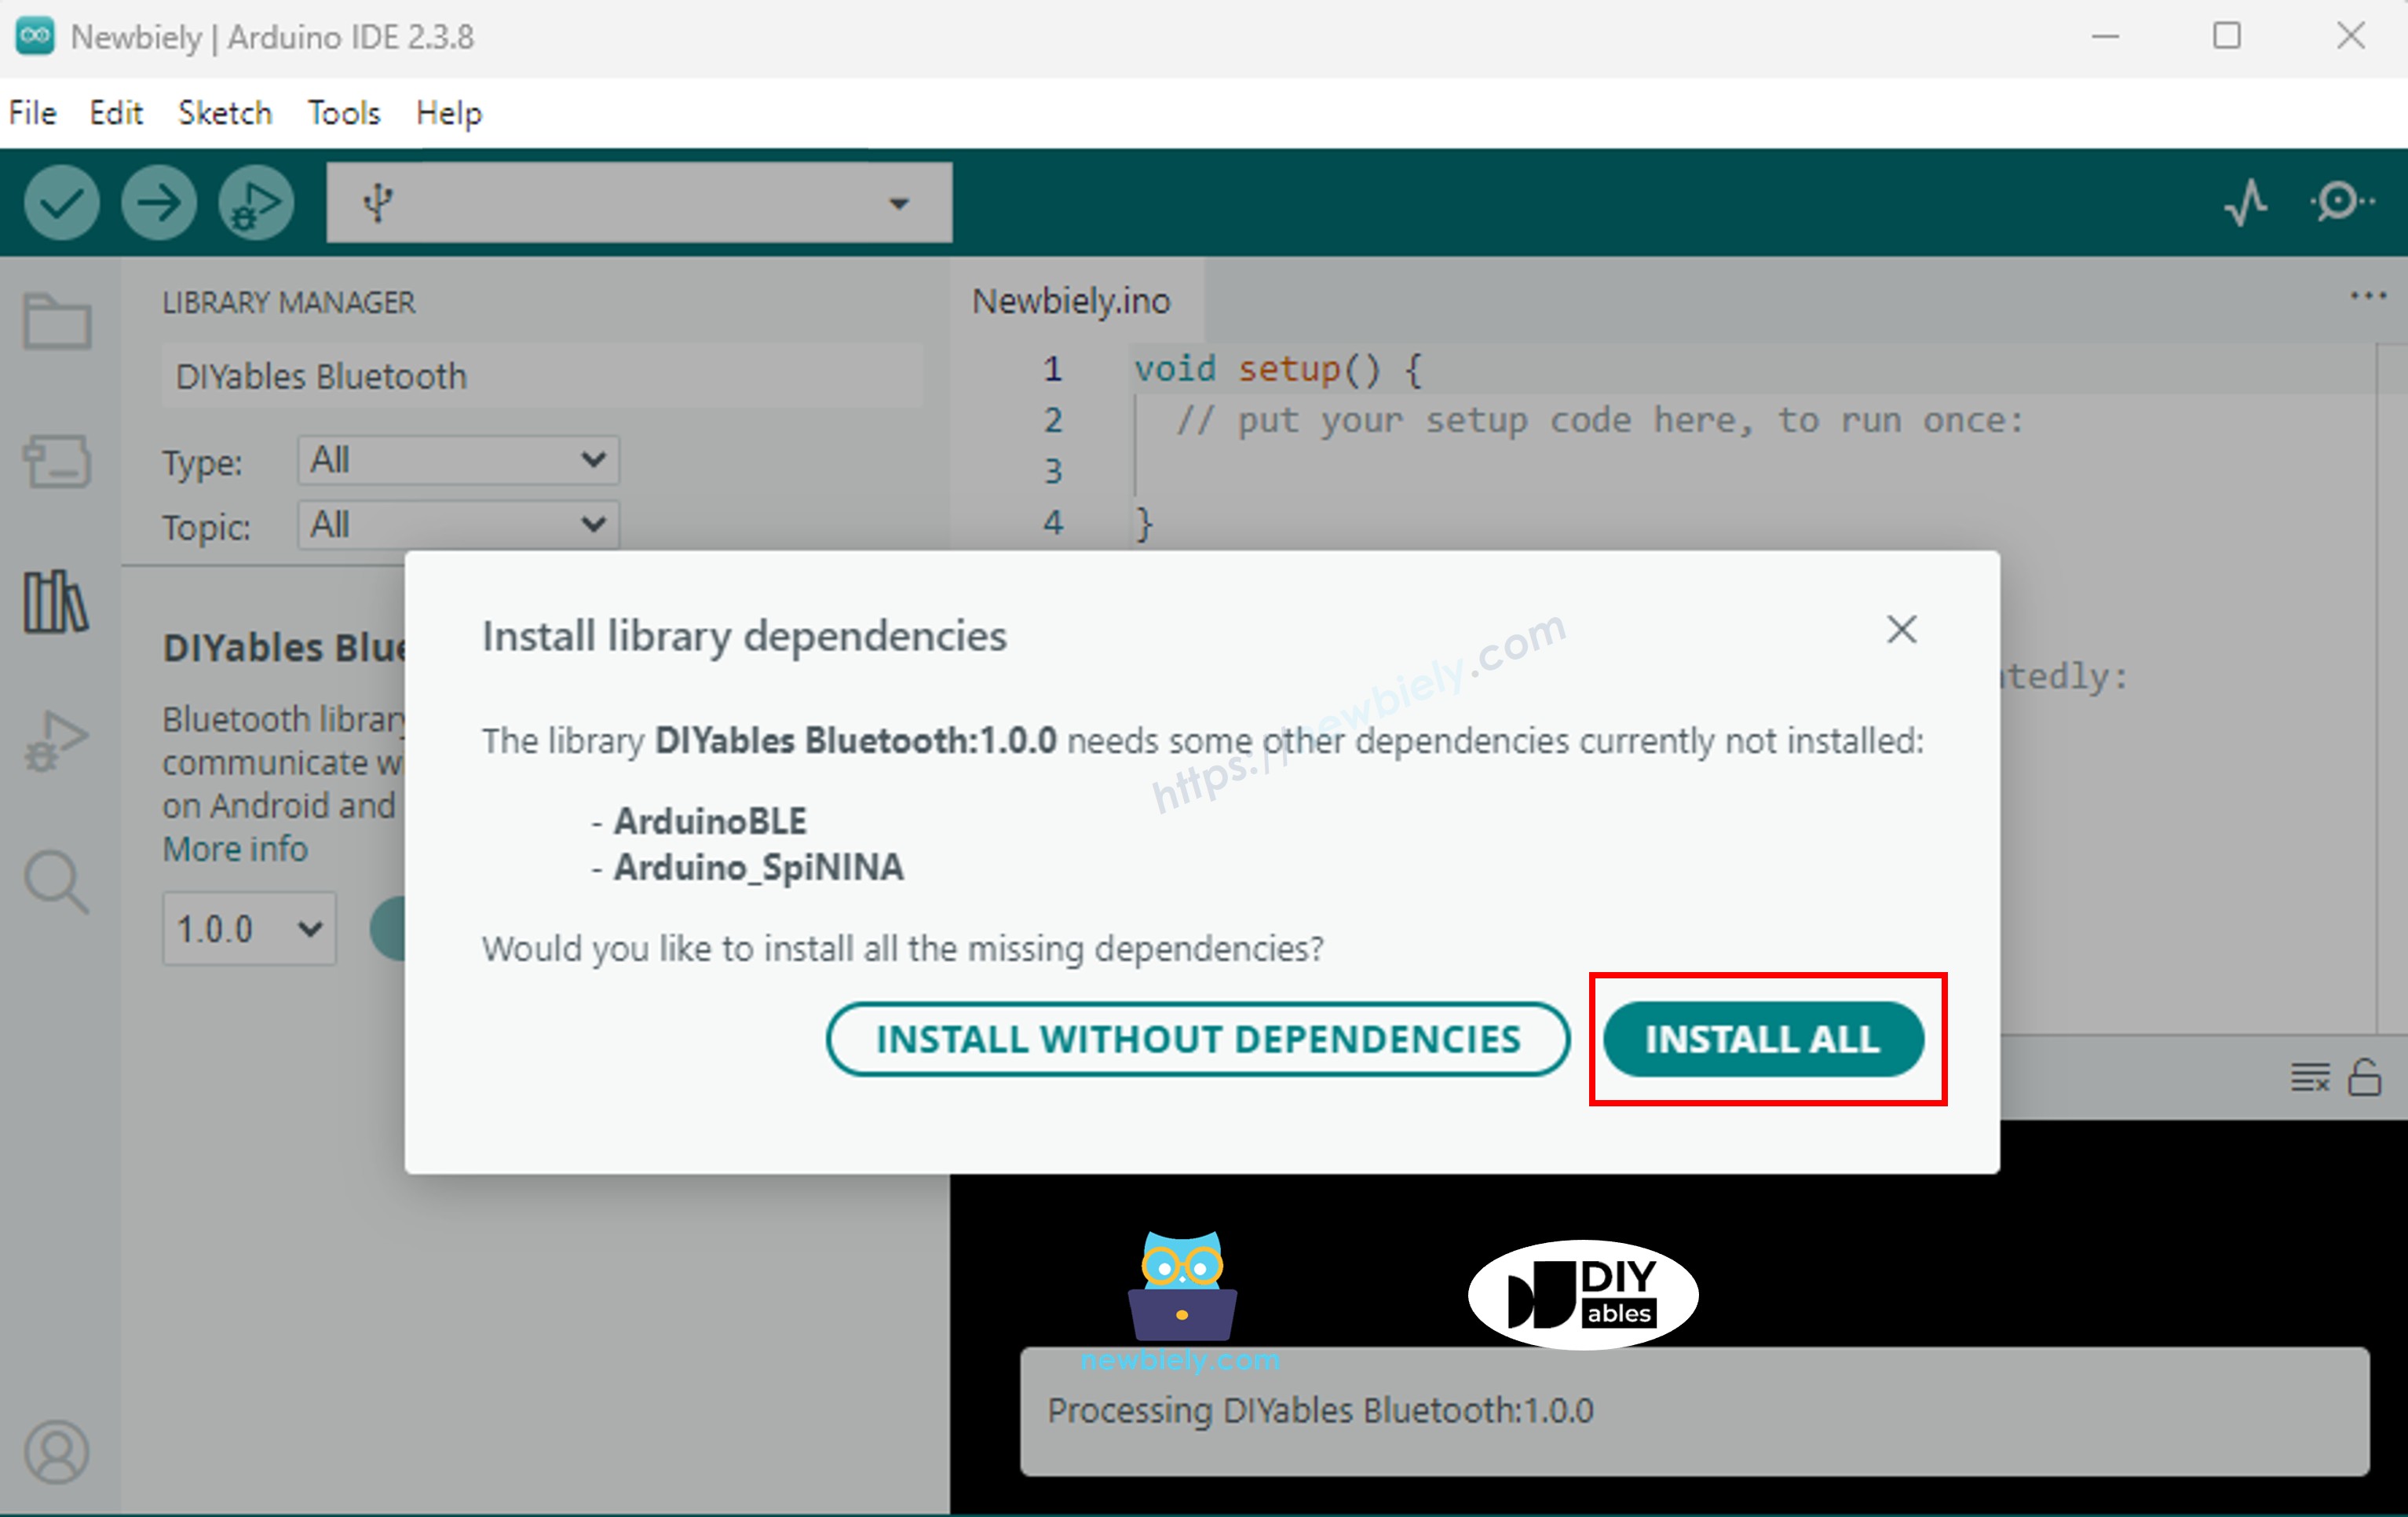
  • U wordt gevraagd om enkele andere bibliothekafhankelijkheden te installeren
  • Klik op de Install All knop om alle bibliothekafhankelijkheden te installeren.
Arduino UNO R4 DIYables Bluetooth dependency

BLE Code

  • Ga in Arduino IDE naar File Examples DIYables Bluetooth ArduinoBLE_Joystick voorbeeld, of kopieer de bovenstaande code en plak het in de editor van Arduino IDE
/* * DIYables Bluetooth Library - Bluetooth Joystick Example * Works with DIYables Bluetooth STEM app on Android and iOS * * This example demonstrates the Bluetooth Joystick feature: * - Interactive joystick control via Bluetooth * - Real-time X/Y coordinate values (-100 to +100) * - Control pins based on joystick position * * Compatible Boards: * - Arduino UNO R4 WiFi * - Arduino Nano 33 BLE / BLE Sense * - Arduino Nano 33 IoT * - Arduino MKR WiFi 1010 * - Arduino Nano RP2040 Connect * - Any board supporting the ArduinoBLE library * * Setup: * 1. Upload the sketch to your Arduino * 2. Open Serial Monitor to see connection status * 3. Use DIYables Bluetooth App to connect and control the joystick * * Tutorial: https://diyables.io/bluetooth-app * Author: DIYables */ #include <DIYables_BluetoothServer.h> #include <DIYables_BluetoothJoystick.h> #include <platforms/DIYables_ArduinoBLE.h> // BLE Configuration const char* DEVICE_NAME = "Arduino_Joystick"; const char* SERVICE_UUID = "19B10000-E8F2-537E-4F6C-D104768A1214"; const char* TX_UUID = "19B10001-E8F2-537E-4F6C-D104768A1214"; const char* RX_UUID = "19B10002-E8F2-537E-4F6C-D104768A1214"; // Create Bluetooth instances DIYables_ArduinoBLE bluetooth(DEVICE_NAME, SERVICE_UUID, TX_UUID, RX_UUID); DIYables_BluetoothServer bluetoothServer(bluetooth); // Create Joystick app instance // Configure with autoReturn=false and sensitivity=5 (minimum 5% change to trigger updates) DIYables_BluetoothJoystick bluetoothJoystick(false, 5); // Variables to store current joystick values int currentJoystickX = 0; int currentJoystickY = 0; void setup() { Serial.begin(9600); while (!Serial); Serial.println("DIYables Bluetooth - Joystick Example"); // TODO: initialize your hardware pins here // Initialize Bluetooth server with platform-specific implementation bluetoothServer.begin(); // Add joystick app to server bluetoothServer.addApp(&bluetoothJoystick); // Set up connection event callbacks bluetoothServer.setOnConnected([]() { Serial.println("Bluetooth connected!"); }); bluetoothServer.setOnDisconnected([]() { Serial.println("Bluetooth disconnected!"); }); // Set up joystick callback for position changes bluetoothJoystick.onJoystickValue([](int x, int y) { // Store the received values currentJoystickX = x; currentJoystickY = y; // Print joystick position values (-100 to +100) Serial.print("Joystick - X: "); Serial.print(x); Serial.print(", Y: "); Serial.println(y); // TODO: Add your control logic here based on joystick position // Examples: // - Control motors: if (x > 50) { /* move right */ } // - Control servos: servo.write(map(y, -100, 100, 0, 180)); // - Control LEDs: analogWrite(LED_PIN, map(abs(x), 0, 100, 0, 255)); // - Send commands to other devices via Serial, I2C, SPI, etc. }); // Optional: Handle requests for current joystick values (when app loads) bluetoothJoystick.onGetConfig([]() { // Send the stored joystick values back to the app bluetoothJoystick.send(currentJoystickX, currentJoystickY); Serial.print("App requested values - Sent: X="); Serial.print(currentJoystickX); Serial.print(", Y="); Serial.println(currentJoystickY); }); // You can change configuration at runtime: // bluetoothJoystick.setAutoReturn(false); // Disable auto-return // bluetoothJoystick.setSensitivity(10.0); // Only send updates when joystick moves >10% (less sensitive) Serial.println("Waiting for Bluetooth connection..."); } void loop() { // Handle Bluetooth server communications bluetoothServer.loop(); // TODO: Add your main application code here delay(10); }
  • Klik op de Upload knop in Arduino IDE om de code naar Arduino UNO R4 WiFi te uploaden
  • Open de Serial Monitor
  • Bekijk het resultaat in Serial Monitor. Het ziet er zo uit:
COM6
Send
DIYables Bluetooth - Joystick Example Waiting for Bluetooth connection...
Autoscroll Show timestamp
Clear output
9600 baud  
Newline  

Mobiele App

  • Installeer de DIYables Bluetooth App op uw smartphone: Android | iOS

Opmerking: De DIYables Bluetooth App ondersteunt zowel BLE als Classic Bluetooth op Android, en BLE op iOS. Omdat de Arduino UNO R4 WiFi BLE gebruikt, werkt de app op zowel Android als iOS. Handmatige koppeling is niet nodig voor BLE — scan en verbind gewoon.

  • Open de DIYables Bluetooth App
  • Wanneer u de app voor de eerste keer opent, vraagt deze om toestemmingen. Verleen de volgende:
    • Apparaten in de buurt toestemming (Android 12+) / Bluetooth toestemming (iOS) - vereist om te scannen en verbinden met Bluetooth-apparaten
    • Locatie toestemming (alleen Android 11 en lager) - vereist door oudere Android-versies om te scannen naar BLE-apparaten
  • Zorg ervoor dat Bluetooth ingeschakeld is op uw telefoon
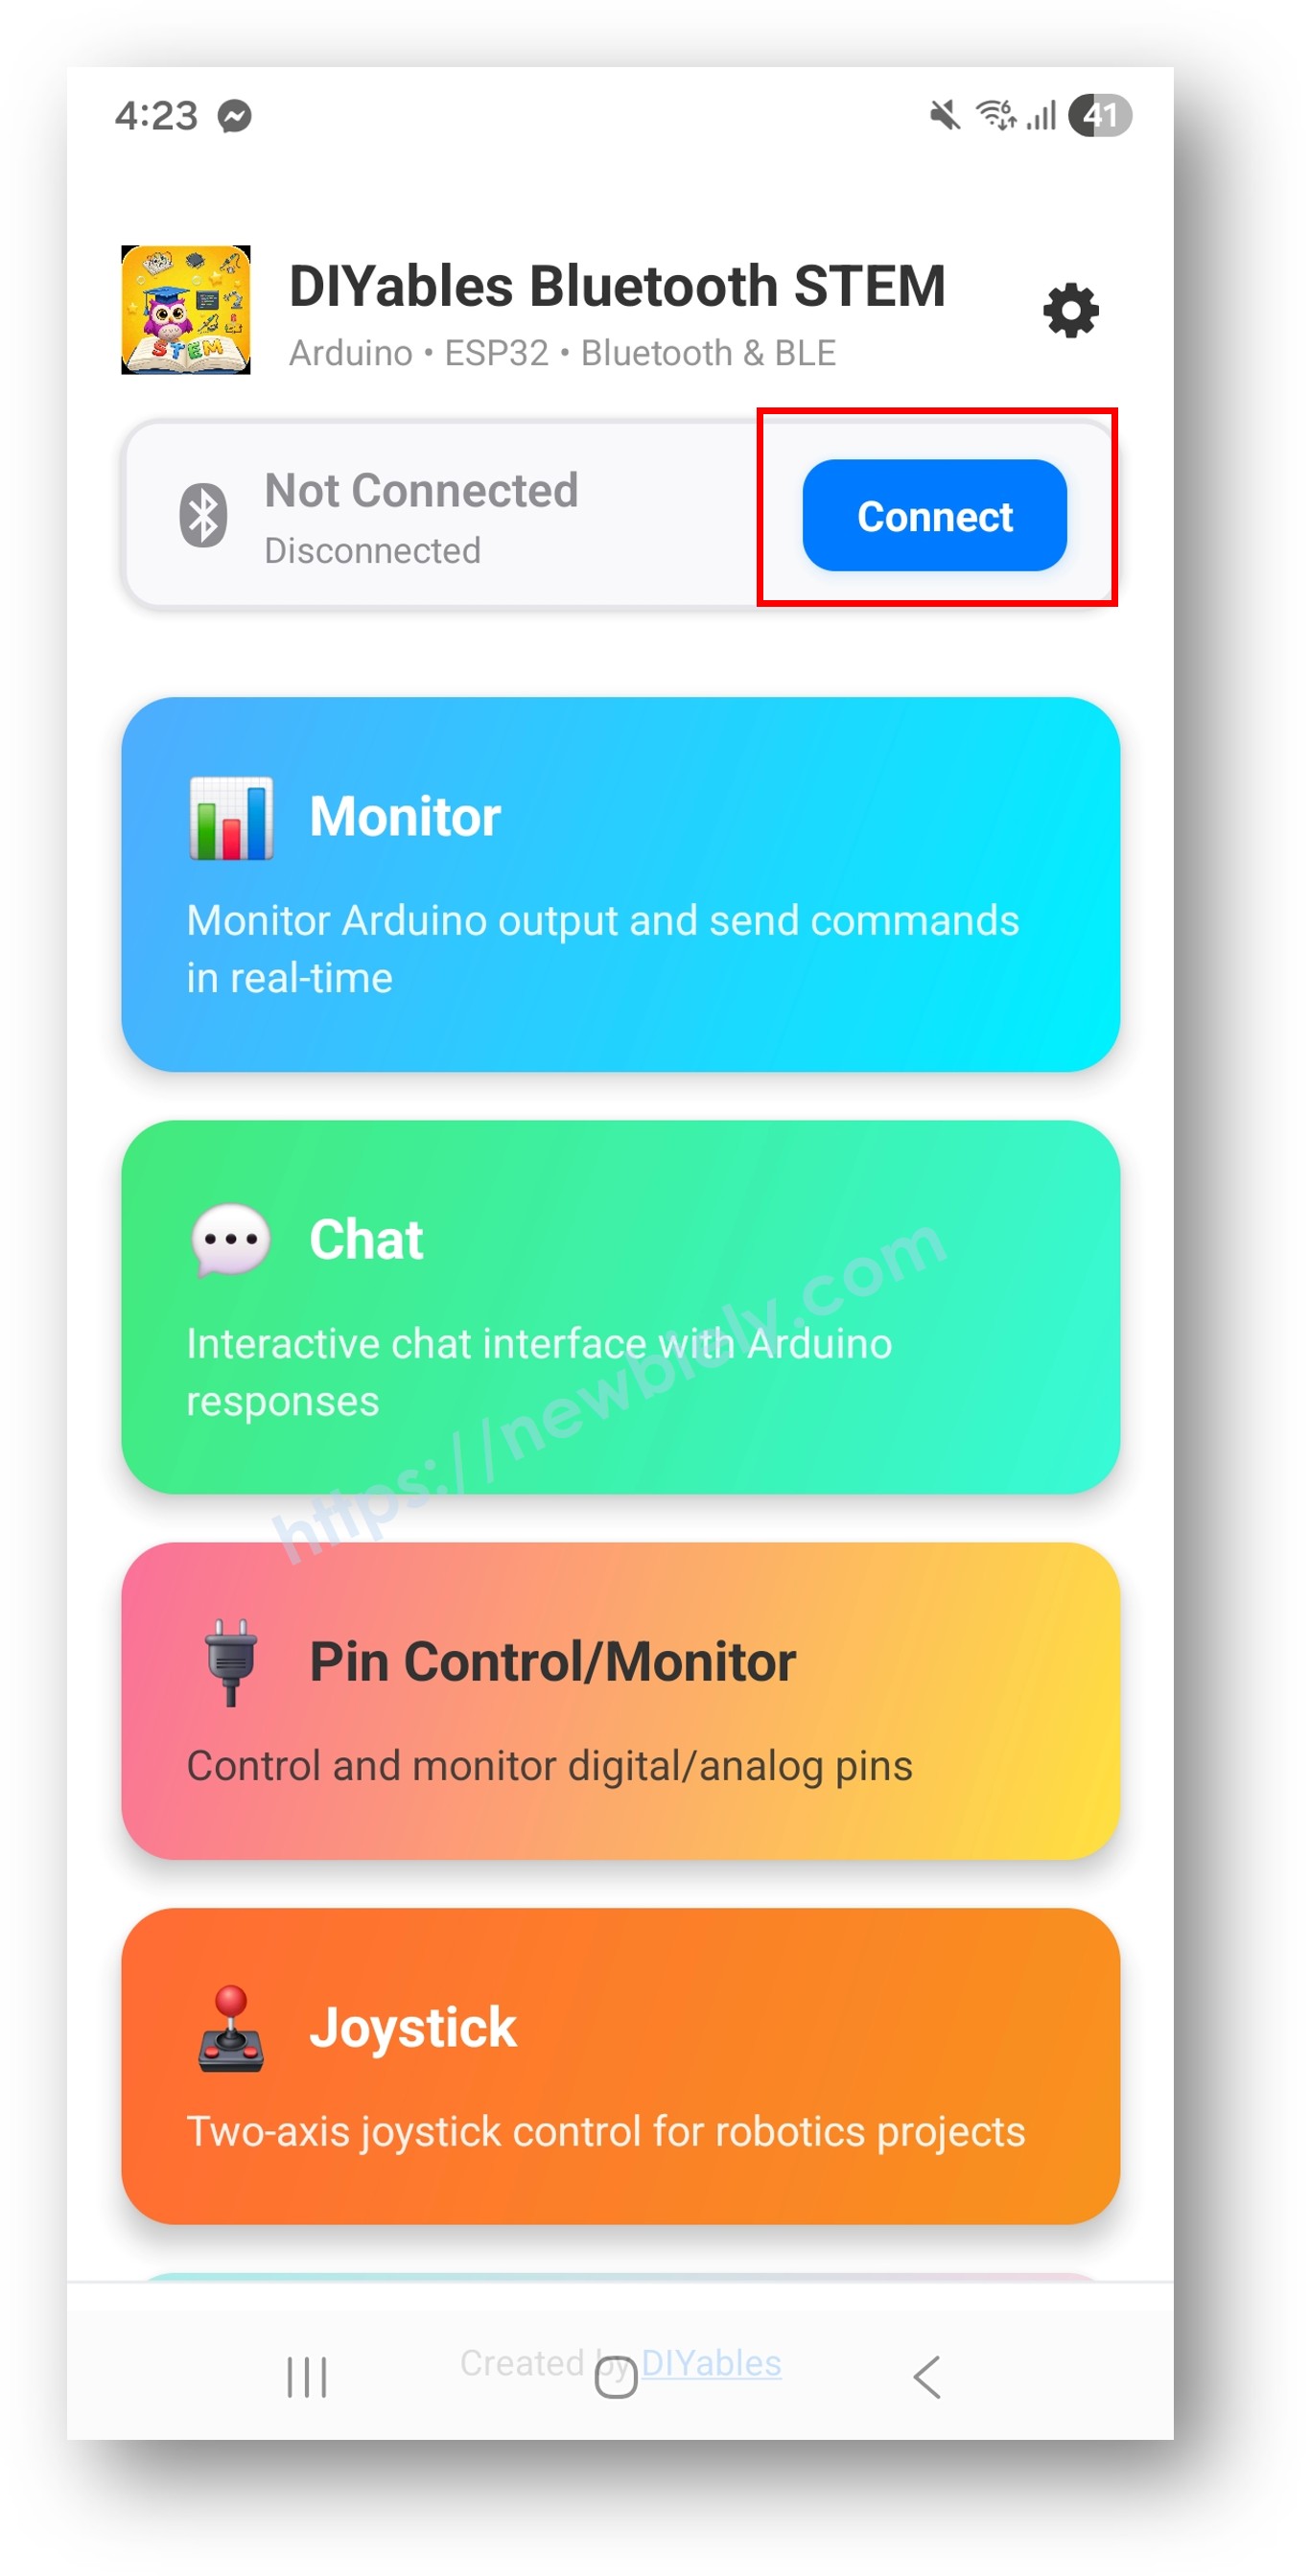
  • Tik op het beginscherm op de Connect knop. De app zal scannen naar BLE-apparaten.
DIYables Bluetooth App - Home Screen with Scan Button
  • Vind en tik op "Arduino_Joystick" in de scanresultaten om verbinding te maken.
  • Eenmaal verbonden gaat de app automatisch terug naar het beginscherm. Selecteer de Joystick app uit het app-menu.
DIYables Bluetooth App - Home Screen with Joystick App

Opmerking: U kunt op het instellingenpictogram op het beginscherm tikken om apps op het beginscherm te verbergen/tonen. Voor meer details, zie de DIYables Bluetooth App Gebruikershandleiding.

  • Sleep de joystick in elke richting
DIYables Bluetooth App - Joystick Screen

Kijk nu terug naar de Serial Monitor in Arduino IDE. U zult zien:

COM6
Send
Bluetooth connected! Joystick - X: 50, Y: 0 Joystick - X: 100, Y: 50 Joystick - X: 0, Y: -75 Joystick - X: 0, Y: 0
Autoscroll Show timestamp
Clear output
9600 baud  
Newline  

Creatieve Aanpassing - Pas de Code aan uw Project aan

Joystick Waarden Verwerken

bluetoothJoystick.onJoystickValue([](int x, int y) { currentJoystickX = x; currentJoystickY = y; Serial.print("Joystick - X: "); Serial.print(x); Serial.print(", Y: "); Serial.println(y); // TODO: Voeg hier uw besturingslogica toe });

Joystick Instellingen Configureren

// Constructor: DIYables_BluetoothJoystick(autoReturn, sensitivity) DIYables_BluetoothJoystick bluetoothJoystick(false, 5); // Instellingen wijzigen tijdens runtime bluetoothJoystick.setAutoReturn(true); // Auto-centreren wanneer losgelaten bluetoothJoystick.setSensitivity(10.0); // Alleen updaten wanneer bewogen >10%

Configuratieverzoek Afhandelen

bluetoothJoystick.onGetConfig([]() { bluetoothJoystick.send(currentJoystickX, currentJoystickY); });

Programmeervoorbeelden

Differentieel Aandrijf Robot

const int LEFT_MOTOR_PIN = 9; const int RIGHT_MOTOR_PIN = 10; const int LEFT_DIR_PIN = 7; const int RIGHT_DIR_PIN = 8; bluetoothJoystick.onJoystickValue([](int x, int y) { // Differentiële aandrijving: mix X en Y int leftSpeed = constrain(y + x, -100, 100); int rightSpeed = constrain(y - x, -100, 100); // Richting instellen digitalWrite(LEFT_DIR_PIN, leftSpeed >= 0 ? HIGH : LOW); digitalWrite(RIGHT_DIR_PIN, rightSpeed >= 0 ? HIGH : LOW); // Snelheid instellen (PWM) analogWrite(LEFT_MOTOR_PIN, map(abs(leftSpeed), 0, 100, 0, 255)); analogWrite(RIGHT_MOTOR_PIN, map(abs(rightSpeed), 0, 100, 0, 255)); });

Pan-Tilt Servo

#include <Servo.h> Servo panServo, tiltServo; void setup() { panServo.attach(9); tiltServo.attach(10); bluetoothJoystick.onJoystickValue([](int x, int y) { int panAngle = map(x, -100, 100, 0, 180); int tiltAngle = map(y, -100, 100, 0, 180); panServo.write(panAngle); tiltServo.write(tiltAngle); }); }

Richting met Dode Zone

const int DEAD_ZONE = 15; bluetoothJoystick.onJoystickValue([](int x, int y) { if (abs(x) < DEAD_ZONE && abs(y) < DEAD_ZONE) { Serial.println("GESTOPT"); return; } if (abs(y) > abs(x)) { Serial.println(y > 0 ? "VOORUIT" : "ACHTERUIT"); } else { Serial.println(x > 0 ? "RECHTS" : "LINKS"); } });

Probleemoplossing

Veelvoorkomende Problemen

1. Kan het apparaat niet vinden in de app

  • Zorg ervoor dat de Arduino UNO R4 WiFi is ingeschakeld en de sketch is geüpload
  • Controleer of Bluetooth op uw telefoon is ingeschakeld
  • Op Android 11 en lager, schakel ook Locatieservices in

2. Joystick reageert niet

  • Controleer Bluetooth-verbindingsstatus in de app
  • Verifieer dat de onJoystickValue callback correct is ingesteld
  • Controleer Serial Monitor voor verbindingsberichten

3. Beweging voelt traag

  • Verlaag de gevoeligheidswaarde voor frequentere updates
  • Zorg ervoor dat bluetoothServer.loop() wordt aangeroepen zonder lange vertragingen

4. Waarden springen of zijn inconsistent

  • Voeg een dode zone filter toe voor kleine bewegingen
  • Controleer gevoeligheidsinstelling

5. Verbinding valt regelmatig weg

  • Ga dichter bij de Arduino staan (verkort afstand)
  • Zorg voor stabiele USB-stroomvoorziening

6. Upload mislukt of board wordt niet herkend

  • Installeer het nieuwste Arduino UNO R4 board pakket via Board Manager
  • Probeer een andere USB-kabel of poort

Projectideeën

  • Draadloze robotcontroller
  • Camera pan-tilt mount
  • Robotarm 2-assen besturing
  • LED matrix positiecontroller
  • Game controller voor Arduino games

Volgende Stappen

Na het beheersen van het Bluetooth Joystick voorbeeld, probeer:

  1. Bluetooth Slider - Voor lineaire waardebesturing
  2. Bluetooth Rotator - Voor hoekbesturing
  3. Bluetooth Monitor - Voor statusfeedback
  4. Meerdere Bluetooth Apps - Joystick combineren met andere besturingen

Ondersteuning

Voor extra hulp:

  • Bekijk de API Referentie documentatie
  • Arduino community forums

※ ONZE BERICHTEN

  • U bent welkom om de link naar deze tutorial te delen. Gebruik onze inhoud echter niet op andere websites. We hebben veel moeite en tijd gestoken in het maken van de inhoud, respecteer alstublieft ons werk!