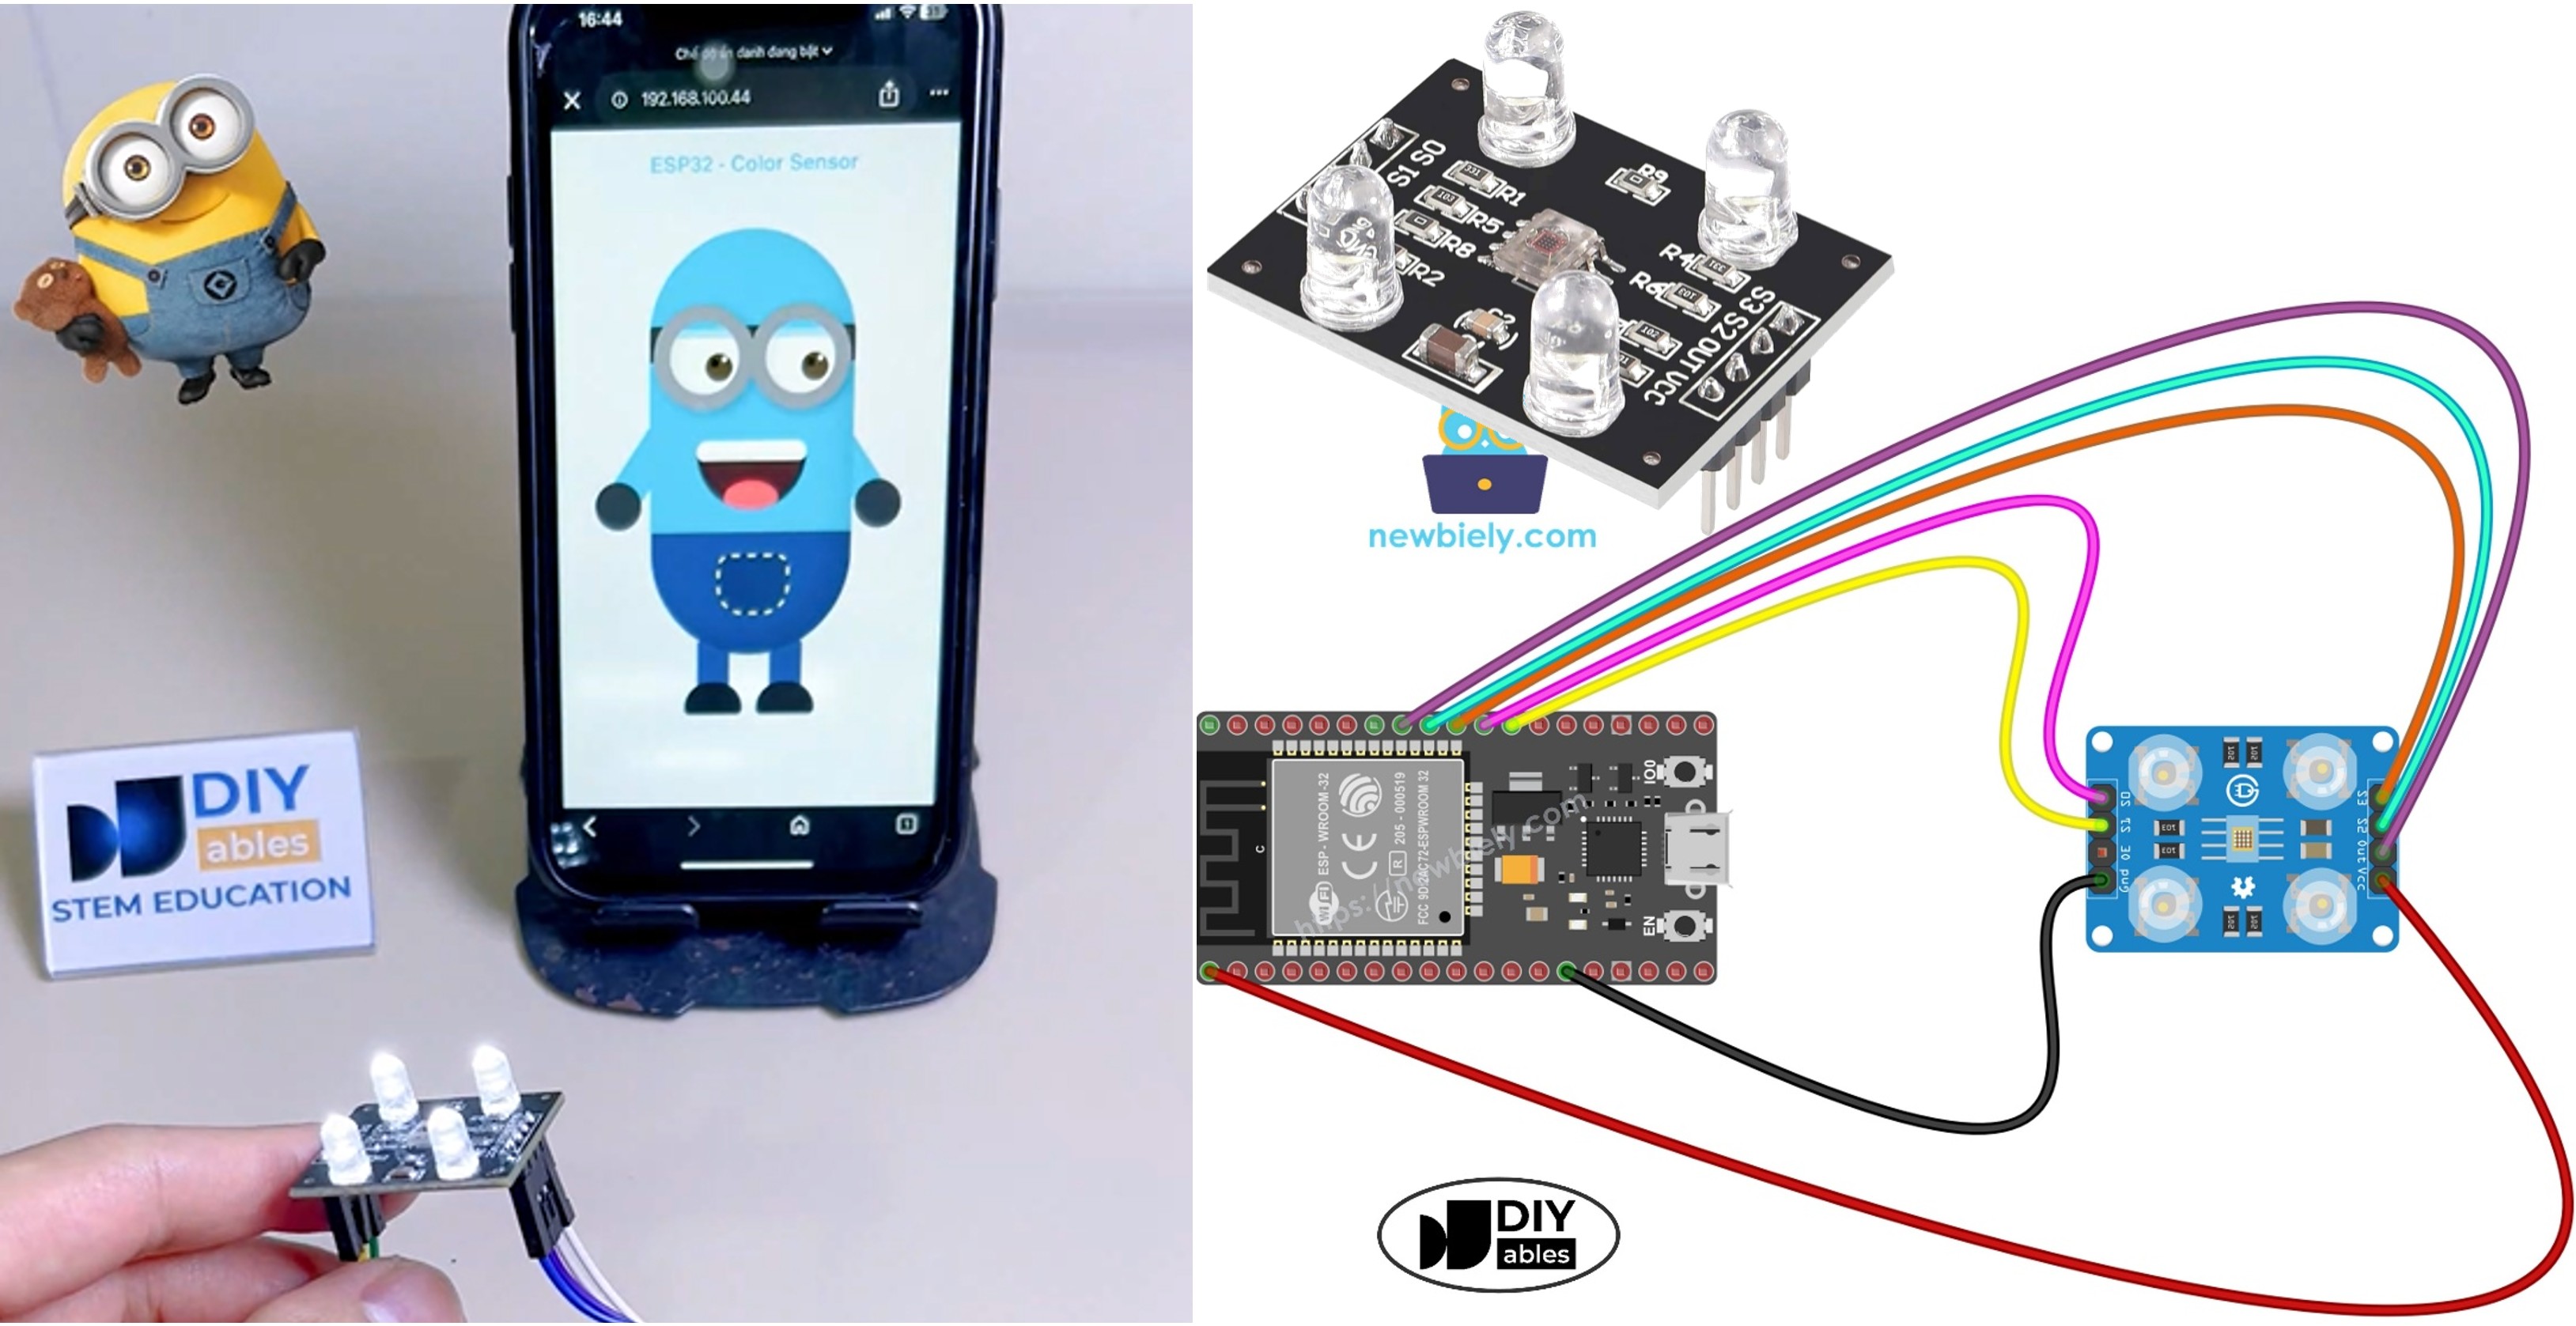
In dit leuke project koppelt u een TCS3200D/TCS230 kleursensor aan een ESP32 en streamt u de gedetecteerde kleuren in realtime naar een webbrowser. De webpagina bevat een speelse, geanimeerde Minion-figuur waarvan de huidskleur live wordt aangepast aan wat de sensor ziet. Om het bouwen van de webinterface en het beheren van de WebSocket-communicatie te vereenvoudigen, maakt dit project gebruik van de DIYables ESP32 WebApps bibliotheek.
Er is ook een stap-voor-stap video walkthrough beschikbaar onderaan deze handleiding.
Het onderstaande schema toont hoe u de TCS3200 kleursensor aansluit op de ESP32:
| TCS3200 Kleursensor | ESP32 |
|---|
| VCC | 5V (VIN) |
| GND | GND |
| S0 | GPIO 17 |
| S1 | GPIO 16 |
| S2 | GPIO 18 |
| S3 | GPIO 5 |
| OUT | GPIO 19 |
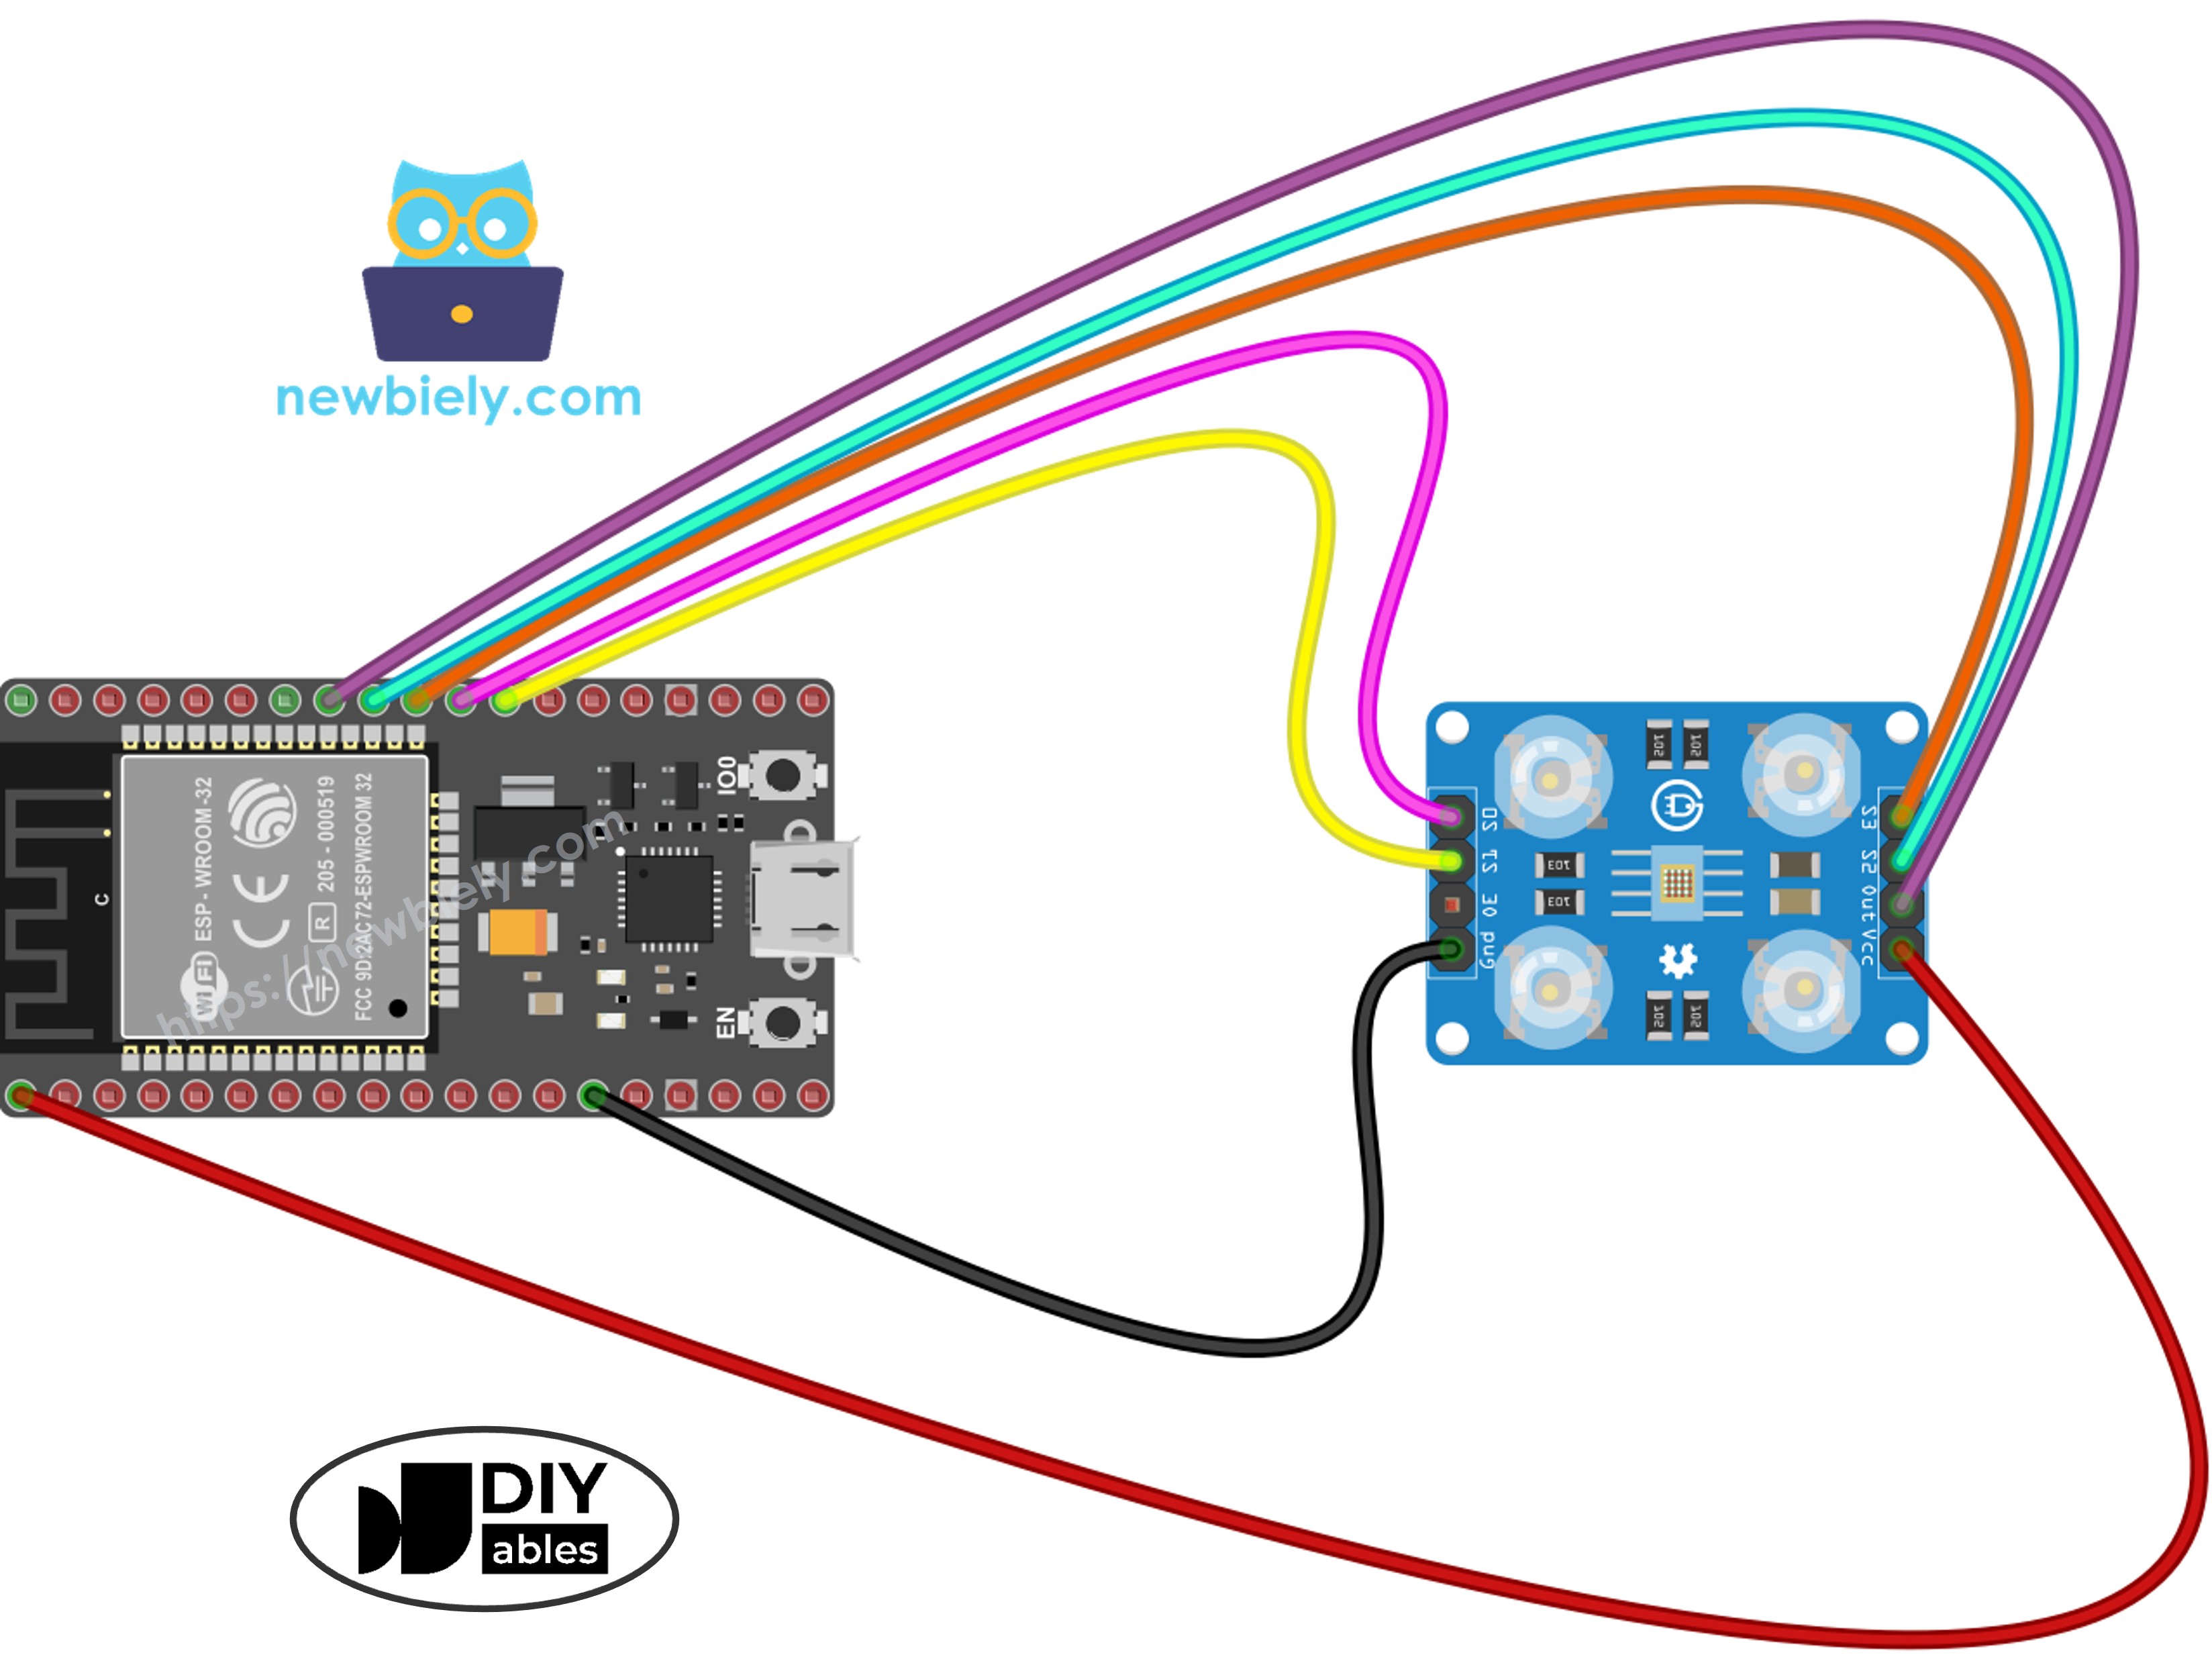
Deze afbeelding is gemaakt met Fritzing. Klik om de afbeelding te vergroten.
Als u niet weet hoe u ESP32 en andere componenten van stroom moet voorzien, vindt u instructies in de volgende tutorial: Hoe ESP32 van stroom te voorzien.
Hier volgt het stapsgewijze verloop van dit project:
Elke seconde leest de ESP32 de kleursensor uit door te schakelen tussen de rode, groene en blauwe filters met de S2/S3 controlepinnen, terwijl de pulsduur op de OUT-pin wordt gemeten.
De ruwe pulsduurwaarden worden omgezet naar RGB-waarden van 0–255 met behulp van kalibratiegegevens (verkregen via de
sensor kalibratiestap).
De RGB-waarden worden geformatteerd naar een HEX-kleurstring zoals #FF8000.
Deze kleurstring wordt via WebSocket naar alle verbonden webbrowsers uitgezonden met behulp van de DIYables ESP32 WebApps bibliotheek.
Op de webpagina ontvangt JavaScript de kleur en past deze direct toe op het lichaam, de armen en de oogleden van de Minion-figuur.
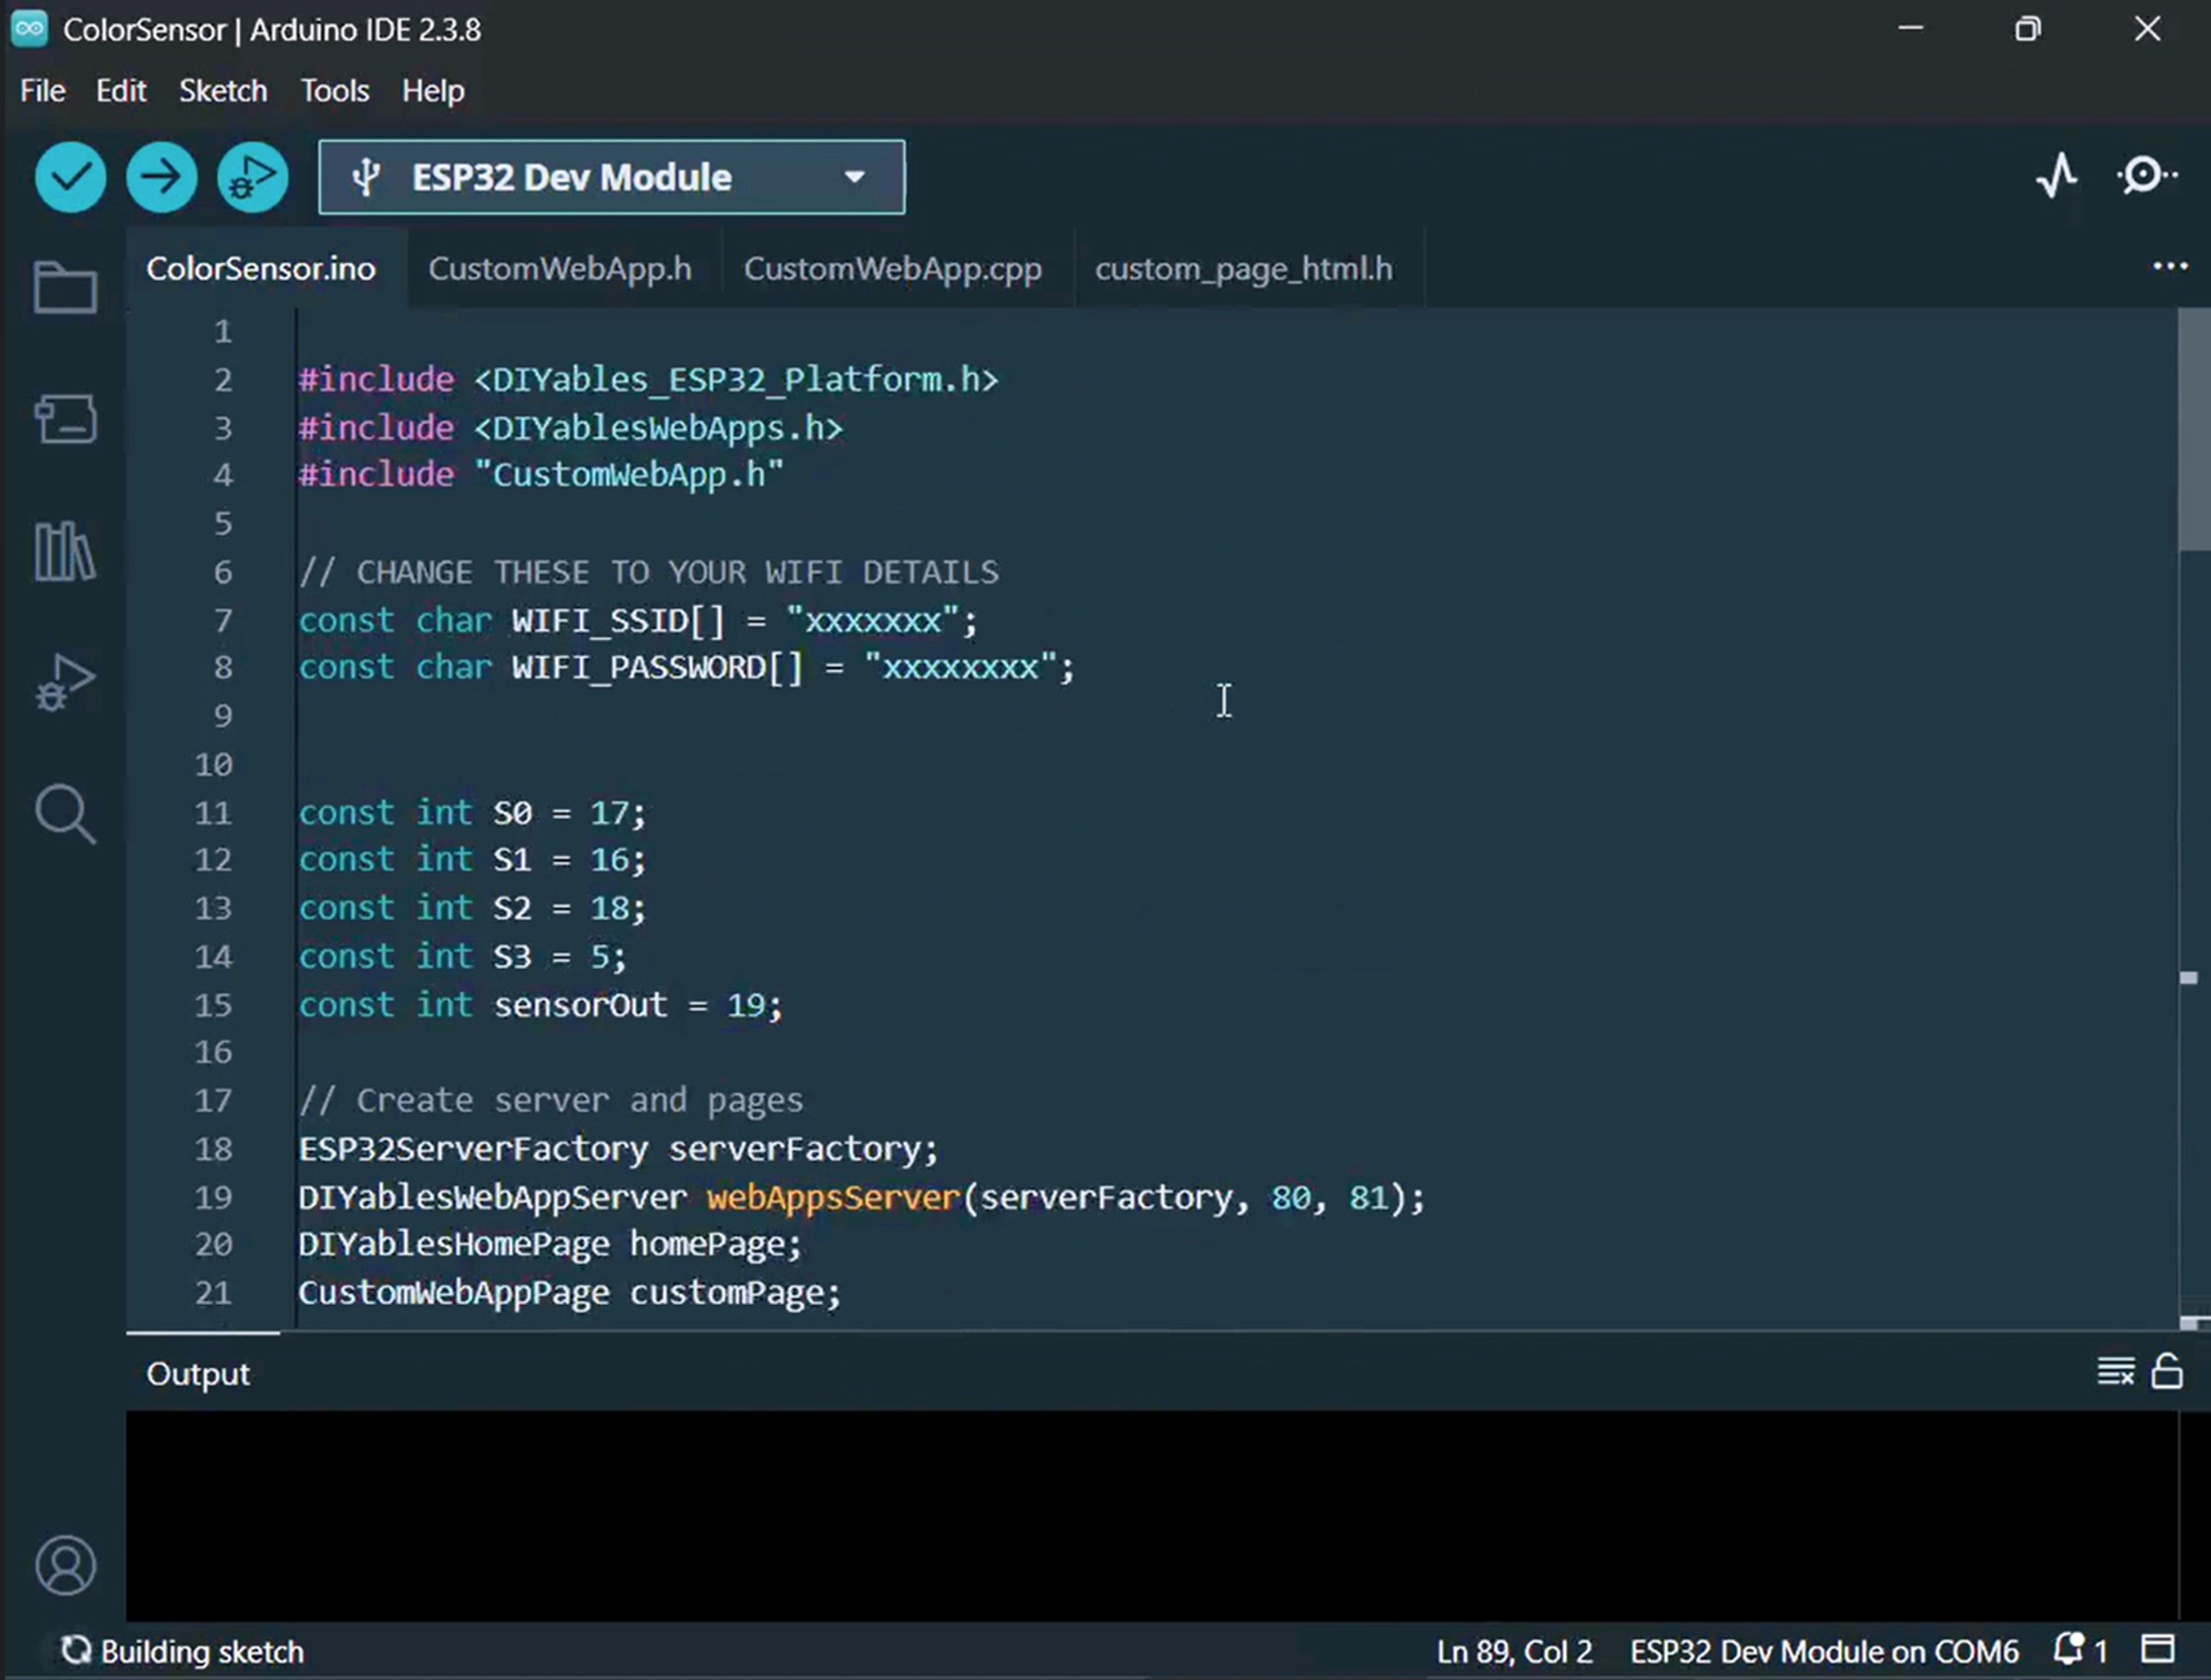
Dit project bestaat uit 4 bestanden:
ColorSensorESP32.ino - Hoofd sketch: initialiseert de sensor, leest kleuren uit en stuurt ze naar de webpagina
CustomWebApp.h - Headerbestand: definieert de custom web app pagina klasse
CustomWebApp.cpp - Implementatiebestand: beheert WebSocket-berichten met de identifier "Color sensor:"
custom_page_html.h - Webpagina: de geanimeerde Minion gemaakt met HTML/CSS/JavaScript die reageert op inkomende kleuren
ColorSensorESP32.ino
#include <DIYables_ESP32_Platform.h>
#include <DIYablesWebApps.h>
#include "CustomWebApp.h"
const char WIFI_SSID[] = "YOUR_WIFI_SSID";
const char WIFI_PASSWORD[] = "YOUR_WIFI_PASSWORD";
const int S0 = 17;
const int S1 = 16;
const int S2 = 18;
const int S3 = 5;
const int sensorOut = 19;
ESP32ServerFactory serverFactory;
DIYablesWebAppServer webAppsServer(serverFactory, 80, 81);
DIYablesHomePage homePage;
CustomWebAppPage customPage;
unsigned long lastColorRead = 0;
void setup() {
Serial.begin(9600);
delay(1000);
Serial.println("Starting Custom WebApp...");
pinMode(S0, OUTPUT);
pinMode(S1, OUTPUT);
pinMode(S2, OUTPUT);
pinMode(S3, OUTPUT);
pinMode(sensorOut, INPUT);
digitalWrite(S0, HIGH);
digitalWrite(S1, LOW);
webAppsServer.addApp(&homePage);
webAppsServer.addApp(&customPage);
if (!webAppsServer.begin(WIFI_SSID, WIFI_PASSWORD)) {
while (1) {
Serial.println("Failed to connect to WiFi!");
delay(1000);
}
}
Serial.println("Custom WebApp ready!");
customPage.sendToWeb("Arduino is ready!");
}
void loop() {
webAppsServer.loop();
if (millis() - lastColorRead > 1000) {
digitalWrite(S2, LOW);
digitalWrite(S3, LOW);
int r = map(pulseIn(sensorOut, LOW), 31, 150, 255, 0);
digitalWrite(S2, HIGH);
digitalWrite(S3, HIGH);
int g = map(pulseIn(sensorOut, LOW), 35, 180, 255, 0);
digitalWrite(S2, LOW);
digitalWrite(S3, HIGH);
int b = map(pulseIn(sensorOut, LOW), 30, 150, 255, 0);
char hexColor[8];
sprintf(hexColor, "#%02X%02X%02X", constrain(r, 0, 255), constrain(g, 0, 255), constrain(b, 0, 255));
customPage.sendToWeb(String(hexColor));
Serial.println("Sent to Minion: " + String(hexColor));
lastColorRead = millis();
}
}
CustomWebApp.h
#ifndef CUSTOM_WEBAPP_H
#define CUSTOM_WEBAPP_H
#include <DIYablesWebApps.h>
class CustomWebAppPage : public DIYablesWebAppPageBase {
private:
static const String APP_IDENTIFIER;
public:
CustomWebAppPage();
void handleHTTPRequest(IWebClient& client) override;
void handleWebSocketMessage(IWebSocket& ws, const char* message, uint16_t length) override;
const char* getPageInfo() const override;
String getNavigationInfo() const override;
void onCustomMessageReceived(void (*callback)(const String& payload));
void sendToWeb(const String& message);
};
#endif
CustomWebApp.cpp
#include "CustomWebApp.h"
#include "custom_page_html.h"
const String CustomWebAppPage::APP_IDENTIFIER = "Color sensor:";
void (*customMessageCallback)(const String& payload) = nullptr;
CustomWebAppPage::CustomWebAppPage() : DIYablesWebAppPageBase("/custom") {
}
void CustomWebAppPage::handleHTTPRequest(IWebClient& client) {
sendHTTPHeader(client);
client.print(CUSTOM_PAGE_HTML);
}
void CustomWebAppPage::handleWebSocketMessage(IWebSocket& ws, const char* message, uint16_t length) {
String messageStr = String(message, length);
Serial.print("Color sensor WebApp received: ");
Serial.println(messageStr);
if (messageStr.startsWith(APP_IDENTIFIER)) {
String payload = messageStr.substring(APP_IDENTIFIER.length());
if (customMessageCallback) {
customMessageCallback(payload);
}
}
}
void CustomWebAppPage::onCustomMessageReceived(void (*callback)(const String& payload)) {
customMessageCallback = callback;
}
void CustomWebAppPage::sendToWeb(const String& message) {
String fullMessage = APP_IDENTIFIER + message;
broadcastToAllClients(fullMessage.c_str());
}
const char* CustomWebAppPage::getPageInfo() const {
return "🔧 Color sensor WebApp";
}
String CustomWebAppPage::getNavigationInfo() const {
String result = "<a href=\"";
result += getPagePath();
result += "\" class=\"app-card custom\" style=\"background: linear-gradient(135deg, #007bff 0%, #0056b3 100%);\">";
result += "<h3>🔧 Color sensor WebApp</h3>";
result += "<p>Simple template for your own apps</p>";
result += "</a>";
return result;
}
custom_page_html.h
#ifndef CUSTOM_PAGE_HTML_H
#define CUSTOM_PAGE_HTML_H
const char CUSTOM_PAGE_HTML[] PROGMEM = R"HTML_WRAPPER(
<!DOCTYPE html>
<html lang="en">
<head>
<meta charset="UTF-8">
<meta name="viewport" content="width=device-width, initial-scale=1.0, maximum-scale=1.0, user-scalable=no">
<title>Mobile Laughing Minion</title>
<style>
body { margin: 0; padding: 20px; box-sizing: border-box; display: flex; flex-direction: column; justify-content: flex-start; align-items: center; background-color: #f0f8ff; font-family: sans-serif; overflow-x: hidden; }
.text { font-size: clamp(16px, 5vw, 24px); font-weight: bold; color: #333; margin-bottom: 20px; text-align: center; z-index: 10; }
.scale-wrapper { transform-origin: top center; display: flex; justify-content: center; align-items: flex-start; }
.minion-container { position: relative; width: 200px; height: 400px; }
.body { position: absolute; top: 20px; left: 25px; width: 150px; height: 300px; background-color: #FFD90F; border-radius: 75px; box-shadow: inset -10px -10px 20px rgba(0,0,0,0.1); overflow: hidden; z-index: 2; transition: background-color 0.5s; }
.overalls { position: absolute; bottom: 0; width: 100%; height: 90px; background-color: #225A94; border-radius: 0 0 75px 75px; box-shadow: inset -10px -10px 20px rgba(0,0,0,0.2); }
.pocket { position: absolute; bottom: 30px; left: 50px; width: 50px; height: 40px; background-color: #1A4674; border-radius: 10px 10px 20px 20px; border: 2px dashed #fce144; }
.strap { position: absolute; top: 65px; left: 0; width: 100%; height: 25px; background-color: #333; z-index: 1; }
.goggles-wrapper { position: absolute; top: 50px; left: -5px; width: 160px; display: flex; justify-content: center; z-index: 3; }
.goggle { position: relative; width: 50px; height: 50px; background-color: white; border: 12px solid #999; border-radius: 50%; box-shadow: 3px 3px 8px rgba(0,0,0,0.2), inset 3px 3px 8px rgba(0,0,0,0.1); margin: 0 -2px; overflow: hidden; }
.pupil { position: absolute; top: 50%; left: 50%; width: 20px; height: 20px; background-color: #4B3621; border-radius: 50%; transform: translate(-50%, -50%); transition: transform 0.2s ease-out; }
.pupil::after { content: ''; position: absolute; top: 4px; left: 4px; width: 6px; height: 6px; background-color: black; border-radius: 50%; }
.catchlight { position: absolute; top: 2px; right: 4px; width: 4px; height: 4px; background-color: white; border-radius: 50%; z-index: 4; }
.eyelid { position: absolute; top: 0; left: 0; width: 100%; height: 100%; background-color: #FFD90F; border-bottom: 3px solid #D4B200; transform-origin: top; transform: scaleY(0); z-index: 5; animation: blink 4s infinite; }
.mouth { position: absolute; top: 145px; left: 35px; width: 80px; height: 45px; background-color: #3E2723; border-radius: 10px 10px 60px 60px; overflow: hidden; z-index: 3; box-shadow: inset 0 5px 10px rgba(0,0,0,0.5); animation: laugh 0.2s infinite alternate ease-in-out; }
.teeth { position: absolute; top: 0; left: 0; width: 100%; height: 14px; background-color: #fff; border-radius: 0 0 5px 5px; }
.tongue { position: absolute; bottom: -5px; left: 20px; width: 40px; height: 25px; background-color: #FF5252; border-radius: 50%; animation: wag 0.2s infinite alternate ease-in-out; }
.arm { position: absolute; top: 140px; width: 25px; height: 80px; background-color: #FFD90F; border-radius: 12px; z-index: 1; transition: background-color 0.5s; }
.arm.left { left: 10px; transform: rotate(35deg); }
.arm.right { right: 15px; transform: rotate(-35deg); }
.glove { position: absolute; bottom: -15px; left: -5px; width: 35px; height: 35px; background-color: #333; border-radius: 50%; }
.leg { position: absolute; bottom: 50px; width: 25px; height: 40px; background-color: #225A94; z-index: 1; }
.leg.left { left: 60px; }
.leg.right { left: 115px; }
.shoe { position: absolute; bottom: -15px; left: -10px; width: 45px; height: 20px; background-color: #222; border-radius: 20px 20px 5px 5px; border-bottom: 5px solid #111; }
@keyframes blink { 0%, 94%, 100% { transform: scaleY(0); } 97% { transform: scaleY(1); } }
@keyframes laugh { 0% { height: 40px; transform: scaleX(1); } 100% { height: 55px; transform: scaleX(1.05); } }
@keyframes wag { 0% { transform: translateY(0); } 100% { transform: translateY(-3px); } }
</style>
</head>
<body>
<div class="text" id="status-text">Just watch him look around! 👀</div>
<div class="scale-wrapper" id="minionWrapper">
<div class="minion-container">
<div class="arm left" id="armL"><div class="glove"></div></div>
<div class="arm right" id="armR"><div class="glove"></div></div>
<div class="leg left"><div class="shoe"></div></div>
<div class="leg right"><div class="shoe"></div></div>
<div class="body" id="minionBody">
<div class="overalls">
<div class="pocket"></div>
</div>
<div class="strap"></div>
<div class="goggles-wrapper">
<div class="goggle"><div class="pupil"><div class="catchlight"></div></div><div class="eyelid" id="eyelidL"></div></div>
<div class="goggle"><div class="pupil"><div class="catchlight"></div></div><div class="eyelid" id="eyelidR"></div></div>
</div>
<div class="mouth">
<div class="teeth"></div>
<div class="tongue"></div>
</div>
</div>
</div>
</div>
<script>
const APP_IDENTIFIER = 'Color sensor:';
let ws = null;
function connectWebSocket() {
ws = new WebSocket('ws:
ws.onopen = () => document.getElementById('status-text').textContent = "ESP32 - Color Sensor";
ws.onclose = () => setTimeout(connectWebSocket, 2000);
ws.onmessage = (event) => {
if (event.data.startsWith(APP_IDENTIFIER)) {
let color = event.data.substring(APP_IDENTIFIER.length);
document.getElementById('minionBody').style.backgroundColor = color;
document.getElementById('armL').style.backgroundColor = color;
document.getElementById('armR').style.backgroundColor = color;
document.getElementById('eyelidL').style.backgroundColor = color;
document.getElementById('eyelidR').style.backgroundColor = color;
document.getElementById('status-text').style.color = color;
}
};
}
function resizeMinion() {
const wrapper = document.getElementById('minionWrapper');
const availableWidth = window.innerWidth - 40;
const minionTrueWidth = 260;
const minionHeight = 400;
let scaleFactor = availableWidth / minionTrueWidth;
if (scaleFactor > 1.5) scaleFactor = 1.5;
wrapper.style.transform = `scale(${scaleFactor})`;
wrapper.style.height = `${minionHeight * scaleFactor}px`;
}
window.addEventListener('resize', resizeMinion);
resizeMinion();
connectWebSocket();
const pupils = document.querySelectorAll('.pupil');
function moveEyesAutomatically() {
const angle = Math.random() * Math.PI * 2;
const distance = Math.random() * 15;
const pupilX = Math.cos(angle) * distance;
const pupilY = Math.sin(angle) * distance;
pupils.forEach(pupil => {
pupil.style.transform = `translate(calc(-50% + ${pupilX}px), calc(-50% + ${pupilY}px))`;
});
}
setInterval(moveEyesAutomatically, 600);
</script>
</body>
</html>
)HTML_WRAPPER";
#endif
Volg deze stappen om het project werkend te krijgen:
Verbind de hardware zoals getoond in het aansluitschema hierboven.
Sluit de ESP32 aan op uw computer met een USB-kabel.
Open de Arduino IDE.
Kies de juiste ESP32 bord (bijv. ESP32 Dev Module) en de correcte COM-poort.
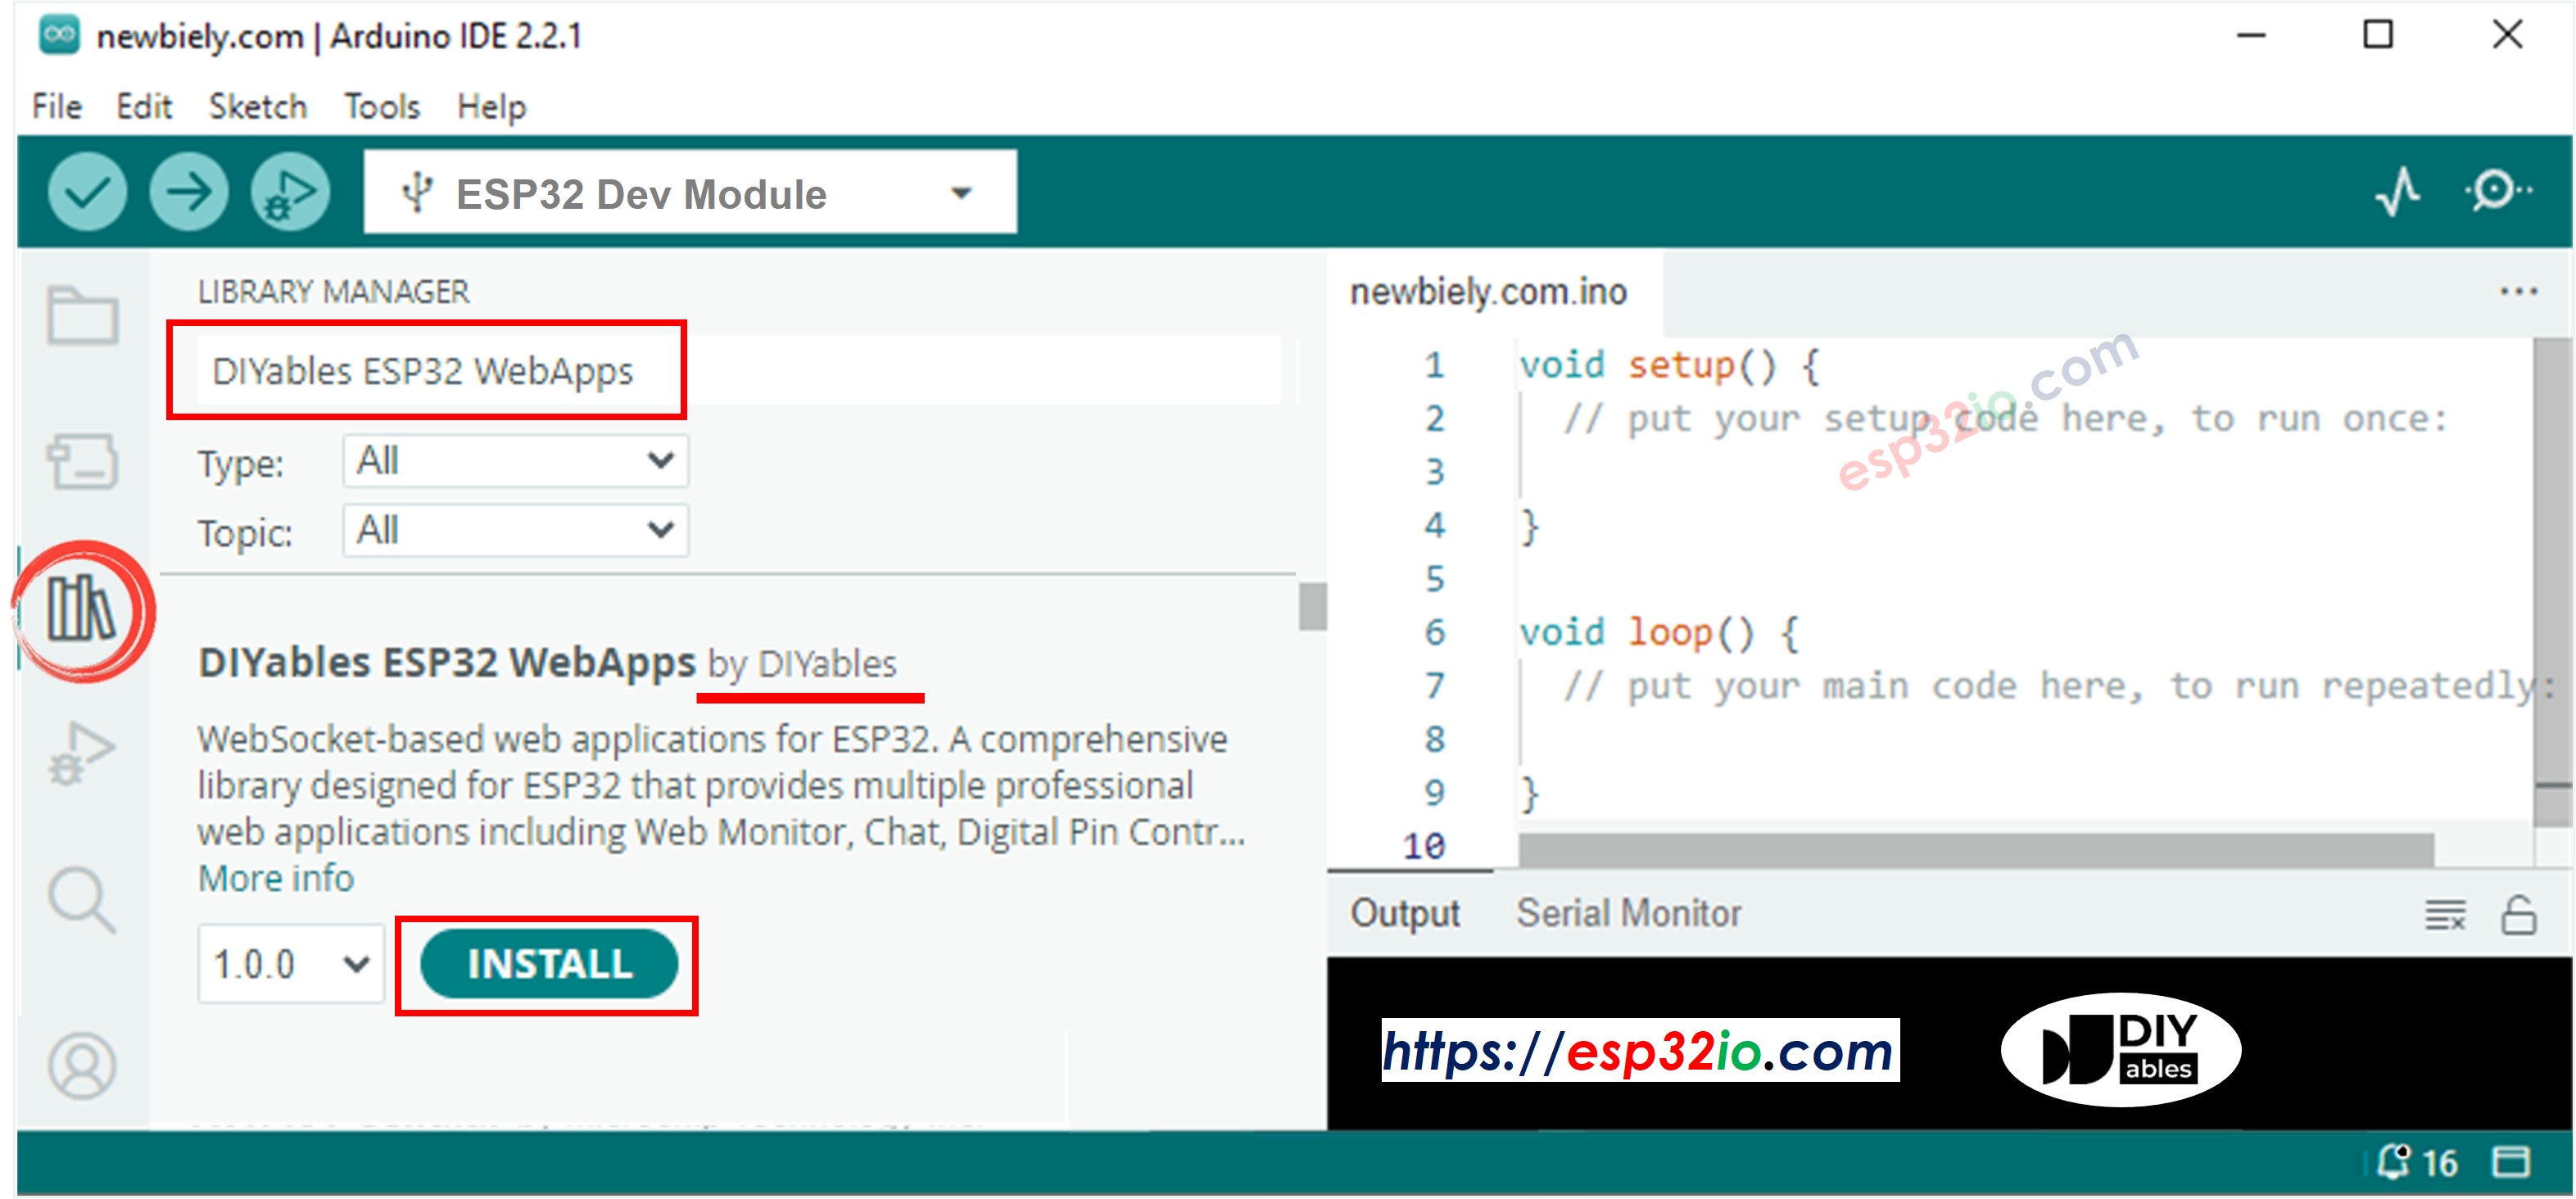
Ga naar het Libraries-icoon in de linkerzijbalk van Arduino IDE.
Zoek naar "DIYables ESP32 WebApps" en selecteer de bibliotheek van DIYables.
Klik op Installeren om de library te installeren.
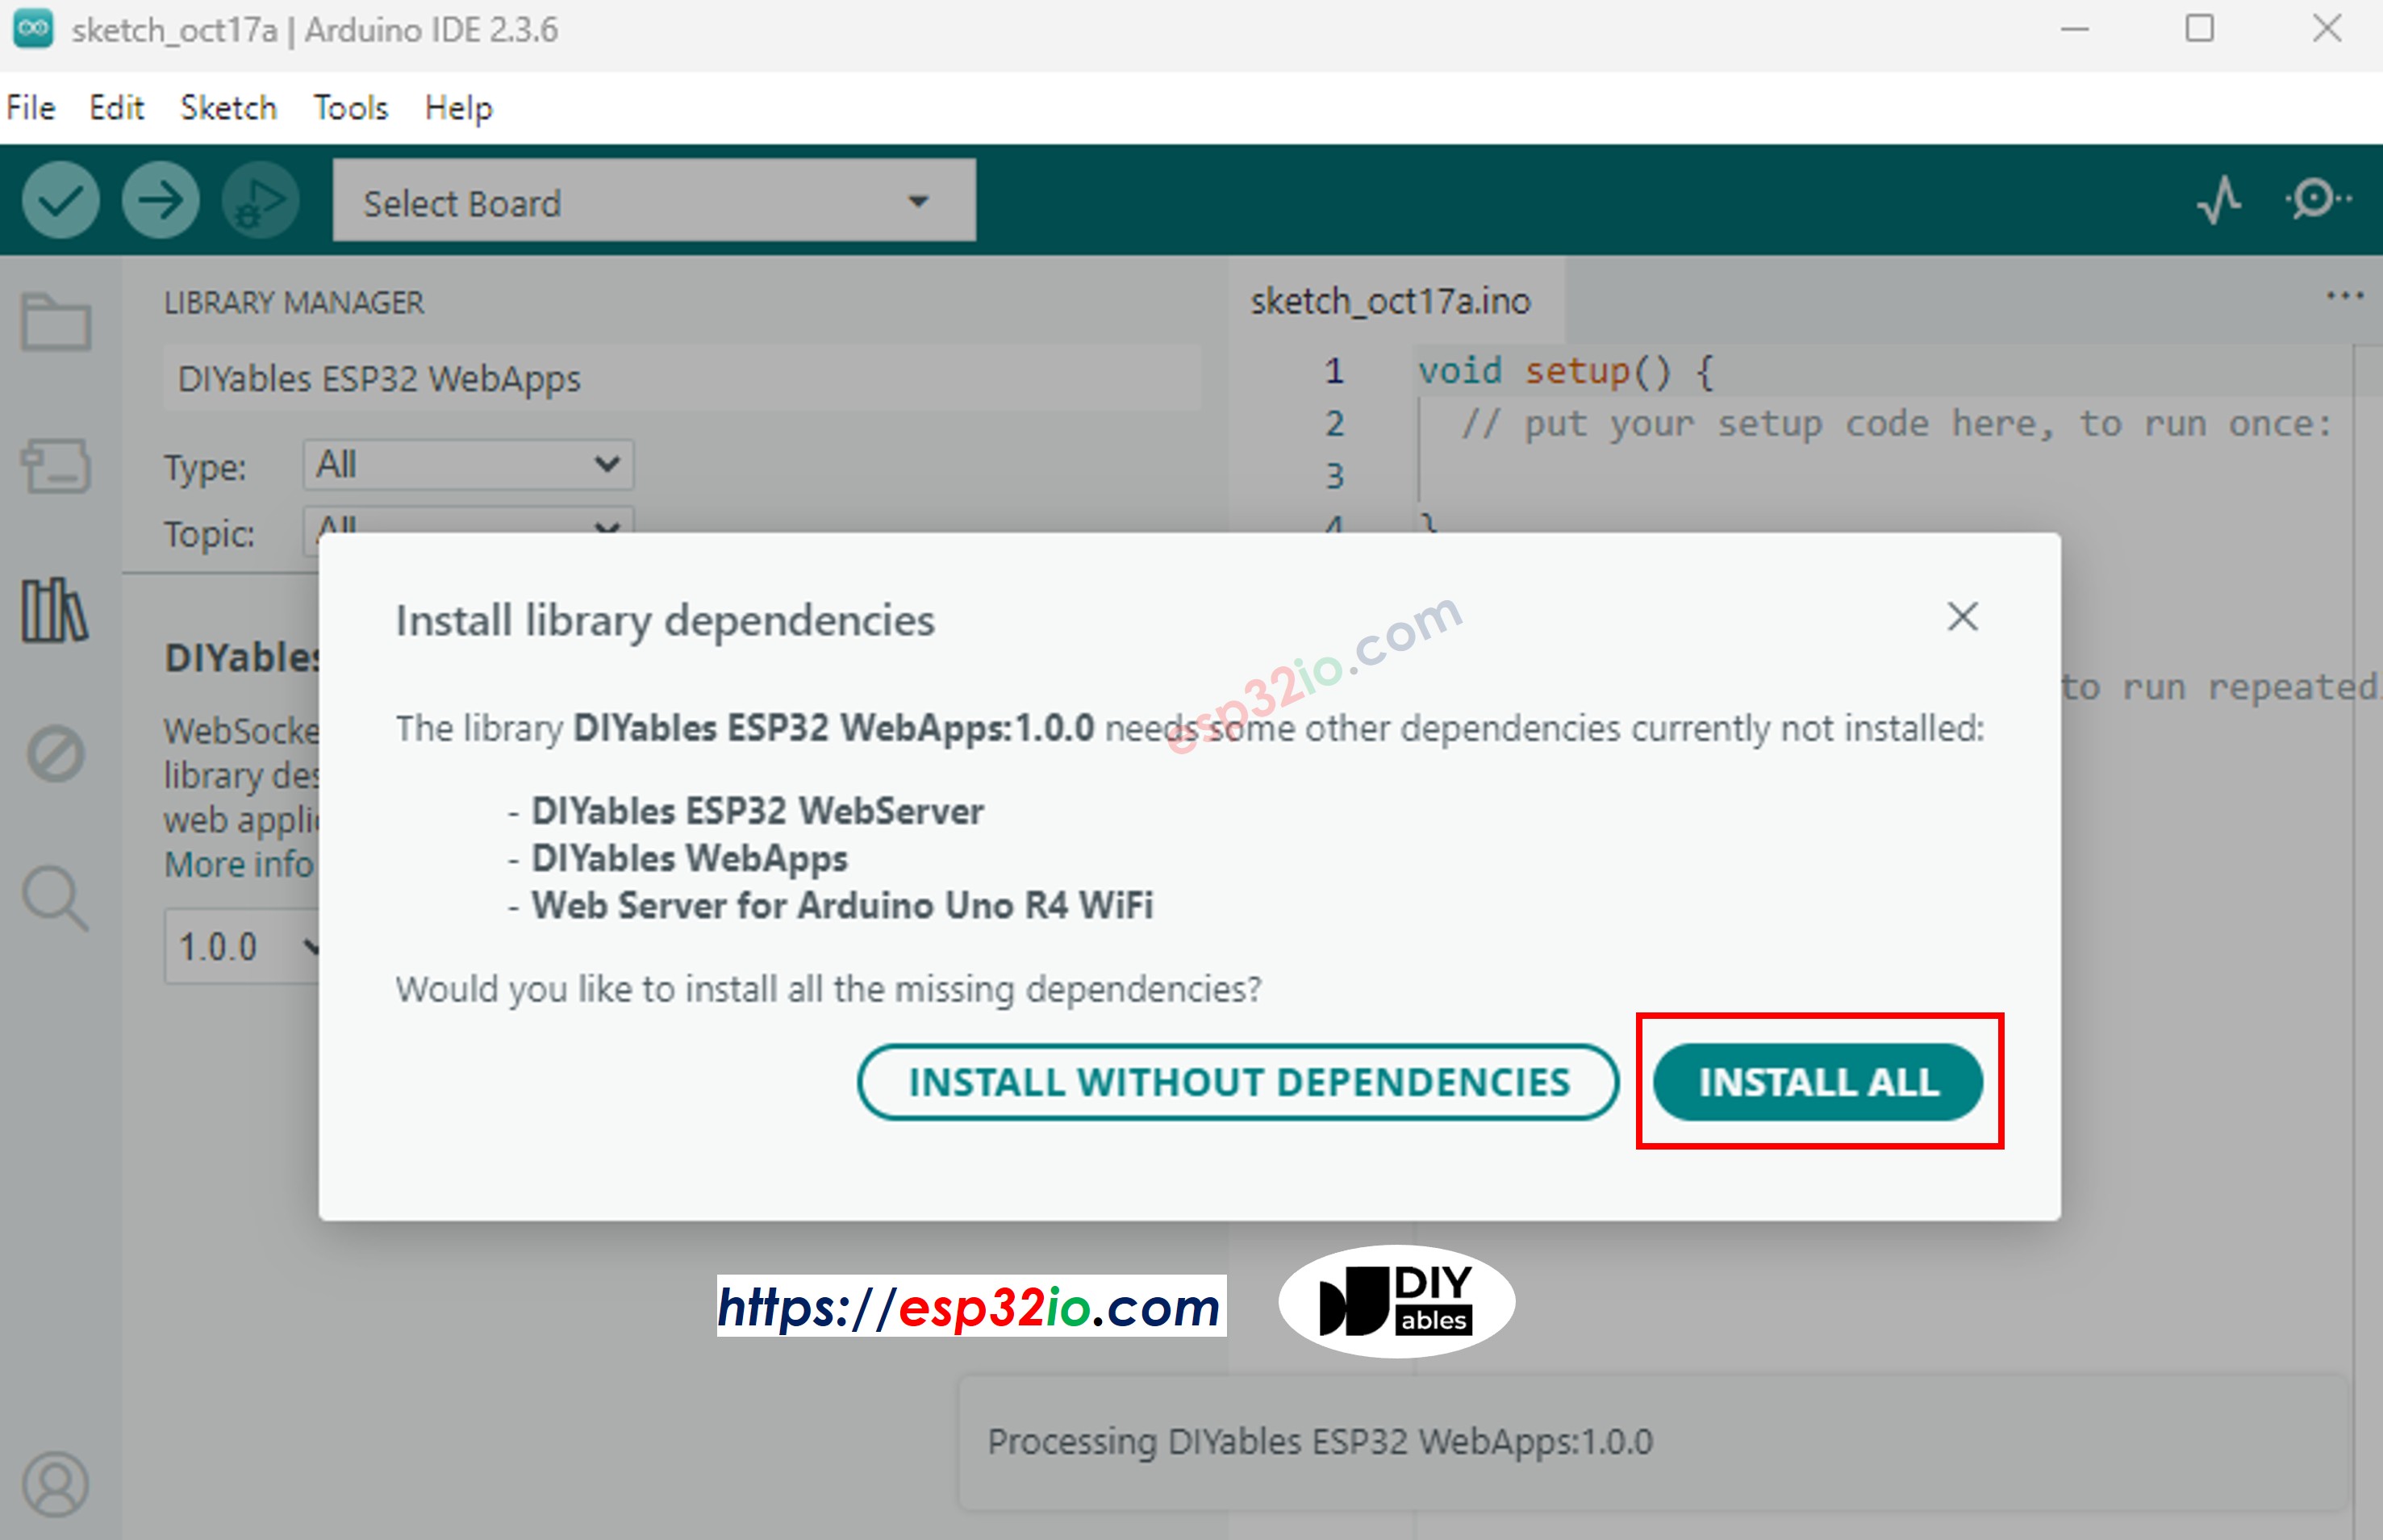
Wanneer u wordt gevraagd over aanvullende dependencies, klik op Alles installeren.
const char WIFI_SSID[] = "YOUR_WIFI_NAME";
const char WIFI_PASSWORD[] = "YOUR_WIFI_PASSWORD";
Vervang de kalibratiewaarden in de map()-functies binnen loop() door de getallen die u tijdens de kalibratie hebt genoteerd. Bijvoorbeeld bij redMin = 42, redMax = 210, greenMin = 55, greenMax = 185, blueMin = 60, blueMax = 172 worden de regels:
int r = map(pulseIn(sensorOut, LOW), 42, 210, 255, 0);
int g = map(pulseIn(sensorOut, LOW), 55, 185, 255, 0);
int b = map(pulseIn(sensorOut, LOW), 60, 172, 255, 0);
Starting Custom WebApp...
Custom WebApp ready!
INFO: Added app /
INFO: Added app /custom
DIYables ESP32 WebApp Library
Network connected!
IP address: 192.168.0.5
HTTP server started on port 80
WebSocket server started on port 81
==========================================
DIYables WebApp Ready!
==========================================
📱 Web Interface: http://192.168.0.5
🔗 WebSocket: ws://192.168.0.5:81
📋 Available Applications:
🏠 Home Page: http://192.168.0.5/
🔧 Color sensor WebApp: http://192.168.0.5/custom
==========================================
Sent to Minion: #FFD200
Sent to Minion: #00C832
Sent to Minion: #0028FF
Verschijnt er niets? Probeer dan de resetknop op de ESP32 in te drukken.
Kopieer het IP-adres dat in de Seriële Monitor wordt weergegeven en open dit in een webbrowser op uw telefoon of computer.
Bijvoorbeeld: http://192.168.0.5
Tik op de startpagina op de Color sensor WebApp kaart om de Minion-pagina te openen.
Of ga rechtstreeks naar http://[IP_ADRES]/custom.
U ziet de geanimeerde lachende Minion op uw scherm.
Houd een gekleurd object dichtbij de TCS3200 sensor — de huidskleur van de Minion past direct aan naar de gedetecteerde kleur!
U kunt de stap-voor-stap video handleiding hieronder volgen.
De hoofd sketch voert de volgende taken uit:
Stelt de TCS3200 sensor in: Configureert S0/S1 voor 20% frequentiescaling en bereidt S2/S3 voor filterselectie voor.
Meet elke seconde kleur: Binnen loop() doorloopt de ESP32 de rode, groene en blauwe kleurfilters, meet met pulseIn() de pulsbreedte en zet elke meting om naar een waarde van 0–255 met map() en uw kalibratiegegevens.
Formatteert als HEX: De drie RGB-waarden worden gecombineerd tot een HEX-string (bijv. #FF8000) met sprintf() en constrain().
Zend uit naar browsers: De HEX-kleur wordt naar elk verbonden webclient verzonden via customPage.sendToWeb().
Het HTML-bestand bevat:
Een CSS-geanimeerde Minion: Het figuur heeft knipperende ogen, een lachende mond met tong die zwaait, en pupillen die willekeurig bewegen — allemaal aangestuurd door CSS-animaties en een kleine JavaScript interval.
WebSocket luisteraar: JavaScript opent een persistente verbinding met de WebSocket server van de ESP32 op poort 81 en verwerkt de binnenkomende kleurberichten.
Live kleurtoepassing: Elke ontvangen HEX-kleur wordt vloeiend toegepast op het lichaam, de armen en de oogleden van de Minion via een CSS transition voor een soepele visuele overgang.
Automatisch opnieuw verbinden: Als de WebSocket wordt verbroken, probeert de pagina elke 2 seconden opnieuw te verbinden zonder dat de gebruiker iets hoeft te doen.
Responsief ontwerp: De Minion schaalt automatisch mee naar elk schermformaat, van telefoons tot desktops.
Dit project volgt het DIYables ESP32 WebApps custom app framework. Berichten bevatten de identifier "Color sensor:":
Meer informatie over dit communicatiepatroon en het maken van eigen custom apps vindt u in de DIYables ESP32 WebApps Custom WebApp tutorial.