ESP32 Bluetooth Analoog Meter Voorbeeld - Analoog Meter Display Tutorial

Overzicht

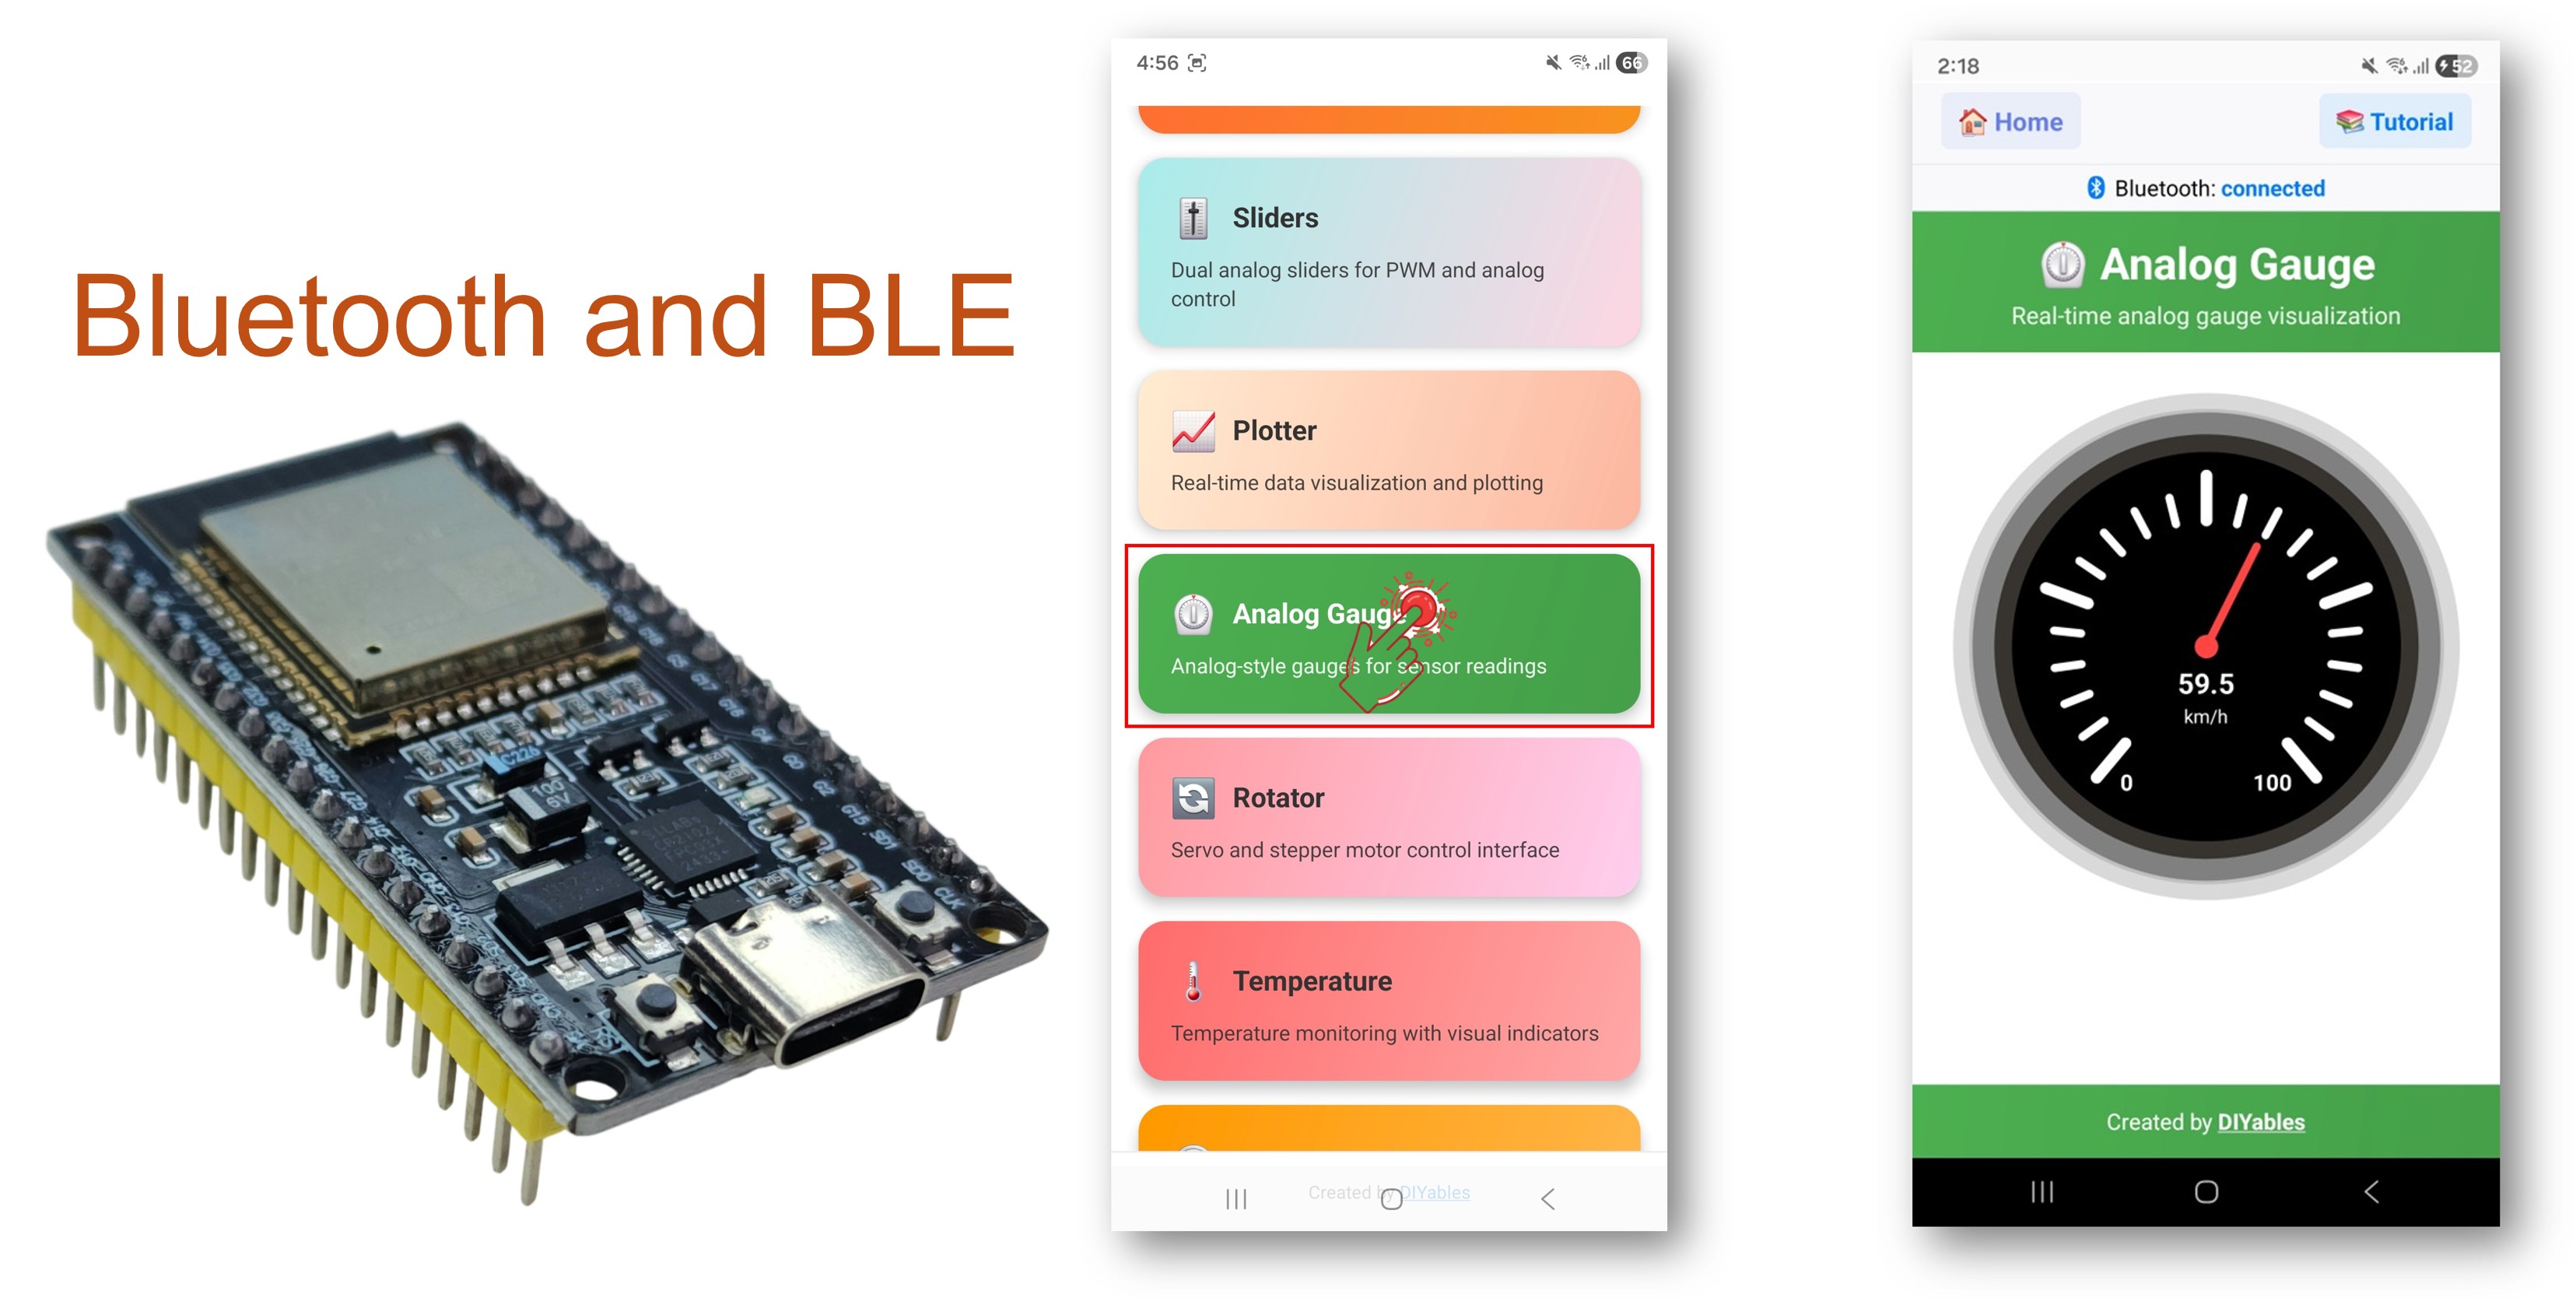
Het Bluetooth Analoog Meter voorbeeld biedt een klassiek analoog meter-stijl display dat toegankelijk is via de DIYables Bluetooth STEM app. Ontworpen voor ESP32 boards met ondersteuning voor zowel BLE (Bluetooth Low Energy) als Classic Bluetooth verbindingen. Verstuur numerieke waarden met configureerbaar bereik en eenheidsetiketten — perfect voor snelheidsmeters, druksensoren, voltmeters en elke toepassing die een analoog wijzerplaatdisplay vereist.

Dit voorbeeld ondersteunt twee Bluetooth-modi:

  • ESP32 BLE (Bluetooth Low Energy): Werkt op zowel Android als iOS
  • ESP32 Classic Bluetooth: Werkt alleen op Android. iOS ondersteunt Classic Bluetooth niet. Gebruik BLE als u iOS-ondersteuning nodig heeft.
ESP32 Bluetooth Analoog Meter Voorbeeld - Analoog Meter Display Tutorial

Kenmerken

  • Analoog Meter Display: Klassieke wijzerplaat/meter-stijl visualisatie
  • Configureerbaar Bereik: Stel minimum- en maximumwaarden in voor de meter
  • Aangepaste Eenheden: Toon km/h, PSI, V, %, of een willekeurige eenheidstekst
  • Realtime Updates: Stuur live metingen met vloeiende naaldbeweging
  • Verzoek Callback: App kan huidige waarde op aanvraag opvragen
  • BLE & Classic Bluetooth: Kies de Bluetooth-modus die bij uw project past
  • Cross-Platform: BLE modus werkt op Android en iOS; Classic Bluetooth werkt op Android
  • Laag Energieverbruik Optie: BLE gebruikt minder stroom dan Classic Bluetooth

Benodigdheden Hardware

1×ESP32 ESP-WROOM-32 Ontwikkelingsmodule
1×USB-kabel Type-C
1×Breadboard (experimenteerprint)
1×Jumperdraden (man-man)
1×(Aanbevolen) Schroefklem Uitbreidingsboard voor ESP32
1×(Aanbevolen) Breakout Expansion Board for ESP32
1×(Aanbevolen) Stromsplitter voor ESP32

Of u kunt de volgende kits kopen:

1×DIYables Sensorkit (30 sensoren/displays)
1×DIYables Sensorkit (18 sensoren/displays)
Openbaarmaking: Sommige van de links in deze sectie zijn Amazon-affiliate links. We kunnen een commissie ontvangen voor aankopen die via deze links worden gedaan, zonder extra kosten voor u. We waarderen uw steun.

ESP32 Code

Snelle Stappen

Volg deze instructies stap voor stap:

  • Als u voor het eerst met de ESP32 werkt, raadpleeg dan de tutorial over het instellen van de ESP32-omgeving in de Arduino IDE.
  • Verbind het ESP32 board via een USB-kabel met uw computer.
  • Start de Arduino IDE op uw computer.
  • Selecteer het juiste ESP32 board en de COM-poort.
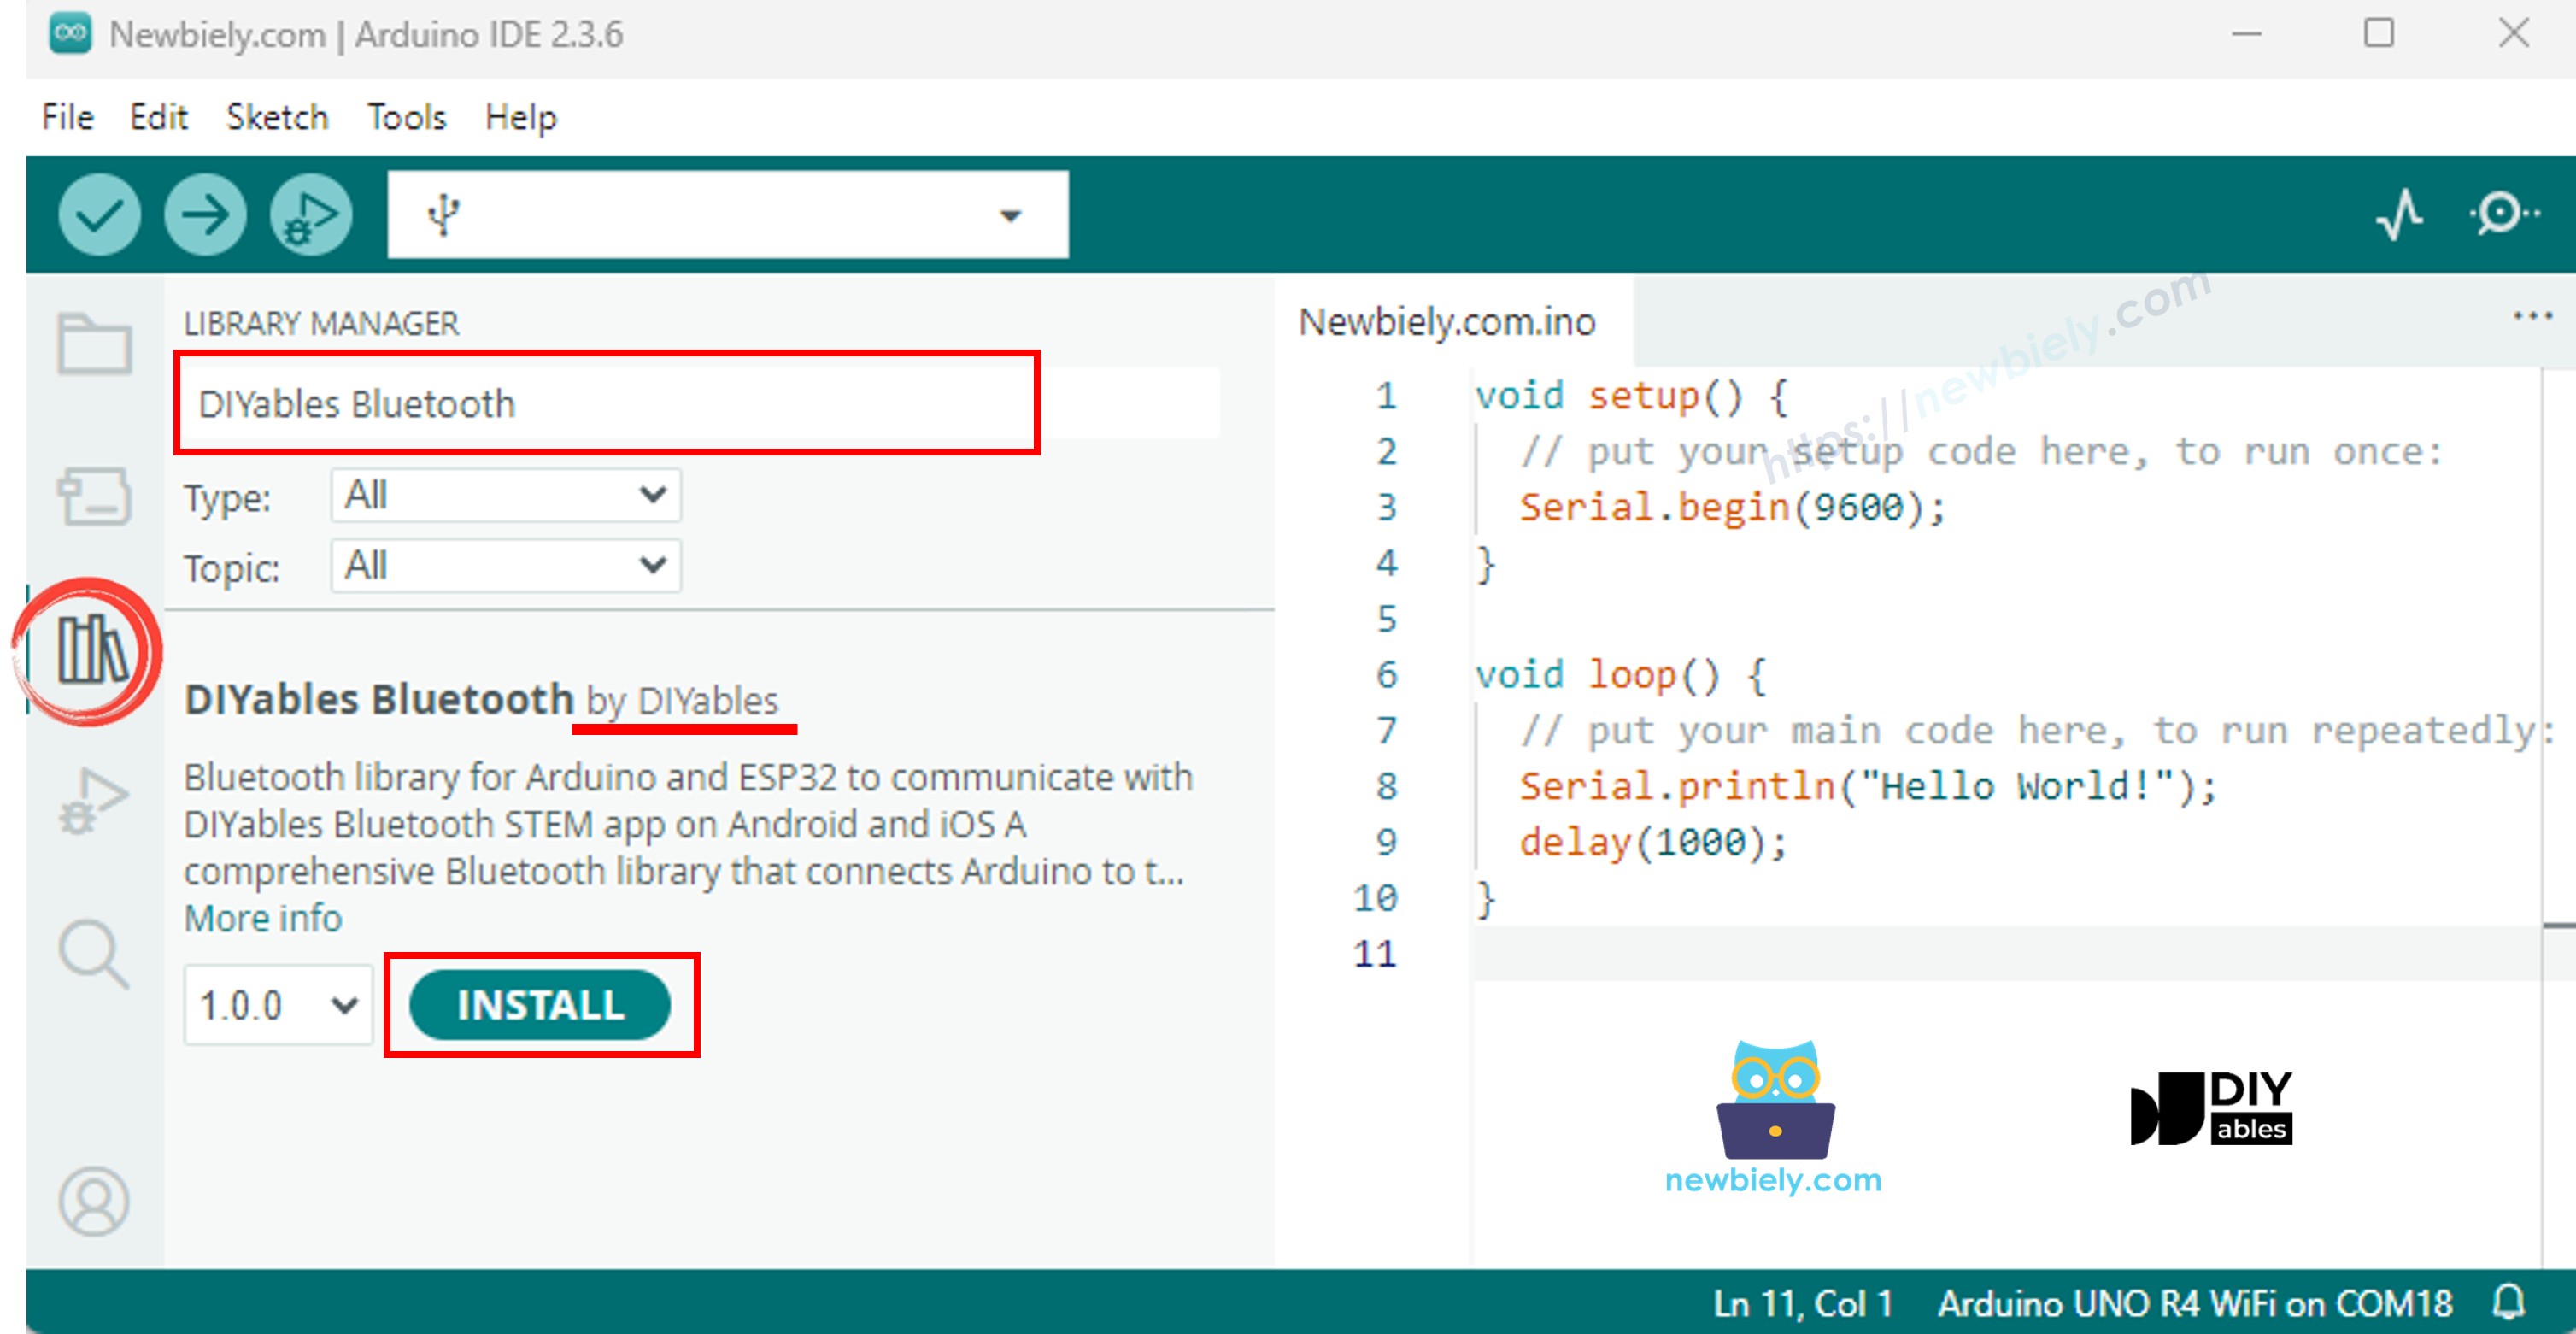
  • Navigeer naar het Libraries-icoon in de linker balk van de Arduino IDE.
  • Zoek op "DIYables Bluetooth", en vind dan de DIYables Bluetooth bibliotheek van DIYables.
  • Klik op de Installeren-knop om de bibliotheek te installeren.
ESP32 DIYables Bluetooth bibliotheek
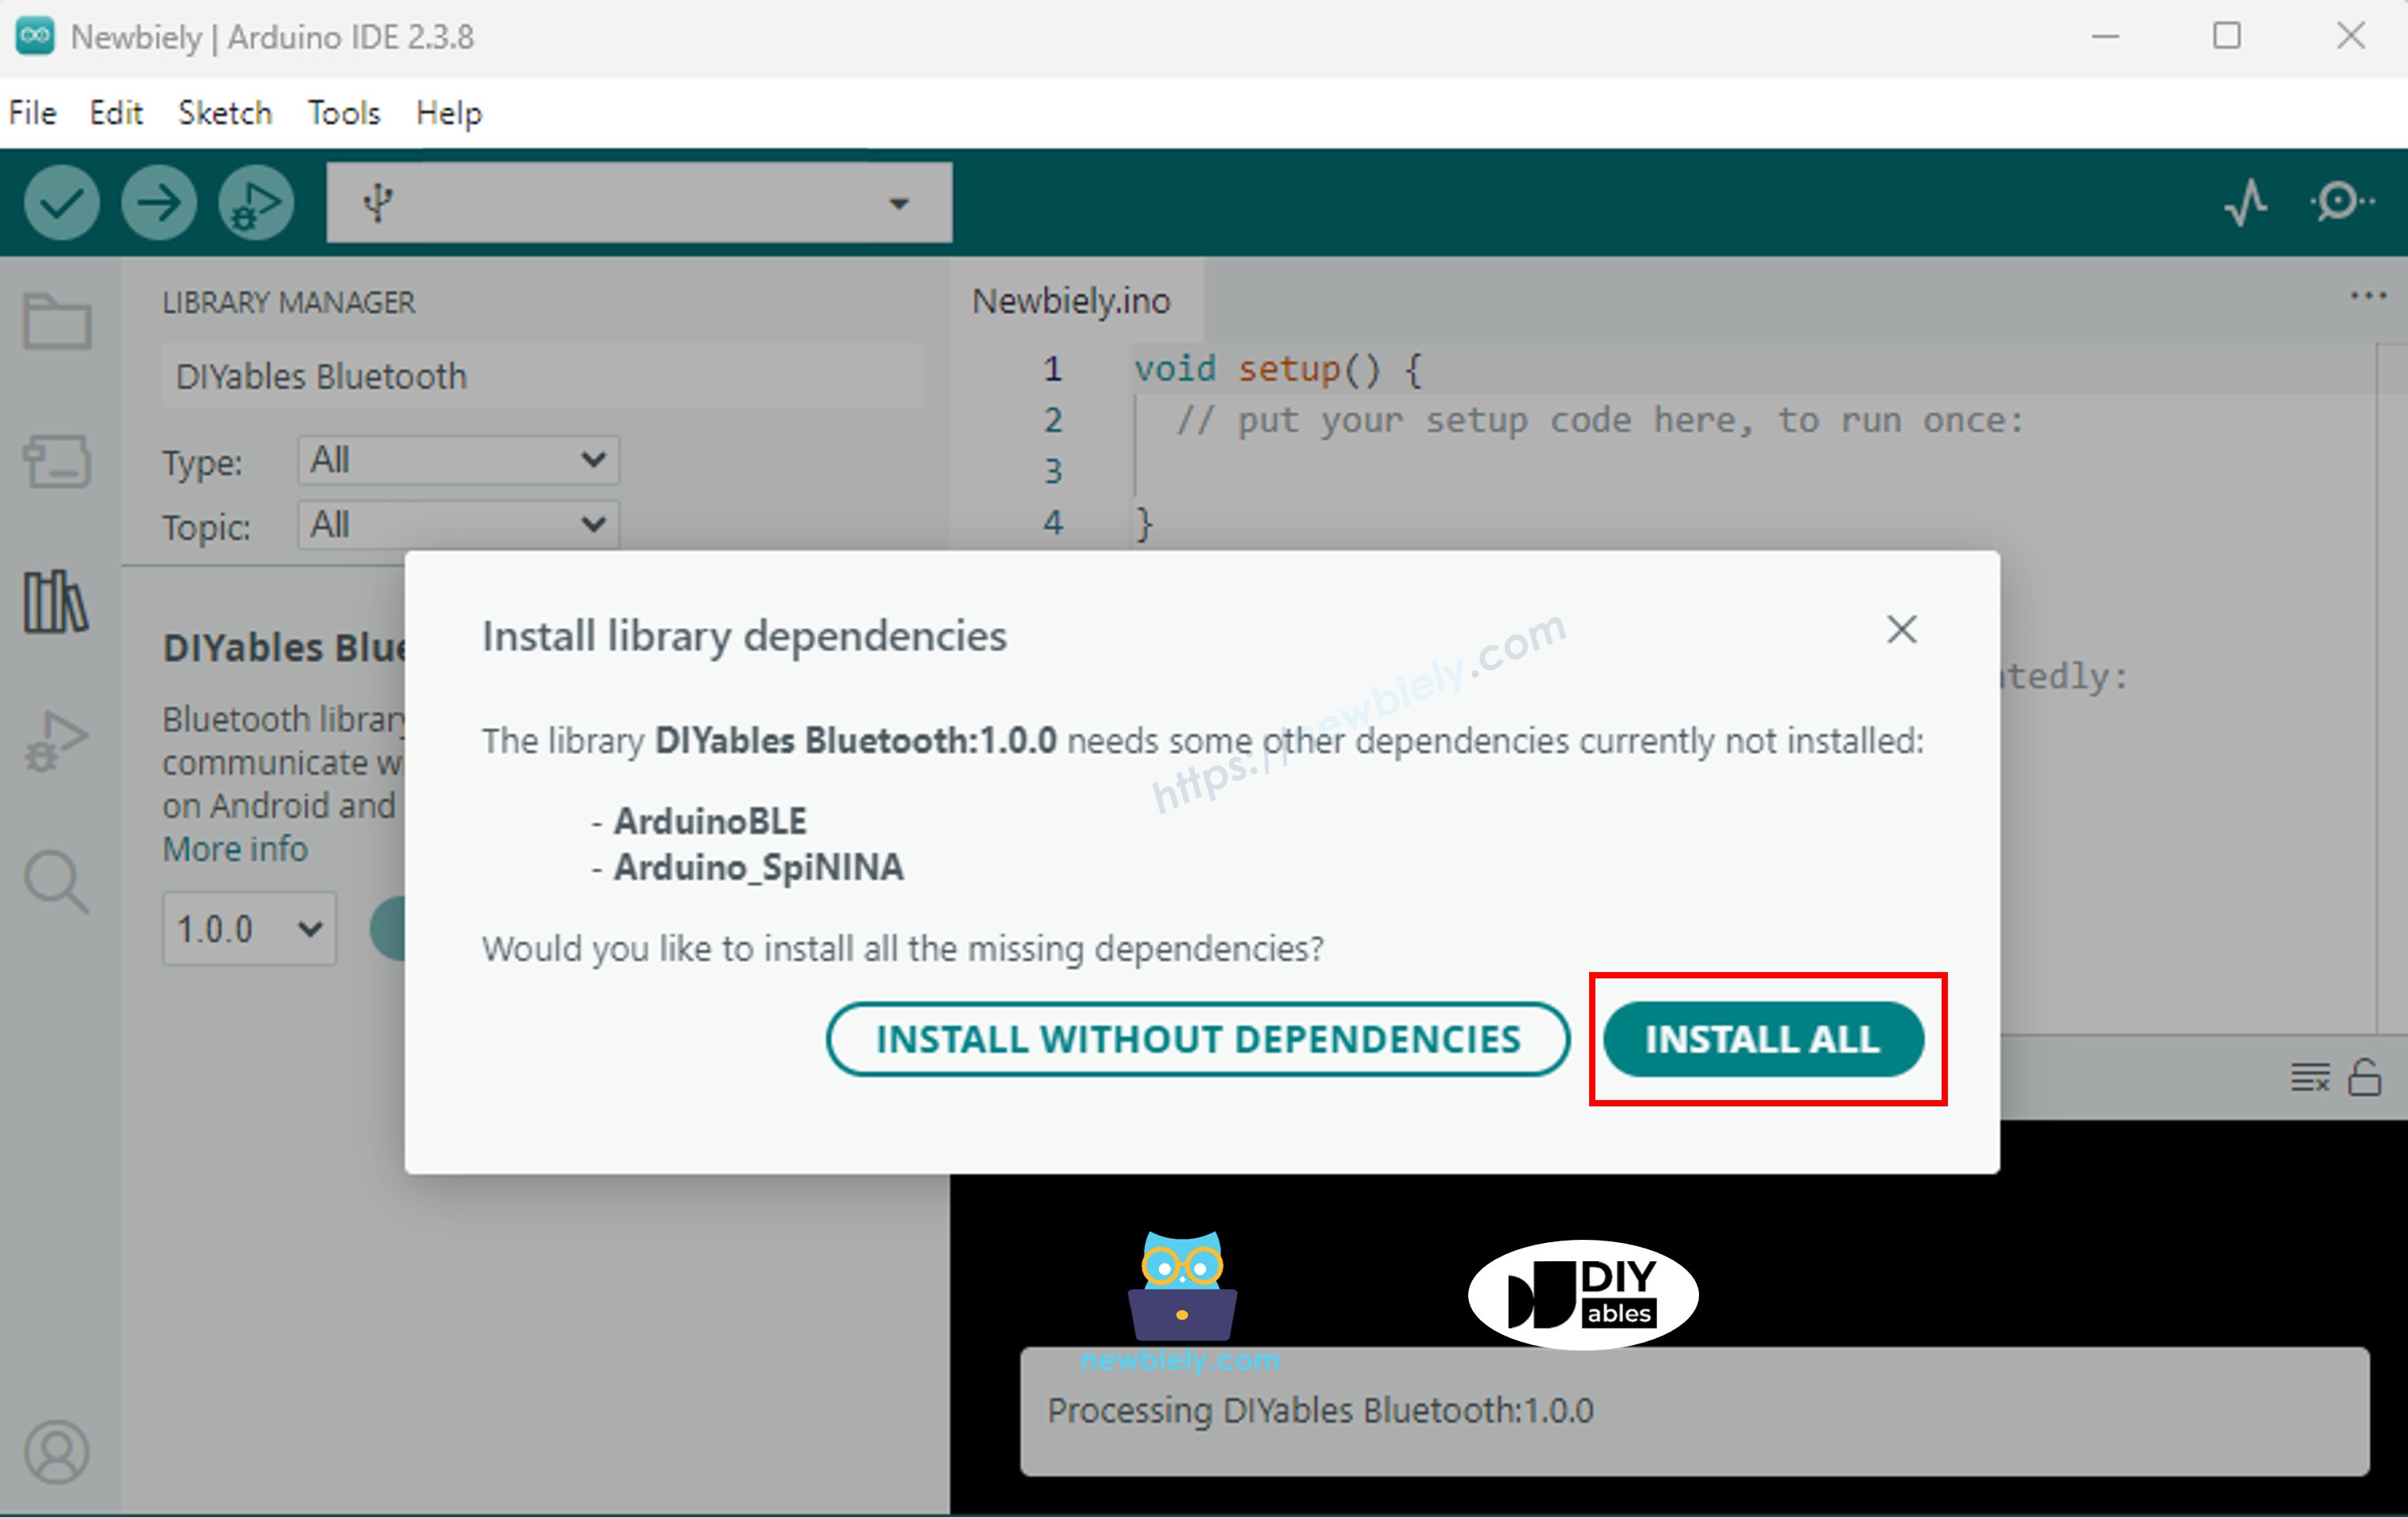
  • U wordt gevraagd om aanvullende bibliotheekafhankelijkheden te installeren
  • Klik op de Alles installeren-knop om alle afhankelijkheden te installeren.
ESP32 DIYables Bluetooth afhankelijkheden

Kies een van de onderstaande twee Bluetooth-modi, afhankelijk van uw behoeften:

ESP32 Classic Bluetooth Code (werkt alleen met de app op Android)

Opmerking: Classic Bluetooth wordt NIET ondersteund op iOS. Gebruik de BLE-code hieronder als u iOS-ondersteuning nodig heeft.

  • In Arduino IDE, ga naar Bestand Voorbeelden DIYables Bluetooth Esp32Bluetooth_AnalogGauge voorbeeld, of kopieer bovenstaande code en plak deze in de editor van de Arduino IDE
/* * DIYables Bluetooth Library - ESP32 Classic Bluetooth Analog Gauge Example * Works with DIYables Bluetooth STEM app on Android * Note: Classic Bluetooth is NOT supported on iOS. Use BLE examples for iOS support. * * This example demonstrates the Bluetooth Analog Gauge feature: * - Display values on an analog meter/gauge * - Configurable range and unit * - Perfect for sensor monitoring (speed, pressure, voltage, etc.) * * Compatible Boards: * - ESP32 (all variants with Classic Bluetooth) * - ESP32-WROOM-32 * - ESP32-DevKitC * - ESP32-WROVER * * Note: Select "Huge APP (3MB No OTA/1MB SPIFFS)" partition scheme * in Arduino IDE: Tools > Partition Scheme * * Optional: Analog sensor (potentiometer, pressure sensor, etc.) * * Setup: * 1. Upload the sketch to your ESP32 * 2. Open Serial Monitor (115200 baud) to see connection status * 3. Use DIYables Bluetooth App to connect and view the gauge * * Tutorial: https://diyables.io/bluetooth-app * Author: DIYables */ #include <DIYables_BluetoothServer.h> #include <DIYables_BluetoothAnalogGauge.h> #include <platforms/DIYables_Esp32Bluetooth.h> // Create Bluetooth instances DIYables_Esp32Bluetooth bluetooth("ESP32_Gauge"); DIYables_BluetoothServer bluetoothServer(bluetooth); // Create Analog Gauge app instance (min=0, max=100, unit="km/h") DIYables_BluetoothAnalogGauge bluetoothGauge(0.0, 100.0, "km/h"); // Variables for gauge value float currentValue = 0.0; unsigned long lastUpdate = 0; const unsigned long UPDATE_INTERVAL = 200; // Update every 200ms // Optional: Analog input pin for sensor const int ANALOG_PIN = 34; // ESP32 ADC pin // Function to read sensor value float readSensorValue() { // TODO: Replace with actual sensor reading // Examples: // - Pressure sensor: readPressure() // - Voltage sensor: analogRead(34) * (3.3 / 4095.0) // - Speed sensor: calculateSpeed() // Option 1: Read from analog pin and map to gauge range // int rawValue = analogRead(ANALOG_PIN); // return map(rawValue, 0, 4095, 0, 100); // Option 2: Simulated data (sine wave) static float phase = 0; phase += 0.05; if (phase > 2 * PI) phase = 0; return 50 + 50 * sin(phase); // Oscillates between 0-100 } void setup() { Serial.begin(115200); delay(1000); Serial.println("DIYables Bluetooth - ESP32 Analog Gauge Example"); // Optional: Initialize analog pin // pinMode(ANALOG_PIN, INPUT); // Initialize Bluetooth server with platform-specific implementation bluetoothServer.begin(); // Add gauge app to server bluetoothServer.addApp(&bluetoothGauge); // Set up connection event callbacks bluetoothServer.setOnConnected([]() { Serial.println("Bluetooth connected!"); // Send initial value currentValue = readSensorValue(); bluetoothGauge.send(currentValue); Serial.print("Initial value sent: "); Serial.print(currentValue); Serial.print(" "); Serial.println(bluetoothGauge.getUnit()); }); bluetoothServer.setOnDisconnected([]() { Serial.println("Bluetooth disconnected!"); }); // Optional: Handle requests for current value bluetoothGauge.onValueRequest([]() { currentValue = readSensorValue(); bluetoothGauge.send(currentValue); Serial.print("Value requested - Sent: "); Serial.print(currentValue); Serial.print(" "); Serial.println(bluetoothGauge.getUnit()); }); // You can change gauge configuration at runtime: // bluetoothGauge.setRange(0.0, 200.0); // Change range to 0-200 // bluetoothGauge.setUnit("mph"); // Change unit to mph // bluetoothGauge.setRange(0.0, 3.3); // For voltage (0-3.3V on ESP32) // bluetoothGauge.setUnit("V"); Serial.println("Waiting for Bluetooth connection..."); Serial.print("Gauge range: "); Serial.print(bluetoothGauge.getMin()); Serial.print(" - "); Serial.print(bluetoothGauge.getMax()); Serial.print(" "); Serial.println(bluetoothGauge.getUnit()); } void loop() { // Handle Bluetooth server communications bluetoothServer.loop(); // Send gauge updates periodically (only when connected) if (bluetooth.isConnected() && millis() - lastUpdate >= UPDATE_INTERVAL) { lastUpdate = millis(); // Read sensor value currentValue = readSensorValue(); // Send to Bluetooth app bluetoothGauge.send(currentValue); // Print to Serial Monitor Serial.print("Gauge: "); Serial.print(currentValue, 1); Serial.print(" "); Serial.println(bluetoothGauge.getUnit()); } delay(10); }
  • Klik op de Uploaden-knop in Arduino IDE om de code naar de ESP32 te uploaden
  • Open de Seriële Monitor
  • Bekijk het resultaat in de Seriële Monitor. Het ziet eruit als onderstaand:
COM6
Send
DIYables Bluetooth - ESP32 Analog Gauge Example Waiting for Bluetooth connection...
Autoscroll Show timestamp
Clear output
9600 baud  
Newline  

ESP32 BLE Code (werkt met de app op zowel Android als iOS)

  • In Arduino IDE, ga naar Bestand Voorbeelden DIYables Bluetooth Esp32BLE_AnalogGauge voorbeeld, of kopieer bovenstaande code en plak deze in de editor van de Arduino IDE
/* * DIYables Bluetooth Library - ESP32 BLE Analog Gauge Example * Works with DIYables Bluetooth STEM app on Android and iOS * * This example demonstrates the Bluetooth Analog Gauge feature: * - Display values on an analog meter/gauge * - Configurable range and unit * - Perfect for sensor monitoring (speed, pressure, voltage, etc.) * * Compatible Boards: * - ESP32-WROOM-32 * - ESP32-DevKitC * - ESP32-WROVER * - ESP32-S3 * - ESP32-C3 * - Any ESP32 board supporting BLE * * Note: Select "Huge APP (3MB No OTA/1MB SPIFFS)" partition scheme * in Arduino IDE: Tools > Partition Scheme * * Optional: Analog sensor (potentiometer, pressure sensor, etc.) * * Setup: * 1. Upload the sketch to your ESP32 * 2. Open Serial Monitor (115200 baud) to see connection status * 3. Use DIYables Bluetooth App to connect and view the gauge * * Tutorial: https://diyables.io/bluetooth-app * Author: DIYables */ #include <DIYables_BluetoothServer.h> #include <DIYables_BluetoothAnalogGauge.h> #include <platforms/DIYables_Esp32BLE.h> // BLE Configuration const char* DEVICE_NAME = "ESP32BLE_Gauge"; const char* SERVICE_UUID = "19B10000-E8F2-537E-4F6C-D104768A1214"; const char* TX_UUID = "19B10001-E8F2-537E-4F6C-D104768A1214"; const char* RX_UUID = "19B10002-E8F2-537E-4F6C-D104768A1214"; // Create Bluetooth instances DIYables_Esp32BLE bluetooth(DEVICE_NAME, SERVICE_UUID, TX_UUID, RX_UUID); DIYables_BluetoothServer bluetoothServer(bluetooth); // Create Analog Gauge app instance (min=0, max=100, unit="km/h") DIYables_BluetoothAnalogGauge bluetoothGauge(0.0, 100.0, "km/h"); // Variables for gauge value float currentValue = 0.0; unsigned long lastUpdate = 0; const unsigned long UPDATE_INTERVAL = 200; // Update every 200ms // Optional: Analog input pin for sensor const int ANALOG_PIN = 34; // ESP32 ADC pin // Function to read sensor value float readSensorValue() { // TODO: Replace with actual sensor reading // Option 1: Read from analog pin and map to gauge range // int rawValue = analogRead(ANALOG_PIN); // return map(rawValue, 0, 4095, 0, 100); // ESP32 has 12-bit ADC // Option 2: Simulated data (sine wave) static float phase = 0; phase += 0.05; if (phase > 2 * PI) phase = 0; return 50 + 50 * sin(phase); // Oscillates between 0-100 } void setup() { Serial.begin(115200); delay(1000); Serial.println("DIYables Bluetooth - ESP32 BLE Analog Gauge Example"); // Initialize Bluetooth server with platform-specific implementation bluetoothServer.begin(); // Add gauge app to server bluetoothServer.addApp(&bluetoothGauge); // Set up connection event callbacks bluetoothServer.setOnConnected([]() { Serial.println("Bluetooth connected!"); currentValue = readSensorValue(); bluetoothGauge.send(currentValue); Serial.print("Initial value sent: "); Serial.print(currentValue); Serial.print(" "); Serial.println(bluetoothGauge.getUnit()); }); bluetoothServer.setOnDisconnected([]() { Serial.println("Bluetooth disconnected!"); }); bluetoothGauge.onValueRequest([]() { currentValue = readSensorValue(); bluetoothGauge.send(currentValue); Serial.print("Value requested - Sent: "); Serial.print(currentValue); Serial.print(" "); Serial.println(bluetoothGauge.getUnit()); }); Serial.println("Waiting for Bluetooth connection..."); Serial.print("Gauge range: "); Serial.print(bluetoothGauge.getMin()); Serial.print(" - "); Serial.print(bluetoothGauge.getMax()); Serial.print(" "); Serial.println(bluetoothGauge.getUnit()); } void loop() { bluetoothServer.loop(); if (bluetooth.isConnected() && millis() - lastUpdate >= UPDATE_INTERVAL) { lastUpdate = millis(); currentValue = readSensorValue(); bluetoothGauge.send(currentValue); Serial.print("Gauge: "); Serial.print(currentValue, 1); Serial.print(" "); Serial.println(bluetoothGauge.getUnit()); } delay(10); }
  • Klik op de Uploaden-knop in Arduino IDE om de code naar de ESP32 te uploaden
  • Open de Seriële Monitor
  • Bekijk het resultaat in de Seriële Monitor. Het ziet eruit als onderstaand:
COM6
Send
DIYables Bluetooth - ESP32 BLE Analog Gauge Example Waiting for Bluetooth connection...
Autoscroll Show timestamp
Clear output
9600 baud  
Newline  

Mobiele App

  • Installeer de DIYables Bluetooth App op uw smartphone: Android | iOS
  • Als u de ESP32 Classic Bluetooth code gebruikt, moet u de ESP32 eerst koppelen met uw Android-telefoon voordat u de app opent:
    • Ga naar de Instellingen > Bluetooth van uw telefoon
    • Zorg dat Bluetooth aan staat
    • Uw telefoon scant naar beschikbare apparaten
    • Zoek en tik op "ESP32_Gauge" in de lijst van beschikbare apparaten
    • Bevestig het koppelverzoek (geen pincode nodig)
    • Wacht tot het "Gekoppeld" onder de apparaatnaam toont
  • Als u de ESP32 BLE code gebruikt, is koppelen niet nodig. Ga direct naar de volgende stap.
  • Open de DIYables Bluetooth App
  • Bij het eerste gebruik vraagt de app om toestemmingen. Sta alstublieft het volgende toe:
    • Nearby Devices toestemming (Android 12+) / Bluetooth toestemming (iOS) — nodig om te scannen en verbinding te maken met Bluetooth-apparaten
    • Locatie toestemming (alleen Android 11 en lager) — vereist door oudere Android-versies voor het scannen van BLE-apparaten
  • Controleer of Bluetooth ingeschakeld is op uw telefoon
  • Tik op het startscherm op de Verbinden-knop. De app zal zowel BLE als Classic Bluetooth apparaten scannen.
DIYables Bluetooth App - Startscherm met Scan-knop
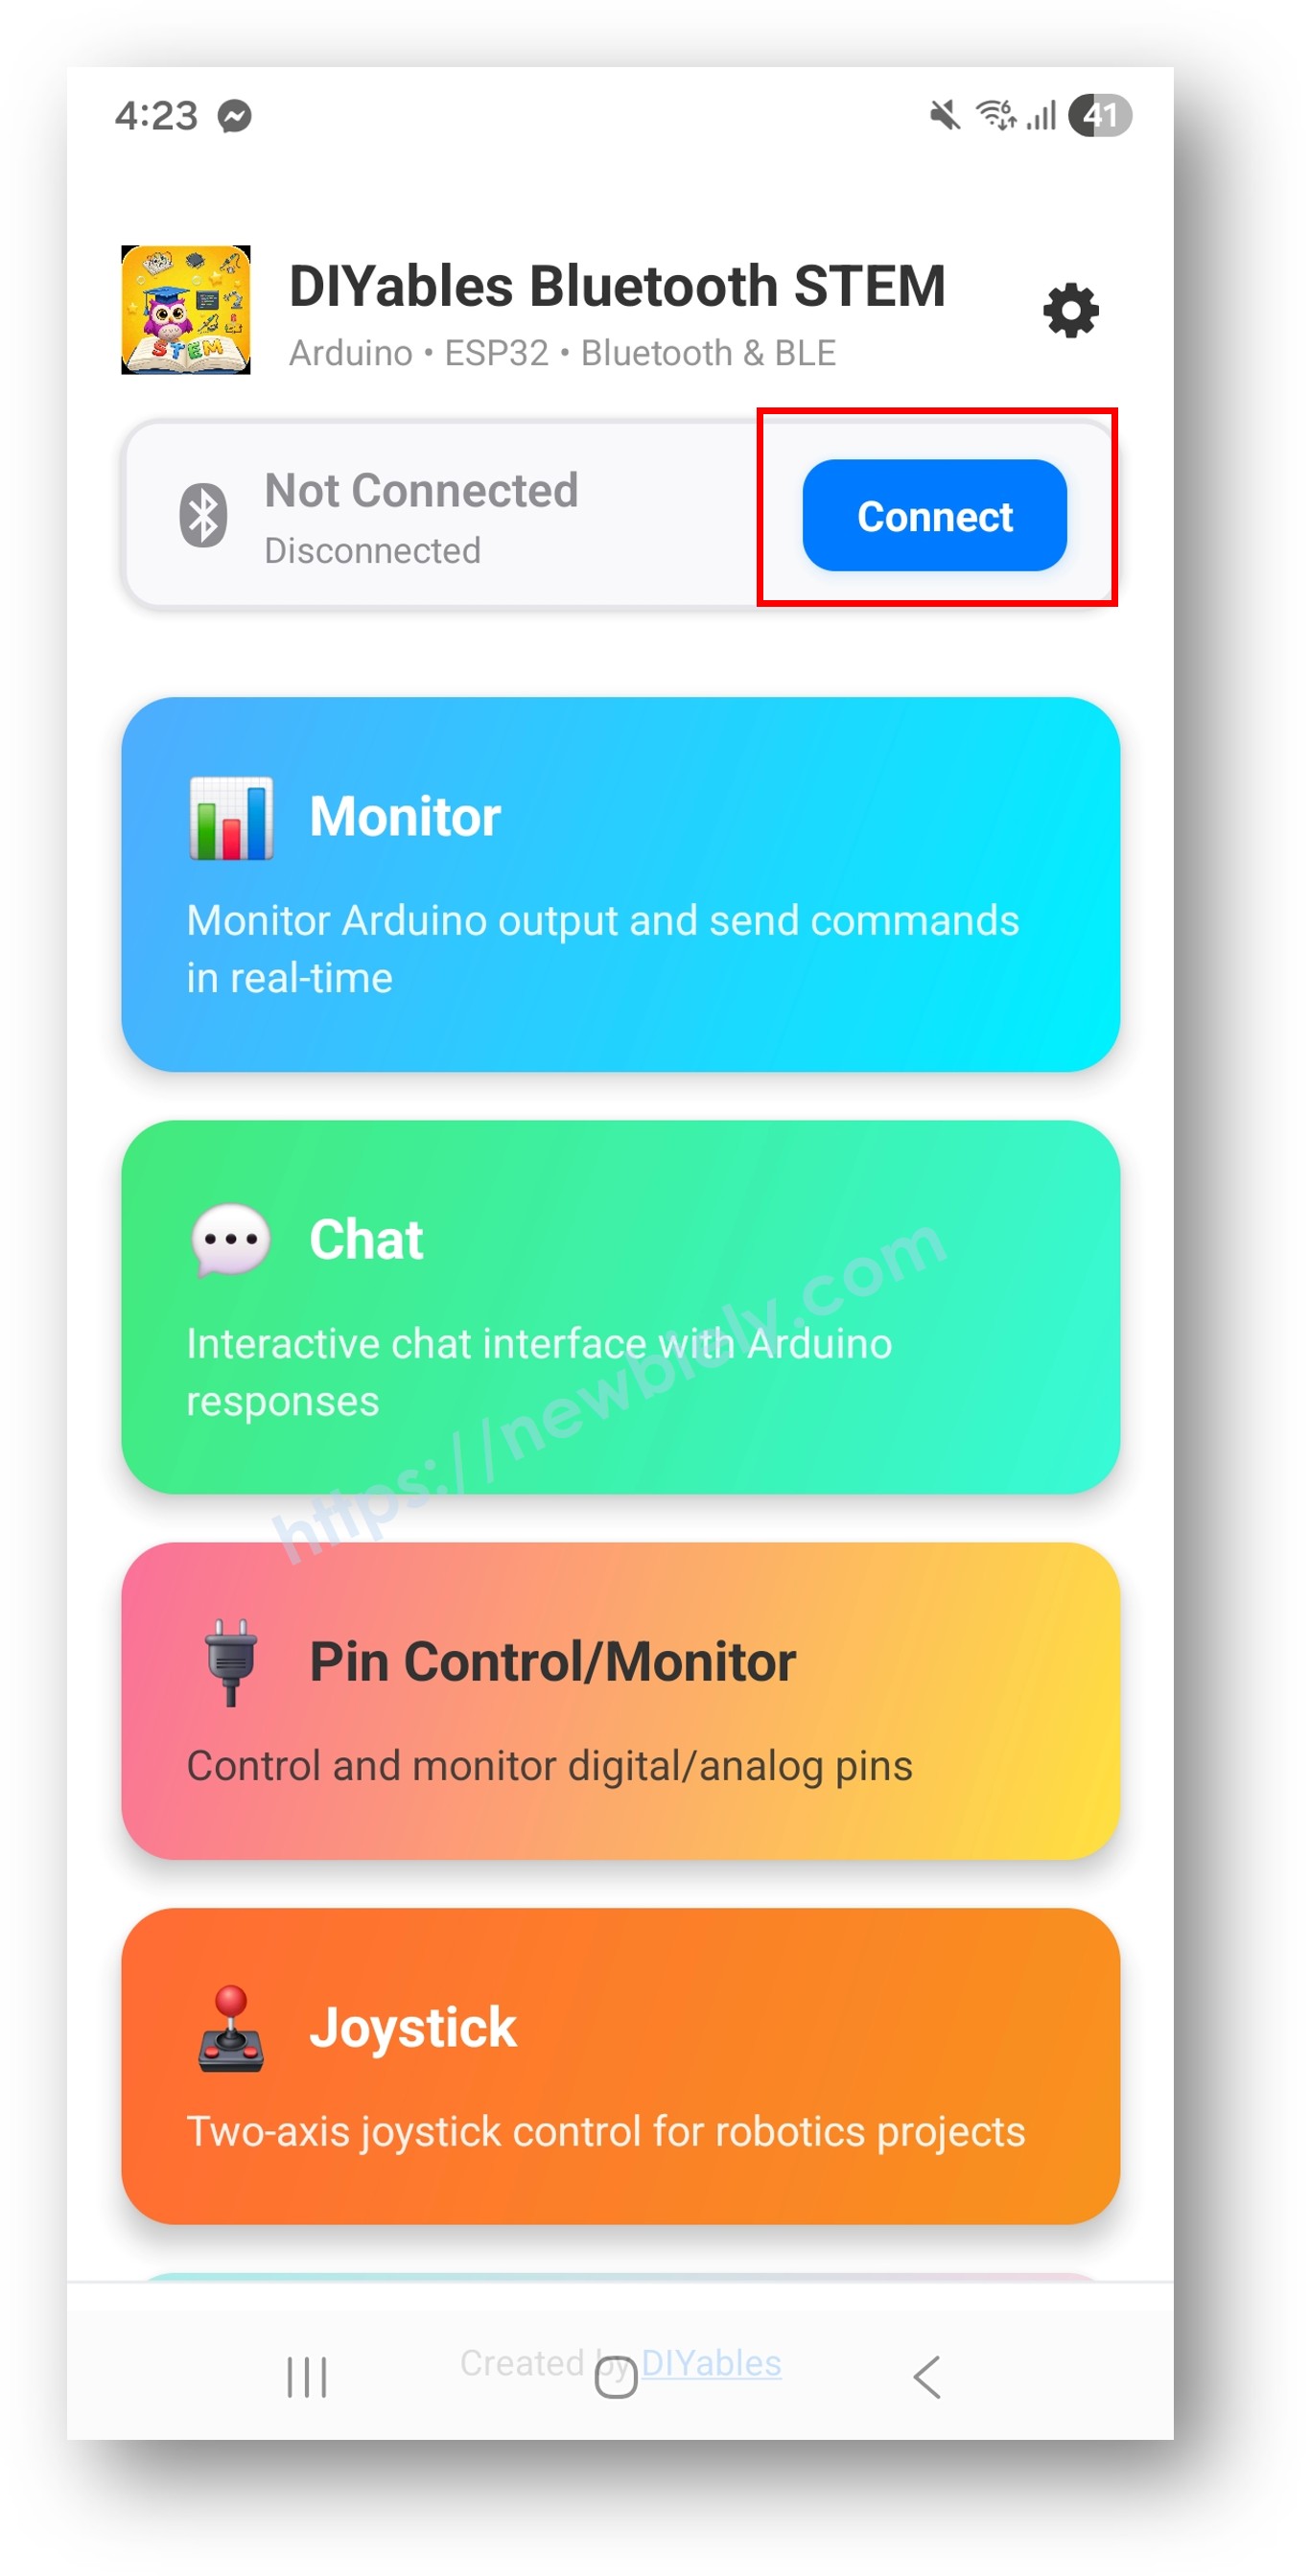
  • Zoek en tik op uw apparaat in de scanresultaten om verbinding te maken:
    • Voor Classic Bluetooth: tik op "ESP32_Gauge"
    • Voor BLE: tik op "ESP32BLE_Gauge"
  • Na verbinding keert de app automatisch terug naar het startscherm. Selecteer de Analog Gauge app in het app-menu.
DIYables Bluetooth App - Startscherm met Analog Gauge App

Opmerking: U kunt het instellingen-icoon op het startscherm tikken om apps te verbergen of weer te geven. Voor meer details, zie de DIYables Bluetooth App gebruikershandleiding.

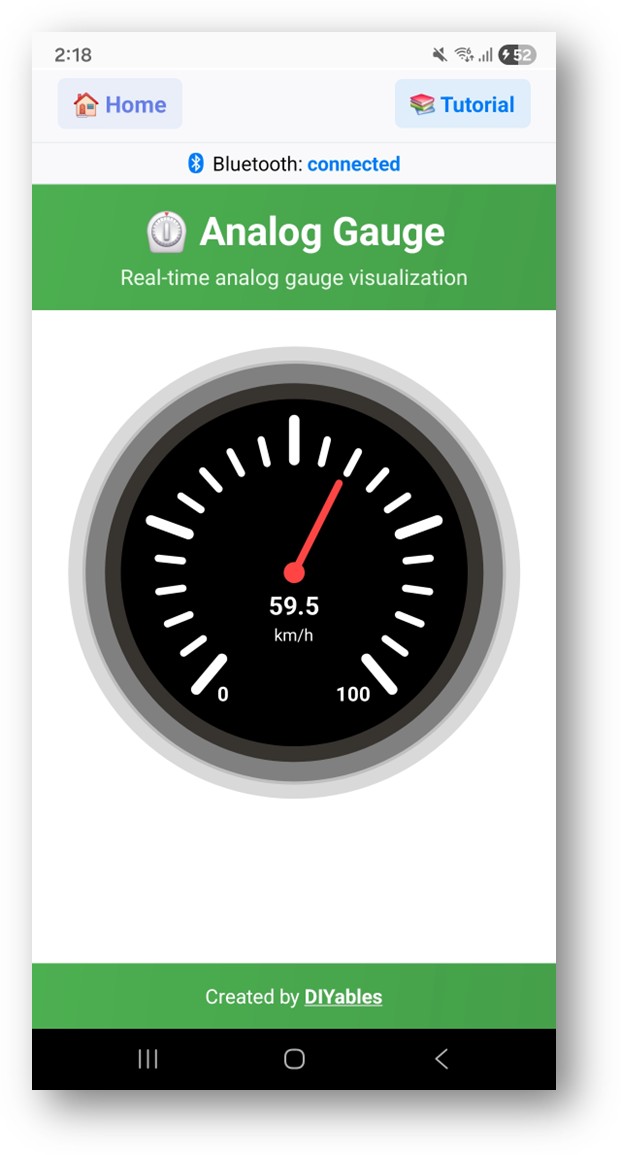
  • De analoge meter toont de huidige waarde met een bewegende naald
DIYables Bluetooth App - Analog Gauge Scherm

Bekijk nu de Seriële Monitor in de Arduino IDE. U ziet:

COM6
Send
Bluetooth connected! Gauge value: 50.0 km/h Gauge value: 75.0 km/h Gauge value: 93.3 km/h Gauge value: 100.0 km/h
Autoscroll Show timestamp
Clear output
9600 baud  
Newline  
  • Kijk hoe de meternaald in de app in realtime beweegt

Creatieve Aanpassing - Pas de Code aan voor Uw Project

Stel Meterbereik en Eenheid In

Stel het displaybereik en de eenheid in:

// Constructor: DIYables_BluetoothAnalogGauge(min, max, unit) DIYables_BluetoothAnalogGauge bluetoothGauge(0.0, 100.0, "km/h"); // Wijzig bereik tijdens runtime bluetoothGauge.setRange(0.0, 200.0); // Wijzig eenheid bluetoothGauge.setUnit("MPH"); // Lees huidige configuratie float minVal = bluetoothGauge.getMin(); // Geeft 0.0 terug float maxVal = bluetoothGauge.getMax(); // Geeft 100.0 terug String unit = bluetoothGauge.getUnit(); // Geeft "km/h" terug

Verstuur Meterwaarde

// Verstuur huidige meting float speed = 72.5; bluetoothGauge.send(speed); // Verstuur tekstbericht bluetoothGauge.send("Calibrating...");

Verwerk Waardeverzoeken van de App

bluetoothGauge.onValueRequest([]() { float currentValue = readSensor(); bluetoothGauge.send(currentValue); Serial.println("App requested value: " + String(currentValue)); });

Verwerk Verbindingsgebeurtenissen

bluetoothServer.setOnConnected([]() { Serial.println("Bluetooth connected!"); bluetoothGauge.send(currentValue); // Verstuur huidige meting }); bluetoothServer.setOnDisconnected([]() { Serial.println("Bluetooth disconnected!"); });

Hoe de Analoog Meter te Gebruiken

App Interface

De analoge meter interface in de DIYables Bluetooth App toont:

  • Wijzerplaat/Naald: Klassieke analoge meter met bewegende naald
  • Numerieke Weergave: Toont exacte actuele waarde
  • Eenheidsetiket: Toont de ingestelde eenheidstekst
  • Schaalmarkeringen: Toont genummerde schaal van min tot max

Veelvoorkomende Eenheidsconfiguraties

  • Snelheid: DIYables_BluetoothAnalogGauge(0.0, 200.0, "km/h")
  • Druk: DIYables_BluetoothAnalogGauge(0.0, 100.0, "PSI")
  • Spanning: DIYables_BluetoothAnalogGauge(0.0, 5.0, "V")
  • Percentage: DIYables_BluetoothAnalogGauge(0.0, 100.0, "%")
  • RPM: DIYables_BluetoothAnalogGauge(0.0, 8000.0, "RPM")

Programmeervoorbeelden

Voltmeter

const int VOLTAGE_PIN = 34; const float VREF = 3.3; const float DIVIDER_RATIO = 5.0; // Voltagedelerverhouding // Meter ingesteld voor 0-16V bereik DIYables_BluetoothAnalogGauge bluetoothGauge(0.0, 16.0, "V"); void loop() { bluetoothServer.loop(); static unsigned long lastUpdate = 0; if (millis() - lastUpdate >= 500) { lastUpdate = millis(); int raw = analogRead(VOLTAGE_PIN); float voltage = (raw / 4095.0) * VREF * DIVIDER_RATIO; bluetoothGauge.send(voltage); Serial.println("Voltage: " + String(voltage, 2) + " V"); } delay(10); }

Drukmeter (BMP280)

#include <Adafruit_BMP280.h> Adafruit_BMP280 bmp; // Meter ingesteld voor atmosferische drukbereik DIYables_BluetoothAnalogGauge bluetoothGauge(900.0, 1100.0, "hPa"); void setup() { Serial.begin(115200); bmp.begin(0x76); // ... Bluetooth setup ... bluetoothGauge.onValueRequest([]() { float pressure = bmp.readPressure() / 100.0; // Pa naar hPa bluetoothGauge.send(pressure); }); } void loop() { bluetoothServer.loop(); static unsigned long lastUpdate = 0; if (millis() - lastUpdate >= 1000) { lastUpdate = millis(); float pressure = bmp.readPressure() / 100.0; bluetoothGauge.send(pressure); Serial.println("Pressure: " + String(pressure, 1) + " hPa"); } delay(10); }

Stroomsensor (ACS712)

const int CURRENT_PIN = 34; const float SENSITIVITY = 0.185; // ACS712-05B: 185mV/A const float ZERO_CURRENT_VOLTAGE = 2.5; // Meter ingesteld voor 0-5A bereik DIYables_BluetoothAnalogGauge bluetoothGauge(0.0, 5.0, "A"); void loop() { bluetoothServer.loop(); static unsigned long lastUpdate = 0; if (millis() - lastUpdate >= 200) { lastUpdate = millis(); int raw = analogRead(CURRENT_PIN); float voltage = (raw / 4095.0) * 3.3; float current = abs((voltage - ZERO_CURRENT_VOLTAGE) / SENSITIVITY); bluetoothGauge.send(current); Serial.println("Current: " + String(current, 2) + " A"); } delay(10); }

Snelheid van Encoder

volatile unsigned long pulseCount = 0; const int ENCODER_PIN = 2; const float PULSES_PER_REV = 20.0; const float WHEEL_CIRCUMFERENCE = 0.628; // meters (diameter 20cm) DIYables_BluetoothAnalogGauge bluetoothGauge(0.0, 50.0, "km/h"); void IRAM_ATTR countPulse() { pulseCount++; } void setup() { Serial.begin(115200); pinMode(ENCODER_PIN, INPUT_PULLUP); attachInterrupt(digitalPinToInterrupt(ENCODER_PIN), countPulse, RISING); // ... Bluetooth setup ... } void loop() { bluetoothServer.loop(); static unsigned long lastCalc = 0; if (millis() - lastCalc >= 500) { unsigned long elapsed = millis() - lastCalc; lastCalc = millis(); noInterrupts(); unsigned long count = pulseCount; pulseCount = 0; interrupts(); float revPerSec = (count / PULSES_PER_REV) / (elapsed / 1000.0); float speedKmh = revPerSec * WHEEL_CIRCUMFERENCE * 3.6; bluetoothGauge.send(speedKmh); Serial.println("Speed: " + String(speedKmh, 1) + " km/h"); } delay(10); }

Gevorderde Programmeertechnieken

Vloeiende Naaldbeweging

float displayValue = 0; float targetValue = 0; const float SMOOTHING = 0.1; // 0.0-1.0, lager = vloeiender void loop() { bluetoothServer.loop(); static unsigned long lastUpdate = 0; if (millis() - lastUpdate >= 50) { // 20 FPS lastUpdate = millis(); targetValue = readSensor(); displayValue += (targetValue - displayValue) * SMOOTHING; bluetoothGauge.send(displayValue); } delay(5); }

Peak Hold

float peakValue = 0; unsigned long peakTime = 0; const unsigned long PEAK_HOLD_MS = 3000; // Houd piekwaarde 3 seconden vast void updateWithPeakHold(float value) { if (value > peakValue) { peakValue = value; peakTime = millis(); } if (millis() - peakTime > PEAK_HOLD_MS) { peakValue = value; // Reset piekwaarde } // Verstuur de hogere van huidige of piekwaarde bluetoothGauge.send(max(value, peakValue)); }

Bereik Automatische Schaling

float autoMin = 0; float autoMax = 100; void autoScale(float value) { bool changed = false; if (value < autoMin) { autoMin = value - 10; changed = true; } if (value > autoMax) { autoMax = value + 10; changed = true; } if (changed) { bluetoothGauge.setRange(autoMin, autoMax); } bluetoothGauge.send(value); }

Hardware Integratie Ideeën

Analoge Sensoren

Elke sensor met een analoge output kan de meter aandrijven: potentiometers, krachtmeters, flex-sensoren enzovoort.

I2C/SPI Sensoren

Gebruik I2C-sensoren zoals BMP280 (druk), INA219 (stroom/vermogen) of SPI-sensoren voor hoge-snelheidsmetingen.

Puls/Frequentie Sensoren

Snelheidsencoders, flowmeters en RPM-sensoren die interrupt-gebaseerde telling gebruiken.

Weegcellen (HX711)

Gewichtsmeting met HX711 versterker voor keuken- of industriële weging.

BLE versus Classic Bluetooth - Welke te Kiezen?

FeatureBLE (Esp32BLE_AnalogGauge)Classic Bluetooth (Esp32Bluetooth_AnalogGauge)
iOS-ondersteuning? Ja? Nee
Android-ondersteuning? Ja? Ja
EnergieverbruikLaagHoog
Bereik~30-100m~10-100m
DatasnelheidLagerHoger
Koppeling NodigNee (auto-connect)Ja (handmatige koppeling)
Geschikt VoorBatterijgevoed, cross-platformHoge throughput, alleen Android

Problemen Oplossen

Veelvoorkomende Problemen

1. Kan apparaat niet vinden in app

  • Zorg dat de ESP32 aanstaat en dat de sketch geüpload is
  • Voor BLE: Controleer of Bluetooth en Locatie op uw telefoon ingeschakeld zijn
  • Voor Classic Bluetooth: Verbind het apparaat eerst via de Bluetooth-instellingen van uw telefoon
  • Controleer of het juiste partitietype geselecteerd is (Huge APP)

2. Meter toont 0 of onjuiste waarde

  • Controleer de bedrading en aansluitingen van de sensor
  • Controleer sensorwaarden eerst via de Seriële Monitor
  • Zorg dat de waarde binnen het ingestelde bereik valt
  • Controleer de configuratie van eenheid en bereik in de constructor

3. Meternaald beweegt niet soepel

  • Verhoog de update frequentie (kleinere interval in millis() check)
  • Pas smoothing/filtering toe op sensorwaarden
  • Controleer op ruis of instabiele sensormetingen

4. Waarden buiten meterbereik

  • Pas het bereik aan met setRange(min, max) passend bij sensoroutput
  • Waarden buiten bereik zullen worden getoond, maar kunnen afgekapt worden aan min/max
  • Overweeg auto-scaling voor onbekende bereiken

5. Frequent wegvallende verbinding

  • Kom dichter bij de ESP32 (verminder afstand)
  • Voor BLE: Let op interferentie van andere BLE-apparaten
  • Voor Classic Bluetooth: Zorg voor stabiele voeding van de ESP32

6. Sketch te groot / onvoldoende ruimte

  • In Arduino IDE, ga naar Tools > Partition Scheme en selecteer "Huge APP (3MB No OTA/1MB SPIFFS)" of "No OTA (Large APP)"
  • Het standaard partitietype biedt slechts ~1.2MB voor app-code en is onvoldoende voor Bluetooth bibliotheken
  • Deze instelling vergroot beschikbaarheid tot ~3MB door de OTA partitie te verwijderen

Debug Tips

Voeg uitgebreide debugging toe:

void debugGauge(float value) { Serial.println("=== Gauge Debug ==="); Serial.println("Value: " + String(value, 2) + " " + bluetoothGauge.getUnit()); Serial.println("Range: " + String(bluetoothGauge.getMin(), 1) + " - " + String(bluetoothGauge.getMax(), 1)); Serial.println("In Range: " + String(value >= bluetoothGauge.getMin() && value <= bluetoothGauge.getMax() ? "Yes" : "No")); float percentage = (value - bluetoothGauge.getMin()) / (bluetoothGauge.getMax() - bluetoothGauge.getMin()) * 100.0; Serial.println("Percentage: " + String(percentage, 1) + "%"); Serial.println("==================="); }

Projectideeën

Voertuig & Beweging

  • Snelheidsmeter voor RC-auto of fiets
  • RPM-tachometer voor motoren
  • G-krachtsmeter voor acceleratie
  • Kantelhoekindicator

Elektrisch & Vermogen

  • Voltmeter (batterijspanningsmonitor)
  • Ampermeter (stroomverbruik)
  • Wattmeter (vermogen)
  • Batterijniveau meter

Omgevingsmetingen

  • Barometerdrukmeter
  • Windsnelheidsmeter (anemometer)
  • UV-indexmeter
  • Geluidsmeter (dB)

Industrieel

  • Weegschaal weergave
  • Doorstroomsnelheidmeter
  • Tankniveaumeter
  • Koppelmeter

Integratie met Andere Bluetooth Apps

Combineer met Bluetooth Temperatuur

Meter voor één parameter, temperatuur voor een andere:

// Meter toont druk bluetoothGauge.send(pressure); // Temperatuur toont temperatuur bluetoothTemperature.send(temperature);

Combineer met Bluetooth Tabel

Meter voor visueel, tabel voor details:

float speed = readSpeed(); bluetoothGauge.send(speed); bluetoothTable.sendValueUpdate("Speed", String(speed, 1) + " km/h"); bluetoothTable.sendValueUpdate("Distance", String(totalDistance, 2) + " km"); bluetoothTable.sendValueUpdate("Max Speed", String(maxSpeed, 1) + " km/h"); bluetoothTable.sendValueUpdate("Avg Speed", String(avgSpeed, 1) + " km/h");

Volgende Stappen

Na het beheersen van het Bluetooth Analoog Meter voorbeeld, probeer:

  1. Bluetooth Temperatuur - Voor gespecialiseerde temperatuurweergave
  2. Bluetooth Plotter - Voor trendvisualisatie over tijd
  3. Bluetooth Tabel - Voor gestructureerde meerwaardeweergave
  4. Meerdere Bluetooth Apps - Combineer meter met andere displays

Ondersteuning

Voor extra hulp:

  • Raadpleeg de API Reference documentatie
  • Arduino community forums

※ ONZE BERICHTEN

  • U bent welkom om de link naar deze tutorial te delen. Gebruik onze inhoud echter niet op andere websites. We hebben veel moeite en tijd gestoken in het maken van de inhoud, respecteer alstublieft ons werk!