ESP32 - OLED

Deze handleiding leert u hoe u de ESP32 gebruikt om gegevens weer te geven op een OLED. In detail leert u hoe u tekens en cijfers print, lijnen en vormen tekent, en afbeeldingen afdrukt op het OLED-display.

Hardware Benodigdheden

1×ESP32 ESP-WROOM-32 Ontwikkelingsmodule
1×USB-kabel Type-C
1×SSD1306 I2C OLED-Display 128x64
1×SSD1306 I2C OLED-Display 128x32
1×Breadboard (experimenteerprint)
1×Jumperkabels
1×(Optioneel) DC Power Jack
1×(Aanbevolen) Schroefklem Uitbreidingsboard voor ESP32
1×(Aanbevolen) Breakout Expansion Board for ESP32
1×(Aanbevolen) Stromsplitter voor ESP32

Of u kunt de volgende kits kopen:

1×DIYables Sensorkit (30 sensoren/displays)
1×DIYables Sensorkit (18 sensoren/displays)
Openbaarmaking: Sommige van de links in deze sectie zijn Amazon-affiliate links. We kunnen een commissie ontvangen voor aankopen die via deze links worden gedaan, zonder extra kosten voor u. We waarderen uw steun.

Over OLED Display

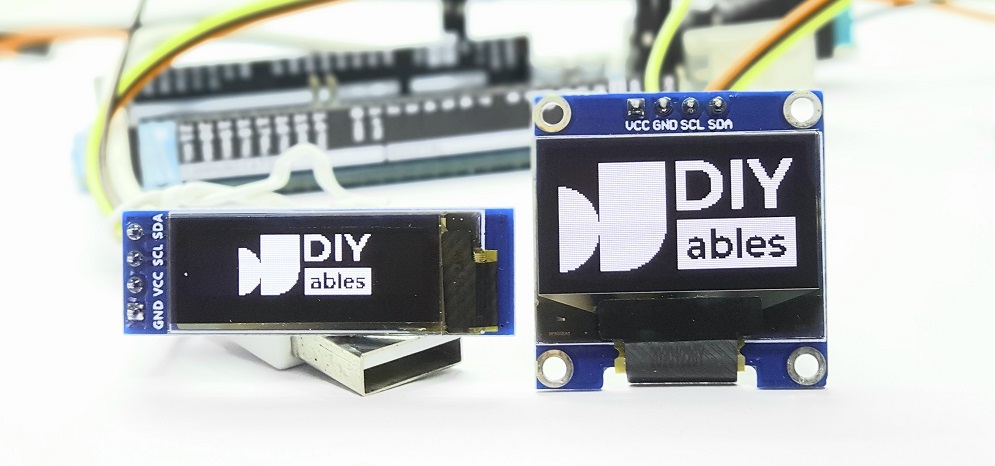
Er zijn verschillende soorten OLED-displays die werken met de ESP32. Ze verschillen in communicatie-interface (I2C, SPI), kleuren (wit, blauw, dual color...) en formaten (128x64, 128×32...).

ESP32 OLED

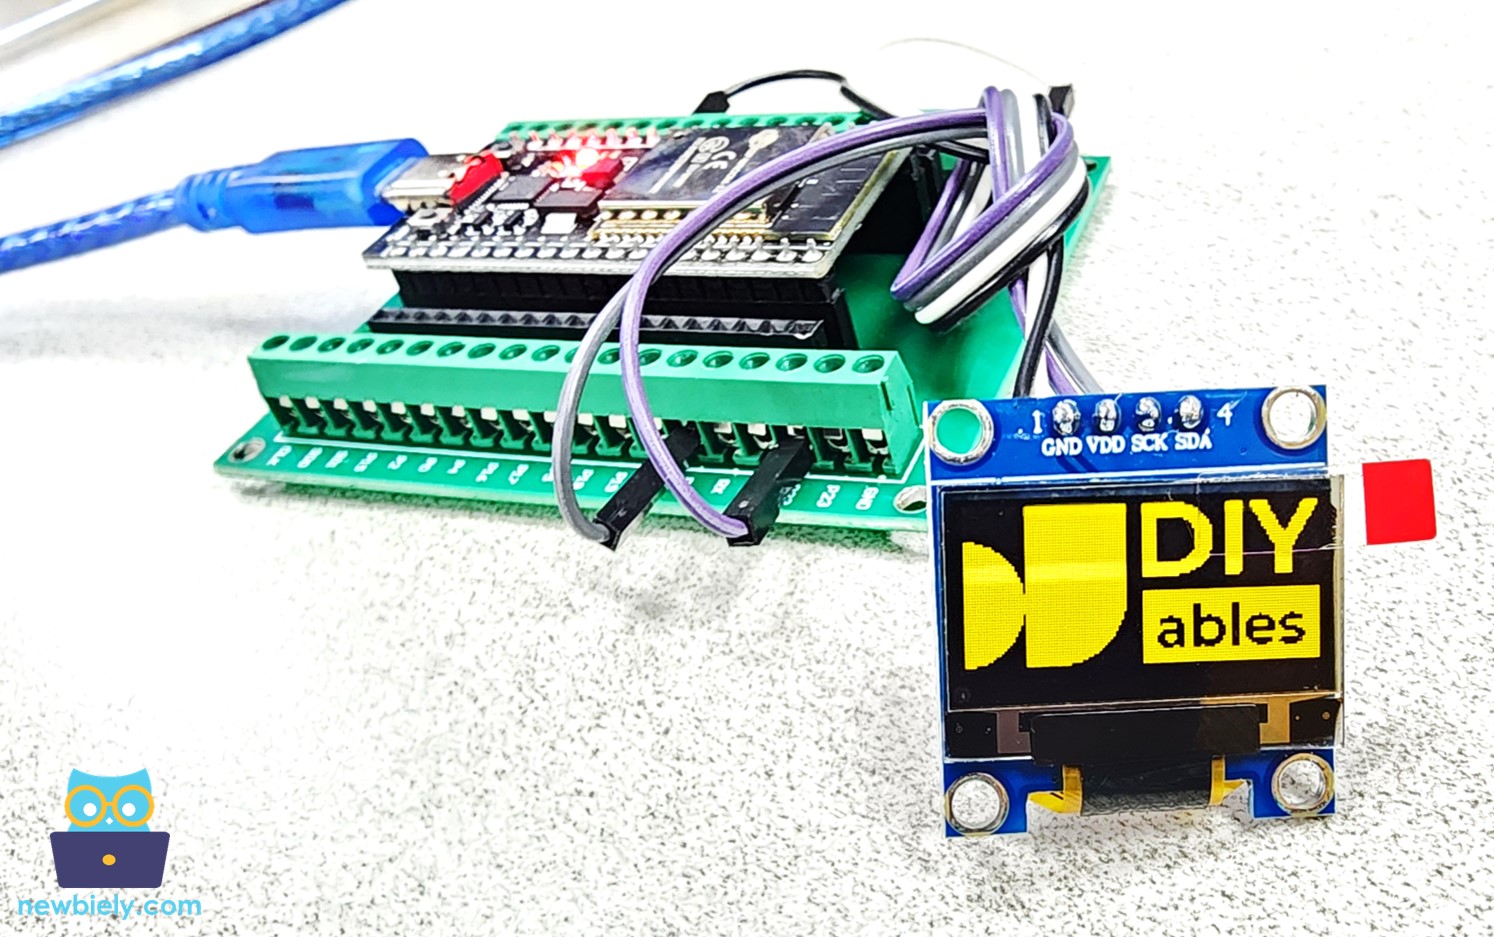
In deze handleiding gebruiken we een SSD1306 128x64 I2C OLED Display.

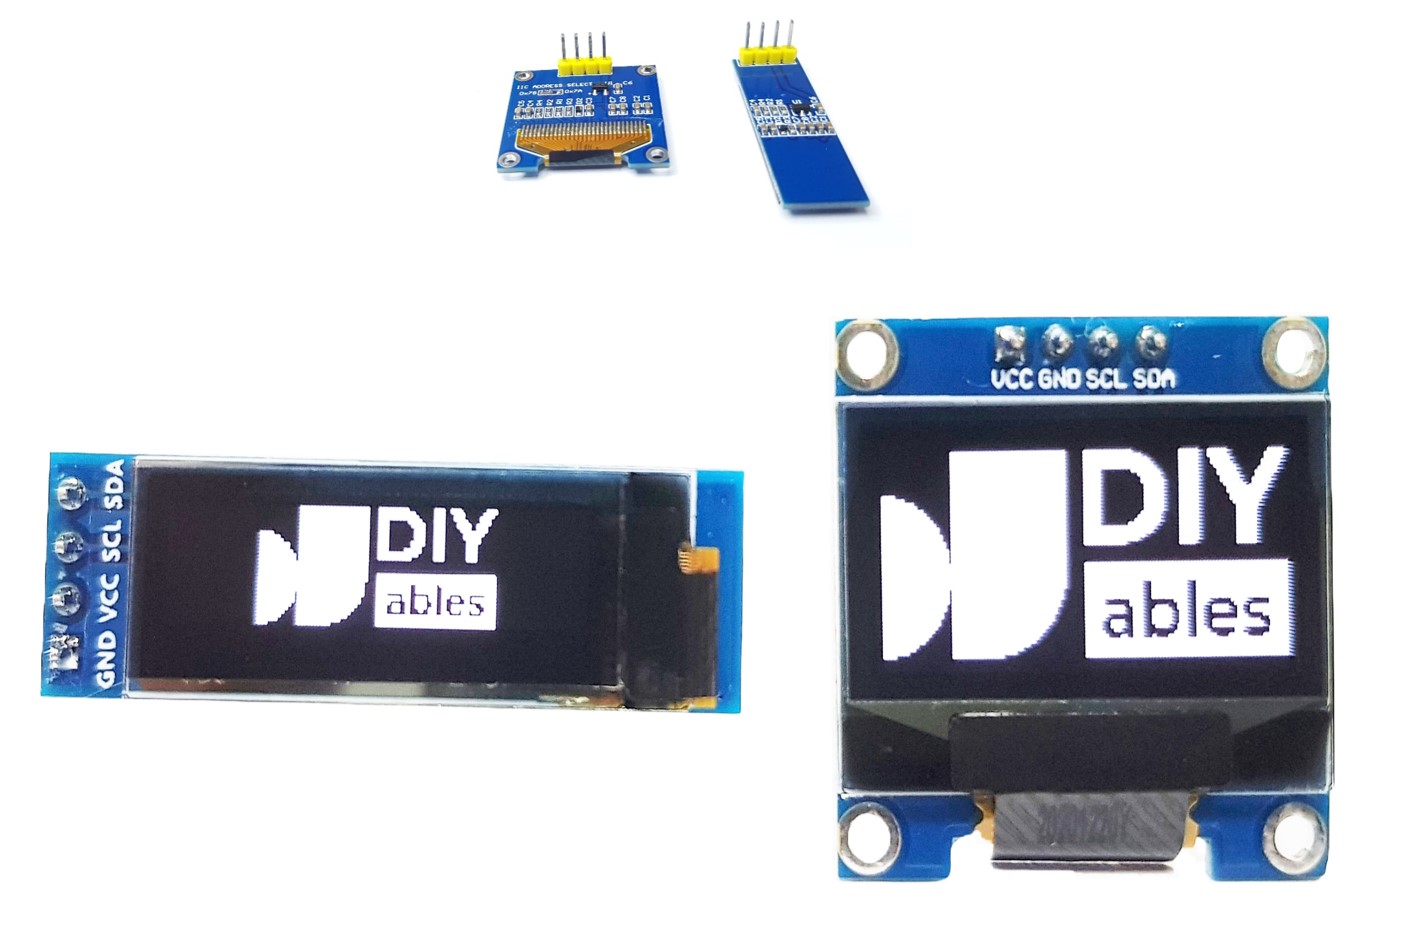
I2C OLED Display Pinout

I2C OLED-display heeft 4 pinnen:

  • GND pin: moet verbonden worden met de ground (massa) van de ESP32
  • VCC pin: moet verbonden worden met de 5V pin van de ESP32
  • SCL pin: is de I2C klokpin
  • SDA pin: is de I2C datapin
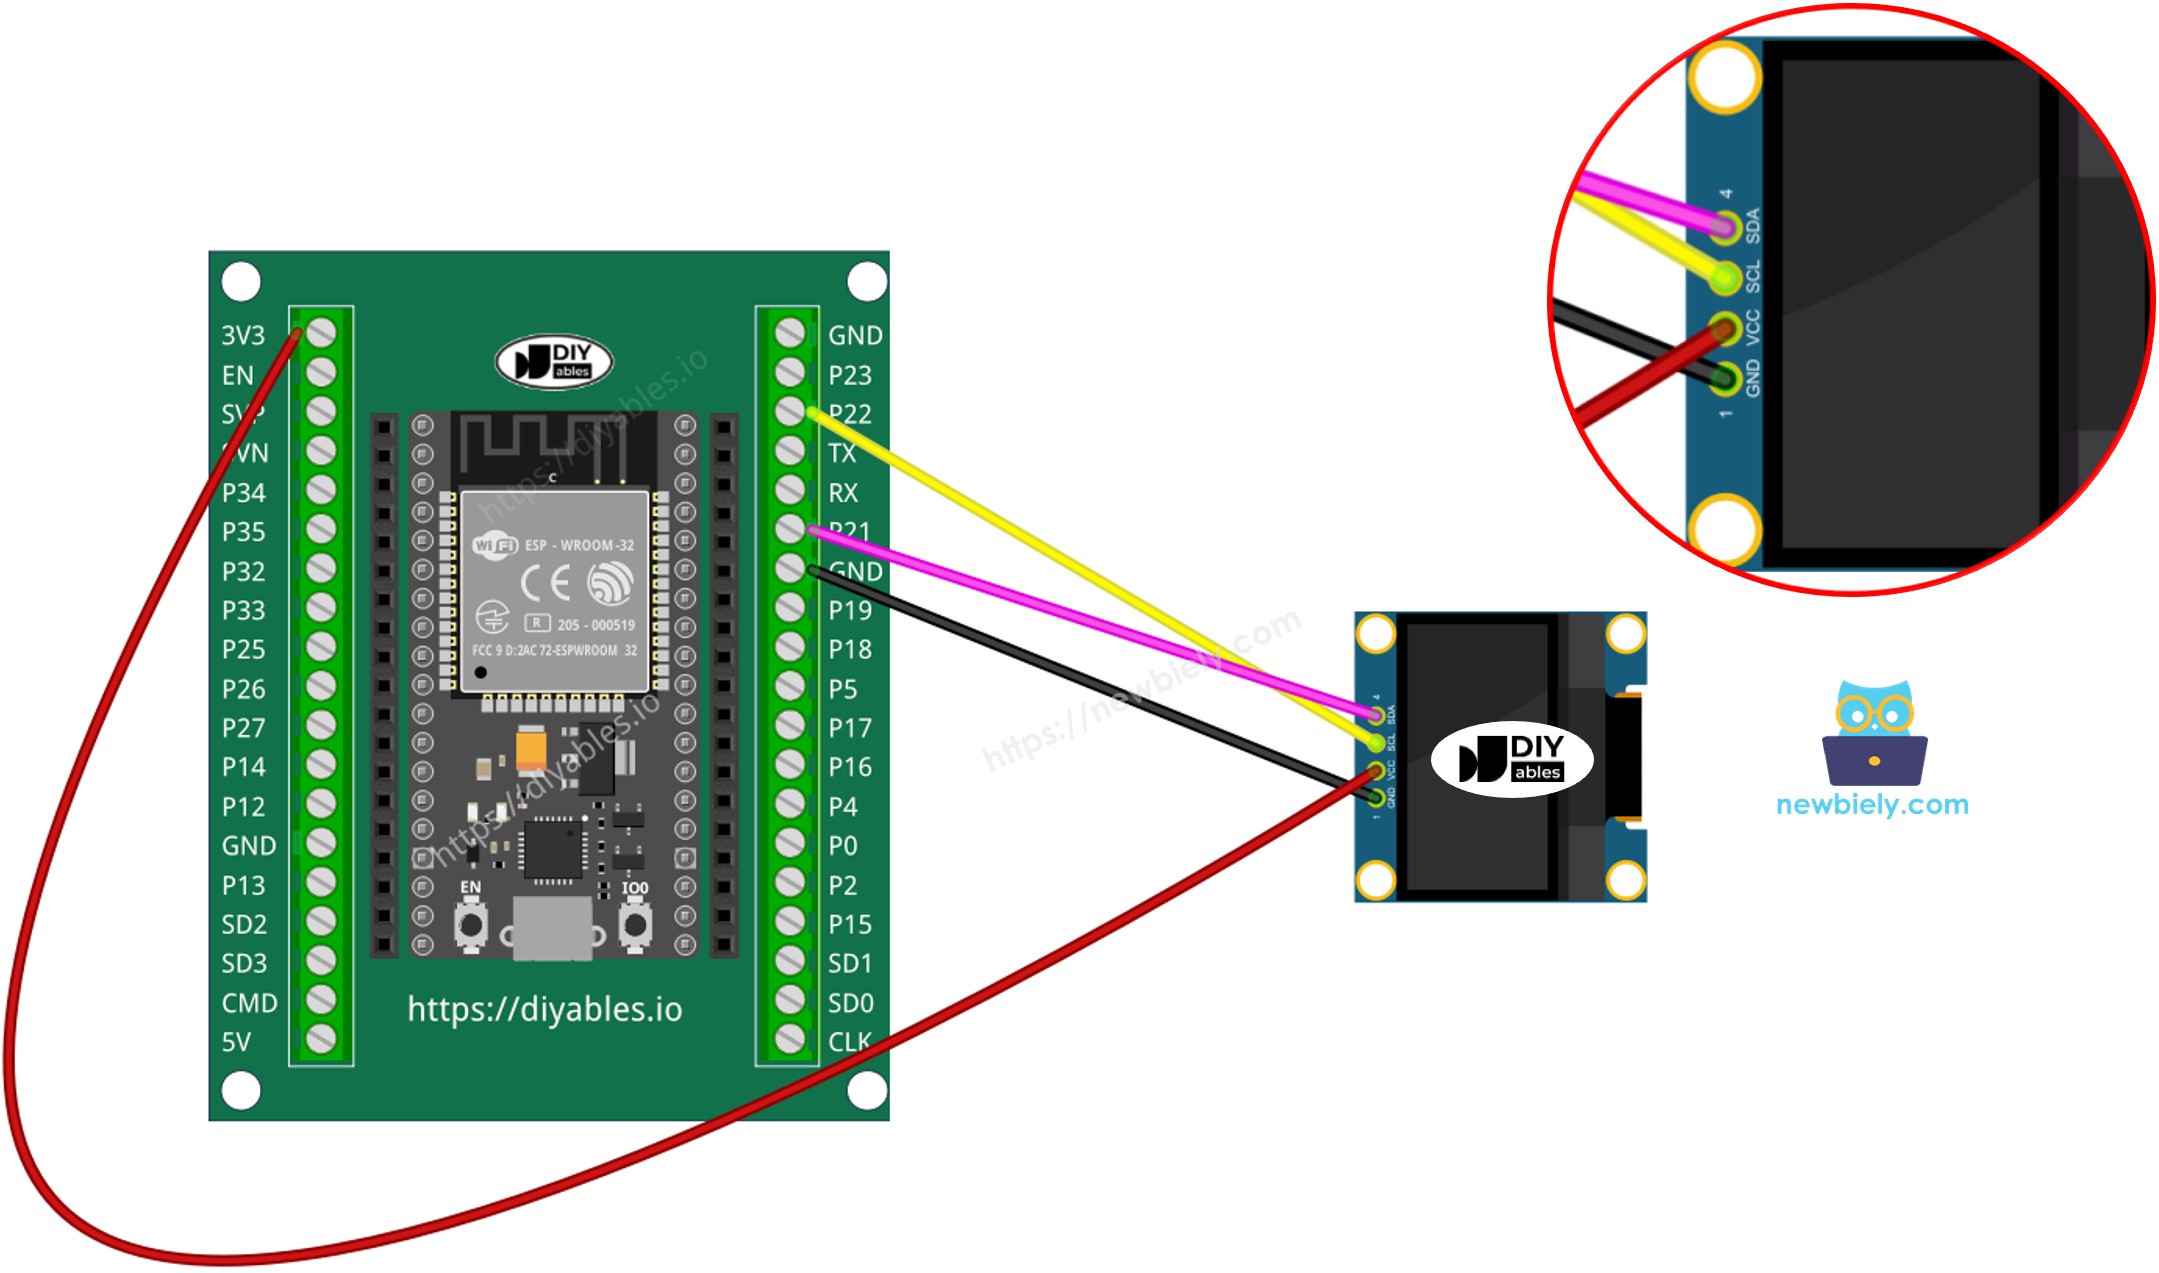
OLED Pinout

Bedradingsschema

  • Hoe u de ESP32 verbindt met een OLED 128x64 display via een breadboard
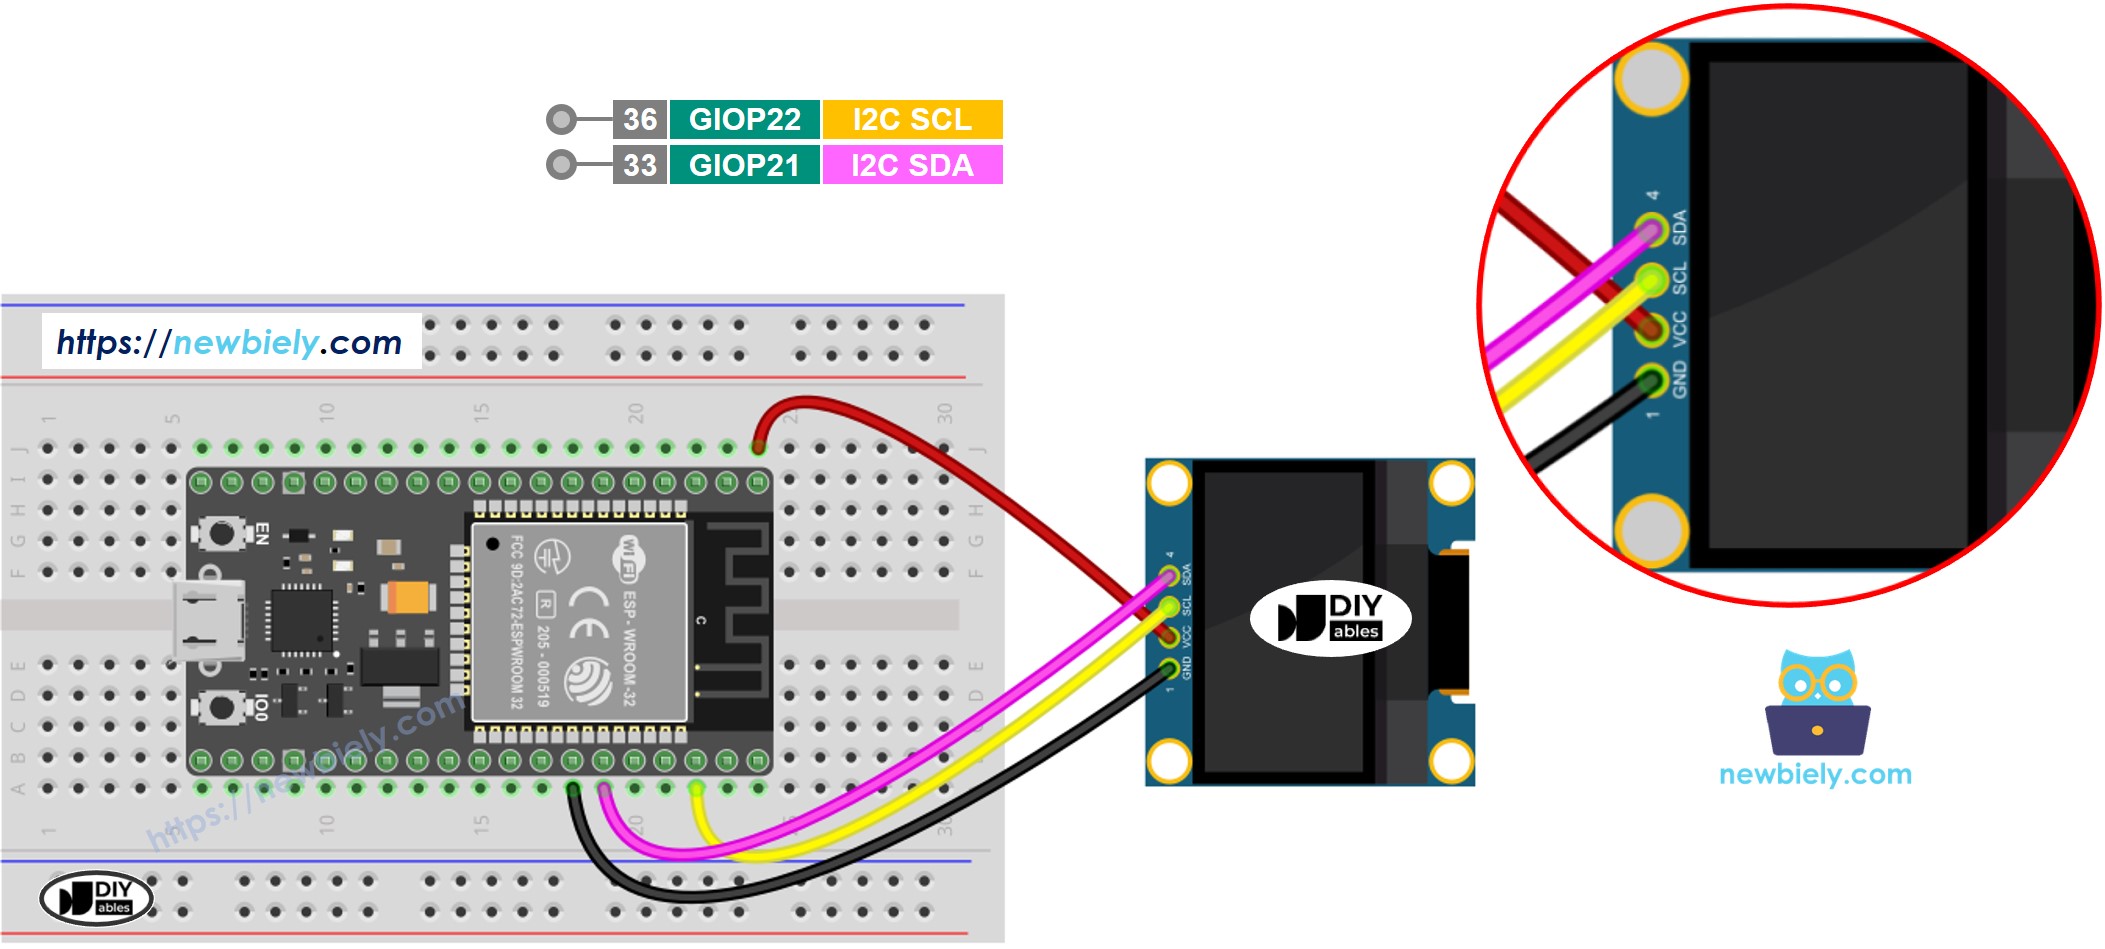
ESP32 OLED 128x64 bedradingsschema

This image is created using Fritzing. Click to enlarge image

Hoe ESP32 verbinden met oled

※ Notiz:

  • De volgorde van de pinnen van het OLED-module kan per fabrikant verschillen. Gebruik ALTIJD de labels die op het OLED-module zelf staan. Kijk goed!

Hoe OLED te gebruiken met ESP32

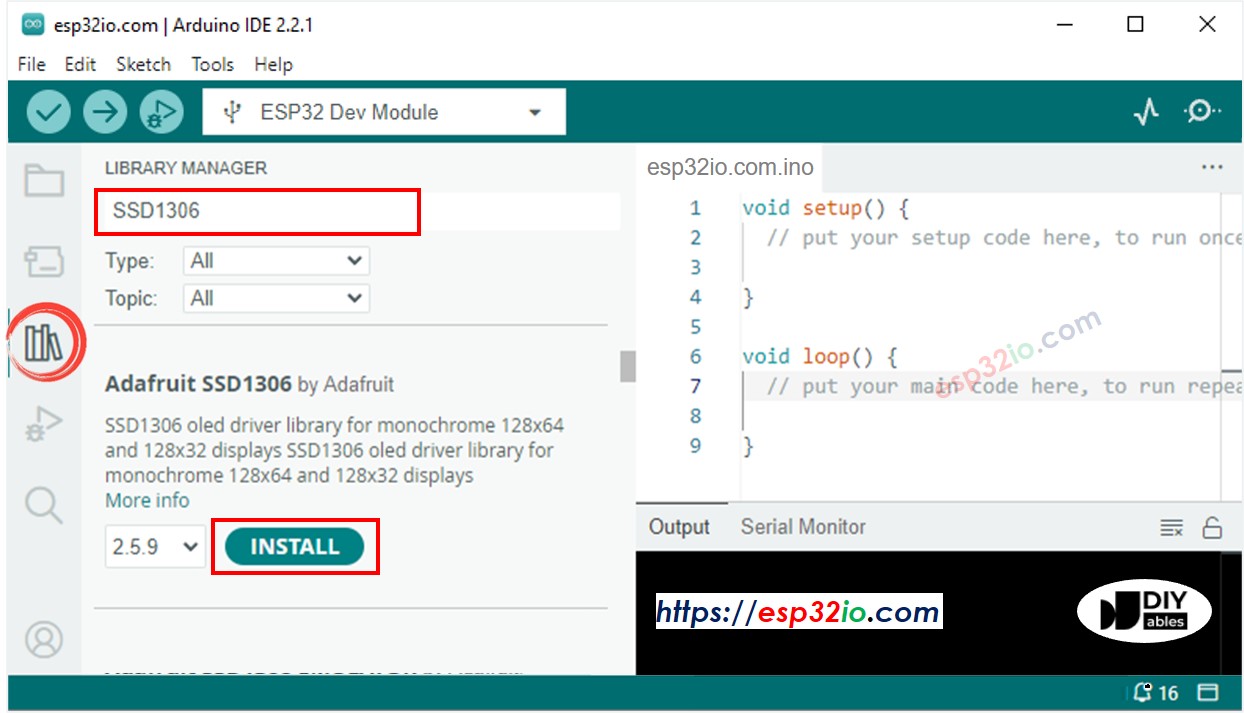
Installeer SSD1306 OLED bibliotheek

  • Klik op het icoon Libraries in de linker balk van de Arduino IDE.
  • Typ SSD1306 in het zoekveld en zoek dan naar de SSD1306 bibliotheek van Adafruit
  • Installeer de bibliotheek door op de Install-knop te klikken.
ESP32 OLED bibliotheek
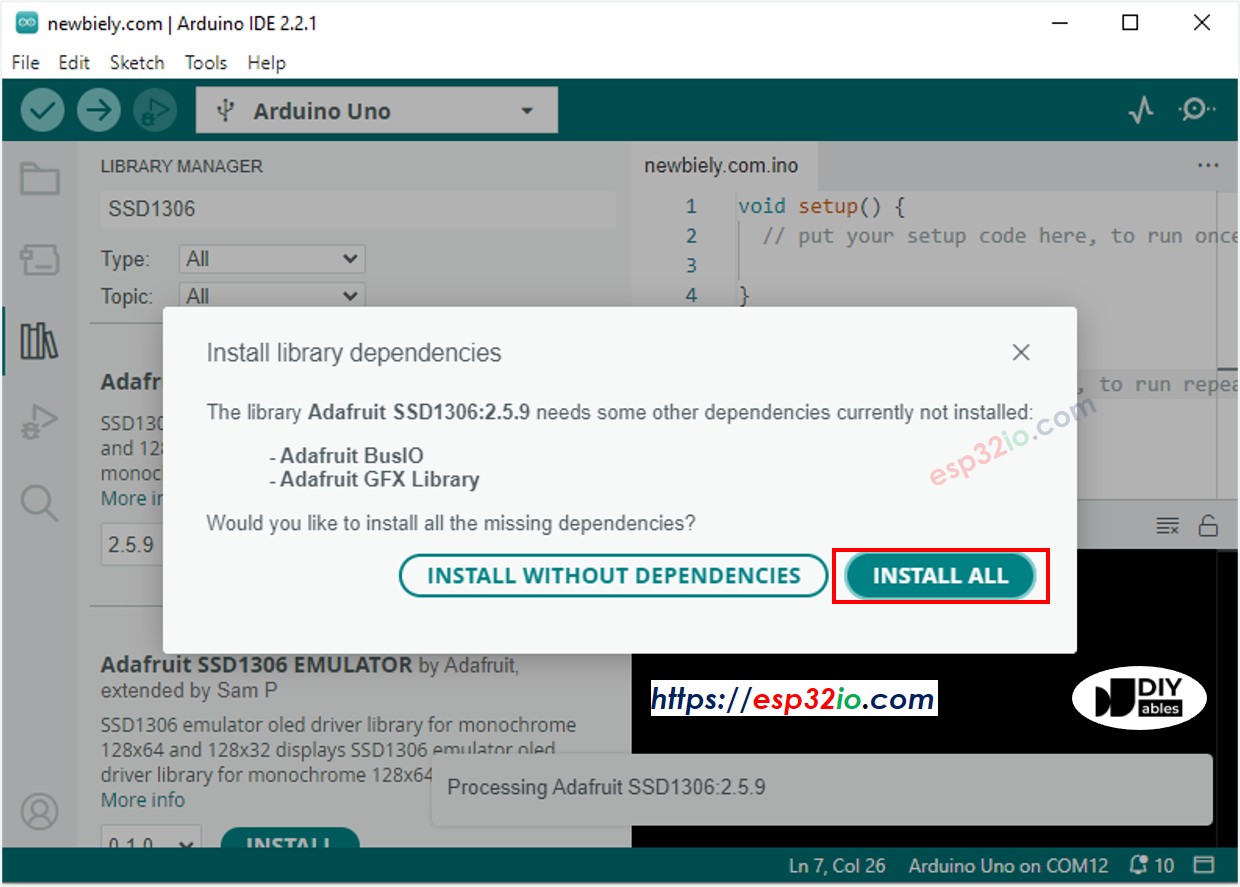
  • Er verschijnt een venster dat vraagt om de afhankelijkheden van de bibliotheek te installeren
  • Installeer alle afhankelijkheden door op de Install All-knop te klikken.
ESP32 Adafruit GFX sensor bibliotheek

Hoe te programmeren voor OLED

  • Voeg de bibliotheken toe
#include <Wire.h> #include <Adafruit_GFX.h> #include <Adafruit_SSD1306.h>
  • Definieer het schermformaat (128x64 of 128x32)
#define SCREEN_WIDTH 128 // OLED display breedte, in pixels #define SCREEN_HEIGHT 64 // OLED display hoogte, in pixels
  • Declareer een SSD1306 OLED-object
// declareer een SSD1306 display-object verbonden via I2C Adafruit_SSD1306 oled(SCREEN_WIDTH, SCREEN_HEIGHT, &Wire, -1);
  • Initialiseert het OLED-display in de functie setup()
// initialiseer OLED display met adres 0x3C voor 128x64 if (!oled.begin(SSD1306_SWITCHCAPVCC, 0x3C)) { Serial.println(F("SSD1306 allocation failed")); while (true); }
  • Daarna kunt u tekst, afbeeldingen weergeven en lijnen tekenen ...

ESP32 Code - Tekst weergeven op OLED

Hieronder staat een voorbeeldcode om tekst weer te geven op het OLED-display

/* * Deze ESP32 code is ontwikkeld door newbiely.nl * Deze ESP32 code wordt zonder enige beperking aan het publiek beschikbaar gesteld. * Voor volledige instructies en schema's, bezoek: * https://newbiely.nl/tutorials/esp32/esp32-oled */ #include <Wire.h> #include <Adafruit_GFX.h> #include <Adafruit_SSD1306.h> #define SCREEN_WIDTH 128 // OLED width, in pixels #define SCREEN_HEIGHT 64 // OLED height, in pixels // create an OLED display object connected to I2C Adafruit_SSD1306 oled(SCREEN_WIDTH, SCREEN_HEIGHT, &Wire, -1); void setup() { Serial.begin(9600); // initialize OLED display with I2C address 0x3C if (!oled.begin(SSD1306_SWITCHCAPVCC, 0x3C)) { Serial.println(F("failed to start SSD1306 OLED")); while (1); } delay(2000); // wait two seconds for initializing oled.clearDisplay(); // clear display oled.setTextSize(1); // set text size oled.setTextColor(WHITE); // set text color oled.setCursor(0, 10); // set position to display oled.println("esp32io.com"); // set text oled.display(); // display on OLED } void loop() { }

Met de volgende functies kunt u meer doen:

  • oled.clearDisplay(): wist het display
  • oled.setTextSize(n): zet de lettergrootte (ondersteunt 1 t/m 8)
  • oled.setTextColor(WHITE): zet de tekstkleur
  • oled.setCursor(x,y): zet de cursorpositie om tekst te starten
  • oled.drawPixel(x,y, color): tekent een pixel op de x,y coördinaten
  • oled.setTextColor(BLACK, WHITE): zet tekstkleur (zwart) en achtergrondkleur (wit)
  • oled.println("message"): print een tekststring
  • oled.println(number): print een nummer
  • oled.println(number, HEX): print een nummer in hexadecimale formaat
  • oled.display(): past de wijzigingen toe op het scherm
  • oled.startscrollright(start, stop): laat tekst van links naar rechts scrollen
  • oled.startscrollleft(start, stop): laat tekst van rechts naar links scrollen
  • oled.startscrolldiagright(start, stop): laat tekst diagonaal scrollen van linksonder naar rechtsboven
  • oled.startscrolldiagleft(start, stop): laat tekst diagonaal scrollen van rechtsonder naar linksboven
  • oled.stopscroll(): stopt het scrollen

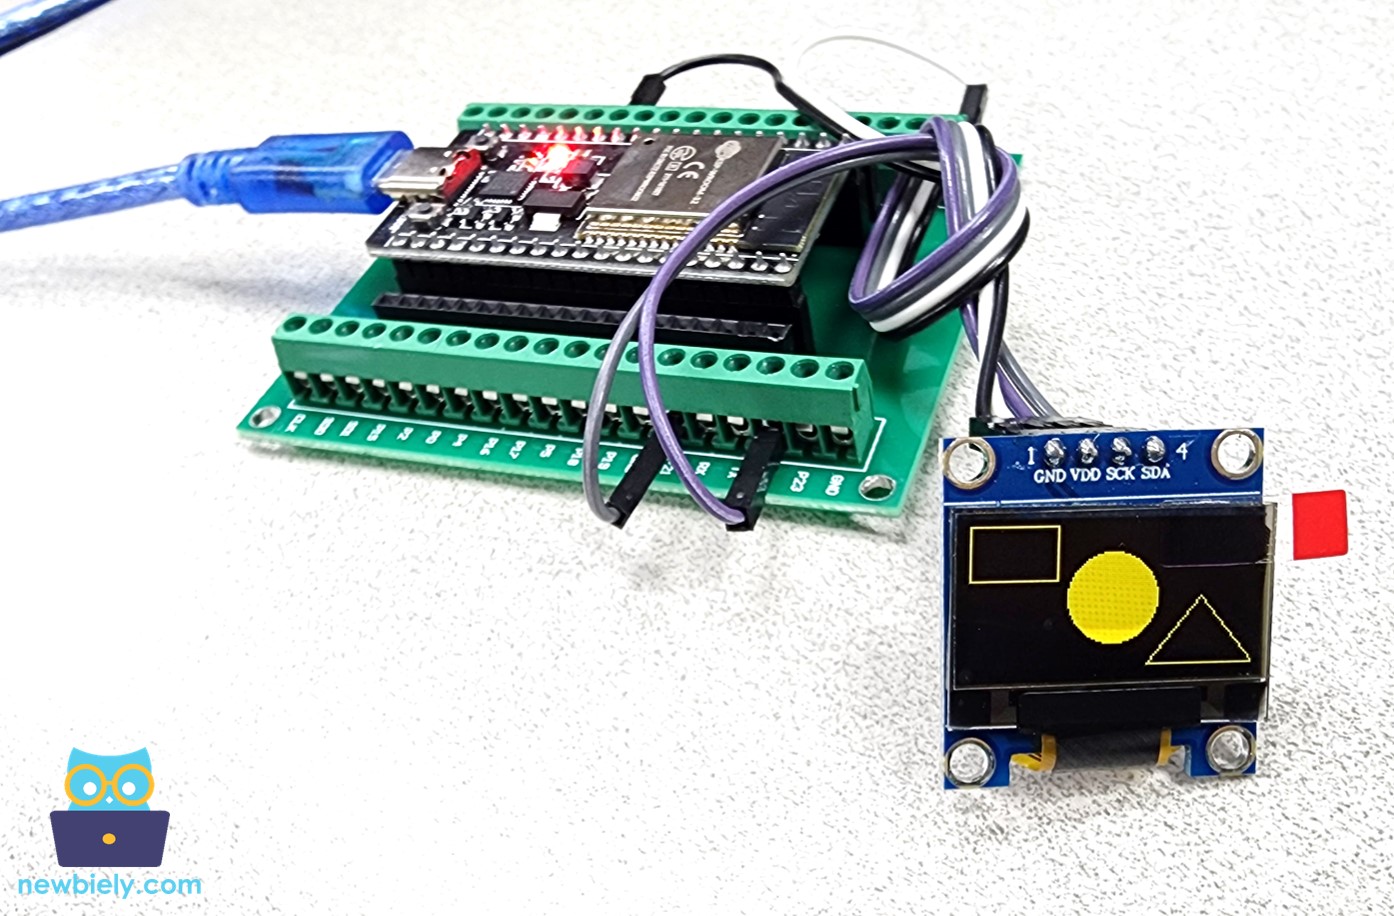
ESP32 Code - Vormen tekenen op OLED

De onderstaande code laat zien hoe u verschillende vormen tekent op het OLED-display

/* * Deze ESP32 code is ontwikkeld door newbiely.nl * Deze ESP32 code wordt zonder enige beperking aan het publiek beschikbaar gesteld. * Voor volledige instructies en schema's, bezoek: * https://newbiely.nl/tutorials/esp32/esp32-oled */ #include <Wire.h> #include <Adafruit_GFX.h> #include <Adafruit_SSD1306.h> #define SCREEN_WIDTH 128 // OLED width, in pixels #define SCREEN_HEIGHT 64 // OLED height, in pixels // create an OLED display object connected to I2C Adafruit_SSD1306 oled(SCREEN_WIDTH, SCREEN_HEIGHT, &Wire, -1); void setup() { Serial.begin(9600); // initialize OLED display with I2C address 0x3C if (!oled.begin(SSD1306_SWITCHCAPVCC, 0x3C)) { Serial.println(F("failed to start SSD1306 OLED")); while (1); } delay(2000); // wait two seconds for initializing oled.setCursor(0, 0); } void loop() { // draw a circle oled.clearDisplay(); //oled.drawCircle(64, 32, 20, WHITE); oled.fillCircle(64, 32, 20, WHITE); oled.display(); // draw a triangle oled.clearDisplay(); //oled.fillTriangle(80, 62, 128, 62, 104, 32, WHITE); oled.drawTriangle(80, 62, 128, 62, 104, 32, WHITE); oled.display(); // draw a rectangle oled.clearDisplay(); //oled.fillRect(0, 0, 40, 25, WHITE); oled.drawRect(0, 0, 40, 25, WHITE); oled.display(); delay(1000); }

Na het uitvoeren van de code ziet u een rechthoek, cirkel en driehoek op het OLED-scherm.

ESP32 teken rechthoek, cirkel en driehoek op OLED

ESP32 Code – Afbeelding weergeven op OLED

Om een afbeelding op het OLED-scherm te tonen, moet u de afbeelding converteren naar een bitmap-array. Er is een online tool beschikbaar om afbeeldingen om te zetten naar een bitmap-array. Hieronder ziet u hoe dat werkt. Ik heb het ESP32-icoon geconverteerd naar een bitmap-array.

afbeelding naar bitmap-array

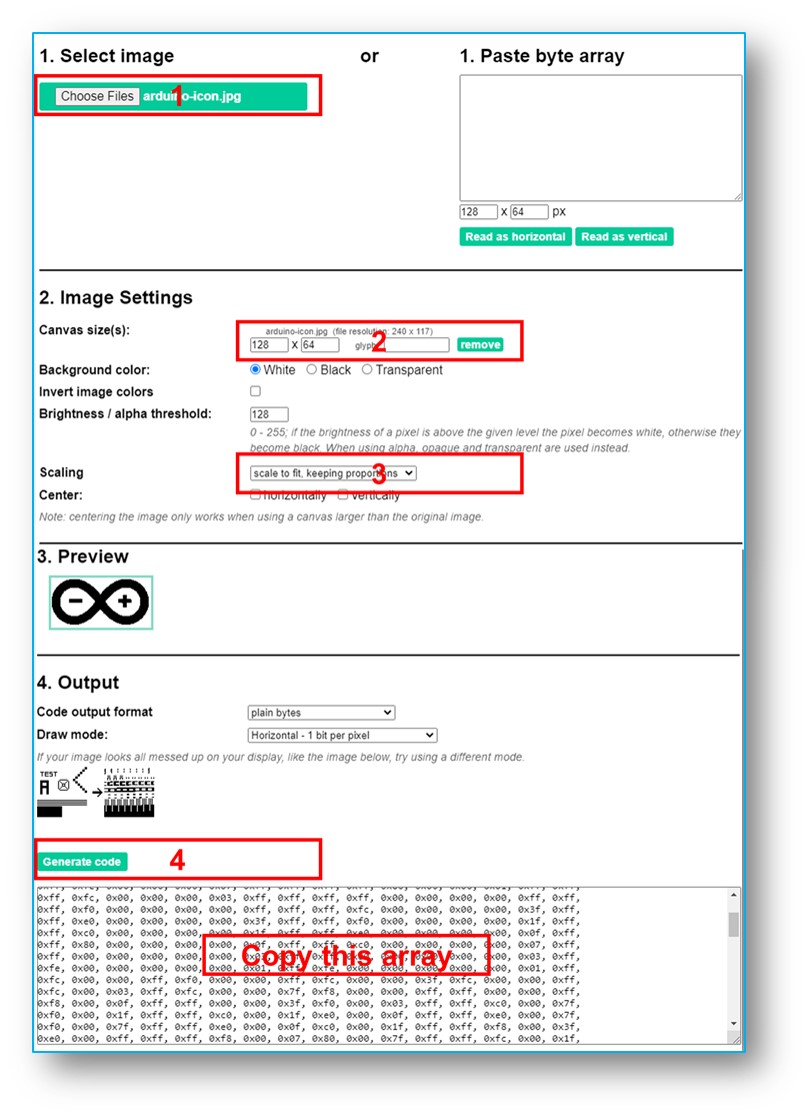
Na het converteren kopieert u de array en plakt u deze in de bitmap_image array in de volgende code:

/* * Deze ESP32 code is ontwikkeld door newbiely.nl * Deze ESP32 code wordt zonder enige beperking aan het publiek beschikbaar gesteld. * Voor volledige instructies en schema's, bezoek: * https://newbiely.nl/tutorials/esp32/esp32-oled */ #include <Wire.h> #include <Adafruit_GFX.h> #include <Adafruit_SSD1306.h> #define SCREEN_WIDTH 128 // OLED width, in pixels #define SCREEN_HEIGHT 64 // OLED height, in pixels // create an OLED display object connected to I2C Adafruit_SSD1306 oled(SCREEN_WIDTH, SCREEN_HEIGHT, &Wire, -1); // bitmap of DIYables-icon image const unsigned char bitmap_image [] PROGMEM = { // 'DIYables-icon', 128x64px 0x00, 0x00, 0x03, 0xff, 0xff, 0xff, 0xff, 0xc0, 0xff, 0xfe, 0x00, 0x03, 0xf1, 0xf8, 0x00, 0x3e, 0x00, 0x00, 0x03, 0xff, 0xff, 0xff, 0xff, 0xc0, 0xff, 0xff, 0xc0, 0x03, 0xf1, 0xf8, 0x00, 0x7e, 0x00, 0x00, 0x03, 0xff, 0xff, 0xff, 0xff, 0xc0, 0xff, 0xff, 0xf0, 0x03, 0xf0, 0xfc, 0x00, 0x7c, 0x00, 0x00, 0x03, 0xff, 0xff, 0xff, 0xff, 0xc0, 0xff, 0xff, 0xf8, 0x03, 0xf0, 0xfc, 0x00, 0xfc, 0x00, 0x00, 0x03, 0xff, 0xff, 0xff, 0xff, 0xc0, 0xff, 0xff, 0xfc, 0x03, 0xf0, 0x7e, 0x00, 0xf8, 0x00, 0x00, 0x03, 0xff, 0xff, 0xff, 0xff, 0xc0, 0xf8, 0x01, 0xfe, 0x03, 0xf0, 0x3f, 0x01, 0xf8, 0x00, 0x00, 0x03, 0xff, 0xff, 0xff, 0xff, 0xc0, 0xf8, 0x00, 0x7f, 0x03, 0xf0, 0x3f, 0x03, 0xf0, 0x00, 0x00, 0x03, 0xff, 0xff, 0xff, 0xff, 0xc0, 0xf8, 0x00, 0x3f, 0x03, 0xf0, 0x1f, 0x83, 0xe0, 0x00, 0x00, 0x03, 0xff, 0xff, 0xff, 0xff, 0xc0, 0xf8, 0x00, 0x3f, 0x83, 0xf0, 0x1f, 0x87, 0xe0, 0x00, 0x00, 0x03, 0xff, 0xff, 0xff, 0xff, 0xc0, 0xf8, 0x00, 0x1f, 0x83, 0xf0, 0x0f, 0xc7, 0xc0, 0x00, 0x00, 0x03, 0xff, 0xff, 0xff, 0xff, 0xc0, 0xf8, 0x00, 0x1f, 0x83, 0xf0, 0x07, 0xef, 0xc0, 0x00, 0x00, 0x03, 0xff, 0xff, 0xff, 0xff, 0xc0, 0xf8, 0x00, 0x1f, 0x83, 0xf0, 0x07, 0xff, 0x80, 0xf0, 0x00, 0x03, 0xff, 0xff, 0xff, 0xff, 0xc0, 0xf8, 0x00, 0x1f, 0x83, 0xf0, 0x03, 0xff, 0x00, 0xfe, 0x00, 0x03, 0xff, 0xff, 0xff, 0xff, 0xc0, 0xf8, 0x00, 0x1f, 0x83, 0xf0, 0x03, 0xff, 0x00, 0xff, 0xc0, 0x03, 0xff, 0xff, 0xff, 0xff, 0xc0, 0xf8, 0x00, 0x1f, 0x83, 0xf0, 0x01, 0xfe, 0x00, 0xff, 0xe0, 0x03, 0xff, 0xff, 0xff, 0xff, 0xc0, 0xf8, 0x00, 0x1f, 0x83, 0xf0, 0x00, 0xfe, 0x00, 0xff, 0xf8, 0x03, 0xff, 0xff, 0xff, 0xff, 0xc0, 0xf8, 0x00, 0x1f, 0x83, 0xf0, 0x00, 0xfc, 0x00, 0xff, 0xfc, 0x03, 0xff, 0xff, 0xff, 0xff, 0xc0, 0xf8, 0x00, 0x3f, 0x03, 0xf0, 0x00, 0xfc, 0x00, 0xff, 0xfe, 0x03, 0xff, 0xff, 0xff, 0xff, 0xc0, 0xf8, 0x00, 0x7f, 0x03, 0xf0, 0x00, 0xfc, 0x00, 0xff, 0xff, 0x03, 0xff, 0xff, 0xff, 0xff, 0xc0, 0xf8, 0x00, 0xff, 0x03, 0xf0, 0x00, 0xfc, 0x00, 0xff, 0xff, 0x83, 0xff, 0xff, 0xff, 0xff, 0xc0, 0xf8, 0x03, 0xfe, 0x03, 0xf0, 0x00, 0xfc, 0x00, 0xff, 0xff, 0xc3, 0xff, 0xff, 0xff, 0xff, 0xc0, 0xff, 0xff, 0xfc, 0x03, 0xf0, 0x00, 0xfc, 0x00, 0xff, 0xff, 0xc3, 0xff, 0xff, 0xff, 0xff, 0xc0, 0xff, 0xff, 0xf8, 0x03, 0xf0, 0x00, 0xfc, 0x00, 0xff, 0xff, 0xe3, 0xff, 0xff, 0xff, 0xff, 0xc0, 0xff, 0xff, 0xe0, 0x03, 0xf0, 0x00, 0xfc, 0x00, 0xff, 0xff, 0xe3, 0xff, 0xff, 0xff, 0xff, 0xc0, 0xff, 0xff, 0x80, 0x03, 0xf0, 0x00, 0xfc, 0x00, 0xff, 0xff, 0xf3, 0xff, 0xff, 0xff, 0xff, 0xc0, 0xff, 0xf8, 0x00, 0x03, 0xe0, 0x00, 0xfc, 0x00, 0xff, 0xff, 0xf3, 0xff, 0xff, 0xff, 0xff, 0xc0, 0x00, 0x00, 0x00, 0x00, 0x00, 0x00, 0x00, 0x00, 0xff, 0xff, 0xfb, 0xff, 0xff, 0xff, 0xff, 0xc0, 0x00, 0x00, 0x00, 0x00, 0x00, 0x00, 0x00, 0x00, 0xff, 0xff, 0xfb, 0xff, 0xff, 0xff, 0xff, 0xc0, 0x00, 0x00, 0x00, 0x00, 0x00, 0x00, 0x00, 0x00, 0xff, 0xff, 0xfb, 0xff, 0xff, 0xff, 0xff, 0xc0, 0x00, 0x00, 0x00, 0x00, 0x00, 0x00, 0x00, 0x00, 0xff, 0xff, 0xfb, 0xff, 0xff, 0xff, 0xff, 0xc0, 0x00, 0x00, 0x00, 0x00, 0x00, 0x00, 0x00, 0x00, 0xff, 0xff, 0xff, 0xff, 0xff, 0xff, 0xff, 0xc0, 0xff, 0xff, 0xff, 0xff, 0xff, 0xff, 0xff, 0xff, 0xff, 0xff, 0xff, 0xff, 0xff, 0xff, 0xff, 0xc0, 0xff, 0xff, 0xff, 0xff, 0xff, 0xff, 0xff, 0xff, 0xff, 0xff, 0xff, 0xff, 0xff, 0xff, 0xff, 0xc0, 0xff, 0xff, 0xff, 0xff, 0xff, 0xff, 0xff, 0xff, 0xff, 0xff, 0xff, 0xff, 0xff, 0xff, 0xff, 0xc0, 0xff, 0xff, 0xff, 0xff, 0xff, 0xff, 0xff, 0xff, 0xff, 0xff, 0xff, 0xff, 0xff, 0xff, 0xff, 0xc0, 0xff, 0xff, 0xff, 0xff, 0xff, 0xff, 0xff, 0xff, 0xff, 0xff, 0xff, 0xff, 0xff, 0xff, 0xff, 0xc0, 0xff, 0xff, 0xc7, 0xff, 0x1f, 0xff, 0xff, 0xff, 0xff, 0xff, 0xff, 0xff, 0xff, 0xff, 0xff, 0xc0, 0xff, 0xff, 0xc7, 0xff, 0x1f, 0xff, 0xff, 0xff, 0xff, 0xff, 0xfb, 0xff, 0xff, 0xff, 0xff, 0x80, 0xff, 0xff, 0xc7, 0xff, 0x1f, 0xff, 0xff, 0xff, 0xff, 0xff, 0xfb, 0xff, 0xff, 0xff, 0xff, 0x80, 0xff, 0xff, 0xc7, 0xff, 0x1f, 0xff, 0xff, 0xff, 0xff, 0xff, 0xfb, 0xff, 0xff, 0xff, 0xff, 0x80, 0xff, 0x9f, 0xc6, 0x7f, 0x1f, 0xdf, 0xf9, 0xff, 0xff, 0xff, 0xfb, 0xff, 0xff, 0xff, 0xff, 0x00, 0xfc, 0x03, 0xc0, 0x0f, 0x1e, 0x03, 0xe0, 0x3f, 0xff, 0xff, 0xf3, 0xff, 0xff, 0xff, 0xff, 0x00, 0xfc, 0x03, 0xc0, 0x07, 0x1c, 0x01, 0xc0, 0x3f, 0xff, 0xff, 0xf3, 0xff, 0xff, 0xff, 0xfe, 0x00, 0xfd, 0xf1, 0xc3, 0xc7, 0x18, 0xf8, 0x8f, 0xff, 0xff, 0xff, 0xe3, 0xff, 0xff, 0xff, 0xfe, 0x00, 0xff, 0xf1, 0xc7, 0xe3, 0x18, 0xf8, 0x8f, 0xff, 0xff, 0xff, 0xe3, 0xff, 0xff, 0xff, 0xfc, 0x00, 0xfe, 0x01, 0xc7, 0xe3, 0x18, 0x00, 0xc0, 0xff, 0xff, 0xff, 0xc3, 0xff, 0xff, 0xff, 0xfc, 0x00, 0xfc, 0x01, 0xc7, 0xe3, 0x18, 0x00, 0xe0, 0x3f, 0xff, 0xff, 0xc3, 0xff, 0xff, 0xff, 0xf8, 0x00, 0xf8, 0xf1, 0xc7, 0xe3, 0x18, 0xff, 0xfe, 0x1f, 0xff, 0xff, 0x83, 0xff, 0xff, 0xff, 0xf0, 0x00, 0xf8, 0xf1, 0xc3, 0xc7, 0x18, 0xff, 0xff, 0x1f, 0xff, 0xff, 0x03, 0xff, 0xff, 0xff, 0xe0, 0x00, 0xf8, 0x61, 0xc0, 0x07, 0x1c, 0x01, 0xc0, 0x3f, 0xff, 0xfe, 0x03, 0xff, 0xff, 0xff, 0xc0, 0x00, 0xfc, 0x01, 0xc0, 0x0f, 0x1e, 0x01, 0x80, 0x3f, 0xff, 0xfc, 0x03, 0xff, 0xff, 0xff, 0x80, 0x00, 0xfe, 0x19, 0xc4, 0x3f, 0x1f, 0x87, 0xe0, 0xff, 0xff, 0xf8, 0x03, 0xff, 0xff, 0xff, 0x00, 0x00, 0xff, 0xff, 0xff, 0xff, 0xff, 0xff, 0xff, 0xff, 0xff, 0xe0, 0x03, 0xff, 0xff, 0xfc, 0x00, 0x00, 0xff, 0xff, 0xff, 0xff, 0xff, 0xff, 0xff, 0xff, 0xff, 0xc0, 0x03, 0xff, 0xff, 0xf0, 0x00, 0x00, 0xff, 0xff, 0xff, 0xff, 0xff, 0xff, 0xff, 0xff, 0xff, 0x00, 0x03, 0xff, 0xff, 0xc0, 0x00, 0x00, 0xff, 0xff, 0xff, 0xff, 0xff, 0xff, 0xff, 0xff, 0xf0, 0x00, 0x03, 0xff, 0xfc, 0x00, 0x00, 0x00, 0xff, 0xff, 0xff, 0xff, 0xff, 0xff, 0xff, 0xff }; void setup() { Serial.begin(9600); // initialize OLED display with I2C address 0x3C if (!oled.begin(SSD1306_SWITCHCAPVCC, 0x3C)) { Serial.println(F("failed to start SSD1306 OLED")); while (1); } delay(2000); // wait two seconds for initializing oled.setCursor(0, 0); } void loop() { oled.clearDisplay(); // display bitmap oled.drawBitmap(0, 0, bitmap_image, 128, 57, WHITE); oled.display(); delay(1000); // invert display oled.invertDisplay(1); delay(1000); }

Nadat u de code hebt uitgevoerd, ziet u de afbeelding op het OLED-scherm zoals hieronder weergegeven.

ESP32 afbeelding weergeven op OLED

OLED Problemen oplossen

Zie OLED Problemen oplossen

※ ONZE BERICHTEN

  • U bent welkom om de link naar deze tutorial te delen. Gebruik onze inhoud echter niet op andere websites. We hebben veel moeite en tijd gestoken in het maken van de inhoud, respecteer alstublieft ons werk!