ESP32 Bluetooth Chat Voorbeeld - Tweerichtingsberichtgeving Interface Tutorial
Met het Bluetooth Chat voorbeeld kunt u tweerichtings-verkeer van tekstberichten realiseren tussen uw ESP32 en een smartphone via de DIYables Bluetooth STEM app. Speciaal ontworpen voor ESP32 boards met ondersteuning voor zowel BLE (Bluetooth Low Energy) als Classic Bluetooth verbindingen. Stuur en ontvang tekstberichten in realtime, implementeer aangepaste commandoverwerking en verbind de Seriële Monitor met Bluetooth — ideaal voor debugging, afstandsbediening en interactieve projecten.
Dit voorbeeld ondersteunt twee Bluetooth-modi:
ESP32 BLE (Bluetooth Low Energy): Werkt op zowel Android als iOS
ESP32 Classic Bluetooth: Werkt alleen op Android. iOS ondersteunt geen Classic Bluetooth. Gebruik BLE als u iOS-ondersteuning nodig heeft.
Tweerichtingsberichtgeving: Stuur en ontvang tekstberichten in realtime
Echo Modus: Ontvangen berichten worden automatisch teruggestuurd naar de app
Commandoverwerking: Verwerk aangepaste tekstcommando’s (ping, status, time, heap)
Periodieke berichten: Verstuur automatische statusupdates met configureerbare intervallen
Serieel-naar-Bluetooth brug: Typ berichten in Serial Monitor en verstuur ze naar de app
BLE & Classic Bluetooth: Kies de Bluetooth-modus die bij uw project past
Cross-platform: BLE werkt op Android en iOS; Classic Bluetooth werkt alleen op Android
Laag stroomverbruik optie: BLE verbruikt minder energie dan Classic Bluetooth
Of u kunt de volgende kits kopen:
Openbaarmaking: Sommige van de links in deze sectie zijn Amazon-affiliate links. We kunnen een commissie ontvangen voor aankopen die via deze links worden gedaan, zonder extra kosten voor u. We waarderen uw steun.
Volg deze instructies stap voor stap:
Verbind het ESP32 board met uw computer via een USB-kabel.
Start de Arduino IDE op uw computer.
Selecteer het juiste ESP32 board en COM-poort.
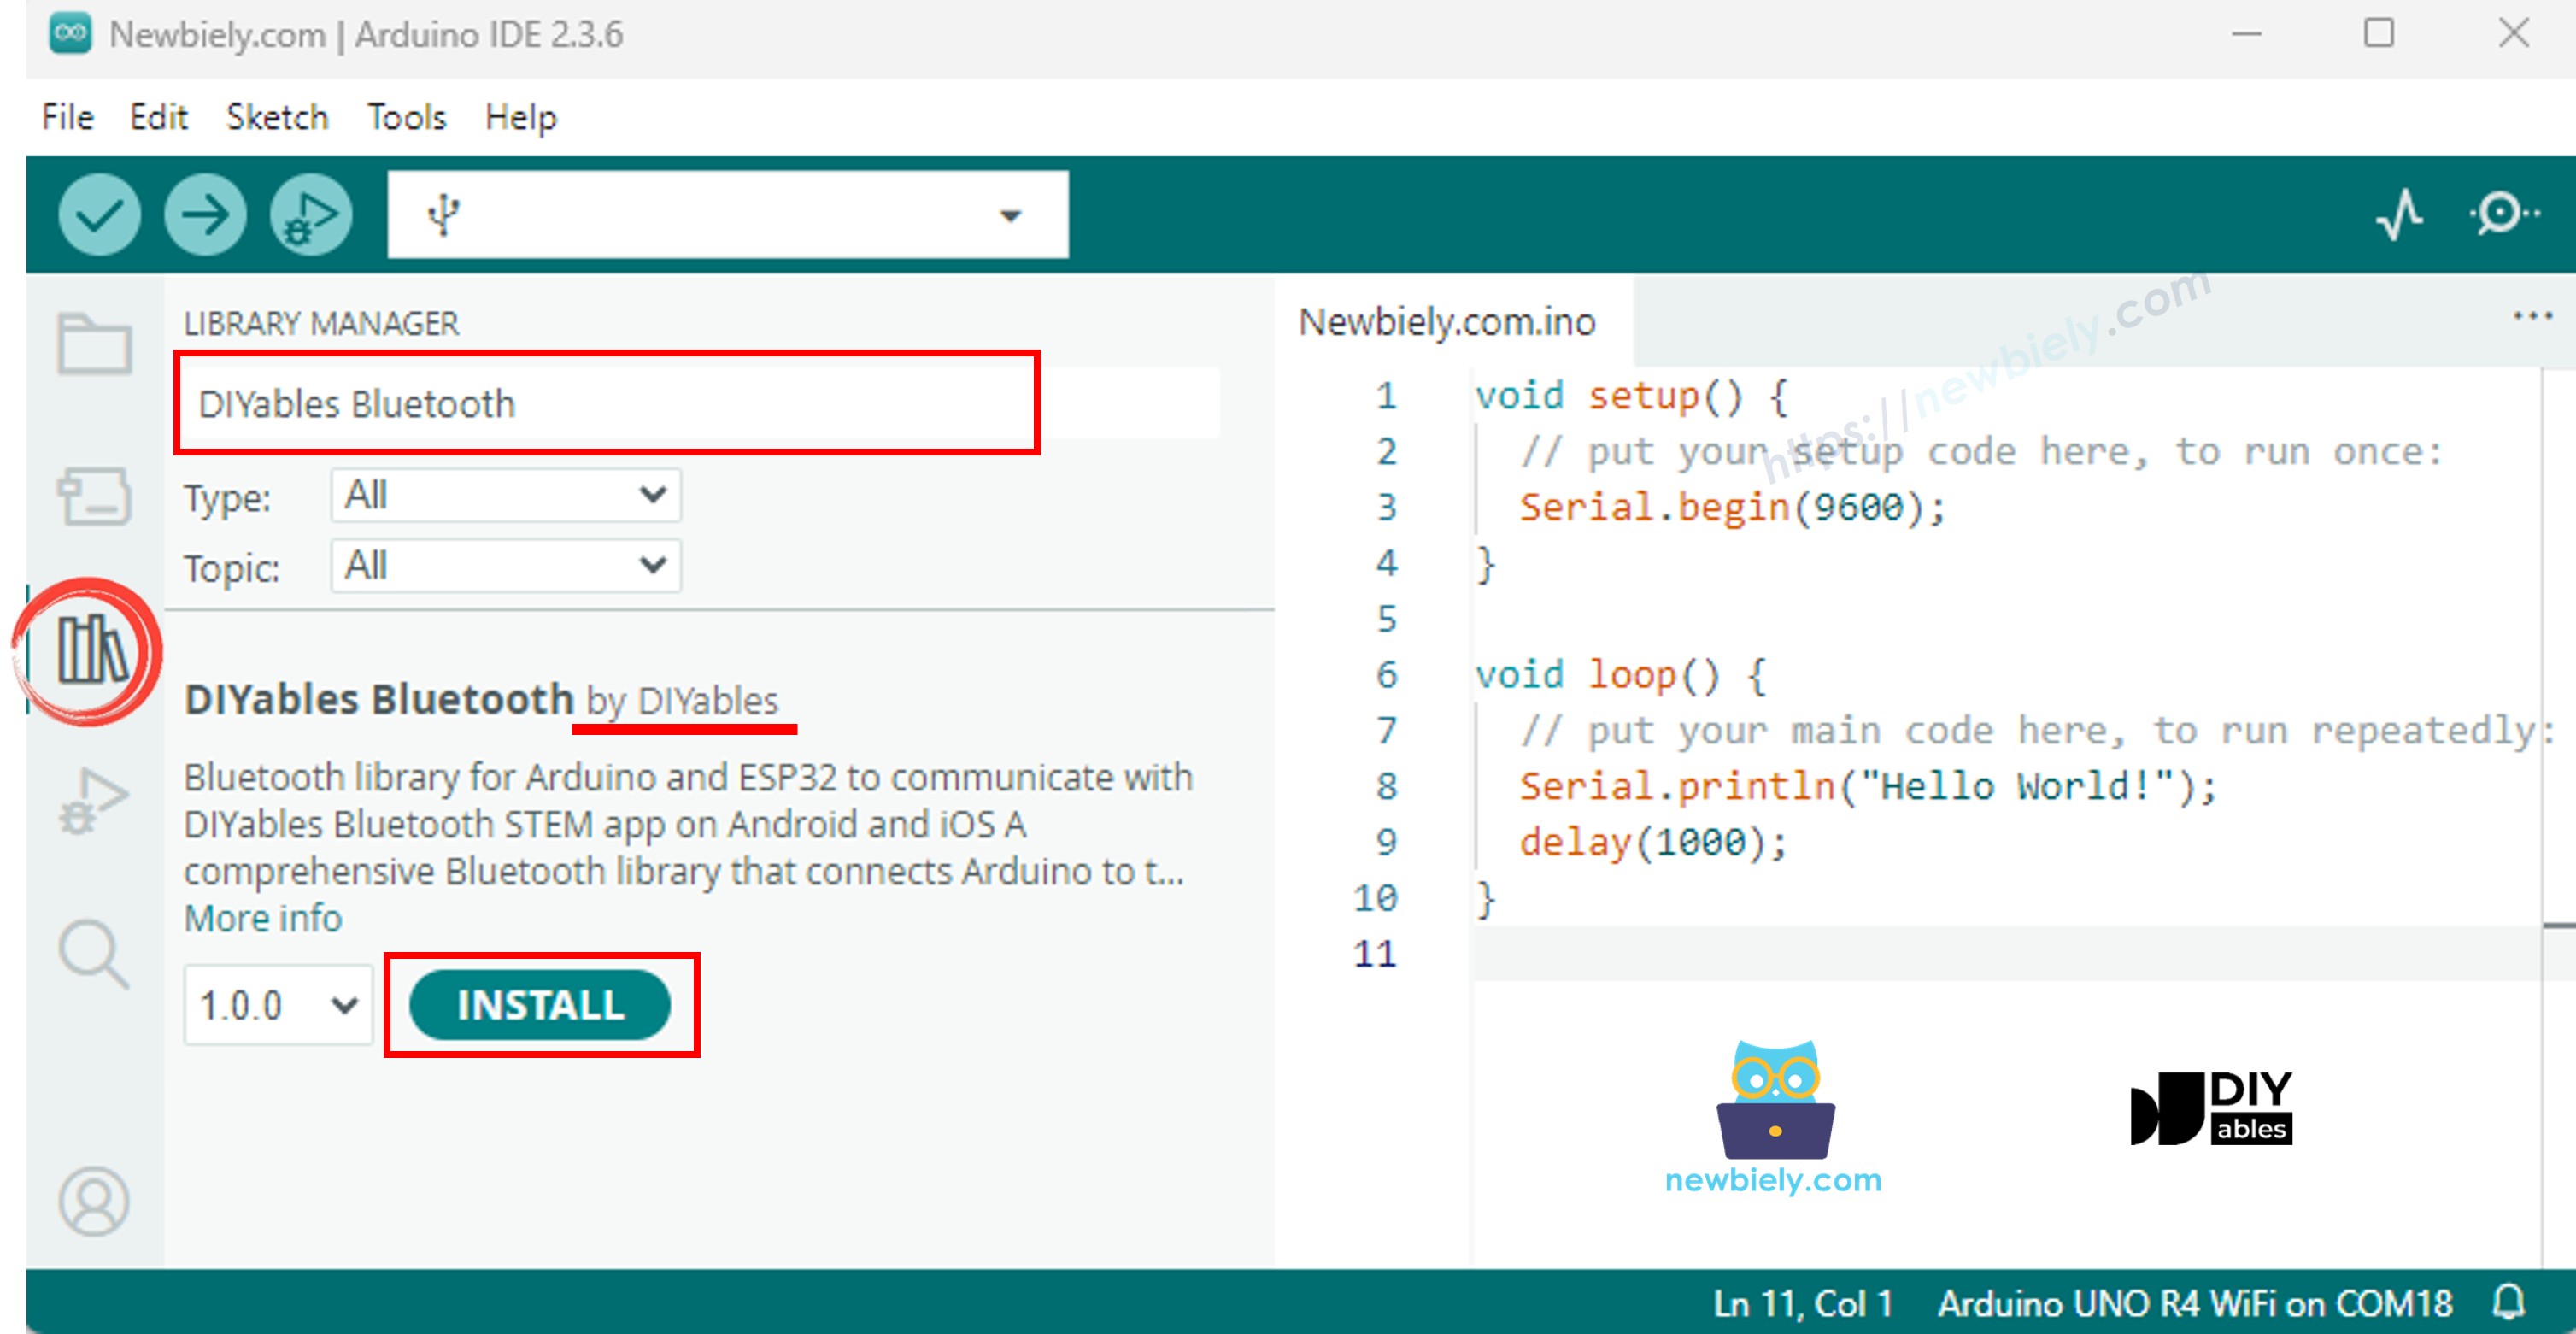
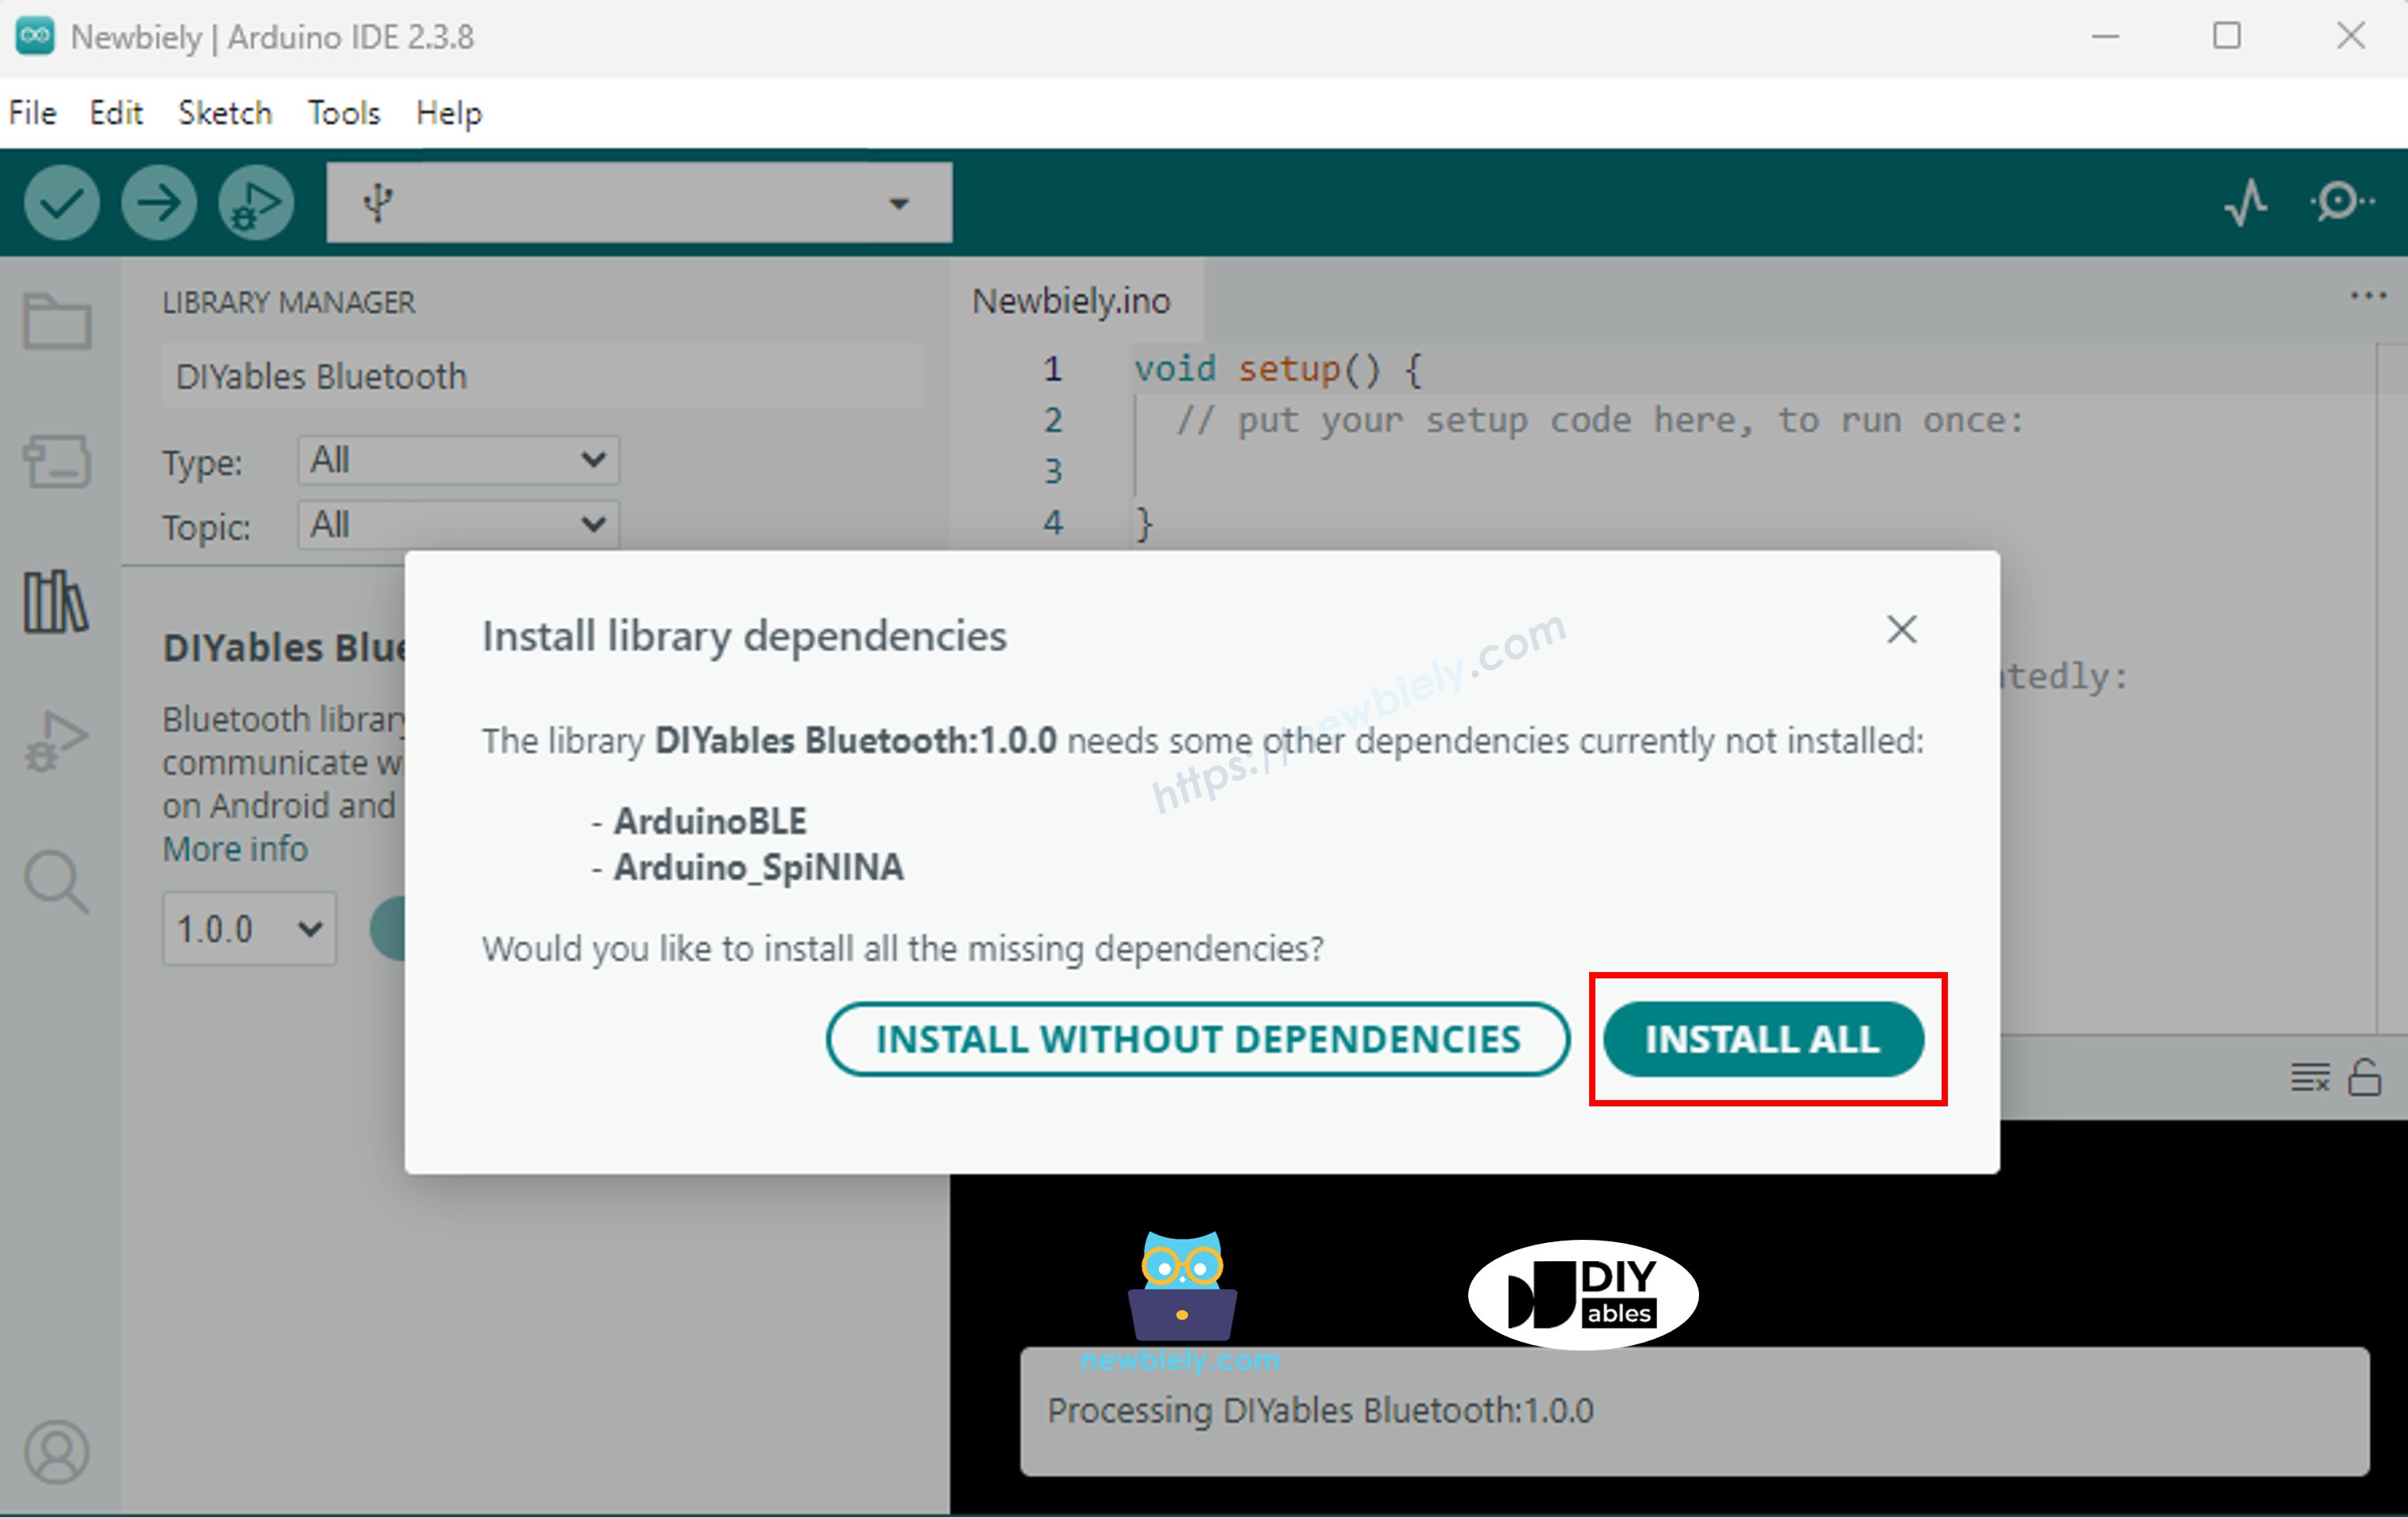
Ga naar het Bibliotheek-icoon in de linker balk van de Arduino IDE.
Zoek op "DIYables Bluetooth" en vind de DIYables Bluetooth bibliotheek van DIYables.
Klik op de knop Installeren om de bibliotheek te installeren.
Kies een van onderstaande Bluetooth-modi die bij uw behoeften past:
Let op: Classic Bluetooth wordt NIET ondersteund op iOS. Heeft u iOS-ondersteuning nodig, gebruik dan de BLE-code hieronder.
#include <DIYables_BluetoothServer.h>
#include <DIYables_BluetoothChat.h>
#include <platforms/DIYables_Esp32Bluetooth.h>
DIYables_Esp32Bluetooth bluetooth("ESP32_Chat");
DIYables_BluetoothServer bluetoothServer(bluetooth);
DIYables_BluetoothChat bluetoothChat;
unsigned long lastMessageTime = 0;
const unsigned long MESSAGE_INTERVAL = 10000;
int messageCount = 0;
void setup() {
Serial.begin(115200);
delay(1000);
Serial.println("DIYables Bluetooth - ESP32 Chat Example");
bluetoothServer.begin();
bluetoothServer.addApp(&bluetoothChat);
bluetoothServer.setOnConnected([]() {
Serial.println("Bluetooth connected!");
bluetoothChat.send("Hello! ESP32 is ready to chat.");
});
bluetoothServer.setOnDisconnected([]() {
Serial.println("Bluetooth disconnected!");
messageCount = 0;
});
bluetoothChat.onChatMessage([](const String& message) {
Serial.print("Received: ");
Serial.println(message);
String response = "Echo: ";
response += message;
bluetoothChat.send(response);
if (message.equalsIgnoreCase("ping")) {
bluetoothChat.send("pong!");
} else if (message.equalsIgnoreCase("status")) {
bluetoothChat.send("ESP32 is running normally");
} else if (message.equalsIgnoreCase("time")) {
String timeMsg = "Uptime: ";
timeMsg += String(millis() / 1000);
timeMsg += " seconds";
bluetoothChat.send(timeMsg);
} else if (message.equalsIgnoreCase("heap")) {
String heapMsg = "Free heap: ";
heapMsg += String(ESP.getFreeHeap());
heapMsg += " bytes";
bluetoothChat.send(heapMsg);
}
});
Serial.println("Waiting for Bluetooth connection...");
Serial.println("Type 'ping', 'status', 'time', or 'heap' in the app to test commands");
}
void loop() {
bluetoothServer.loop();
if (bluetooth.isConnected() && millis() - lastMessageTime >= MESSAGE_INTERVAL) {
lastMessageTime = millis();
messageCount++;
String statusMsg = "Status update #";
statusMsg += String(messageCount);
statusMsg += " - All systems operational";
bluetoothChat.send(statusMsg);
Serial.print("Sent: ");
Serial.println(statusMsg);
}
if (Serial.available()) {
String serialMsg = Serial.readStringUntil('\n');
serialMsg.trim();
if (serialMsg.length() > 0 && bluetooth.isConnected()) {
bluetoothChat.send(serialMsg);
Serial.print("Sent from Serial: ");
Serial.println(serialMsg);
}
}
delay(10);
}
Klik op de knop Uploaden in Arduino IDE om de code naar ESP32 te uploaden
Open de Seriële Monitor
Bekijk het resultaat in de Seriële Monitor, het ziet er als volgt uit:
DIYables Bluetooth - ESP32 Chat Example
Waiting for Bluetooth connection...
Type 'ping', 'status', 'time', or 'heap' in the app to test commands
#include <DIYables_BluetoothServer.h>
#include <DIYables_BluetoothChat.h>
#include <platforms/DIYables_Esp32BLE.h>
const char* DEVICE_NAME = "ESP32BLE_Chat";
const char* SERVICE_UUID = "19B10000-E8F2-537E-4F6C-D104768A1214";
const char* TX_UUID = "19B10001-E8F2-537E-4F6C-D104768A1214";
const char* RX_UUID = "19B10002-E8F2-537E-4F6C-D104768A1214";
DIYables_Esp32BLE bluetooth(DEVICE_NAME, SERVICE_UUID, TX_UUID, RX_UUID);
DIYables_BluetoothServer bluetoothServer(bluetooth);
DIYables_BluetoothChat bluetoothChat;
unsigned long lastMessageTime = 0;
const unsigned long MESSAGE_INTERVAL = 10000;
int messageCount = 0;
void setup() {
Serial.begin(115200);
delay(1000);
Serial.println("DIYables Bluetooth - ESP32 BLE Chat Example");
bluetoothServer.begin();
bluetoothServer.addApp(&bluetoothChat);
bluetoothServer.setOnConnected([]() {
Serial.println("Bluetooth connected!");
bluetoothChat.send("Hello! ESP32 BLE is ready to chat.");
});
bluetoothServer.setOnDisconnected([]() {
Serial.println("Bluetooth disconnected!");
messageCount = 0;
});
bluetoothChat.onChatMessage([](const String& message) {
Serial.print("Received: ");
Serial.println(message);
String response = "Echo: ";
response += message;
bluetoothChat.send(response);
if (message.equalsIgnoreCase("ping")) {
bluetoothChat.send("pong!");
} else if (message.equalsIgnoreCase("status")) {
bluetoothChat.send("ESP32 BLE is running normally");
} else if (message.equalsIgnoreCase("time")) {
String timeMsg = "Uptime: ";
timeMsg += String(millis() / 1000);
timeMsg += " seconds";
bluetoothChat.send(timeMsg);
} else if (message.equalsIgnoreCase("heap")) {
String heapMsg = "Free heap: ";
heapMsg += String(ESP.getFreeHeap());
heapMsg += " bytes";
bluetoothChat.send(heapMsg);
}
});
Serial.println("Waiting for Bluetooth connection...");
Serial.println("Type 'ping', 'status', 'time', or 'heap' in the app to test commands");
}
void loop() {
bluetoothServer.loop();
if (bluetooth.isConnected() && millis() - lastMessageTime >= MESSAGE_INTERVAL) {
lastMessageTime = millis();
messageCount++;
String statusMsg = "Status update #";
statusMsg += String(messageCount);
statusMsg += " - All systems operational";
bluetoothChat.send(statusMsg);
Serial.print("Sent: ");
Serial.println(statusMsg);
}
if (Serial.available()) {
String serialMsg = Serial.readStringUntil('\n');
serialMsg.trim();
if (serialMsg.length() > 0 && bluetooth.isConnected()) {
bluetoothChat.send(serialMsg);
Serial.print("Sent from Serial: ");
Serial.println(serialMsg);
}
}
delay(10);
}
Klik op de knop Uploaden in Arduino IDE om de code naar ESP32 te uploaden
Open de Seriële Monitor
Bekijk het resultaat in de Seriële Monitor, het ziet er als volgt uit:
DIYables Bluetooth - ESP32 BLE Chat Example
Waiting for Bluetooth connection...
Type 'ping', 'status', 'time', or 'heap' in the app to test commands
Installeer de DIYables Bluetooth App op uw smartphone:
Android |
iOS
Als u de ESP32 Classic Bluetooth code gebruikt, moet u de ESP32 eerst koppelen met uw Android-telefoon voor het openen van de app:
Ga in uw telefoon naar Instellingen > Bluetooth
Zorg dat Bluetooth aan staat
Uw telefoon zal beschikbare apparaten zoeken
Zoek en tik op "ESP32_Chat" in de lijst beschikbare apparaten
Bevestig het koppelingsverzoek (geen pincode vereist)
Wacht tot onder de apparaatnaam "Gekoppeld" staat
Als u de ESP32 BLE code gebruikt, is koppelen niet nodig, ga direct naar de volgende stap.
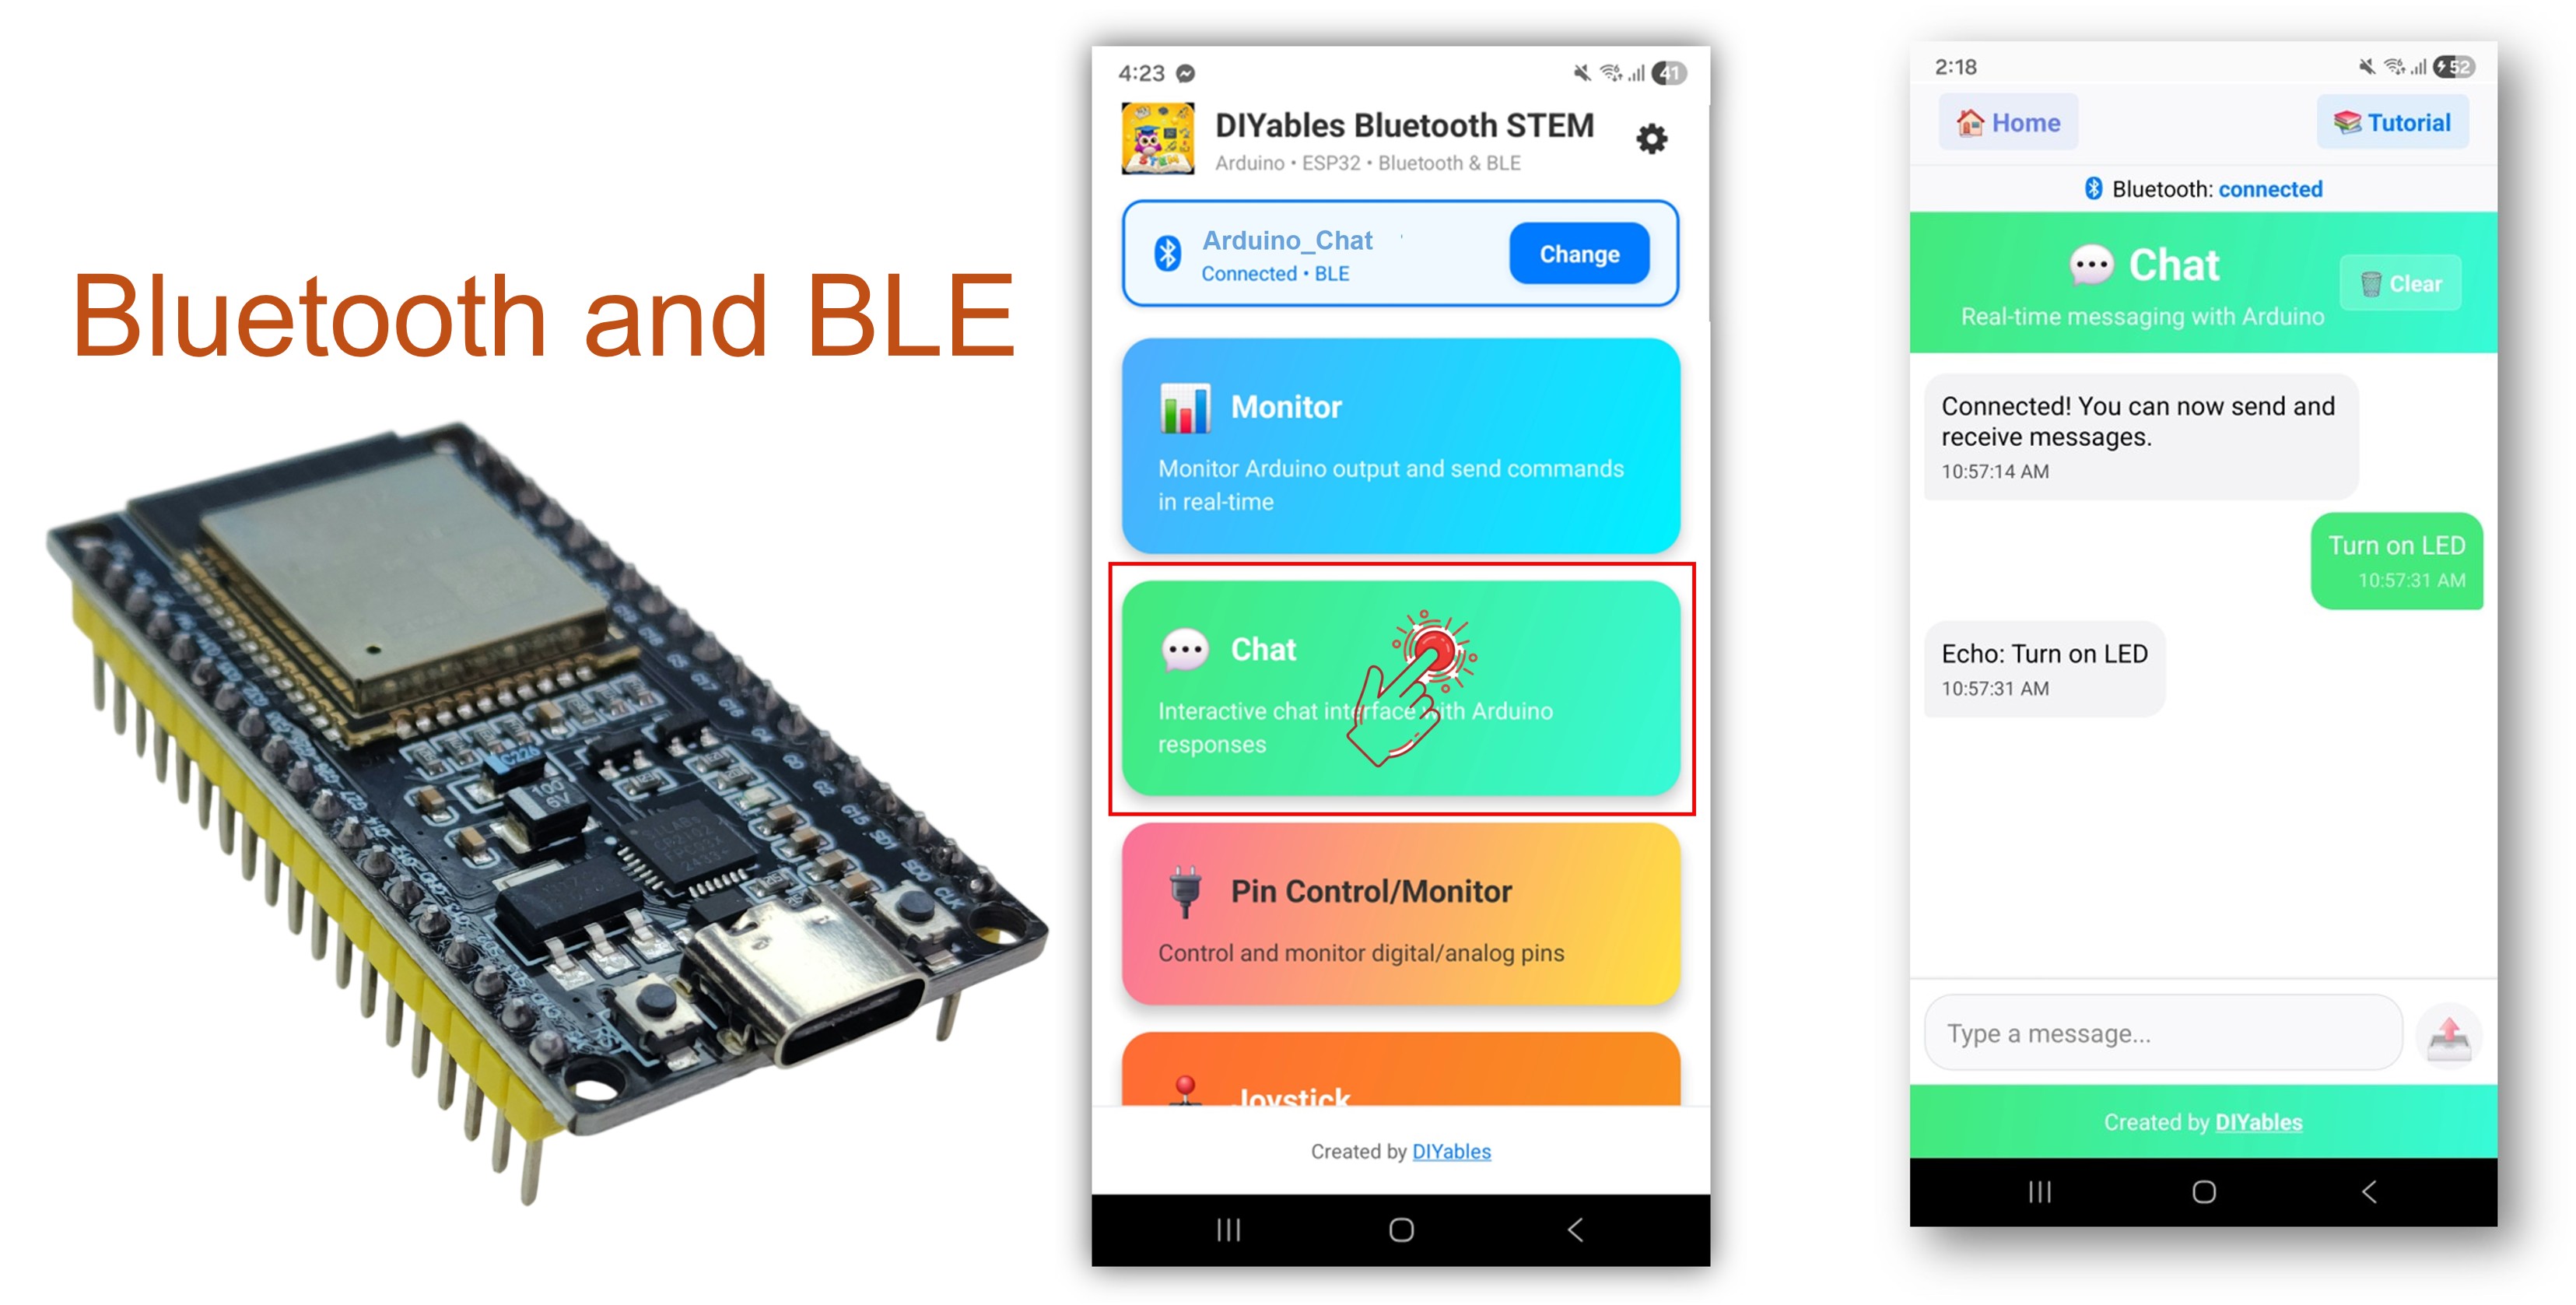
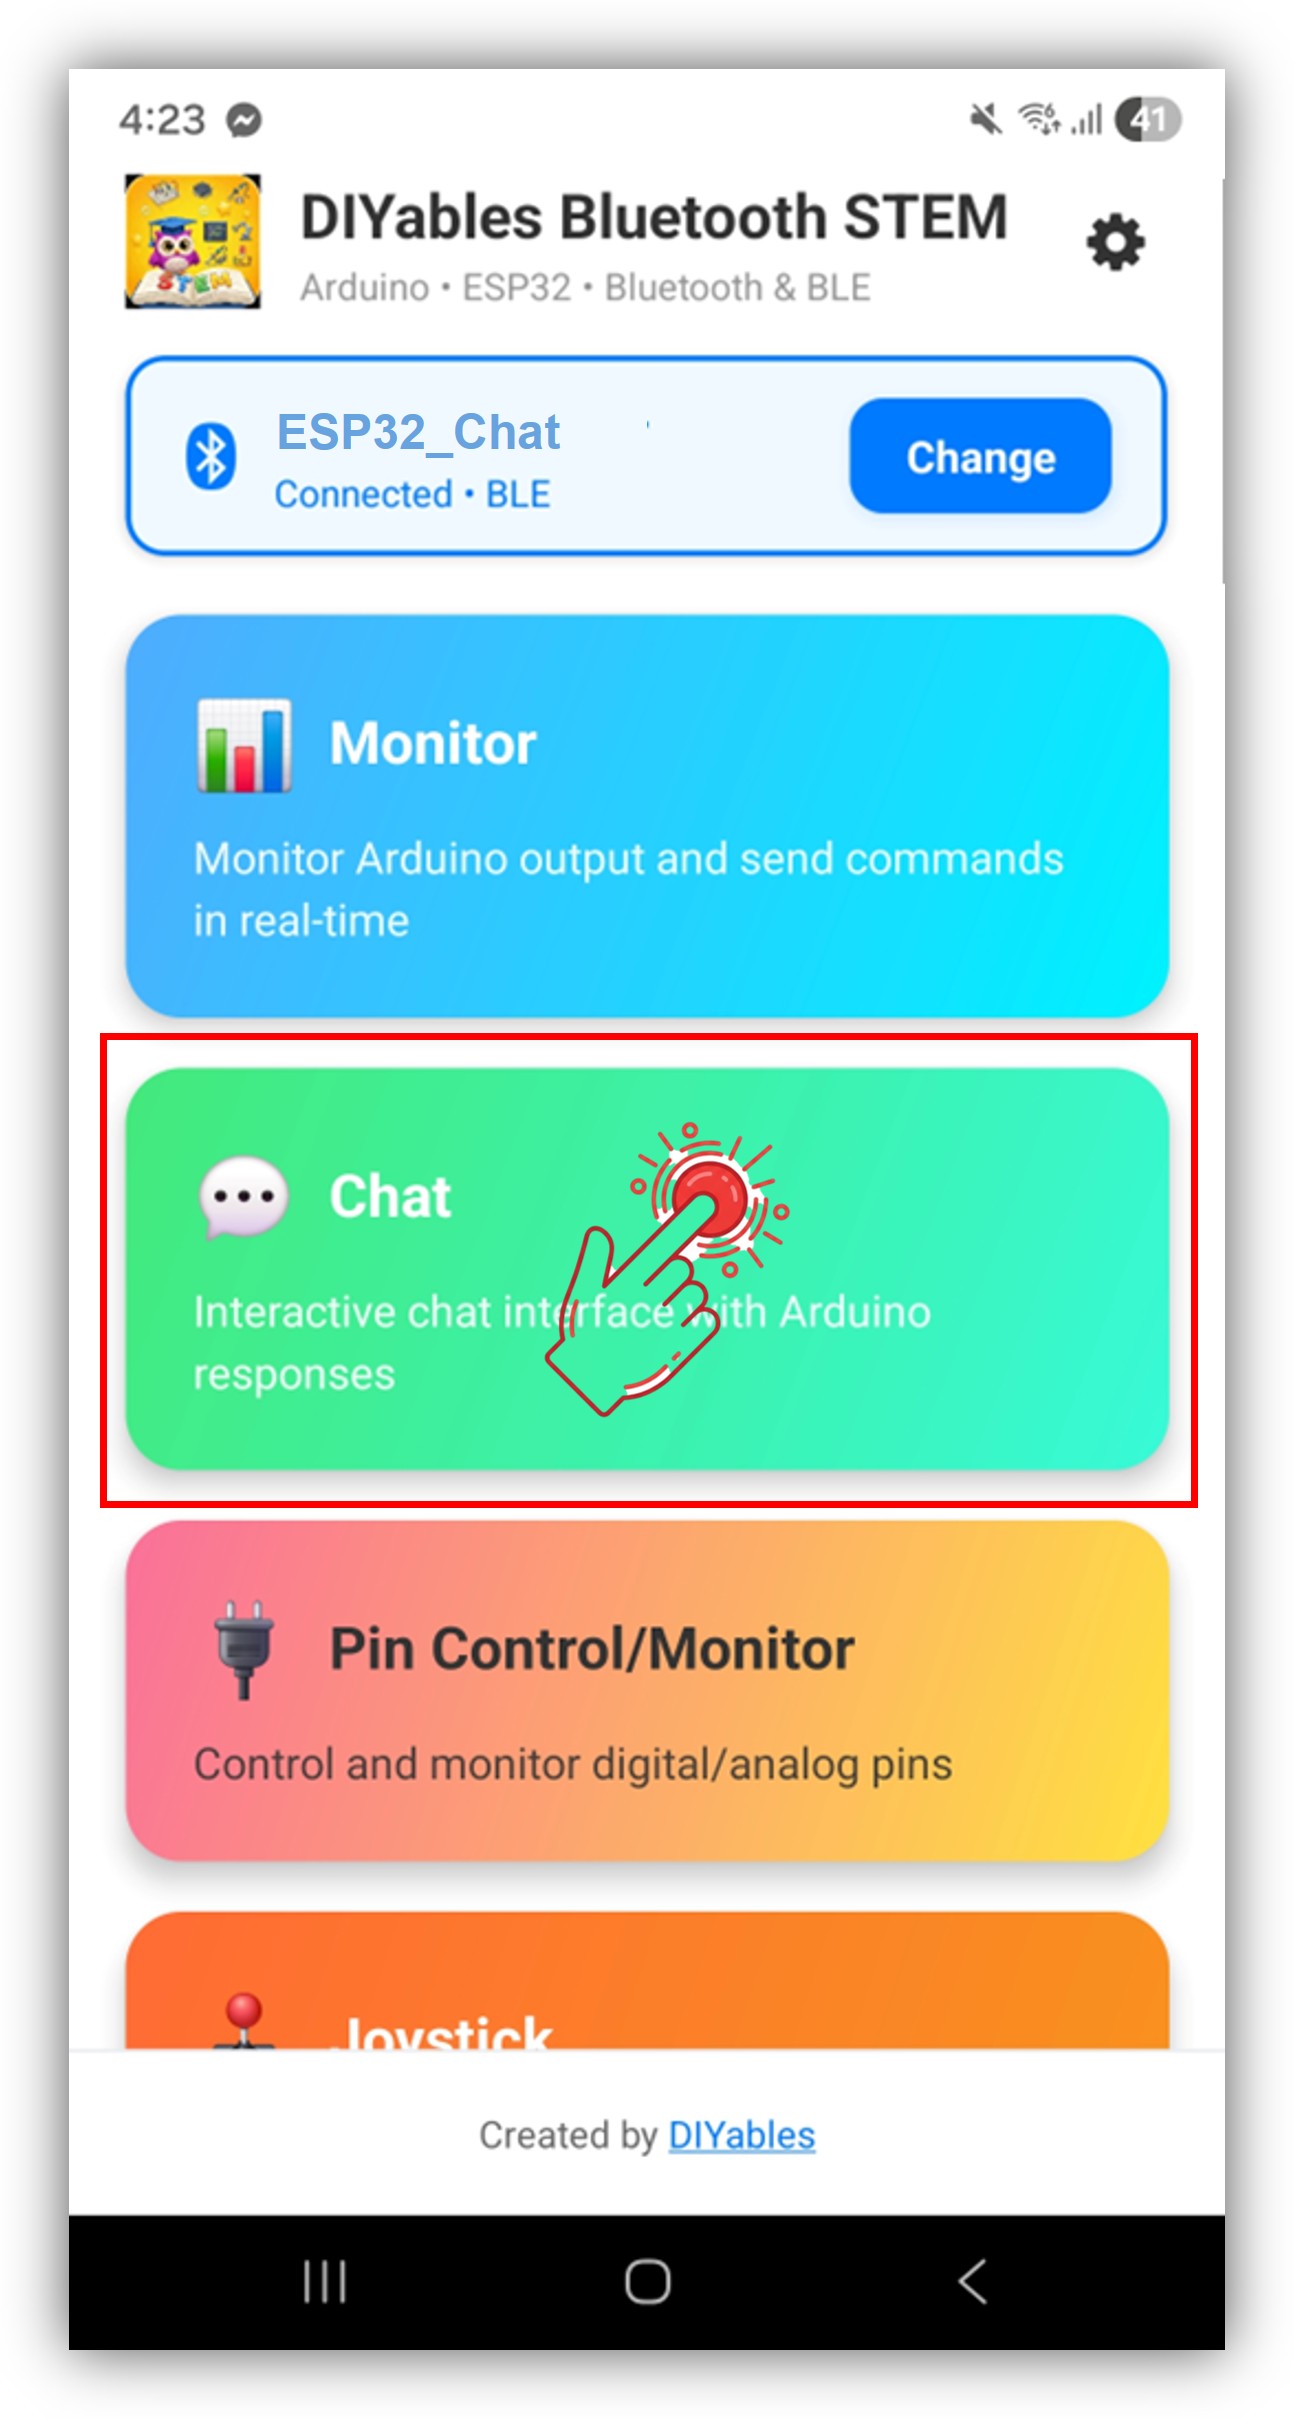
Open de DIYables Bluetooth App
Bij het eerste gebruik zal de app om permissies vragen. Geef deze toestemming:
Nabije apparaten toestemming (Android 12+) / Bluetooth toestemming (iOS) – nodig om Bluetooth-apparaten te zoeken en verbinden
Locatie toestemming (alleen Android 11 en lager) – nodig voor oudere Android versies om BLE-apparaten te scannen
Controleer of Bluetooth aan staat op uw telefoon
Tik op het startscherm op de knop Verbinden. De app zoekt naar zowel BLE- als Classic Bluetooth apparaten.
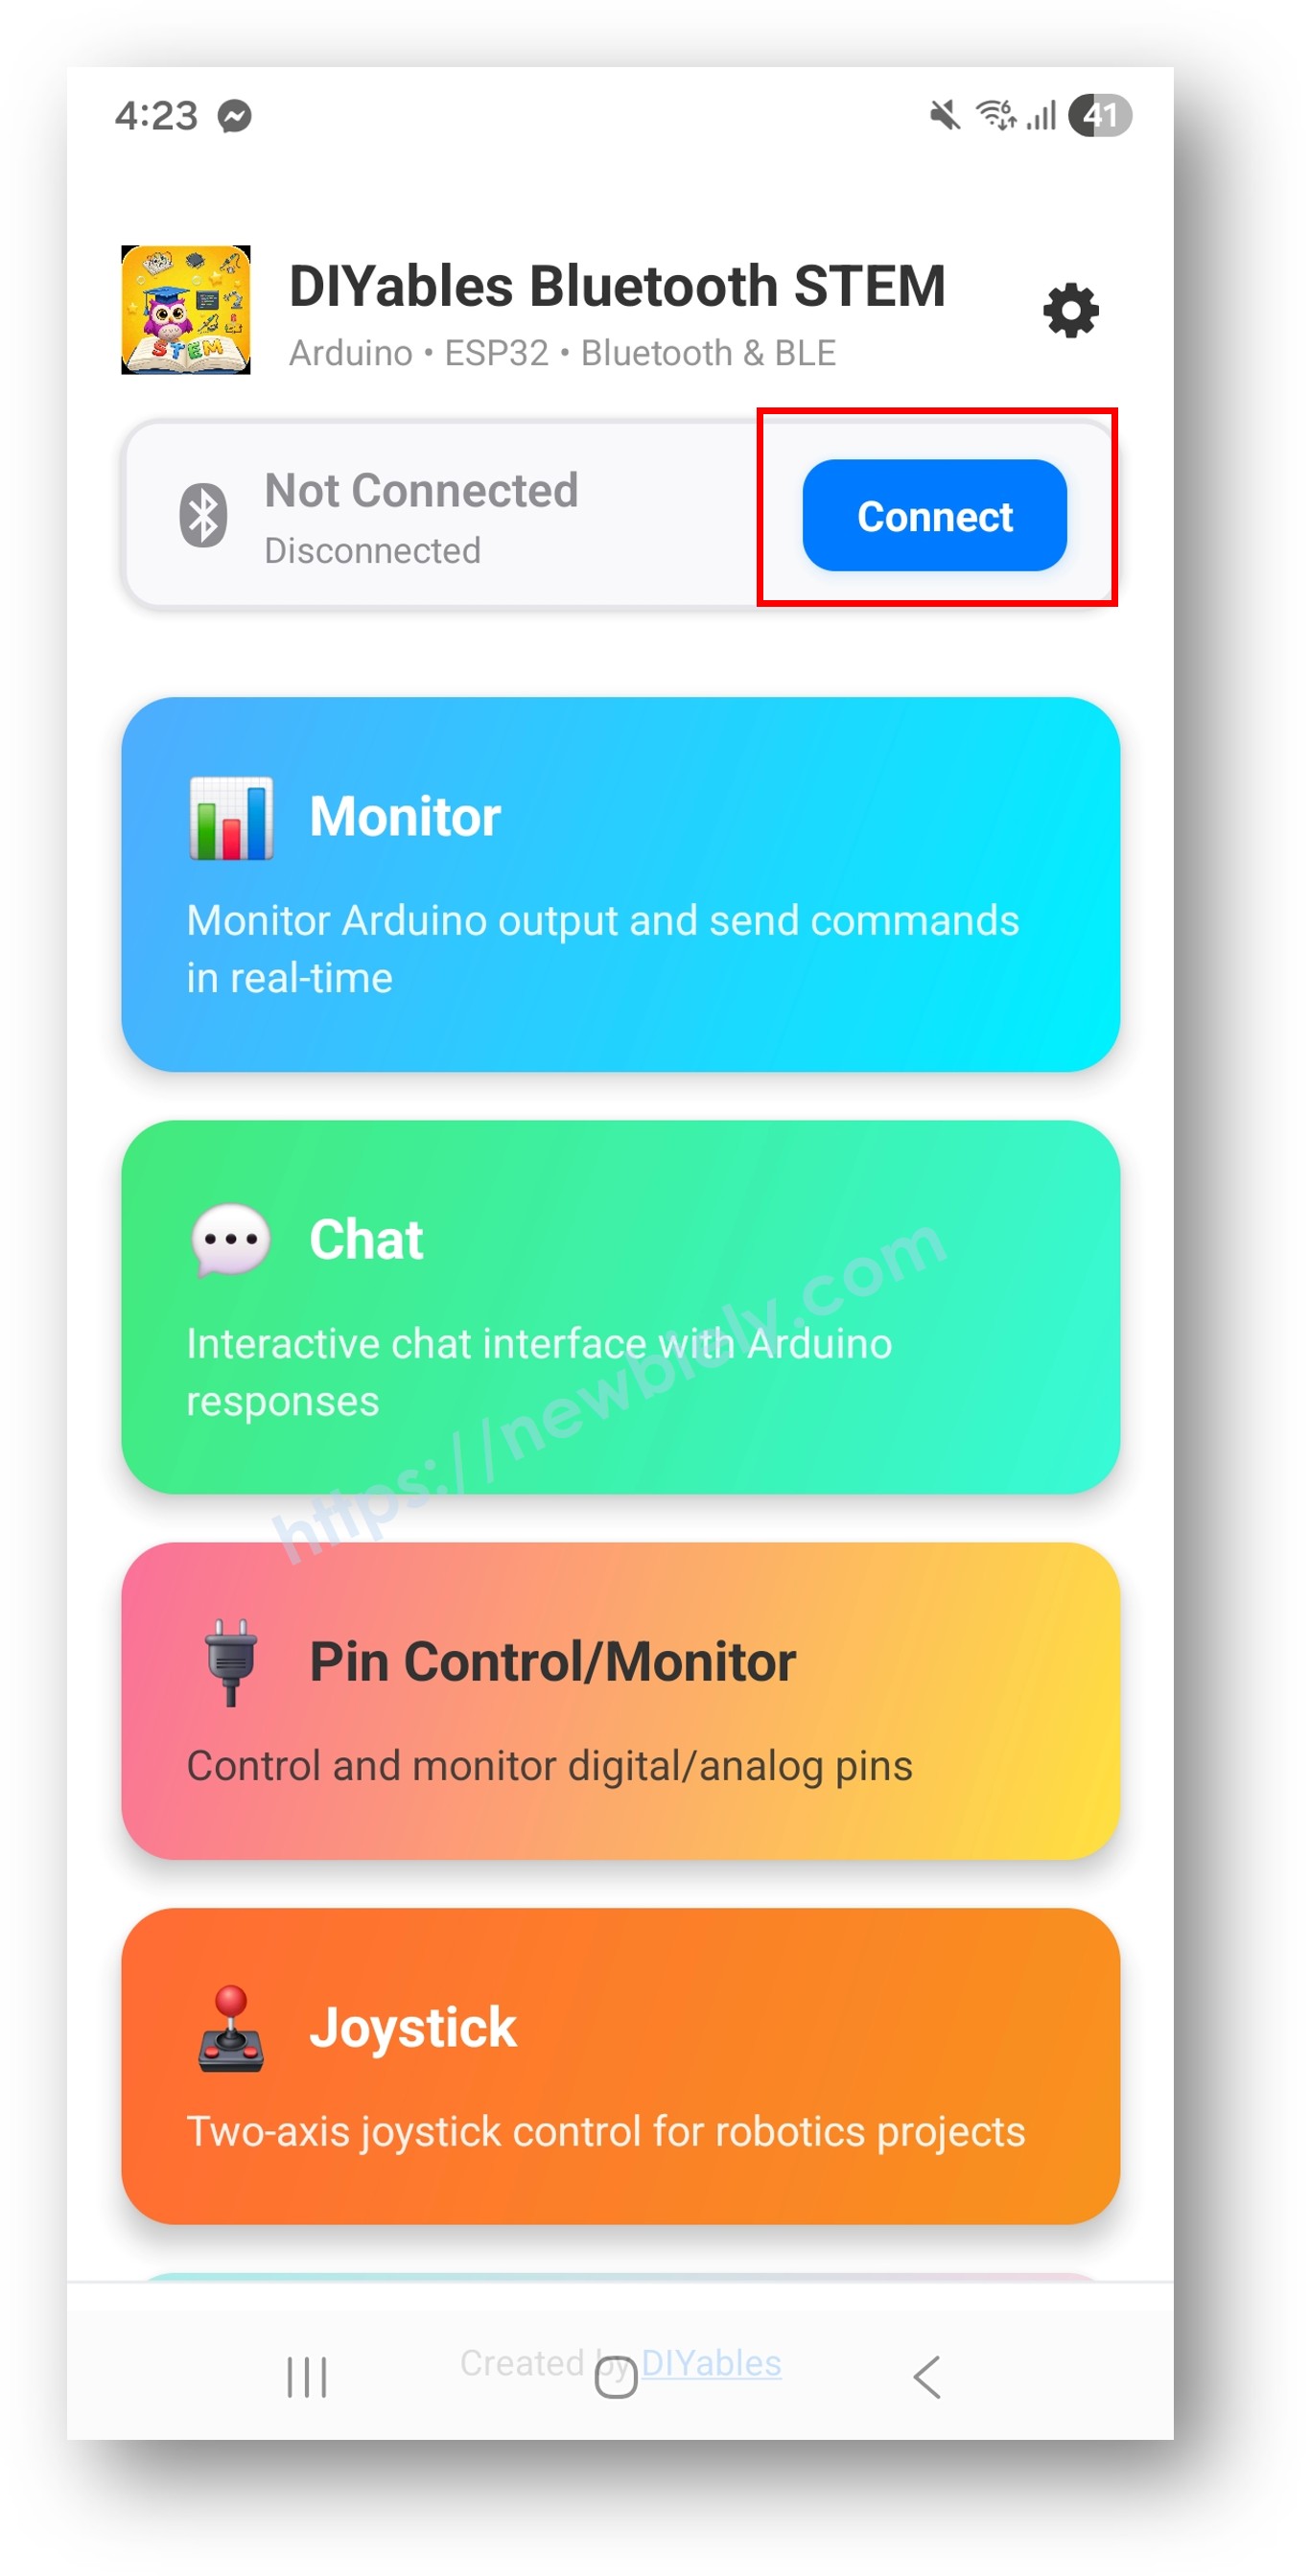
Let op: U kunt met het instellingen-icoon op het startscherm apps verbergen of weergeven. Zie de DIYables Bluetooth App gebruikershandleiding voor meer informatie.
Kijk nu terug naar de Seriële Monitor in Arduino IDE. U zult zien:
Bluetooth connected!
Received: Hello
Received: ping
Received: status
Sent: Status update #1 - All systems operational
Typ berichten in de app en kijk hoe ze direct zichtbaar zijn in de Seriële Monitor
Probeer ingebouwde commando's: ping, status, time, heap
U kunt ook berichten typen in de Seriële Monitor die dan naar de app verzonden worden
Gebruik de onChatMessage() callback om berichten te verwerken die vanuit de app worden ontvangen. U kunt zelf aangepaste commando’s definiëren die logisch zijn voor uw project — de ESP32 reageert daarop:
bluetoothChat.onChatMessage([](const String& message) {
Serial.print("Received: ");
Serial.println(message);
if (message == "LED_ON") {
digitalWrite(2, HIGH);
bluetoothChat.send("LED turned ON");
} else if (message == "LED_OFF") {
digitalWrite(2, LOW);
bluetoothChat.send("LED turned OFF");
} else {
bluetoothChat.send("Unknown command: " + message);
}
});
U kunt zoveel aangepaste commando’s toevoegen als nodig door meer else if blokken toe te voegen. Bijvoorbeeld het toevoegen van RELAY_ON / RELAY_OFF om een relais aan te sturen, of READ om een sensorwaarde op te vragen — elk woord dat u in de app typt wordt een commando.
U kunt op elk moment tekstberichten van de ESP32 naar de app sturen:
bluetoothChat.send("Hello from ESP32!");
float temperature = 25.3;
bluetoothChat.send("Temperature: " + String(temperature) + "°C");
bluetoothChat.send("System ready");
U kunt detecteren wanneer de app verbinding maakt of verbreekt met de ESP32:
bluetoothServer.setOnConnected([]() {
Serial.println("Bluetooth connected!");
bluetoothChat.send("Welcome! ESP32 is ready to chat.");
});
bluetoothServer.setOnDisconnected([]() {
Serial.println("Bluetooth disconnected!");
});
if (bluetoothServer.isConnected()) {
bluetoothChat.send("Still connected!");
}
Stuur berichten die u in de Arduino IDE Seriële Monitor typt door naar de Bluetooth app:
void loop() {
bluetoothServer.loop();
if (Serial.available()) {
String serialMsg = Serial.readStringUntil('\n');
serialMsg.trim();
if (serialMsg.length() > 0 && bluetooth.isConnected()) {
bluetoothChat.send(serialMsg);
Serial.print("Sent from Serial: ");
Serial.println(serialMsg);
}
}
delay(10);
}
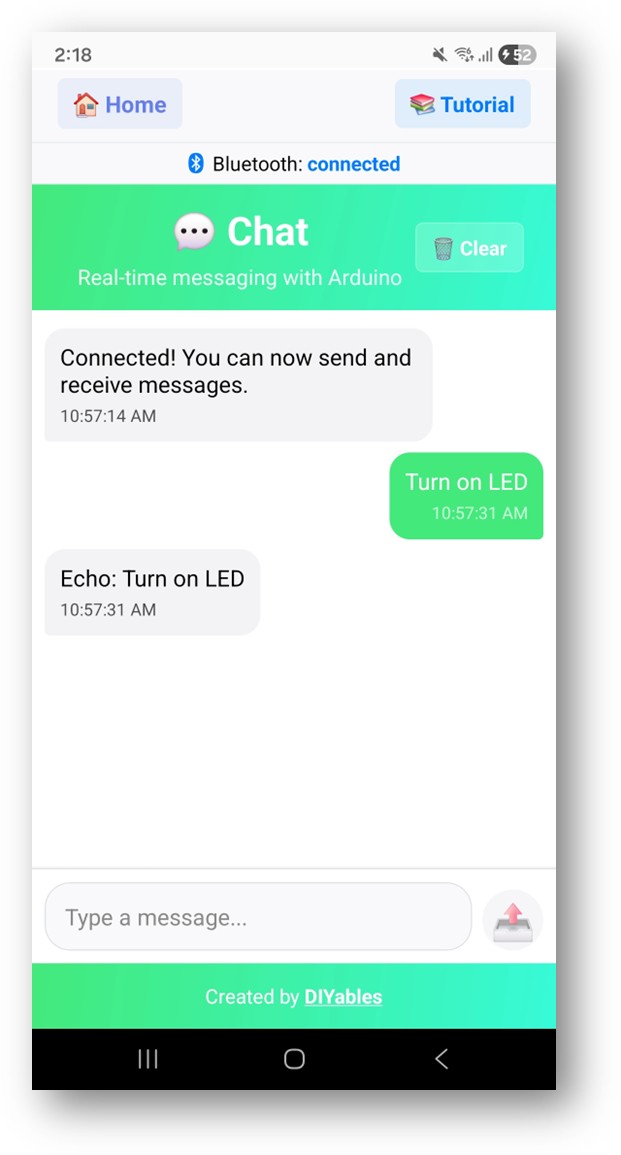
De chatinterface in de DIYables Bluetooth App bevat:
Lijst met berichten: Scrollbare lijst met verzonden en ontvangen berichten
Tekstinvoer: Typ uw bericht onderaan
Verzendknop: Tik om het getypte bericht te verzenden
Automatisch scrollen: Scrollt automatisch naar het nieuwste bericht
De voorbeeldcode bevat de volgende ingebouwde commando's:
ping ? Reageert met "pong!"
status ? Geeft de status van de ESP32 weer
time ? Toont de uptime in seconden
heap ? Toont vrije heap-geheugen in bytes
void setup() {
bluetoothChat.onChatMessage([](const String& message) {
Serial.print("Received: ");
Serial.println(message);
bluetoothChat.send("Echo: " + message);
});
}
const int LED_PIN = 2;
const int RED_PIN = 16;
const int GREEN_PIN = 17;
const int BLUE_PIN = 18;
void setup() {
pinMode(LED_PIN, OUTPUT);
pinMode(RED_PIN, OUTPUT);
pinMode(GREEN_PIN, OUTPUT);
pinMode(BLUE_PIN, OUTPUT);
bluetoothChat.onChatMessage([](const String& message) {
String cmd = message;
cmd.toUpperCase();
if (cmd == "LED ON") {
digitalWrite(LED_PIN, HIGH);
bluetoothChat.send("LED is now ON");
} else if (cmd == "LED OFF") {
digitalWrite(LED_PIN, LOW);
bluetoothChat.send("LED is now OFF");
} else if (cmd == "RED") {
digitalWrite(RED_PIN, HIGH);
digitalWrite(GREEN_PIN, LOW);
digitalWrite(BLUE_PIN, LOW);
bluetoothChat.send("Red LED activated");
} else if (cmd == "GREEN") {
digitalWrite(RED_PIN, LOW);
digitalWrite(GREEN_PIN, HIGH);
digitalWrite(BLUE_PIN, LOW);
bluetoothChat.send("Green LED activated");
} else if (cmd == "BLUE") {
digitalWrite(RED_PIN, LOW);
digitalWrite(GREEN_PIN, LOW);
digitalWrite(BLUE_PIN, HIGH);
bluetoothChat.send("Blue LED activated");
} else if (cmd == "OFF") {
digitalWrite(RED_PIN, LOW);
digitalWrite(GREEN_PIN, LOW);
digitalWrite(BLUE_PIN, LOW);
bluetoothChat.send("All LEDs off");
} else if (cmd == "HELP") {
bluetoothChat.send("Commands: LED ON, LED OFF, RED, GREEN, BLUE, OFF, HELP");
} else {
bluetoothChat.send("Unknown command. Type HELP for list.");
}
});
}
#include <DHT.h>
DHT dht(4, DHT22);
void setup() {
dht.begin();
bluetoothChat.onChatMessage([](const String& message) {
String cmd = message;
cmd.toUpperCase();
if (cmd == "TEMP") {
float temp = dht.readTemperature();
if (!isnan(temp)) {
bluetoothChat.send("Temperature: " + String(temp, 1) + " °C");
} else {
bluetoothChat.send("Error reading temperature sensor");
}
} else if (cmd == "HUMIDITY") {
float hum = dht.readHumidity();
if (!isnan(hum)) {
bluetoothChat.send("Humidity: " + String(hum, 1) + " %");
} else {
bluetoothChat.send("Error reading humidity sensor");
}
} else if (cmd == "ALL") {
float temp = dht.readTemperature();
float hum = dht.readHumidity();
bluetoothChat.send("Temp: " + String(temp, 1) + "°C | Humidity: " + String(hum, 1) + "%");
} else if (cmd == "HELP") {
bluetoothChat.send("Commands: TEMP, HUMIDITY, ALL, HELP");
}
});
}
const int RELAY_1 = 16;
const int RELAY_2 = 17;
bool relay1State = false;
bool relay2State = false;
void setup() {
pinMode(RELAY_1, OUTPUT);
pinMode(RELAY_2, OUTPUT);
digitalWrite(RELAY_1, LOW);
digitalWrite(RELAY_2, LOW);
bluetoothChat.onChatMessage([](const String& message) {
String cmd = message;
cmd.toUpperCase();
if (cmd == "R1 ON") {
digitalWrite(RELAY_1, HIGH);
relay1State = true;
bluetoothChat.send("Relay 1: ON");
} else if (cmd == "R1 OFF") {
digitalWrite(RELAY_1, LOW);
relay1State = false;
bluetoothChat.send("Relay 1: OFF");
} else if (cmd == "R2 ON") {
digitalWrite(RELAY_2, HIGH);
relay2State = true;
bluetoothChat.send("Relay 2: ON");
} else if (cmd == "R2 OFF") {
digitalWrite(RELAY_2, LOW);
relay2State = false;
bluetoothChat.send("Relay 2: OFF");
} else if (cmd == "STATUS") {
bluetoothChat.send("Relay 1: " + String(relay1State ? "ON" : "OFF"));
bluetoothChat.send("Relay 2: " + String(relay2State ? "ON" : "OFF"));
} else if (cmd == "HELP") {
bluetoothChat.send("Commands: R1 ON, R1 OFF, R2 ON, R2 OFF, STATUS, HELP");
}
});
}
unsigned long lastMessageTime = 0;
const unsigned long MESSAGE_INTERVAL = 10000;
void loop() {
bluetoothServer.loop();
if (bluetooth.isConnected() && millis() - lastMessageTime >= MESSAGE_INTERVAL) {
lastMessageTime = millis();
messageCount++;
String statusMsg = "Status update #" + String(messageCount);
statusMsg += " - Uptime: " + String(millis() / 1000) + "s";
statusMsg += " - Heap: " + String(ESP.getFreeHeap()) + " bytes";
bluetoothChat.send(statusMsg);
}
delay(10);
}
bluetoothChat.onChatMessage([](const String& message) {
unsigned long timestamp = millis() / 1000;
Serial.print("[");
Serial.print(timestamp);
Serial.print("s] Received: ");
Serial.println(message);
String response = processCommand(message);
bluetoothChat.send(response);
Serial.print("[");
Serial.print(millis() / 1000);
Serial.print("s] Sent: ");
Serial.println(response);
});
String processCommand(const String& cmd) {
if (cmd.equalsIgnoreCase("ping")) return "pong!";
if (cmd.equalsIgnoreCase("status")) return "All systems operational";
if (cmd.equalsIgnoreCase("time")) return "Uptime: " + String(millis() / 1000) + "s";
return "Echo: " + cmd;
}
bluetoothChat.onChatMessage([](const String& message) {
int spaceIndex = message.indexOf(' ');
String command, argument;
if (spaceIndex > 0) {
command = message.substring(0, spaceIndex);
argument = message.substring(spaceIndex + 1);
} else {
command = message;
argument = "";
}
command.toUpperCase();
if (command == "PWM") {
int value = argument.toInt();
value = constrain(value, 0, 255);
analogWrite(16, value);
bluetoothChat.send("PWM set to " + String(value));
} else if (command == "DELAY") {
int ms = argument.toInt();
bluetoothChat.send("Waiting " + String(ms) + "ms...");
delay(ms);
bluetoothChat.send("Done!");
} else if (command == "PIN") {
int secondSpace = argument.indexOf(' ');
if (secondSpace > 0) {
int pin = argument.substring(0, secondSpace).toInt();
String state = argument.substring(secondSpace + 1);
state.toUpperCase();
digitalWrite(pin, state == "HIGH" ? HIGH : LOW);
bluetoothChat.send("Pin " + String(pin) + " set " + state);
}
}
});
#include <ESP32Servo.h>
Servo myServo;
const int SERVO_PIN = 13;
void setup() {
myServo.attach(SERVO_PIN);
bluetoothChat.onChatMessage([](const String& message) {
String cmd = message;
cmd.toUpperCase();
int angle = -1;
if (cmd.startsWith("SERVO ")) {
angle = cmd.substring(6).toInt();
} else {
angle = cmd.toInt();
if (angle == 0 && cmd != "0") angle = -1;
}
if (angle >= 0 && angle <= 180) {
myServo.write(angle);
bluetoothChat.send("Servo moved to " + String(angle) + "°");
} else if (cmd == "SWEEP") {
bluetoothChat.send("Sweeping servo...");
for (int a = 0; a <= 180; a += 5) {
myServo.write(a);
delay(30);
}
for (int a = 180; a >= 0; a -= 5) {
myServo.write(a);
delay(30);
}
bluetoothChat.send("Sweep complete");
}
});
}
const int MOTOR_PWM = 16;
const int MOTOR_DIR1 = 18;
const int MOTOR_DIR2 = 19;
void setup() {
pinMode(MOTOR_PWM, OUTPUT);
pinMode(MOTOR_DIR1, OUTPUT);
pinMode(MOTOR_DIR2, OUTPUT);
bluetoothChat.onChatMessage([](const String& message) {
String cmd = message;
cmd.toUpperCase();
if (cmd == "FORWARD") {
digitalWrite(MOTOR_DIR1, HIGH);
digitalWrite(MOTOR_DIR2, LOW);
analogWrite(MOTOR_PWM, 200);
bluetoothChat.send("Motor running forward");
} else if (cmd == "REVERSE") {
digitalWrite(MOTOR_DIR1, LOW);
digitalWrite(MOTOR_DIR2, HIGH);
analogWrite(MOTOR_PWM, 200);
bluetoothChat.send("Motor running reverse");
} else if (cmd == "STOP") {
analogWrite(MOTOR_PWM, 0);
bluetoothChat.send("Motor stopped");
} else if (cmd.startsWith("SPEED ")) {
int speed = cmd.substring(6).toInt();
speed = constrain(speed, 0, 255);
analogWrite(MOTOR_PWM, speed);
bluetoothChat.send("Motor speed: " + String(speed));
}
});
}
| Feature | BLE (Esp32BLE_Chat) | Classic Bluetooth (Esp32Bluetooth_Chat) |
|---|
| iOS Ondersteuning | ? Ja | ? Nee |
| Android Ondersteuning | ? Ja | ? Ja |
| Stroomverbruik | Laag | Hoger |
| Bereik | ~30-100m | ~10-100m |
| Datasnelheid | Lager | Hoger |
| Koppelen Vereist | Nee (automatisch) | Ja (handmatig) |
| Beste Voor | Batterijgevoede, cross-platform | Hoge doorvoer, alleen Android |
1. App kan het apparaat niet vinden
Controleer of de ESP32 is ingeschakeld en de sketch is geüpload
Voor BLE: Zorg dat Bluetooth en Locatie aan staan op uw telefoon
Voor Classic Bluetooth: Koppel het apparaat eerst in de Bluetooth-instellingen van de telefoon
Controleer dat de juiste partitieschema is geselecteerd (Huge APP)
2. Berichten verschijnen niet in de app
Controleer de Bluetooth verbindingstatus in de app
Verifieer de verbinding in de Seriële Monitor
Controleer of berichten worden verstuurd met bluetoothChat.send()
Probeer opnieuw verbinden
3. Echo berichten werken niet
Controleer of onChatMessage() callback correct is ingesteld
Bekijk ontvangen berichten in Seriële Monitor
Controleer of het chat scherm is geselecteerd in de mobiele app
4. Verbinding valt vaak weg
Ga dichter bij de ESP32 staan (verminder afstand)
Voor BLE: Controleer interferentie van andere BLE apparaten
Voor Classic Bluetooth: Zorg voor stabiele voedingsspanning van ESP32
Controleer verbindings- en ontkoppelingsmeldingen in Seriële Monitor
5. Serieel-naar-Bluetooth brug werkt niet
Controleer dat Seriële Monitor baudrate 115200 is ingesteld
Stel regelafbreking in op "Newline" in Seriële Monitor
Controleer of bluetooth.isConnected() true teruggeeft
Verifieer dat Serial.available() binnen de loop() functie wordt uitgevoerd
6. Sketch is te groot / niet genoeg ruimte
Kies in Arduino IDE onder Tools > Partition Scheme het partitieschema "Huge APP (3MB No OTA/1MB SPIFFS)" of "No OTA (Large APP)"
Het standaard schema geeft ~1.2MB voor app code, te weinig voor Bluetooth bibliotheken
Deze instelling biedt ~3MB door de OTA (wireless update) partitie op te offeren
Voeg uitgebreide debug-informatie toe:
void debugChatMessage(const String& message) {
Serial.println("=== Chat Debug ===");
Serial.println("Message: " + message);
Serial.println("Length: " + String(message.length()));
Serial.println("Free Heap: " + String(ESP.getFreeHeap()));
Serial.println("==================");
}
Tekstbesturing via spraakcommando-stijl voor robots
Commandocentrum voor huisautomatisering
Draadloze relaisbesturing met tekstfeedback
Afstandsbediening van servo’s via chat
Opvragen van sensordata op afstand
Statuscontrole via chatcommando’s
Data-logging met Bluetooth feedback
Afstandsdebugging en diagnose
Quiz of trivia spel via Bluetooth chat
Interactieve tutorials met stapsgewijze instructies
Chatbot voor ESP32 projectinformatie
Tool voor afstandsconfiguratie
Leer de basis van Bluetooth communicatie
Oefen string parsing en commandoverwerking
Begrijp client-server berichtpatronen
Bouw aangepaste communicatieprotocollen
Gebruik Chat voor commando’s en Monitor voor continue output:
bluetoothChat.onChatMessage([](const String& message) {
if (message.equalsIgnoreCase("start")) {
monitoring = true;
bluetoothChat.send("Monitoring started");
} else if (message.equalsIgnoreCase("stop")) {
monitoring = false;
bluetoothChat.send("Monitoring stopped");
}
});
if (monitoring) {
bluetoothMonitor.send("Sensor: " + String(analogRead(34)));
}
Gebruik Chat om presetwaarden voor te stellen en Slider voor fijnregeling:
bluetoothChat.onChatMessage([](const String& message) {
if (message.equalsIgnoreCase("preset1")) {
currentSlider1 = 25;
currentSlider2 = 75;
bluetoothSlider.send(currentSlider1, currentSlider2);
bluetoothChat.send("Applied Preset 1: 25%, 75%");
} else if (message.equalsIgnoreCase("preset2")) {
currentSlider1 = 50;
currentSlider2 = 50;
bluetoothSlider.send(currentSlider1, currentSlider2);
bluetoothChat.send("Applied Preset 2: 50%, 50%");
}
});
Nadat u het Bluetooth Chat voorbeeld beheerst, probeer dan:
Bluetooth Monitor – Voor eenrichtingsdata streaming naar de app
Bluetooth Slider – Voor analoge waardecontrole
Bluetooth Digital Pins – Voor discrete aan/uit besturing
Meerdere Bluetooth Apps – Combineer chat met andere bedieningselementen