ESP32 Bluetooth Joystick Voorbeeld - Interactieve 2D Besturingsinterface Tutorial

Overzicht

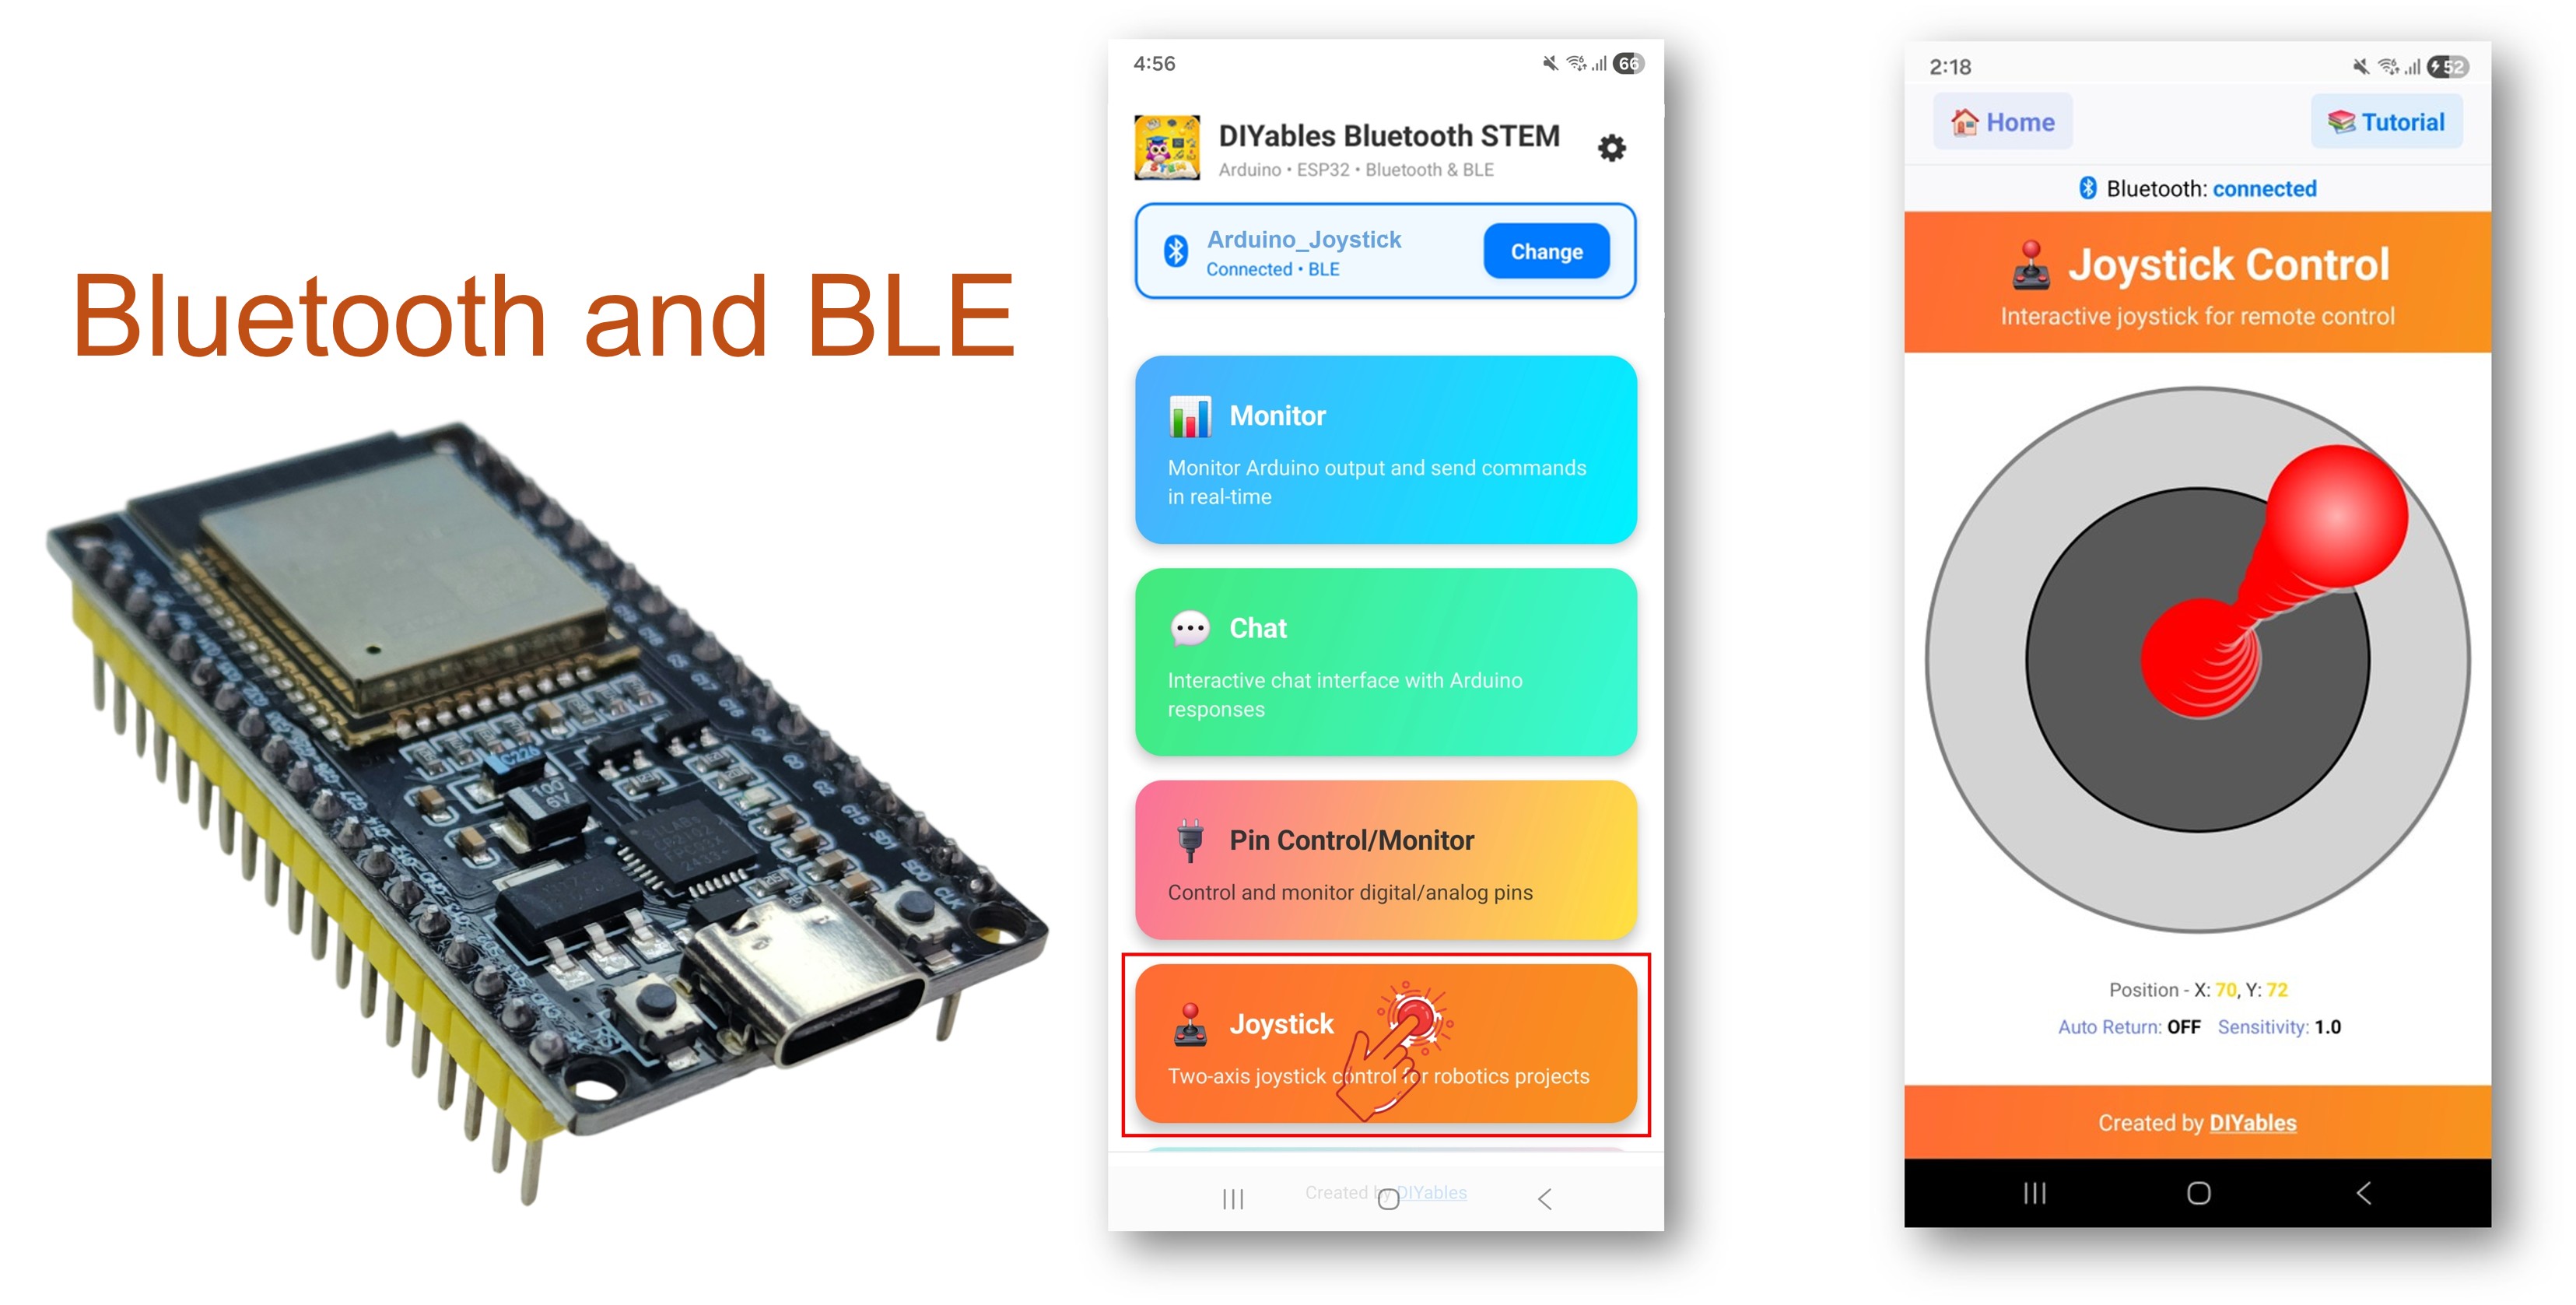
Het Bluetooth Joystick voorbeeld biedt een interactieve 2D joystickbesturing die toegankelijk is via de DIYables Bluetooth STEM-app. Ontworpen voor ESP32 boards met ondersteuning voor zowel BLE (Bluetooth Low Energy) als Classic Bluetooth verbindingen. De joystick stuurt real-time X- en Y-coördinaatwaarden tussen -100 en +100, wat het ideaal maakt voor robotbesturing, motorsturing, servo-positionering en elke toepassing die richtingsinvoer vereist.

Dit voorbeeld ondersteunt twee Bluetooth-modus:

  • ESP32 BLE (Bluetooth Low Energy): Werkt op zowel Android als iOS
  • ESP32 Classic Bluetooth: Werkt alleen op Android. iOS ondersteunt Classic Bluetooth niet. Gebruik BLE als u iOS-ondersteuning nodig heeft.
ESP32 Bluetooth Joystick Voorbeeld - Interactieve 2D Besturingsinterface Tutorial

Kenmerken

  • 2D Besturing: X- en Y-assen met waarden van -100 tot +100
  • Real-time updates: Directe positieweergave via Bluetooth-communicatie
  • Auto-terugkeer optie: Instelbare automatische terugkeer naar middenpositie (0, 0)
  • Aanpasbare gevoeligheid: Stel de minimale bewegingstolerantie in om kleine veranderingen te filteren
  • Compatibel met robots: Waarden eenvoudig te mappen naar motorstuurinvoer
  • BLE & Classic Bluetooth: Kies de Bluetooth-modus die bij uw project past
  • Cross-platform: BLE werkt op Android en iOS; Classic Bluetooth werkt op Android
  • Laag stroomverbruik optie: BLE verbruikt minder energie dan Classic Bluetooth

Benodigde Hardware

1×ESP32 ESP-WROOM-32 Ontwikkelingsmodule
1×USB Kabel Type-C
1×Breadboard (experimenteerprint)
1×Jumper Draden (man-man)
1×(Aanbevolen) Schroefklem Uitbreidingsboard voor ESP32
1×(Aanbevolen) Breakout Expansion Board for ESP32
1×(Aanbevolen) Stromsplitter voor ESP32

Of u kunt de volgende kits kopen:

1×DIYables Sensorkit (30 sensoren/displays)
1×DIYables Sensorkit (18 sensoren/displays)
Openbaarmaking: Sommige van de links in deze sectie zijn Amazon-affiliate links. We kunnen een commissie ontvangen voor aankopen die via deze links worden gedaan, zonder extra kosten voor u. We waarderen uw steun.

ESP32 Code

Snelle Stappen

Volg deze stappen één voor één:

  • Als dit de eerste keer is dat u een ESP32 gebruikt, raadpleeg dan de tutorial over de opzet van de omgeving voor ESP32 in de Arduino IDE.
  • Verbind het ESP32 board met uw computer via een USB-kabel.
  • Start de Arduino IDE op uw computer.
  • Selecteer het juiste ESP32 board en COM-poort.
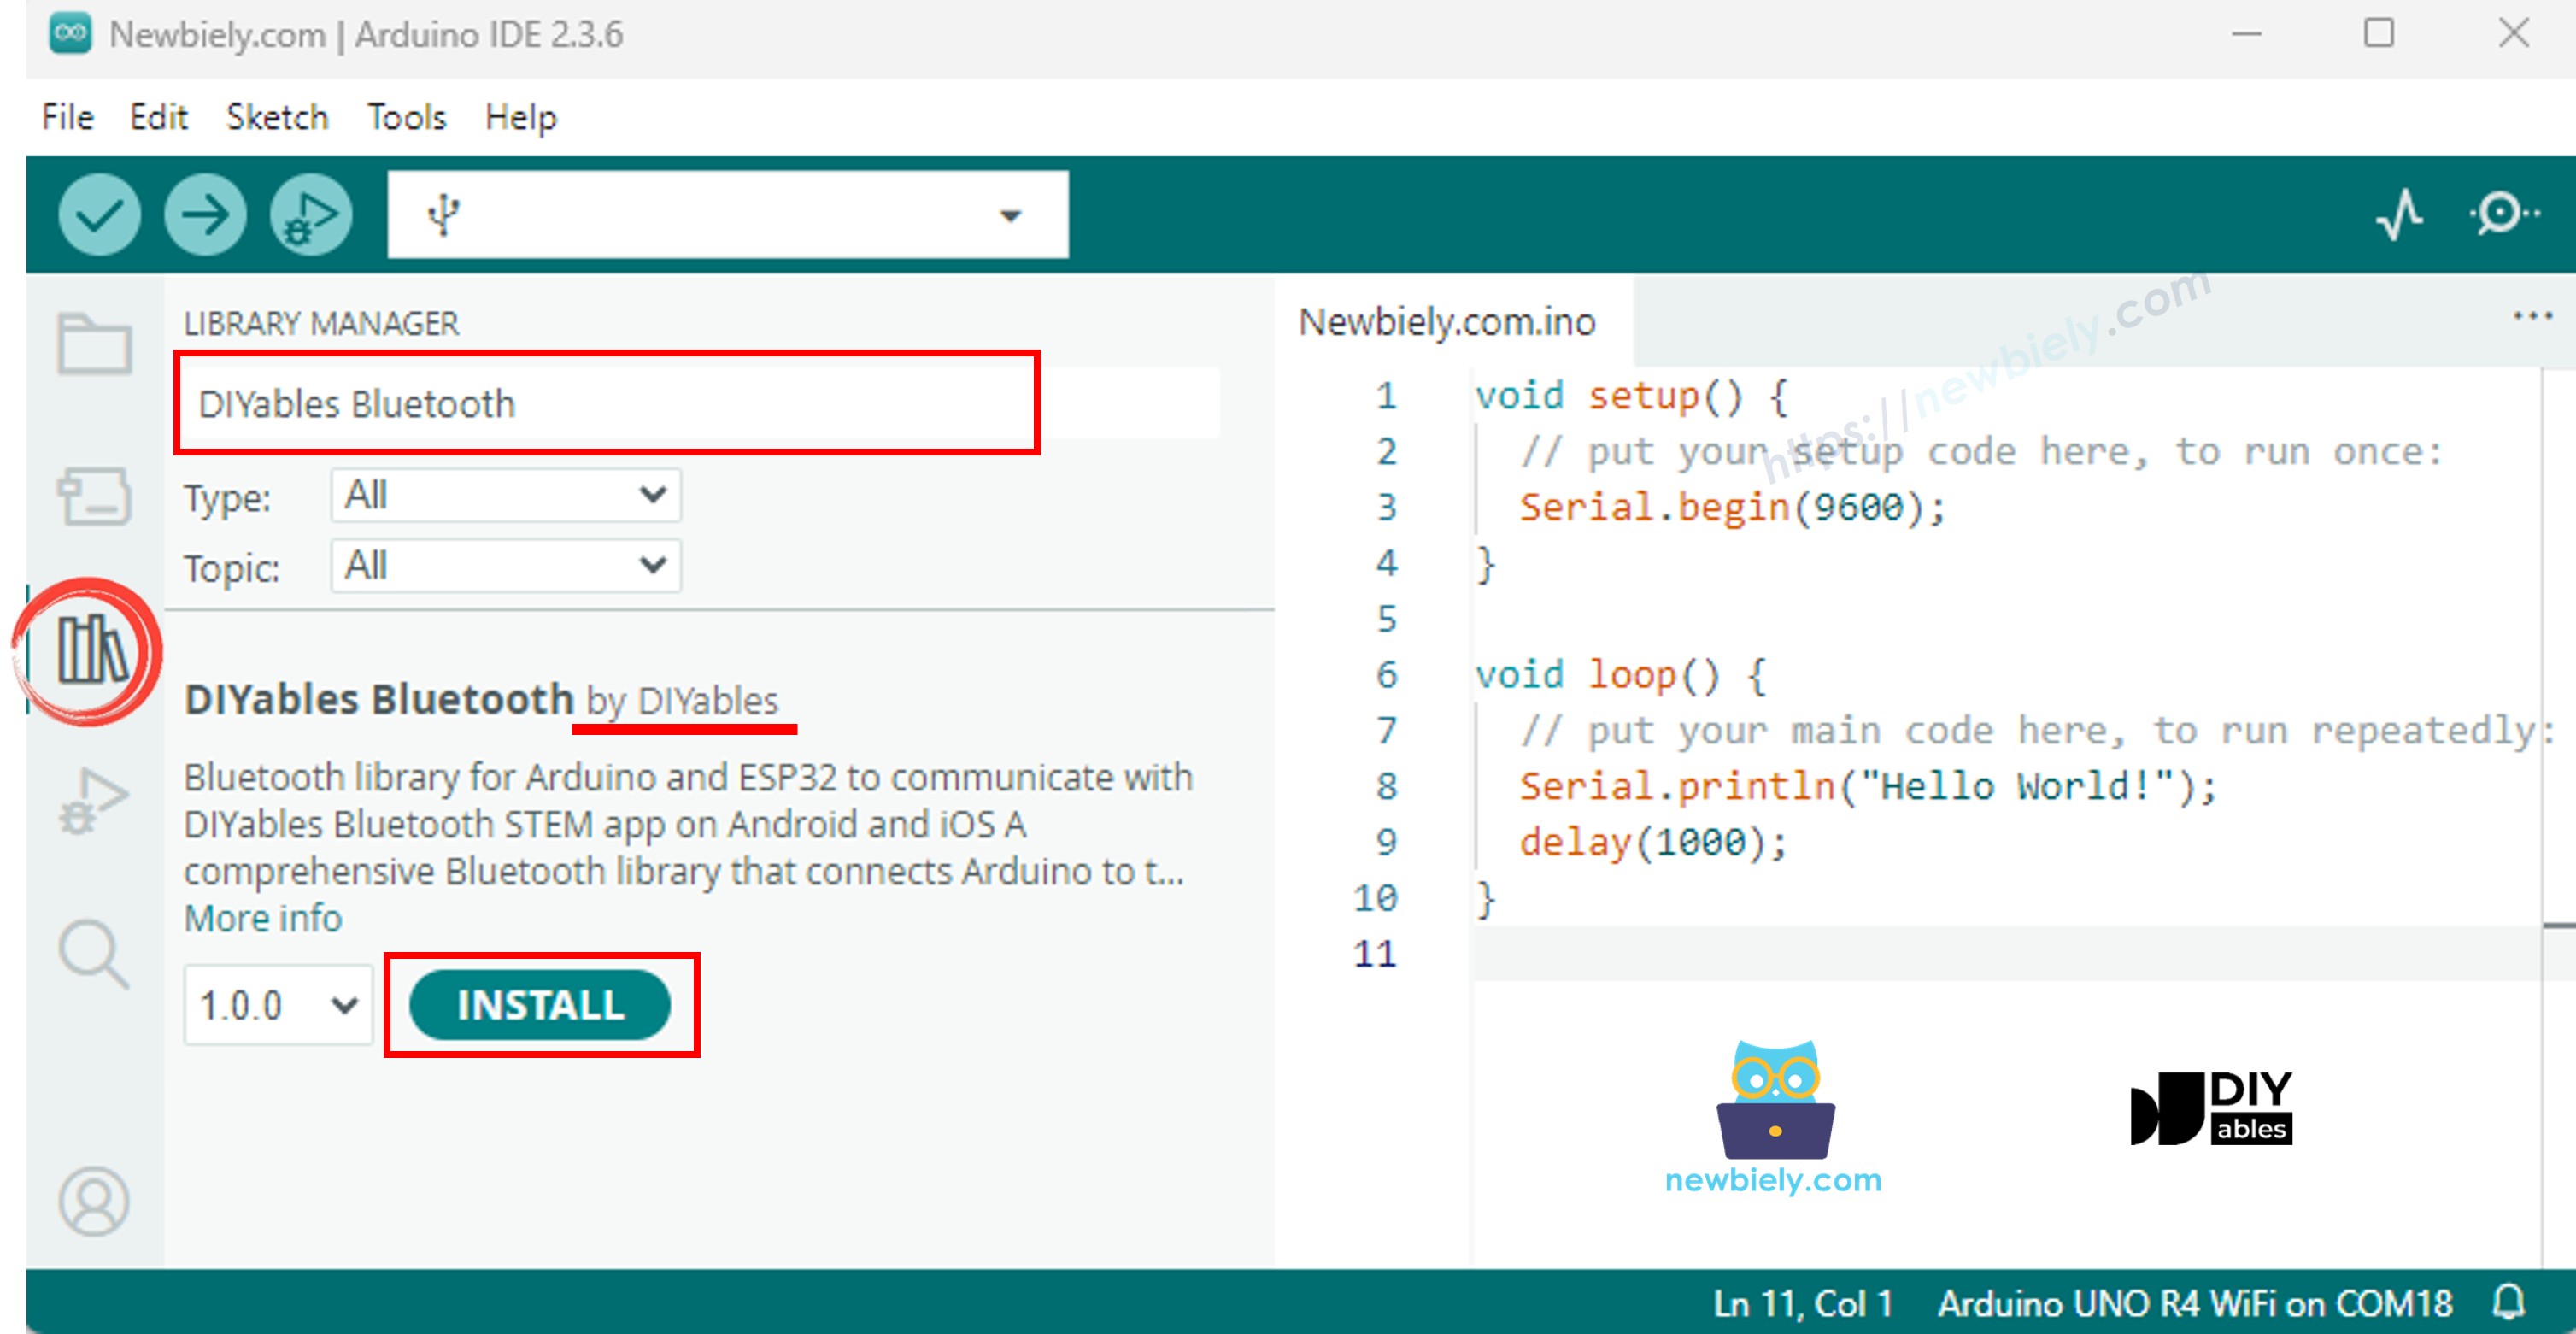
  • Navigeer naar het icoon Bibliotheken in de linkerzijbalk van de Arduino IDE.
  • Zoek op "DIYables Bluetooth" en vind de DIYables Bluetooth bibliotheek van DIYables.
  • Klik op de knop Installeren om de bibliotheek te installeren.
ESP32 DIYables Bluetooth bibliotheek
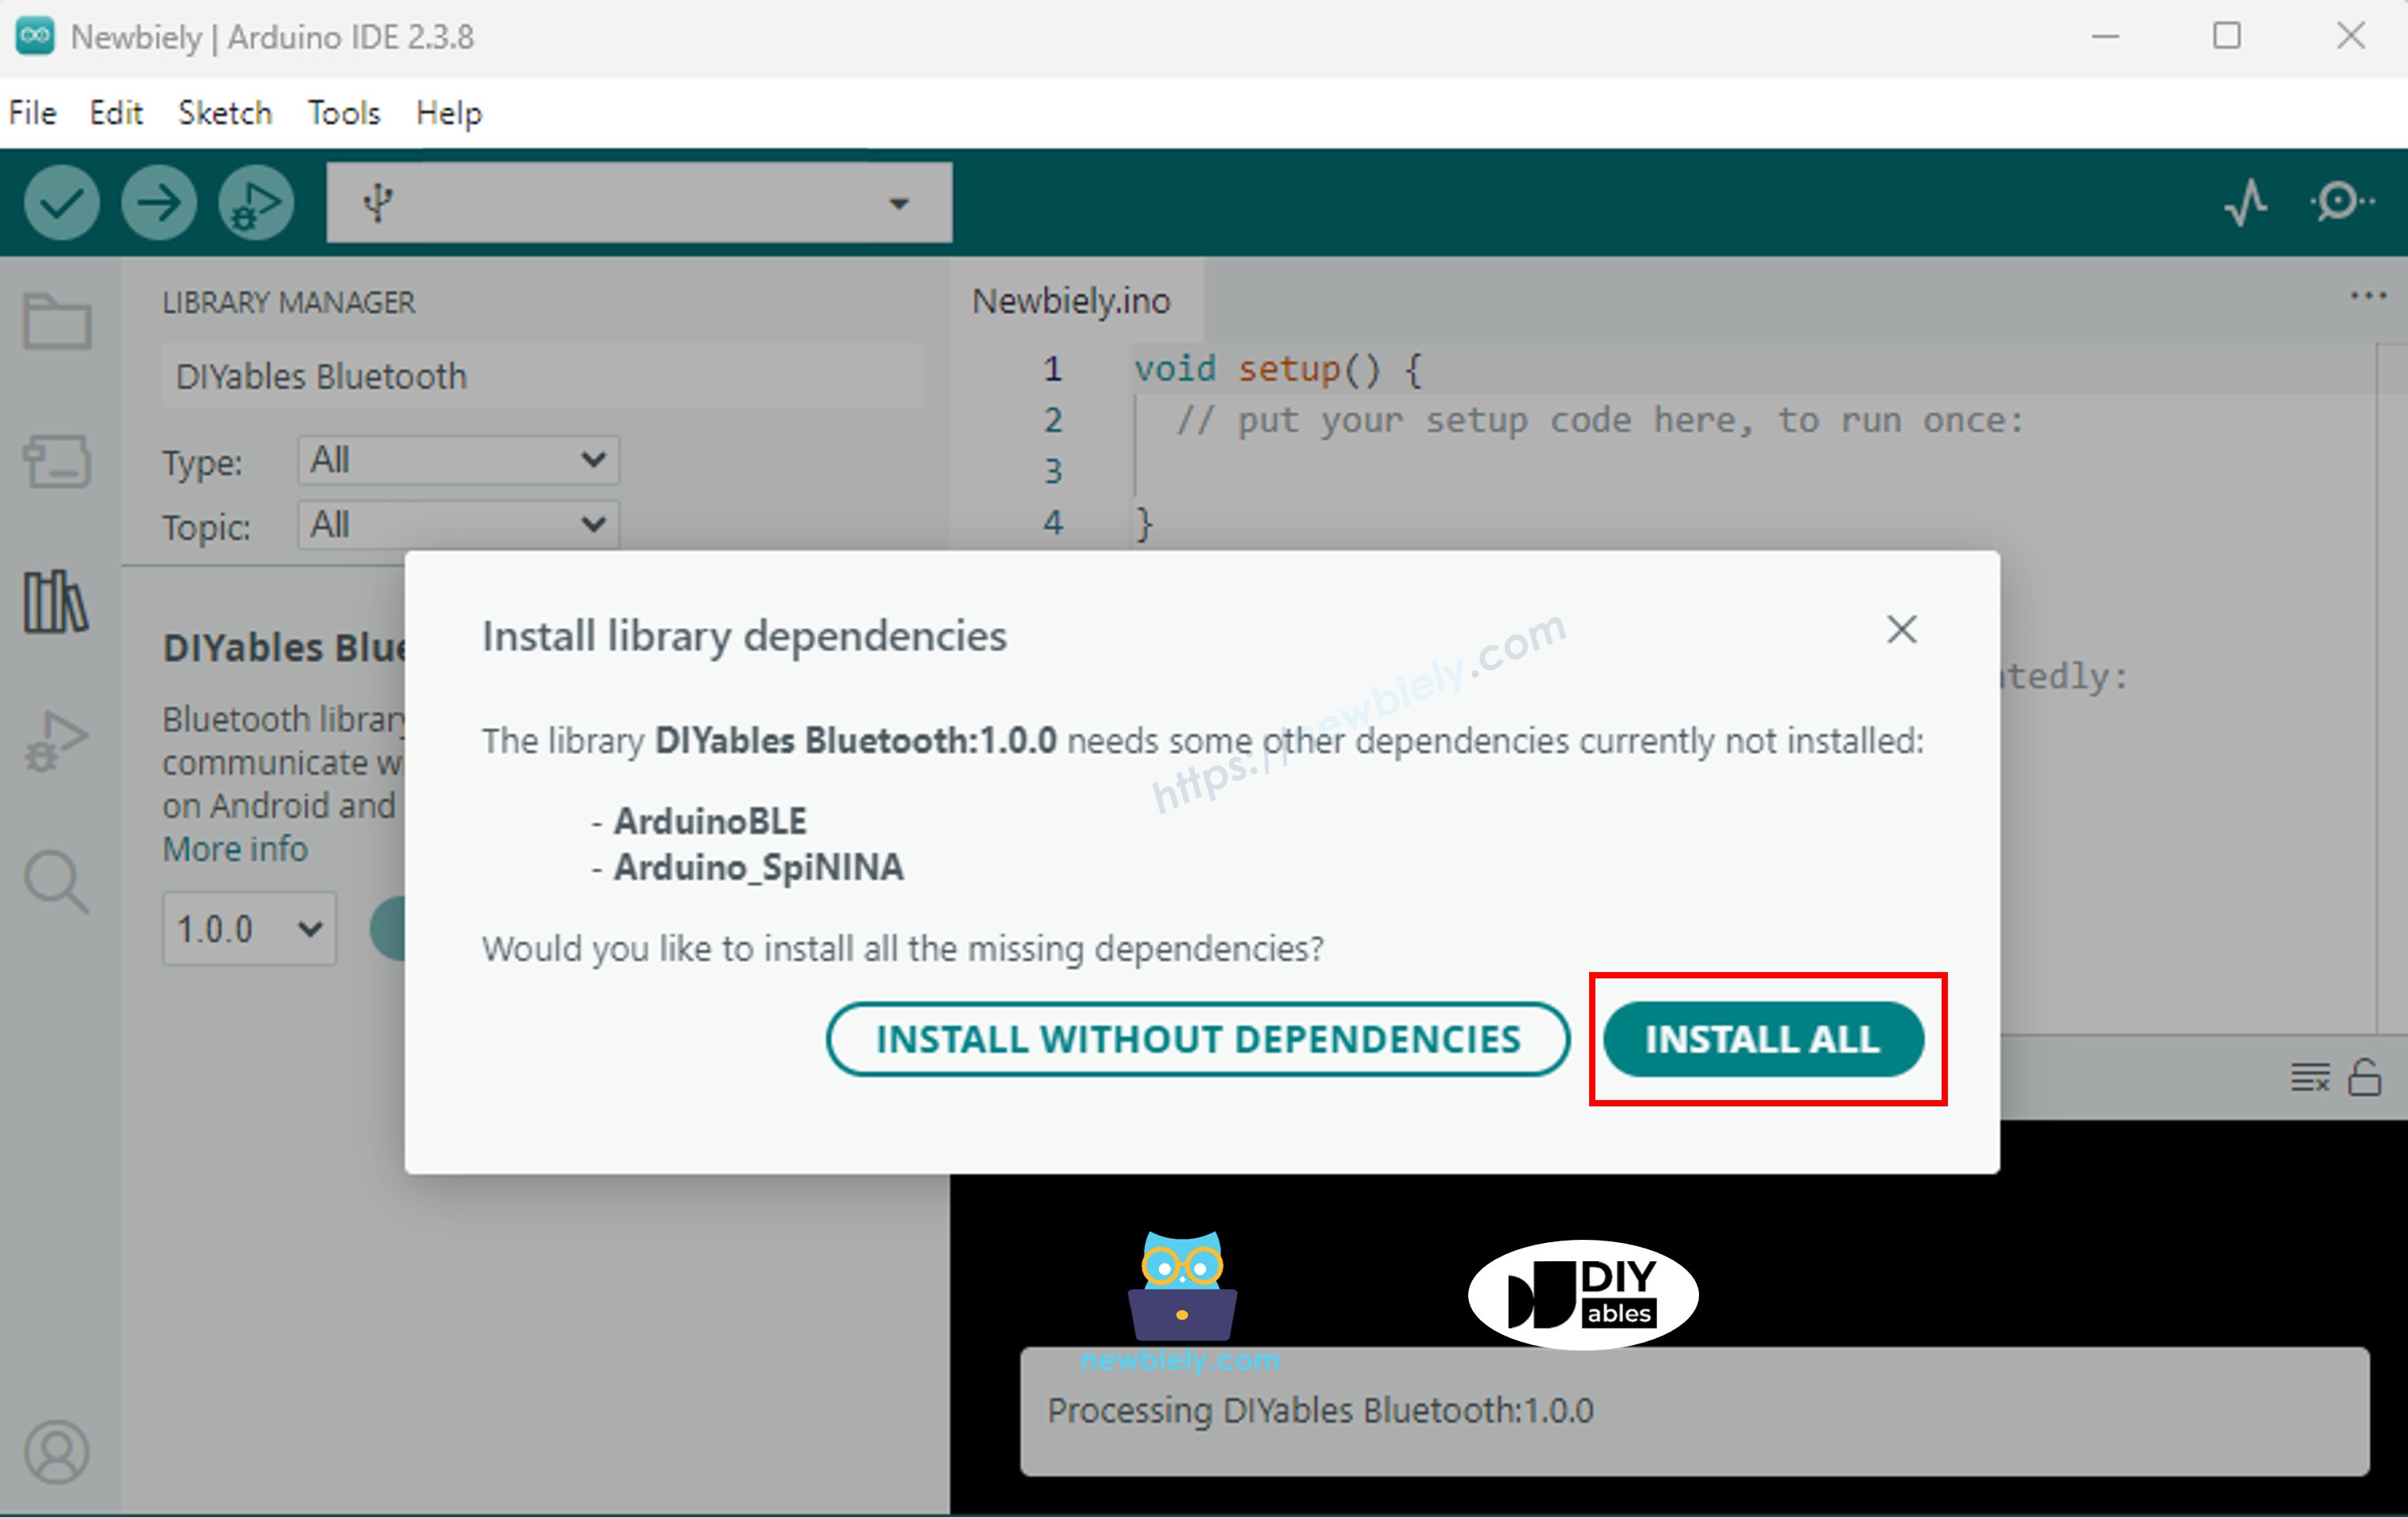
  • U wordt gevraagd om enkele extra bibliotheekafhankelijkheden te installeren.
  • Klik op Alles installeren om alle afhankelijkheden te installeren.
ESP32 DIYables Bluetooth afhankelijkheden

Kies één van onderstaande twee Bluetooth-modi, afhankelijk van uw behoeften:

ESP32 Classic Bluetooth Code (werkt alleen met app op Android)

Opmerking: Classic Bluetooth wordt NIET ondersteund op iOS. Gebruik de BLE code hieronder als u iOS-ondersteuning nodig heeft.

  • Ga in Arduino IDE naar Bestand Voorbeelden DIYables Bluetooth Esp32Bluetooth_Joystick, of kopieer de bovenstaande code en plak deze in de Arduino IDE editor.
/* * DIYables Bluetooth Library - ESP32 Classic Bluetooth Joystick Example * Works with DIYables Bluetooth STEM app on Android * Note: Classic Bluetooth is NOT supported on iOS. Use BLE examples for iOS support. * * This example demonstrates the Bluetooth Joystick feature: * - Interactive joystick control via Bluetooth * - Real-time X/Y coordinate values (-100 to +100) * - Control pins based on joystick position * * Compatible Boards: * - ESP32 (all variants with Classic Bluetooth) * - ESP32-WROOM-32 * - ESP32-DevKitC * - ESP32-WROVER * * Note: Select "Huge APP (3MB No OTA/1MB SPIFFS)" partition scheme * in Arduino IDE: Tools > Partition Scheme * * Setup: * 1. Upload the sketch to your ESP32 * 2. Open Serial Monitor (115200 baud) to see connection status * 3. Use DIYables Bluetooth App to connect and control the joystick * * Tutorial: https://diyables.io/bluetooth-app * Author: DIYables */ #include <DIYables_BluetoothServer.h> #include <DIYables_BluetoothJoystick.h> #include <platforms/DIYables_Esp32Bluetooth.h> // Create Bluetooth instances DIYables_Esp32Bluetooth bluetooth("ESP32_Joystick"); DIYables_BluetoothServer bluetoothServer(bluetooth); // Create Joystick app instance // Configure with autoReturn=false and sensitivity=5 (minimum 5% change to trigger updates) DIYables_BluetoothJoystick bluetoothJoystick(false, 5); // Variables to store current joystick values int currentJoystickX = 0; int currentJoystickY = 0; void setup() { Serial.begin(115200); delay(1000); Serial.println("DIYables Bluetooth - ESP32 Joystick Example"); // TODO: initialize your hardware pins here // Initialize Bluetooth server with platform-specific implementation bluetoothServer.begin(); // Add joystick app to server bluetoothServer.addApp(&bluetoothJoystick); // Set up connection event callbacks bluetoothServer.setOnConnected([]() { Serial.println("Bluetooth connected!"); }); bluetoothServer.setOnDisconnected([]() { Serial.println("Bluetooth disconnected!"); }); // Set up joystick callback for position changes bluetoothJoystick.onJoystickValue([](int x, int y) { // Store the received values currentJoystickX = x; currentJoystickY = y; // Print joystick position values (-100 to +100) Serial.print("Joystick - X: "); Serial.print(x); Serial.print(", Y: "); Serial.println(y); // TODO: Add your control logic here based on joystick position // Examples: // - Control motors: if (x > 50) { /* move right */ } // - Control servos: servo.write(map(y, -100, 100, 0, 180)); // - Control LEDs: ledcWrite(channel, map(abs(x), 0, 100, 0, 255)); // - Send commands to other devices via Serial, I2C, SPI, etc. }); // Optional: Handle requests for current joystick values (when app loads) bluetoothJoystick.onGetConfig([]() { // Send the stored joystick values back to the app bluetoothJoystick.send(currentJoystickX, currentJoystickY); Serial.print("App requested values - Sent: X="); Serial.print(currentJoystickX); Serial.print(", Y="); Serial.println(currentJoystickY); }); // You can change configuration at runtime: // bluetoothJoystick.setAutoReturn(false); // Disable auto-return // bluetoothJoystick.setSensitivity(10.0); // Only send updates when joystick moves >10% (less sensitive) Serial.println("Waiting for Bluetooth connection..."); } void loop() { // Handle Bluetooth server communications bluetoothServer.loop(); // TODO: Add your main application code here delay(10); }
  • Klik op de knop Uploaden in Arduino IDE om de code naar de ESP32 te uploaden.
  • Open de Serial Monitor.
  • Bekijk het resultaat in de Serial Monitor. Het ziet er als volgt uit:
COM6
Send
DIYables Bluetooth - ESP32 Joystick Voorbeeld Wacht op Bluetooth-verbinding...
Autoscroll Show timestamp
Clear output
9600 baud  
Newline  

ESP32 BLE Code (werkt met app op zowel Android als iOS)

  • Ga in Arduino IDE naar Bestand Voorbeelden DIYables Bluetooth Esp32BLE_Joystick, of kopieer de bovenstaande code en plak deze in de Arduino IDE editor.
/* * DIYables Bluetooth Library - ESP32 BLE Joystick Example * Works with DIYables Bluetooth STEM app on Android and iOS * * This example demonstrates the Bluetooth Joystick feature: * - Interactive joystick control via Bluetooth * - Real-time X/Y coordinate values (-100 to +100) * - Control pins based on joystick position * * Compatible Boards: * - ESP32-WROOM-32 * - ESP32-DevKitC * - ESP32-WROVER * - ESP32-S3 * - ESP32-C3 * - Any ESP32 board supporting BLE * * Note: Select "Huge APP (3MB No OTA/1MB SPIFFS)" partition scheme * in Arduino IDE: Tools > Partition Scheme * * Setup: * 1. Upload the sketch to your ESP32 * 2. Open Serial Monitor (115200 baud) to see connection status * 3. Use DIYables Bluetooth App to connect and control the joystick * * Tutorial: https://diyables.io/bluetooth-app * Author: DIYables */ #include <DIYables_BluetoothServer.h> #include <DIYables_BluetoothJoystick.h> #include <platforms/DIYables_Esp32BLE.h> // BLE Configuration const char* DEVICE_NAME = "ESP32BLE_Joystick"; const char* SERVICE_UUID = "19B10000-E8F2-537E-4F6C-D104768A1214"; const char* TX_UUID = "19B10001-E8F2-537E-4F6C-D104768A1214"; const char* RX_UUID = "19B10002-E8F2-537E-4F6C-D104768A1214"; // Create Bluetooth instances DIYables_Esp32BLE bluetooth(DEVICE_NAME, SERVICE_UUID, TX_UUID, RX_UUID); DIYables_BluetoothServer bluetoothServer(bluetooth); // Create Joystick app instance DIYables_BluetoothJoystick bluetoothJoystick(false, 5); // Variables to store current joystick values int currentJoystickX = 0; int currentJoystickY = 0; void setup() { Serial.begin(115200); delay(1000); Serial.println("DIYables Bluetooth - ESP32 BLE Joystick Example"); // Initialize Bluetooth server with platform-specific implementation bluetoothServer.begin(); // Add joystick app to server bluetoothServer.addApp(&bluetoothJoystick); // Set up connection event callbacks bluetoothServer.setOnConnected([]() { Serial.println("Bluetooth connected!"); }); bluetoothServer.setOnDisconnected([]() { Serial.println("Bluetooth disconnected!"); }); // Set up joystick callback for position changes bluetoothJoystick.onJoystickValue([](int x, int y) { currentJoystickX = x; currentJoystickY = y; Serial.print("Joystick - X: "); Serial.print(x); Serial.print(", Y: "); Serial.println(y); // TODO: Add your control logic here based on joystick position }); bluetoothJoystick.onGetConfig([]() { bluetoothJoystick.send(currentJoystickX, currentJoystickY); Serial.print("App requested values - Sent: X="); Serial.print(currentJoystickX); Serial.print(", Y="); Serial.println(currentJoystickY); }); Serial.println("Waiting for Bluetooth connection..."); } void loop() { bluetoothServer.loop(); delay(10); }
  • Klik op de knop Uploaden in Arduino IDE om de code naar de ESP32 te uploaden.
  • Open de Serial Monitor.
  • Bekijk het resultaat in de Serial Monitor. Het ziet er als volgt uit:
COM6
Send
DIYables Bluetooth - ESP32 BLE Joystick Voorbeeld Wacht op Bluetooth-verbinding...
Autoscroll Show timestamp
Clear output
9600 baud  
Newline  

Mobiele App

  • Installeer de DIYables Bluetooth App op uw smartphone: Android | iOS
  • Als u de ESP32 Classic Bluetooth code gebruikt, moet u de ESP32 eerst koppelen met uw Android-telefoon voordat u de app opent:
    • Ga naar de Instellingen > Bluetooth van uw telefoon
    • Zorg dat Bluetooth is ingeschakeld
    • Uw telefoon zoekt naar beschikbare apparaten
    • Zoek en tik op "ESP32_Joystick" in de lijst met beschikbare apparaten
    • Bevestig het koppelingsverzoek (geen pincode nodig)
    • Wacht tot er "Gekoppeld" verschijnt onder de apparaatnaam
  • Als u de ESP32 BLE code gebruikt, is koppelen niet nodig. Ga direct naar de volgende stap.
  • Open de DIYables Bluetooth App.
  • Wanneer u de app voor het eerst opent, wordt u gevraagd om permissies. Geef de volgende toestemming:
    • Dichtbijzijnde apparaten permissie (Android 12+) / Bluetooth permissie (iOS) - nodig om Bluetooth-apparaten te scannen en verbinden
    • Locatie permissie (alleen Android 11 en lager) - vereist voor BLE scanning op oudere Android versies
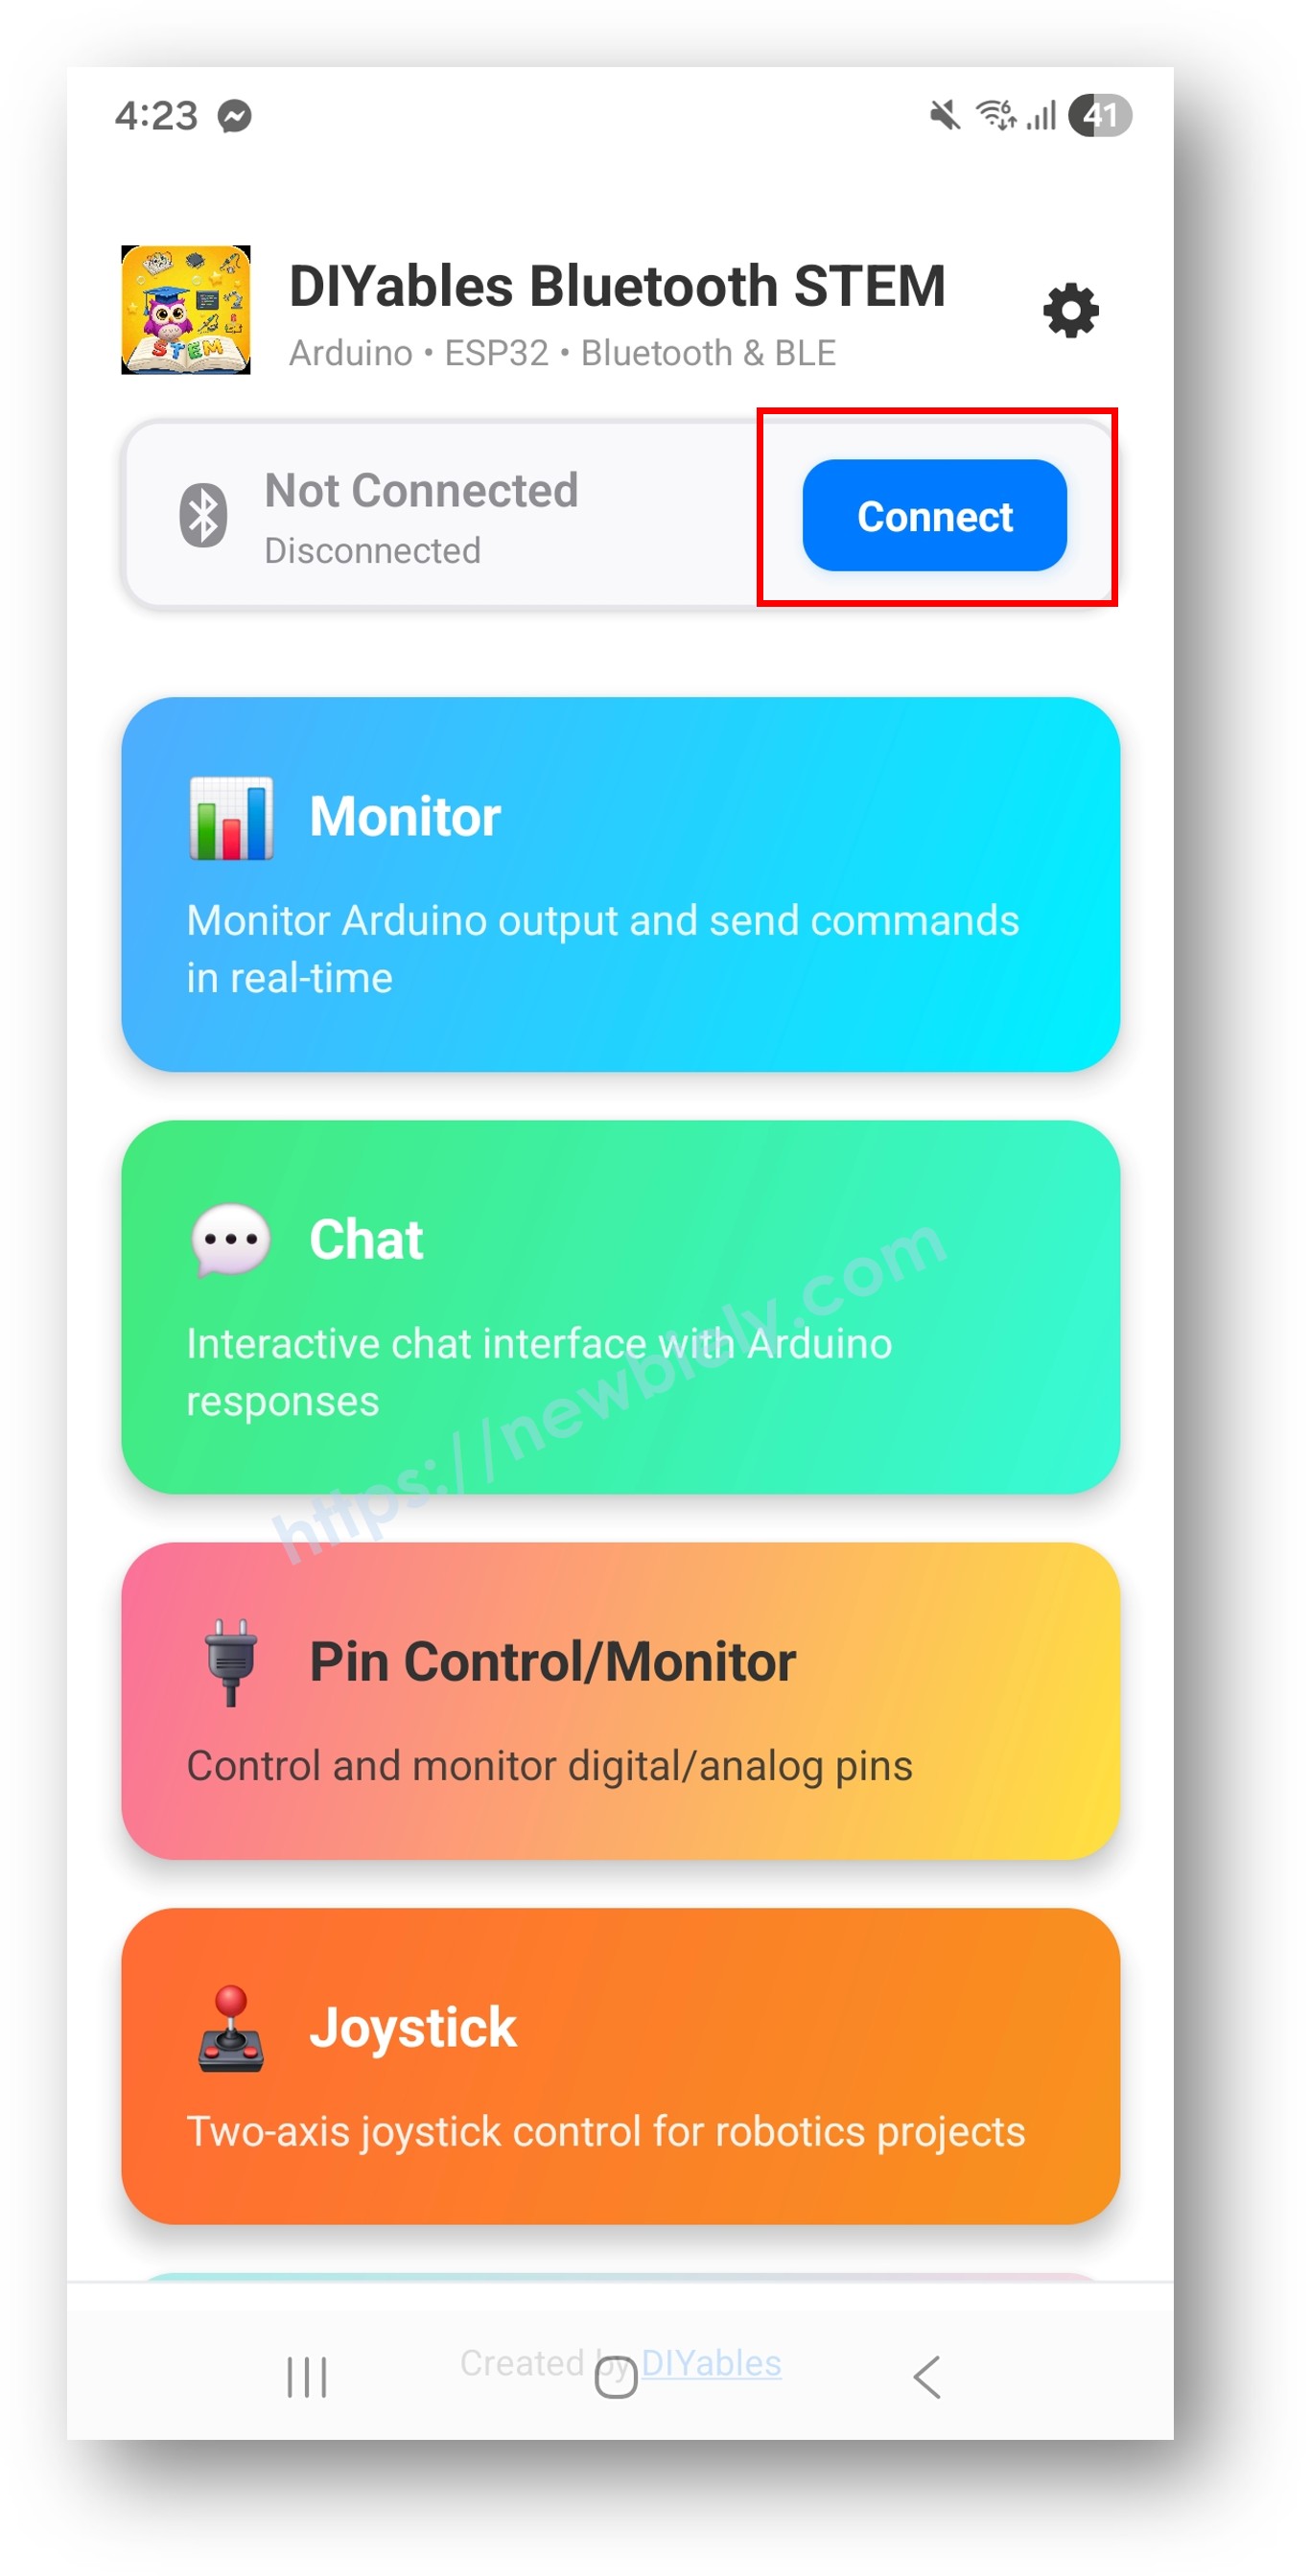
  • Zorg dat Bluetooth is ingeschakeld op uw telefoon.
  • Tik op het startscherm op de Verbinden-knop. De app zoekt naar zowel BLE- als Classic Bluetooth-apparaten.
DIYables Bluetooth App - Startscherm met Zoekknop
  • Zoek en tik op uw apparaat in de scanresultaten om verbinding te maken:
    • Voor Classic Bluetooth: tik op "ESP32_Joystick"
    • Voor BLE: tik op "ESP32BLE_Joystick"
  • Na verbinding gaat de app automatisch terug naar het startscherm. Selecteer de Joystick app vanuit het app-menu.
DIYables Bluetooth App - Startscherm met Joystick App

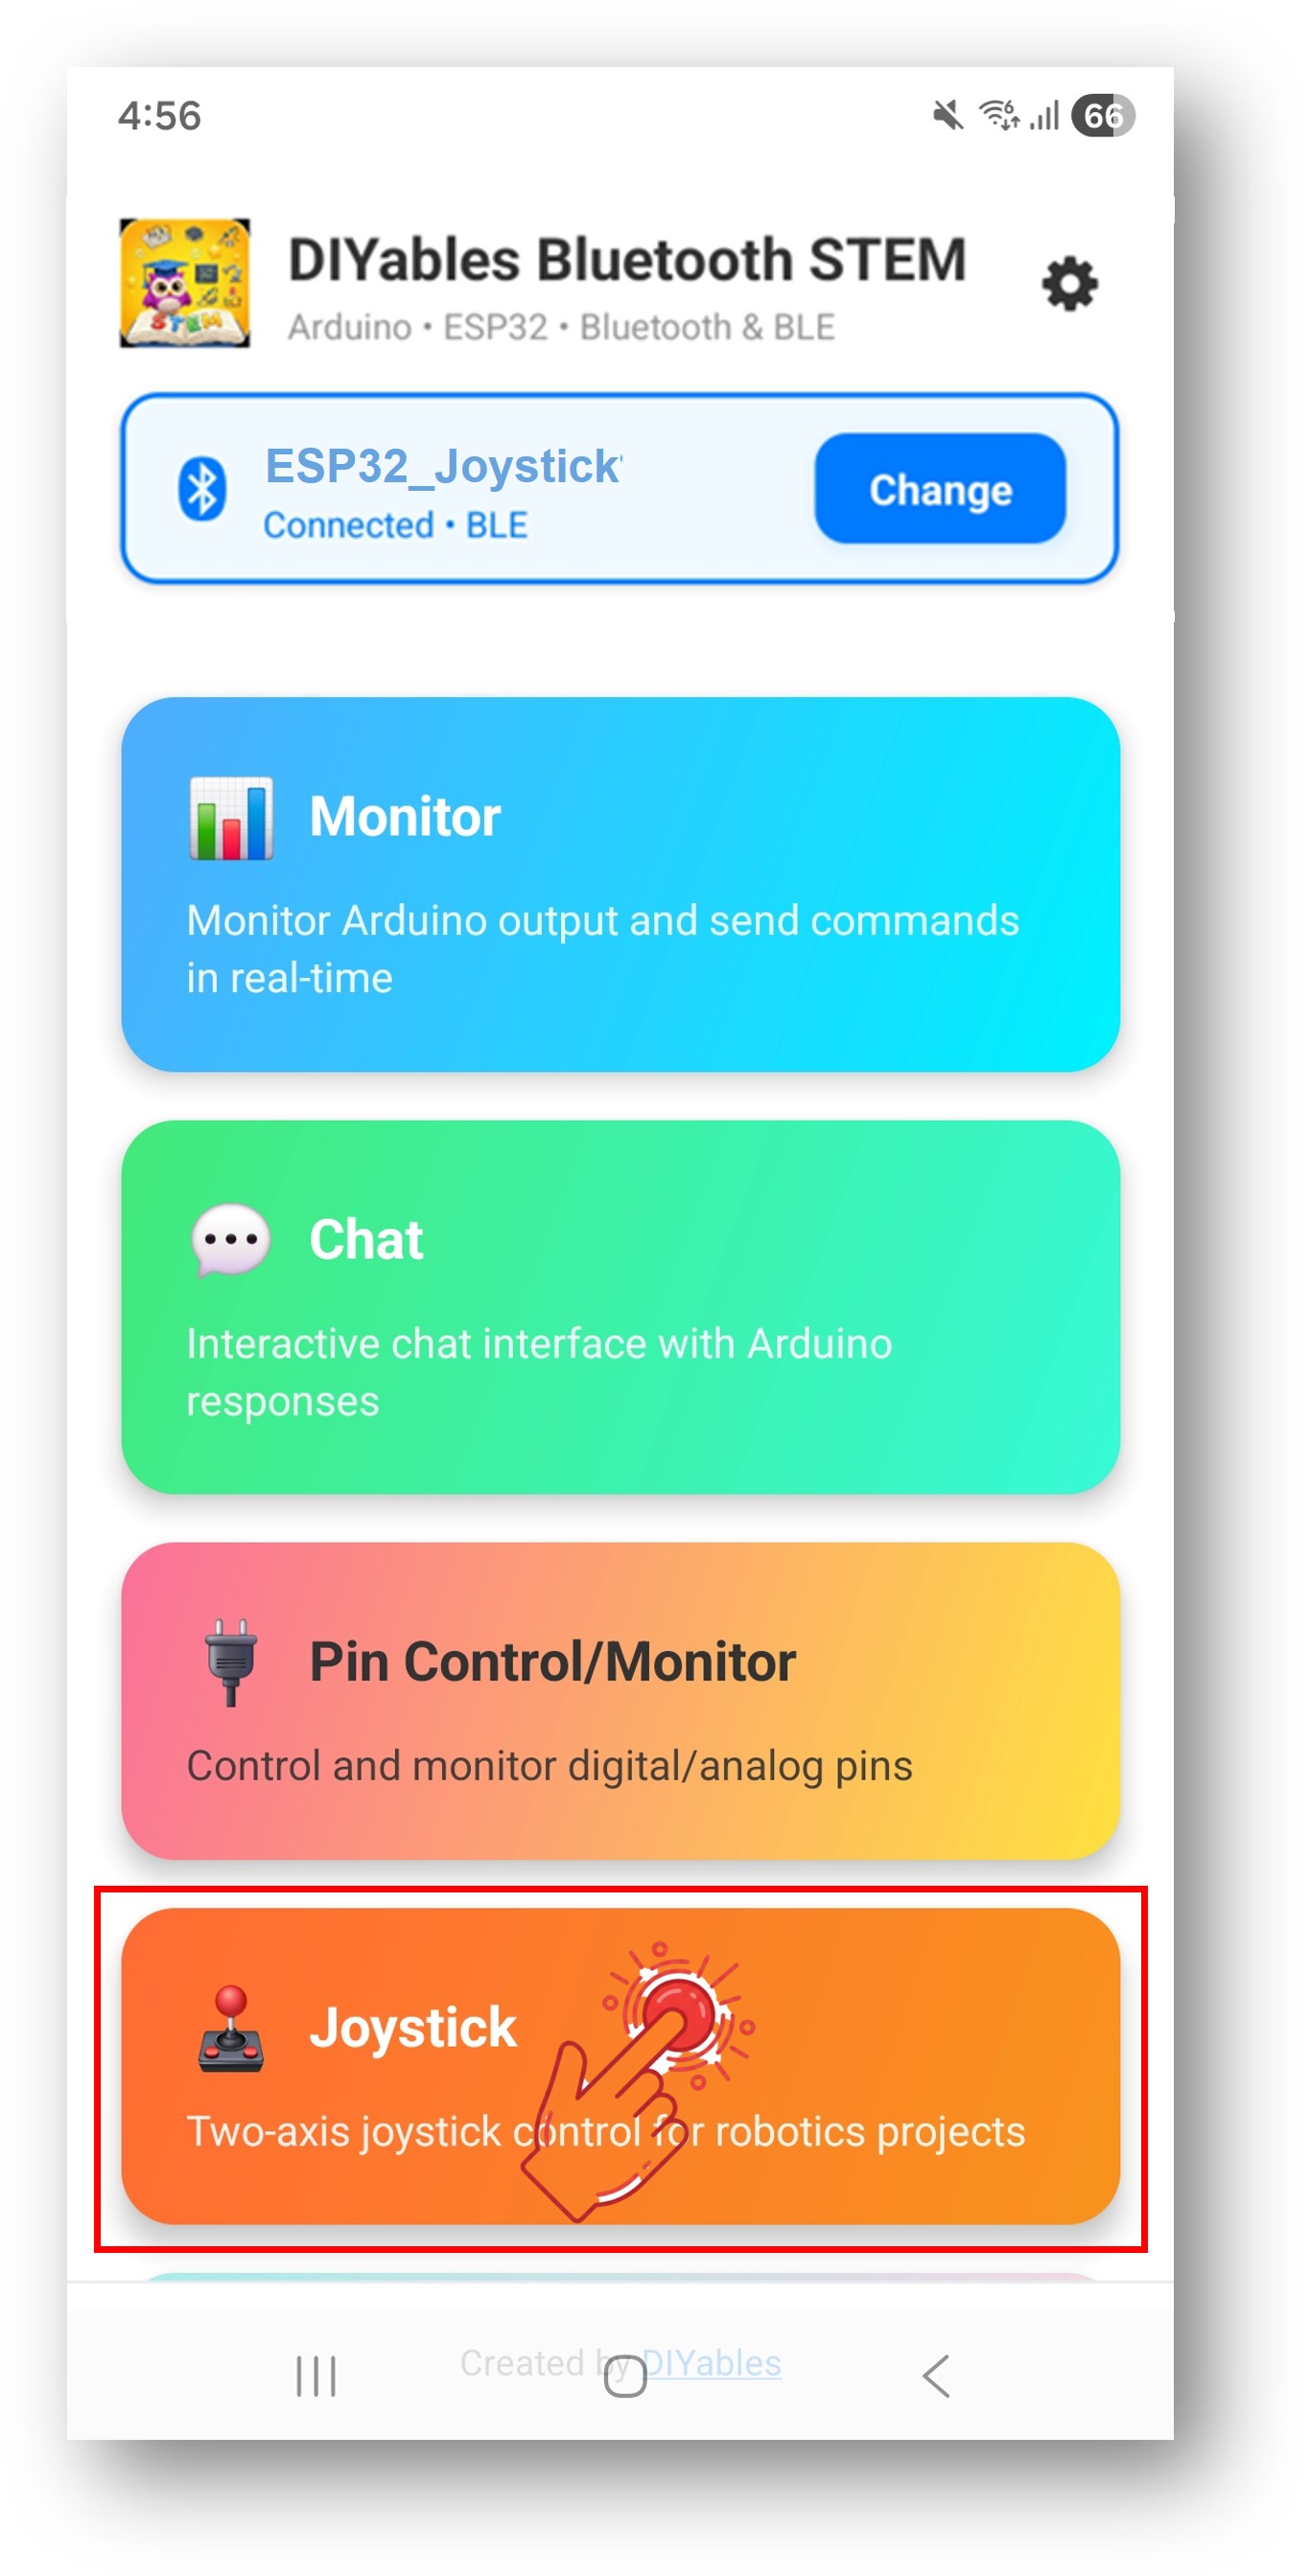
Opmerking: U kunt het instellingenicoon op het startscherm gebruiken om apps te verbergen/tonen op het startscherm. Voor meer details, zie de DIYables Bluetooth App Gebruikershandleiding.

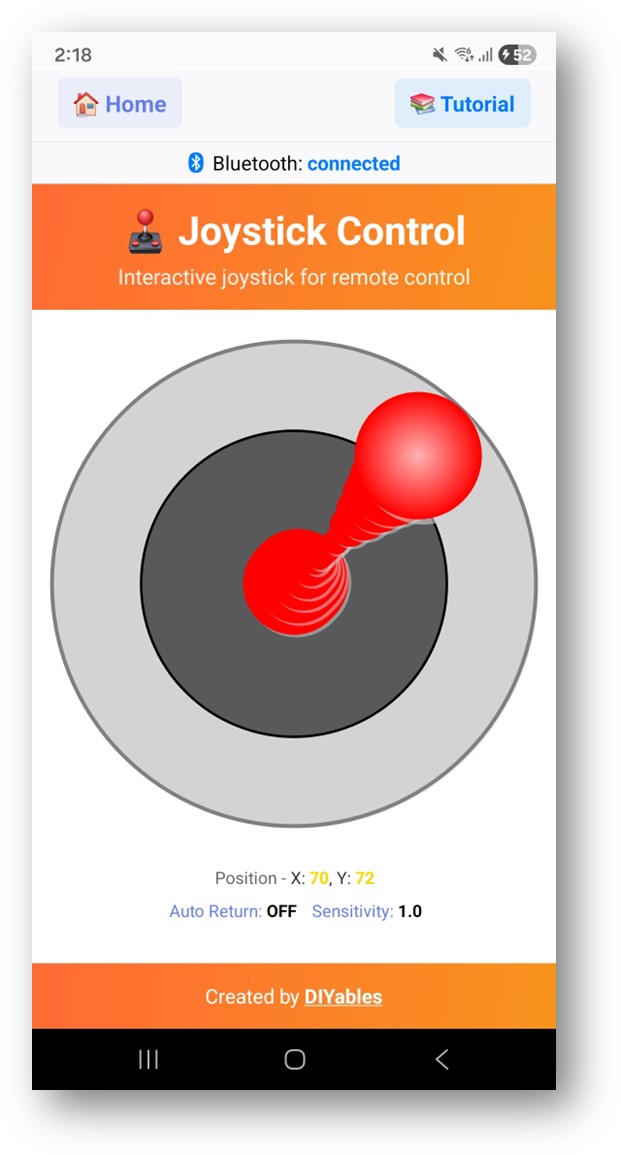
  • Beweeg de joystick in elke richting om X/Y-coördinaten te verzenden.
DIYables Bluetooth App - Joystick Scherm

Kijk nu terug naar de Serial Monitor in de Arduino IDE. U ziet:

COM6
Send
Bluetooth connected! Joystick - X: 50, Y: 0 Joystick - X: 75, Y: -30 Joystick - X: 0, Y: 100 Joystick - X: -60, Y: 45 Joystick - X: 0, Y: 0
Autoscroll Show timestamp
Clear output
9600 baud  
Newline  
  • Beweeg de joystick in de app en zie de real-time X/Y waarden verschijnen in de Serial Monitor.

Creatieve Aanpassing - Pas de Code aan voor Uw Project

Configureer Auto-terugkeer en Gevoeligheid

Stel het gedrag van de joystick in met constructorparameters:

// Maak Joystick app instantie aan // Parameters: autoReturn (bool), sensitivity (float - minimale procentuele verandering om update te triggeren) DIYables_BluetoothJoystick bluetoothJoystick(false, 5); // Of verander tijdens runtime: bluetoothJoystick.setAutoReturn(true); // Schakel auto-terugkeer naar midden in bluetoothJoystick.setSensitivity(10.0); // Verstuur alleen updates bij beweging >10% // Lees huidige configuratie: bool autoReturn = bluetoothJoystick.getAutoReturn(); float sensitivity = bluetoothJoystick.getSensitivity();

Handel Joystick Positiewijzigingen af

Gebruik de callback onJoystickValue() om X/Y coördinaten te ontvangen:

bluetoothJoystick.onJoystickValue([](int x, int y) { // x loopt van -100 (links) tot +100 (rechts) // y loopt van -100 (beneden) tot +100 (boven) Serial.print("X: "); Serial.print(x); Serial.print(", Y: "); Serial.println(y); // TODO: Voeg hier uw besturingslogica toe });

Handel Configuratieverzoeken van de App af

Wanneer de app verbinding maakt en het joystickscherm opent, vraagt deze de joystickconfiguratie op bij de ESP32. Gebruik de callback onGetConfig() om de huidige joystickwaarden naar de app te sturen op dat moment:

bluetoothJoystick.onGetConfig([]() { // Wordt aangeroepen wanneer app configuratie opvraagt // Stuur huidige joystickwaarden zodat app ze correct toont bluetoothJoystick.send(currentJoystickX, currentJoystickY); Serial.println("App requested config - sent current values"); });

Stuur Waarden naar de App

U kunt joystickcoördinaten van ESP32 naar de app sturen:

// Verstuur X/Y coördinaten naar de app bluetoothJoystick.send(currentJoystickX, currentJoystickY); // Verstuur een tekstbericht bluetoothJoystick.send("Joystick calibrated");

Handel Verbindingsgebeurtenissen af

U kunt detecteren wanneer de app verbinding maakt of verbreekt met de ESP32:

// Wordt aangeroepen wanneer app verbonden is met ESP32 bluetoothServer.setOnConnected([]() { Serial.println("Bluetooth connected!"); bluetoothJoystick.send(currentJoystickX, currentJoystickY); }); // Wordt aangeroepen wanneer app verbinding verbreekt met ESP32 bluetoothServer.setOnDisconnected([]() { Serial.println("Bluetooth disconnected!"); // Stop alle motoren bij wegvallen verbinding stopAllMotors(); }); // Controleer verbindingsstatus waar dan ook in uw code if (bluetoothServer.isConnected()) { // Doe iets alleen als verbonden }

Hoe de Joystick te Gebruiken

App Interface Besturingselementen

De joystickinterface in de DIYables Bluetooth App biedt:

  • Virtueel Joystickvlak: Raak aan en sleep om positie te regelen
  • X Waardeweergave: Toont huidige horizontale positie (-100 tot +100)
  • Y Waardeweergave: Toont huidige verticale positie (-100 tot +100)

Waardebereiken

De joystick levert:

  • X-as: van -100 (volledig links) via 0 (midden) tot +100 (volledig rechts)
  • Y-as: van -100 (volledig naar beneden) via 0 (midden) tot +100 (volledig omhoog)
  • Middenpositie: (0, 0) wanneer joystick in ruststand staat

Programmeervoorbeelden

Basis Joystick Handler

void setup() { bluetoothJoystick.onJoystickValue([](int x, int y) { currentJoystickX = x; currentJoystickY = y; Serial.print("Joystick - X: "); Serial.print(x); Serial.print(", Y: "); Serial.println(y); }); }

Twee-Wiel Robotbesturing

const int MOTOR_LEFT_PWM = 16; const int MOTOR_LEFT_DIR1 = 18; const int MOTOR_LEFT_DIR2 = 19; const int MOTOR_RIGHT_PWM = 17; const int MOTOR_RIGHT_DIR1 = 21; const int MOTOR_RIGHT_DIR2 = 22; void setup() { // Configureer motorpinnen pinMode(MOTOR_LEFT_PWM, OUTPUT); pinMode(MOTOR_LEFT_DIR1, OUTPUT); pinMode(MOTOR_LEFT_DIR2, OUTPUT); pinMode(MOTOR_RIGHT_PWM, OUTPUT); pinMode(MOTOR_RIGHT_DIR1, OUTPUT); pinMode(MOTOR_RIGHT_DIR2, OUTPUT); bluetoothJoystick.onJoystickValue([](int x, int y) { // Differentieel sturen: mix X (bocht) en Y (snelheid) int leftSpeed = constrain(y + x, -100, 100); int rightSpeed = constrain(y - x, -100, 100); // Stel linker motorstand en snelheid in if (leftSpeed >= 0) { digitalWrite(MOTOR_LEFT_DIR1, HIGH); digitalWrite(MOTOR_LEFT_DIR2, LOW); } else { digitalWrite(MOTOR_LEFT_DIR1, LOW); digitalWrite(MOTOR_LEFT_DIR2, HIGH); } analogWrite(MOTOR_LEFT_PWM, map(abs(leftSpeed), 0, 100, 0, 255)); // Stel rechter motorstand en snelheid in if (rightSpeed >= 0) { digitalWrite(MOTOR_RIGHT_DIR1, HIGH); digitalWrite(MOTOR_RIGHT_DIR2, LOW); } else { digitalWrite(MOTOR_RIGHT_DIR1, LOW); digitalWrite(MOTOR_RIGHT_DIR2, HIGH); } analogWrite(MOTOR_RIGHT_PWM, map(abs(rightSpeed), 0, 100, 0, 255)); Serial.print("Links: "); Serial.print(leftSpeed); Serial.print("%, Rechts: "); Serial.print(rightSpeed); Serial.println("%"); }); }

Pan-Tilt Servo Besturing

#include <ESP32Servo.h> Servo panServo; // Horizontaal (X-as) Servo tiltServo; // Verticaal (Y-as) const int PAN_PIN = 13; const int TILT_PIN = 14; void setup() { panServo.attach(PAN_PIN); tiltServo.attach(TILT_PIN); panServo.write(90); // Middenpositie tiltServo.write(90); bluetoothJoystick.onJoystickValue([](int x, int y) { // Map joystickwaarden (-100 tot +100) naar servohoeken (0 tot 180) int panAngle = map(x, -100, 100, 0, 180); int tiltAngle = map(y, -100, 100, 0, 180); panServo.write(panAngle); tiltServo.write(tiltAngle); Serial.print("Pan: "); Serial.print(panAngle); Serial.print("°, Tilt: "); Serial.print(tiltAngle); Serial.println("°"); }); }

LED Matrix Richtingsindicator

// 4 richting-LED's const int LED_UP = 16; const int LED_DOWN = 17; const int LED_LEFT = 18; const int LED_RIGHT = 19; const int THRESHOLD = 30; // Minimale joystickwaarde voor LED activering void setup() { pinMode(LED_UP, OUTPUT); pinMode(LED_DOWN, OUTPUT); pinMode(LED_LEFT, OUTPUT); pinMode(LED_RIGHT, OUTPUT); bluetoothJoystick.onJoystickValue([](int x, int y) { // Zet LED's aan op basis van joystickrichting digitalWrite(LED_UP, y > THRESHOLD ? HIGH : LOW); digitalWrite(LED_DOWN, y < -THRESHOLD ? HIGH : LOW); digitalWrite(LED_RIGHT, x > THRESHOLD ? HIGH : LOW); digitalWrite(LED_LEFT, x < -THRESHOLD ? HIGH : LOW); // Toon richting in Serial String direction = ""; if (y > THRESHOLD) direction += "OMHOOG "; if (y < -THRESHOLD) direction += "OMLAAG "; if (x > THRESHOLD) direction += "RECHTS "; if (x < -THRESHOLD) direction += "LINKS "; if (direction == "") direction = "MIDDEN"; Serial.println("Richting: " + direction); }); }

Geavanceerde Programmeertechnieken

Dead Zone Filter

const int DEAD_ZONE = 15; // Negeer joystickwaarden binnen ±15 bluetoothJoystick.onJoystickValue([](int x, int y) { // Pas dead zone filter toe int filteredX = (abs(x) > DEAD_ZONE) ? x : 0; int filteredY = (abs(y) > DEAD_ZONE) ? y : 0; // Gebruik gefilterde waarden voor besturing controlMotors(filteredX, filteredY); });

Snelheidsramping

int targetX = 0, targetY = 0; int currentX = 0, currentY = 0; const int RAMP_RATE = 5; // Maximale verandering per update void setup() { bluetoothJoystick.onJoystickValue([](int x, int y) { targetX = x; targetY = y; }); } void loop() { bluetoothServer.loop(); // Geleidelijk naar targetwaarden verhogen if (currentX < targetX) currentX = min(currentX + RAMP_RATE, targetX); else if (currentX > targetX) currentX = max(currentX - RAMP_RATE, targetX); if (currentY < targetY) currentY = min(currentY + RAMP_RATE, targetY); else if (currentY > targetY) currentY = max(currentY - RAMP_RATE, targetY); controlMotors(currentX, currentY); delay(20); }

Grootte en Hoek Berekening

bluetoothJoystick.onJoystickValue([](int x, int y) { // Bereken magnitude (afstand tot midden, 0-100) float magnitude = sqrt(x * x + y * y); magnitude = constrain(magnitude, 0, 100); // Bereken hoek in graden (0° = rechts, 90° = omhoog) float angle = atan2(y, x) * 180.0 / PI; Serial.print("Magnitude: "); Serial.print(magnitude, 1); Serial.print(", Hoek: "); Serial.print(angle, 1); Serial.println("°"); // Gebruik magnitude voor snelheid en hoek voor richting int speed = map((int)magnitude, 0, 100, 0, 255); // Pas toe op uw hardware... });

Voorbeelden van Hardware Integratie

Mecanum Wiel Robot

// Mecanum wiel robot heeft 4 motoren nodig const int MOTOR_FL = 16; // Voorzijde links const int MOTOR_FR = 17; // Voorzijde rechts const int MOTOR_BL = 18; // Achterzijde links const int MOTOR_BR = 19; // Achterzijde rechts void setupMecanumRobot() { bluetoothJoystick.onJoystickValue([](int x, int y) { // Kinematica voor mecanum wiel int fl = constrain(y + x, -100, 100); int fr = constrain(y - x, -100, 100); int bl = constrain(y - x, -100, 100); int br = constrain(y + x, -100, 100); setMotor(MOTOR_FL, fl); setMotor(MOTOR_FR, fr); setMotor(MOTOR_BL, bl); setMotor(MOTOR_BR, br); }); } void setMotor(int pin, int speed) { // Map -100..100 naar PWM met richting analogWrite(pin, map(abs(speed), 0, 100, 0, 255)); }

Stappenmotor Positiebesturing

#include <AccelStepper.h> AccelStepper stepperX(AccelStepper::DRIVER, 16, 17); AccelStepper stepperY(AccelStepper::DRIVER, 18, 19); void setup() { stepperX.setMaxSpeed(1000); stepperX.setAcceleration(500); stepperY.setMaxSpeed(1000); stepperY.setAcceleration(500); bluetoothJoystick.onJoystickValue([](int x, int y) { // Map joystick naar stappenmotorsnelheid (-1000 tot +1000 stappen/sec) int speedX = map(x, -100, 100, -1000, 1000); int speedY = map(y, -100, 100, -1000, 1000); stepperX.setSpeed(speedX); stepperY.setSpeed(speedY); }); } void loop() { bluetoothServer.loop(); stepperX.runSpeed(); stepperY.runSpeed(); }

BLE vs Classic Bluetooth - Welke te Kiezen?

FeatureBLE (Esp32BLE_Joystick)Classic Bluetooth (Esp32Bluetooth_Joystick)
iOS Ondersteuning? Ja? Nee
Android Ondersteuning? Ja? Ja
StroomverbruikLaagHoger
Bereik~30-100m~10-100m
Data SnelheidLagerHoger
Koppeling VereistNee (auto-connect)Ja (handmatige koppeling)
Geschikt VoorBatterijgevoede, cross-platformHoge doorvoer, alleen Android

Problemen Oplossen

Veelvoorkomende Problemen

1. App vindt apparaat niet

  • Controleer of de ESP32 is ingeschakeld en de sketch is geüpload
  • Voor BLE: Zorg dat Bluetooth en Locatie op uw telefoon zijn ingeschakeld
  • Voor Classic Bluetooth: Koppel het apparaat eerst via de Bluetooth-instellingen van uw telefoon
  • Controleer of het juiste partitiezchema is geselecteerd (Huge APP)

2. Joystick reageert niet

  • Controleer de Bluetooth-verbinding in de app
  • Controleer verbinding in de Serial Monitor
  • Probeer te ontkoppelen en opnieuw verbinden

3. Joystickwaarden lijken onregelmatig

  • Verhoog de gevoeligheid om kleine bewegingen te filteren: bluetoothJoystick.setSensitivity(10.0)
  • Pas een dead zone filter toe in uw callback
  • Controleer op interferentie van andere Bluetooth-apparaten

4. Verbinding valt vaak weg

  • Kom dichter bij de ESP32 (verminder afstand)
  • Voor BLE: Controleer op interferentie van andere BLE-apparaten
  • Voor Classic Bluetooth: Zorg voor een stabiele voedingsspanning van de ESP32
  • Controleer de Serial Monitor op verbindings- en verbreekmeldingen

5. Motoren stoppen niet als joystick wordt losgelaten

  • Zorg dat auto-terugkeer ingeschakeld is: bluetoothJoystick.setAutoReturn(true)
  • Voeg een dead zone check toe in uw motorbesturingscode
  • Voeg een noodstop toe in de setOnDisconnected() callback

6. Sketch is te groot / onvoldoende ruimte

  • Ga in Arduino IDE naar Tools > Partition Scheme en kies "Huge APP (3MB No OTA/1MB SPIFFS)" of "No OTA (Large APP)"
  • Het standaard partitiezchema biedt ~1,2 MB voor appcode, niet genoeg voor Bluetooth bibliotheken
  • Deze instelling geeft ~3 MB door de OTA (over-the-air update) partitie op te offeren

Debug Tips

Voeg uitgebreide debug-informatie toe:

void debugJoystickValues(int x, int y) { float magnitude = sqrt(x * x + y * y); float angle = atan2(y, x) * 180.0 / PI; Serial.println("=== Joystick Debug ==="); Serial.println("X: " + String(x) + ", Y: " + String(y)); Serial.println("Magnitude: " + String(magnitude, 1)); Serial.println("Angle: " + String(angle, 1) + "°"); Serial.println("======================"); }

Projectideeën

Robotica Projecten

  • Bluetooth-gestuurde differentiële robot
  • Mecanum of omnidirectionele wielrobot
  • Robotarm gewrichtsbesturing
  • Drone grondstation besturing

Camera Projecten

  • Pan-tilt camerasteun besturing
  • Gemotoriseerde cameraslider positionering
  • Surveillance camera afstandsbediening

Game Projecten

  • Bluetooth gamecontroller voor ESP32 games
  • Doolhofnavigatiespel
  • LED matrix joystickspellen (Snake, Pong)

Industriële Projecten

  • CNC jog controller
  • Gemotoriseerde podium- of platformpositionering
  • Kraan- of lierrichtingbesturing

Integratie met Andere Bluetooth Apps

Combineren met Bluetooth Slider

Gebruik joystick voor richting en sliders voor snelheidsbeperkingen:

int maxSpeed = 100; bluetoothSlider.onSliderValue([](int slider1, int slider2) { maxSpeed = slider1; // Slider regelt maximale snelheid }); bluetoothJoystick.onJoystickValue([](int x, int y) { // Schaal joystick met slider-gereguleerde snelheidslimiet int scaledX = map(x, -100, 100, -maxSpeed, maxSpeed); int scaledY = map(y, -100, 100, -maxSpeed, maxSpeed); controlRobot(scaledX, scaledY); });

Combineren met Bluetooth Monitor

Gebruik joystick voor besturing en monitor voor telemetrie:

bluetoothJoystick.onJoystickValue([](int x, int y) { controlMotors(x, y); // Verstuur telemetrie naar monitor bluetoothMonitor.send("X=" + String(x) + " Y=" + String(y) + " Speed=" + String(sqrt(x*x + y*y), 0)); });

Volgende Stappen

Na het beheersen van het Bluetooth Joystick voorbeeld, probeer:

  1. Bluetooth Slider - Voor nauwkeurige analoge waardebesturing
  2. Bluetooth Digitale Pinnen - Voor discrete aan/uit besturing
  3. Bluetooth Monitor - Voor debuggen van joystickwaarden
  4. Meerdere Bluetooth Apps - Combineren van joystick met sliders en andere besturingen

Ondersteuning

Voor extra hulp:

  • Raadpleeg de API Reference documentatie
  • Arduino community forums

※ ONZE BERICHTEN

  • U bent welkom om de link naar deze tutorial te delen. Gebruik onze inhoud echter niet op andere websites. We hebben veel moeite en tijd gestoken in het maken van de inhoud, respecteer alstublieft ons werk!