ESP32 Bluetooth Digital Pins Voorbeeld - Pinbesturing en Monitor Interface Tutorial
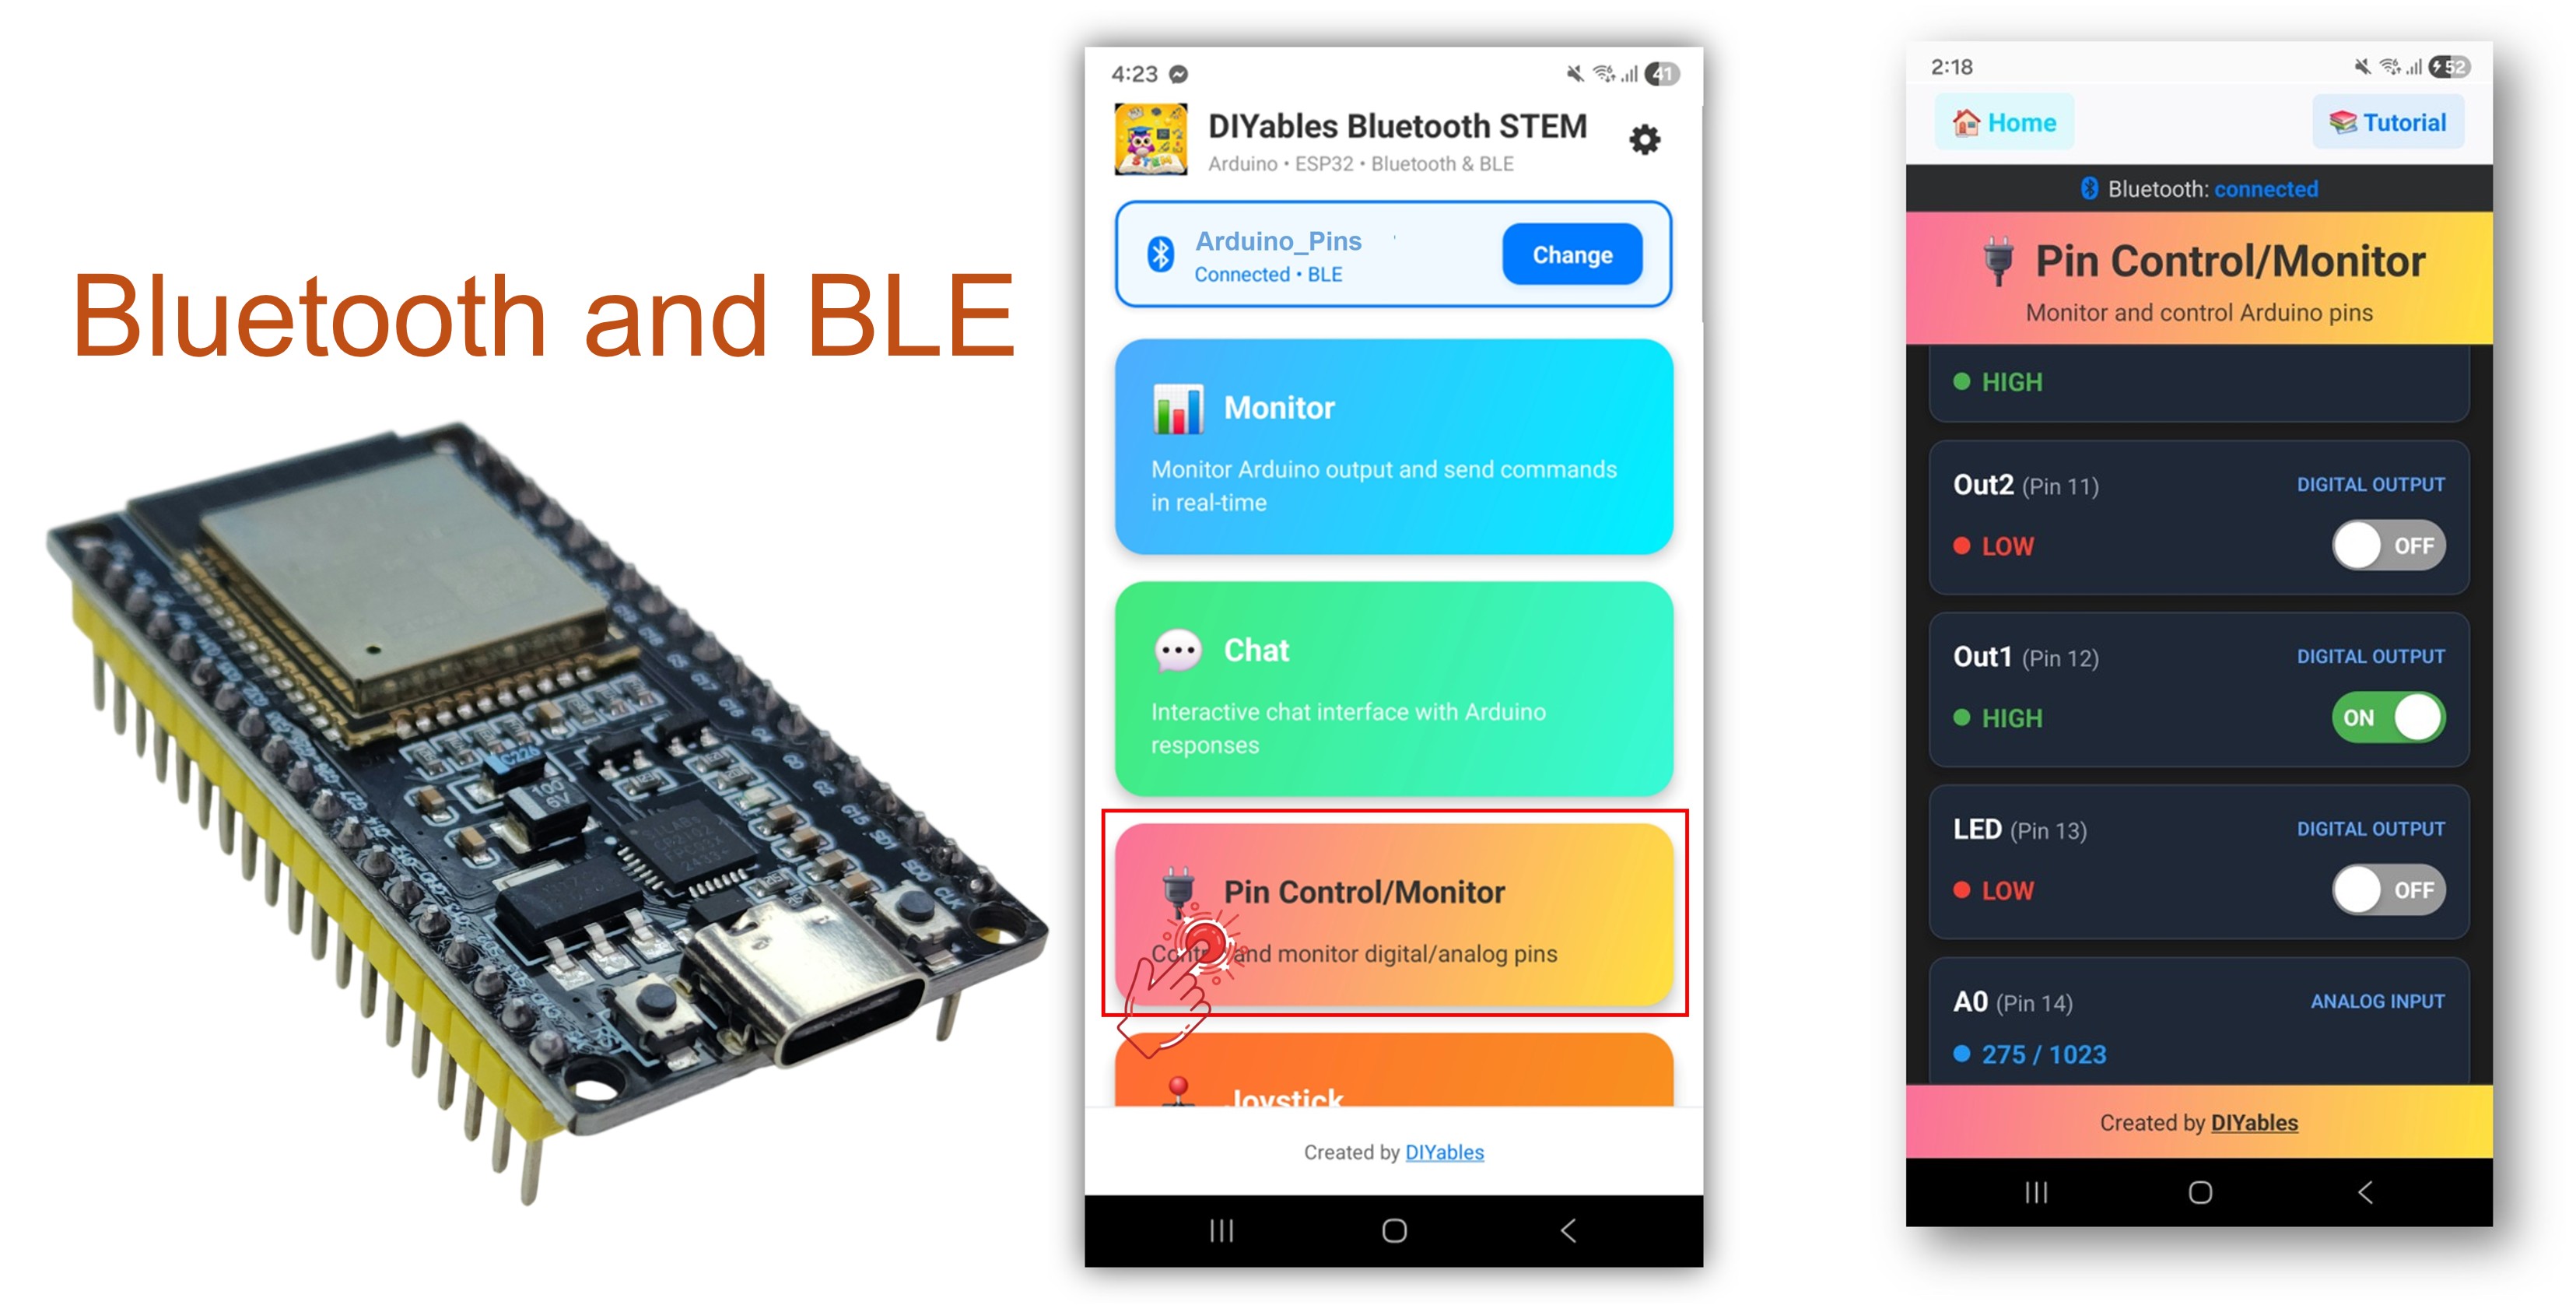
Het Bluetooth Digital Pins voorbeeld biedt bediening en monitoring van ESP32 GPIO-pinnen op afstand via de DIYables Bluetooth STEM-app. Ontworpen voor ESP32 bordjes met ondersteuning voor zowel BLE (Bluetooth Low Energy) als Classic Bluetooth verbindingen. Configureer pinnen als input of output, schakel output-pinnen in- en uit, lees digitale en analoge inputwaarden uit en ontvang real-time meldingen bij pinstatuswijzigingen — ideaal voor home automation, relaisbesturing, knopmonitoring en sensoruitlezing.
Dit voorbeeld ondersteunt twee Bluetooth-modi:
ESP32 BLE (Bluetooth Low Energy): Werkt op zowel Android als iOS
ESP32 Classic Bluetooth: Werkt alleen op Android. iOS ondersteunt geen Classic Bluetooth. Gebruik BLE als u iOS-ondersteuning nodig heeft.
Output Pin Besturing: Schakel digitale output-pinnen HIGH/LOW via de app
Input Pin Monitoring: Lees digitale en analoge inputpinstatussen uit
Aangepaste Pin Namen: Ken vriendelijke namen toe aan elke pin (bijv. "LED", "Btn1", "A34")
Real-Time Updates: Automatische meldingen bij verandering van inputpinstatussen
Tot 16 Pinnen: Ondersteuning voor maximaal 16 configureerbare pinnen tegelijk
Gemengde Modi: Combineer input- en outputpinnen in dezelfde setup
BLE & Classic Bluetooth: Kies de Bluetooth-modus die past bij uw project
Cross-Platform: BLE modus werkt op Android en iOS; Classic Bluetooth alleen Android
Of u kunt de volgende kits kopen:
Openbaarmaking: Sommige van de links in deze sectie zijn Amazon-affiliate links. We kunnen een commissie ontvangen voor aankopen die via deze links worden gedaan, zonder extra kosten voor u. We waarderen uw steun.
Volg deze stappen zorgvuldig:
Verbind het ESP32-board met uw computer via een USB-kabel.
Open de Arduino IDE op uw computer.
Selecteer het juiste ESP32-board en COM-poort.
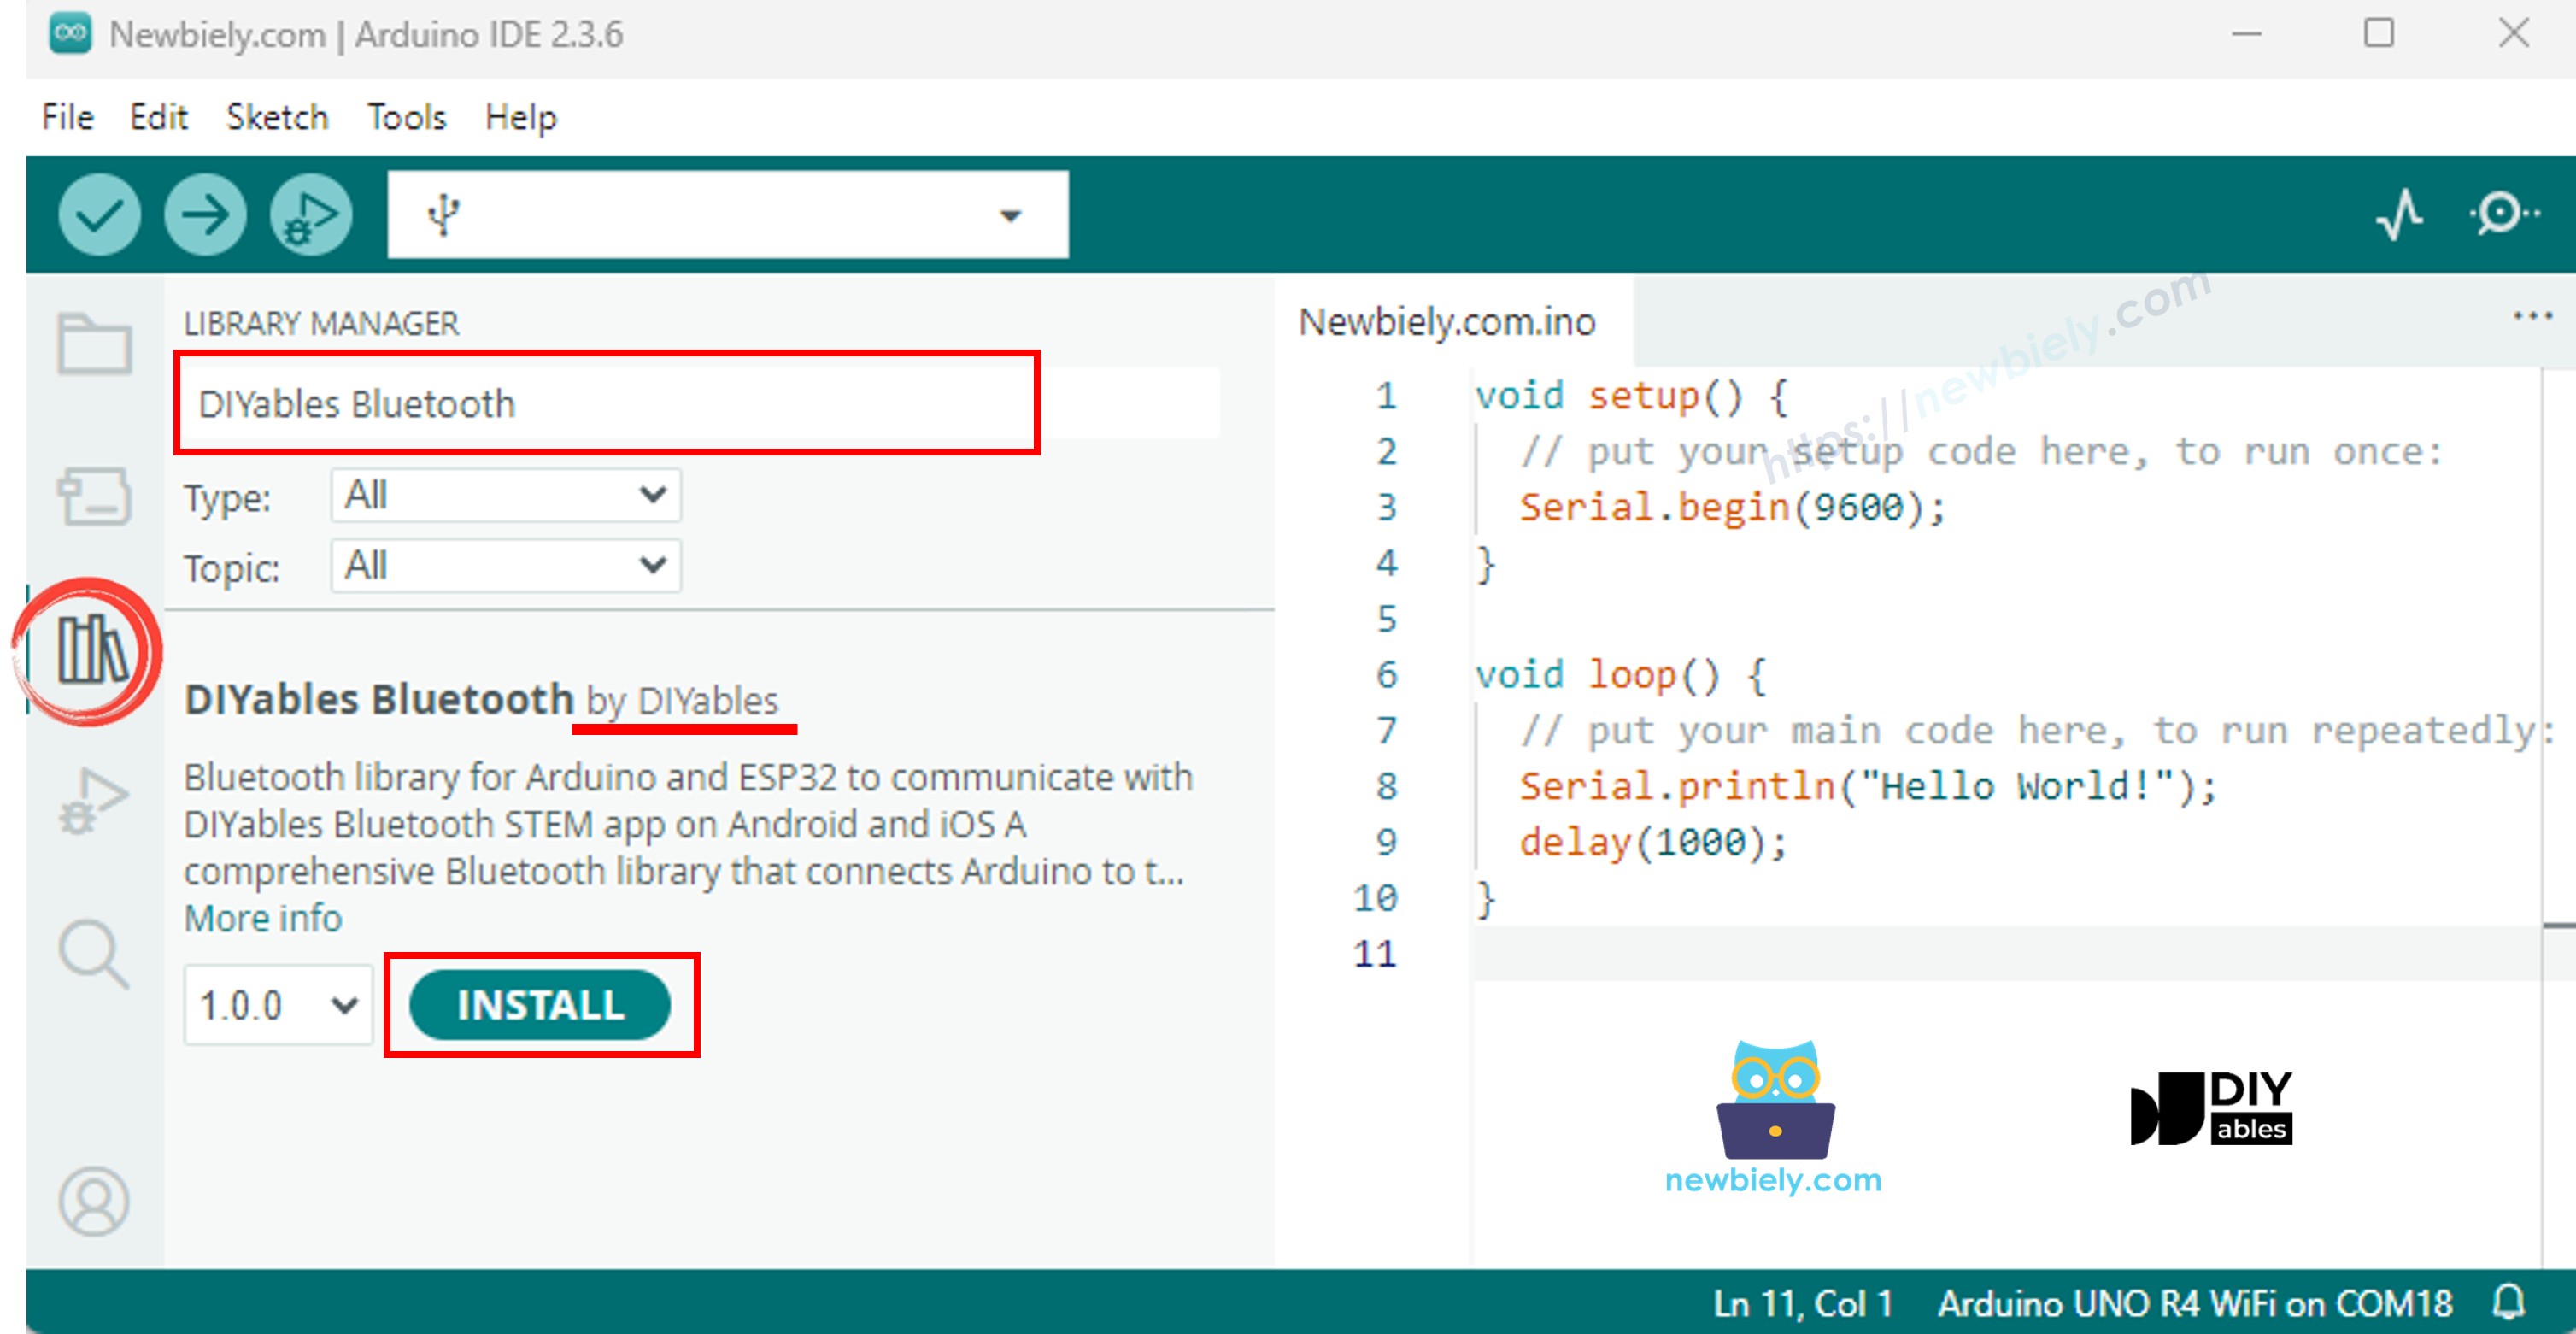
Ga naar het Bibliotheken-icoon in de linkerzijbalk van de Arduino IDE.
Zoek op "DIYables Bluetooth" en selecteer de DIYables Bluetooth bibliotheek van DIYables.
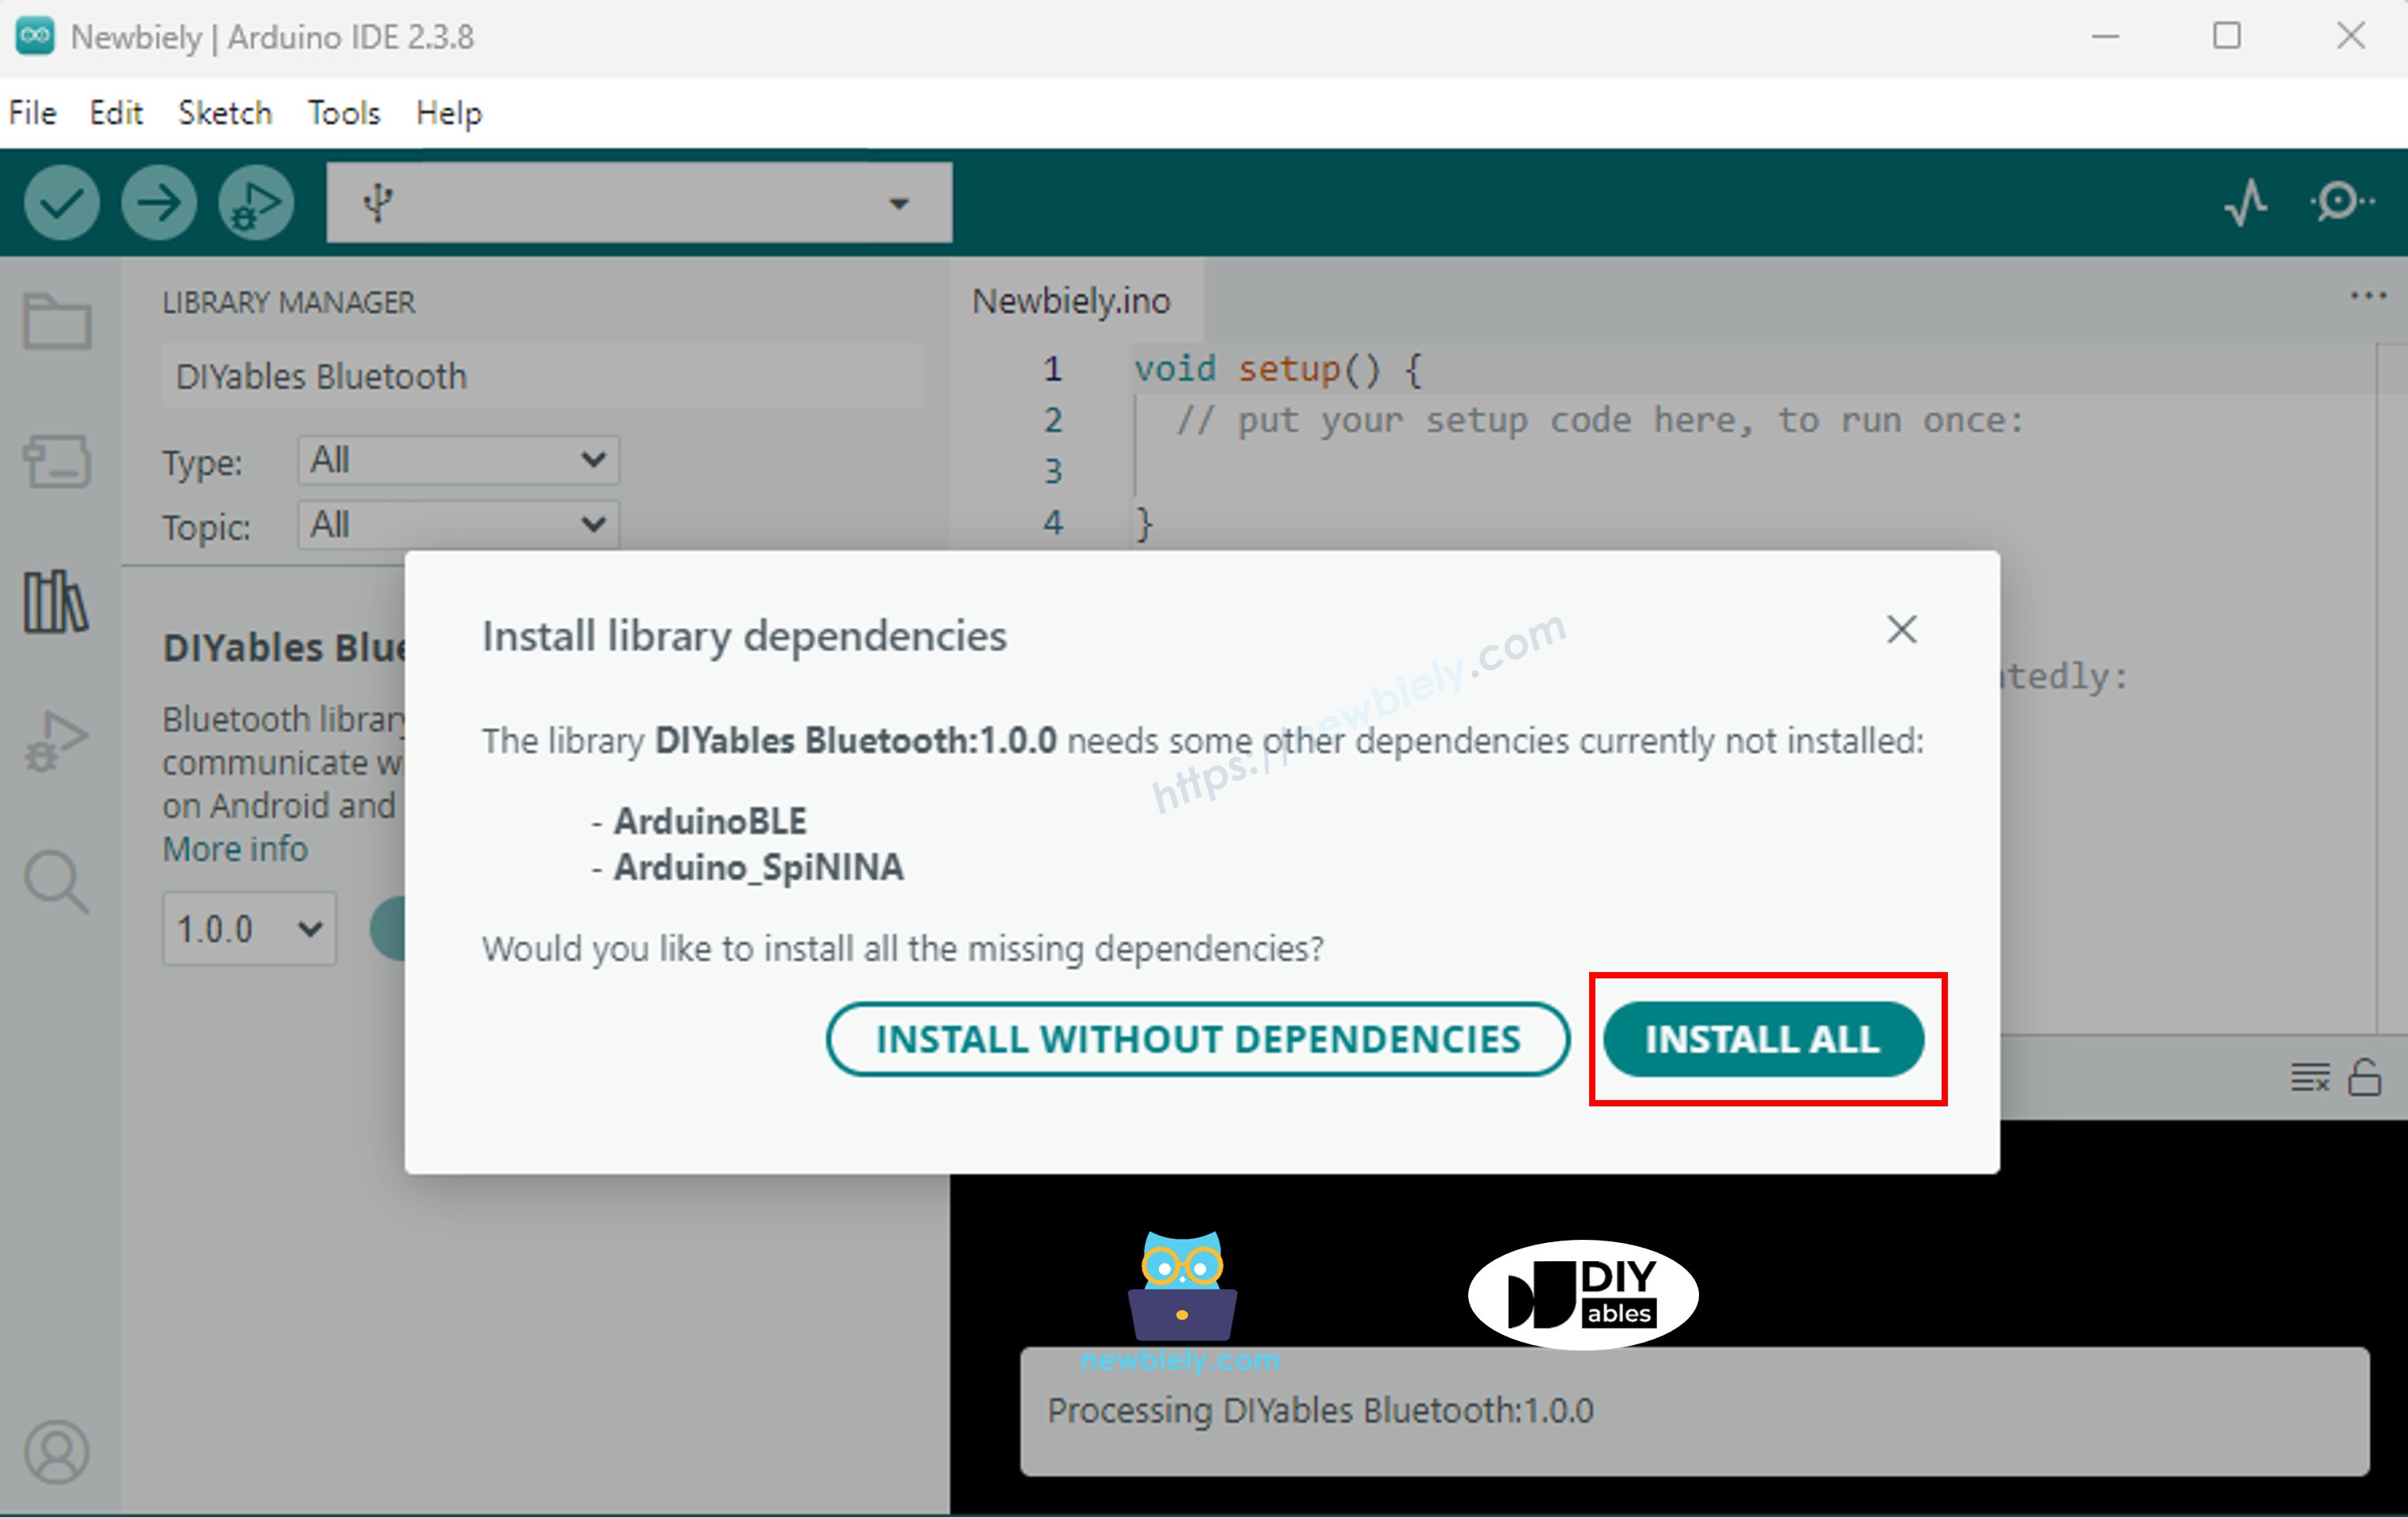
Klik op de Installeren-knop om de bibliotheek te installeren.
Kies één van de twee Bluetooth-modi hieronder, afhankelijk van uw behoeften:
Opmerking: Classic Bluetooth wordt NIET ondersteund op iOS. Als u iOS-ondersteuning nodig heeft, gebruik dan de BLE-code hieronder.
#include <DIYables_BluetoothServer.h>
#include <DIYables_BluetoothPinControl.h>
#include <platforms/DIYables_Esp32Bluetooth.h>
DIYables_Esp32Bluetooth bluetooth("ESP32_Pins");
DIYables_BluetoothServer bluetoothServer(bluetooth);
DIYables_BluetoothPinControl bluetoothPins;
const int LED_PIN = 2;
const int OUTPUT_PIN_1 = 16;
const int OUTPUT_PIN_2 = 17;
const int INPUT_PIN_1 = 18;
const int INPUT_PIN_2 = 19;
const int ANALOG_PIN_1 = 34;
const int ANALOG_PIN_2 = 35;
void setup() {
Serial.begin(115200);
delay(1000);
Serial.println("DIYables Bluetooth - ESP32 Pin Control/Monitor Example");
pinMode(LED_PIN, OUTPUT);
pinMode(OUTPUT_PIN_1, OUTPUT);
pinMode(OUTPUT_PIN_2, OUTPUT);
pinMode(INPUT_PIN_1, INPUT_PULLUP);
pinMode(INPUT_PIN_2, INPUT_PULLUP);
bluetoothServer.begin();
bluetoothServer.addApp(&bluetoothPins);
bluetoothPins.enablePin(LED_PIN, BT_PIN_OUTPUT, "LED");
bluetoothPins.enablePin(OUTPUT_PIN_1, BT_PIN_OUTPUT, "Out1");
bluetoothPins.enablePin(OUTPUT_PIN_2, BT_PIN_OUTPUT, "Out2");
bluetoothPins.enablePin(INPUT_PIN_1, BT_PIN_INPUT, "Btn1");
bluetoothPins.enablePin(INPUT_PIN_2, BT_PIN_INPUT, "Btn2");
bluetoothPins.enablePin(ANALOG_PIN_1, BT_PIN_INPUT, "A34");
bluetoothPins.enablePin(ANALOG_PIN_2, BT_PIN_INPUT, "A35");
bluetoothServer.setOnConnected([]() {
Serial.println("Bluetooth connected!");
});
bluetoothServer.setOnDisconnected([]() {
Serial.println("Bluetooth disconnected!");
});
bluetoothPins.onPinWrite([](int pin, int state) {
digitalWrite(pin, state);
Serial.print("Pin ");
Serial.print(pin);
Serial.print(" set to ");
Serial.println(state ? "HIGH" : "LOW");
});
bluetoothPins.onPinRead([](int pin) -> int {
int state;
if (pin == ANALOG_PIN_1 || pin == ANALOG_PIN_2) {
state = analogRead(pin);
Serial.print("Analog pin ");
Serial.print(pin);
Serial.print(" read: ");
Serial.println(state);
} else {
state = digitalRead(pin);
Serial.print("Digital pin ");
Serial.print(pin);
Serial.print(" read: ");
Serial.println(state ? "HIGH" : "LOW");
}
return state;
});
bluetoothPins.onPinModeChange([](int pin, int mode) {
pinMode(pin, mode == BT_PIN_OUTPUT ? OUTPUT : INPUT_PULLUP);
Serial.print("Pin ");
Serial.print(pin);
Serial.print(" mode changed to ");
Serial.println(mode == BT_PIN_OUTPUT ? "OUTPUT" : "INPUT");
});
Serial.println("Waiting for Bluetooth connection...");
Serial.print("Enabled pins: ");
Serial.println(bluetoothPins.getEnabledPinCount());
}
void loop() {
bluetoothServer.loop();
static unsigned long lastInputCheck = 0;
static int lastInputState1 = HIGH;
static int lastInputState2 = HIGH;
static int lastAnalogState1 = 0;
static int lastAnalogState2 = 0;
if (millis() - lastInputCheck >= 100) {
lastInputCheck = millis();
int currentState1 = digitalRead(INPUT_PIN_1);
if (currentState1 != lastInputState1) {
lastInputState1 = currentState1;
bluetoothPins.updatePinState(INPUT_PIN_1, currentState1);
Serial.print("Input pin ");
Serial.print(INPUT_PIN_1);
Serial.print(" changed to ");
Serial.println(currentState1 ? "HIGH" : "LOW");
}
int currentState2 = digitalRead(INPUT_PIN_2);
if (currentState2 != lastInputState2) {
lastInputState2 = currentState2;
bluetoothPins.updatePinState(INPUT_PIN_2, currentState2);
Serial.print("Input pin ");
Serial.print(INPUT_PIN_2);
Serial.print(" changed to ");
Serial.println(currentState2 ? "HIGH" : "LOW");
}
int currentAnalog1 = analogRead(ANALOG_PIN_1);
if (abs(currentAnalog1 - lastAnalogState1) > 50) {
lastAnalogState1 = currentAnalog1;
bluetoothPins.updatePinState(ANALOG_PIN_1, currentAnalog1);
Serial.print("Analog pin ");
Serial.print(ANALOG_PIN_1);
Serial.print(" changed to ");
Serial.println(currentAnalog1);
}
int currentAnalog2 = analogRead(ANALOG_PIN_2);
if (abs(currentAnalog2 - lastAnalogState2) > 50) {
lastAnalogState2 = currentAnalog2;
bluetoothPins.updatePinState(ANALOG_PIN_2, currentAnalog2);
Serial.print("Analog pin ");
Serial.print(ANALOG_PIN_2);
Serial.print(" changed to ");
Serial.println(currentAnalog2);
}
}
delay(10);
}
DIYables Bluetooth - ESP32 Pin Control/Monitor Example
Waiting for Bluetooth connection...
Enabled pins: 7
#include <DIYables_BluetoothServer.h>
#include <DIYables_BluetoothPinControl.h>
#include <platforms/DIYables_Esp32BLE.h>
const char* DEVICE_NAME = "ESP32BLE_Pins";
const char* SERVICE_UUID = "19B10000-E8F2-537E-4F6C-D104768A1214";
const char* TX_UUID = "19B10001-E8F2-537E-4F6C-D104768A1214";
const char* RX_UUID = "19B10002-E8F2-537E-4F6C-D104768A1214";
DIYables_Esp32BLE bluetooth(DEVICE_NAME, SERVICE_UUID, TX_UUID, RX_UUID);
DIYables_BluetoothServer bluetoothServer(bluetooth);
DIYables_BluetoothPinControl bluetoothPins;
const int LED_PIN = 2;
const int OUTPUT_PIN_1 = 16;
const int OUTPUT_PIN_2 = 17;
const int INPUT_PIN_1 = 25;
const int INPUT_PIN_2 = 26;
const int ANALOG_PIN_1 = 34;
const int ANALOG_PIN_2 = 35;
void setup() {
Serial.begin(115200);
delay(1000);
Serial.println("DIYables Bluetooth - ESP32 BLE Pin Control/Monitor Example");
pinMode(LED_PIN, OUTPUT);
pinMode(OUTPUT_PIN_1, OUTPUT);
pinMode(OUTPUT_PIN_2, OUTPUT);
pinMode(INPUT_PIN_1, INPUT_PULLUP);
pinMode(INPUT_PIN_2, INPUT_PULLUP);
bluetoothServer.begin();
bluetoothServer.addApp(&bluetoothPins);
bluetoothPins.enablePin(LED_PIN, BT_PIN_OUTPUT, "LED");
bluetoothPins.enablePin(OUTPUT_PIN_1, BT_PIN_OUTPUT, "Out1");
bluetoothPins.enablePin(OUTPUT_PIN_2, BT_PIN_OUTPUT, "Out2");
bluetoothPins.enablePin(INPUT_PIN_1, BT_PIN_INPUT, "Btn1");
bluetoothPins.enablePin(INPUT_PIN_2, BT_PIN_INPUT, "Btn2");
bluetoothPins.enablePin(ANALOG_PIN_1, BT_PIN_INPUT, "A34");
bluetoothPins.enablePin(ANALOG_PIN_2, BT_PIN_INPUT, "A35");
bluetoothServer.setOnConnected([]() {
Serial.println("Bluetooth connected!");
});
bluetoothServer.setOnDisconnected([]() {
Serial.println("Bluetooth disconnected!");
});
bluetoothPins.onPinWrite([](int pin, int state) {
digitalWrite(pin, state);
Serial.print("Pin ");
Serial.print(pin);
Serial.print(" set to ");
Serial.println(state ? "HIGH" : "LOW");
});
bluetoothPins.onPinRead([](int pin) -> int {
int state;
if (pin == ANALOG_PIN_1 || pin == ANALOG_PIN_2) {
state = analogRead(pin);
Serial.print("Analog pin ");
Serial.print(pin);
Serial.print(" read: ");
Serial.println(state);
} else {
state = digitalRead(pin);
Serial.print("Digital pin ");
Serial.print(pin);
Serial.print(" read: ");
Serial.println(state ? "HIGH" : "LOW");
}
return state;
});
bluetoothPins.onPinModeChange([](int pin, int mode) {
pinMode(pin, mode == BT_PIN_OUTPUT ? OUTPUT : INPUT_PULLUP);
Serial.print("Pin ");
Serial.print(pin);
Serial.print(" mode changed to ");
Serial.println(mode == BT_PIN_OUTPUT ? "OUTPUT" : "INPUT");
});
Serial.println("Waiting for Bluetooth connection...");
Serial.print("Enabled pins: ");
Serial.println(bluetoothPins.getEnabledPinCount());
}
void loop() {
bluetoothServer.loop();
static unsigned long lastInputCheck = 0;
static int lastInputState1 = HIGH;
static int lastInputState2 = HIGH;
static int lastAnalogState1 = 0;
static int lastAnalogState2 = 0;
if (millis() - lastInputCheck >= 100) {
lastInputCheck = millis();
int currentState1 = digitalRead(INPUT_PIN_1);
if (currentState1 != lastInputState1) {
lastInputState1 = currentState1;
bluetoothPins.updatePinState(INPUT_PIN_1, currentState1);
Serial.print("Input pin ");
Serial.print(INPUT_PIN_1);
Serial.print(" changed to ");
Serial.println(currentState1 ? "HIGH" : "LOW");
}
int currentState2 = digitalRead(INPUT_PIN_2);
if (currentState2 != lastInputState2) {
lastInputState2 = currentState2;
bluetoothPins.updatePinState(INPUT_PIN_2, currentState2);
Serial.print("Input pin ");
Serial.print(INPUT_PIN_2);
Serial.print(" changed to ");
Serial.println(currentState2 ? "HIGH" : "LOW");
}
int currentAnalog1 = analogRead(ANALOG_PIN_1);
if (abs(currentAnalog1 - lastAnalogState1) > 40) {
lastAnalogState1 = currentAnalog1;
bluetoothPins.updatePinState(ANALOG_PIN_1, currentAnalog1);
Serial.print("Analog pin ");
Serial.print(ANALOG_PIN_1);
Serial.print(" changed to ");
Serial.println(currentAnalog1);
}
int currentAnalog2 = analogRead(ANALOG_PIN_2);
if (abs(currentAnalog2 - lastAnalogState2) > 40) {
lastAnalogState2 = currentAnalog2;
bluetoothPins.updatePinState(ANALOG_PIN_2, currentAnalog2);
Serial.print("Analog pin ");
Serial.print(ANALOG_PIN_2);
Serial.print(" changed to ");
Serial.println(currentAnalog2);
}
}
delay(10);
}
DIYables Bluetooth - ESP32 BLE Pin Control/Monitor Example
Waiting for Bluetooth connection...
Enabled pins: 7
Installeer de DIYables Bluetooth App op uw smartphone:
Android |
iOS
Als u de ESP32 Classic Bluetooth code gebruikt, moet u het ESP32 eerst koppelen met uw Android-telefoon voordat u de app opent:
Ga naar de Instellingen > Bluetooth op uw telefoon.
Zorg dat Bluetooth aan staat.
Uw telefoon zoekt naar beschikbare apparaten.
Zoek en tik op "ESP32_Pins" in de lijst met beschikbare apparaten.
Bevestig het koppelingsverzoek (geen pincode nodig).
Wacht tot het apparaat "Gekoppeld" weergeeft onder de naam.
Als u de ESP32 BLE code gebruikt, is koppelen niet nodig. Ga direct door naar de volgende stap.
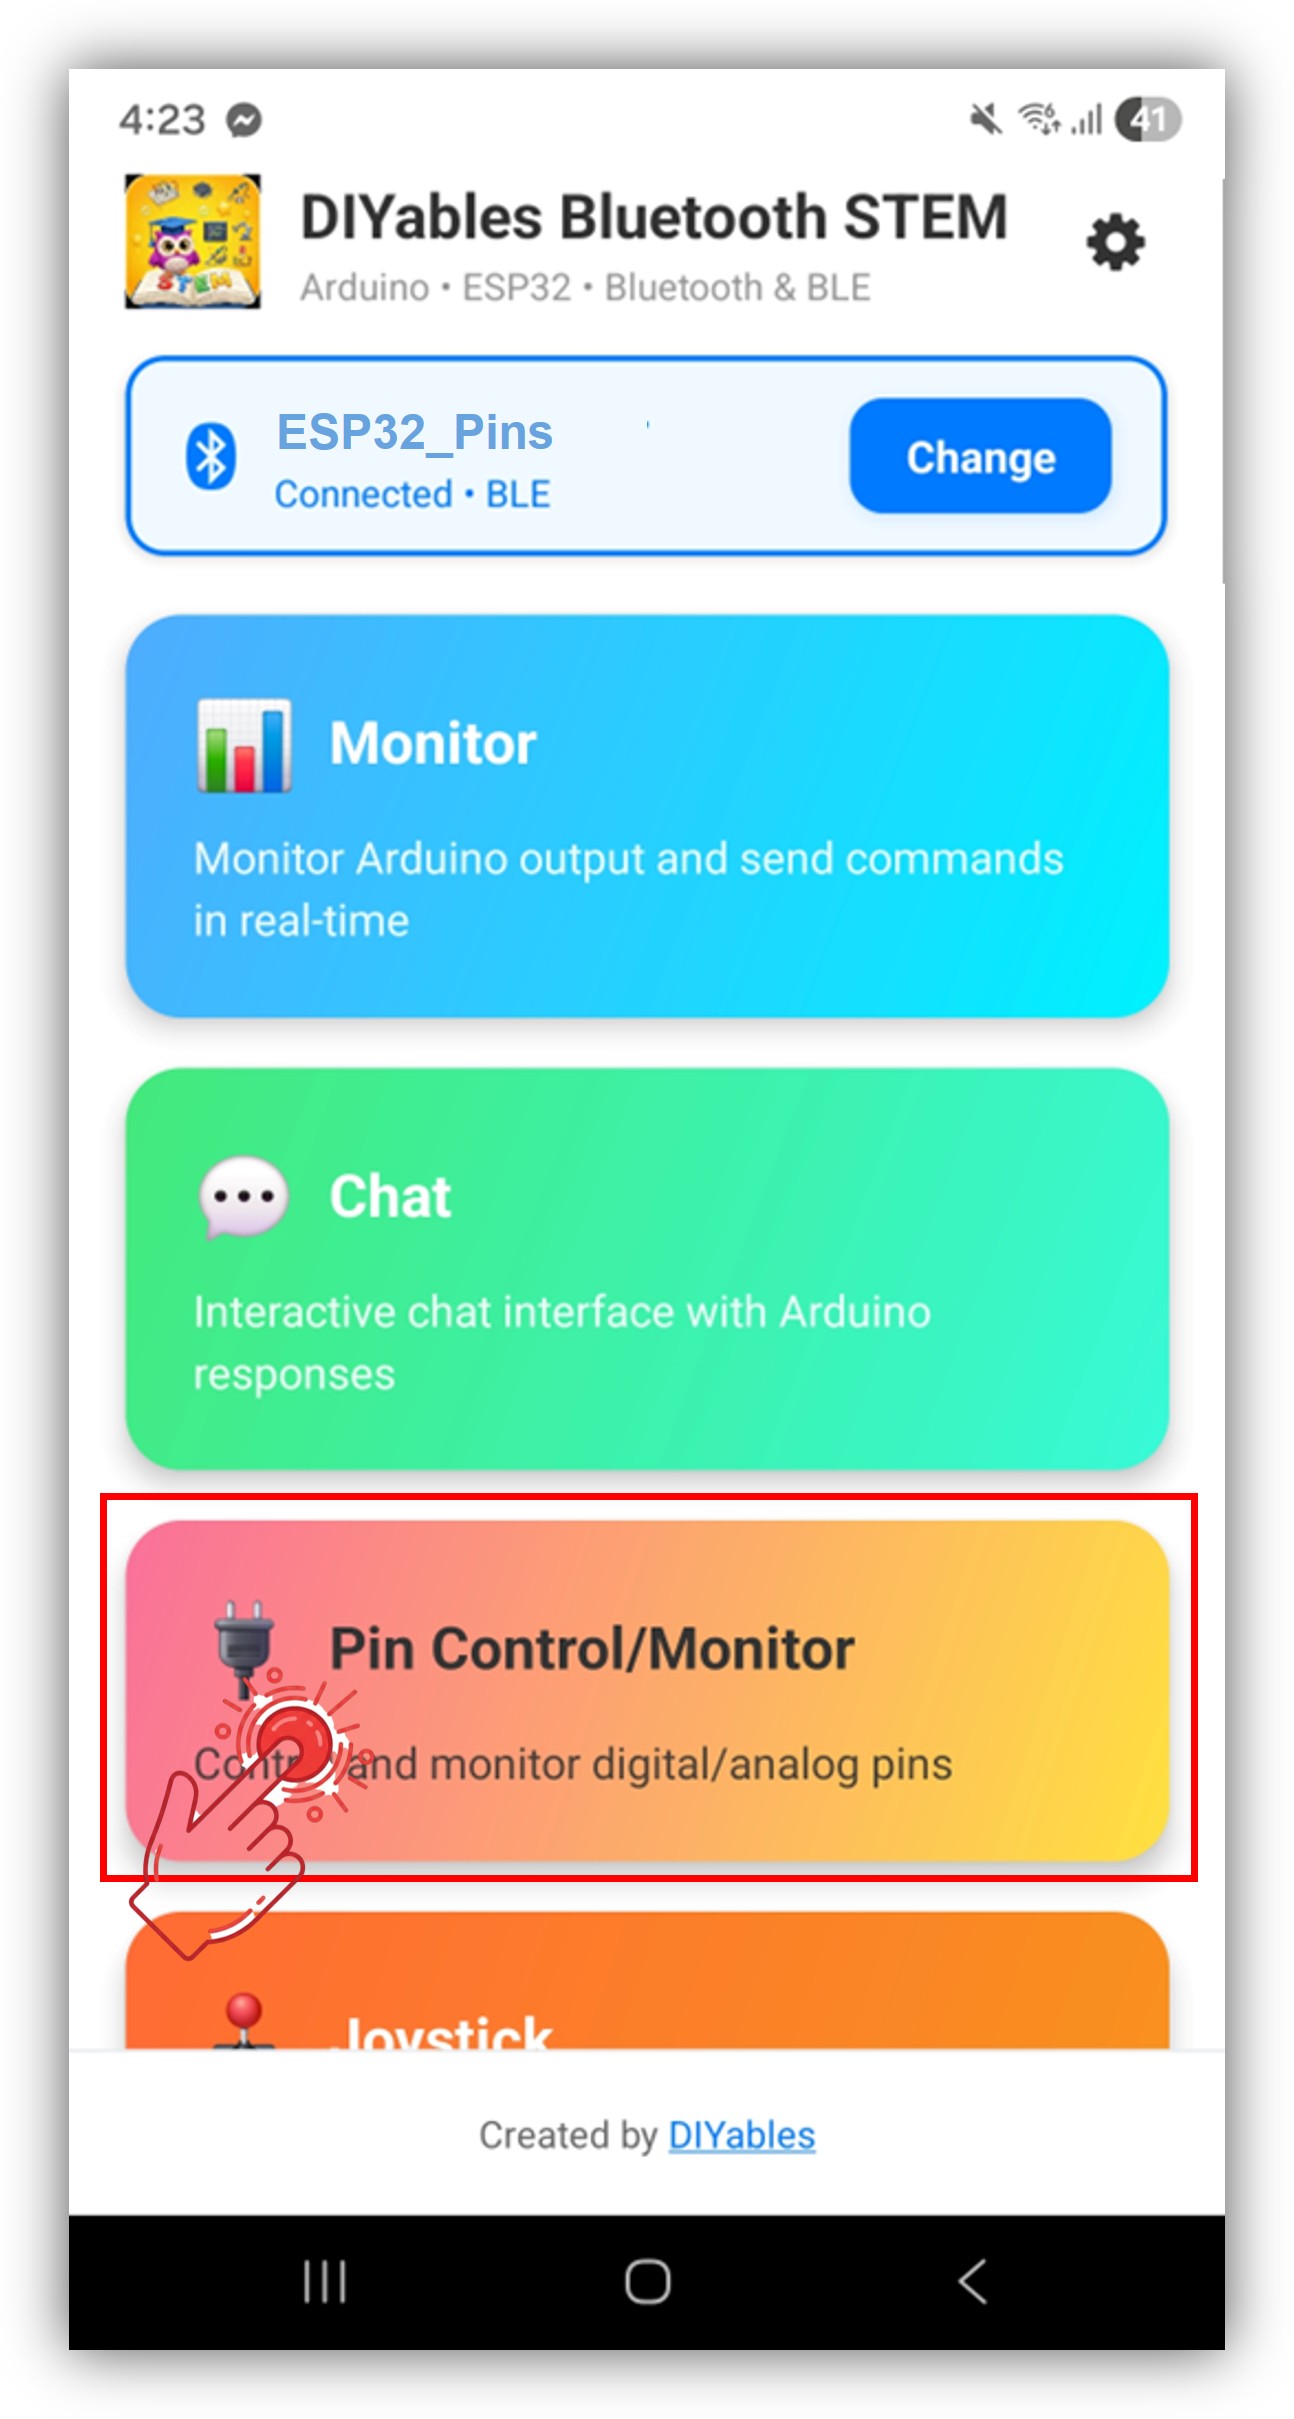
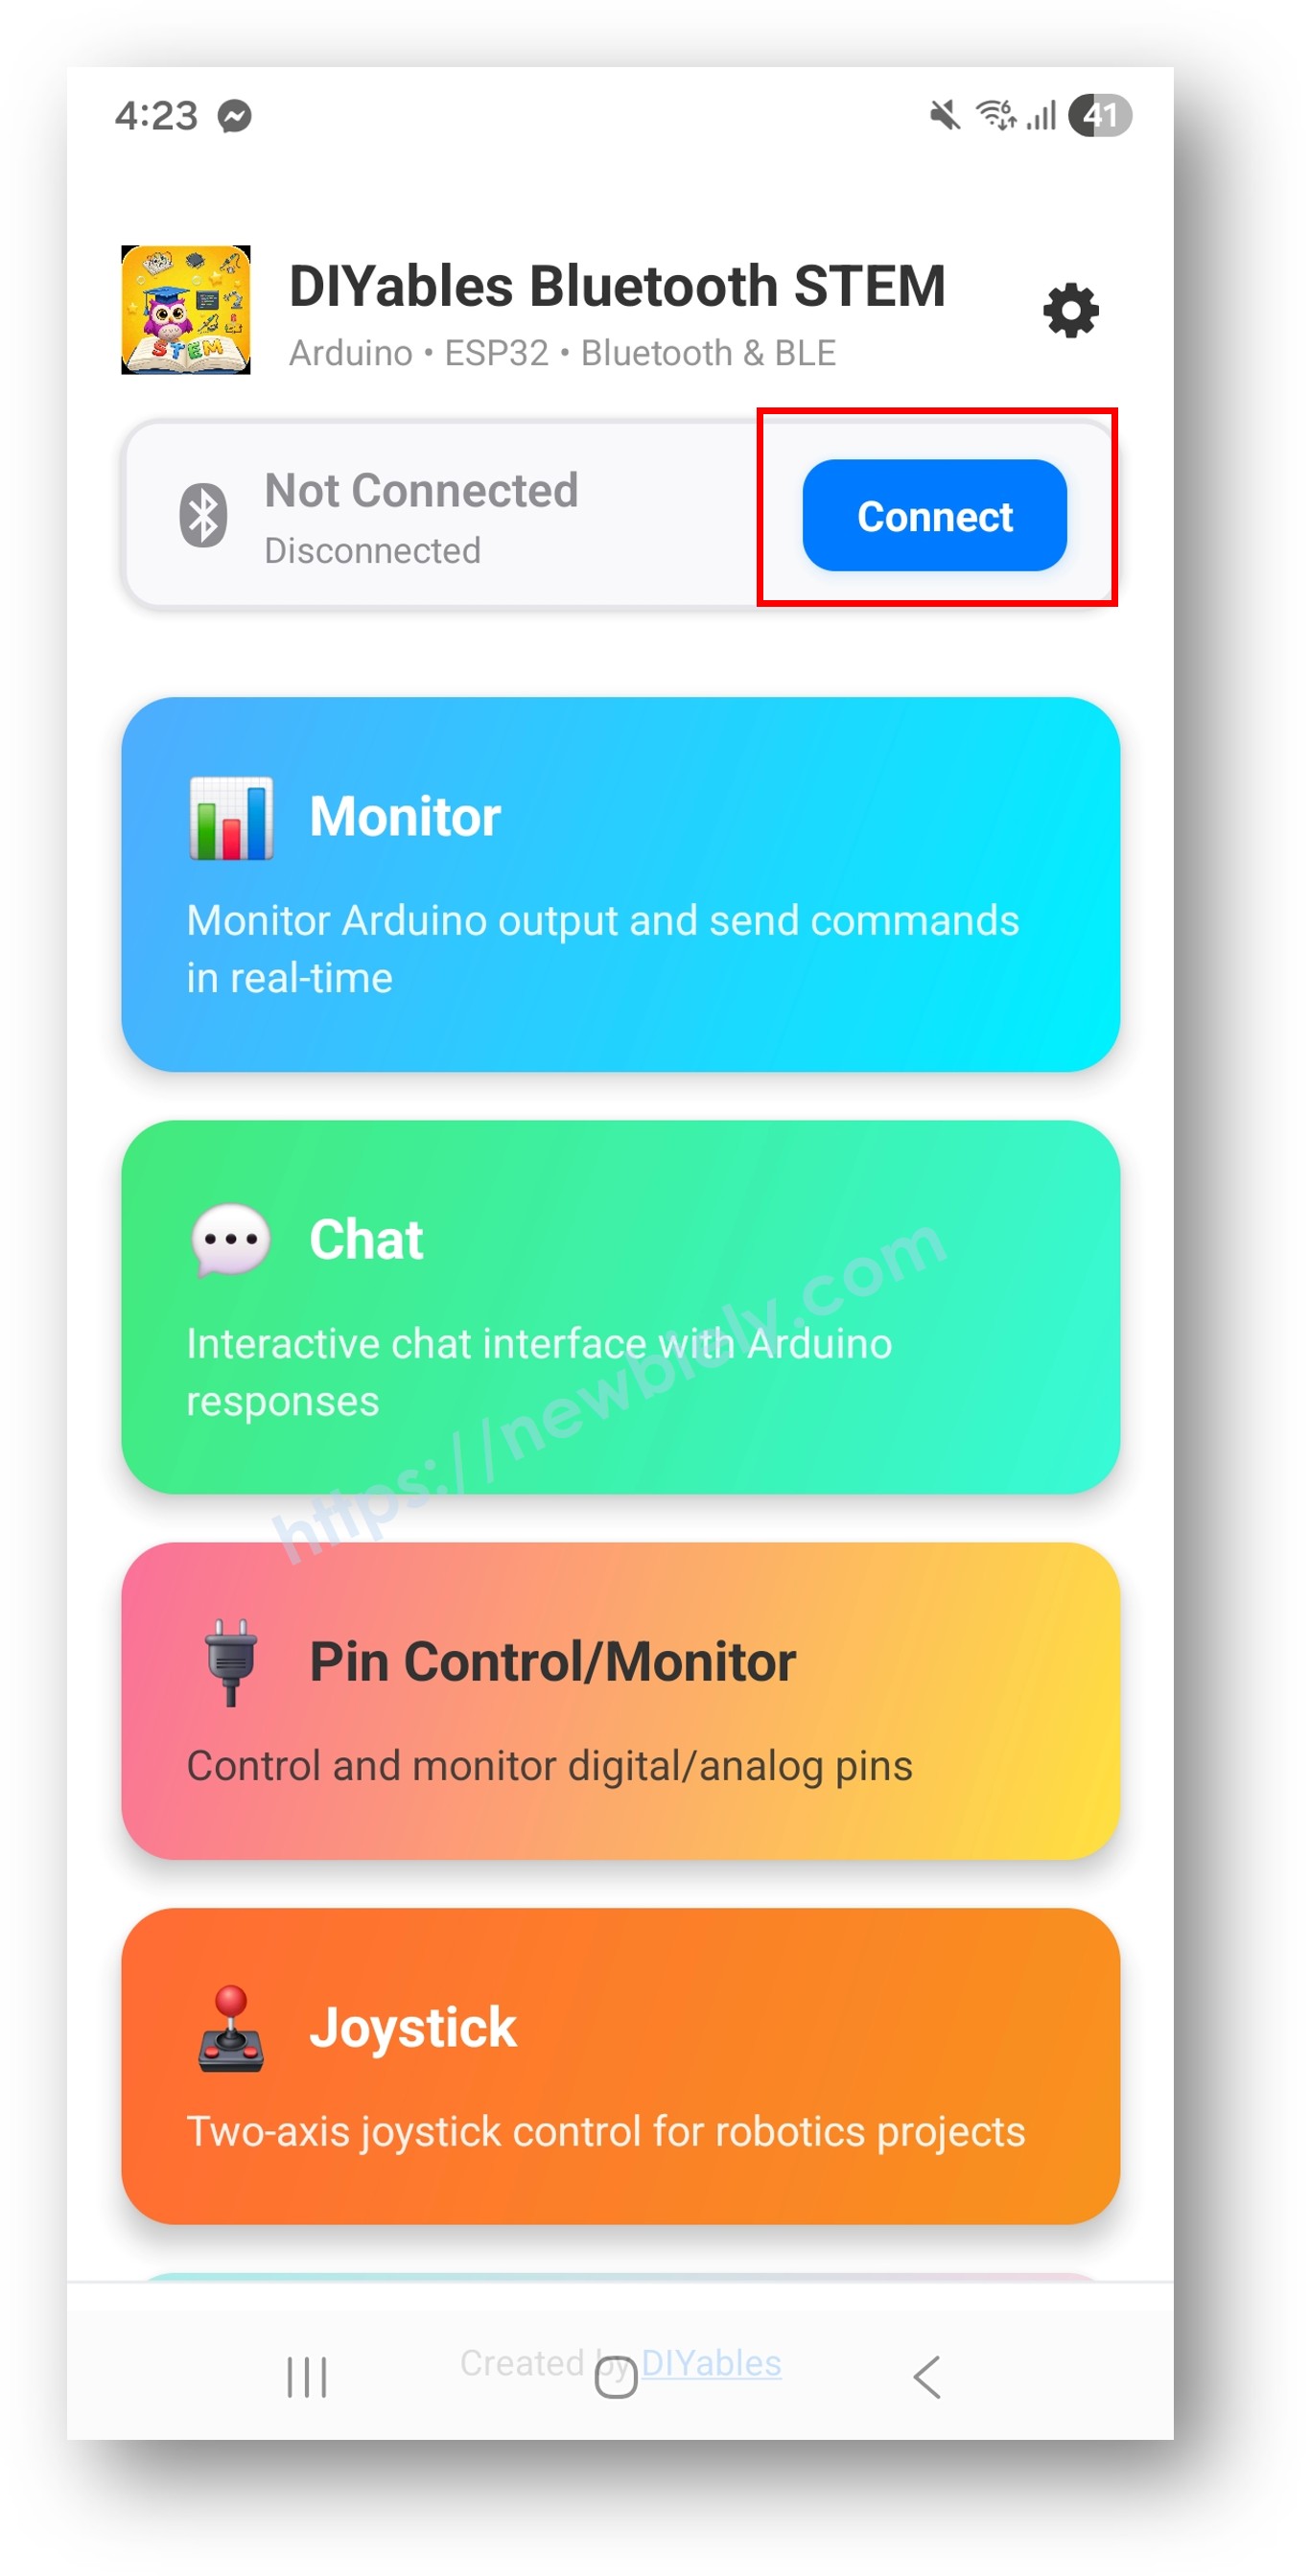
Open de DIYables Bluetooth App.
Bij het eerste gebruik vraagt de app om toestemming. Verleen de volgende:
Nearby Devices toestemming (Android 12+) / Bluetooth toestemming (iOS) — vereist om te scannen en verbinding te maken met Bluetooth-apparaten
Locatie toestemming (alleen Android 11 en lager) — vereist door oudere Android-versies om BLE-apparaten te scannen
Zorg dat Bluetooth aanstaat op uw telefoon.
Tik op het startscherm op de Verbinden-knop. De app zoekt naar zowel BLE als Classic Bluetooth apparaten.
Opmerking: U kunt op het instellingen-icoon op het startscherm tikken om apps te verbergen/tonen. Zie de DIYables Bluetooth App gebruikershandleiding voor meer informatie.
Kijk nu terug naar de Seriële Monitor in Arduino IDE. U ziet:
Bluetooth connected!
Pin 2 set to HIGH
Pin 16 set to LOW
Input pin 18 changed to LOW
Analog pin 34 changed to 2048
Schakel pinnen in met aangepaste namen en modi:
bluetoothPins.enablePin(2, BT_PIN_OUTPUT, "LED");
bluetoothPins.enablePin(16, BT_PIN_OUTPUT, "Relay1");
bluetoothPins.enablePin(17, BT_PIN_OUTPUT, "Relay2");
bluetoothPins.enablePin(18, BT_PIN_INPUT, "Button");
bluetoothPins.enablePin(34, BT_PIN_INPUT, "Sensor");
bluetoothPins.disablePin(17);
bool isEnabled = bluetoothPins.isPinEnabled(2);
int mode = bluetoothPins.getPinMode(2);
int count = bluetoothPins.getEnabledPinCount();
Gebruik de onPinWrite() callback om hardware aan te sturen wanneer de app een pin schakelt:
bluetoothPins.onPinWrite([](int pin, int state) {
digitalWrite(pin, state);
Serial.print("Pin ");
Serial.print(pin);
Serial.print(" set to ");
Serial.println(state ? "HIGH" : "LOW");
});
Gebruik de onPinRead() callback om pinwaarden terug te geven aan de app:
bluetoothPins.onPinRead([](int pin) -> int {
if (pin == 34 || pin == 35) {
return analogRead(pin);
} else {
return digitalRead(pin);
}
});
Gebruik de onPinModeChange() callback om pinmodi dynamisch te wijzigen:
bluetoothPins.onPinModeChange([](int pin, int mode) {
pinMode(pin, mode == BT_PIN_OUTPUT ? OUTPUT : INPUT_PULLUP);
Serial.print("Pin ");
Serial.print(pin);
Serial.print(" mode changed to ");
Serial.println(mode == BT_PIN_OUTPUT ? "OUTPUT" : "INPUT");
});
Zend statuswijzigingen van pinnen naar de app vanuit uw code:
int currentState = digitalRead(18);
if (currentState != lastState) {
lastState = currentState;
bluetoothPins.updatePinState(18, currentState);
}
int analogValue = analogRead(34);
if (abs(analogValue - lastAnalogValue) > 50) {
lastAnalogValue = analogValue;
bluetoothPins.updatePinState(34, analogValue);
}
bluetoothServer.setOnConnected([]() {
Serial.println("Bluetooth connected!");
});
bluetoothServer.setOnDisconnected([]() {
Serial.println("Bluetooth disconnected!");
digitalWrite(2, LOW);
digitalWrite(16, LOW);
digitalWrite(17, LOW);
});
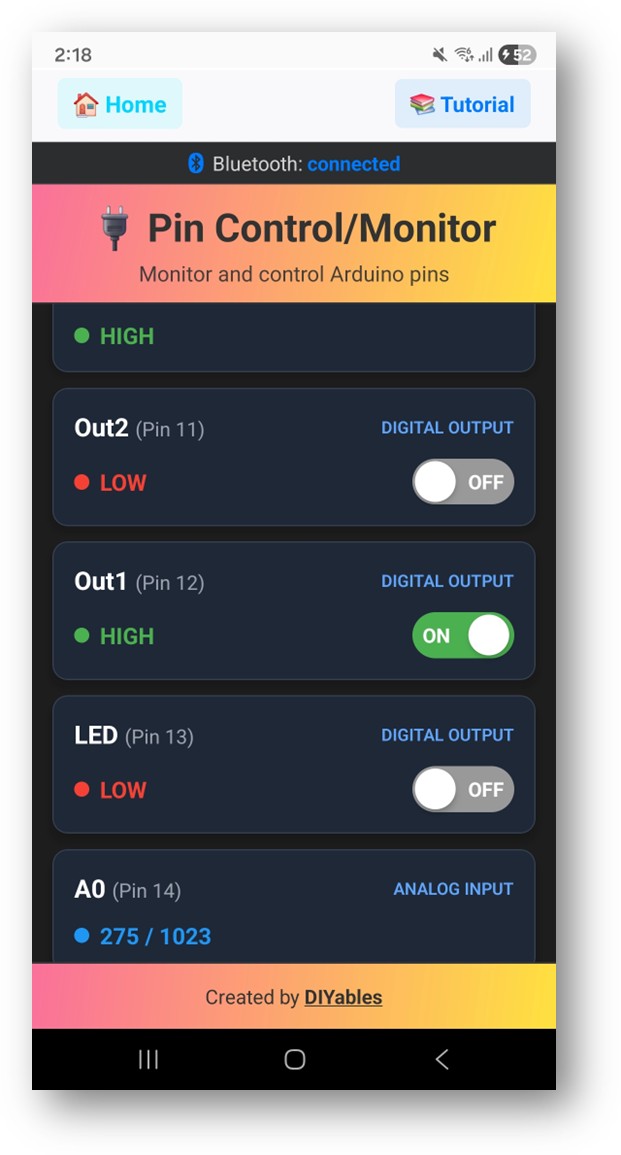
De digitale pinnen interface in de DIYables Bluetooth App biedt:
Pinnenlijst: Toont alle ingeschakelde pinnen met namen en actuele status
Schakelknoppen: Tik op output-pinnen om HIGH/LOW te wisselen
Inputweergave: Realtime weergave van inputpinstatussen
Analoge Waarden: Toont ruwe analoge waarden voor ADC-pinnen
const int RELAY_1 = 16;
const int RELAY_2 = 17;
const int RELAY_3 = 18;
const int RELAY_4 = 19;
void setup() {
pinMode(RELAY_1, OUTPUT);
pinMode(RELAY_2, OUTPUT);
pinMode(RELAY_3, OUTPUT);
pinMode(RELAY_4, OUTPUT);
bluetoothPins.enablePin(RELAY_1, BT_PIN_OUTPUT, "Light");
bluetoothPins.enablePin(RELAY_2, BT_PIN_OUTPUT, "Fan");
bluetoothPins.enablePin(RELAY_3, BT_PIN_OUTPUT, "Pump");
bluetoothPins.enablePin(RELAY_4, BT_PIN_OUTPUT, "Heater");
bluetoothPins.onPinWrite([](int pin, int state) {
digitalWrite(pin, state);
Serial.print("Relay on pin ");
Serial.print(pin);
Serial.println(state ? " activated" : " deactivated");
});
}
const int BUTTON_PINS[] = {18, 19, 21, 22};
const char* BUTTON_NAMES[] = {"Btn1", "Btn2", "Btn3", "Btn4"};
const int NUM_BUTTONS = 4;
int lastButtonStates[4] = {HIGH, HIGH, HIGH, HIGH};
void setup() {
for (int i = 0; i < NUM_BUTTONS; i++) {
pinMode(BUTTON_PINS[i], INPUT_PULLUP);
bluetoothPins.enablePin(BUTTON_PINS[i], BT_PIN_INPUT, BUTTON_NAMES[i]);
}
bluetoothPins.onPinRead([](int pin) -> int {
return digitalRead(pin);
});
}
void loop() {
bluetoothServer.loop();
for (int i = 0; i < NUM_BUTTONS; i++) {
int state = digitalRead(BUTTON_PINS[i]);
if (state != lastButtonStates[i]) {
lastButtonStates[i] = state;
bluetoothPins.updatePinState(BUTTON_PINS[i], state);
}
}
delay(10);
}
void setup() {
bluetoothPins.enablePin(2, BT_PIN_OUTPUT, "LED");
bluetoothPins.enablePin(16, BT_PIN_OUTPUT, "Relay");
bluetoothPins.enablePin(18, BT_PIN_INPUT, "Motion");
bluetoothPins.enablePin(19, BT_PIN_INPUT, "Door");
bluetoothPins.enablePin(34, BT_PIN_INPUT, "Light");
bluetoothPins.enablePin(35, BT_PIN_INPUT, "Temp");
pinMode(2, OUTPUT);
pinMode(16, OUTPUT);
pinMode(18, INPUT_PULLUP);
pinMode(19, INPUT_PULLUP);
bluetoothPins.onPinWrite([](int pin, int state) {
digitalWrite(pin, state);
});
bluetoothPins.onPinRead([](int pin) -> int {
if (pin == 34 || pin == 35) return analogRead(pin);
return digitalRead(pin);
});
}
bool safetyEnabled = true;
bluetoothPins.onPinWrite([](int pin, int state) {
if (pin == 16 && state == HIGH) {
if (digitalRead(18) == LOW) {
bluetoothPins.updatePinState(16, 0);
Serial.println("SAFETY: Operation blocked - safety switch off");
return;
}
}
digitalWrite(pin, state);
});
unsigned long pinTimers[16] = {0};
unsigned long PIN_TIMEOUT = 300000;
bluetoothPins.onPinWrite([](int pin, int state) {
digitalWrite(pin, state);
if (state == HIGH) {
pinTimers[pin] = millis();
} else {
pinTimers[pin] = 0;
}
});
void loop() {
bluetoothServer.loop();
for (int i = 0; i < 16; i++) {
if (pinTimers[i] > 0 && millis() - pinTimers[i] >= PIN_TIMEOUT) {
digitalWrite(i, LOW);
pinTimers[i] = 0;
bluetoothPins.updatePinState(i, 0);
Serial.print("Auto-off: Pin ");
Serial.println(i);
}
}
delay(10);
}
| Feature | BLE (Esp32BLE_PinControl) | Classic Bluetooth (Esp32Bluetooth_PinControl) |
|---|
| iOS Ondersteuning | ? Ja | ? Nee |
| Android Ondersteuning | ? Ja | ? Ja |
| Energieverbruik | Laag | Hoog |
| Bereik | ~30-100m | ~10-100m |
| Datasnelheid | Lager | Hoger |
| Koppeling Nodig | Nee (auto-connect) | Ja (handmatige koppeling) |
| Beste Voor | Batterijgevoede apparaten, cross-platform | Hoog doorvoervermogen, alleen Android |
1. App kan apparaat niet vinden
Zorg dat ESP32 is ingeschakeld en de sketch is geüpload
Voor BLE: controleer of Bluetooth en Locatie aanstaan op uw telefoon
Voor Classic Bluetooth: koppel het apparaat eerst in de Bluetooth-instellingen van uw telefoon
Controleer of het juiste partitiewijzigschema is geselecteerd (Huge APP)
2. Pinnen verschijnen niet in de app
Zorg dat enablePin() is aangeroepen vóór Bluetooth-verbinding
Controleer getEnabledPinCount() in Seriële Monitor
Zorg dat pincodes tussen 0 en 15 liggen
3. Output pinnen schakelen niet
Controleer of de onPinWrite() callback digitalWrite() aanroept
Controleer dat pinnen als BT_PIN_OUTPUT zijn geconfigureerd
Controleer hardwareverbindingen
4. Inputwaarden worden niet bijgewerkt
Controleer dat updatePinState() wordt aangeroepen bij statuswijzigingen
Controleer de polling-interval in de loop
Bij analoge pinnen, pas de wijzigingsdrempel aan
5. Te veel pinnen veroorzaken fouten
Maximaal 16 pinnen ondersteund (0-15)
Houd pin-namen kort om berichtafkapping te voorkomen
Gebruik kortere namen bij waarschuwingen over afkappen
6. Sketch te groot / niet genoeg ruimte
Selecteer in Arduino IDE onder Tools > Partition Scheme "Huge APP (3MB No OTA/1MB SPIFFS)" of "No OTA (Large APP)"
Standaard partitiewijzigschema geeft ~1,2MB aan ruimte, onvoldoende voor Bluetooth-bibliotheken
Dit schema geeft ~3MB code ruimte en offert de OTA-partitie op
Voeg uitgebreide debugging toe:
void debugPinConfig() {
Serial.println("=== Pin Config Debug ===");
Serial.println("Enabled pins: " + String(bluetoothPins.getEnabledPinCount()));
for (int i = 0; i < 16; i++) {
if (bluetoothPins.isPinEnabled(i)) {
Serial.print(" Pin " + String(i) + ": ");
Serial.println(bluetoothPins.getPinMode(i) == BT_PIN_OUTPUT ? "OUTPUT" : "INPUT");
}
}
Serial.println("========================");
}
Bluetooth lichtschakelaar bediening
Meerkamer relaisbesturingspaneel
Garagedeuropener
Tuinirrigatie klepbesturing
Leerhulpmiddel digitale elektronica
GPIO-pin verkenning
Testen van input/output schakelingen
Breadboard projectcontroller
Gebruik digitale pinnen voor aan/uit en sliders voor PWM-intensiteit:
bluetoothPins.onPinWrite([](int pin, int state) {
if (state == HIGH) {
analogWrite(pin, map(currentSlider1, 0, 100, 0, 255));
} else {
analogWrite(pin, 0);
}
});
Log pinwijzigingen naar de monitor:
bluetoothPins.onPinWrite([](int pin, int state) {
digitalWrite(pin, state);
bluetoothMonitor.send("Pin " + String(pin) + " -> " + String(state ? "ON" : "OFF"));
});
Nadat u het Bluetooth Digital Pins voorbeeld beheerst, probeer:
Bluetooth Slider — Voor analoge PWM-besturing
Bluetooth Monitor — Voor debugging van pinstatussen
Bluetooth Table — Voor gestructureerde pinndataweergave
Meerdere Bluetooth Apps — Combineer pinbesturing met andere functionaliteiten