ESP32 - SSD1309 OLED Display 128x64 | 2.42 inch I2C OLED Handleiding
Een OLED (Organic Light-Emitting Diode) display bevat zelflichtgevende pixels die diepe zwarttinten, hoog contrast en brede kijkhoeken bieden — waardoor het een uitstekende upgrade is ten opzichte van traditionele LCD’s. De SSD1309 is de driver IC die vaak wordt gebruikt op 2.42-inch (soms aangeduid als 2.4-inch) 128×64 I2C OLED modules.
In deze stapsgewijze handleiding leert u hoe u het SSD1309 OLED 128×64 display aansluit en programmeert met een ESP32 board, gebruikmakend van de DIYables_OLED_SSD1309 bibliotheek. We behandelen specifiek:
- Het aansluiten van de 2.42-inch SSD1309 OLED op de ESP32 via I2C
- Het weergeven van tekst en cijfers op het scherm
- Het verticaal en horizontaal centreren van tekst
- Het tekenen van geometrische vormen (lijnen, rechthoeken, cirkels, driehoeken, afgeronde rechthoeken)
- Het tonen van monochrome bitmap afbeeldingen
- Hardwarematig scrollen in vier richtingen
- Het aanpassen van contrast en dimmen van het display
- Het gebruik van aangepaste externe lettertypen uit de Adafruit GFX font collectie
Hardware Benodigd
Of u kunt de volgende kits kopen:
| 1 | × | DIYables Sensorkit (30 sensoren/displays) | |
| 1 | × | DIYables Sensorkit (18 sensoren/displays) |
Over het SSD1309 2.42-Inch OLED Display
De SSD1309 is een single-chip CMOS OLED driver IC ontworpen voor 128×64 dot-matrixpanelen. Het is register-compatible met de veelgebruikte SSD1306, waardoor veel bestaande codevoorbeelden met minimale aanpassingen bruikbaar zijn. De belangrijkste hardwareverschillen zijn:
- Geen ingebouwde charge pump — de SSD1309 vereist een externe VCC voeding, hoewel vrijwel alle breakout boards (inclusief de 2.42-inch en 2.4-inch modules) worden geleverd met een on-board boost converter, wat dit voor u transparant maakt.
- Hogere spanningsacceptatie — de SSD1309 accepteert tot 16 V VCC, terwijl de SSD1306 beperkt is tot ongeveer 4,2 V.
Het 2.42 inch (2.4 inch) OLED module gebruikt doorgaans de SSD1309 driver en heeft een resolutie van 128×64 pixels met een I2C-interface. De achtergrondkleur (wit, blauw, geel, groen of dual-zone) wordt bepaald door het fysieke OLED materiaal en is niet softwarematig te beïnvloeden.
Deze handleiding communiceert met het display via de I2C-bus, die slechts twee signaaldraadjes (SDA en SCL) nodig heeft en gedeeld kan worden met andere I2C randapparatuur.
SSD1309 OLED Pinout (I2C Module)
Het typische 2.42-inch SSD1309 I2C OLED module heeft vier pinnen:
- GND pin: moet verbonden worden met de massa (ground) van de ESP32
- VCC pin: moet verbonden worden met de 3.3V of 5V pin van de ESP32 (controleer de specificaties van uw module)
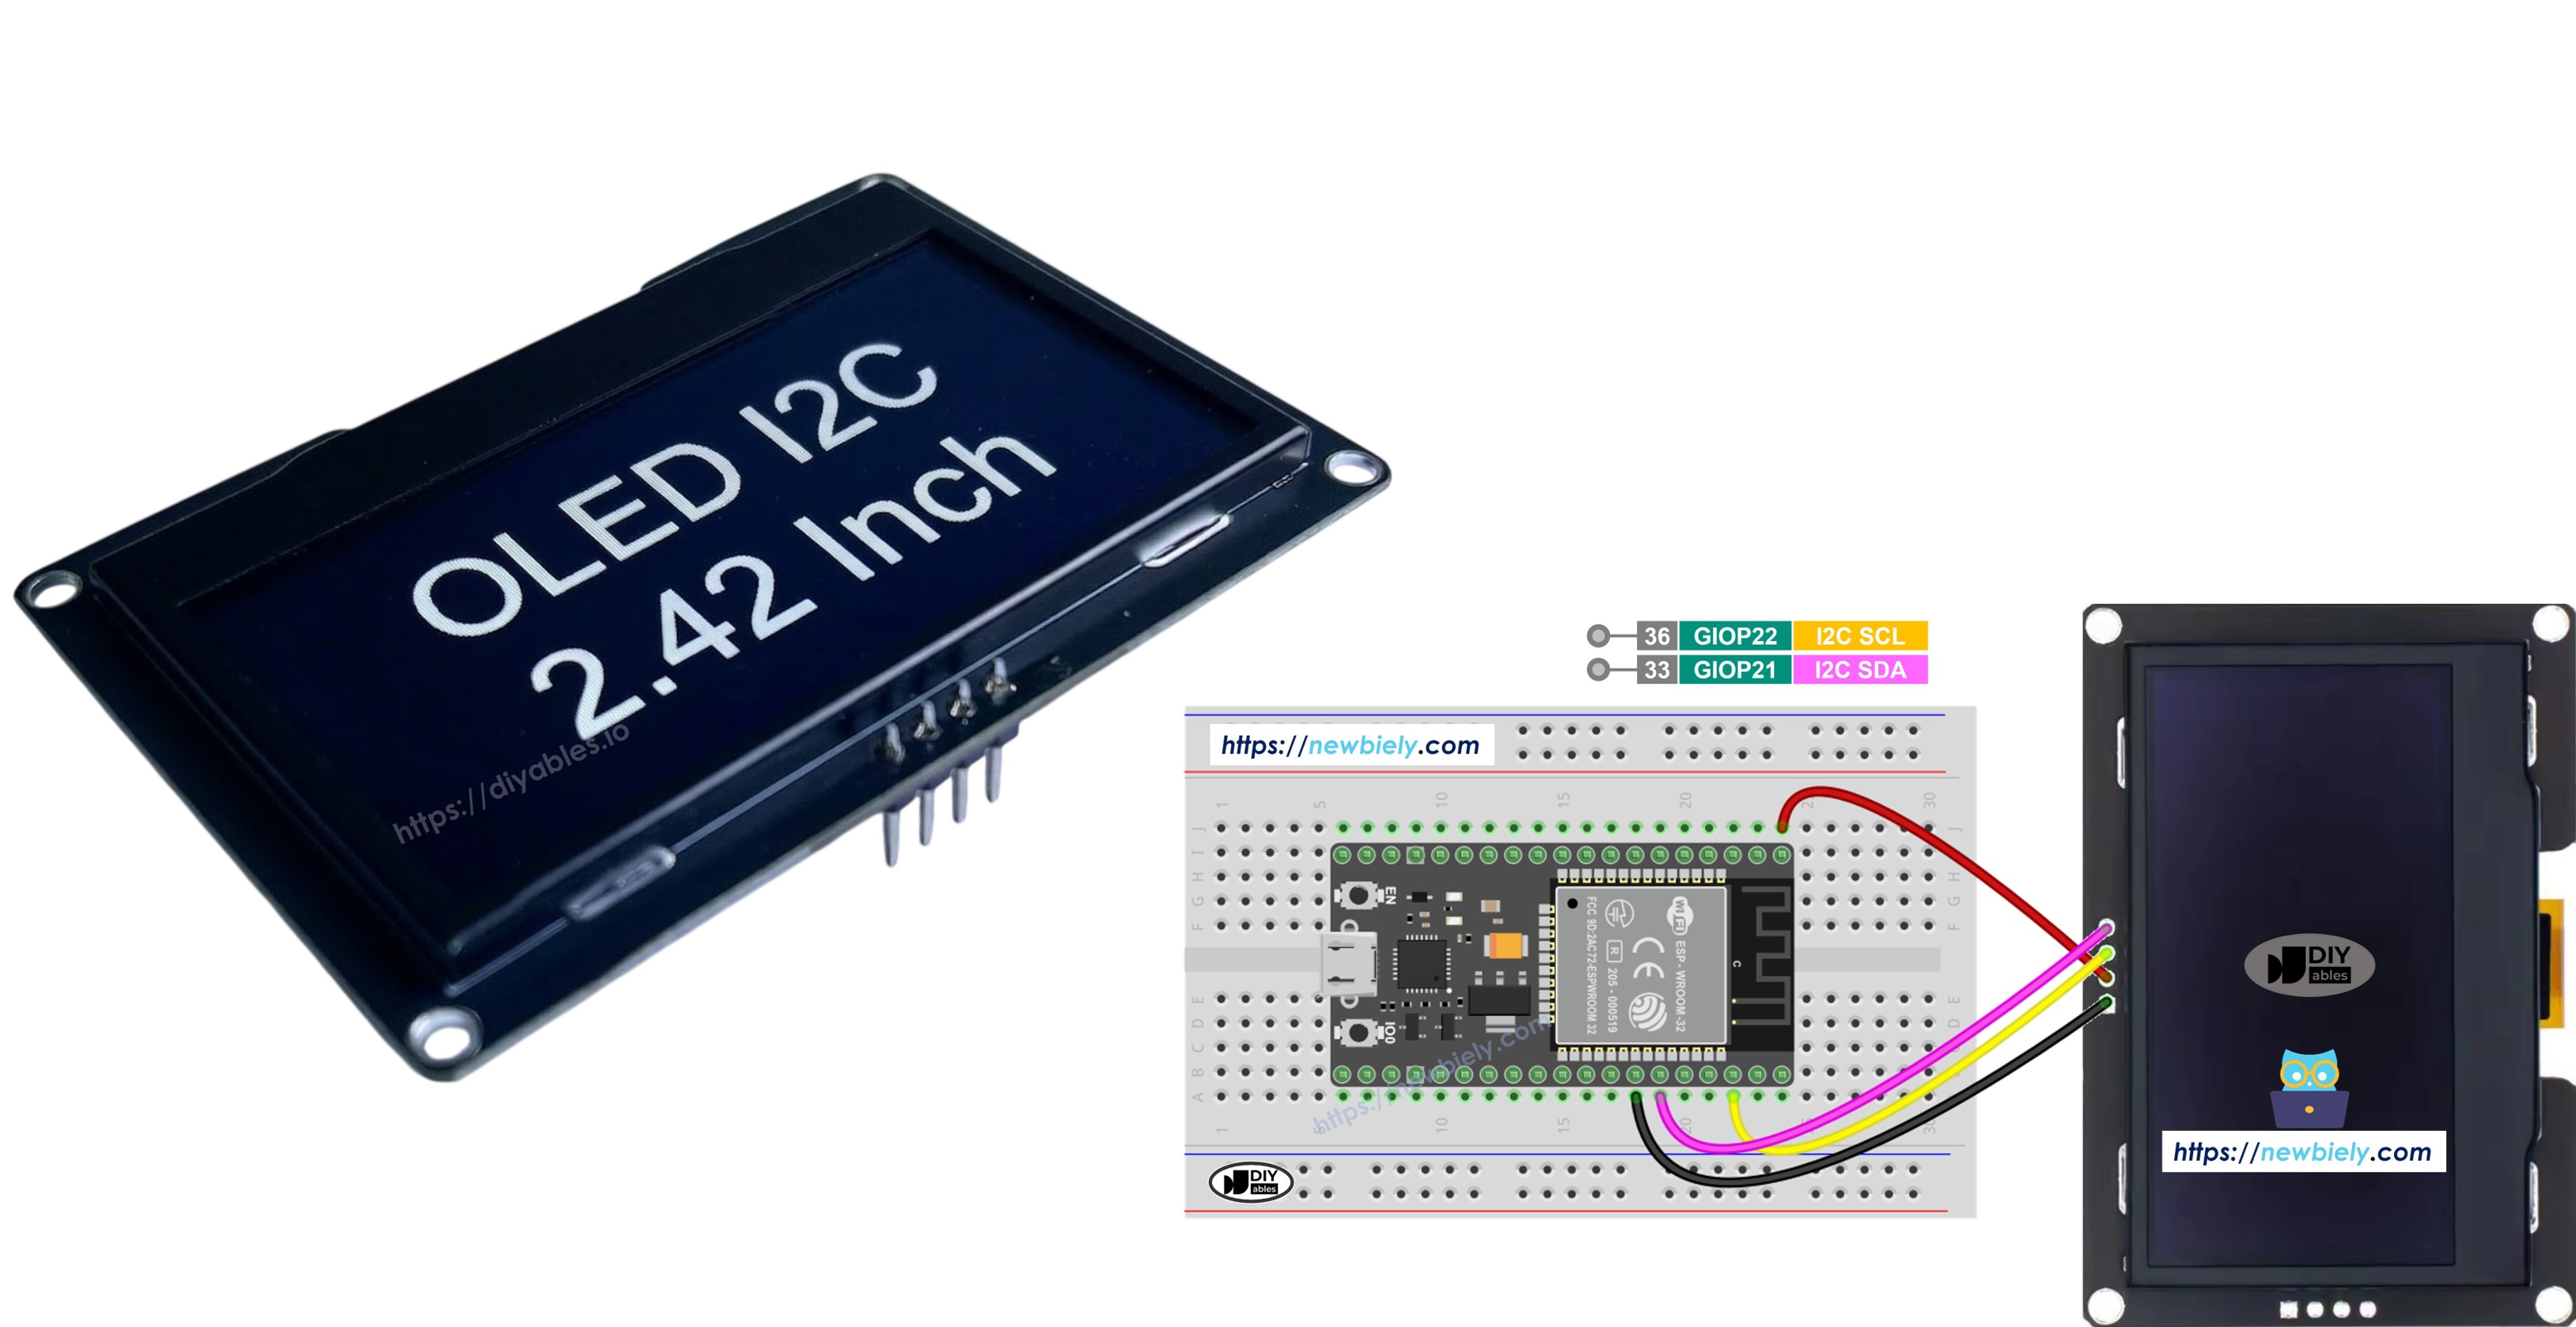
- SCL pin: is de I2C klokpin. Verbind met GPIO 22 (standaard SCL)
- SDA pin: is de I2C datapin. Verbind met GPIO 21 (standaard SDA)
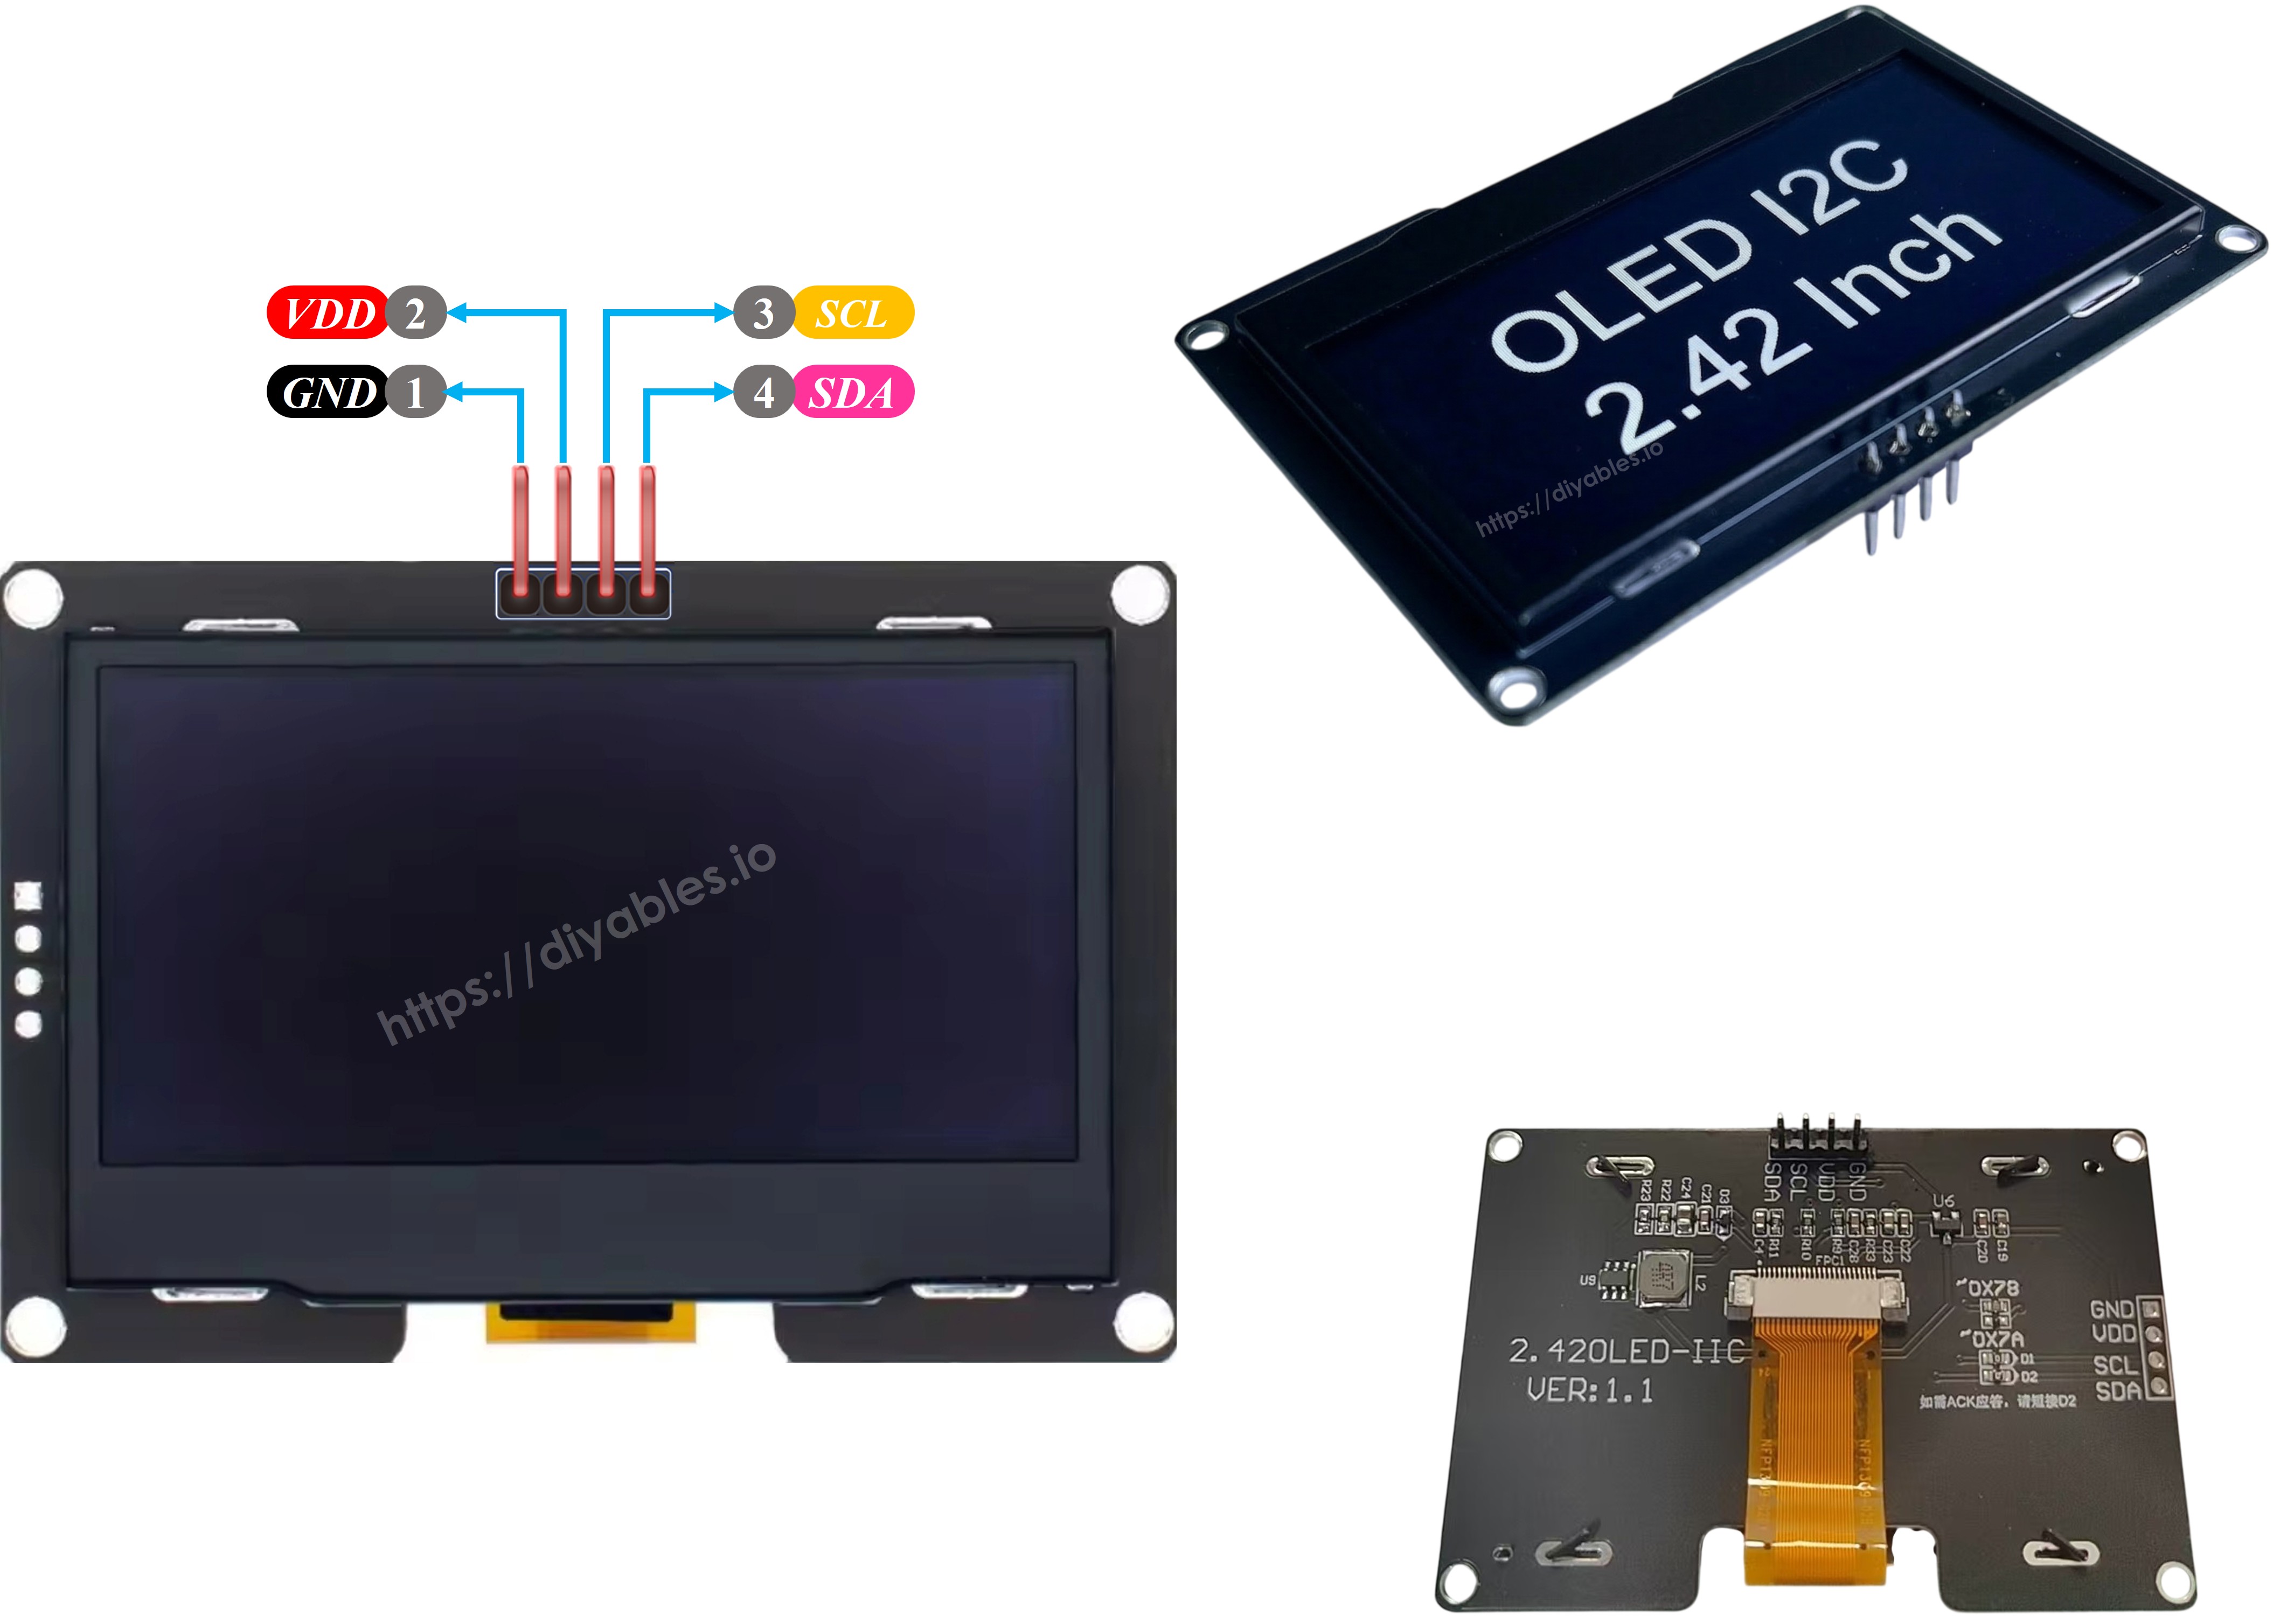
※ Notiz:
De pinvolgorde kan per fabrikant verschillen. Controleer altijd de labels die op uw OLED-module gedrukt staan.
Bedradingsschema
- Hoe ESP32 te verbinden met SSD1309 OLED 128x64 display met behulp van een breadboard
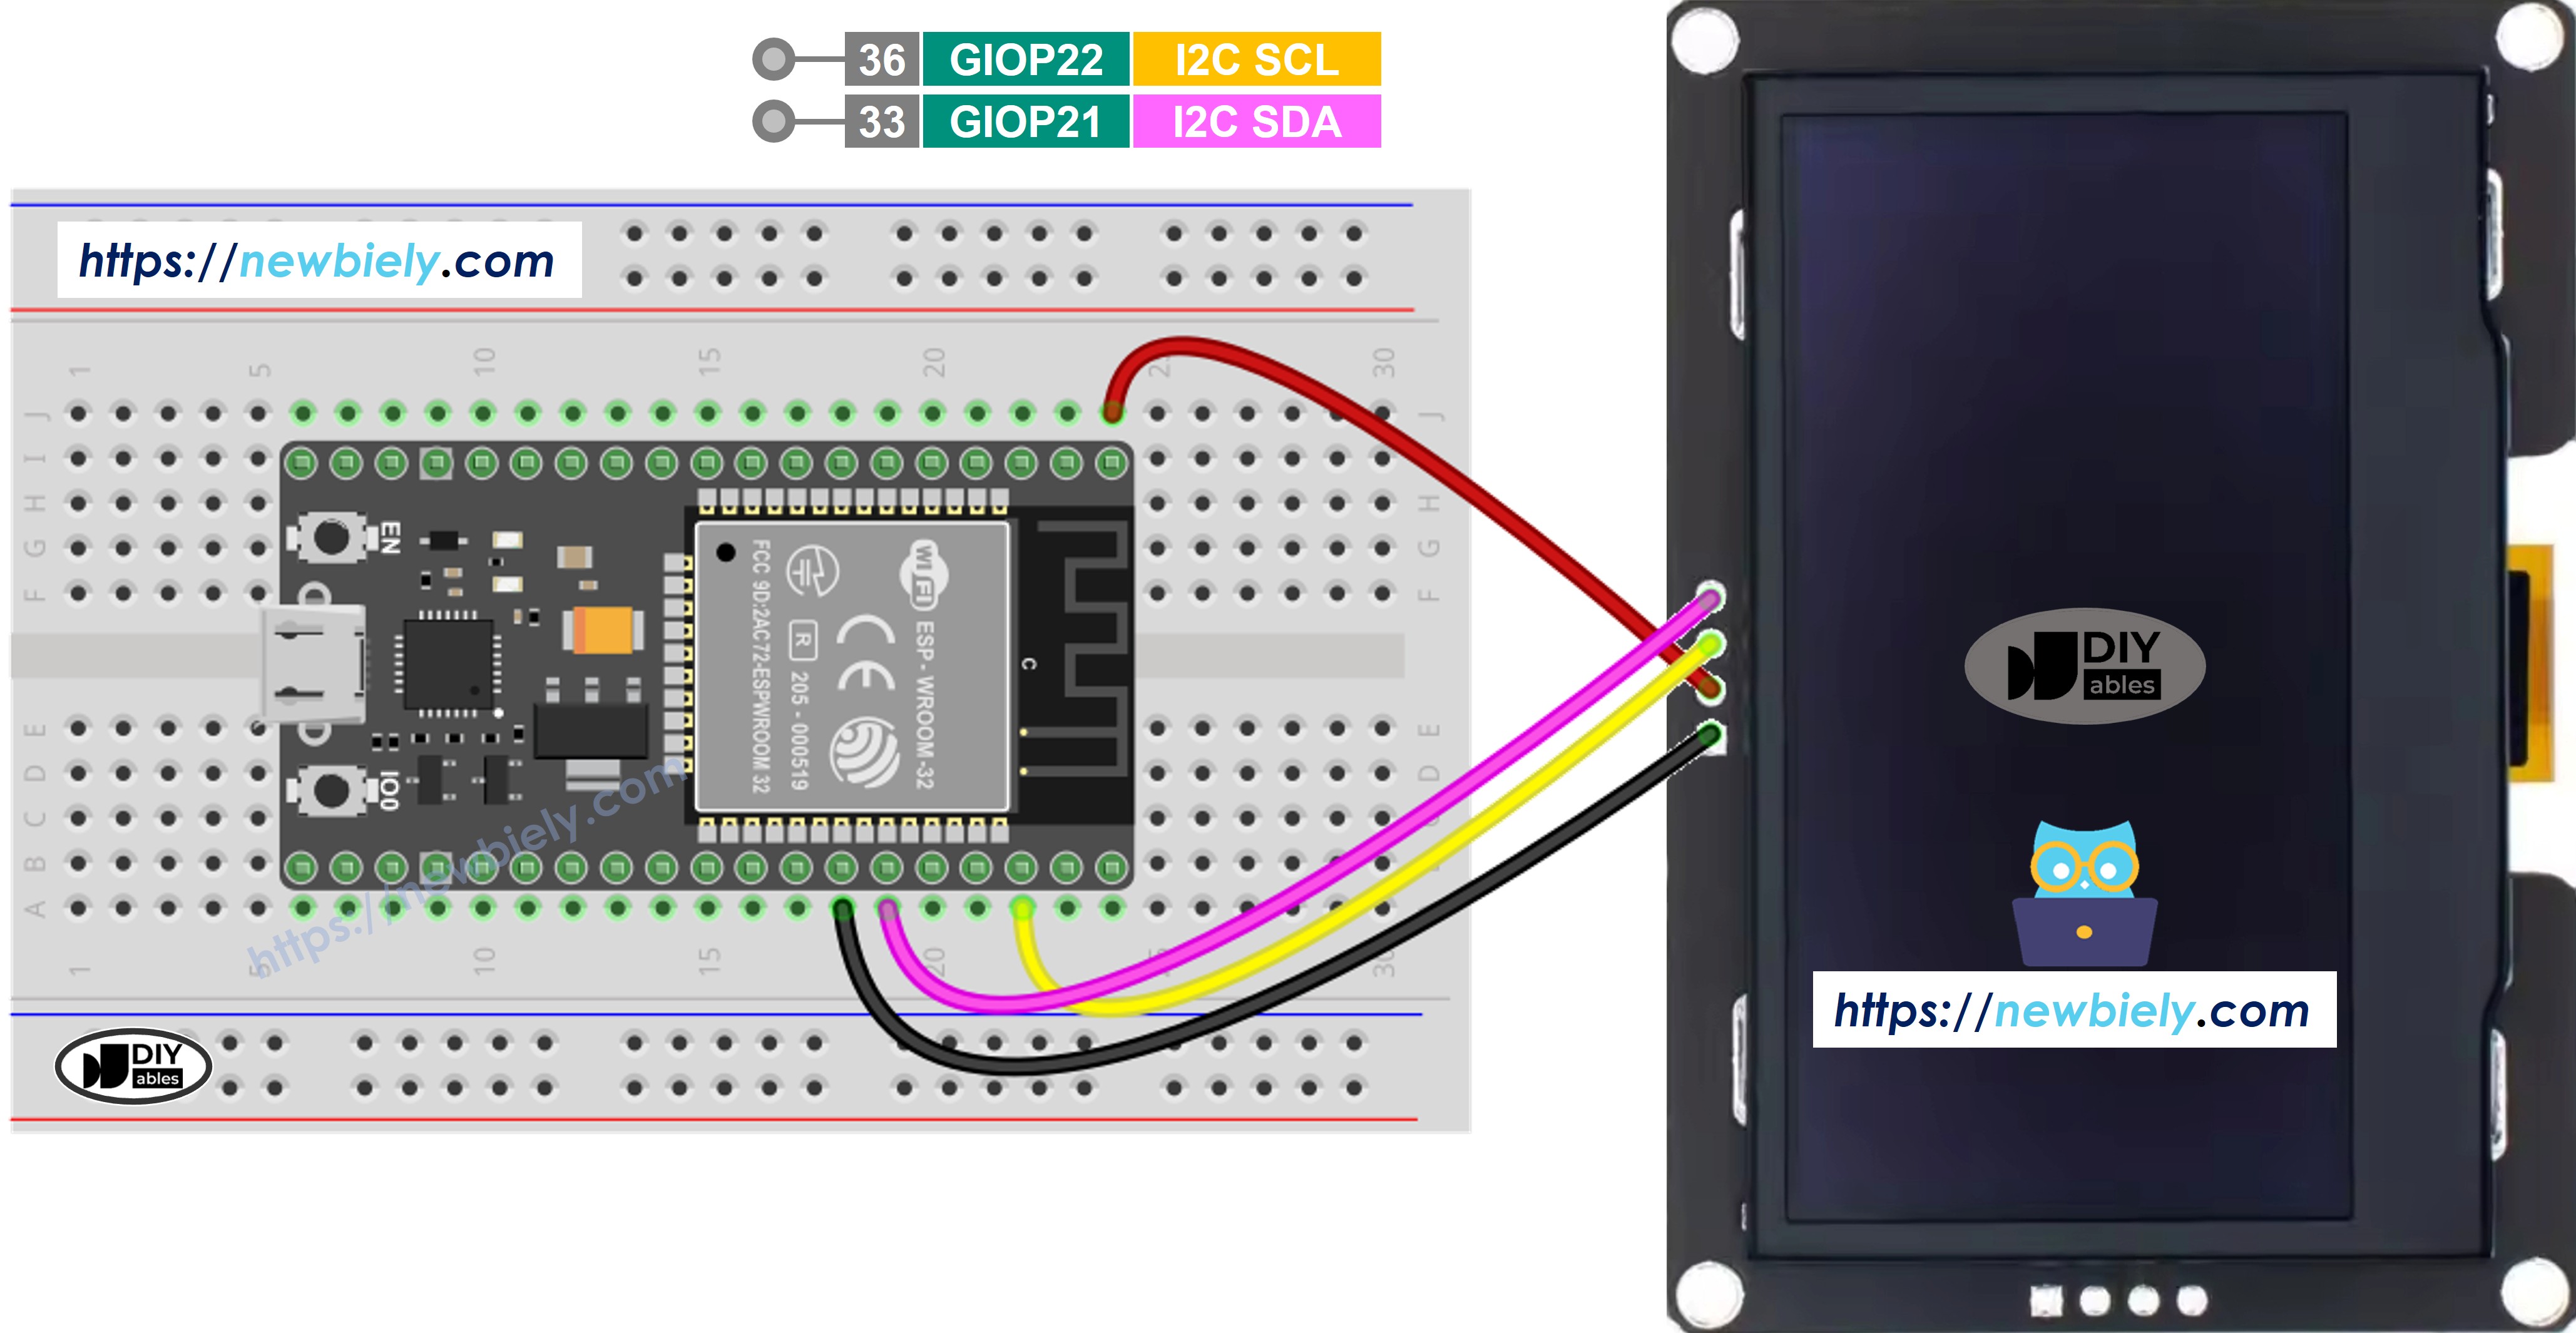
Deze afbeelding is gemaakt met Fritzing. Klik om de afbeelding te vergroten.
- Hoe ESP32 te verbinden met SSD1309 OLED 128x64 display via schroefklem breakout board
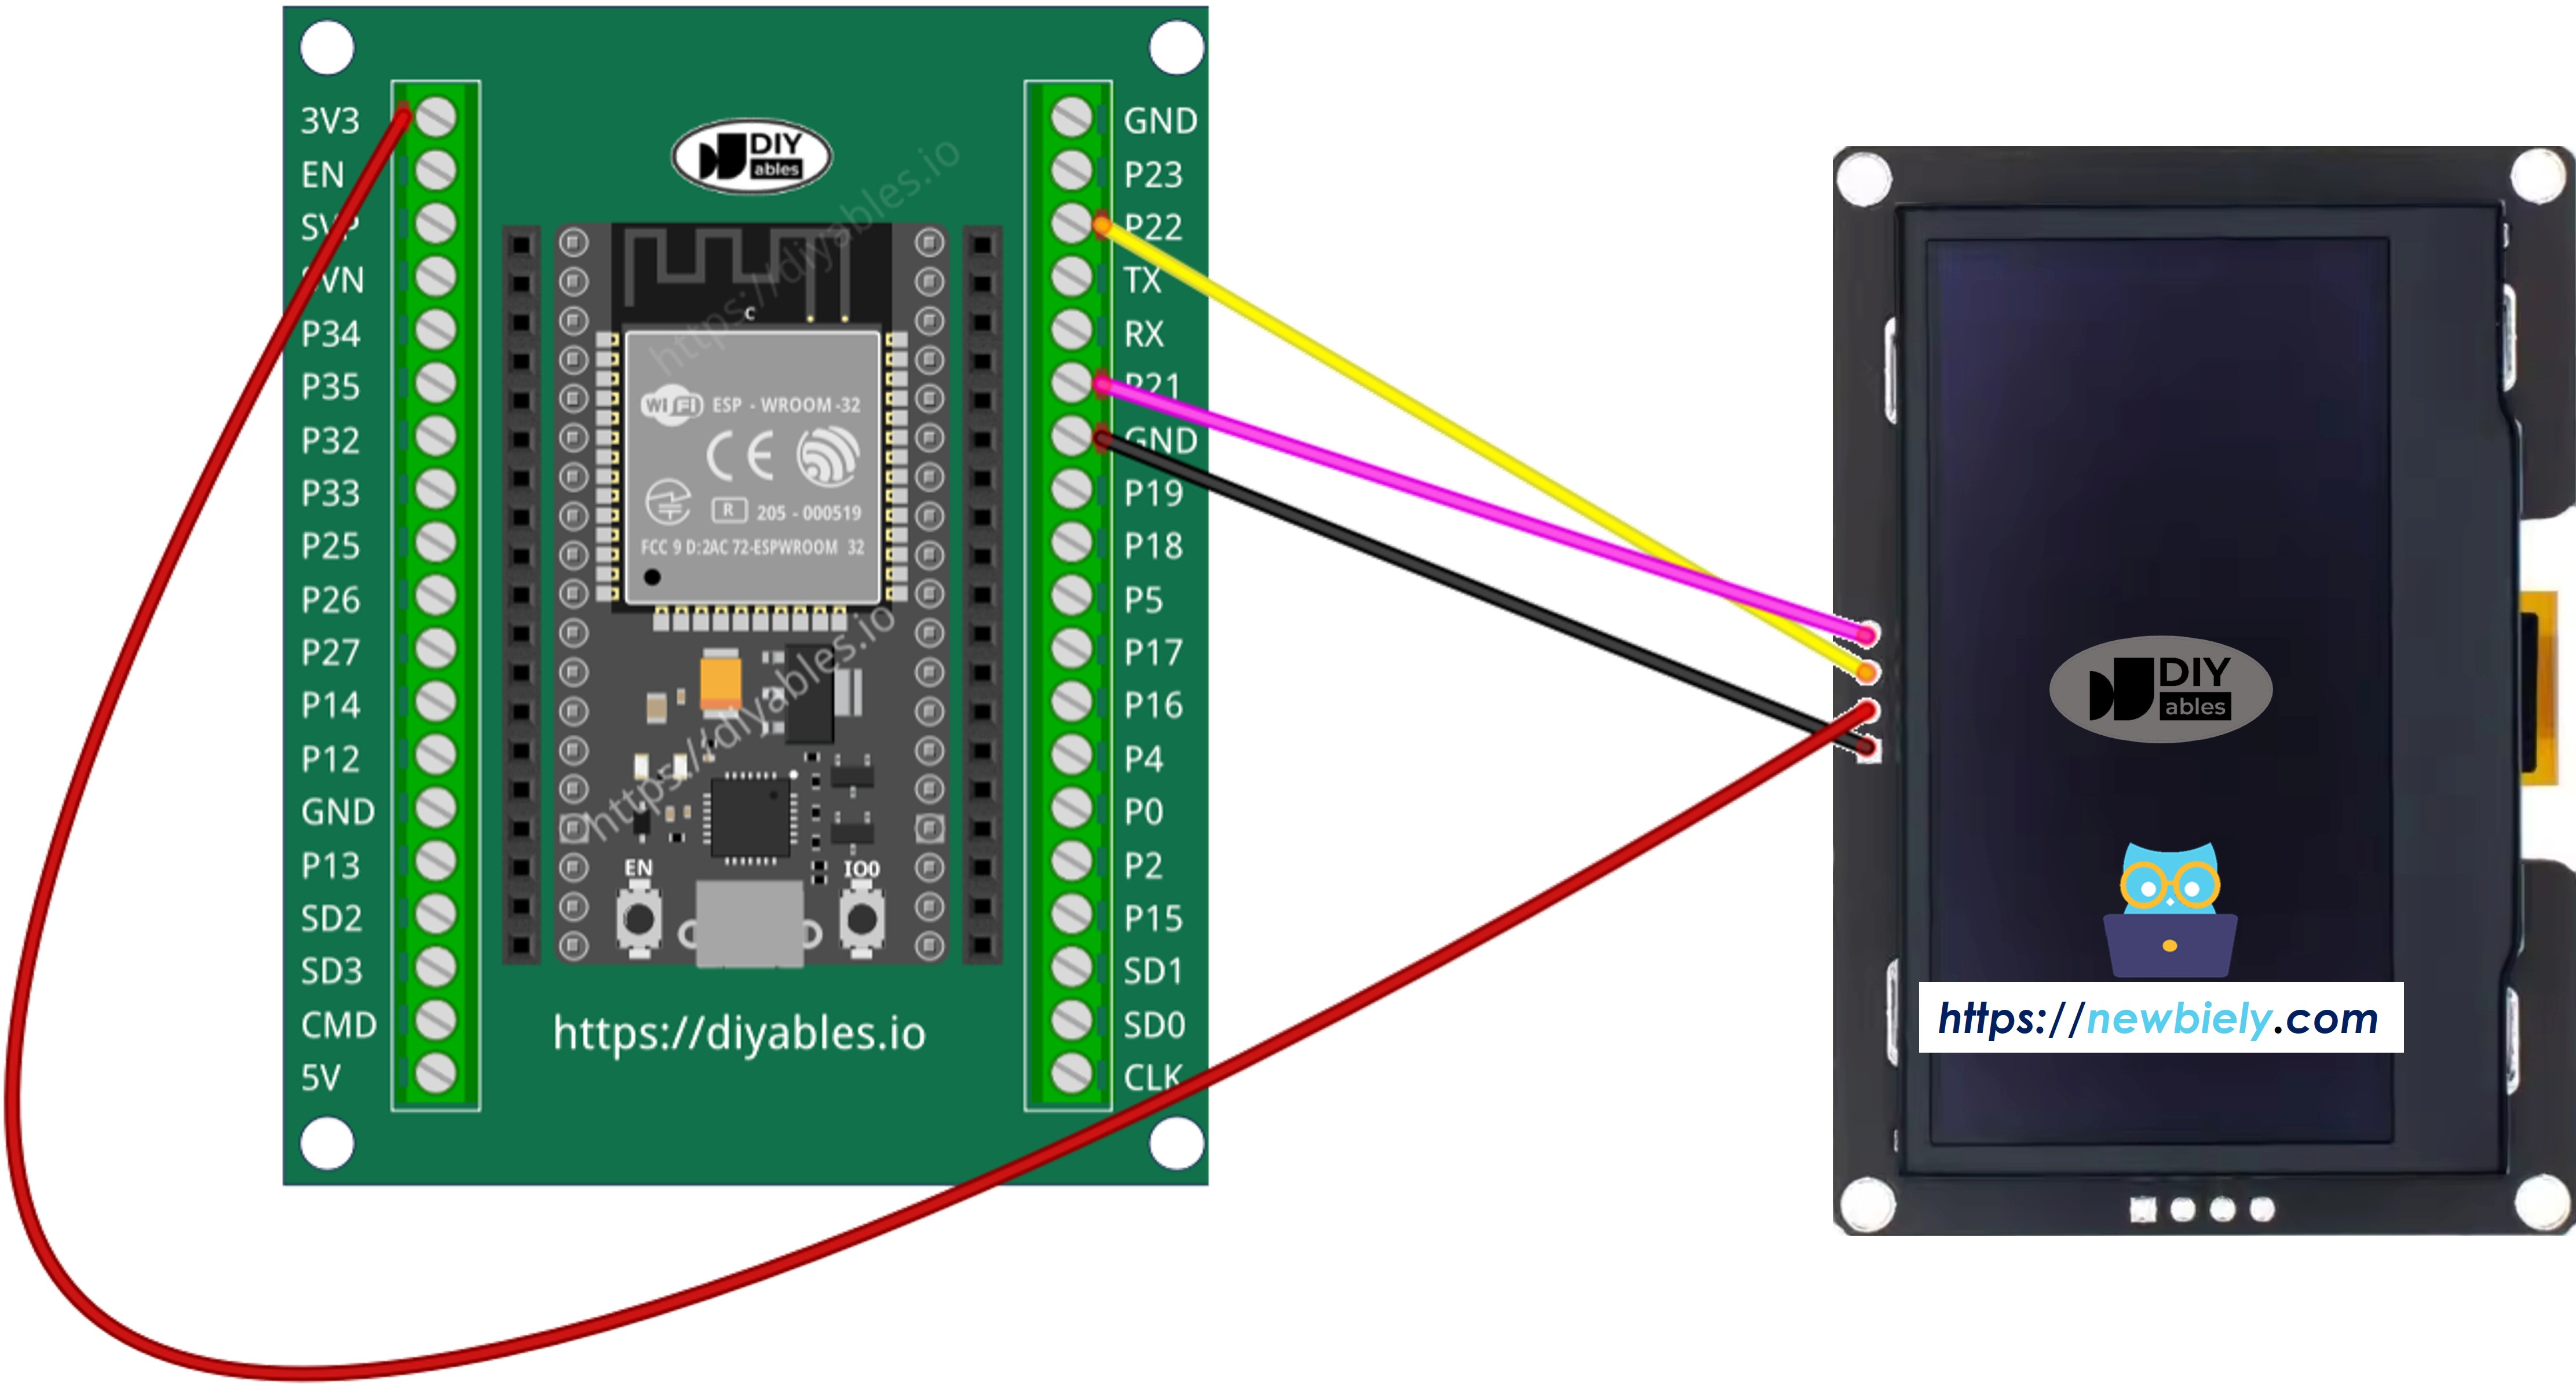
Deze afbeelding is gemaakt met Fritzing. Klik om de afbeelding te vergroten.
Hoe ESP32 te programmeren voor SSD1309 OLED
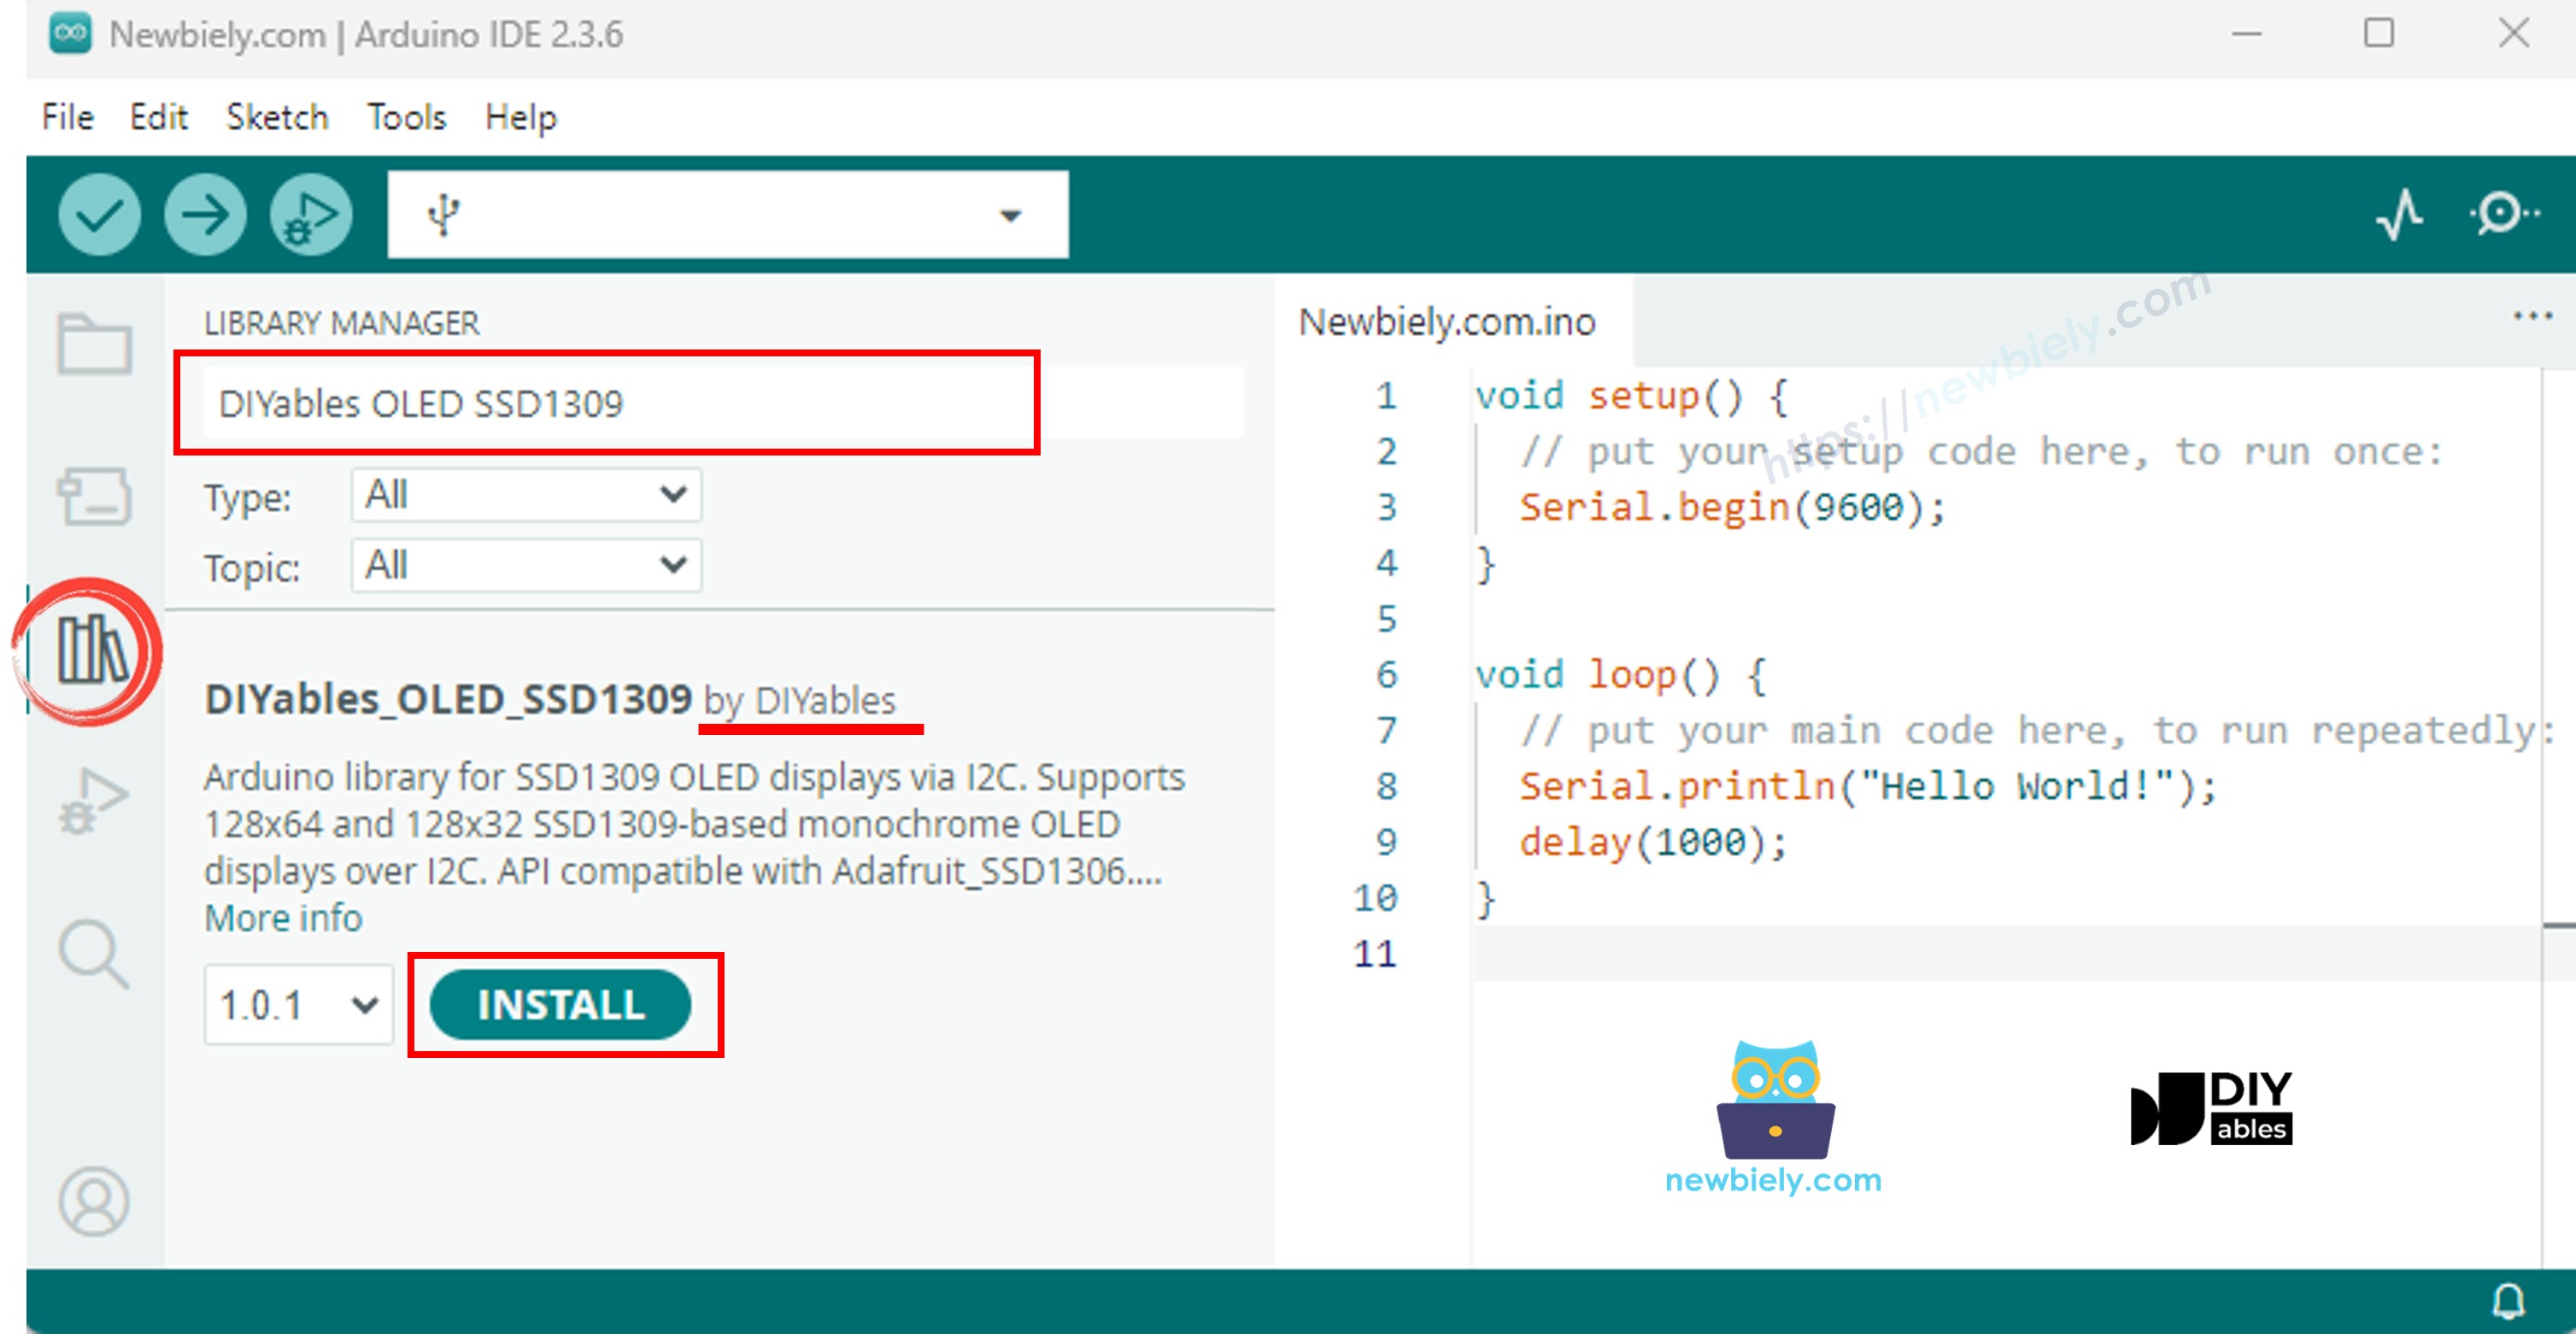
Installeer de DIYables_OLED_SSD1309 Bibliotheek
De DIYables_OLED_SSD1309 bibliotheek is speciaal afgestemd op SSD1309-displays en breidt Adafruit_GFX uit voor uitgebreidere grafische ondersteuning.
- Open de Arduino IDE
- Navigeer naar het Libraries icoon in de linkerzijbalk
- Zoek naar DIYables_OLED_SSD1309
- Klik op Install
- Er verschijnt een afhankelijkheidsmelding — klik op Install All om ook de Adafruit GFX Library te installeren (vereist voor vormtekeningen en lettertypen)
Programmeerstappen
- Include de benodigde libraries
- Definieer de schermafmetingen
- Declareer het display object
- Initialiseer de OLED in setup()
- Toon content
ESP32 Code — Hello World op SSD1309 OLED
Het eenvoudigste startpunt: druk een paar tekstregels af in verschillende groottes.
ESP32 Code — Tekst weergeven op SSD1309 OLED
Het volgende voorbeeld laat meer tekstfuncties zien — meerdere formaten, nummeropmaak en de F() macro voor RAM-besparing.
Nuttige Display Functies Referentie
Hieronder een lijst van meest gebruikte functies bij het werken met de SSD1309 OLED via de DIYables bibliotheek:
- oled.clearDisplay() — wist de frame buffer (alle pixels uit).
- oled.display() — stuurt de buffer naar de OLED zodat aanpassingen zichtbaar worden.
- oled.drawPixel(x, y, color) — zet of wist een individuele pixel.
- oled.setTextSize(n) — schaalt het lettertype met factor *n* (1 = 6×8, 2 = 12×16, …, tot 8).
- oled.setCursor(x, y) — verplaatst de tekstcursor naar pixellocatie *(x, y)*.
- oled.setTextColor(SSD1309_PIXEL_ON) — tekst met alleen voorgrondkleur (achtergrond is transparant).
- oled.setTextColor(SSD1309_PIXEL_OFF, SSD1309_PIXEL_ON) — tekst met expliciete achtergrondkleur.
- oled.println("message") — print een tekststring en gaat door naar volgende regel.
- oled.println(number) — print een geheel getal in decimaal formaat.
- oled.println(number, HEX) — print een geheel getal in hexadecimaal.
- oled.startscrollright(start, stop) — hardware-scroll rechts tussen pagina’s *start* en *stop*.
- oled.startscrollleft(start, stop) — hardware-scroll links.
- oled.startscrolldiagright(start, stop) — hardware-scroll diagonaal rechts.
- oled.startscrolldiagleft(start, stop) — hardware-scroll diagonaal links.
- oled.stopscroll() — stopt actieve hardware-scroll.
- oled.setContrast(value) — regelt schermhelderheid (0–255).
- oled.dim(true/false) — zet snel dimmen aan of uit, schakelt naar minimum of vorige helderheid.
- oled.invertDisplay(true/false) — keert pixels om (aan ↔ uit).
Hoe tekst verticaal en horizontaal centreren op de SSD1309 OLED
ESP32 Code — Teken vormen op SSD1309 OLED
Omdat de DIYables_OLED_SSD1309 bibliotheek Adafruit_GFX uitbreidt, krijgt u een complete set vorm-tekenfuncties: pixels, lijnen, rechthoeken, gevulde rechthoeken, cirkels, gevulde cirkels, driehoeken, gevulde driehoeken en afgeronde rechthoeken. Onderstaand voorbeeld toont ze allemaal met geanimeerde demo’s.
ESP32 Code — Hardware Scrollen op SSD1309 OLED
De SSD1309 heeft een ingebouwde scrollmotor die de scherminhoud verschuift zonder CPU-belasting. De DIYables bibliotheek ondersteunt vier scrollrichtingen: rechts, links, diagonaal-rechts en diagonaal-links. Elke functie neemt een start- en stop-pagina parameter (pagina’s zijn 8-pixel hoge horizontale stroken genummerd 0–7 op een 64-pixels hoog scherm).
※ Notiz:
Roep altijd display() aan om de inhoud naar het OLED scherm te sturen voordat u begint met scrollen. Vermijd tekenen van nieuwe inhoud terwijl scrollen actief is — roep eerst stopscroll() aan.
ESP32 Code — Bitmap afbeelding weergeven op SSD1309 OLED
Om een bitmap te tonen op het SSD1309 OLED moet u eerst de afbeelding converteren naar een C byte array. Gebruik de gratis image2cpp online tool voor deze conversie:
- Upload uw afbeeldingsbestand (PNG, JPG, BMP, etc.).
- Stel de canvasgrootte in op 128×64 (of kleiner).
- Kies Arduino code als uitvoerformaat.
- Kopieer de gegenereerde array in uw sketch.
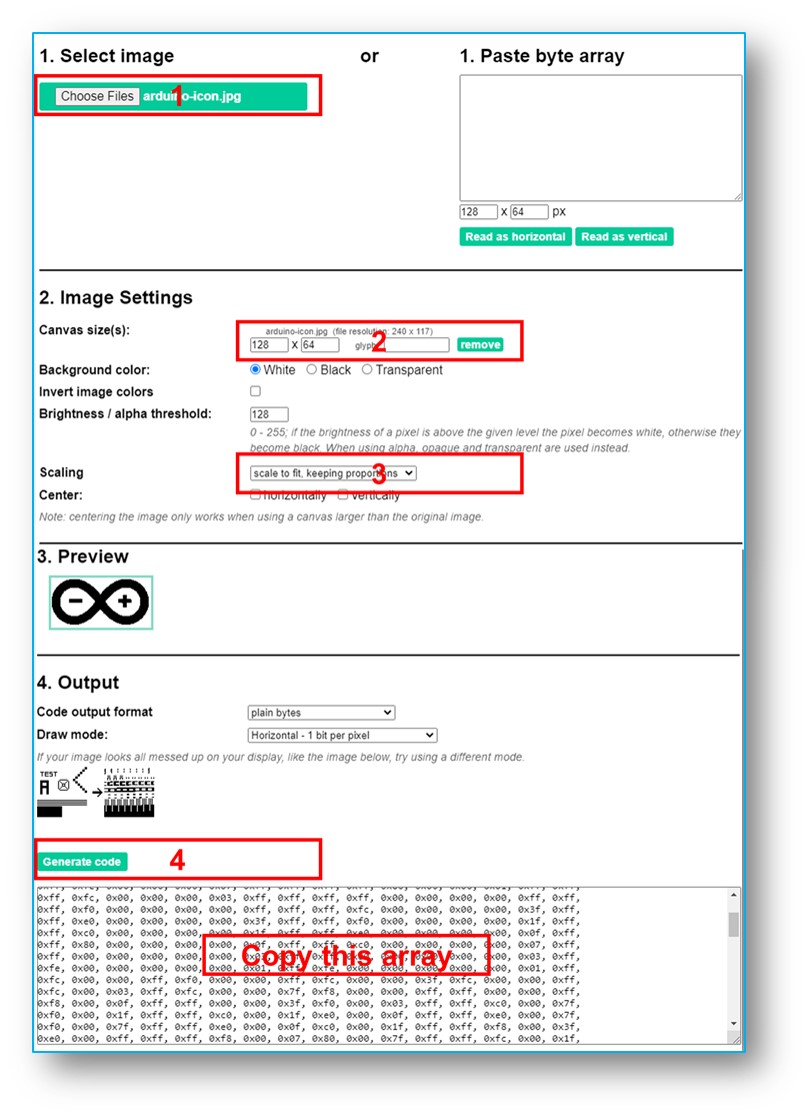
Het voorbeeld hieronder wisselt tussen een 16×16 hart icoon en een full-width DIYables logo:
※ Notiz:
- De bitmapafmetingen mogen de schermresolutie niet overschrijden (128×64 voor het 2.42 inch module).
ESP32 Code — Contrast en Dimbaarheid op SSD1309 OLED
De SSD1309 ondersteunt 256 contrastniveaus (0–255). De DIYables bibliotheek biedt setContrast() voor fijne regeling en dim() voor een snelle wissel tussen minimum helderheid en de eerder ingestelde waarde.
ESP32 Code — Aangepaste Externe Lettertypen op SSD1309 OLED
De Adafruit GFX bibliotheek levert tientallen schaalbare FreeFont lettertypes (Serif, Sans, Mono — elk in Regular, Bold, Italic en vier formaten). U activeert ze op het SSD1309 display door de juiste header toe te voegen en setFont() op te roepen.
※ Notiz:
- Wanneer een extern lettertype actief is, verwijst de Y-coördinaat van de cursor naar de tekst baseline, niet naar de linkerbovenhoek. Dit wijkt af van het ingebouwde 5×7 font.
- Externe lettertypen worden opgeslagen in flash geheugen (PROGMEM). De ESP32 heeft ruim flash geheugen, dus het gebruik van meerdere fontbestanden in uw project is prima mogelijk.
SSD1309 OLED Problemen oplossen met ESP32
Als er niets verschijnt op het 2.42 inch SSD1309 OLED nadat u uw sketch hebt geüpload, doorloop dan de volgende controles:
- Controleer de bekabeling — bevestig dat SDA, SCL, VCC en GND correct zijn aangesloten op de juiste ESP32-pinnen.
- Bevestig de driverchip — deze bibliotheek is ontworpen voor de SSD1309. Als uw module een andere controller gebruikt (bijv. SH1106), werkt deze niet correct.
- Controleer het I2C-adres — de meeste SSD1309 modules gebruiken standaard 0x3C, maar sommigen gebruiken 0x3D. Gebruik de onderstaande I2C scanner sketch om het werkelijke adres te detecteren:
Verwachte output in Serial Monitor wanneer de SSD1309 wordt gedetecteerd:
- Zorg dat display() wordt aangeroepen — de SSD1309 gebruikt een framebuffer. Tekentaken wijzigen alleen de buffer in RAM; niets verschijnt op het scherm zolang u oled.display() niet oproept.
- Controleer de voeding — het 2.42 inch module trekt meer stroom dan kleinere OLED’s. Zorg dat uw voedingsbron voldoende stroom levert (meestal 20–40 mA bij volle helderheid). Bij gebruik van USB-voeding is dit meestal geen probleem met ESP32.
- Aangepaste I2C-pinnen (optioneel) — als u niet-standaard I2C-pinconfiguraties wilt gebruiken, initialiseer dan Wire met Wire.begin(SDA_PIN, SCL_PIN) vóór het aanroepen van display.begin().
Afsluiting
Deze handleiding heeft alle essentiële aspecten behandeld voor het gebruik van het 2.42-inch SSD1309 OLED display (128×64) met ESP32, inclusief:
- Hardware connecties en I2C bedrading
- Tekst en cijfers weergeven in meerdere formaten
- Vormen tekenen (rechthoeken, cirkels, driehoeken)
- Bitmap afbeeldingen tonen
- Hardware scrollen in vier richtingen
- Contrast- en helderheidsregeling
- Aangepaste externe lettertypen
De DIYables_OLED_SSD1309 bibliotheek vereenvoudigt SSD1309-programmering met hoog-niveau functies voor tekst, grafiek en schermbesturing, terwijl het Adafruit GFX benut voor uitgebreide tekenmogelijkheden.
Voor meer ESP32 projecten en tutorials, bezoek esp32io.com