ESP32 Bluetooth Monitor Voorbeeld - Realtime Seriële Monitor Interface Tutorial
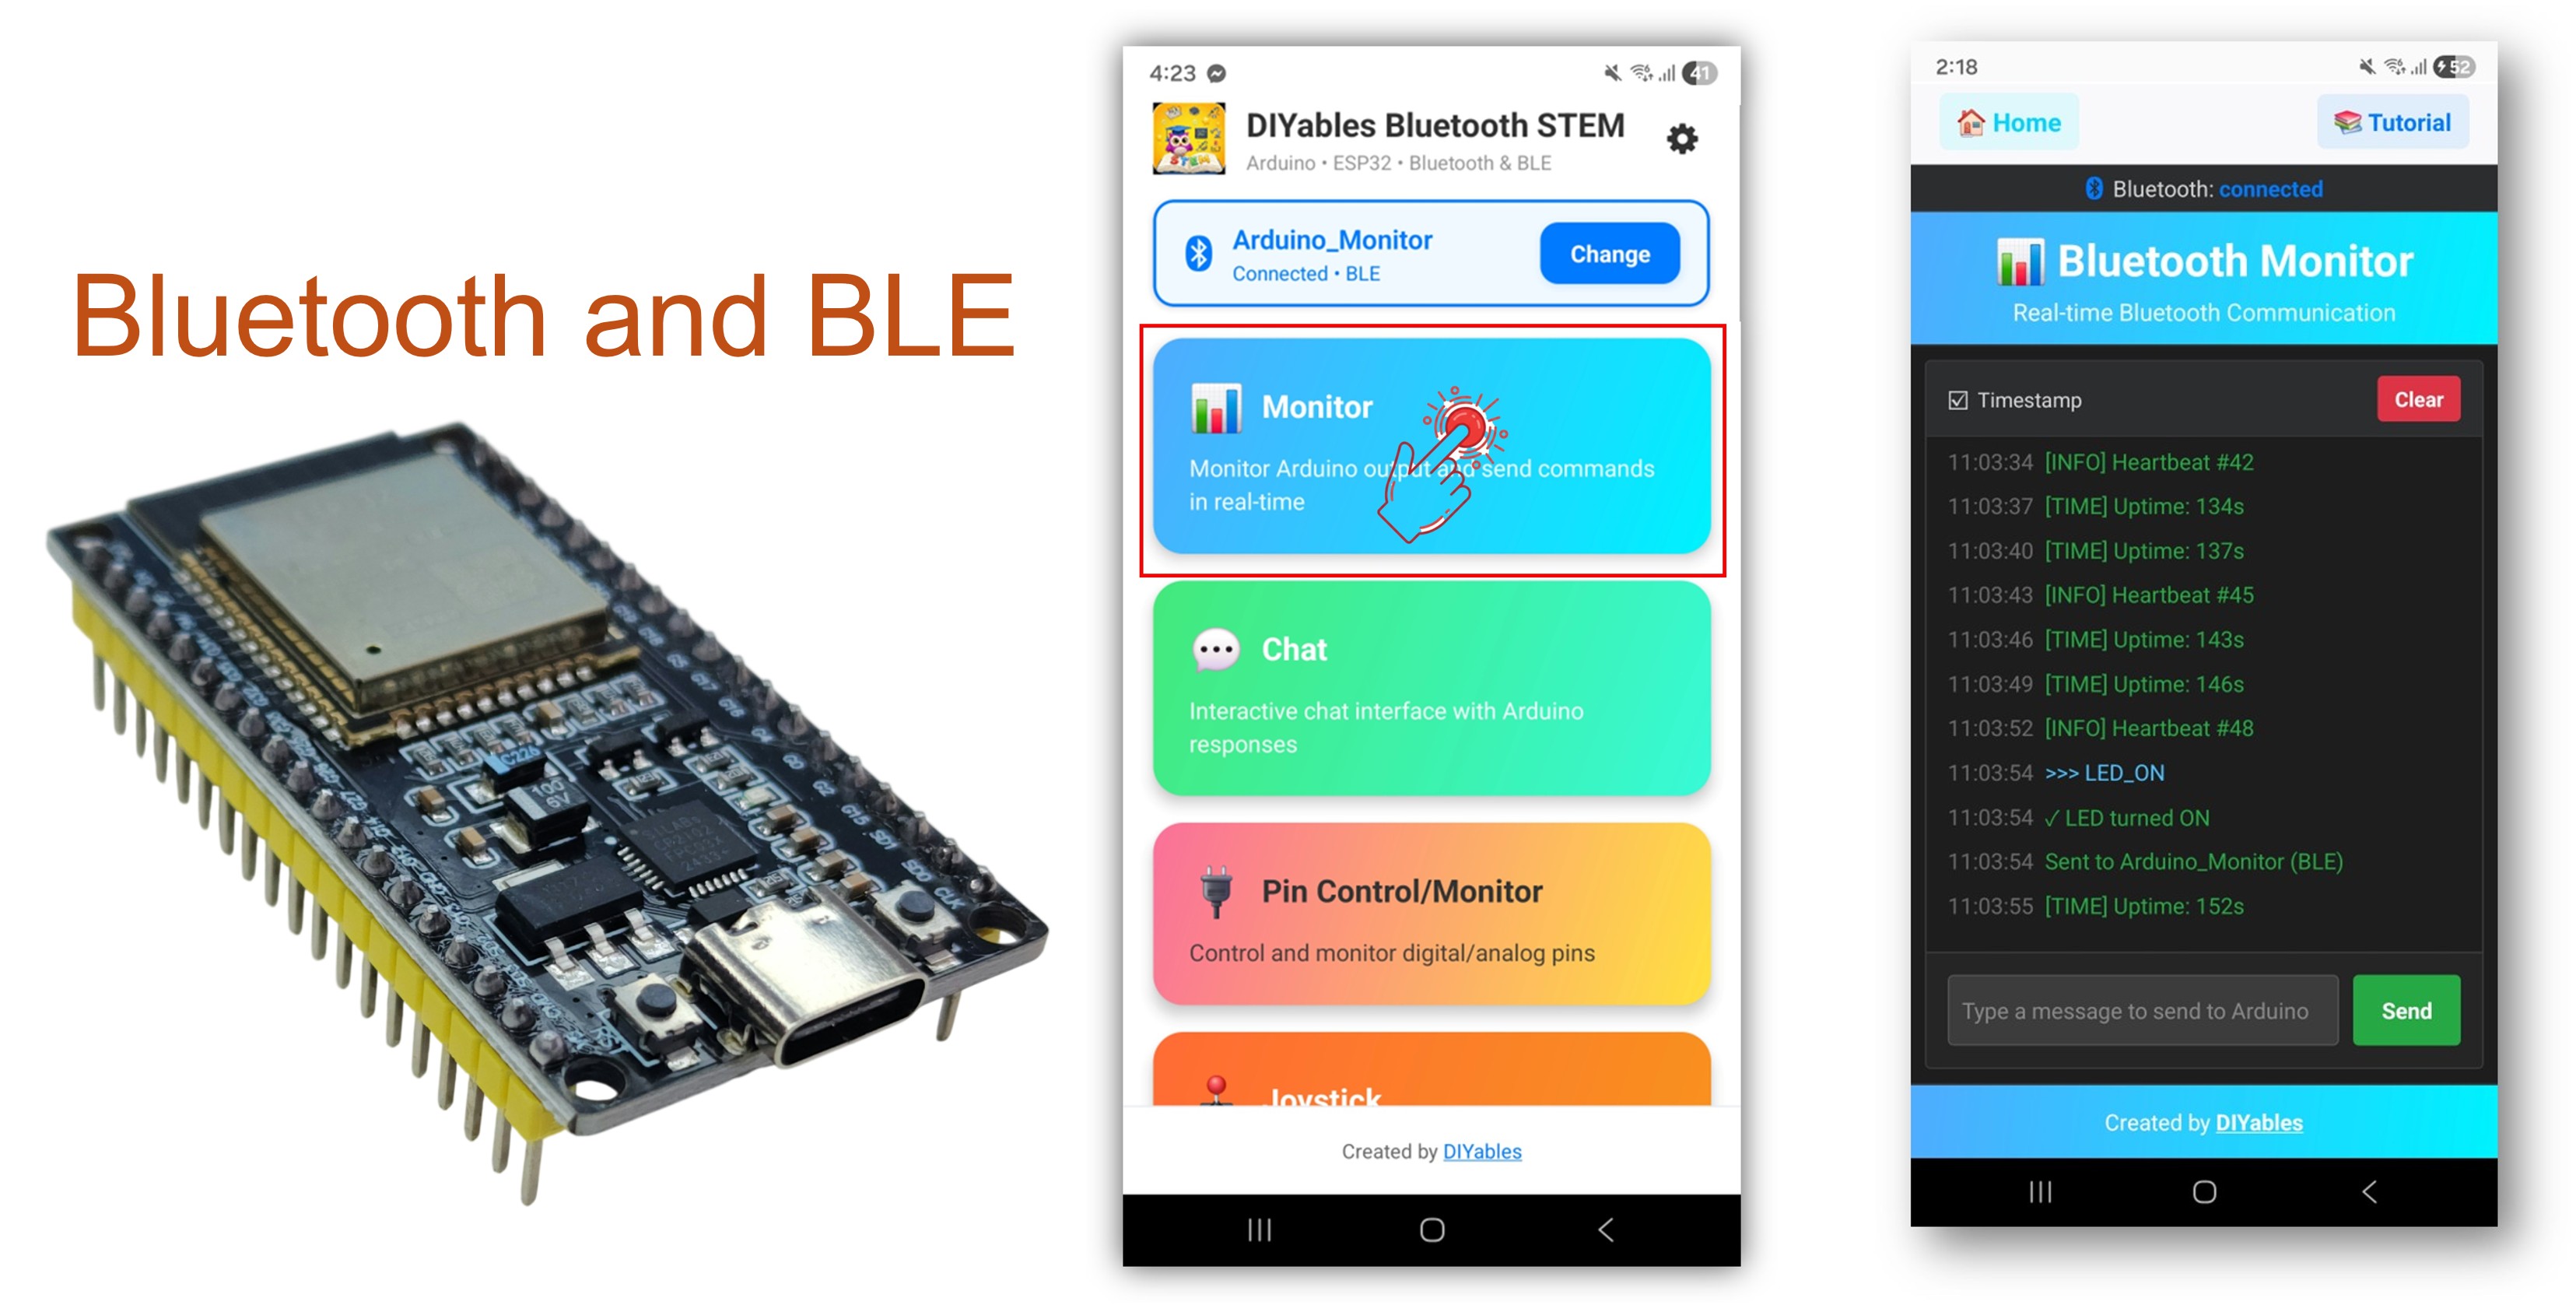
Het Bluetooth Monitor voorbeeld biedt een draadloze seriële monitorinterface die toegankelijk is via de DIYables Bluetooth STEM app. Ontworpen voor ESP32 boards met ondersteuning voor zowel BLE (Bluetooth Low Energy) als Classic Bluetooth verbindingen. Stream realtime statusberichten naar de app, ontvang en verwerk tekstcommando’s, toon systeeminformatie en debug uw projecten draadloos — perfect voor ongebonden monitoring, remote debugging en systeemstatusdisplays.
Dit voorbeeld ondersteunt twee Bluetooth modi:
ESP32 BLE (Bluetooth Low Energy): Werkt op zowel Android als iOS
ESP32 Classic Bluetooth: Werkt alleen op Android. iOS ondersteunt Classic Bluetooth niet. Gebruik BLE als u iOS-ondersteuning nodig heeft.
Realtime streaming: Continue statusberichten verzenden naar het app-scherm
Commandoverwerking: Ontvang en verwerk tekstcommando’s van de app
Systeemmonitoring: Toon uptime, vrije heap, CPU-info en meer
LED-besturing: Ingebouwde LED AAN/UIT commando’s voor snelle tests
Periodieke updates: Automatische heartbeat en statusberichten op configureerbare intervallen
BLE & Classic Bluetooth: Kies de Bluetooth-modus die het beste bij uw project past
Cross-platform: BLE modus werkt op Android en iOS; Classic Bluetooth alleen op Android
Laag stroomverbruik optie: BLE modus verbruikt minder stroom dan Classic Bluetooth
Of u kunt de volgende kits kopen:
Openbaarmaking: Sommige van de links in deze sectie zijn Amazon-affiliate links. We kunnen een commissie ontvangen voor aankopen die via deze links worden gedaan, zonder extra kosten voor u. We waarderen uw steun.
Volg deze instructies stap voor stap:
Verbind het ESP32 board met uw computer via een USB-kabel.
Start de Arduino IDE op uw computer.
Selecteer het juiste ESP32 board en de COM-poort.
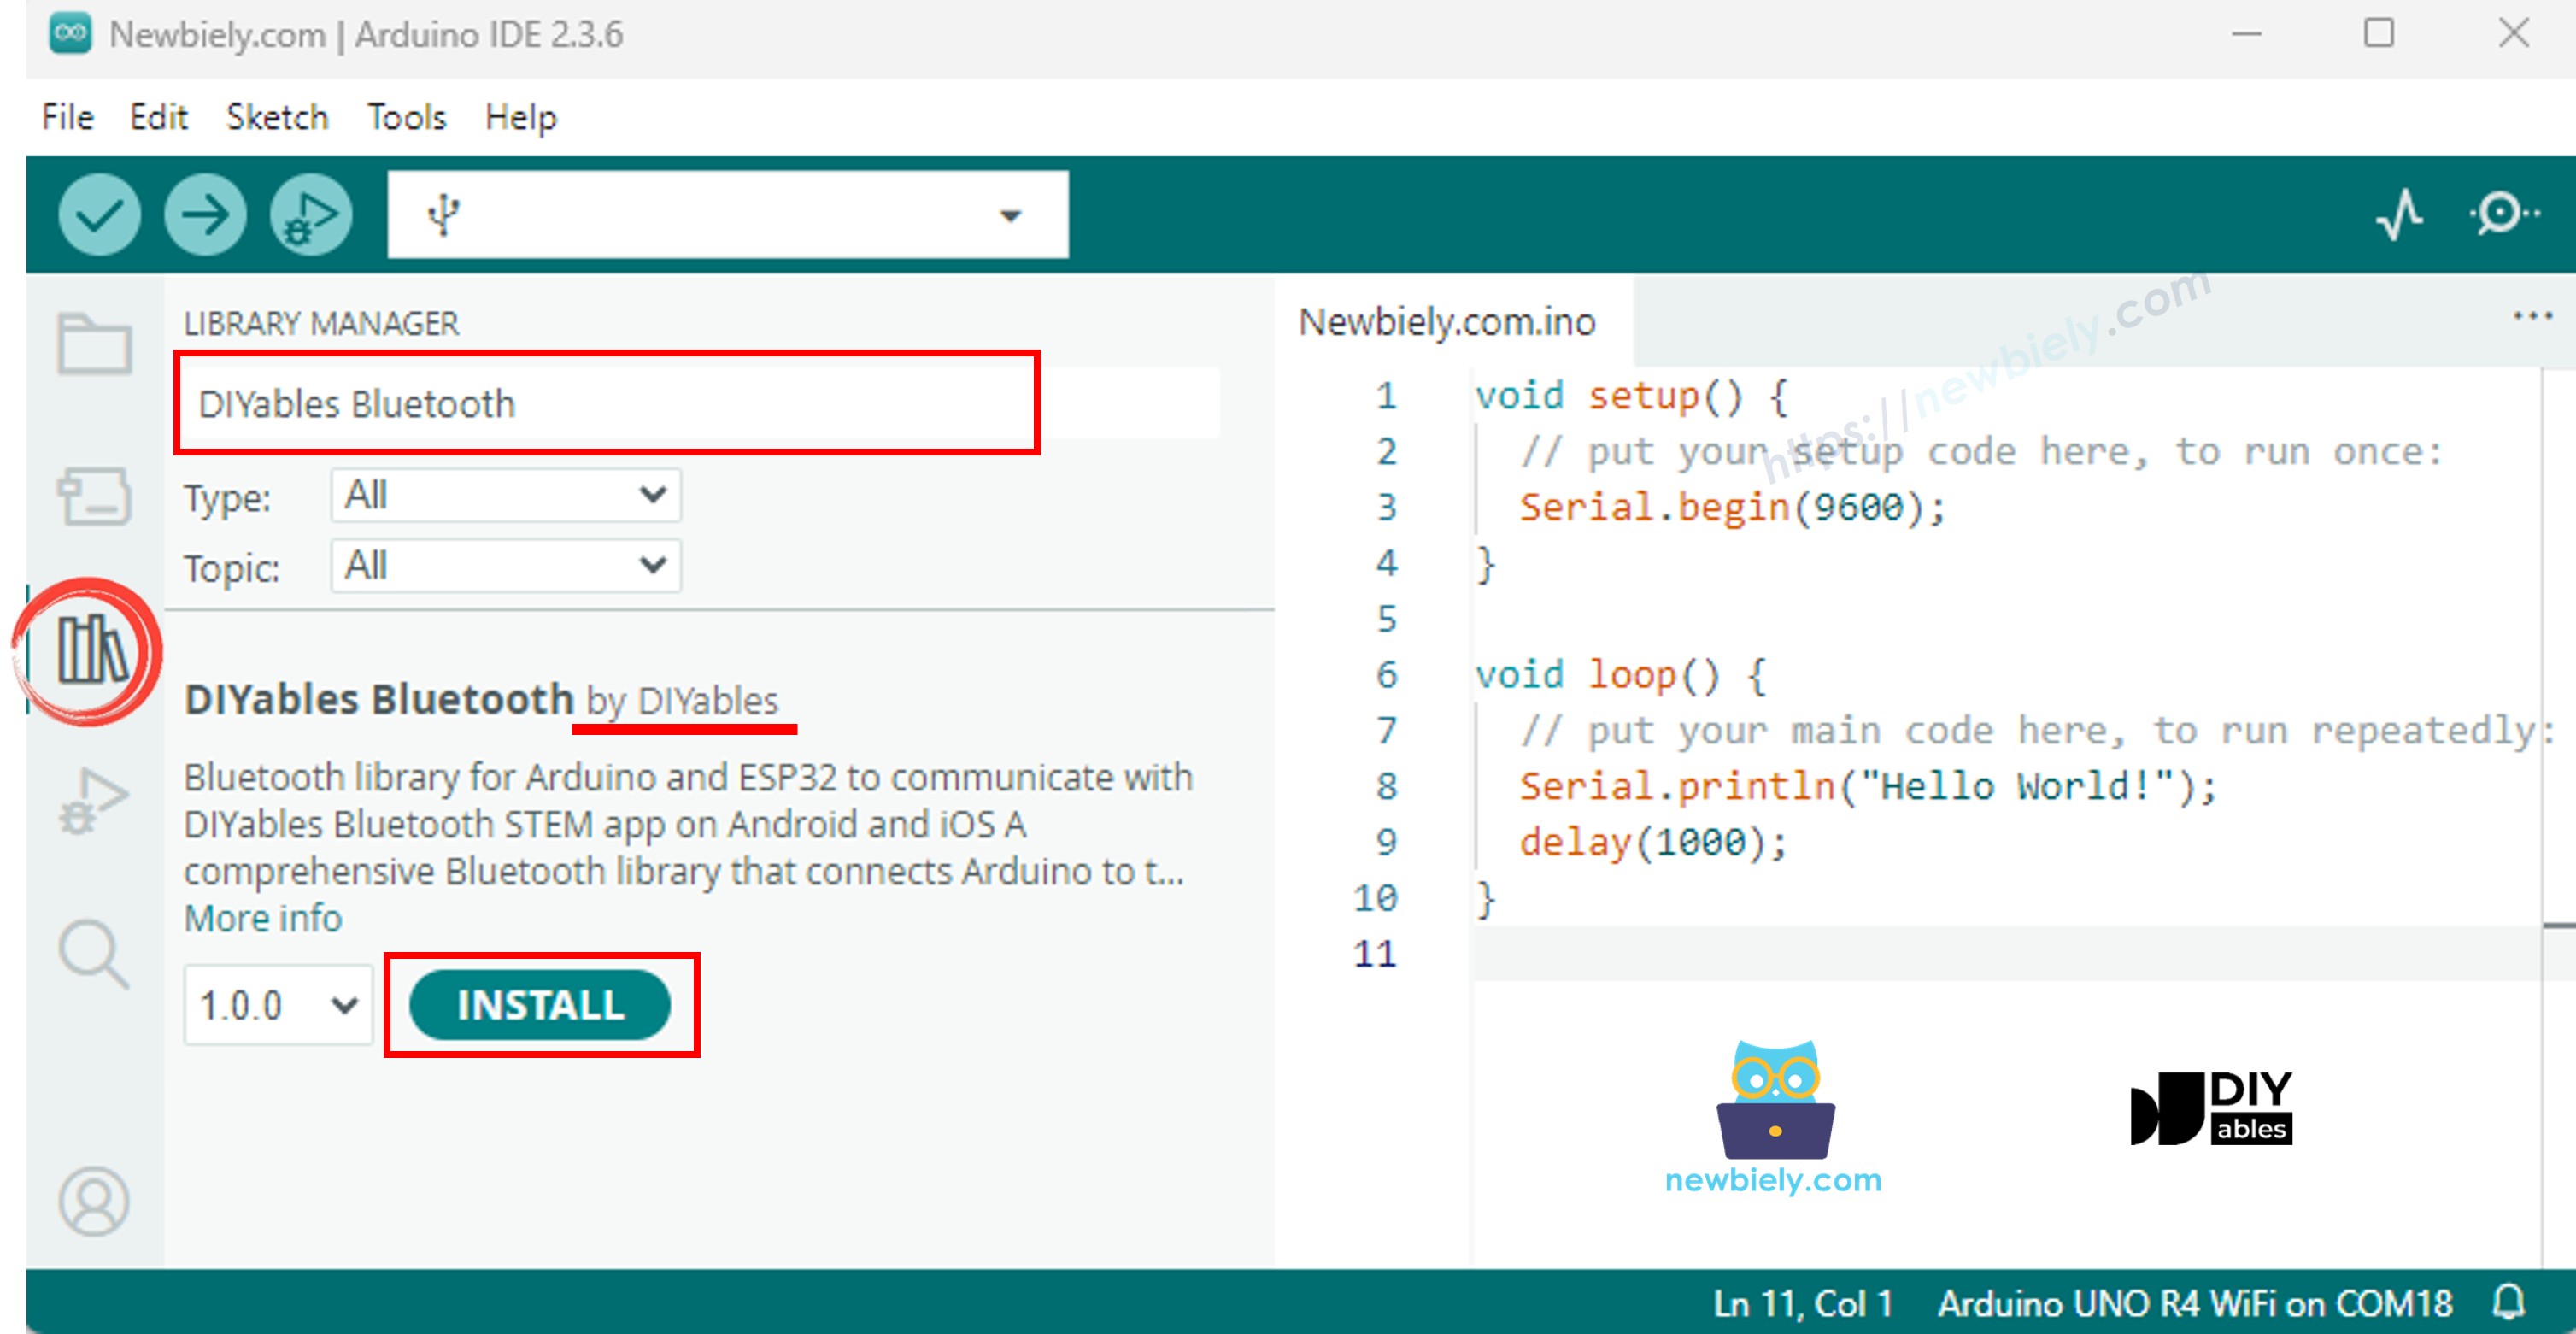
Navigeer in de linkerzijbalk van de Arduino IDE naar het Libraries-icoon.
Zoek op "DIYables Bluetooth" en vind de DIYables Bluetooth bibliotheek van DIYables.
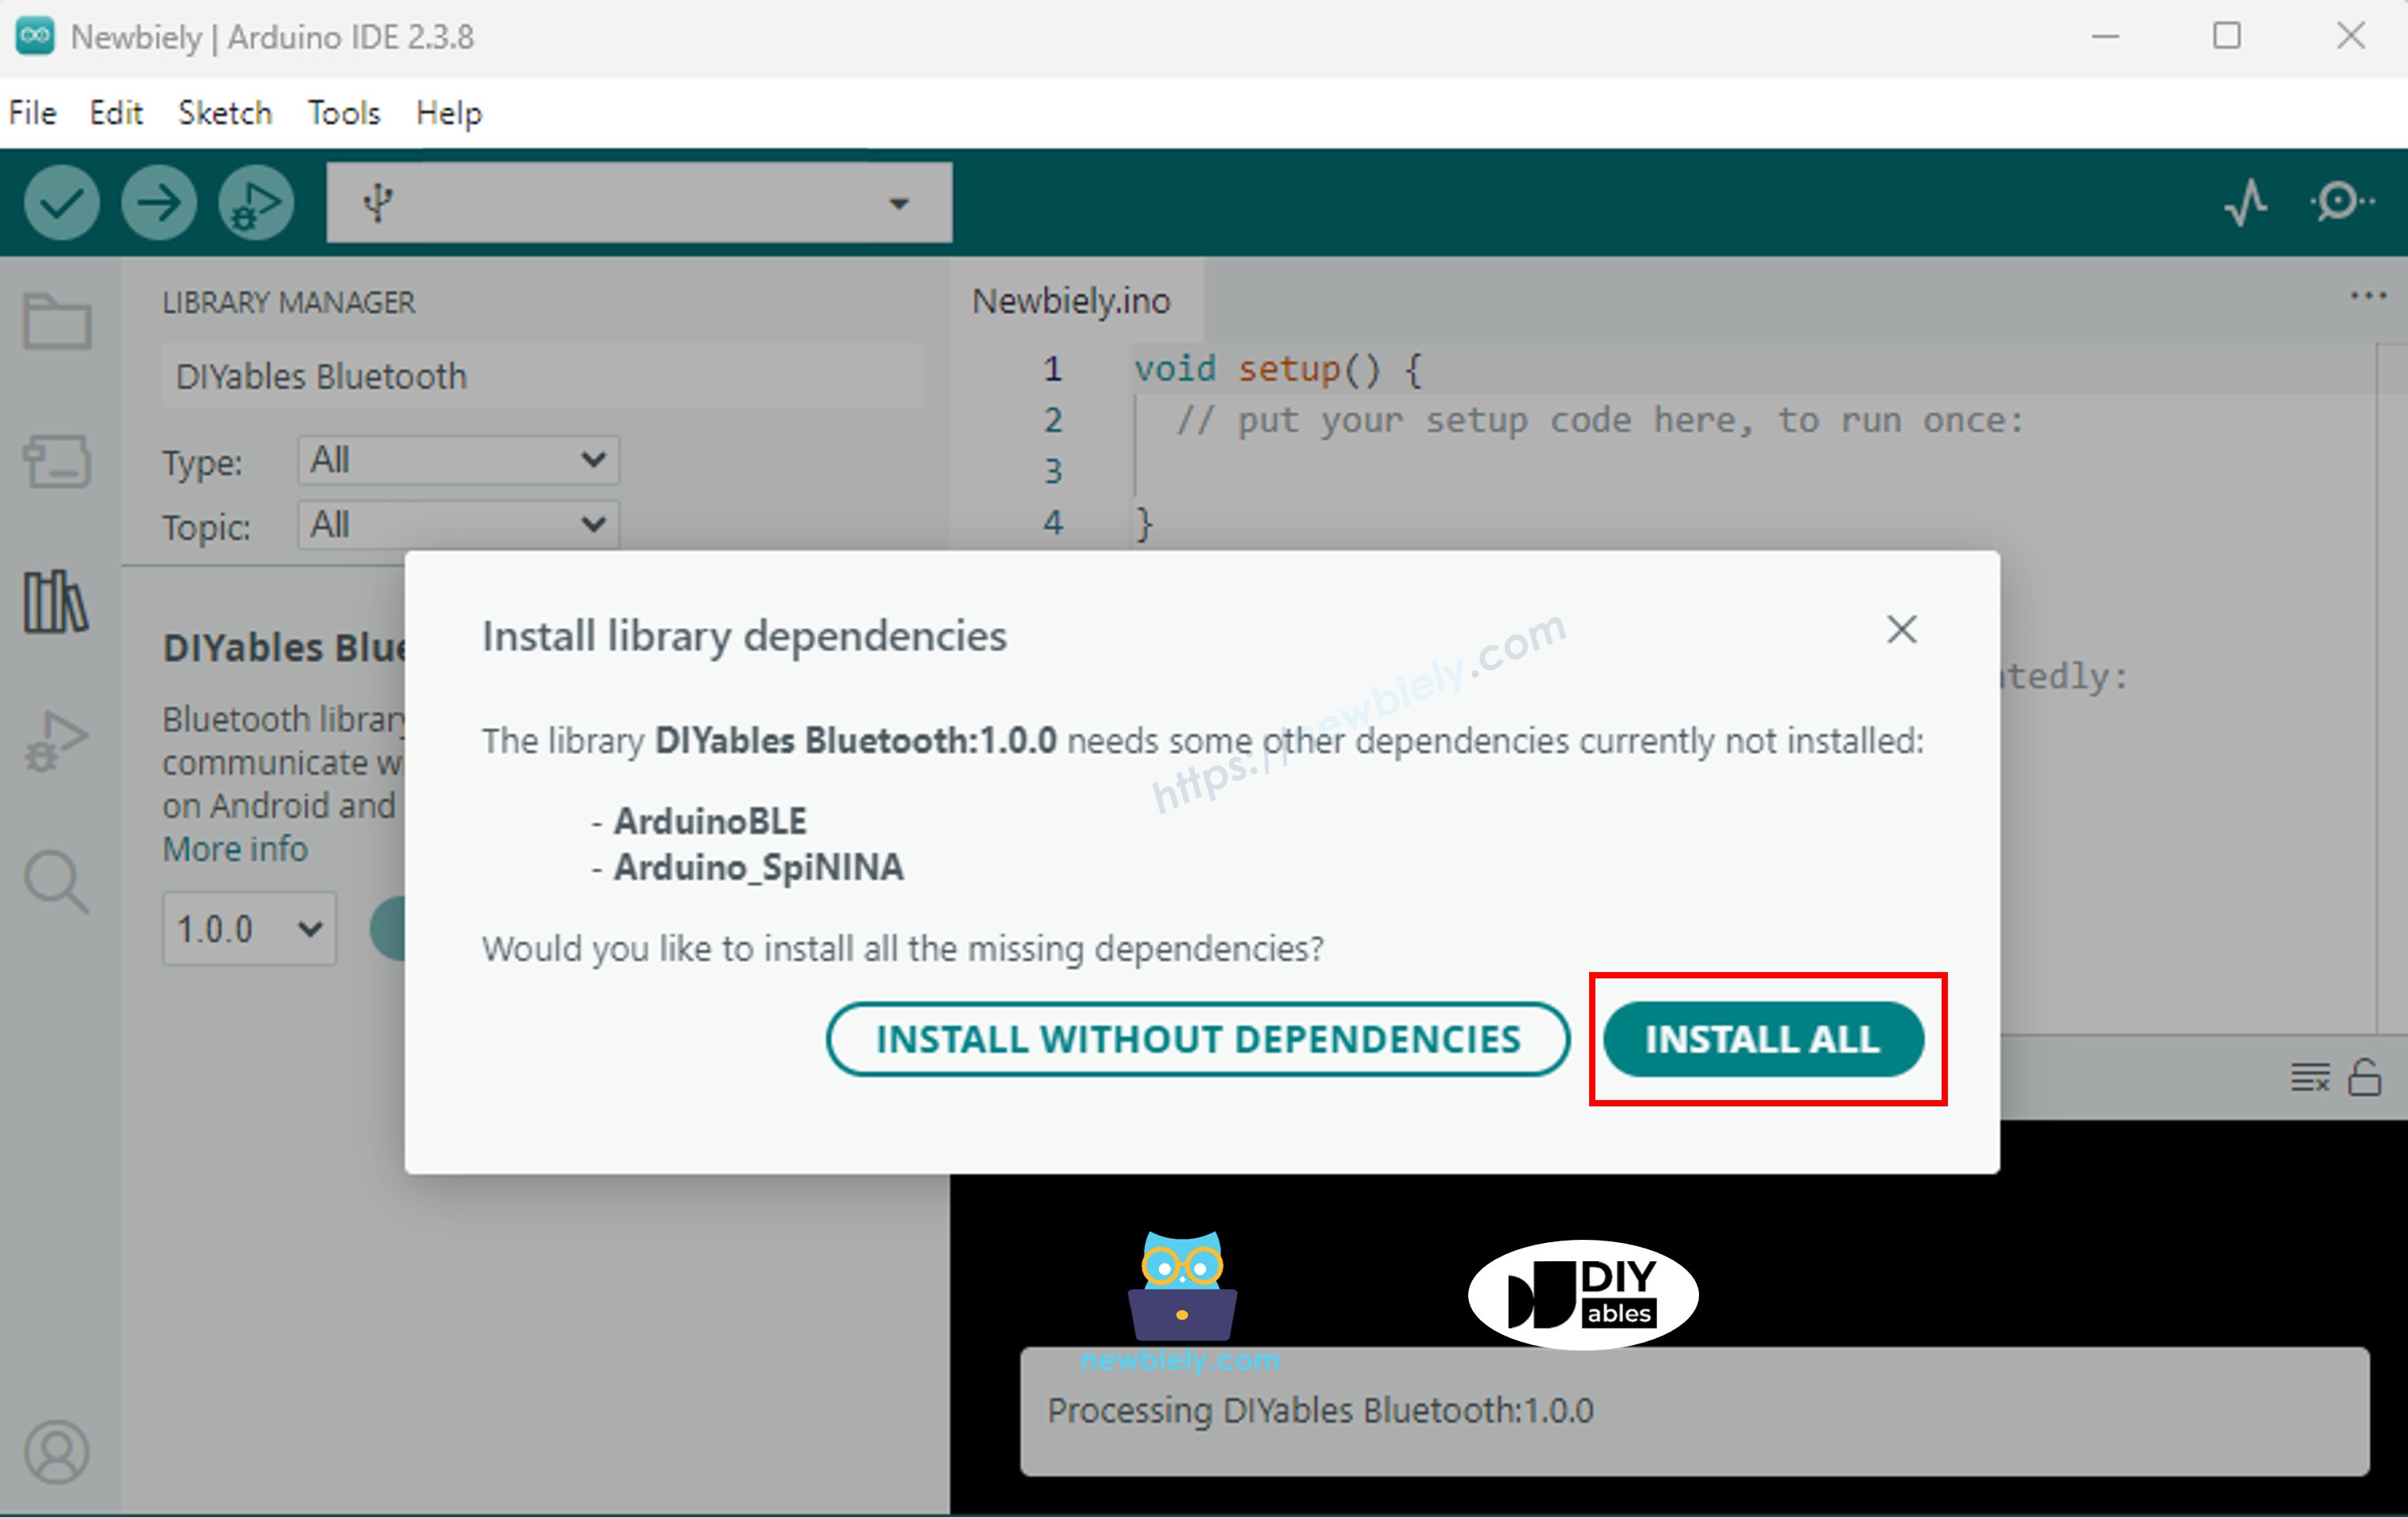
Klik op de Installeren-knop om de bibliotheek te installeren.
Kies een van de twee Bluetooth modi hieronder, afhankelijk van uw behoeften:
Let op: Classic Bluetooth wordt NIET ondersteund op iOS. Heeft u iOS-ondersteuning nodig, gebruik dan de BLE-code hieronder.
#include <DIYables_BluetoothServer.h>
#include <DIYables_BluetoothMonitor.h>
#include <platforms/DIYables_Esp32Bluetooth.h>
DIYables_Esp32Bluetooth bluetooth("ESP32_Monitor");
DIYables_BluetoothServer bluetoothServer(bluetooth);
DIYables_BluetoothMonitor bluetoothMonitor;
unsigned long lastUpdate = 0;
const unsigned long UPDATE_INTERVAL = 3000;
int messageCount = 0;
bool ledState = false;
const int LED_PIN = 2;
void setup() {
Serial.begin(115200);
delay(1000);
Serial.println("DIYables Bluetooth - ESP32 Monitor Example");
pinMode(LED_PIN, OUTPUT);
digitalWrite(LED_PIN, LOW);
bluetoothServer.begin();
bluetoothServer.addApp(&bluetoothMonitor);
bluetoothServer.setOnConnected([]() {
Serial.println("Bluetooth connected!");
bluetoothMonitor.send("=== ESP32 Monitor Connected ===");
bluetoothMonitor.send("System Ready");
bluetoothMonitor.send("Type HELP for available commands");
bluetoothMonitor.send("");
});
bluetoothServer.setOnDisconnected([]() {
Serial.println("Bluetooth disconnected!");
});
bluetoothMonitor.onMonitorMessage([](const String& message) {
Serial.print("Received command: ");
Serial.println(message);
handleCommand(message);
});
Serial.println("Waiting for Bluetooth connection...");
}
void handleCommand(const String& cmd) {
if (cmd == "HELP") {
bluetoothMonitor.send("Available Commands:");
bluetoothMonitor.send(" LED_ON - Turn LED on");
bluetoothMonitor.send(" LED_OFF - Turn LED off");
bluetoothMonitor.send(" STATUS - Show system status");
bluetoothMonitor.send(" HEAP - Show memory info");
bluetoothMonitor.send(" CLEAR - Clear monitor (if supported)");
bluetoothMonitor.send(" HELP - Show this help");
}
else if (cmd == "LED_ON") {
digitalWrite(LED_PIN, HIGH);
ledState = true;
bluetoothMonitor.send("✓ LED turned ON");
}
else if (cmd == "LED_OFF") {
digitalWrite(LED_PIN, LOW);
ledState = false;
bluetoothMonitor.send("✓ LED turned OFF");
}
else if (cmd == "STATUS") {
showStatus();
}
else if (cmd == "HEAP") {
bluetoothMonitor.send("=== Memory Info ===");
bluetoothMonitor.send("Free Heap: " + String(ESP.getFreeHeap()) + " bytes");
bluetoothMonitor.send("Min Free Heap: " + String(ESP.getMinFreeHeap()) + " bytes");
bluetoothMonitor.send("Heap Size: " + String(ESP.getHeapSize()) + " bytes");
bluetoothMonitor.send("===================");
}
else if (cmd == "CLEAR") {
bluetoothMonitor.send("");
}
else {
bluetoothMonitor.send("✗ Unknown command: " + cmd);
bluetoothMonitor.send("Type HELP for available commands");
}
}
void showStatus() {
bluetoothMonitor.send("=== System Status ===");
bluetoothMonitor.send("LED State: " + String(ledState ? "ON" : "OFF"));
unsigned long uptime = millis() / 1000;
bluetoothMonitor.send("Uptime: " + String(uptime / 3600) + "h " + String((uptime % 3600) / 60) + "m " + String(uptime % 60) + "s");
bluetoothMonitor.send("Free Heap: " + String(ESP.getFreeHeap()) + " bytes");
bluetoothMonitor.send("CPU Freq: " + String(ESP.getCpuFreqMHz()) + " MHz");
bluetoothMonitor.send("Chip Model: " + String(ESP.getChipModel()));
bluetoothMonitor.send("Messages Sent: " + String(messageCount));
bluetoothMonitor.send("====================");
}
void sendPeriodicUpdate() {
messageCount++;
if (messageCount % 3 == 0) {
bluetoothMonitor.send("[INFO] Heartbeat #" + String(messageCount));
}
else if (messageCount % 5 == 0) {
bluetoothMonitor.send("[HEAP] Free: " + String(ESP.getFreeHeap()) + " bytes");
}
else {
bluetoothMonitor.send("[TIME] Uptime: " + String(millis() / 1000) + "s");
}
Serial.print("Sent update #");
Serial.println(messageCount);
}
void loop() {
bluetoothServer.loop();
if (bluetooth.isConnected() && millis() - lastUpdate >= UPDATE_INTERVAL) {
lastUpdate = millis();
sendPeriodicUpdate();
}
delay(10);
}
DIYables Bluetooth - ESP32 Monitor Example
Waiting for Bluetooth connection...
#include <DIYables_BluetoothServer.h>
#include <DIYables_BluetoothMonitor.h>
#include <platforms/DIYables_Esp32BLE.h>
const char* DEVICE_NAME = "ESP32BLE_Monitor";
const char* SERVICE_UUID = "19B10000-E8F2-537E-4F6C-D104768A1214";
const char* TX_UUID = "19B10001-E8F2-537E-4F6C-D104768A1214";
const char* RX_UUID = "19B10002-E8F2-537E-4F6C-D104768A1214";
DIYables_Esp32BLE bluetooth(DEVICE_NAME, SERVICE_UUID, TX_UUID, RX_UUID);
DIYables_BluetoothServer bluetoothServer(bluetooth);
DIYables_BluetoothMonitor bluetoothMonitor;
unsigned long lastUpdate = 0;
const unsigned long UPDATE_INTERVAL = 3000;
int messageCount = 0;
bool ledState = false;
void setup() {
Serial.begin(115200);
delay(1000);
Serial.println("DIYables Bluetooth - ESP32 BLE Monitor Example");
pinMode(2, OUTPUT);
digitalWrite(2, LOW);
bluetoothServer.begin();
bluetoothServer.addApp(&bluetoothMonitor);
bluetoothServer.setOnConnected([]() {
Serial.println("Bluetooth connected!");
bluetoothMonitor.send("=== ESP32 BLE Monitor Connected ===");
bluetoothMonitor.send("System Ready");
bluetoothMonitor.send("Type HELP for available commands");
bluetoothMonitor.send("");
});
bluetoothServer.setOnDisconnected([]() {
Serial.println("Bluetooth disconnected!");
});
bluetoothMonitor.onMonitorMessage([](const String& message) {
Serial.print("Received command: ");
Serial.println(message);
handleCommand(message);
});
Serial.println("Waiting for Bluetooth connection...");
}
void handleCommand(const String& cmd) {
if (cmd == "HELP") {
bluetoothMonitor.send("Available Commands:");
bluetoothMonitor.send(" LED_ON - Turn LED on");
bluetoothMonitor.send(" LED_OFF - Turn LED off");
bluetoothMonitor.send(" STATUS - Show system status");
bluetoothMonitor.send(" HEAP - Show free heap memory");
bluetoothMonitor.send(" HELP - Show this help");
}
else if (cmd == "LED_ON") {
digitalWrite(2, HIGH);
ledState = true;
bluetoothMonitor.send("LED turned ON");
}
else if (cmd == "LED_OFF") {
digitalWrite(2, LOW);
ledState = false;
bluetoothMonitor.send("LED turned OFF");
}
else if (cmd == "STATUS") {
showStatus();
}
else if (cmd == "HEAP") {
bluetoothMonitor.send("Free heap: " + String(ESP.getFreeHeap()) + " bytes");
}
else {
bluetoothMonitor.send("Unknown command: " + cmd);
bluetoothMonitor.send("Type HELP for available commands");
}
}
void showStatus() {
bluetoothMonitor.send("=== System Status ===");
bluetoothMonitor.send("LED State: " + String(ledState ? "ON" : "OFF"));
unsigned long uptime = millis() / 1000;
bluetoothMonitor.send("Uptime: " + String(uptime / 3600) + "h " + String((uptime % 3600) / 60) + "m " + String(uptime % 60) + "s");
bluetoothMonitor.send("Free Heap: " + String(ESP.getFreeHeap()) + " bytes");
bluetoothMonitor.send("Messages Sent: " + String(messageCount));
bluetoothMonitor.send("====================");
}
void sendPeriodicUpdate() {
messageCount++;
if (messageCount % 3 == 0) {
bluetoothMonitor.send("[INFO] Heartbeat #" + String(messageCount));
}
else if (messageCount % 5 == 0) {
bluetoothMonitor.send("[HEAP] Free: " + String(ESP.getFreeHeap()) + " bytes");
}
else {
bluetoothMonitor.send("[TIME] Uptime: " + String(millis() / 1000) + "s");
}
Serial.print("Sent update #");
Serial.println(messageCount);
}
void loop() {
bluetoothServer.loop();
if (bluetooth.isConnected() && millis() - lastUpdate >= UPDATE_INTERVAL) {
lastUpdate = millis();
sendPeriodicUpdate();
}
delay(10);
}
DIYables Bluetooth - ESP32 BLE Monitor Example
Waiting for Bluetooth connection...
Installeer de DIYables Bluetooth App op uw smartphone:
Android |
iOS
Als u de ESP32 Classic Bluetooth code gebruikt, moet u de ESP32 koppelen met uw Android-telefoon voordat u de app opent:
Ga naar de Instellingen > Bluetooth van uw telefoon
Zorg dat Bluetooth is ingeschakeld
Uw telefoon zoekt naar beschikbare apparaten
Zoek en tik op "ESP32_Monitor" in de lijst met beschikbare apparaten
Bevestig het koppelingsverzoek (geen pincode nodig)
Wacht tot er "Gekoppeld" onder de apparaattnaam verschijnt
Gebruikt u de ESP32 BLE code, dan is koppelen niet nodig. Ga gewoon door met de volgende stap.
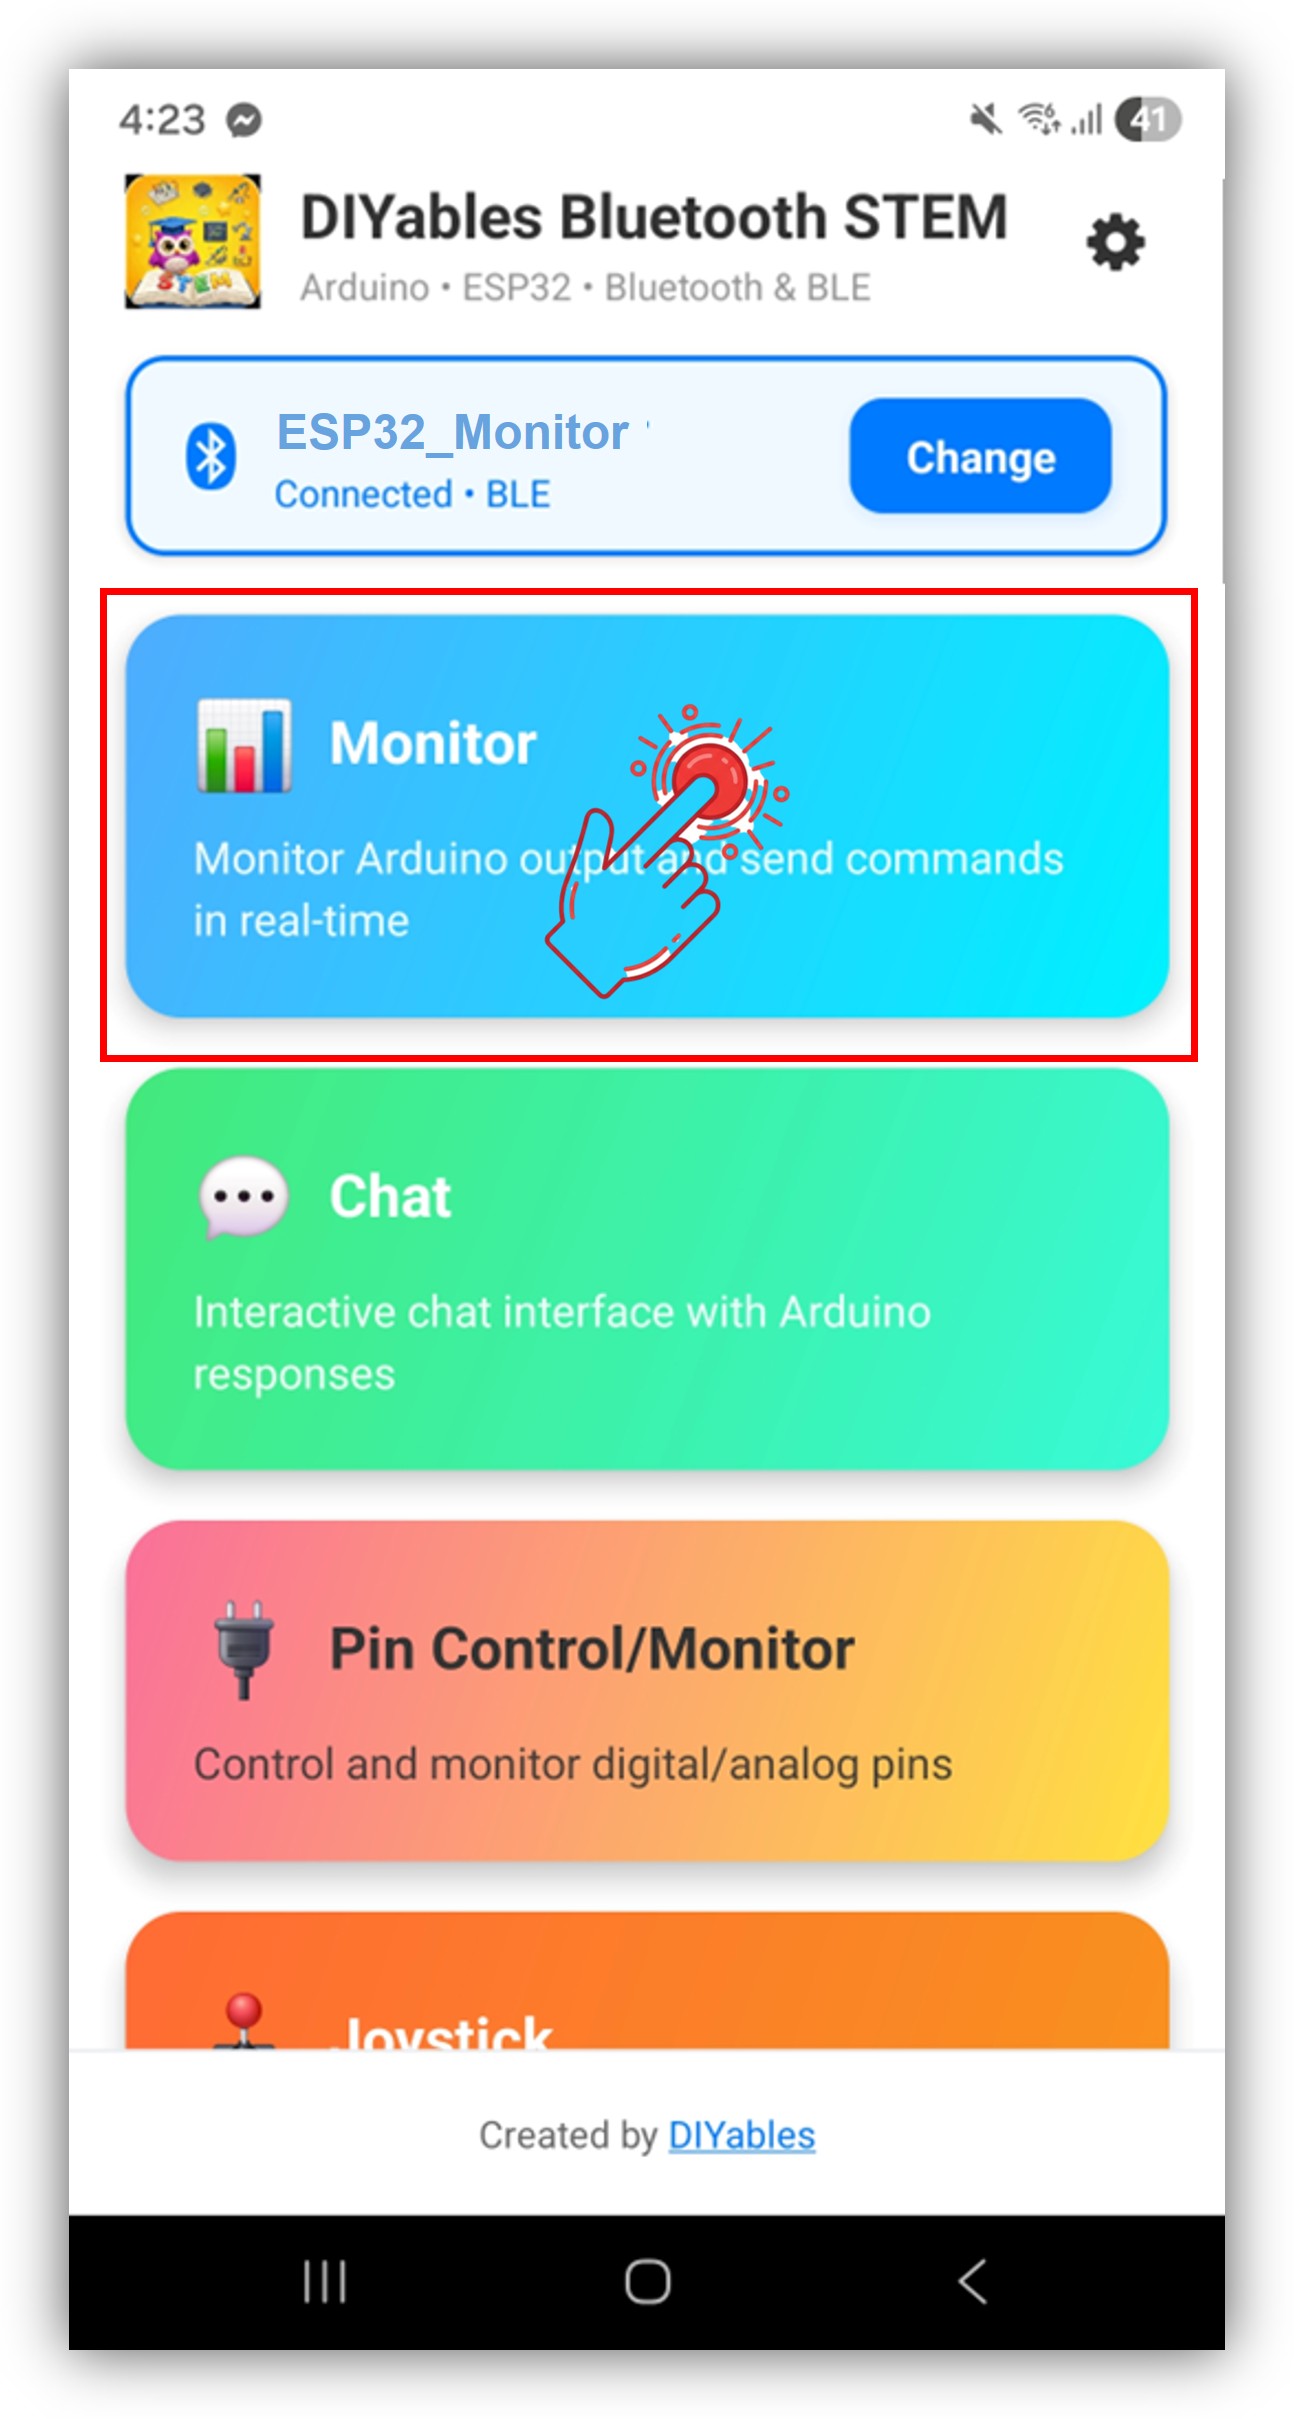
Open de DIYables Bluetooth App
Bij de eerste keer openen vraagt de app om permissies. Verleen alstublieft:
Nabije apparaten toestemming (Android 12+) / Bluetooth toestemming (iOS) - nodig om te scannen en verbinding te maken met Bluetooth-apparaten
Locatie toestemming (Android 11 en lager) - vereist door oudere Android-versies voor BLE-scanning
Zorg dat Bluetooth aan staat op uw telefoon
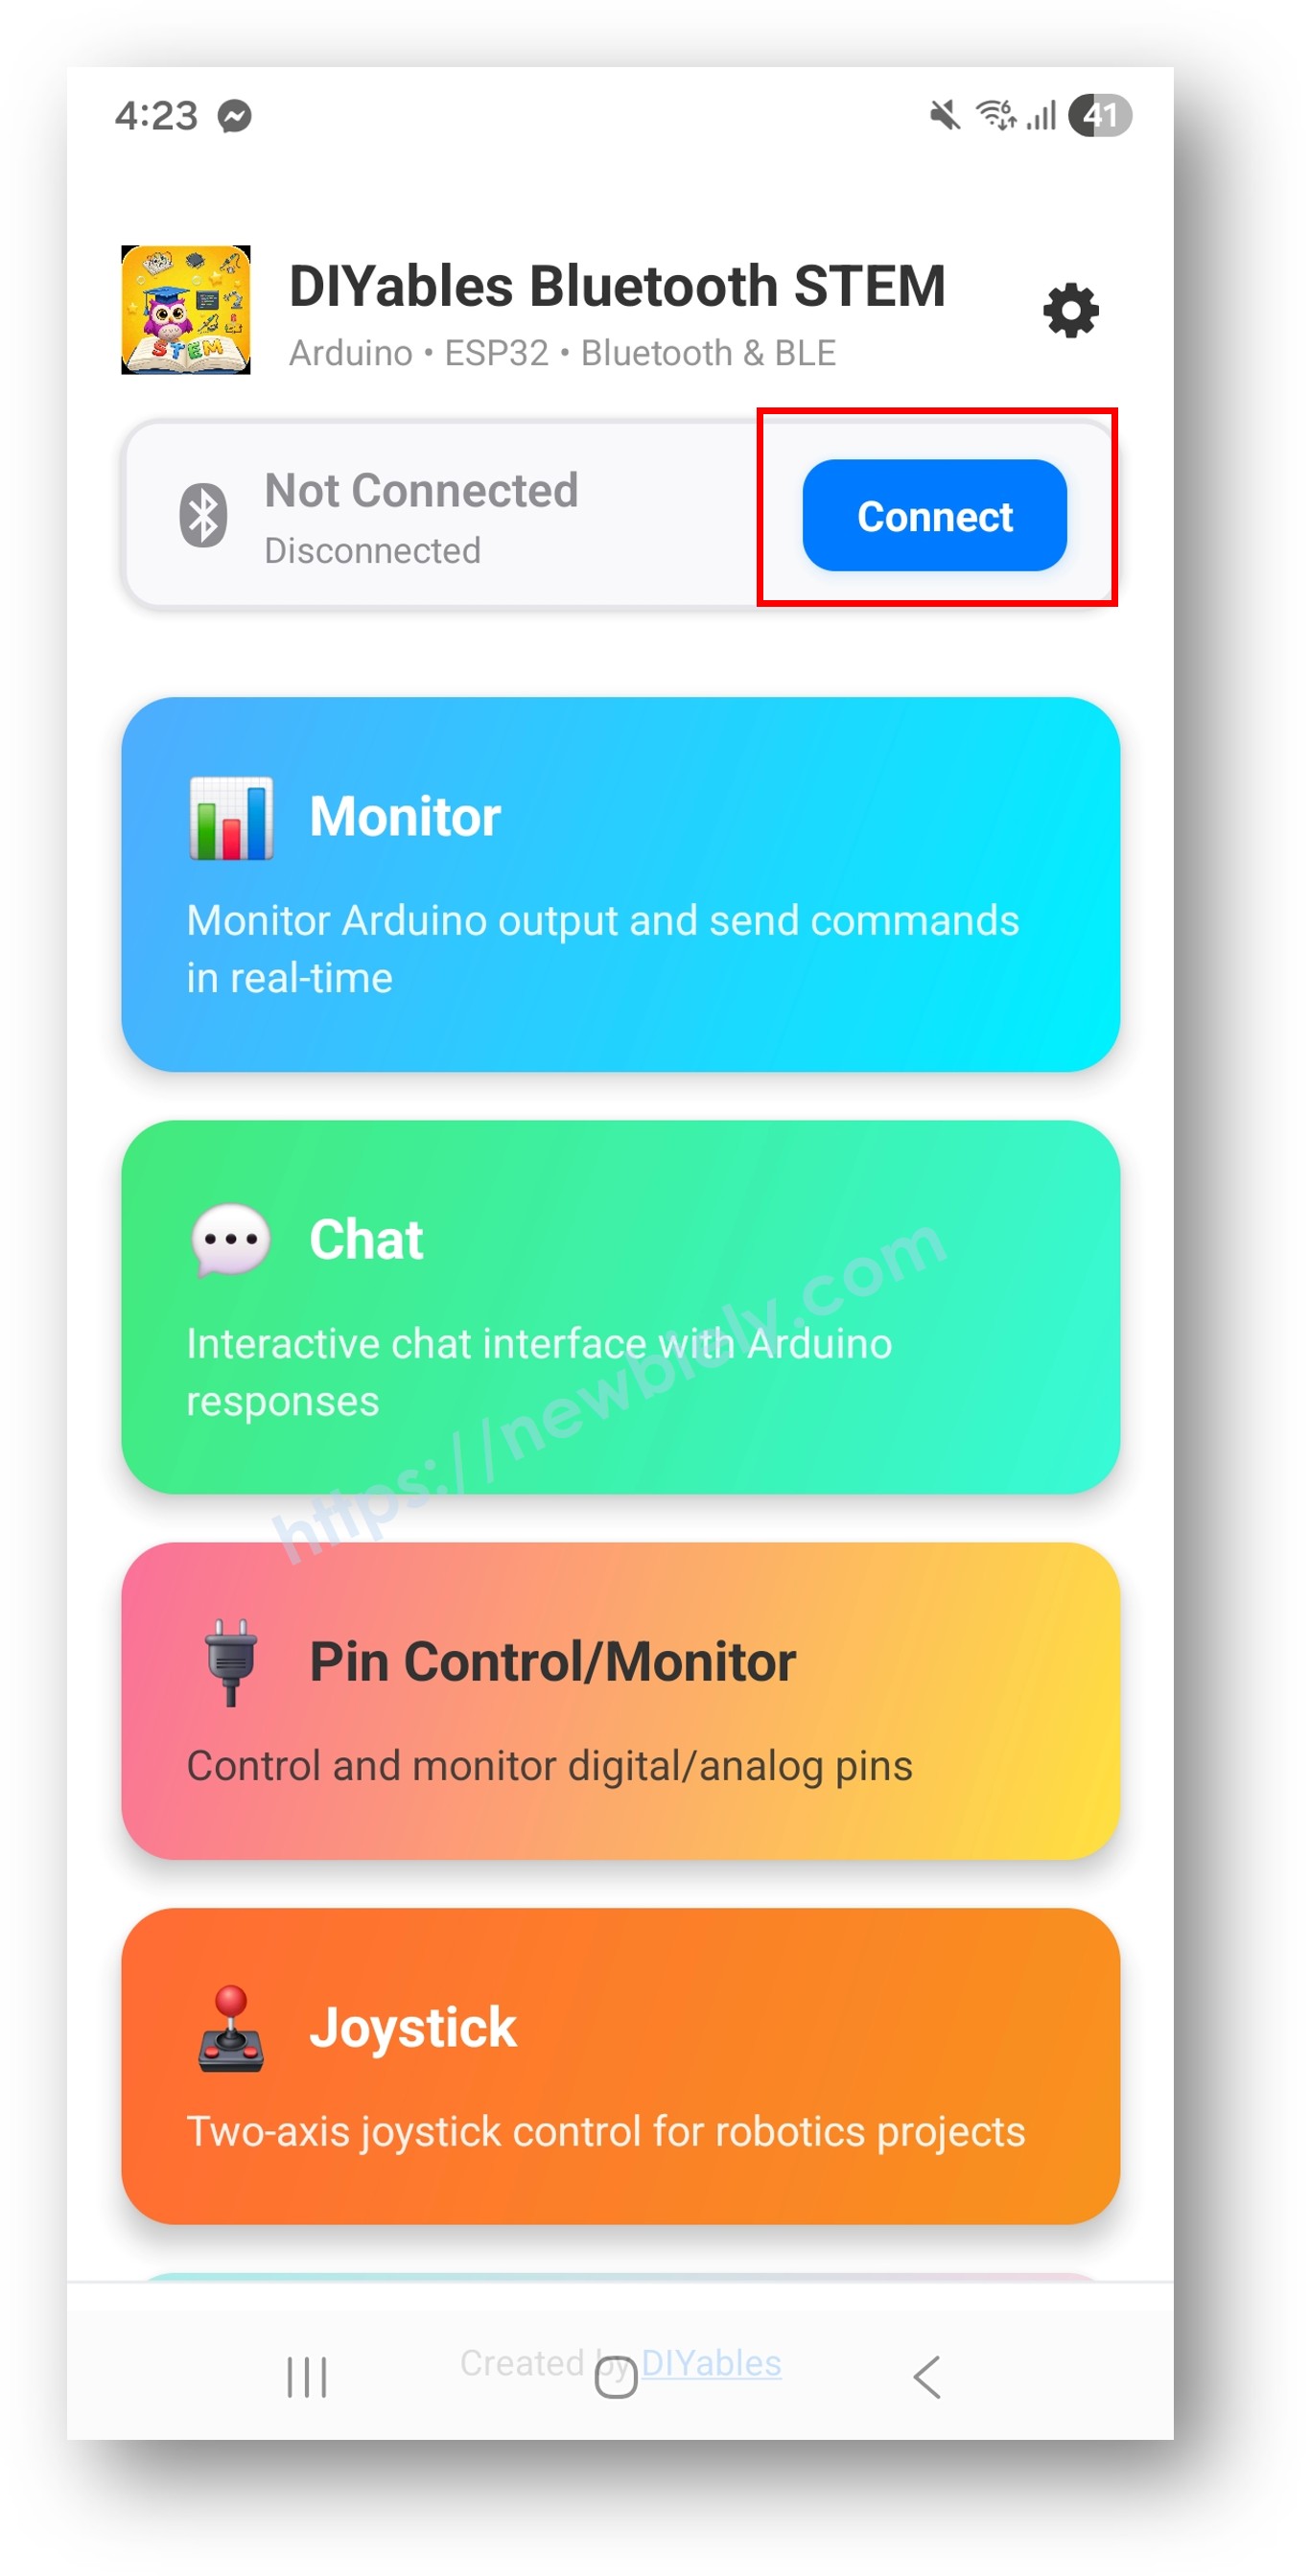
Tik op het startscherm op de Verbinden-knop. De app zoekt naar BLE en Classic Bluetooth apparaten.
Let op: U kunt op het instellingenicoon op het startscherm tikken om apps te verbergen/tonen op het startscherm. Voor meer informatie, zie de DIYables Bluetooth App Gebruikershandleiding.
Kijk nu opnieuw naar de Seriële Monitor in de Arduino IDE. U ziet:
Bluetooth connected!
Sent update #1
Sent update #2
Received command: HELP
Received command: STATUS
Typ commando’s in de app (HELP, STATUS, LED_ON, LED_OFF, HEAP) en observeer de reacties
Gebruik de send() methode om tekstberichten naar het monitor-scherm te streamen:
bluetoothMonitor.send("System initialized");
bluetoothMonitor.send("Sensor reading: 25.3°C");
bluetoothMonitor.send("[INFO] Heartbeat #" + String(count));
bluetoothMonitor.send("[WARN] Temperature high: " + String(temp) + "°C");
bluetoothMonitor.send("[ERROR] Sensor disconnected");
bluetoothMonitor.send("Free Heap: " + String(ESP.getFreeHeap()) + " bytes");
bluetoothMonitor.send("Uptime: " + String(millis() / 1000) + " seconds");
Gebruik de onMonitorMessage() callback om commando’s die in de Monitor app worden getypt te ontvangen en te verwerken:
bluetoothMonitor.onMonitorMessage([](const String& message) {
Serial.print("Received command: ");
Serial.println(message);
if (message == "HELP") {
bluetoothMonitor.send("Available Commands:");
bluetoothMonitor.send(" LED_ON - Turn LED on");
bluetoothMonitor.send(" LED_OFF - Turn LED off");
bluetoothMonitor.send(" STATUS - Show system status");
bluetoothMonitor.send(" HEAP - Show memory info");
} else if (message == "LED_ON") {
digitalWrite(LED_BUILTIN, HIGH);
bluetoothMonitor.send("LED turned ON");
} else if (message == "LED_OFF") {
digitalWrite(LED_BUILTIN, LOW);
bluetoothMonitor.send("LED turned OFF");
} else if (message == "STATUS") {
bluetoothMonitor.send("System is running normally");
bluetoothMonitor.send("Uptime: " + String(millis() / 1000) + "s");
} else if (message == "HEAP") {
bluetoothMonitor.send("Free Heap: " + String(ESP.getFreeHeap()) + " bytes");
} else {
bluetoothMonitor.send("Unknown command: " + message);
}
});
U kunt zo veel aangepaste commando’s toevoegen als u wilt door meer else if blokken toe te voegen. Voeg bijvoorbeeld RELAY_ON / RELAY_OFF toe om een relais te bedienen, of READ om een sensorwaarde op te vragen — elk woord dat u in de app typt wordt een commando.
U kunt detecteren wanneer de app verbinding maakt of verbreekt met de ESP32:
bluetoothServer.setOnConnected([]() {
Serial.println("Bluetooth connected!");
bluetoothMonitor.send("=== ESP32 Monitor Connected ===");
bluetoothMonitor.send("System Ready");
bluetoothMonitor.send("Type HELP for available commands");
});
bluetoothServer.setOnDisconnected([]() {
Serial.println("Bluetooth disconnected!");
});
if (bluetoothServer.isConnected()) {
bluetoothMonitor.send("Status update");
}
De monitorinterface in de DIYables Bluetooth App biedt:
Berichtweergave: Scrollbare lijst van ontvangen berichten met auto-scroll
Tekstinvoer: Typ commando’s onderaan
Verzendknop: Tik om het getypte commando naar de ESP32 te sturen
De voorbeeldcode bevat deze ingebouwde commando’s:
HELP ? Toont alle beschikbare commando’s
LED_ON ? Zet de ingebouwde LED aan
LED_OFF ? Zet de ingebouwde LED uit
STATUS ? Toont systeemstatus (LED status, uptime, heap, verzonden berichten)
HEAP ? Toont gedetailleerde geheugeninformatie
unsigned long lastUpdate = 0;
const unsigned long UPDATE_INTERVAL = 3000;
int messageCount = 0;
void loop() {
bluetoothServer.loop();
if (bluetooth.isConnected() && millis() - lastUpdate >= UPDATE_INTERVAL) {
lastUpdate = millis();
messageCount++;
if (messageCount % 3 == 0) {
bluetoothMonitor.send("[INFO] Heartbeat #" + String(messageCount));
} else if (messageCount % 5 == 0) {
bluetoothMonitor.send("[HEAP] Free: " + String(ESP.getFreeHeap()) + " bytes");
} else {
bluetoothMonitor.send("[TIME] Uptime: " + String(millis() / 1000) + "s");
}
}
delay(10);
}
#include <DHT.h>
DHT dht(4, DHT22);
unsigned long lastSensorRead = 0;
const unsigned long SENSOR_INTERVAL = 5000;
void setup() {
dht.begin();
bluetoothMonitor.onMonitorMessage([](const String& message) {
if (message == "READ") {
readAndSendSensorData();
} else if (message == "INTERVAL") {
bluetoothMonitor.send("Sensor interval: " + String(SENSOR_INTERVAL / 1000) + "s");
}
});
}
void readAndSendSensorData() {
float temp = dht.readTemperature();
float hum = dht.readHumidity();
if (!isnan(temp) && !isnan(hum)) {
bluetoothMonitor.send("Temp: " + String(temp, 1) + "°C | Humidity: " + String(hum, 1) + "%");
} else {
bluetoothMonitor.send("[ERROR] Failed to read sensor");
}
}
void loop() {
bluetoothServer.loop();
if (bluetooth.isConnected() && millis() - lastSensorRead >= SENSOR_INTERVAL) {
lastSensorRead = millis();
readAndSendSensorData();
}
delay(10);
}
void sendDashboard() {
bluetoothMonitor.send("========== DASHBOARD ==========");
bluetoothMonitor.send("Temp: " + String(readTemperature(), 1) + "°C");
bluetoothMonitor.send("Humidity: " + String(readHumidity(), 0) + "%");
bluetoothMonitor.send("Light: " + String(analogRead(34)));
bluetoothMonitor.send("Battery: " + String(readBatteryVoltage(), 2) + "V");
bluetoothMonitor.send("Heap: " + String(ESP.getFreeHeap()) + " bytes");
unsigned long uptime = millis() / 1000;
bluetoothMonitor.send("Uptime: " + String(uptime / 3600) + "h " +
String((uptime % 3600) / 60) + "m " +
String(uptime % 60) + "s");
bluetoothMonitor.send("===============================");
}
const int MONITOR_PINS[] = {16, 17, 18, 19, 21, 22};
const int NUM_PINS = 6;
int lastPinStates[6] = {0};
void setup() {
for (int i = 0; i < NUM_PINS; i++) {
pinMode(MONITOR_PINS[i], INPUT_PULLUP);
lastPinStates[i] = digitalRead(MONITOR_PINS[i]);
}
bluetoothMonitor.onMonitorMessage([](const String& message) {
if (message == "PINS") {
for (int i = 0; i < NUM_PINS; i++) {
int state = digitalRead(MONITOR_PINS[i]);
bluetoothMonitor.send("Pin " + String(MONITOR_PINS[i]) + ": " +
String(state ? "HIGH" : "LOW"));
}
}
});
}
void loop() {
bluetoothServer.loop();
for (int i = 0; i < NUM_PINS; i++) {
int state = digitalRead(MONITOR_PINS[i]);
if (state != lastPinStates[i]) {
lastPinStates[i] = state;
if (bluetooth.isConnected()) {
bluetoothMonitor.send("[PIN] GPIO " + String(MONITOR_PINS[i]) +
" changed to " + String(state ? "HIGH" : "LOW"));
}
}
}
delay(10);
}
enum LogLevel { LOG_INFO, LOG_WARN, LOG_ERROR, LOG_DEBUG };
void sendLog(LogLevel level, const String& message) {
String prefix;
switch (level) {
case LOG_INFO: prefix = "[INFO] "; break;
case LOG_WARN: prefix = "[WARN] "; break;
case LOG_ERROR: prefix = "[ERROR] "; break;
case LOG_DEBUG: prefix = "[DEBUG] "; break;
}
bluetoothMonitor.send(prefix + message);
}
sendLog(LOG_INFO, "System started");
sendLog(LOG_WARN, "Battery low: " + String(voltage, 2) + "V");
sendLog(LOG_ERROR, "Sensor read failed");
sendLog(LOG_DEBUG, "Loop time: " + String(loopTime) + "ms");
int sensorInterval = 3000;
bool verboseMode = false;
bluetoothMonitor.onMonitorMessage([](const String& message) {
String cmd = message;
cmd.toUpperCase();
if (cmd.startsWith("SET INTERVAL ")) {
sensorInterval = cmd.substring(13).toInt() * 1000;
bluetoothMonitor.send("Interval set to " + String(sensorInterval / 1000) + "s");
} else if (cmd == "VERBOSE ON") {
verboseMode = true;
bluetoothMonitor.send("Verbose mode enabled");
} else if (cmd == "VERBOSE OFF") {
verboseMode = false;
bluetoothMonitor.send("Verbose mode disabled");
} else if (cmd == "CONFIG") {
bluetoothMonitor.send("Interval: " + String(sensorInterval / 1000) + "s");
bluetoothMonitor.send("Verbose: " + String(verboseMode ? "ON" : "OFF"));
}
});
unsigned long lastLoopTime = 0;
unsigned long maxLoopTime = 0;
int warningCount = 0;
void loop() {
unsigned long loopStart = millis();
bluetoothServer.loop();
performTasks();
unsigned long loopTime = millis() - loopStart;
if (loopTime > maxLoopTime) {
maxLoopTime = loopTime;
}
if (loopTime > 100) {
warningCount++;
if (bluetooth.isConnected()) {
bluetoothMonitor.send("[WARN] Slow loop: " + String(loopTime) + "ms");
}
}
delay(10);
}
| Feature | BLE (Esp32BLE_Monitor) | Classic Bluetooth (Esp32Bluetooth_Monitor) |
|---|
| iOS Support | ? Ja | ? Nee |
| Android Support | ? Ja | ? Ja |
| Power Consumption | Laag | Hoger |
| Range | ~30-100m | ~10-100m |
| Data Rate | Lagere | Hogere |
| Pairing Required | Nee (automatisch verbonden) | Ja (handmatig koppelen) |
| Best For | Op batterij werkend, cross-platform | Hoog doorvoer, enkel Android |
1. Kan het apparaat niet vinden in de app
Zorg dat de ESP32 aan staat en de sketch geüpload is
Voor BLE: Zorg dat Bluetooth en Locatie aan staan op uw telefoon
Voor Classic Bluetooth: Koppel eerst het apparaat in de Bluetooth-instellingen van uw telefoon
Controleer dat de juiste partitieschema is gekozen (Huge APP)
2. Berichten verschijnen niet in de monitor
Controleer de verbindingstatus in de app
Verifieer verbinding in de Seriële Monitor
Zorg dat berichten worden verzonden met bluetoothMonitor.send()
Probeer opnieuw verbinden door verbinding te verbreken en opnieuw te maken
3. Commando’s worden niet ontvangen
Controleer of onMonitorMessage() callback correct is ingesteld
Kijk in Seriële Monitor of de commando’s binnenkomen
Zorg dat het monitor scherm in de app is geselecteerd
4. De verbinding valt vaak weg
Ga dichter bij de ESP32 staan (verminder afstand)
Voor BLE: Let op storing door andere BLE-apparaten
Voor Classic Bluetooth: Zorg voor een stabiele voeding van de ESP32
Verminder de frequentie van de verzonden berichten als u te snel stuurt
5. Berichten zijn verstoord of worden afgekapt
Houd individuele berichten kort (minder dan 200 karakters)
Voeg kleine pauzes toe tussen snel opeenvolgende verzendingen
Controleer vrije heap (geheugen) voor bufferproblemen
6. Sketch is te groot / onvoldoende ruimte
Ga in Arduino IDE naar Extra > Partitieschema en selecteer "Huge APP (3MB No OTA/1MB SPIFFS)" of "No OTA (Large APP)"
Het standaard partitieschema biedt maar ~1,2MB voor app-code, wat te klein is voor Bluetooth-bibliotheken
Deze instelling geeft ~3MB, ten koste van de OTA (over-the-air update) partitie
Voeg uitgebreide debug-informatie toe:
void debugMonitorStatus() {
Serial.println("=== Monitor Debug ===");
Serial.println("Connected: " + String(bluetooth.isConnected()));
Serial.println("Messages sent: " + String(messageCount));
Serial.println("Free Heap: " + String(ESP.getFreeHeap()));
Serial.println("=====================");
}
Vervanging voor draadloze seriële monitor
Viewer voor sensor-data op afstand
Realtime inspectie van variabelen
Monitoring van systeemprestaties
Weerstation dataweergave
Status home-automatisering systeem
Monitoring van industriële sensoren
IoT-apparaat gezondheidsdashboard
Gebeurtenislogger met tijdstempels
Opname van sensorgegevens
Foutopvolging en waarschuwingen
Prestatieprofilering
Leer Bluetooth-communicatie
Oefen met seriële-achtige berichtgeving
Begrijp embedded systeemmonitoring
Bouw aangepaste debugtools
Gebruik Monitor voor continue output en Chat voor interactieve commando’s:
void loop() {
if (bluetooth.isConnected() && millis() - lastUpdate >= 3000) {
bluetoothMonitor.send("[SENSOR] " + String(readSensor()));
}
}
bluetoothChat.onChatMessage([](const String& message) {
if (message == "read") {
bluetoothChat.send("Value: " + String(readSensor()));
}
});
Gebruik Monitor om sliderwaarden realtime weer te geven:
bluetoothSlider.onSliderValue([](int slider1, int slider2) {
bluetoothMonitor.send("Slider1=" + String(slider1) + "% Slider2=" + String(slider2) + "%");
bluetoothMonitor.send("PWM1=" + String(map(slider1, 0, 100, 0, 255)) +
" PWM2=" + String(map(slider2, 0, 100, 0, 255)));
});
Na het beheersen van het Bluetooth Monitor voorbeeld, probeer dan:
Bluetooth Chat - Voor interactieve tweewegcommunicatie
Bluetooth Table - Voor gestructureerde dataweergave
Bluetooth Plotter - Voor grafische datavisualisatie
Meerdere Bluetooth Apps - Combineren van monitor met andere bedieningselementen