ESP32 - Stappenmotor en Endschakelaar

In deze ESP32 tutorial verkennen we het gebruik van de ESP32, een endschakelaar (limit switch), de L298N driver en een stappenmotor. Specifiek behandelen we:

Deze onderwerpen stellen u in staat om gecontroleerde en veelzijdige bewegingsapplicaties te maken met uw ESP32.

Over Stappenmotor en Endschakelaar

Als u niet bekend bent met de stappenmotor en endschakelaar (pinout, werking, programmeren, enz.), leer hier meer via de volgende tutorials:

Aansluitschema

Deze tutorial bevat ESP32 code voor twee situaties: Eén stappenmotor + één endschakelaar en één stappenmotor + twee endschakelaars.

  • Aansluitschema tussen de stappenmotor en één endschakelaar
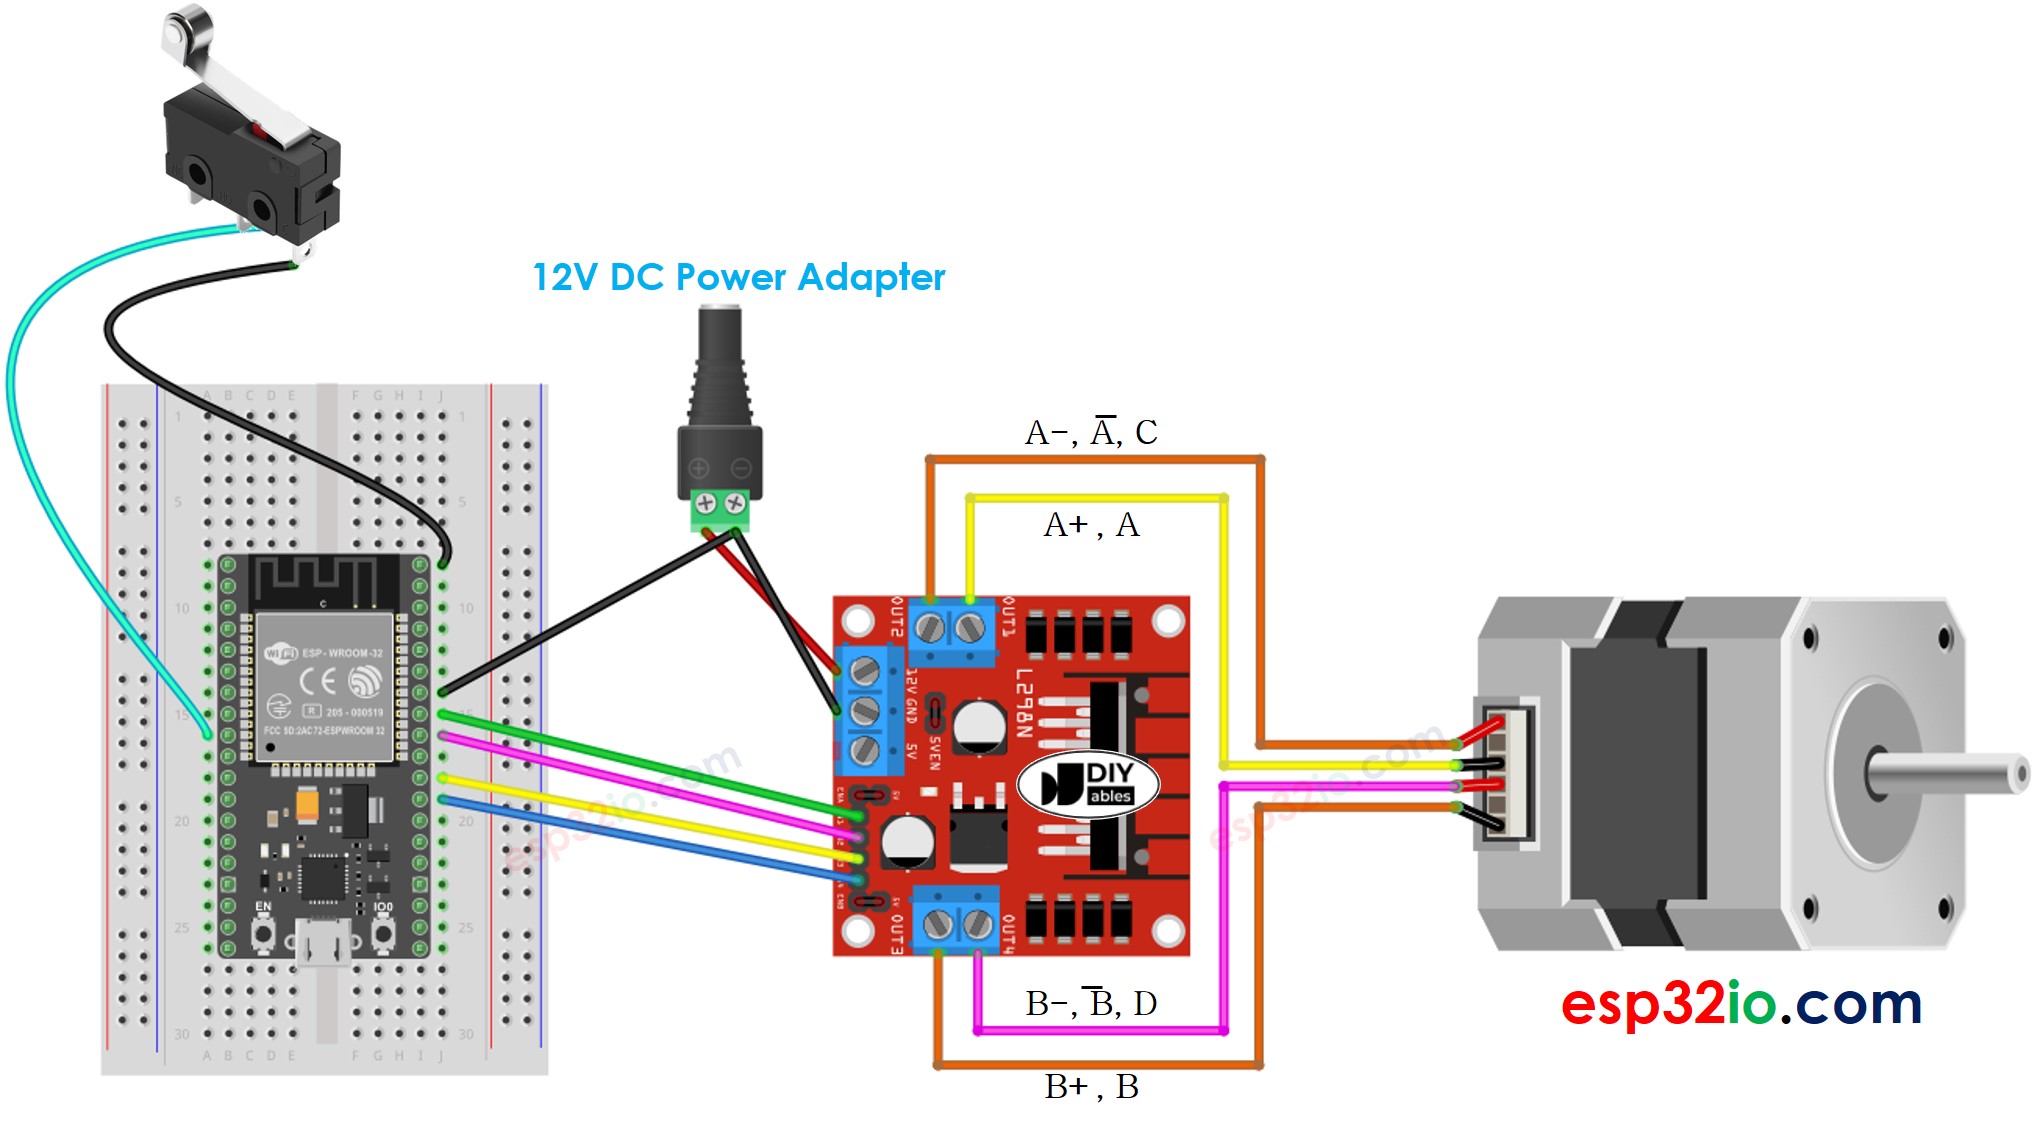
ESP32 stappenmotor en endschakelaar aansluitschema

This image is created using Fritzing. Click to enlarge image

Als u niet weet hoe u ESP32 en andere componenten van stroom moet voorzien, vindt u instructies in de volgende tutorial: Hoe ESP32 van stroom te voorzien.

  • Aansluitschema tussen de stappenmotor en twee endschakelaars
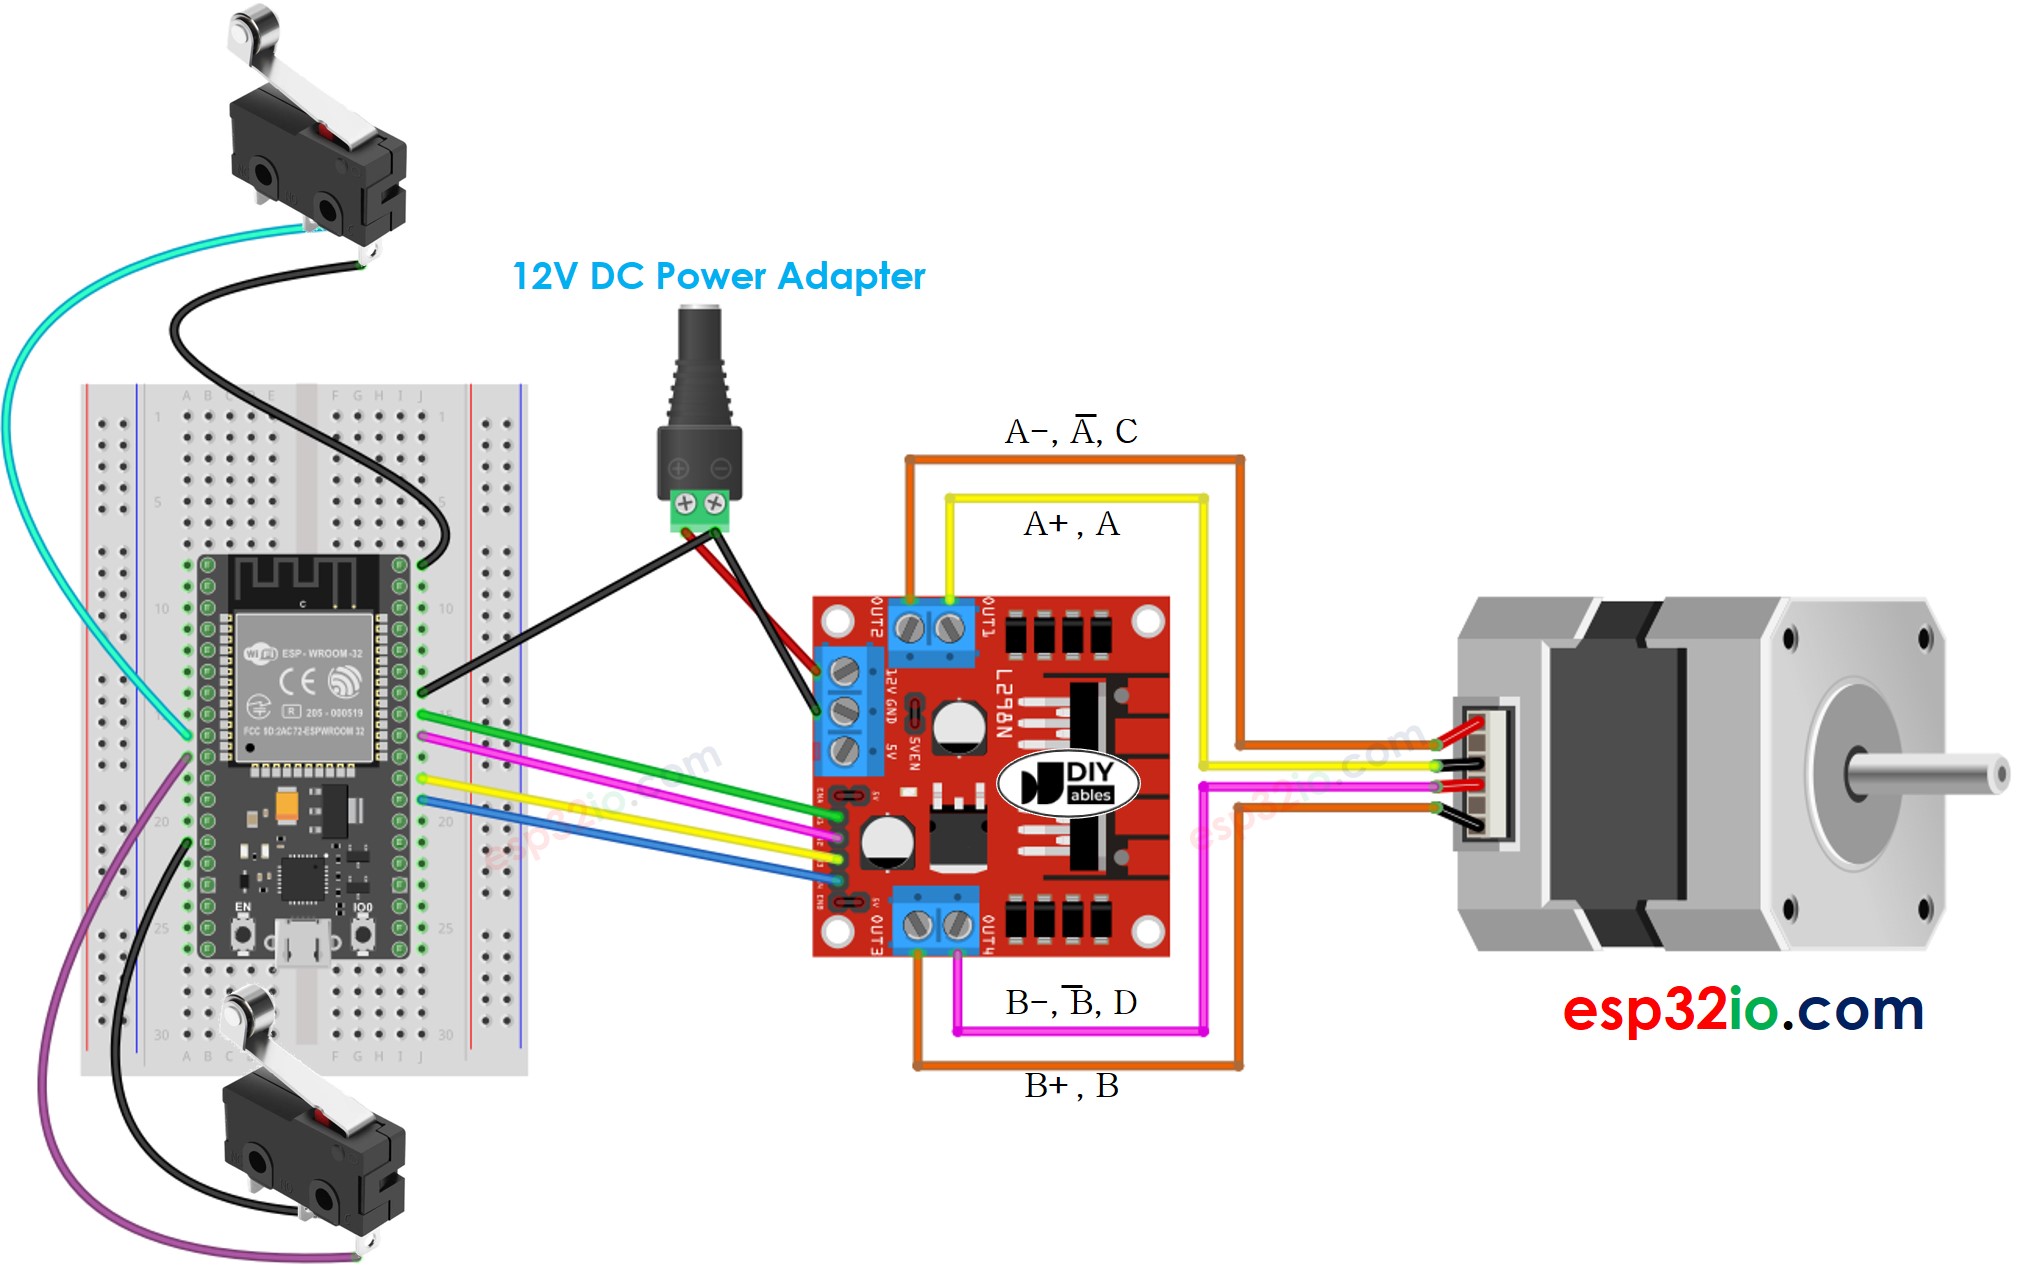
ESP32 stappenmotor en twee endschakelaars aansluitschema

This image is created using Fritzing. Click to enlarge image

※ Notiz:

Afhankelijk van de stappenmotor kan de aansluiting tussen de stappenmotor en de L298N verschillen. Bekijk alstublieft deze ESP32 - Stappenmotor tutorial goed om te zien hoe u de stappenmotor op de L298N motor driver aansluit.

ESP32 Code - Stappenmotor Stoppen met een Endschakelaar

Er zijn meerdere manieren om een stappenmotor te stoppen:

  • De functie stepper.stop() aanroepen: Hiermee stopt de stappenmotor niet onmiddellijk, maar geleidelijk
  • De functie stepper.run() niet aanroepen: Hiermee stopt de stappenmotor onmiddelijk

De onderstaande code zorgt ervoor dat de stappenmotor oneindig draait en direct stopt wanneer een endschakelaar wordt geactiveerd.

/* * Deze ESP32 code is ontwikkeld door newbiely.nl * Deze ESP32 code wordt zonder enige beperking aan het publiek beschikbaar gesteld. * Voor volledige instructies en schema's, bezoek: * https://newbiely.nl/tutorials/esp32/esp32-stepper-motor-and-limit-switch */ #include <ezButton.h> #include <AccelStepper.h> #define MAX_POSITION 0x7FFFFFFF // maximum of position we can set (long type) ezButton limitSwitch(25); // ESP32 pin: GPIO25 AccelStepper stepper(AccelStepper::FULL4WIRE, 19, 18, 17, 16); // ESP32 pin: GPIO19, GPIO18, GPIO17, GPIO16 bool isStopped = false; void setup() { Serial.begin(9600); limitSwitch.setDebounceTime(50); // set debounce time to 50 milliseconds stepper.setMaxSpeed(500.0); // set the maximum speed stepper.setAcceleration(50.0); // set acceleration stepper.setSpeed(100); // set initial speed stepper.setCurrentPosition(0); // set position stepper.moveTo(MAX_POSITION); } void loop() { limitSwitch.loop(); // MUST call the loop() function first if (limitSwitch.isPressed()) { Serial.println(F("The limit switch: TOUCHED")); isStopped = true; } if (isStopped == false) { // without this part, the move will stop after reaching maximum position if (stepper.distanceToGo() == 0) { // if motor moved to the maximum position stepper.setCurrentPosition(0); // reset position to 0 stepper.moveTo(MAX_POSITION); // move the motor to maximum position again } stepper.run(); // MUST be called in loop() function } else { // without calling stepper.run() function, motor stops immediately // NOTE: stepper.stop() function does NOT stops motor immediately Serial.println(F("The stepper motor is STOPPED")); } }

Snelle Stappen

  • Als dit de eerste keer is dat u met ESP32 werkt, bekijk dan hoe u de omgeving instelt voor ESP32 in Arduino IDE.
  • Maak de bekabeling zoals op bovenstaande afbeelding.
  • Verbind de ESP32 met uw PC via een micro USB-kabel
  • Open Arduino IDE op uw PC.
  • Selecteer het juiste ESP32 board (bijvoorbeeld ESP32 Dev Module) en de juiste COM-poort.
  • Verbind ESP32 met de PC via USB-kabel
  • Open de Arduino IDE, selecteer het juiste board en poort
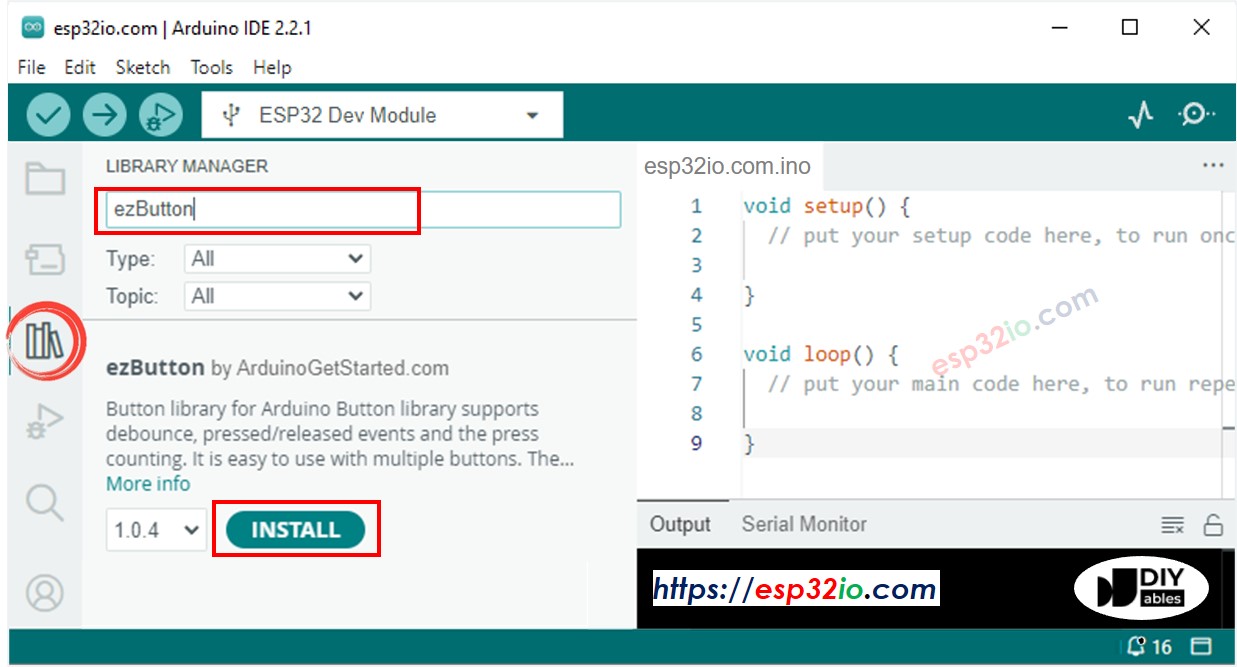
  • Klik op het Libraries icoon in de linker zijbalk van de Arduino IDE.
  • Zoek op “ezButton”, en vind de button library van ArduinoGetStarted.com
  • Klik op de Install knop om de ezButton library te installeren.
ESP32 button library
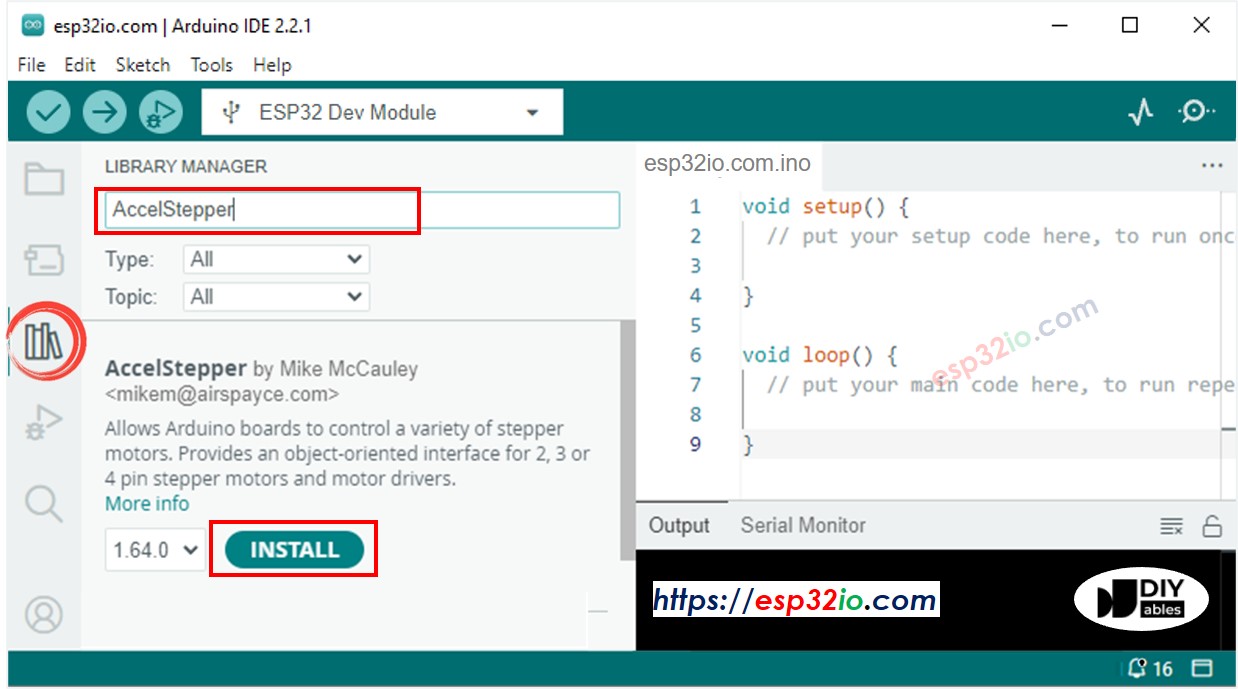
  • Zoek op “AccelStepper”, en vind de AccelStepper library van Mike McCauley
  • Klik op de Install knop om de AccelStepper library te installeren.
ESP32 AccelStepper library
  • Kopieer bovenstaande code en open deze in Arduino IDE
  • Klik op de Upload knop in Arduino IDE om de code op ESP32 te laden
  • Als de verbinding correct is, zult u zien dat de motor met de klok mee draait.
  • Raak de endschakelaar aan
  • U zult zien dat de motor onmiddellijk stopt
  • Het resultaat in de Serial Monitor ziet er als volgt uit
COM6
Send
The limit switch: TOUCHED The stepper motor is STOPPED The stepper motor is STOPPED The stepper motor is STOPPED The stepper motor is STOPPED
Autoscroll Show timestamp
Clear output
9600 baud  
Newline  

Code-uitleg

Lees de regel-voor-regel uitleg in de commentaren van de code!

ESP32 Code - Draairichting Stappenmotor Wijzigen met een Endschakelaar

De onderstaande code laat de stappenmotor oneindig draaien en wisselt de draairichting zodra een endschakelaar wordt geactiveerd.

/* * Deze ESP32 code is ontwikkeld door newbiely.nl * Deze ESP32 code wordt zonder enige beperking aan het publiek beschikbaar gesteld. * Voor volledige instructies en schema's, bezoek: * https://newbiely.nl/tutorials/esp32/esp32-stepper-motor-and-limit-switch */ #include <ezButton.h> #include <AccelStepper.h> #define DIRECTION_CCW -1 #define DIRECTION_CW 1 #define MAX_POSITION 0x7FFFFFFF // maximum of position we can set (long type) ezButton limitSwitch(25); // ESP32 pin: GPIO25 AccelStepper stepper(AccelStepper::FULL4WIRE, 19, 18, 17, 16); // ESP32 pin: GPIO19, GPIO18, GPIO17, GPIO16 int direction = DIRECTION_CW; long targetPos = 0; void setup() { Serial.begin(9600); limitSwitch.setDebounceTime(50); // set debounce time to 50 milliseconds stepper.setMaxSpeed(500.0); // set the maximum speed stepper.setAcceleration(50.0); // set acceleration stepper.setSpeed(100); // set initial speed stepper.setCurrentPosition(0); // set position targetPos = direction * MAX_POSITION; stepper.moveTo(targetPos); } void loop() { limitSwitch.loop(); // MUST call the loop() function first if (limitSwitch.isPressed()) { Serial.println(F("The limit switch: TOUCHED")); direction *= -1; // change direction Serial.print(F("The direction -> ")); if (direction == DIRECTION_CW) Serial.println(F("CLOCKWISE")); else Serial.println(F("ANTI-CLOCKWISE")); targetPos = direction * MAX_POSITION; stepper.setCurrentPosition(0); // set position stepper.moveTo(targetPos); } // without this part, the move will stop after reaching maximum position if (stepper.distanceToGo() == 0) { // if motor moved to the maximum position stepper.setCurrentPosition(0); // reset position to 0 stepper.moveTo(targetPos); // move the motor to maximum position again } stepper.run(); // MUST be called in loop() function }

Snelle Stappen

  • Kopieer bovenstaande code en open deze in Arduino IDE
  • Klik op de Upload knop in Arduino IDE om de code op ESP32 te laden
  • Als de bekabeling correct is, zult u zien dat de motor met de klok mee draait.
  • Raak de endschakelaar aan
  • U zult zien dat de draairichting van de stappenmotor wijzigt naar tegen de klok in
  • Raak de endschakelaar opnieuw aan
  • U zult zien dat de draairichting van de stappenmotor weer wijzigt naar met de klok mee
  • Het resultaat in de Serial Monitor ziet er als volgt uit
COM6
Send
The limit switch: TOUCHED The direction -> ANTI-CLOCKWISE The limit switch: TOUCHED The direction -> CLOCKWISE
Autoscroll Show timestamp
Clear output
9600 baud  
Newline  

ESP32 Code - Draairichting Stappenmotor Wijzigen met twee Endschakelaars

De onderstaande code laat de stappenmotor oneindig draaien en wisselt de draairichting zodra één van twee endschakelaars wordt geactiveerd.

/* * Deze ESP32 code is ontwikkeld door newbiely.nl * Deze ESP32 code wordt zonder enige beperking aan het publiek beschikbaar gesteld. * Voor volledige instructies en schema's, bezoek: * https://newbiely.nl/tutorials/esp32/esp32-stepper-motor-and-limit-switch */ #include <ezButton.h> #include <AccelStepper.h> #define DIRECTION_CCW -1 #define DIRECTION_CW 1 #define STATE_CHANGE_DIR 1 #define STATE_MOVE 2 #define STATE_MOVING 3 #define MAX_POSITION 0x7FFFFFFF // maximum of position we can set (long type) ezButton limitSwitch_1(25); // ESP32 pin: GPIO25 ezButton limitSwitch_2(26); // ESP32 pin: GPIO26 AccelStepper stepper(AccelStepper::FULL4WIRE, 19, 18, 17, 16); // ESP32 pin: GPIO19, GPIO18, GPIO17, GPIO16 int stepperState = STATE_MOVE; int direction = DIRECTION_CW; long targetPos = 0; void setup() { Serial.begin(9600); limitSwitch_1.setDebounceTime(50); // set debounce time to 50 milliseconds limitSwitch_2.setDebounceTime(50); // set debounce time to 50 milliseconds stepper.setMaxSpeed(500.0); // set the maximum speed stepper.setAcceleration(50.0); // set acceleration stepper.setSpeed(100); // set initial speed stepper.setCurrentPosition(0); // set position } void loop() { limitSwitch_1.loop(); // MUST call the loop() function first limitSwitch_2.loop(); // MUST call the loop() function first if (limitSwitch_1.isPressed()) { stepperState = STATE_CHANGE_DIR; Serial.println(F("The limit switch 1: TOUCHED")); } if (limitSwitch_2.isPressed()) { stepperState = STATE_CHANGE_DIR; Serial.println(F("The limit switch 2: TOUCHED")); } switch (stepperState) { case STATE_CHANGE_DIR: direction *= -1; // change direction Serial.print(F("The direction -> ")); if (direction == DIRECTION_CW) Serial.println(F("CLOCKWISE")); else Serial.println(F("ANTI-CLOCKWISE")); stepperState = STATE_MOVE; // after changing direction, go to the next state to move the motor break; case STATE_MOVE: targetPos = direction * MAX_POSITION; stepper.setCurrentPosition(0); // set position stepper.moveTo(targetPos); stepperState = STATE_MOVING; // after moving, go to the next state to keep the motor moving infinity break; case STATE_MOVING: // without this state, the move will stop after reaching maximum position if (stepper.distanceToGo() == 0) { // if motor moved to the maximum position stepper.setCurrentPosition(0); // reset position to 0 stepper.moveTo(targetPos); // move the motor to maximum position again } break; } stepper.run(); // MUST be called in loop() function }

Snelle Stappen

  • Kopieer bovenstaande code en open deze in Arduino IDE
  • Klik op de Upload knop in Arduino IDE om de code op ESP32 te laden
  • Als de bekabeling correct is, zult u zien dat de motor met de klok mee draait.
  • Raak endschakelaar 1 aan
  • U zult zien dat de draairichting van de stappenmotor wijzigt naar tegen de klok in
  • Raak endschakelaar 2 aan
  • U zult zien dat de draairichting van de stappenmotor wijzigt naar met de klok mee
  • Het resultaat in de Serial Monitor ziet er als volgt uit
COM6
Send
The limit switch 1: TOUCHED The direction -> ANTI-CLOCKWISE The limit switch 2: TOUCHED The direction -> CLOCKWISE
Autoscroll Show timestamp
Clear output
9600 baud  
Newline  

Video Tutorial

We overwegen het maken van videotutorials. Als u videotutorials belangrijk vindt, abonneer u dan op ons YouTube-kanaal om ons te motiveren de video's te maken.

Bekijk onze video-tutorial voor een visuele begeleiding bij dit project! De video biedt extra inzichten en helpt u bij elke stap om het met ESP32, stappenmotor en endschakelaar te realiseren.

※ ONZE BERICHTEN

  • U bent welkom om de link naar deze tutorial te delen. Gebruik onze inhoud echter niet op andere websites. We hebben veel moeite en tijd gestoken in het maken van de inhoud, respecteer alstublieft ons werk!