ESP32 - DC Motor - Eindschakelaar

In deze ESP32 tutorial leert u hoe u de ESP32 gebruikt om een DC motor te besturen met een eindschakelaar en een L298N driver. Concreet leert u:

In deze tutorial over de ESP32 verkennen we hoe u de ESP32 kunt inzetten om een DC motor aan te sturen met behulp van een eindschakelaar en een L298N driver. We behandelen specifiek:

Hardware Benodigd

1×ESP32 ESP-WROOM-32 Ontwikkelingsmodule
1×USB-kabel Type-C
1×Eindschakelaar (KW12-3)
1×Eindschakelaar (V-156-1C25)
1×5V DC-Motor
1×5V Voeding Adapter voor 5V DC motor
1×DC-Stroomaansluiting
1×L298N Motordriver Module
1×Jumper Draden
1×(Aanbevolen) Schroefklem Uitbreidingsboard voor ESP32
1×(Aanbevolen) Breakout Expansion Board for ESP32
1×(Aanbevolen) Stromsplitter voor ESP32

Of u kunt de volgende kits kopen:

1×DIYables Sensorkit (30 sensoren/displays)
1×DIYables Sensorkit (18 sensoren/displays)
Openbaarmaking: Sommige van de links in deze sectie zijn Amazon-affiliate links. We kunnen een commissie ontvangen voor aankopen die via deze links worden gedaan, zonder extra kosten voor u. We waarderen uw steun.

Over DC Motor en Eindschakelaar

Als u nog niets weet over DC motoren en eindschakelaars (pinout, werking, programmeren ...), leer er meer over in de volgende tutorials:

Aansluitschema

Deze tutorial bevat ESP32 code voor twee situaties: één DC motor + één eindschakelaar, één DC motor + twee eindschakelaars.

  • Aansluitschema tussen de DC motor en een eindschakelaar
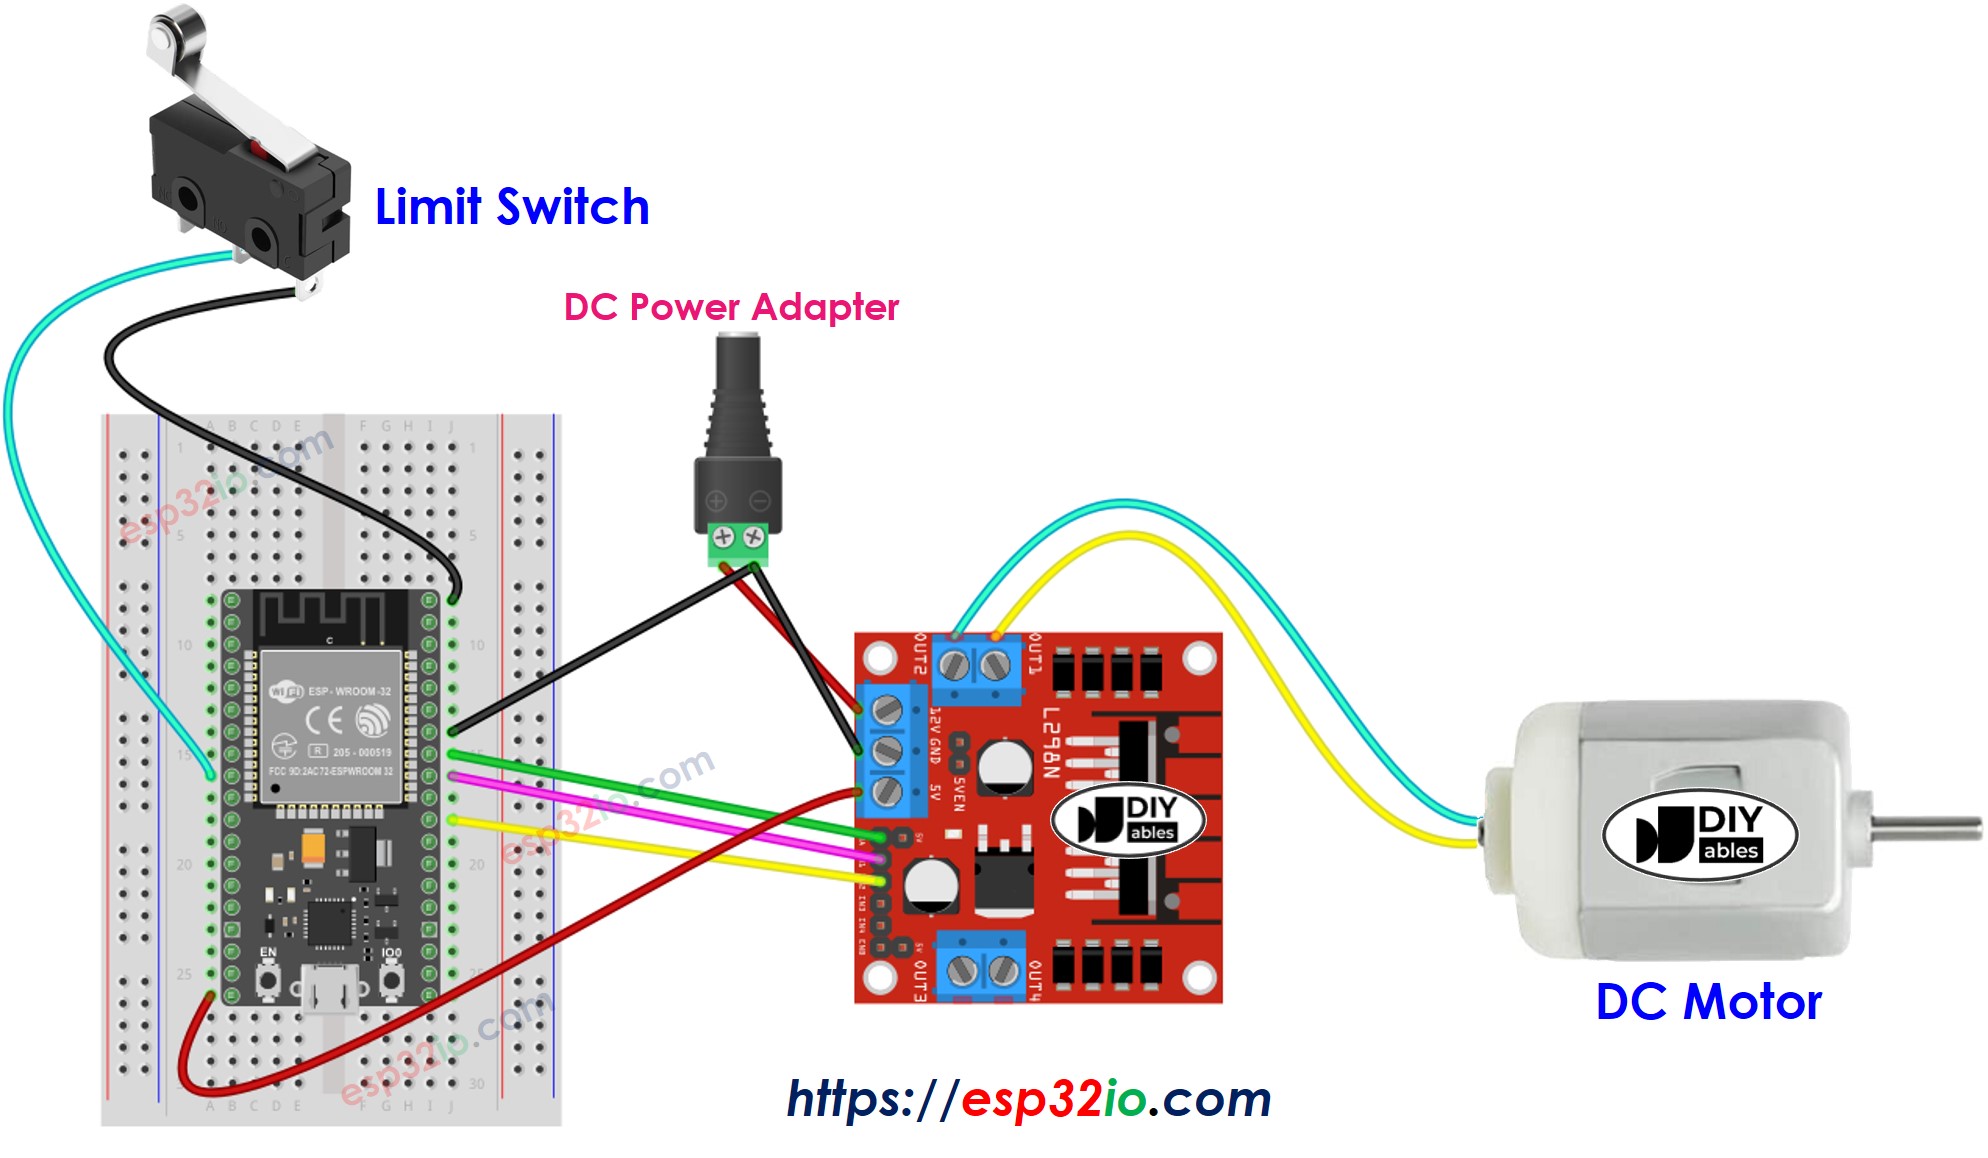
ESP32 DC motor en eindschakelaar aansluitschema

This image is created using Fritzing. Click to enlarge image

  • Aansluitschema tussen de DC motor en twee eindschakelaars
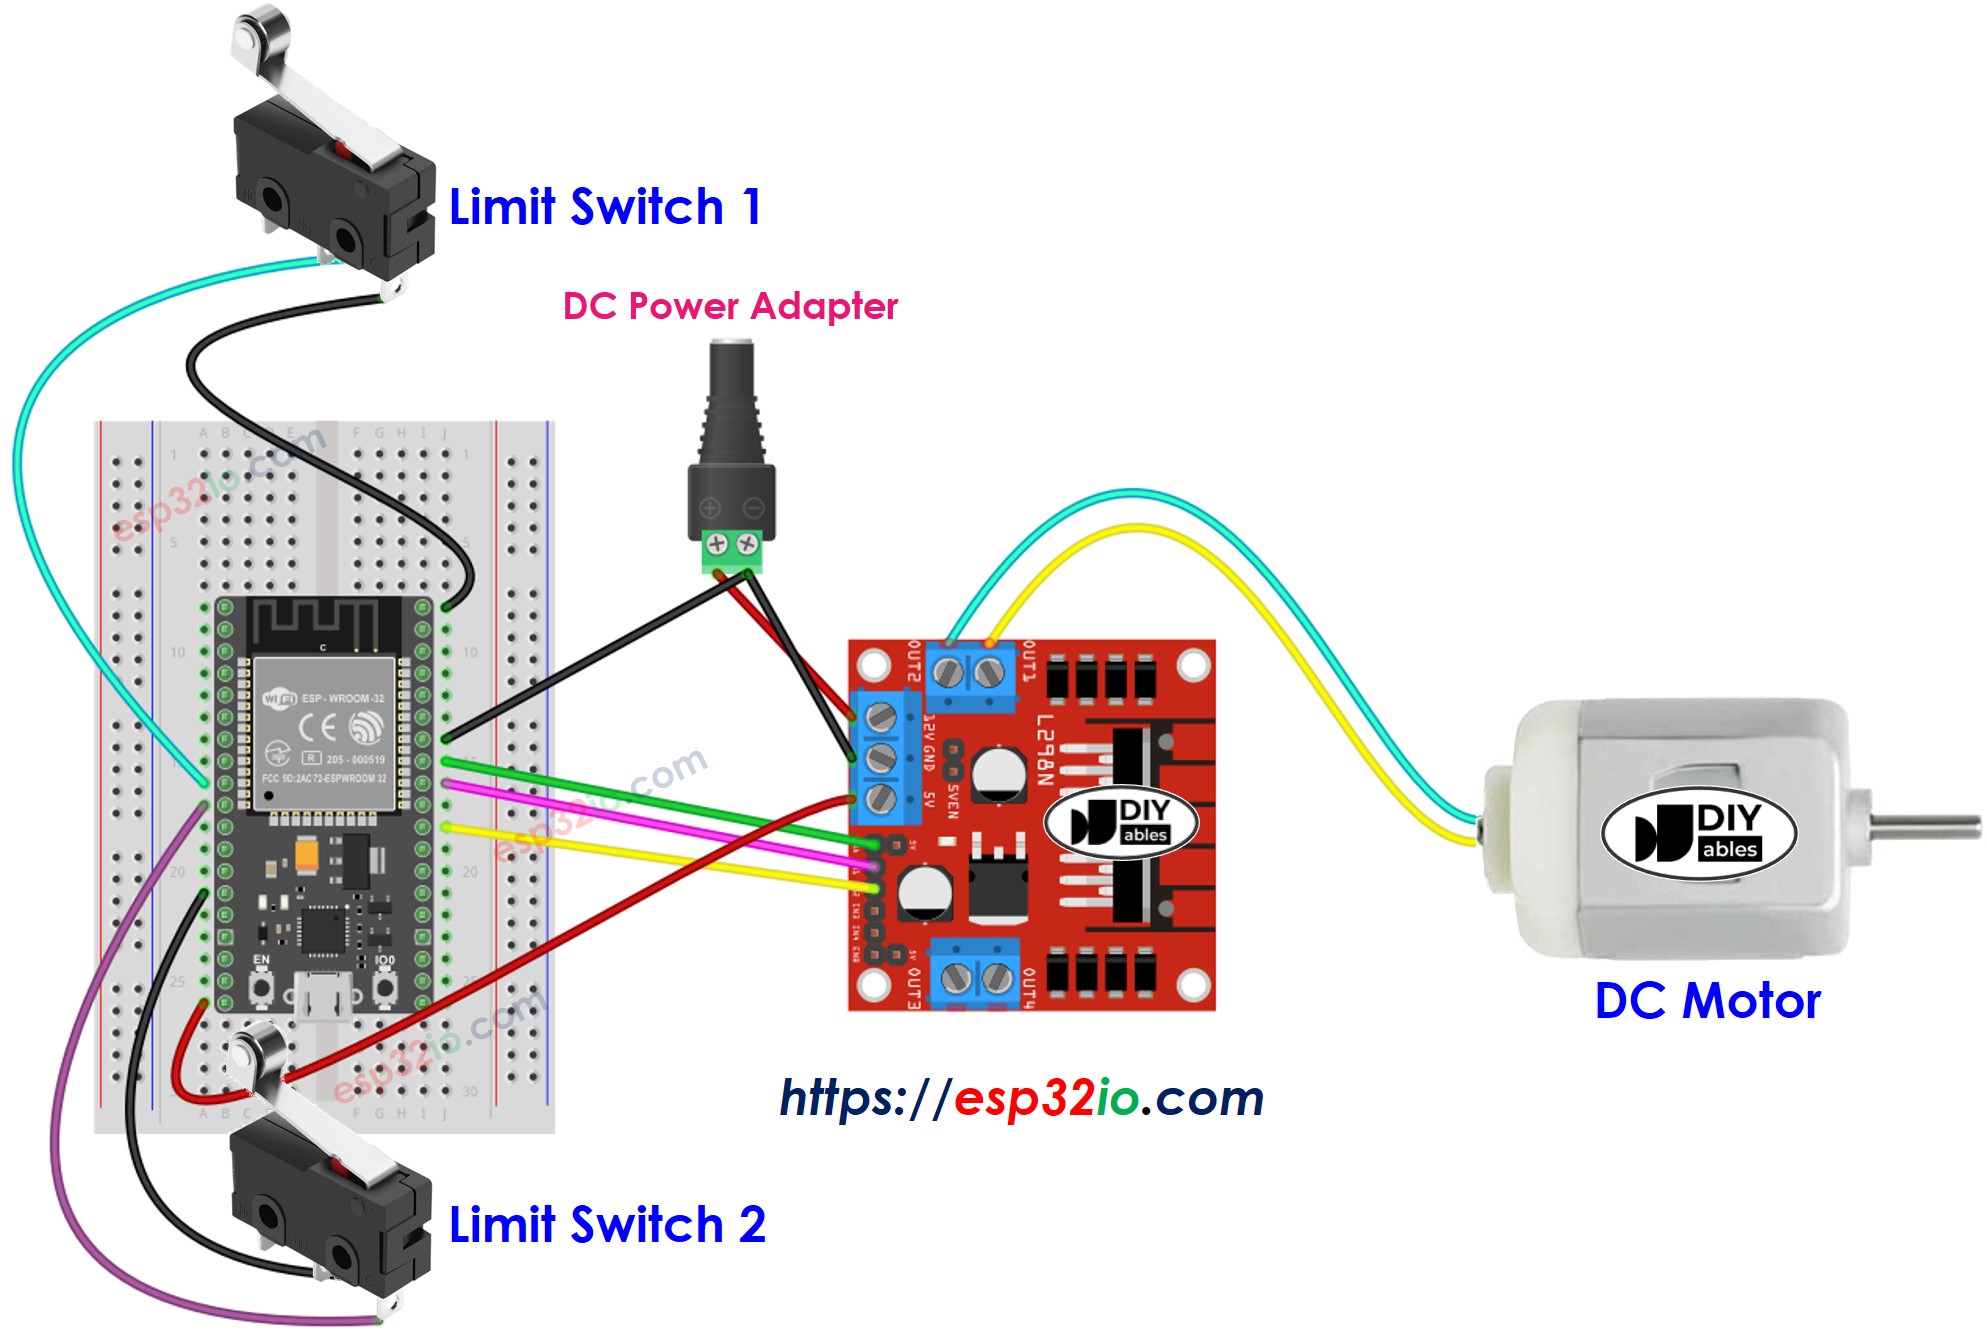
ESP32 DC motor en twee eindschakelaars aansluitschema

This image is created using Fritzing. Click to enlarge image

ESP32 Code - Stop DC Motor door Eindschakelaar

De onderstaande code laat een DC motor continu draaien en stopt deze direct wanneer de eindschakelaar wordt ingedrukt

/* * Deze ESP32 code is ontwikkeld door newbiely.nl * Deze ESP32 code wordt zonder enige beperking aan het publiek beschikbaar gesteld. * Voor volledige instructies en schema's, bezoek: * https://newbiely.nl/tutorials/esp32/esp32-dc-motor-limit-switch */ #include <ezButton.h> #define ENA_PIN 19 // ESP32 pin GPIO19 connected to the IN1 pin L298N #define IN1_PIN 18 // ESP32 pin GPIO18 connected to the IN2 pin L298N #define IN2_PIN 17 // ESP32 pin GPIO17 connected to the EN1 pin L298N ezButton limitSwitch(25); // create ezButton object that attach to pin GPIO25 void setup() { Serial.begin(9600); limitSwitch.setDebounceTime(50); // set debounce time to 50 milliseconds // initialize digital pins as outputs. pinMode(ENA_PIN, OUTPUT); pinMode(IN1_PIN, OUTPUT); pinMode(IN2_PIN, OUTPUT); digitalWrite(ENA_PIN, HIGH); // max speed digitalWrite(IN1_PIN, HIGH); // control motor A spins clockwise digitalWrite(IN2_PIN, LOW); // control motor A spins clockwise } void loop() { limitSwitch.loop(); // MUST call the loop() function first if (limitSwitch.isPressed()) { Serial.println(F("The limit switch: TOUCHED")); digitalWrite(IN1_PIN, LOW); // stop motor digitalWrite(IN2_PIN, LOW); // stop motor } }

Snelle Stappen

  • Als dit uw eerste keer is met ESP32, zie hoe u de omgeving instelt voor ESP32 in Arduino IDE.
  • Maak de bedrading volgens bovenstaande afbeelding.
  • Verbind de ESP32 met uw PC via een micro USB-kabel
  • Open Arduino IDE op uw PC.
  • Selecteer het juiste ESP32 board (bijv. ESP32 Dev Module) en de juiste COM-poort.
  • Verbind ESP32 met PC via USB-kabel
  • Open Arduino IDE, selecteer het juiste board en poort
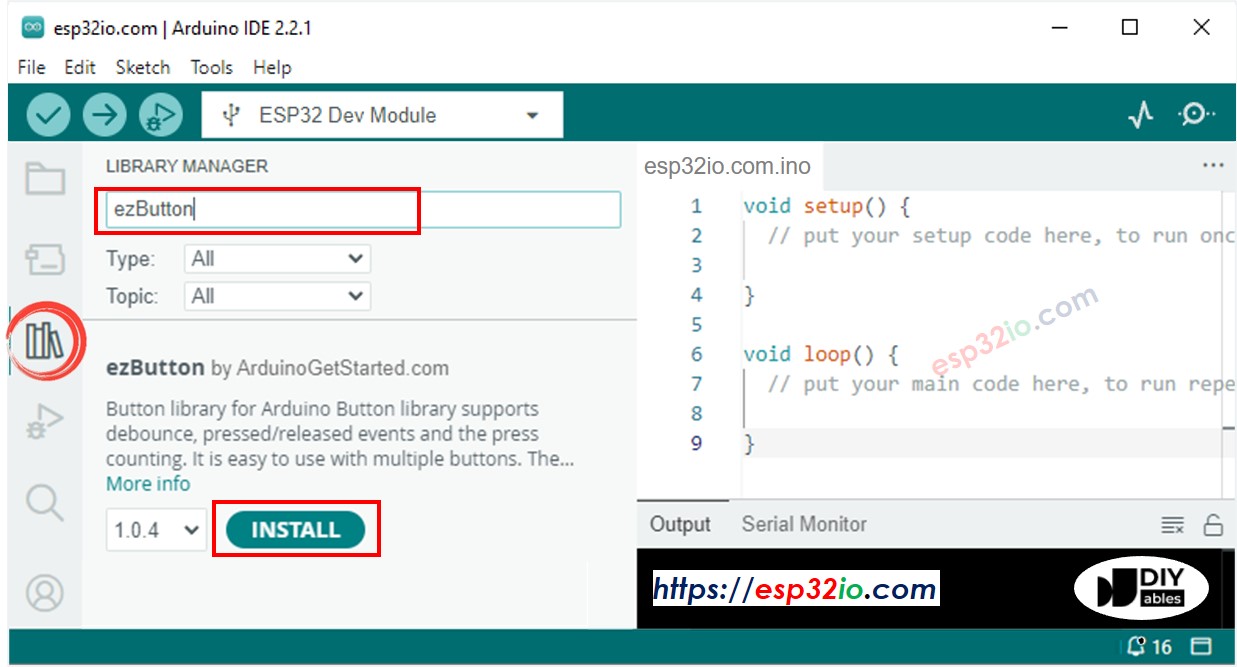
  • Klik op het Bibliotheken-icoon in de linker balk van de Arduino IDE.
  • Zoek op “ezButton” en vind de button bibliotheek van ArduinoGetStarted.com
  • Klik op de Installeren knop om de ezButton bibliotheek te installeren.
ESP32 button bibliotheek
  • Kopieer bovenstaande code en open deze met Arduino IDE
  • Klik op de Upload knop in Arduino IDE om de code naar de ESP32 te uploaden
  • Als de bedrading correct is, ziet u de motor met de klok mee draaien.
  • Druk op de eindschakelaar
  • U zult zien dat de motor direct stopt
  • Het resultaat in de Seriële Monitor ziet er zo uit
COM6
Send
The limit switch: TOUCHED The DC motor is STOPPED The DC motor is STOPPED The DC motor is STOPPED The DC motor is STOPPED
Autoscroll Show timestamp
Clear output
9600 baud  
Newline  

Code-uitleg

Lees de regel-voor-regel toelichting in de commentaarregels van de code!

ESP32 Code - Verander Draairichting van DC Motor door Eindschakelaar

De onderstaande code laat een DC motor continu draaien en verandert de draairichting wanneer de eindschakelaar wordt ingedrukt

/* * Deze ESP32 code is ontwikkeld door newbiely.nl * Deze ESP32 code wordt zonder enige beperking aan het publiek beschikbaar gesteld. * Voor volledige instructies en schema's, bezoek: * https://newbiely.nl/tutorials/esp32/esp32-dc-motor-limit-switch */ #include <ezButton.h> #define DIRECTION_CCW -1 #define DIRECTION_CW 1 #define ENA_PIN 19 // ESP32 pin GPIO19 connected to the IN1 pin L298N #define IN1_PIN 18 // ESP32 pin GPIO18 connected to the IN2 pin L298N #define IN2_PIN 17 // ESP32 pin GPIO17 connected to the EN1 pin L298N ezButton limitSwitch(25); // create ezButton object that attach to pin GPIO25 int direction = DIRECTION_CW; void setup() { Serial.begin(9600); limitSwitch.setDebounceTime(50); // set debounce time to 50 milliseconds // initialize digital pins as outputs. pinMode(ENA_PIN, OUTPUT); pinMode(IN1_PIN, OUTPUT); pinMode(IN2_PIN, OUTPUT); digitalWrite(ENA_PIN, HIGH); // max speed digitalWrite(IN1_PIN, HIGH); // control motor A spins clockwise digitalWrite(IN2_PIN, LOW); // control motor A spins clockwise } void loop() { limitSwitch.loop(); // MUST call the loop() function first if (limitSwitch.isPressed()) { Serial.println(F("The limit switch: TOUCHED")); direction *= -1; // change direction Serial.print(F("The direction -> ")); if (direction == DIRECTION_CW) { Serial.println(F("CLOCKWISE")); digitalWrite(IN1_PIN, HIGH); // control motor A spins clockwise digitalWrite(IN2_PIN, LOW); // control motor A spins clockwise } else { Serial.println(F("ANTI-CLOCKWISE")); digitalWrite(IN1_PIN, LOW); // control motor A spins anti-clockwise digitalWrite(IN2_PIN, HIGH); // control motor A spins anti-clockwise } } }

Snelle Stappen

  • Als dit uw eerste keer is met ESP32, zie hoe u de omgeving instelt voor ESP32 in Arduino IDE.
  • Maak de bedrading volgens bovenstaande afbeelding.
  • Verbind de ESP32 met uw PC via een micro USB-kabel
  • Open Arduino IDE op uw PC.
  • Selecteer het juiste ESP32 board (bijv. ESP32 Dev Module) en de juiste COM-poort.
  • Kopieer bovenstaande code en open deze met Arduino IDE
  • Klik op de Upload knop in Arduino IDE om de code naar de ESP32 te uploaden
  • Als de bedrading correct is, ziet u de motor met de klok mee draaien.
  • Druk op de eindschakelaar
  • U zult zien dat de draairichting van de DC motor verandert naar tegen de klok in.
  • Druk nogmaals op de eindschakelaar
  • U zult zien dat de draairichting van de DC motor weer verandert naar met de klok mee
  • Het resultaat in de Seriële Monitor ziet er zo uit
COM6
Send
The limit switch: TOUCHED The direction -> ANTI-CLOCKWISE The limit switch: TOUCHED The direction -> CLOCKWISE
Autoscroll Show timestamp
Clear output
9600 baud  
Newline  

ESP32 Code - Verander Draairichting van DC Motor door twee Eindschakelaars

De onderstaande code laat een DC motor continu draaien en verandert de draairichting wanneer één van de twee eindschakelaars wordt ingedrukt

/* * Deze ESP32 code is ontwikkeld door newbiely.nl * Deze ESP32 code wordt zonder enige beperking aan het publiek beschikbaar gesteld. * Voor volledige instructies en schema's, bezoek: * https://newbiely.nl/tutorials/esp32/esp32-dc-motor-limit-switch */ #include <ezButton.h> #define DIRECTION_CCW -1 #define DIRECTION_CW 1 #define ENA_PIN 19 // ESP32 pin GPIO19 connected to the IN1 pin L298N #define IN1_PIN 18 // ESP32 pin GPIO18 connected to the IN2 pin L298N #define IN2_PIN 17 // ESP32 pin GPIO17 connected to the EN1 pin L298N ezButton limitSwitch_1(25); // create ezButton object that attach to pin GPIO25 ezButton limitSwitch_2(26); // create ezButton object that attach to pin GPIO26 int direction = DIRECTION_CW; int prev_direction = DIRECTION_CW; void setup() { Serial.begin(9600); limitSwitch_1.setDebounceTime(50); // set debounce time to 50 milliseconds limitSwitch_2.setDebounceTime(50); // set debounce time to 50 milliseconds // initialize digital pins as outputs. pinMode(ENA_PIN, OUTPUT); pinMode(IN1_PIN, OUTPUT); pinMode(IN2_PIN, OUTPUT); digitalWrite(ENA_PIN, HIGH); // max speed digitalWrite(IN1_PIN, HIGH); // control motor A spins clockwise digitalWrite(IN2_PIN, LOW); // control motor A spins clockwise } void loop() { limitSwitch_1.loop(); // MUST call the loop() function first limitSwitch_2.loop(); // MUST call the loop() function first if (limitSwitch_1.isPressed()) { direction *= -1; // change direction Serial.println(F("The limit switch 1: TOUCHED")); } if (limitSwitch_2.isPressed()) { direction *= -1; // change direction Serial.println(F("The limit switch 2: TOUCHED")); } if (prev_direction != direction) { Serial.print(F("The direction -> ")); if (direction == DIRECTION_CW) { Serial.println(F("CLOCKWISE")); digitalWrite(IN1_PIN, HIGH); // control motor A spins clockwise digitalWrite(IN2_PIN, LOW); // control motor A spins clockwise } else { Serial.println(F("ANTI-CLOCKWISE")); digitalWrite(IN1_PIN, LOW); // control motor A spins anti-clockwise digitalWrite(IN2_PIN, HIGH); // control motor A spins anti-clockwise } prev_direction = direction; } }

Snelle Stappen

  • Als dit uw eerste keer is met ESP32, zie hoe u de omgeving instelt voor ESP32 in Arduino IDE.
  • Maak de bedrading volgens bovenstaande afbeelding.
  • Verbind de ESP32 met uw PC via een micro USB-kabel
  • Open Arduino IDE op uw PC.
  • Selecteer het juiste ESP32 board (bijv. ESP32 Dev Module) en de juiste COM-poort.
  • Kopieer bovenstaande code en open deze met Arduino IDE
  • Klik op de Upload knop in Arduino IDE om de code naar de ESP32 te uploaden
  • Als de bedrading correct is, ziet u de motor met de klok mee draaien.
  • Druk op eindschakelaar 1
  • U zult zien dat de draairichting van de DC motor verandert naar tegen de klok in
  • Druk op eindschakelaar 2
  • U zult zien dat de draairichting van de DC motor verandert naar met de klok mee
  • Het resultaat in de Seriële Monitor ziet er zo uit
COM6
Send
The limit switch 1: TOUCHED The direction -> ANTI-CLOCKWISE The limit switch 2: TOUCHED The direction -> CLOCKWISE
Autoscroll Show timestamp
Clear output
9600 baud  
Newline  

Video Tutorial

We overwegen het maken van videotutorials. Als u videotutorials belangrijk vindt, abonneer u dan op ons YouTube-kanaal om ons te motiveren de video's te maken.

Bekijk onze video-tutorial voor een visuele begeleiding bij dit project! De video biedt extra inzichten en laat u stap voor stap zien hoe u dit project met ESP32 kunt uitvoeren.

※ ONZE BERICHTEN

  • U bent welkom om de link naar deze tutorial te delen. Gebruik onze inhoud echter niet op andere websites. We hebben veel moeite en tijd gestoken in het maken van de inhoud, respecteer alstublieft ons werk!