ESP32 - Ultrasone Sensor - OLED

Deze tutorial legt uit hoe u met de ESP32 de afstand van een ultrasone sensor uitleest en deze op een OLED-scherm weergeeft.

ESP32 Ultrasone Sensor OLED

Hardware Benodigd

1×ESP32 ESP-WROOM-32 Ontwikkelingsmodule
1×USB Kabel Type-C
1×SSD1306 I2C OLED-Display 128x64
1×SSD1306 I2C OLED-Display 128x32
1×Ultrasone Sensor
1×Breadboard (experimenteerprint)
1×Jumper Draden
1×(Optioneel) DC Voeding Jack
1×(Aanbevolen) Schroefklem Uitbreidingsboard voor ESP32
1×(Aanbevolen) Breakout Expansion Board for ESP32
1×(Aanbevolen) Stromsplitter voor ESP32

Of u kunt de volgende kits kopen:

1×DIYables Sensorkit (30 sensoren/displays)
1×DIYables Sensorkit (18 sensoren/displays)
Openbaarmaking: Sommige van de links in deze sectie zijn Amazon-affiliate links. We kunnen een commissie ontvangen voor aankopen die via deze links worden gedaan, zonder extra kosten voor u. We waarderen uw steun.

Over OLED en Ultrasone Sensor

We hebben specifieke tutorials over OLED en ultrasone sensoren. Elke tutorial bevat gedetailleerde informatie en stapsgewijze instructies over de hardware pinout, het werkingsprincipe, de bedradingsverbinding met ESP32, ESP32 code... Leer er meer over via de volgende links:

Aansluitschema

  • Het aansluitschema met voeding via USB-kabel
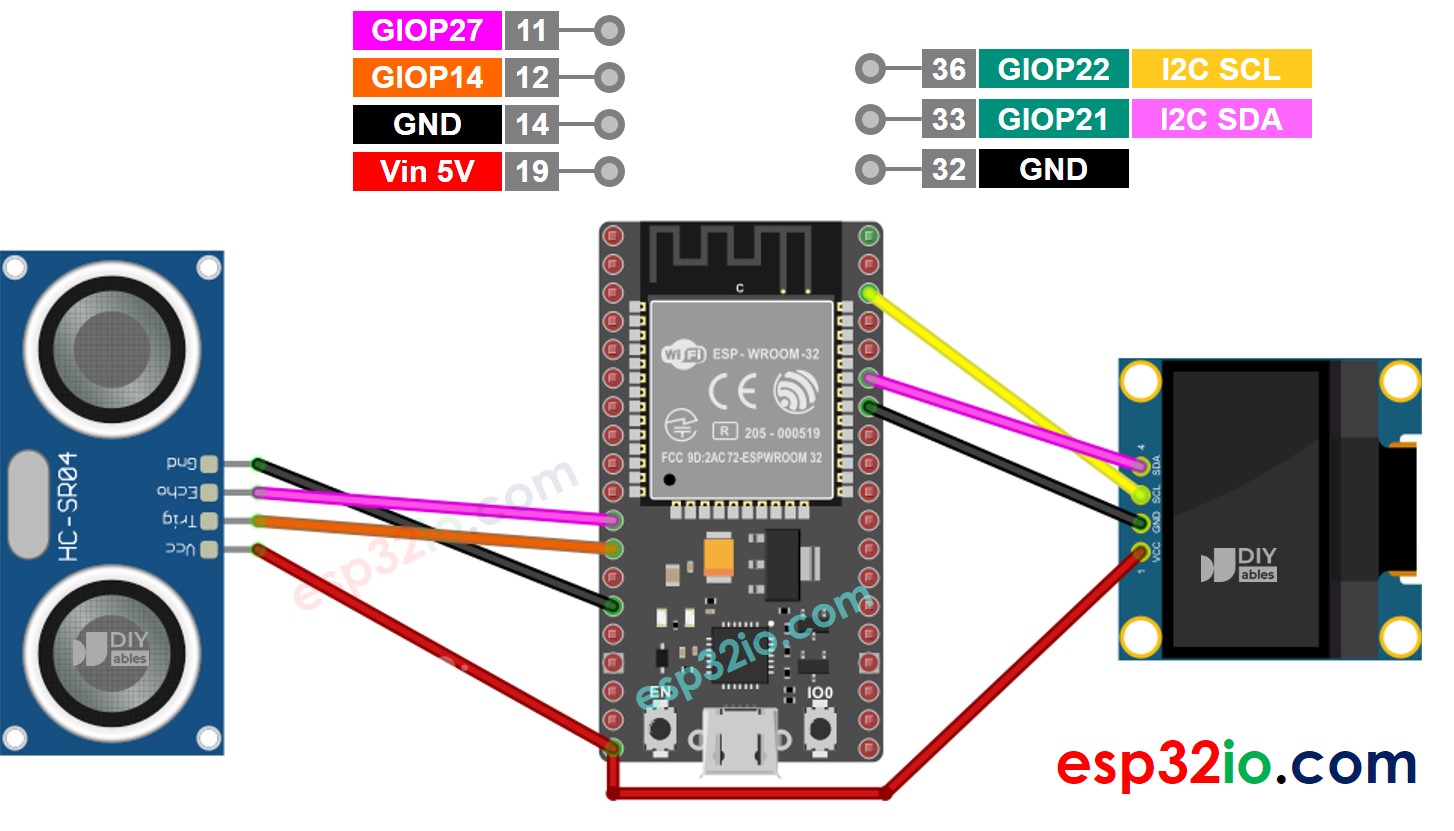
ESP32 Ultrasone sensor OLED aansluitschema

This image is created using Fritzing. Click to enlarge image

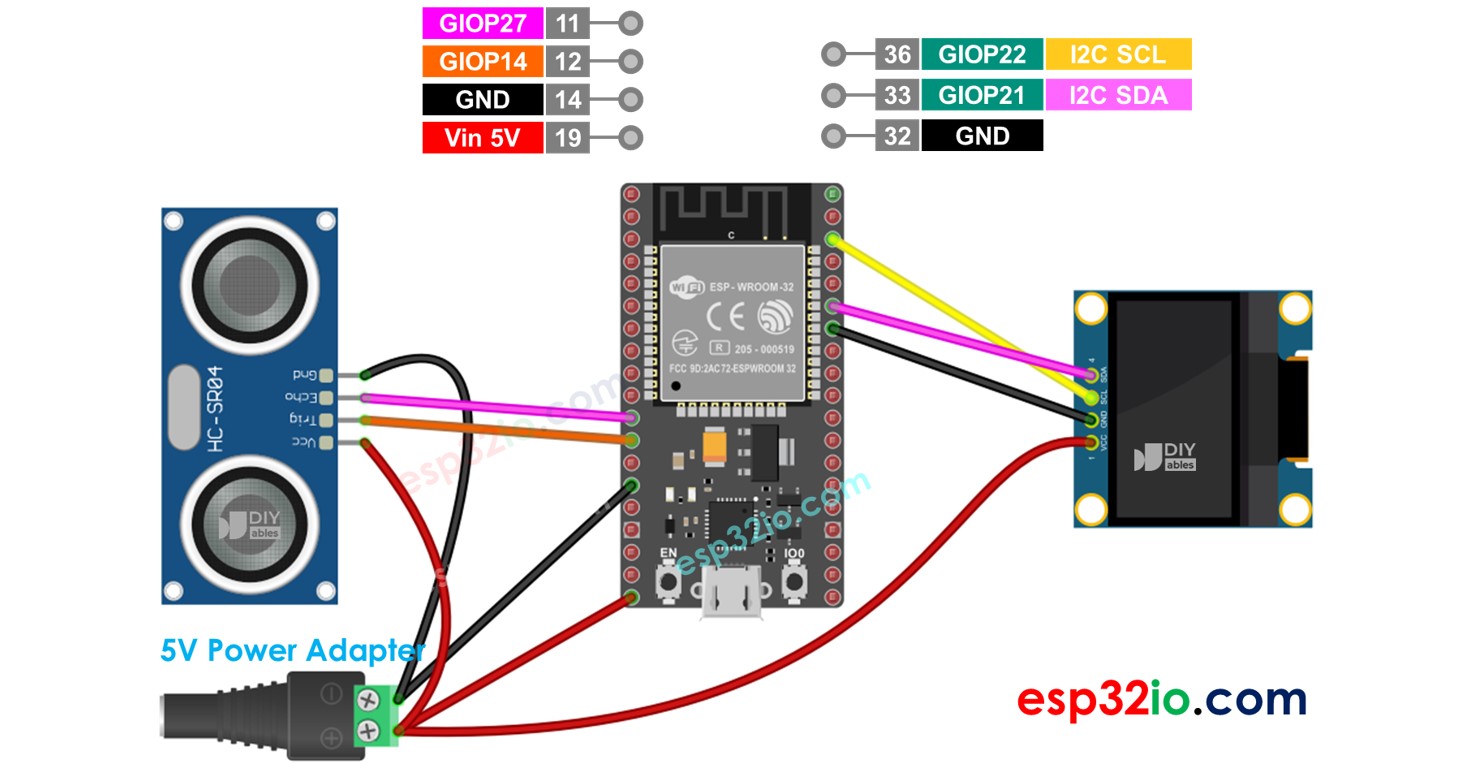
  • Het aansluitschema met voeding via 5V adapter
ESP32 Ultrasone sensor OLED 5V voeding aansluitschema

This image is created using Fritzing. Click to enlarge image

ESP32 Code - Ultrasone Sensor - OLED

/* * Deze ESP32 code is ontwikkeld door newbiely.nl * Deze ESP32 code wordt zonder enige beperking aan het publiek beschikbaar gesteld. * Voor volledige instructies en schema's, bezoek: * https://newbiely.nl/tutorials/esp32/esp32-ultrasonic-sensor-oled */ #include <Wire.h> #include <Adafruit_GFX.h> #include <Adafruit_SSD1306.h> #define SCREEN_WIDTH 128 // OLED display width, in pixels #define SCREEN_HEIGHT 64 // OLED display height, in pixels #define TRIG_PIN 14 // ESP32 pin GPIO14 connected to Ultrasonic Sensor's TRIG pin #define ECHO_PIN 27 // ESP32 pin GPIO27 connected to Ultrasonic Sensor's ECHO pin Adafruit_SSD1306 oled(SCREEN_WIDTH, SCREEN_HEIGHT, &Wire, -1); // create SSD1306 display object connected to I2C String tempString; void setup() { Serial.begin(9600); // initialize OLED display with address 0x3C for 128x64 if (!oled.begin(SSD1306_SWITCHCAPVCC, 0x3C)) { Serial.println(F("SSD1306 allocation failed")); while (true); } delay(2000); // wait for initializing oled.clearDisplay(); // clear display oled.setTextSize(2); // text size oled.setTextColor(WHITE); // text color oled.setCursor(0, 10); // position to display tempString.reserve(10); // to avoid fragmenting memory when using String } void loop() { // generate 10-microsecond pulse to TRIG pin digitalWrite(TRIG_PIN, HIGH); delayMicroseconds(10); digitalWrite(TRIG_PIN, LOW); // measure duration of pulse from ECHO pin long duration_us = pulseIn(ECHO_PIN, HIGH); // calculate the distance float distance_cm = 0.017 * duration_us; // print the value to Serial Monitor Serial.print("distance: "); Serial.print(distance_cm); Serial.println(" cm"); tempString = String(distance_cm, 2); // two decimal places tempString += " cm"; Serial.println(tempString); // print the temperature in Celsius to Serial Monitor oledDisplayCenter(tempString); // display temperature on OLED } void oledDisplayCenter(String text) { int16_t x1; int16_t y1; uint16_t width; uint16_t height; oled.getTextBounds(text, 0, 0, &x1, &y1, &width, &height); // display on horizontal and vertical center oled.clearDisplay(); // clear display oled.setCursor((SCREEN_WIDTH - width) / 2, (SCREEN_HEIGHT - height) / 2); oled.println(text); // text to display oled.display(); }

Snelle Stappen

  • Open de Arduino IDE.
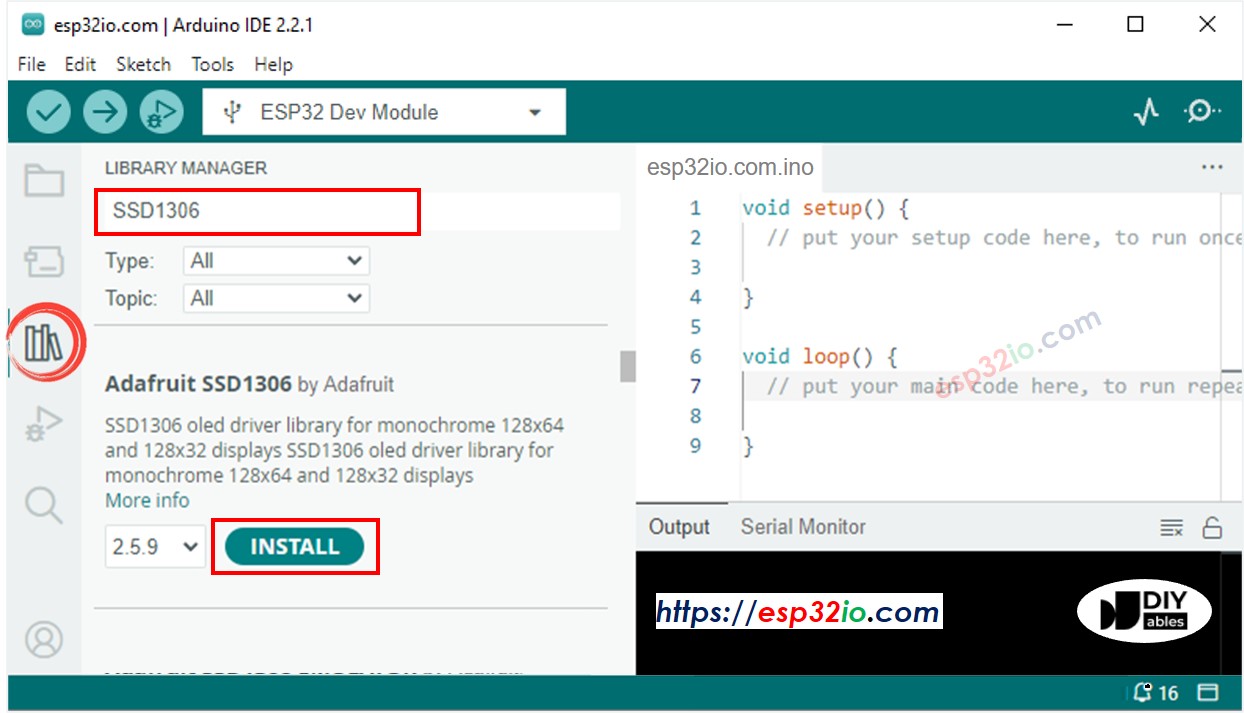
  • Klik op het Libraries icoon in de linker balk van de Arduino IDE.
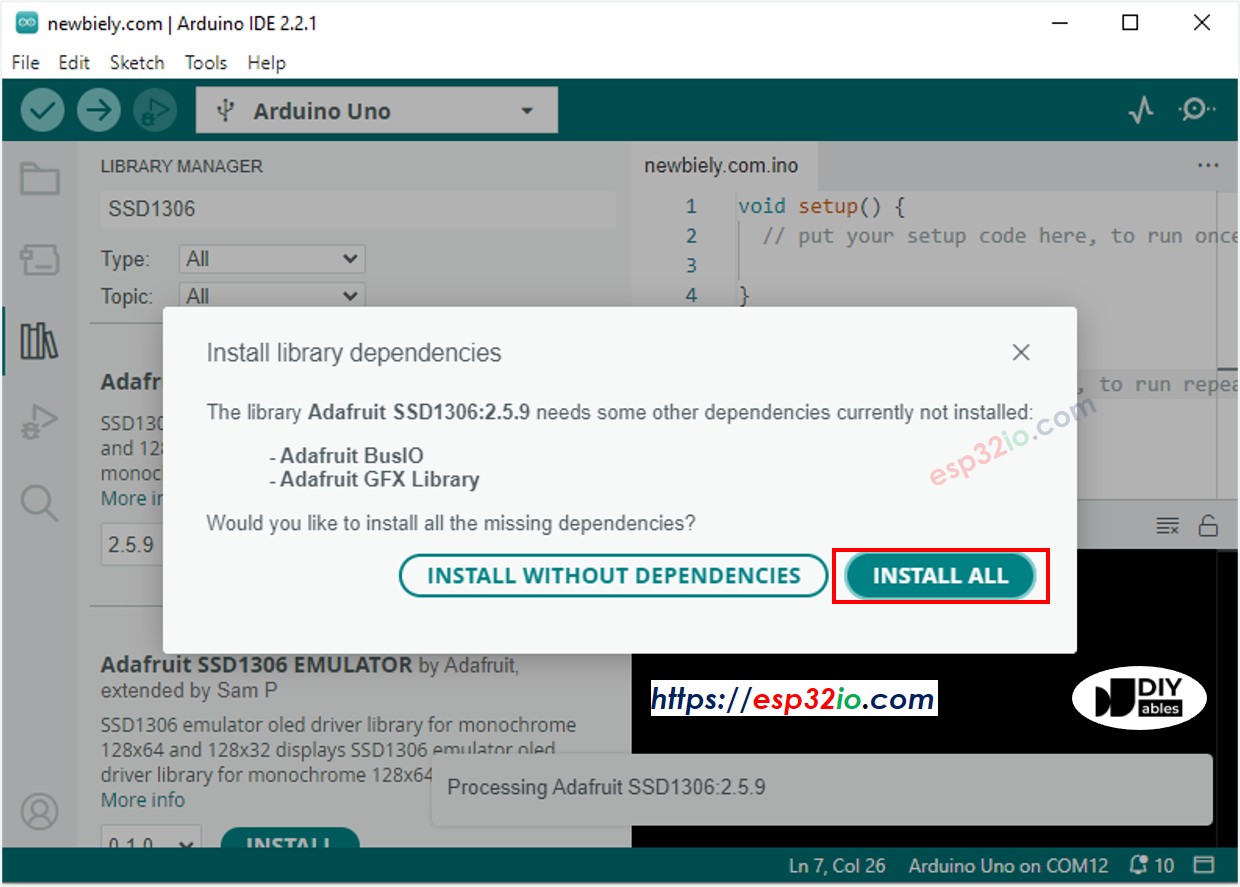
  • Zoek op “SSD1306” en vind de SSD1306-bibliotheek van Adafruit.
  • Klik op de Installeren knop om deze bibliotheek te installeren.
ESP32 OLED bibliotheek
  • U wordt gevraagd enkele andere bibliotheek afhankelijkheden te installeren.
  • Klik op de Installeer Alles knop om alle afhankelijkheden te installeren.
ESP32 Adafruit GFX sensor bibliotheek
  • Kopieer bovenstaande code en plak deze in de Arduino IDE.
  • Compileer en upload de code naar de ESP32 module door op de Uploaden knop in de Arduino IDE te klikken.
  • Beweeg uw hand voor de sensor.
  • Bekijk het resultaat op het OLED-scherm en in de Seriële Monitor.

※ Notiz:

De bovenstaande code centreert de tekst automatisch horizontaal en verticaal op het OLED-display. Zie Hoe tekst verticaal/horizontaal centreren op OLED voor meer informatie.

Video Tutorial

We overwegen het maken van videotutorials. Als u videotutorials belangrijk vindt, abonneer u dan op ons YouTube-kanaal om ons te motiveren de video's te maken.

※ ONZE BERICHTEN

  • U bent welkom om de link naar deze tutorial te delen. Gebruik onze inhoud echter niet op andere websites. We hebben veel moeite en tijd gestoken in het maken van de inhoud, respecteer alstublieft ons werk!