Arduino - DHT22 - OLED
In deze tutorial leert u hoe u de temperatuur en luchtvochtigheid uitleest van de DHT22 module en deze weergeeft op een OLED-display.
Hardware Benodigd
Of u kunt de volgende kits kopen:
| 1 | × | DIYables STEM V3 Starterskit (Arduino inbegrepen) | |
| 1 | × | DIYables Sensorkit (30 sensoren/displays) | |
| 1 | × | DIYables Sensorkit (18 sensoren/displays) |
Openbaarmaking: Sommige van de links in deze sectie zijn Amazon-affiliate links. We kunnen een commissie ontvangen voor aankopen die via deze links worden gedaan, zonder extra kosten voor u. We waarderen uw steun.
Over OLED Display en DHT22 Temperatuur Luchtvochtigheid Sensor
Als u nog niet bekend bent met het OLED-display en de DHT22 temperatuur- en vochtigheidssensor (pinout, werking, programmeren, etc.), leert u hier meer over in de volgende tutorials:
- Arduino - OLED tutorial
- Arduino - DHT22 tutorial
Aansluitschema
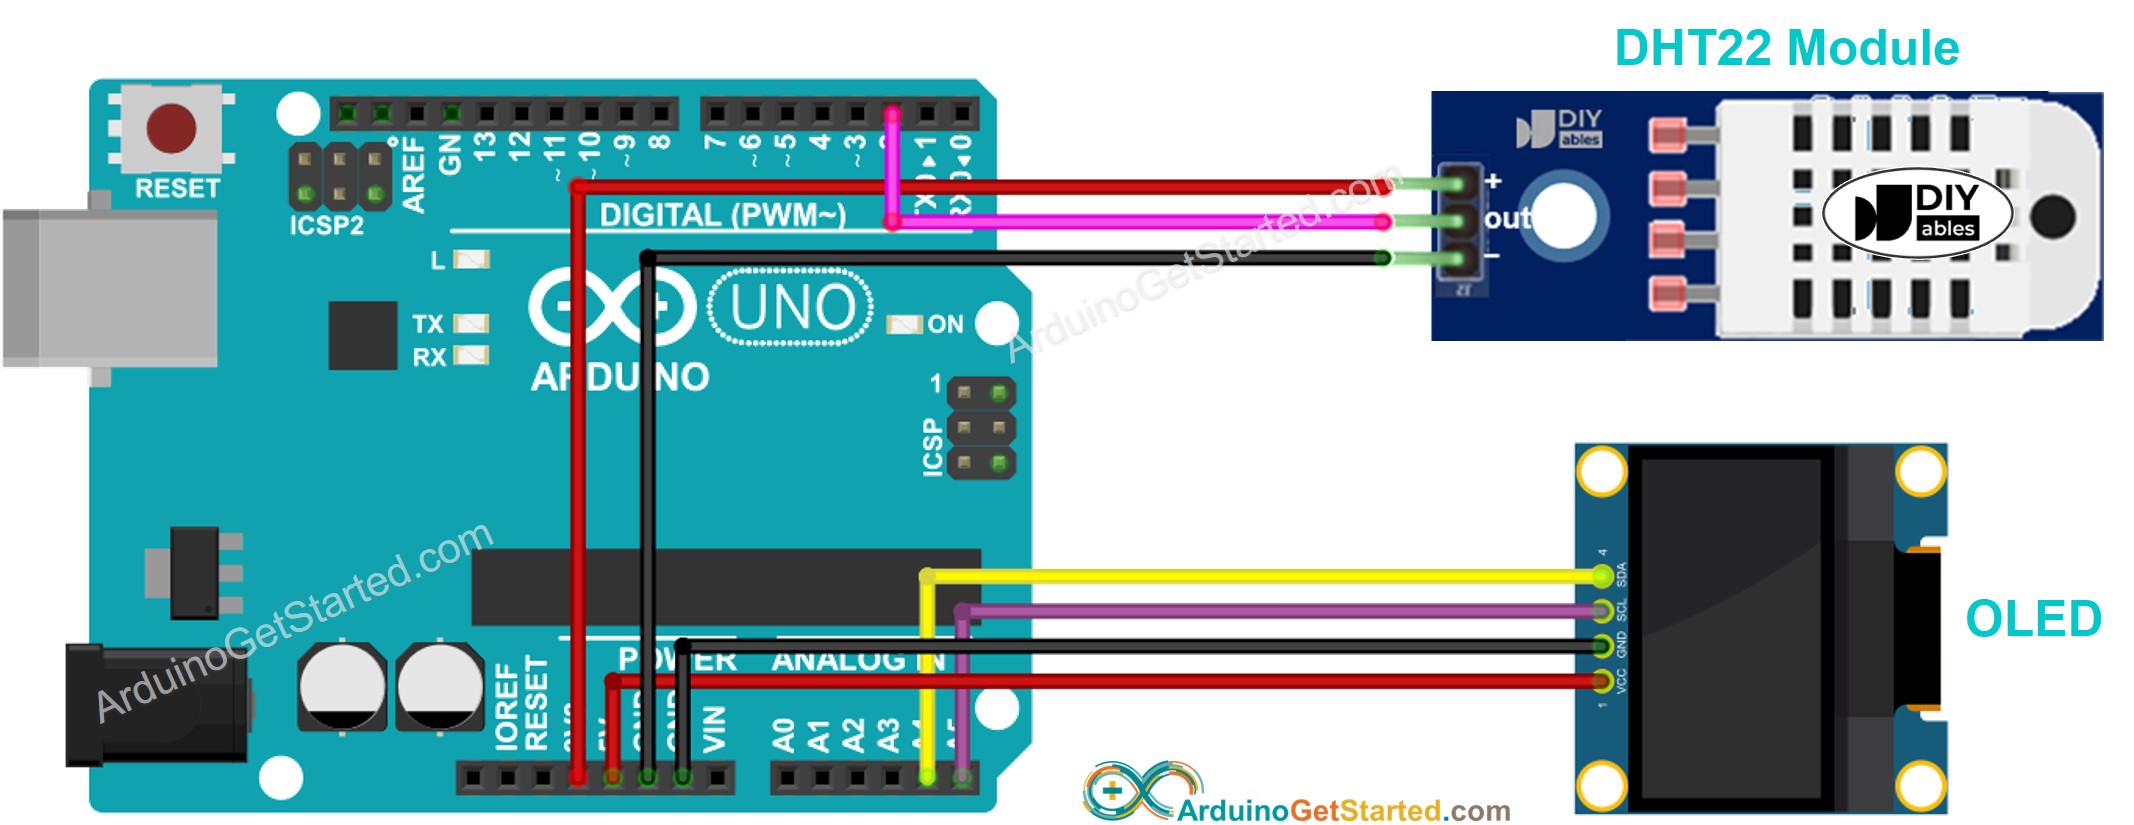
Deze afbeelding is gemaakt met Fritzing. Klik om de afbeelding te vergroten.
Arduino Code - DHT22 Sensor - OLED
/*
* Deze Arduino code is ontwikkeld door newbiely.nl
* Deze Arduino code wordt zonder enige beperking aan het publiek beschikbaar gesteld.
* Voor volledige instructies en schema's, bezoek:
* https://newbiely.nl/tutorials/arduino/arduino-dht22-oled
*/
#include <Wire.h>
#include <Adafruit_GFX.h>
#include <Adafruit_SSD1306.h>
#include <DHT.h>
#define SCREEN_WIDTH 128 // OLED display width, in pixels
#define SCREEN_HEIGHT 64 // OLED display height, in pixels
#define DHT22_PIN 2 // pin connected to DHT22 sensor
Adafruit_SSD1306 oled(SCREEN_WIDTH, SCREEN_HEIGHT, &Wire, -1); // create SSD1306 display object connected to I2C
DHT dht22(DHT22_PIN, DHT22);
String temperature;
String humidity;
void setup() {
Serial.begin(9600);
// initialize OLED display with address 0x3C for 128x64
if (!oled.begin(SSD1306_SWITCHCAPVCC, 0x3C)) {
Serial.println(F("SSD1306 allocation failed"));
while (true);
}
delay(2000); // wait for initializing
oled.clearDisplay(); // clear display
oled.setTextSize(3); // text size
oled.setTextColor(WHITE); // text color
oled.setCursor(0, 10); // position to display
dht22.begin(); // initialize DHT22 the temperature and humidity sensor
temperature.reserve(10); // to avoid fragmenting memory when using String
humidity.reserve(10); // to avoid fragmenting memory when using String
}
void loop() {
float humi = dht22.readHumidity(); // read humidity
float tempC = dht22.readTemperature(); // read temperature
// check if any reads failed
if (isnan(humi) || isnan(tempC)) {
temperature = "Failed";
humidity = "Failed";
} else {
temperature = String(tempC, 1); // one decimal places
temperature += char (247); // degree character
temperature += "C";
humidity = String(humi, 1); // one decimal places
humidity += "%";
Serial.print(tempC); // print to Serial Monitor
Serial.print("°C | " ); // print to Serial Monitor
Serial.print(humi); // print to Serial Monitor
Serial.println("%"); // print to Serial Monitor
}
oledDisplayCenter(temperature, humidity); // display temperature and humidity on OLED
}
void oledDisplayCenter(String temperature, String humidity) {
int16_t x1;
int16_t y1;
uint16_t width_T;
uint16_t height_T;
uint16_t width_H;
uint16_t height_H;
oled.getTextBounds(temperature, 0, 0, &x1, &y1, &width_T, &height_T);
oled.getTextBounds(temperature, 0, 0, &x1, &y1, &width_H, &height_H);
// display on horizontal and vertical center
oled.clearDisplay(); // clear display
oled.setCursor((SCREEN_WIDTH - width_T) / 2, SCREEN_HEIGHT/2 - height_T - 5);
oled.println(temperature); // text to display
oled.setCursor((SCREEN_WIDTH - width_H) / 2, SCREEN_HEIGHT/2 + 5);
oled.println(humidity); // text to display
oled.display();
}
Snelle Stappen
- Open de Arduino IDE op uw pc.
- Ga naar het Libraries-icoon in de linkerzijbalk van de Arduino IDE.
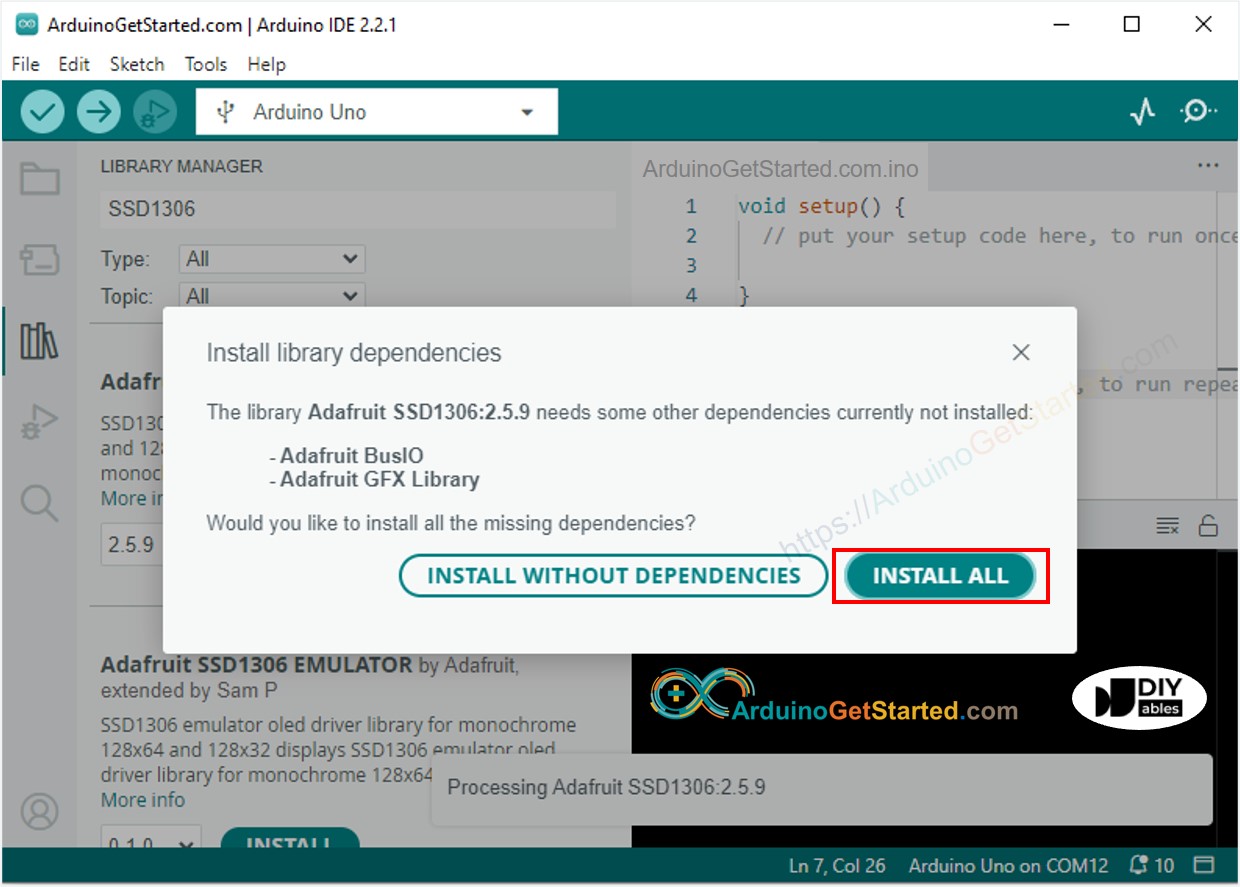
- Zoek op “SSD1306” en vind de SSD1306 library van Adafruit
- Klik op de Install-knop om de library te installeren.

- U wordt gevraagd om enkele aanvullende bibliotheken te installeren
- Klik op de Install All-knop om alle benodigde bibliotheken te installeren.
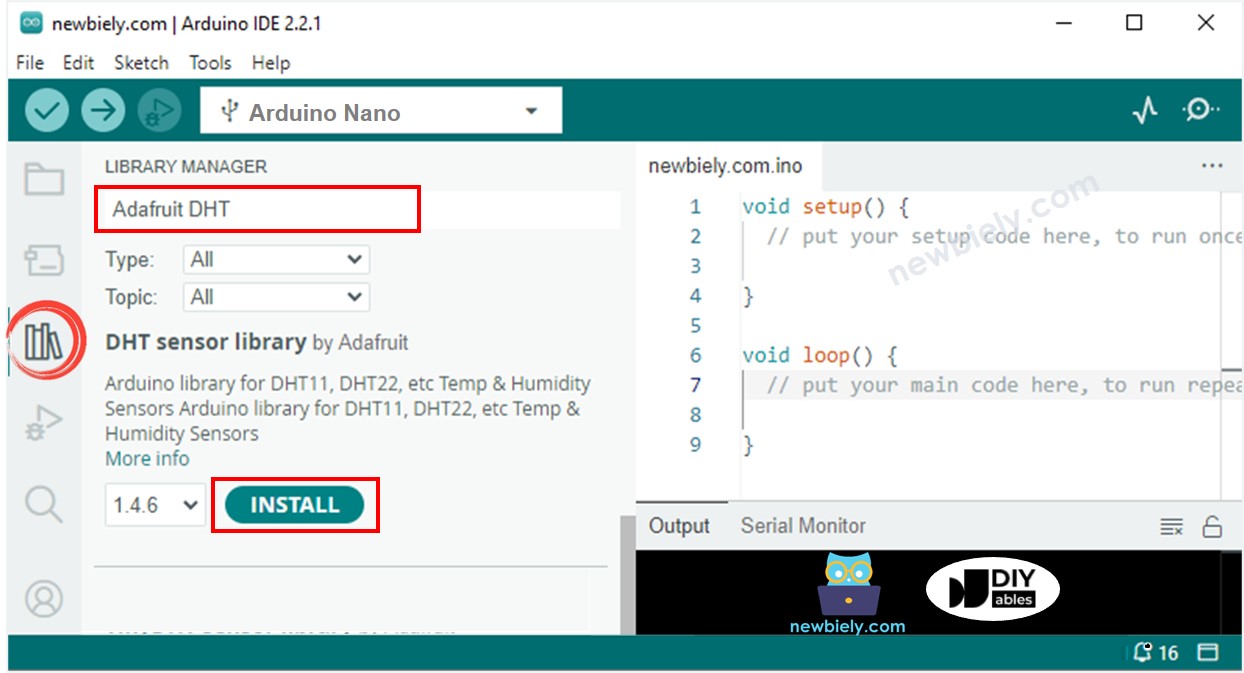
- Zoek op “DHT” en vind de DHT sensor library van Adafruit
- Klik op de Install-knop om de library te installeren.
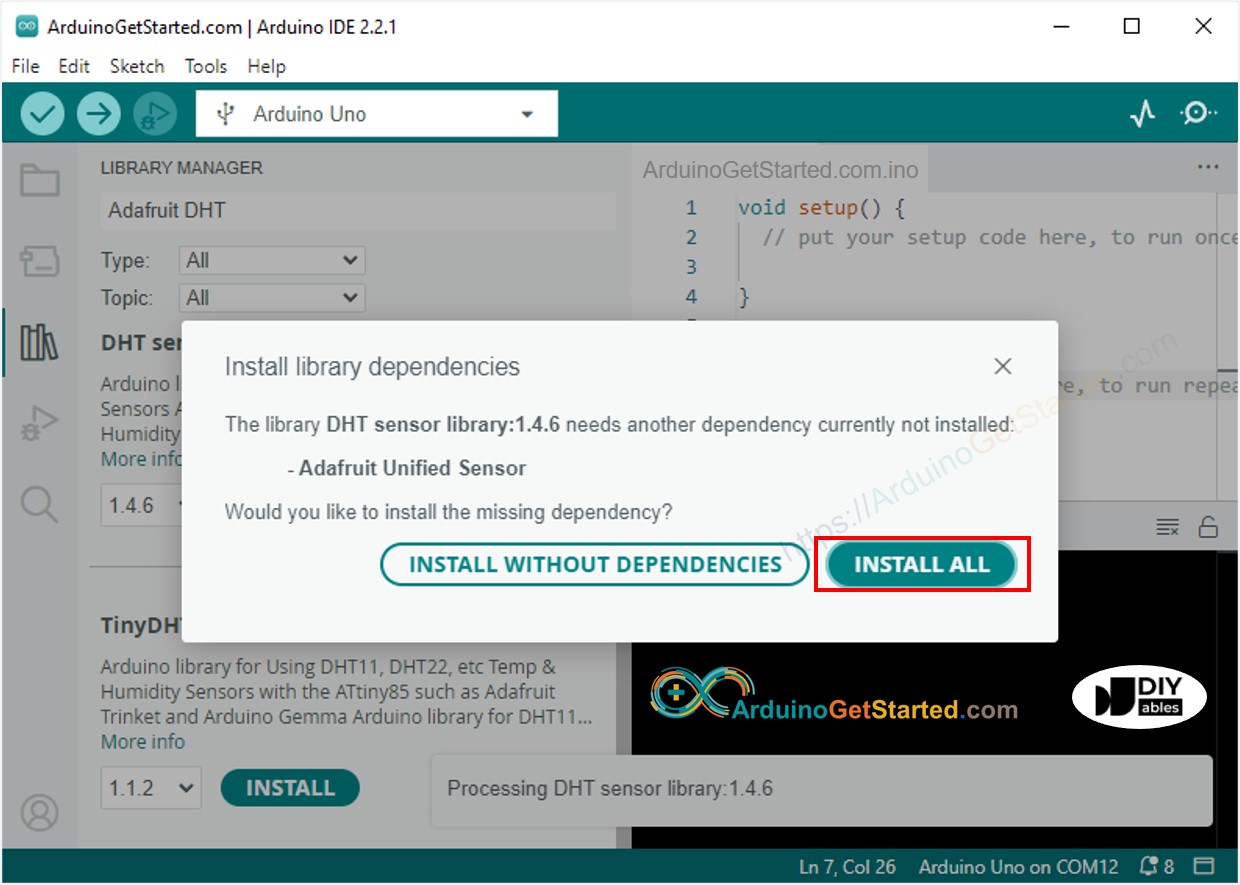
- U wordt gevraagd om enkele aanvullende bibliotheken te installeren
- Klik op de Install All-knop om alle aanvullende bibliotheken te installeren.
- Kopieer bovenstaande code en open deze met de Arduino IDE
- Klik op de Upload-knop in de Arduino IDE om de code naar de Arduino te uploaden
- Houd de sensor in heet en koud water, of pak de sensor vast met uw hand
- Bekijk het resultaat op het OLED-display en de Seriële Monitor
※ Notiz:
De bovenstaande code centreert de tekst automatisch horizontaal en verticaal op het OLED-display
Video Tutorial
We overwegen het maken van videotutorials. Als u videotutorials belangrijk vindt, abonneer u dan op ons YouTube-kanaal om ons te motiveren de video's te maken.