Arduino - Temperatuur via Web
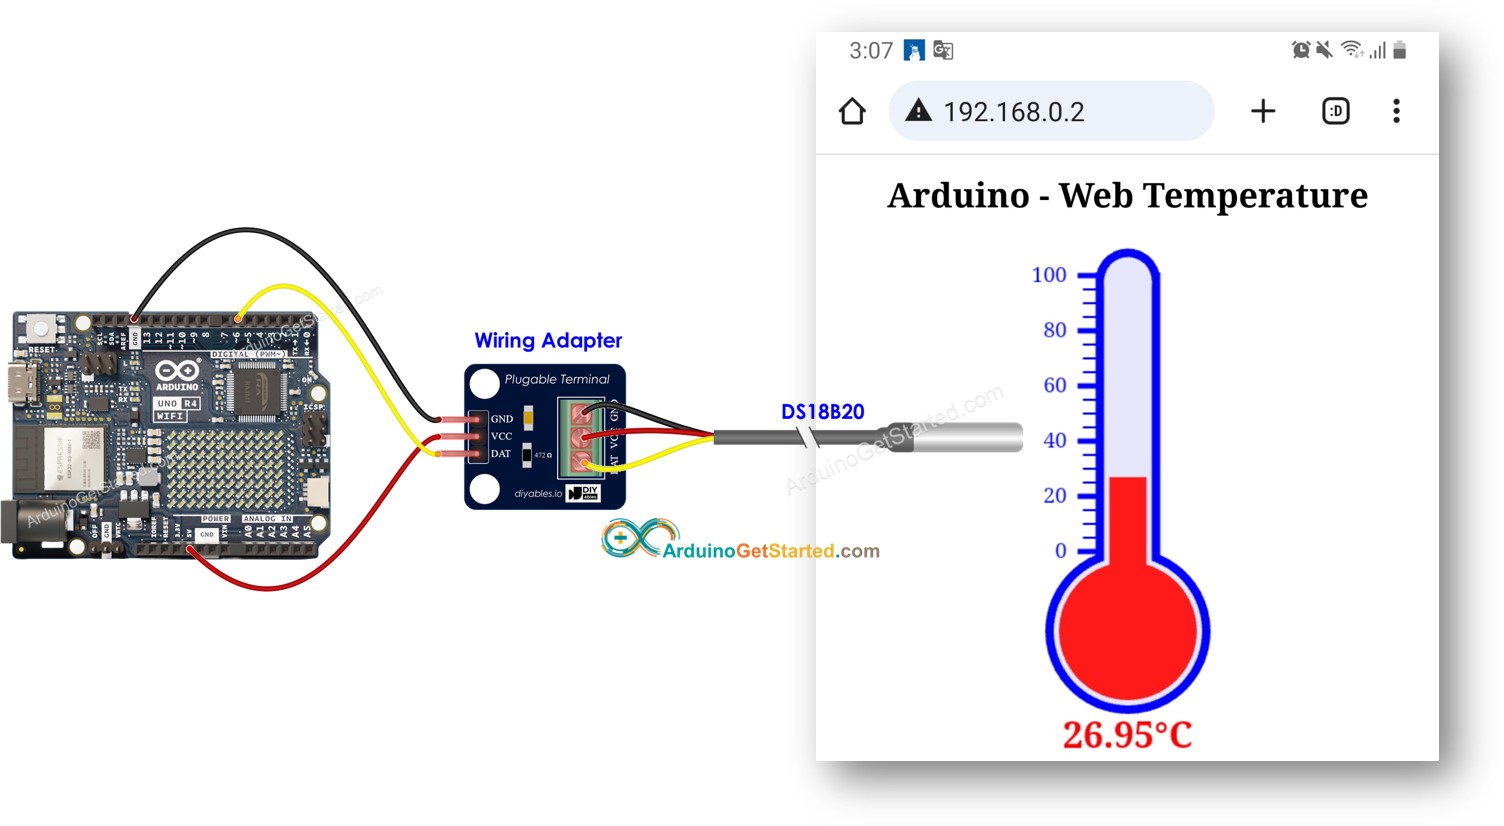
In deze handleiding leert u hoe u een Arduino programmeert om als webserver te functioneren die de temperatuur via het web levert. U kunt de webpagina die Arduino aanbiedt openen om de temperatuur af te lezen van een DS18B20 temperatuursensor. Zo werkt het in grote lijnen:
Arduino is geprogrammeerd als een webserver.
U typt het IP-adres van de Arduino in een webbrowser op uw smartphone of PC.
Arduino reageert op het verzoek van de webbrowser met een webpagina die de temperatuur toont die de DS18B20 sensor meet.
We lopen twee voorbeeldcodes langs:
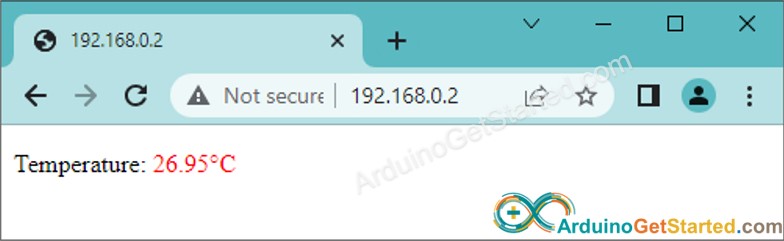
Arduino-code die een zeer eenvoudige webpagina aanbiedt met de temperatuur van de DS18B20 sensor. Dit maakt het gemakkelijk te begrijpen hoe het werkt.
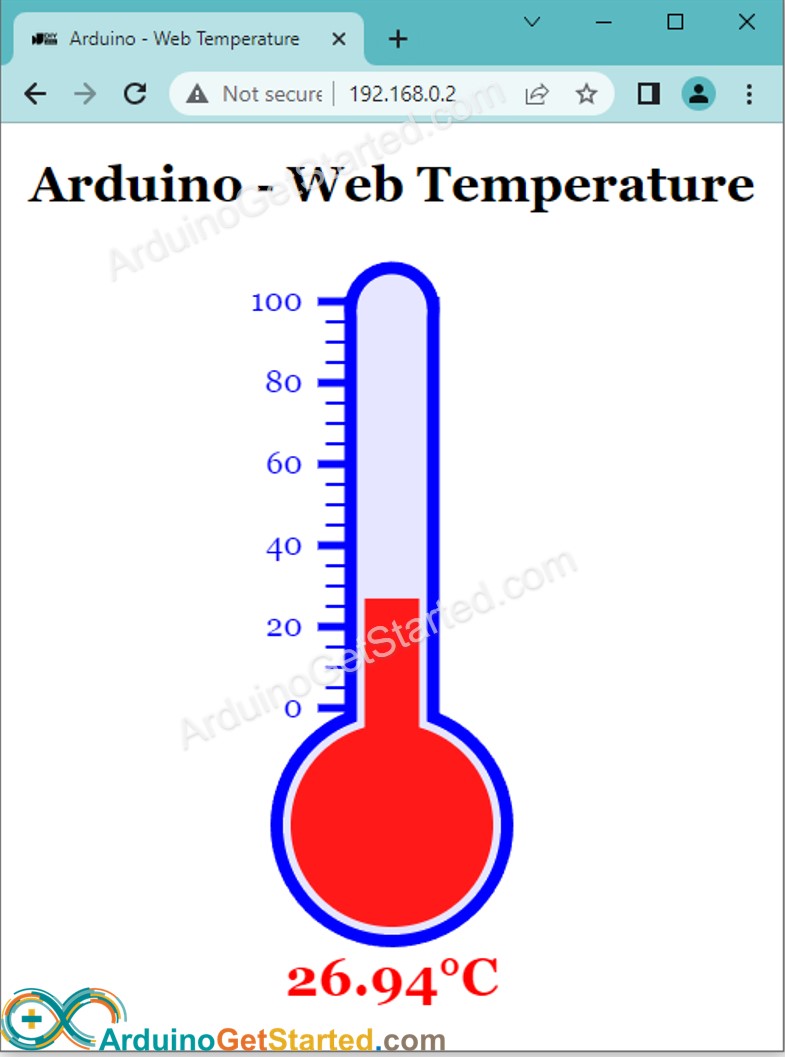
Arduino-code die een grafische webpagina aanbiedt met de temperatuur van de DS18B20 sensor.
Of u kunt de volgende kits kopen:
Openbaarmaking: Sommige van de links in deze sectie zijn Amazon-affiliate links. We kunnen een commissie ontvangen voor aankopen die via deze links worden gedaan, zonder extra kosten voor u. We waarderen uw steun.
Aankoopadvies: Veel DS18B20-sensoren op de markt zijn van lage kwaliteit. We raden u ten zeerste aan de sensor van het merk DIYables te kopen via de bovenstaande link. We hebben het getest en het werkte goed.
Als u nog niet bekend bent met de Arduino Uno R4 en DS18B20 temperatuursensor (pinout, werking, programmeren, enz.), leer er meer over in de volgende tutorials:
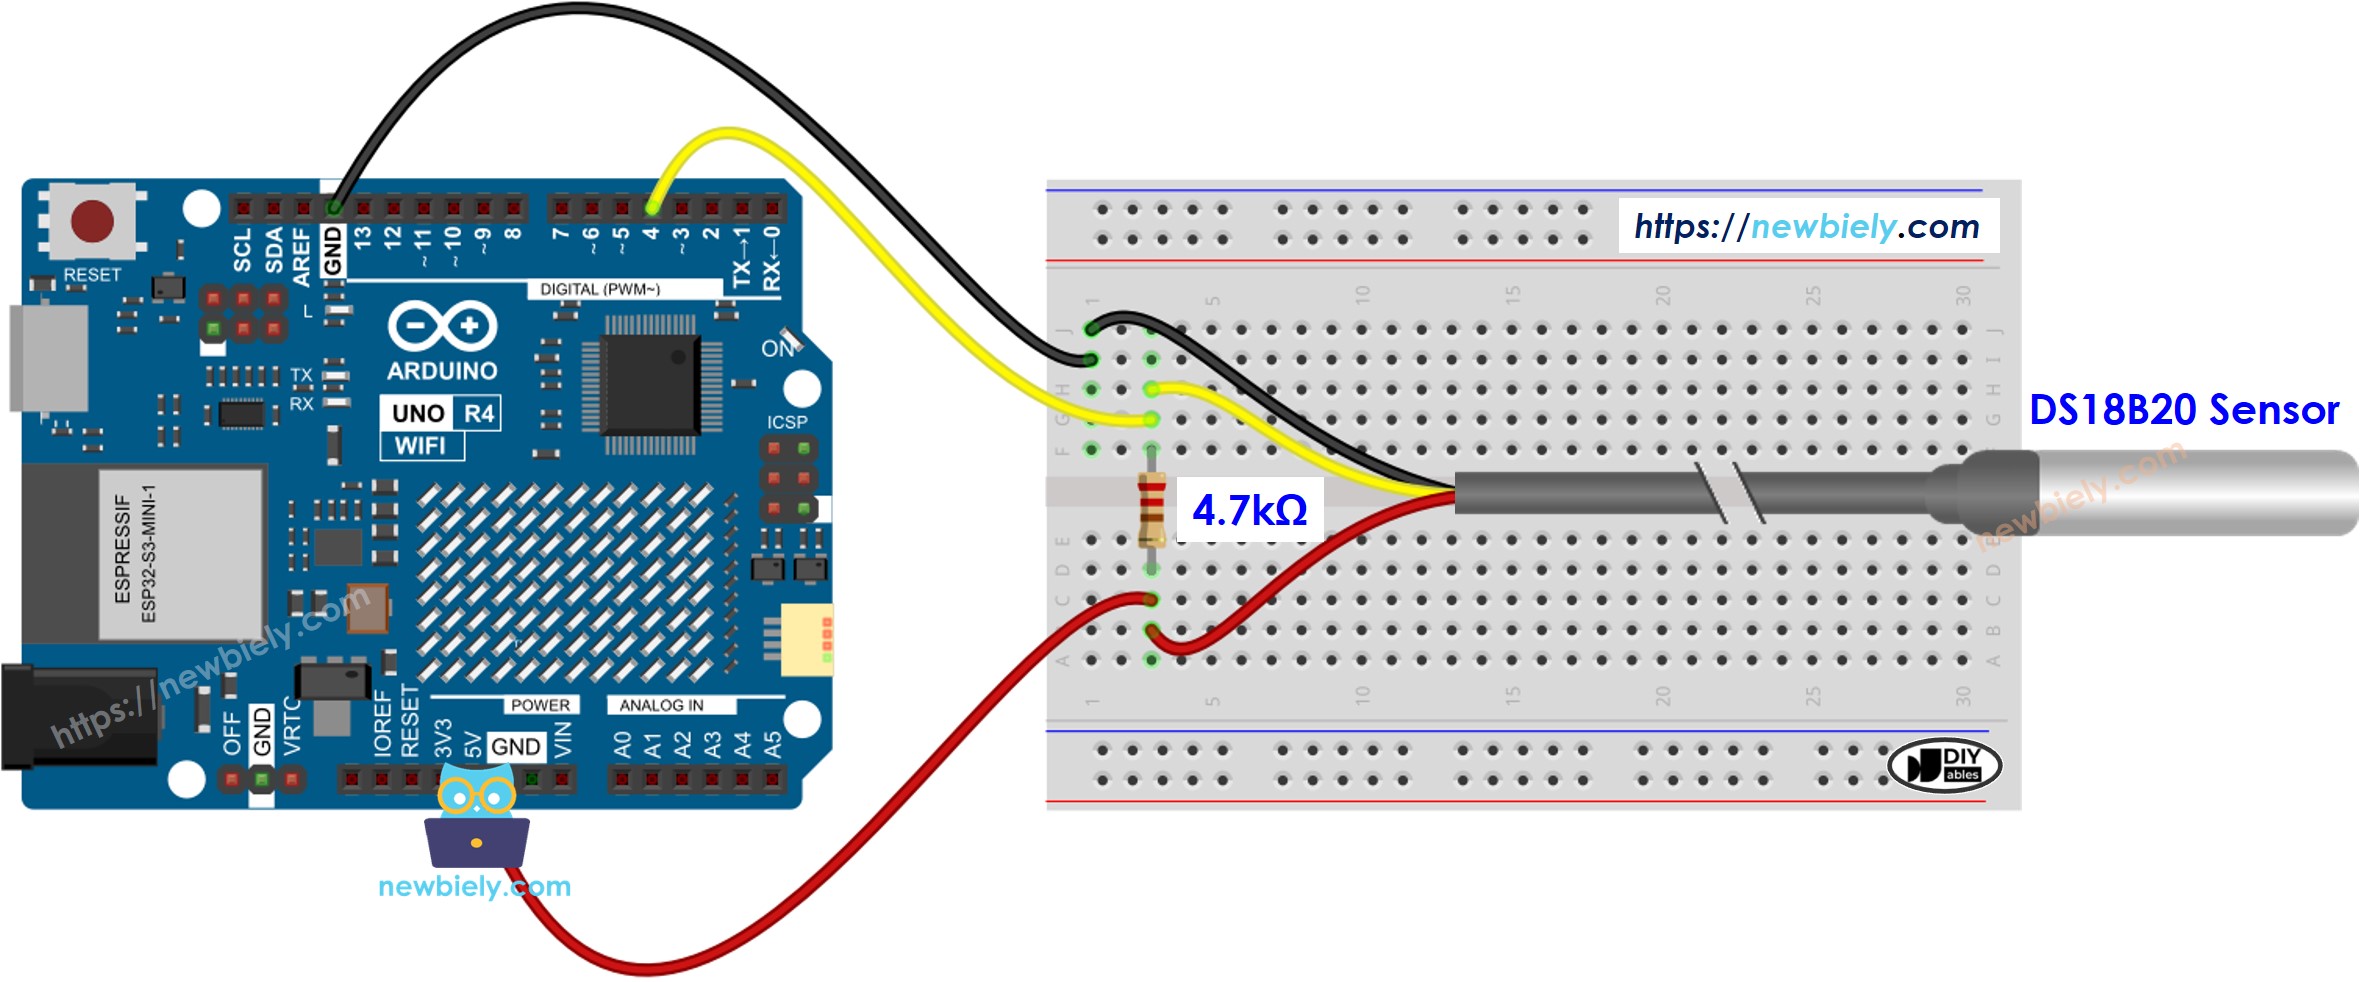
Deze afbeelding is gemaakt met Fritzing. Klik om de afbeelding te vergroten.
#include <UnoR4WiFi_WebServer.h>
#include <OneWire.h>
#include <DallasTemperature.h>
const char HTML_CONTENT[] PROGMEM = R"rawliteral(
<!DOCTYPE HTML>
<html>
<head>
<link rel="icon" href="data:,">
</head>
<p>
Temperature: <span style="color: red;">%TEMP_PLACE_HOLDER% °C</span>
</p>
</html>
)rawliteral";
const char WIFI_SSID[] = "YOUR_WIFI_SSID";
const char WIFI_PASSWORD[] = "YOUR_WIFI_PASSWORD";
const int SENSOR_PIN = 6;
OneWire oneWire(SENSOR_PIN);
DallasTemperature tempSensor(&oneWire);
UnoR4WiFi_WebServer server;
float getTemperature() {
tempSensor.requestTemperatures();
float tempCelsius = tempSensor.getTempCByIndex(0);
return tempCelsius;
}
void handleHome(WiFiClient& client, const String& method, const String& request, const QueryParams& params, const String& jsonData) {
float tempC = getTemperature();
String response = HTML_CONTENT;
response.replace("%TEMP_PLACE_HOLDER%", String(tempC, 1));
server.sendResponse(client, response.c_str());
}
void setup() {
Serial.begin(9600);
delay(1000);
tempSensor.begin();
Serial.println("Arduino Uno R4 WiFi - Temperature via Web");
Serial.print("Connecting to ");
Serial.println(WIFI_SSID);
WiFi.begin(WIFI_SSID, WIFI_PASSWORD);
while (WiFi.status() != WL_CONNECTED) {
delay(500);
Serial.print(".");
}
Serial.println("connected!");
Serial.print("IP address: ");
Serial.println(WiFi.localIP());
server.addRoute("/", handleHome);
server.begin();
Serial.println("\n=== Web Server Ready! ===");
Serial.print("Visit: http://");
Serial.println(WiFi.localIP());
}
void loop() {
server.handleClient();
}
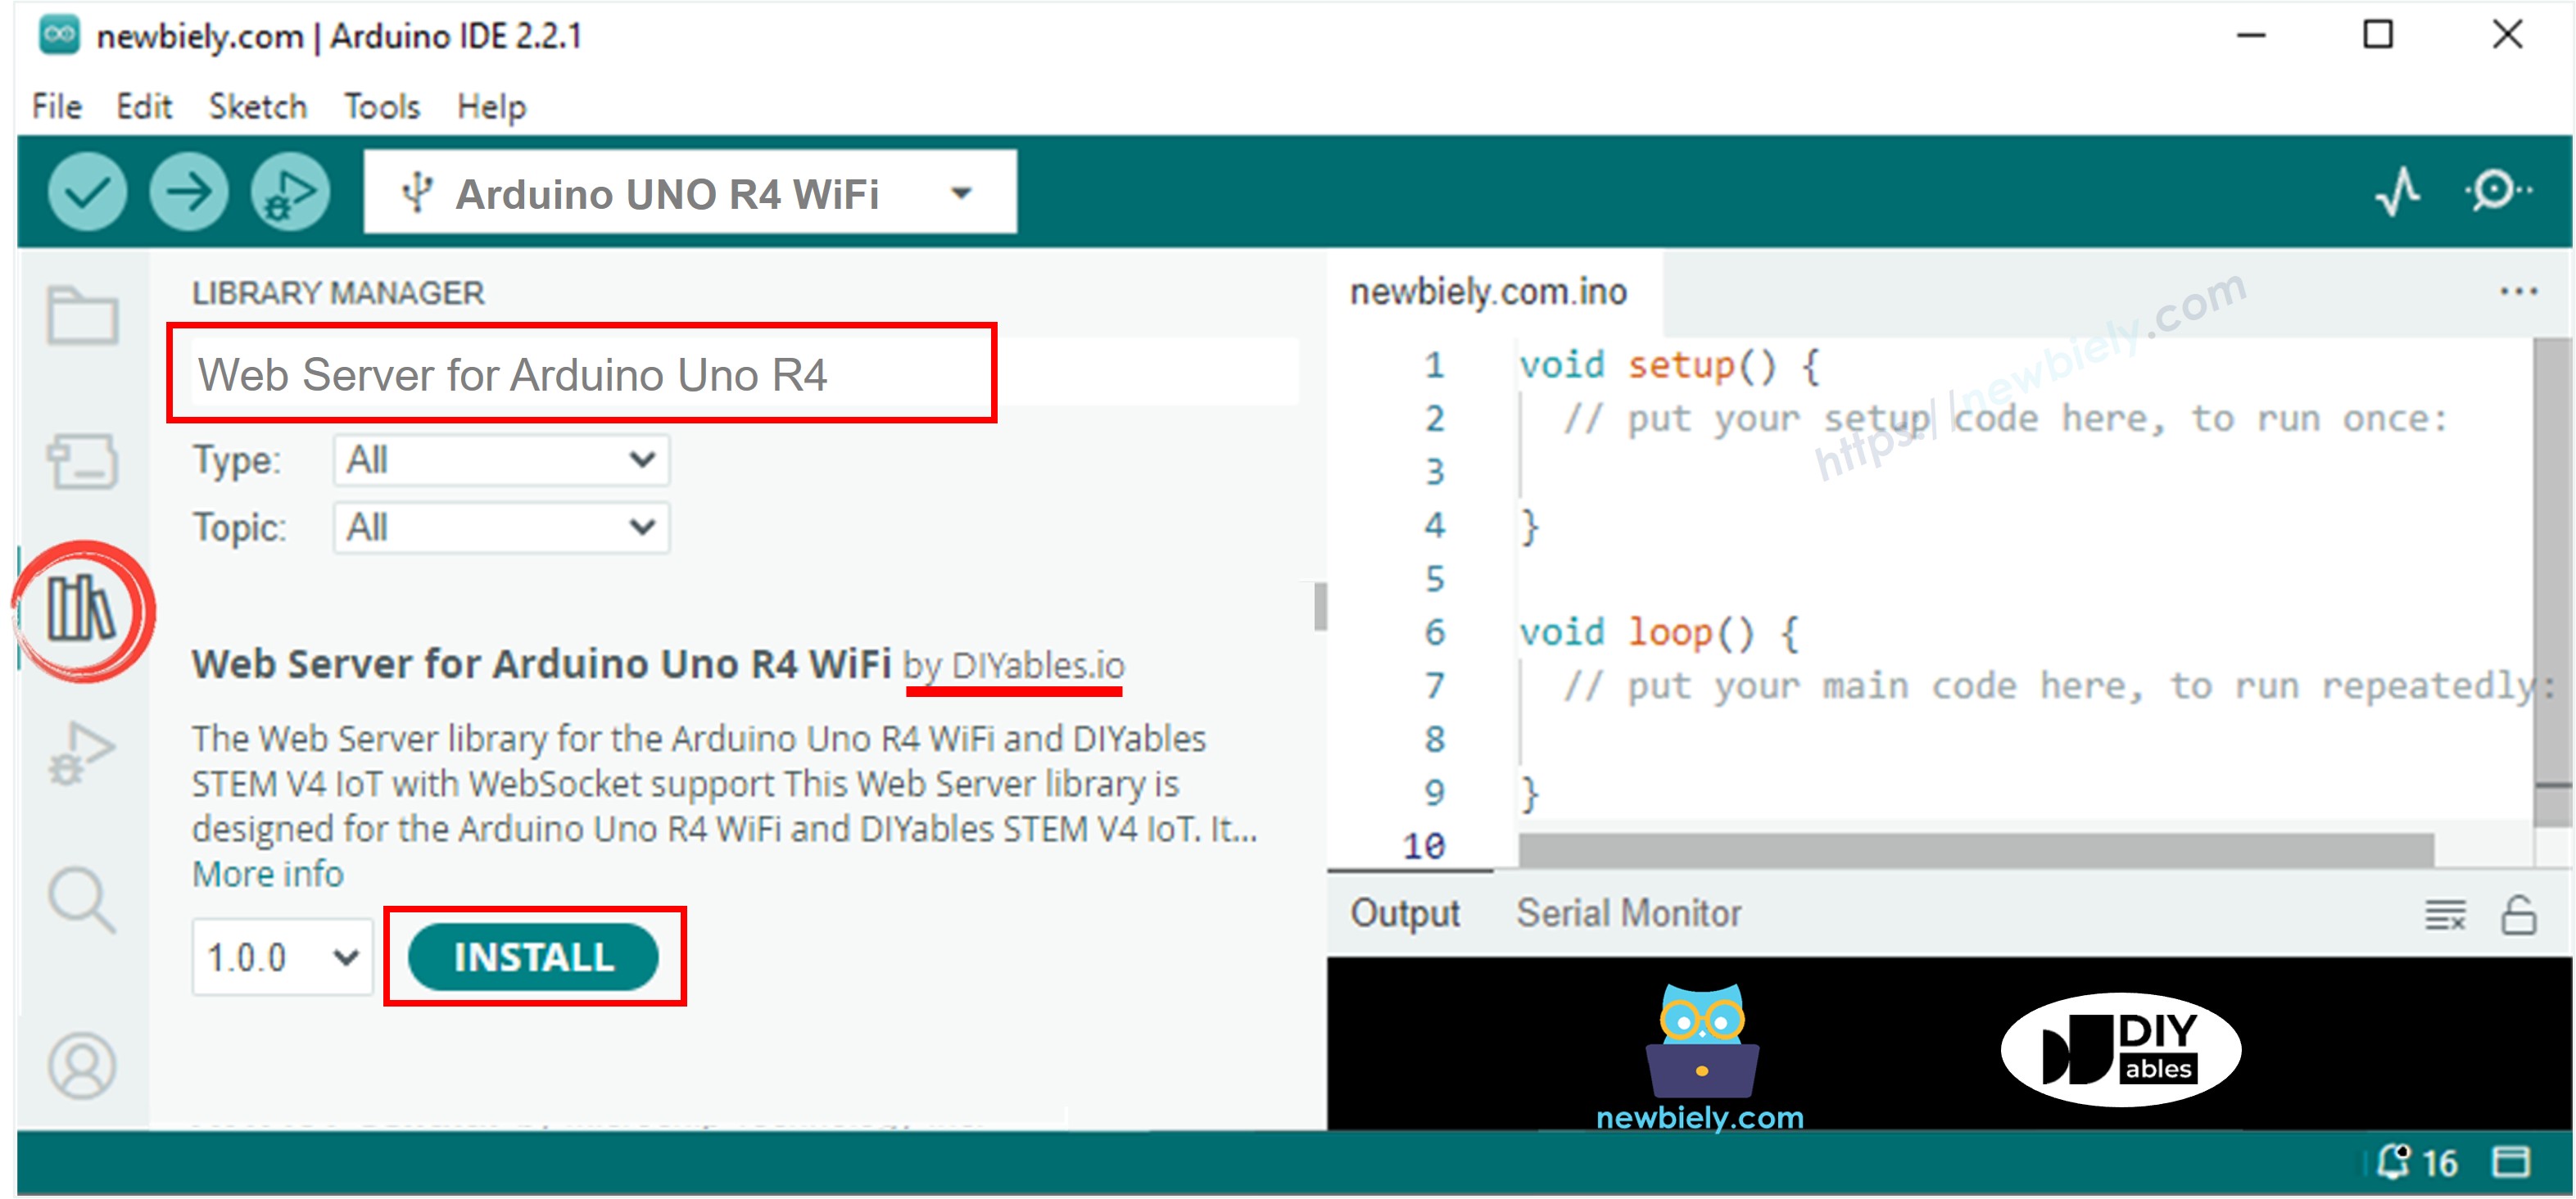
Open de Library Manager door te klikken op het Library Manager icoon links in de Arduino IDE.
Zoek op Web Server for Arduino Uno R4 WiFi en vind de Web Server bibliotheek gemaakt door DIYables.
Klik op de Installeren knop om de Web Server bibliotheek toe te voegen.
Kopieer bovenstaande code en open deze in Arduino IDE
Pas de wifi-gegevens (SSID en wachtwoord) in de code aan naar uw gegevens
Klik op de Upload knop in Arduino IDE om de code naar Arduino te laden
Open de Serial Monitor
Bekijk het resultaat in de Serial Monitor.
Arduino Uno R4 WiFi - Temperature via Web
Connecting to YOUR_WIFI_SSID
connected!
IP address: 192.168.0.254
Starting web server on IP: 192.168.0.254
=== Web Server Ready! ===
Visit: http://192.168.0.254
Arduino Uno R4 WiFi - Temperature via Web
Connecting to YOUR_WIFI_SSID
connected!
IP address: 192.168.0.254
Starting web server on IP: 192.168.0.254
=== Web Server Ready! ===
Visit: http://192.168.0.254
Method: GET
Requested path: /
Client disconnected
Omdat een grafische webpagina veel HTML-code bevat, is het niet praktisch om deze zoals eerder direct in de Arduino code te plaatsen. Daarom splitsen we de Arduino code en de HTML code in verschillende bestanden:
De Arduino code plaatsen we in een .ino bestand.
De HTML code (inclusief HTML, CSS en Javascript) plaatsen we in een .h bestand.
Open Arduino IDE en maak een nieuw sketch aan. Geef het een naam, bijvoorbeeld ArduinoGetStarted.com.ino
Kopieer onderstaande code en open deze in Arduino IDE
#include <UnoR4WiFi_WebServer.h>
#include "index.h"
#include <OneWire.h>
#include <DallasTemperature.h>
const char WIFI_SSID[] = "YOUR_WIFI_SSID";
const char WIFI_PASSWORD[] = "YOUR_WIFI_PASSWORD";
const int SENSOR_PIN = 6;
OneWire oneWire(SENSOR_PIN);
DallasTemperature tempSensor(&oneWire);
UnoR4WiFi_WebServer server;
float getTemperature() {
tempSensor.requestTemperatures();
float tempCelsius = tempSensor.getTempCByIndex(0);
return tempCelsius;
}
void handleHome(WiFiClient& client, const String& method, const String& request, const QueryParams& params, const String& jsonData) {
float tempC = getTemperature();
String response = HTML_CONTENT;
response.replace("TEMPERATURE_MARKER", String(tempC, 1));
server.sendResponse(client, response.c_str());
}
void setup() {
Serial.begin(9600);
delay(1000);
tempSensor.begin();
Serial.println("Arduino Uno R4 WiFi - Temperature via Web");
Serial.print("Connecting to ");
Serial.println(WIFI_SSID);
WiFi.begin(WIFI_SSID, WIFI_PASSWORD);
while (WiFi.status() != WL_CONNECTED) {
delay(500);
Serial.print(".");
}
Serial.println("connected!");
Serial.print("IP address: ");
Serial.println(WiFi.localIP());
server.addRoute("/", handleHome);
server.begin();
Serial.println("\n=== Web Server Ready! ===");
Serial.print("Visit: http://");
Serial.println(WiFi.localIP());
}
void loop() {
server.handleClient();
}
Pas de WiFi-gegevens (SSID en wachtwoord) in de code aan naar uw eigen instellingen
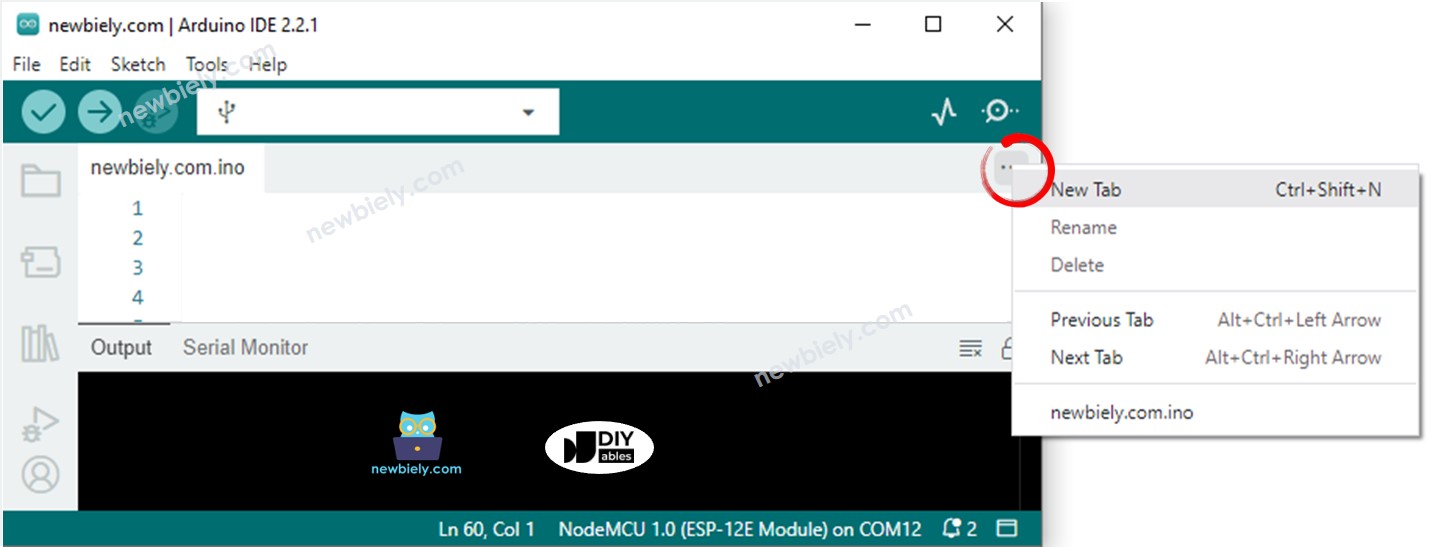
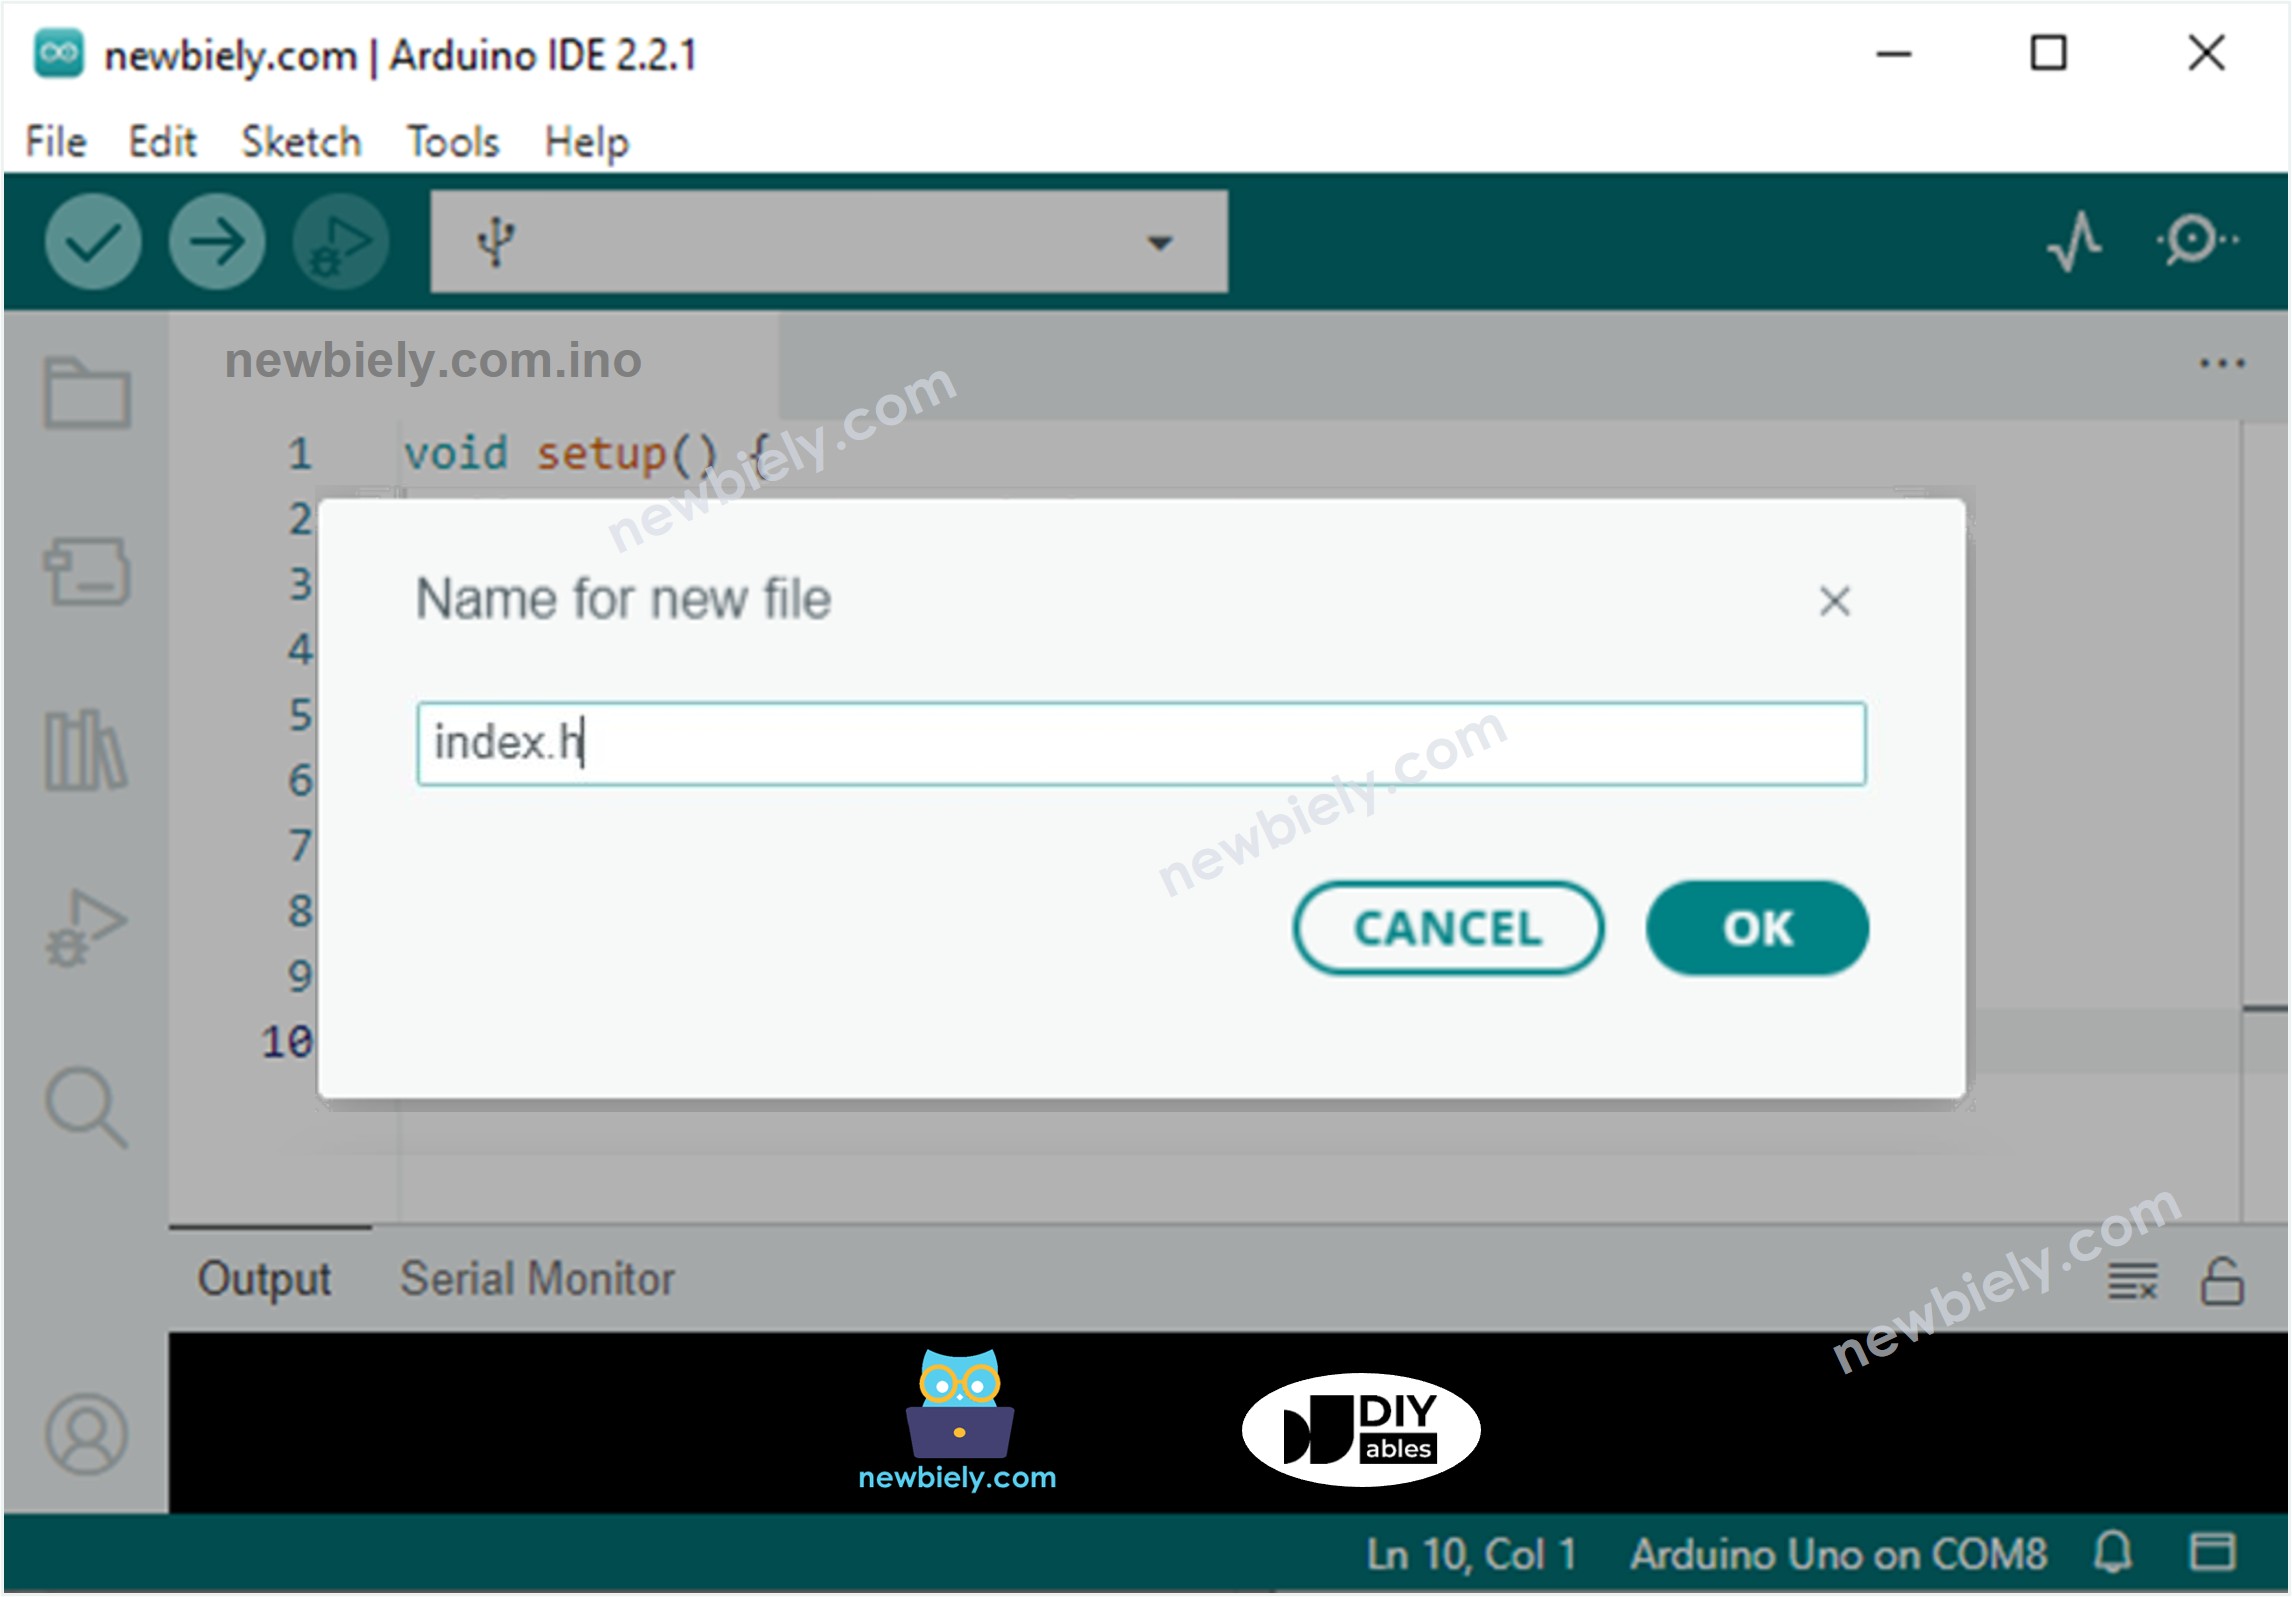
Maak het index.h bestand aan in Arduino IDE door:
const char *HTML_CONTENT = R""""(
<!DOCTYPE html>
<html>
<head>
<title>Arduino - Web Temperature</title>
<meta name="viewport" content="width=device-width, initial-scale=0.7, maximum-scale=0.7">
<meta charset="utf-8">
<link rel="icon" href="https://diyables.io/images/page/diyables.svg">
<style>
body { font-family: "Georgia"; text-align: center; font-size: width/2pt;}
h1 { font-weight: bold; font-size: width/2pt;}
h2 { font-weight: bold; font-size: width/2pt;}
button { font-weight: bold; font-size: width/2pt;}
</style>
<script>
var cvs_width = 200, cvs_height = 450;
function init() {
var canvas = document.getElementById("cvs");
canvas.width = cvs_width;
canvas.height = cvs_height + 50;
var ctx = canvas.getContext("2d");
ctx.translate(cvs_width/2, cvs_height - 80);
update_view(TEMPERATURE_MARKER);
}
function update_view(temp) {
var canvas = document.getElementById("cvs");
var ctx = canvas.getContext("2d");
var radius = 70;
var offset = 5;
var width = 45;
var height = 330;
ctx.clearRect(-cvs_width/2, -350, cvs_width, cvs_height);
ctx.strokeStyle="blue";
ctx.fillStyle="blue";
var x = -width/2;
ctx.lineWidth=2;
for (var i = 0; i <= 100; i+=5) {
var y = -(height - radius)*i/100 - radius - 5;
ctx.beginPath();
ctx.lineTo(x, y);
ctx.lineTo(x - 20, y);
ctx.stroke();
}
ctx.lineWidth=5;
for (var i = 0; i <= 100; i+=20) {
var y = -(height - radius)*i/100 - radius - 5;
ctx.beginPath();
ctx.lineTo(x, y);
ctx.lineTo(x - 25, y);
ctx.stroke();
ctx.font="20px Georgia";
ctx.textBaseline="middle";
ctx.textAlign="right";
ctx.fillText(i.toString(), x - 35, y);
}
ctx.lineWidth=16;
ctx.beginPath();
ctx.arc(0, 0, radius, 0, 2 * Math.PI);
ctx.stroke();
ctx.beginPath();
ctx.rect(-width/2, -height, width, height);
ctx.stroke();
ctx.beginPath();
ctx.arc(0, -height, width/2, 0, 2 * Math.PI);
ctx.stroke();
ctx.fillStyle="#e6e6ff";
ctx.beginPath();
ctx.arc(0, 0, radius, 0, 2 * Math.PI);
ctx.fill();
ctx.beginPath();
ctx.rect(-width/2, -height, width, height);
ctx.fill();
ctx.beginPath();
ctx.arc(0, -height, width/2, 0, 2 * Math.PI);
ctx.fill();
ctx.fillStyle="#ff1a1a";
ctx.beginPath();
ctx.arc(0, 0, radius - offset, 0, 2 * Math.PI);
ctx.fill();
temp = Math.round(temp * 100) / 100;
var y = (height - radius)*temp/100.0 + radius + 5;
ctx.beginPath();
ctx.rect(-width/2 + offset, -y, width - 2*offset, y);
ctx.fill();
ctx.fillStyle="red";
ctx.font="bold 34px Georgia";
ctx.textBaseline="middle";
ctx.textAlign="center";
ctx.fillText(temp.toString() + "°C", 0, 100);
}
window.onload = init;
</script>
</head>
<body>
<h1>Arduino - Web Temperature</h1>
<canvas id="cvs"></canvas>
</body>
</html>
)"""";
Nu heeft u de code in twee bestanden: ArduinoGetStarted.com.ino en index.h
Klik op de Upload knop in Arduino IDE om de code naar de Arduino te uploaden
Open de webpagina van de Arduino zoals eerder in uw webbrowser. U ziet het volgende:
※ Notiz:
Als u wijzigingen aanbrengt in de HTML-inhoud in het index.h bestand maar niets aanpast in het ArduinoGetStarted.com.ino bestand, zal Arduino IDE de HTML inhoud niet verversen of bijwerken bij compilatie en upload.
Om Arduino IDE te dwingen toch de HTML inhoud bij te werken, moet u een wijziging aanbrengen in het ArduinoGetStarted.com.ino bestand. Bijvoorbeeld door een lege regel toe te voegen of een commentaar. Hierdoor herkent de IDE dat het project veranderd is en wordt de geüpdatete HTML inhoud opgenomen bij het uploaden.