Arduino - Rotary Encoder LED
In deze tutorial gaan we leren hoe u Arduino programmeert om de helderheid van een LED te regelen aan de hand van de uitgangswaarde van een rotary encoder.
Hardware Benodigd
Of u kunt de volgende kits kopen:
| 1 | × | DIYables Sensorkit (30 sensoren/displays) | |
| 1 | × | DIYables Sensorkit (18 sensoren/displays) |
Openbaarmaking: Sommige van de links in deze sectie zijn Amazon-affiliate links. We kunnen een commissie ontvangen voor aankopen die via deze links worden gedaan, zonder extra kosten voor u. We waarderen uw steun.
Over LED en Rotary Encoder
Als u nog niet bekend bent met LED en rotary encoder (pinout, hoe het werkt, hoe te programmeren ...), bekijk dan de volgende tutorials:
Bekabelingsschema
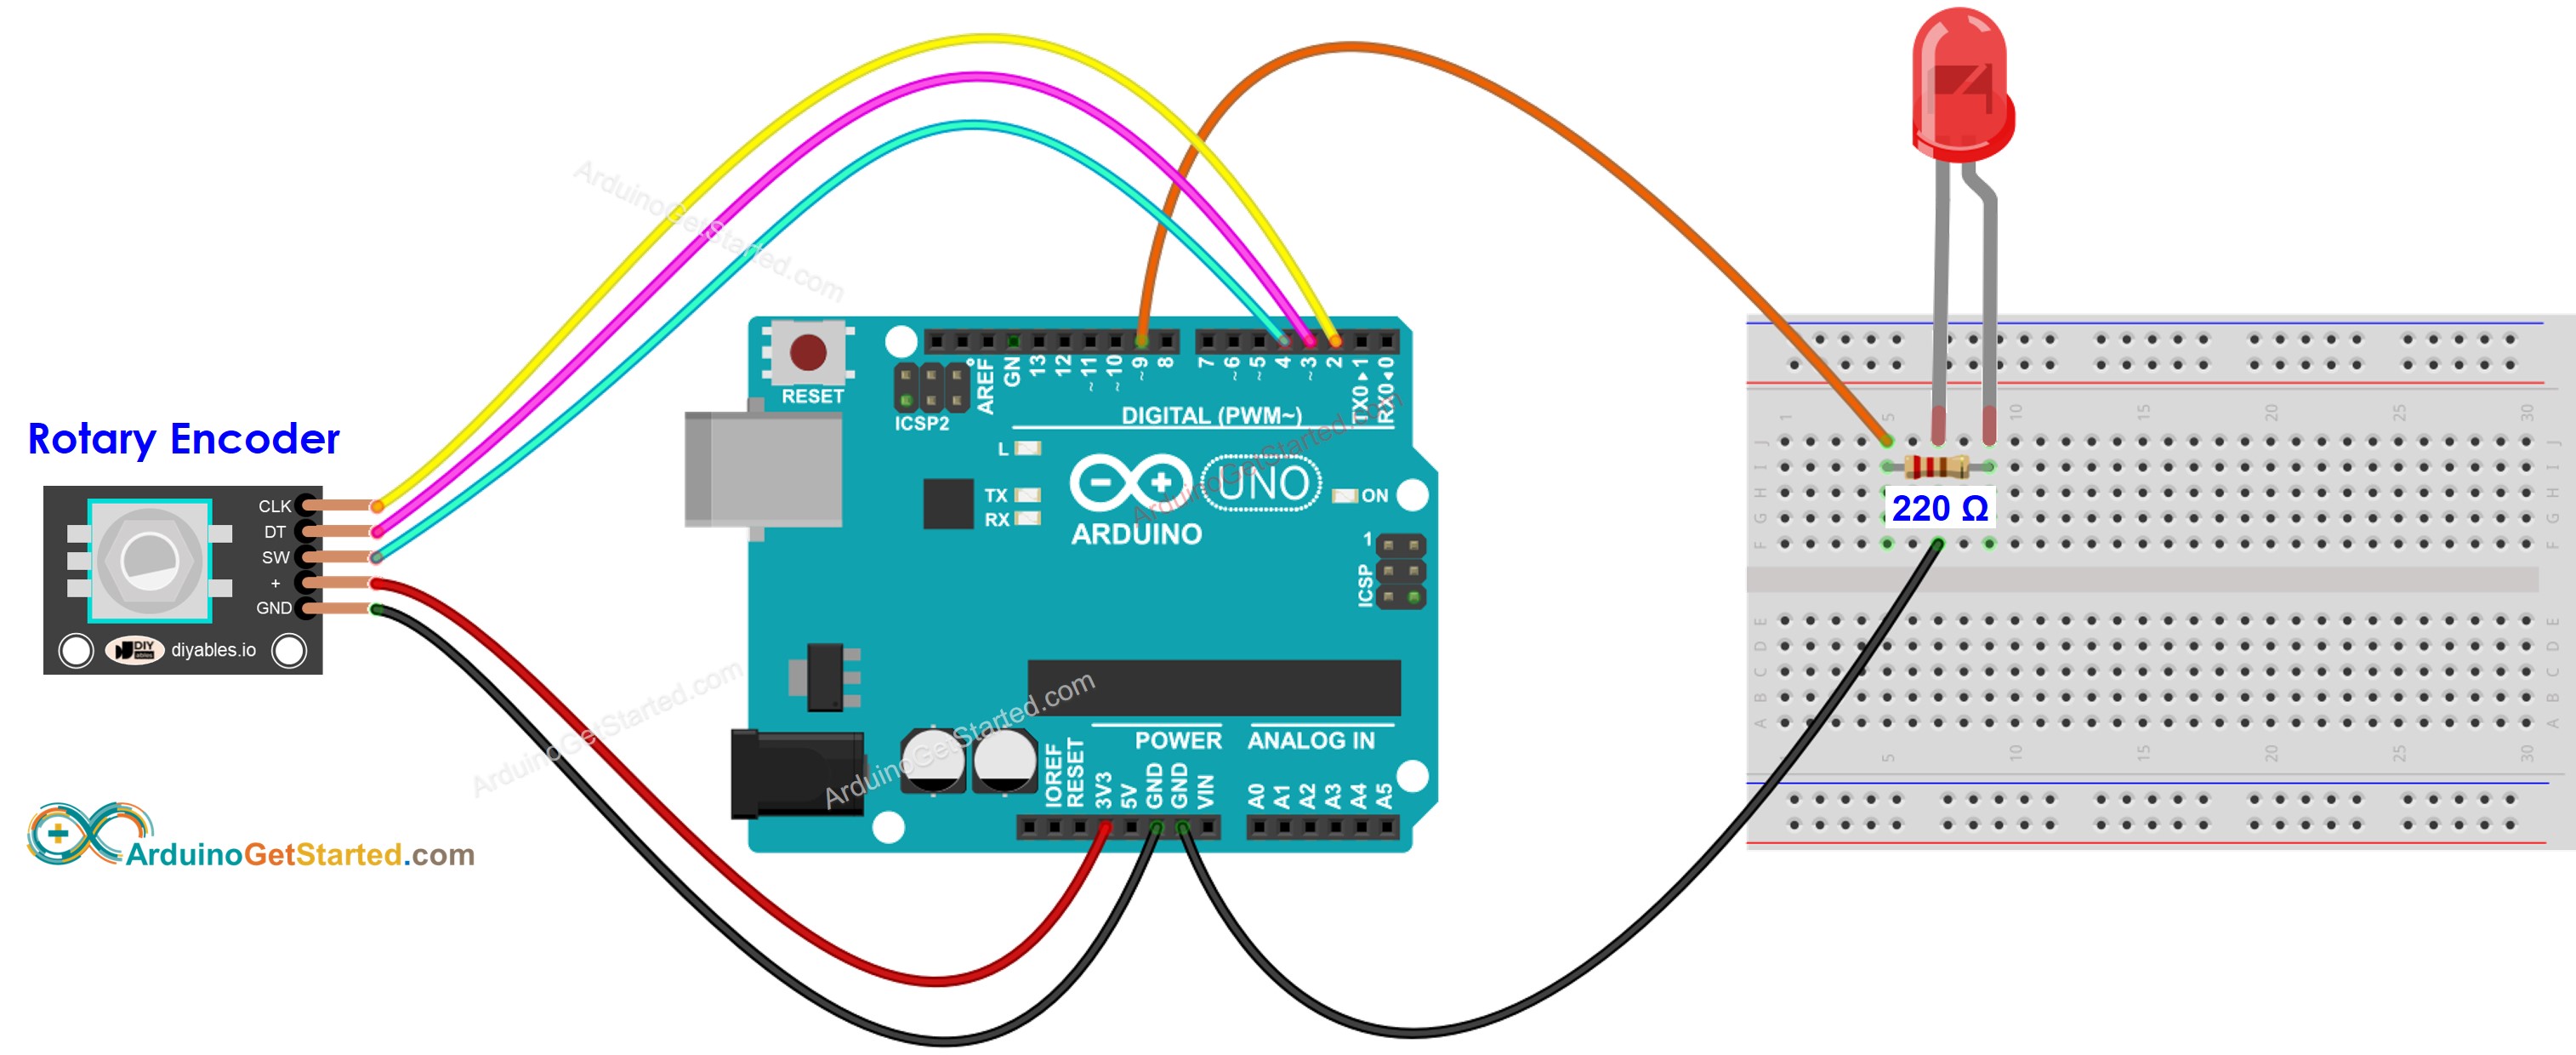
Deze afbeelding is gemaakt met Fritzing. Klik om de afbeelding te vergroten.
Arduino Code
/*
* Deze Arduino code is ontwikkeld door newbiely.nl
* Deze Arduino code wordt zonder enige beperking aan het publiek beschikbaar gesteld.
* Voor volledige instructies en schema's, bezoek:
* https://newbiely.nl/tutorials/arduino/arduino-rotary-encoder-led
*/
#include <Servo.h>
#define CLK_PIN 2
#define DT_PIN 3
#define SW_PIN 4
#define LED_PIN 9
#define DIRECTION_CW 0 // clockwise direction
#define DIRECTION_CCW 1 // counter-clockwise direction
int counter = 0;
int direction = DIRECTION_CW;
int CLK_state;
int prev_CLK_state;
int brightness = 125; // middle value
void setup() {
Serial.begin(9600);
// configure encoder pins as inputs
pinMode(CLK_PIN, INPUT);
pinMode(DT_PIN, INPUT);
// read the initial state of the rotary encoder's CLK pin
prev_CLK_state = digitalRead(CLK_PIN);
pinMode(LED_PIN, OUTPUT);
}
void loop() {
// read the current state of the rotary encoder's CLK pin
CLK_state = digitalRead(CLK_PIN);
// If the state of CLK is changed, then pulse occurred
// React to only the rising edge (from LOW to HIGH) to avoid double count
if (CLK_state != prev_CLK_state && CLK_state == HIGH) {
// if the DT state is HIGH
// the encoder is rotating in counter-clockwise direction => decrease the counter
if (digitalRead(DT_PIN) == HIGH) {
direction = DIRECTION_CCW;
counter--;
brightness -= 10; // you can change this value
} else {
// the encoder is rotating in clockwise direction => increase the counter
direction = DIRECTION_CW;
counter++;
brightness += 10; // you can change this value
}
if (brightness < 0)
brightness = 0;
else if (brightness > 255)
brightness = 255;
// sets the brightness of LED according to the counter
analogWrite(LED_PIN, brightness);
Serial.print("COUNTER: ");
Serial.print(counter);
Serial.print(" | BRIGHTNESS: ");
Serial.println(brightness);
}
// save last CLK state
prev_CLK_state = CLK_state;
}
Snelle Stappen
- Verbind de Arduino via de USB-kabel met uw PC
- Open de Arduino IDE, selecteer het juiste board en juiste poort
- Kopieer de bovenstaande code en open deze met de Arduino IDE
- Klik op de Upload knop in de Arduino IDE om de code naar de Arduino te uploaden
- Open de Seriële Monitor
- Draai aan de rotary encoder
- Zie de helderheid van de LED veranderen
- Bekijk de resultaten in de Seriële Monitor
COM6
COUNTER: 1 | BRIGHTNESS: 135
COUNTER: 2 | BRIGHTNESS: 145
COUNTER: 3 | BRIGHTNESS: 155
COUNTER: 4 | BRIGHTNESS: 165
COUNTER: 5 | BRIGHTNESS: 175
COUNTER: 6 | BRIGHTNESS: 185
COUNTER: 7 | BRIGHTNESS: 195
Autoscroll
Clear output
9600 baud
Newline
Code Uitleg
Lees de regel-voor-regel uitleg in de commentaarregels van de broncode!
Video Tutorial
We overwegen het maken van videotutorials. Als u videotutorials belangrijk vindt, abonneer u dan op ons YouTube-kanaal om ons te motiveren de video's te maken.