Arduino RS485 naar WiFi

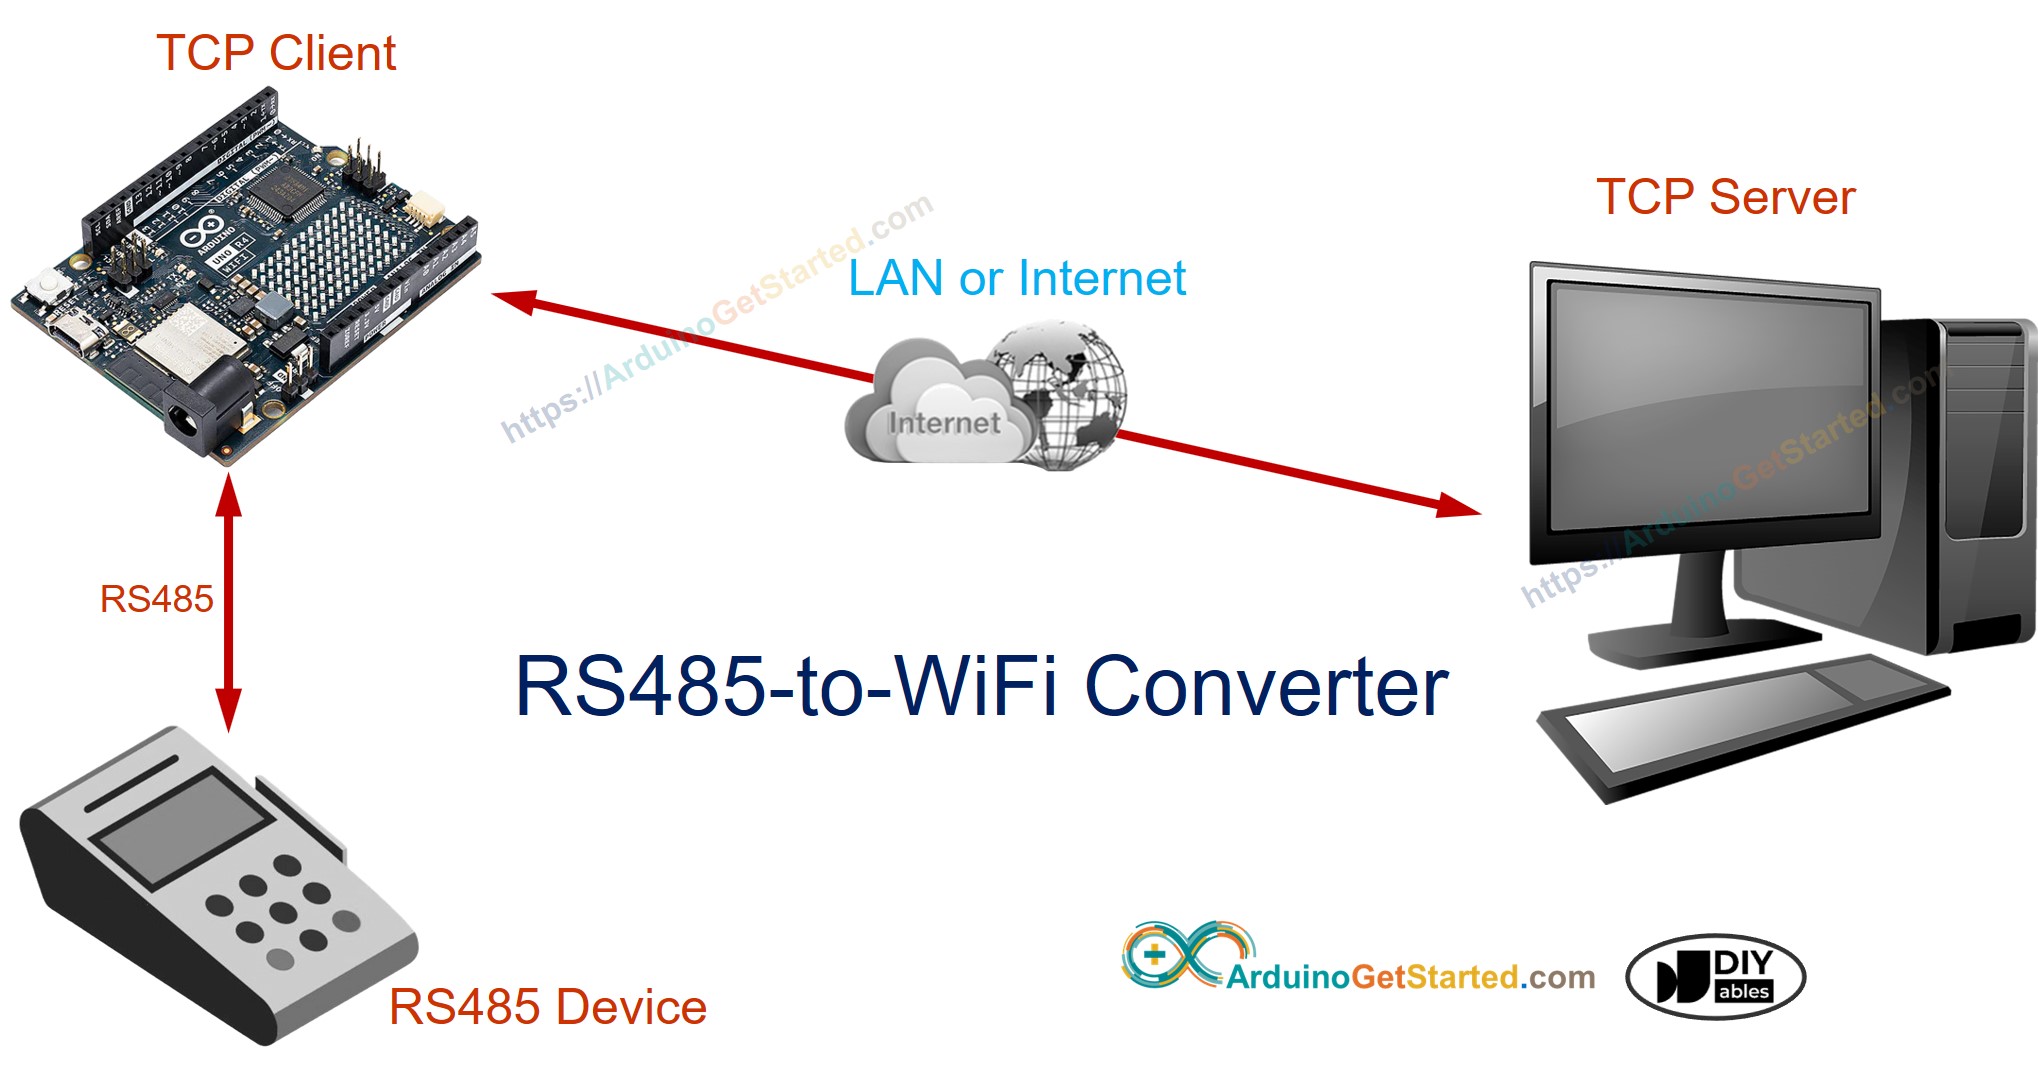
In deze handleiding gaan we aan de slag met de Arduino Uno R4 WiFi om een Serial RS485 naar WiFi converter te bouwen. Met deze opstelling leest de Arduino data uit een seriële RS485-interface en verzendt deze naar een TCP-server, die zich kan bevinden binnen hetzelfde lokale netwerk (LAN) of op afstand via internet. De Arduino kan ook data van de TCP-server ontvangen en terugsturen via de seriële RS485-interface.

Deze stappen stellen u in staat om veelzijdige communicatieschrijden tot stand te brengen tussen seriële RS-485 apparaten en TCP/IP-servers met behulp van Arduino.

Arduino RS485 naar WiFi converter

Over RS485 en TCP

Als u niet bekend bent met het gebruik van RS485 en TCP-communicatie met Arduino, leer hierover dan meer in de volgende tutorials:

Hoe de RS485 naar WiFi converter werkt

  • Arduino maakt verbinding met een serieel apparaat via de seriële RS485-interface
  • Arduino functioneert als een TCP-client die verbinding maakt met een TCP-server (dit kan TCP-server software op uw PC of een andere Arduino zijn die als TCP-server is geprogrammeerd)
  • Arduino leest data van de seriële RS485-interface en stuurt die naar de TCP-server
  • Arduino leest data van de TCP-verbinding en stuurt die naar de seriële RS485-interface

Aansluitschema

  • Aansluitschema bij gebruik van hardware serial
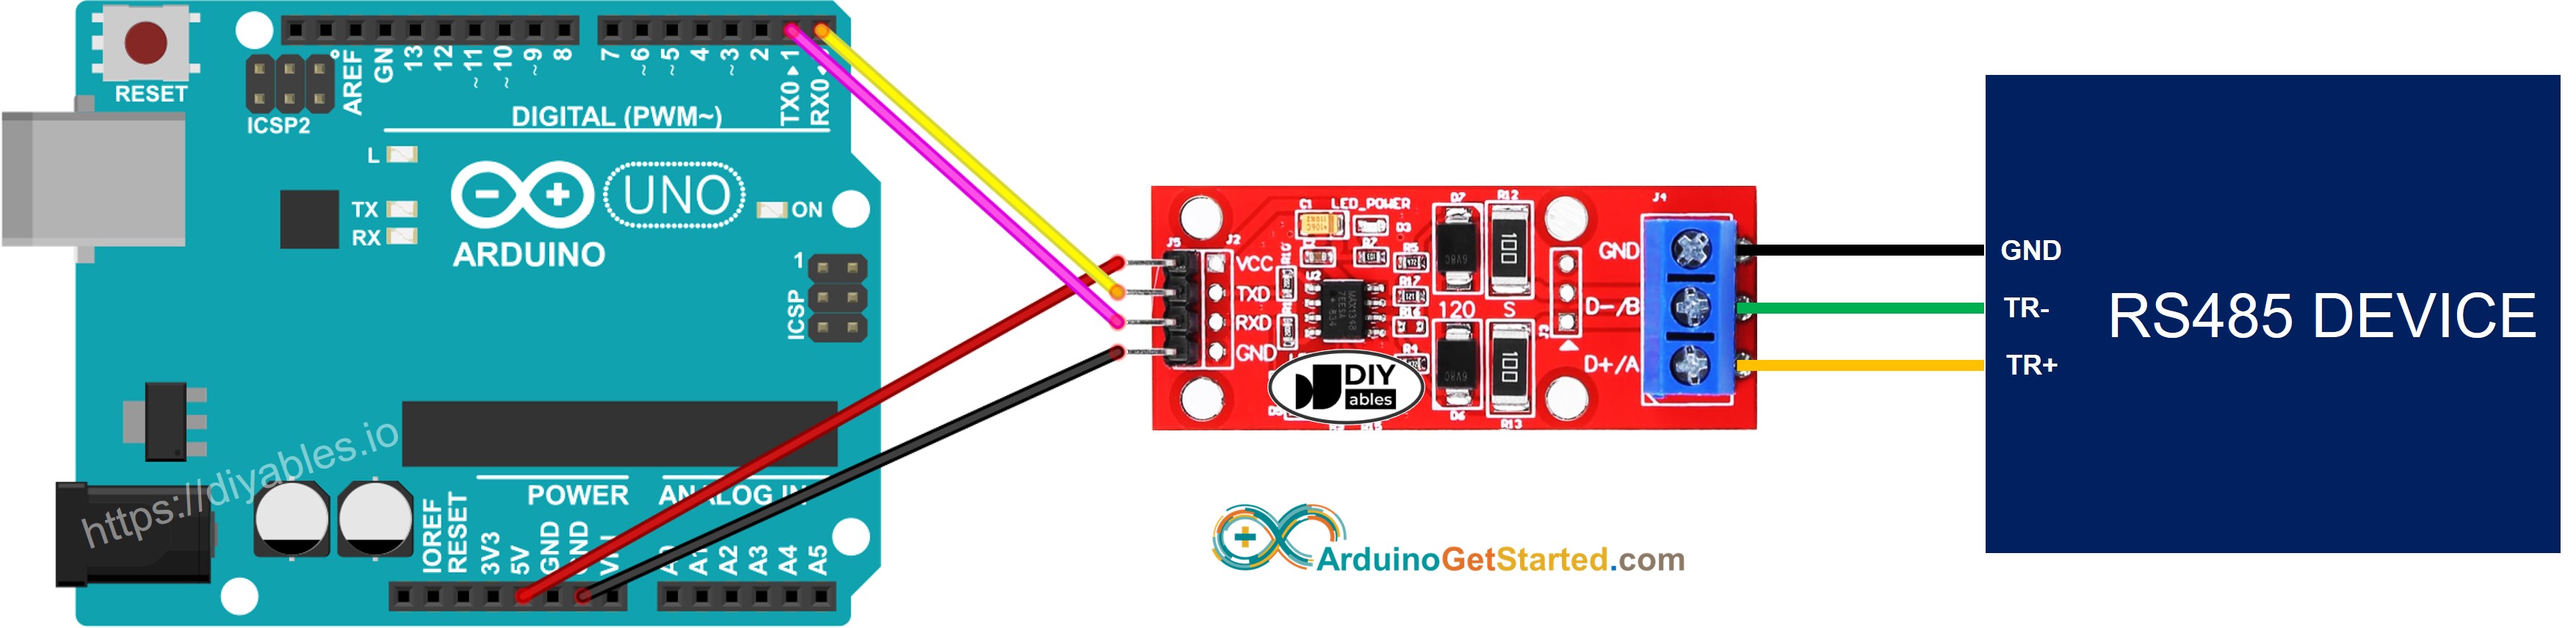
Arduino TTL naar RS485 Aansluitschema

This image is created using Fritzing. Click to enlarge image

  • Aansluitschema bij gebruik van software serial
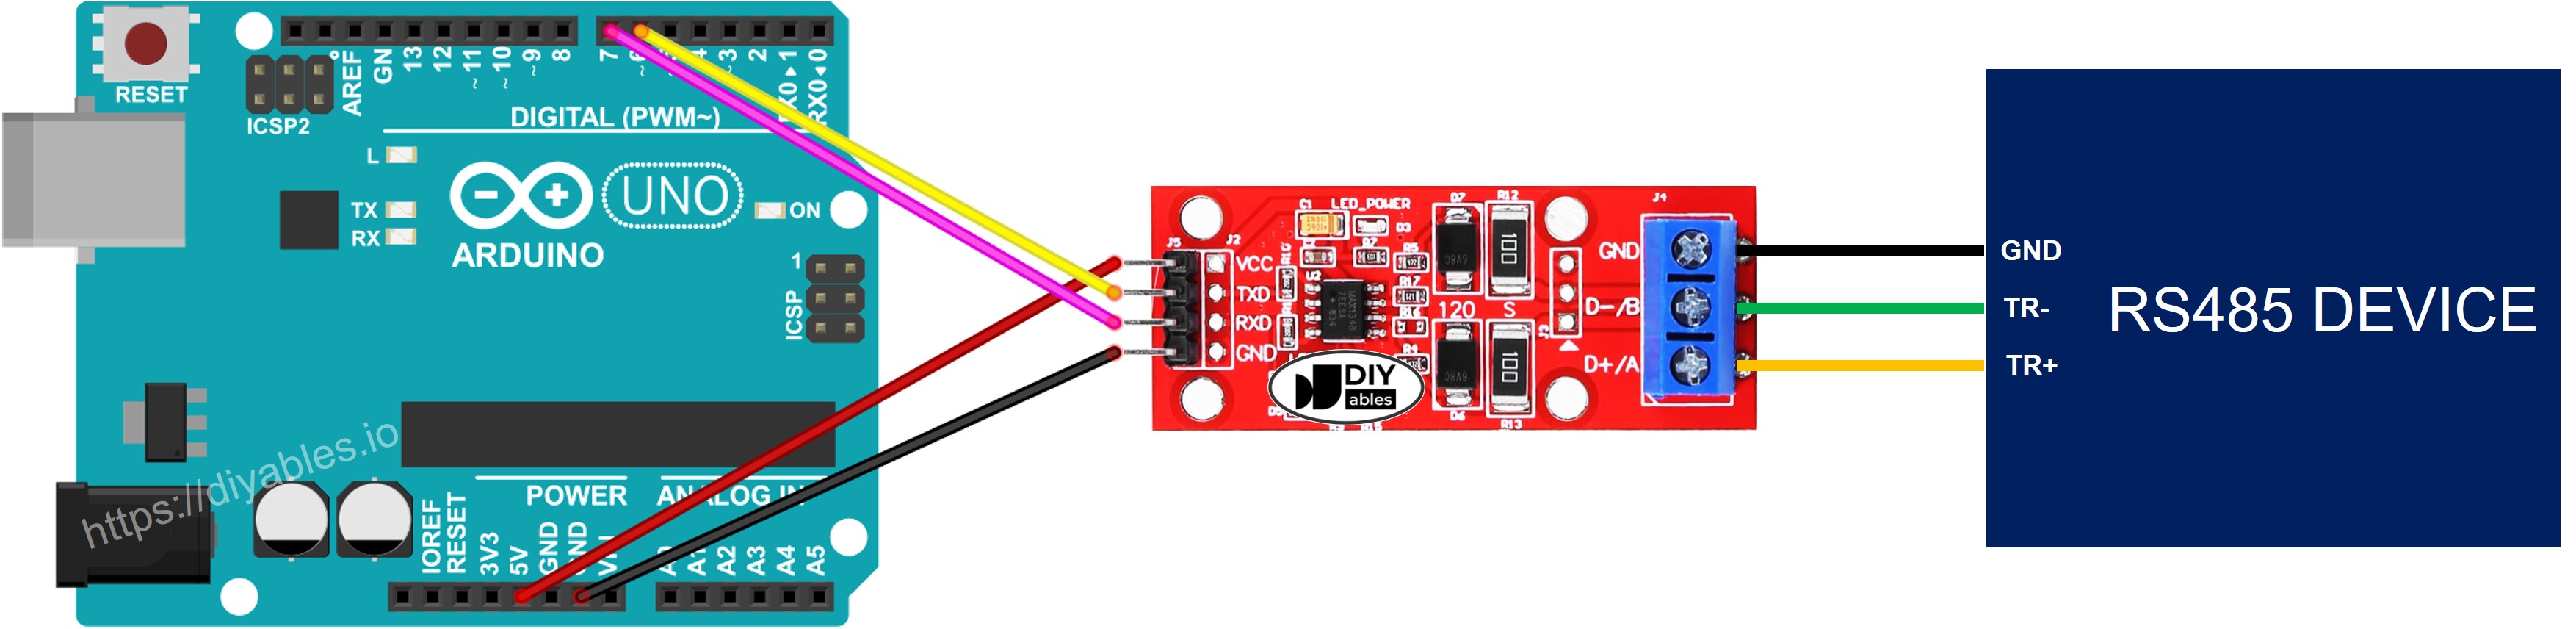
Arduino RS-485 naar TTL Aansluitschema

This image is created using Fritzing. Click to enlarge image

Arduino Code voor Hardware Serial

/* * Deze Arduino code is ontwikkeld door newbiely.nl * Deze Arduino code wordt zonder enige beperking aan het publiek beschikbaar gesteld. * Voor volledige instructies en schema's, bezoek: * https://newbiely.nl/tutorials/arduino/arduino-rs485-to-wifi */ #include <WiFiS3.h> const char* WIFI_SSID = "YOUR_WIFI_SSID"; // CHANGE TO YOUR WIFI SSID const char* WIFI_PASSWORD = "YOUR_WIFI_PASSWORD"; // CHANGE TO YOUR WIFI PASSWORD const char* TCP_SERVER_ADDR = "192.168.0.26"; // CHANGE TO TCP SERVER'S IP ADDRESS const int TCP_SERVER_PORT = 1470; WiFiClient TCP_client; void setup() { Serial.begin(9600); Serial.println("Arduino: TCP CLIENT"); // check for the WiFi module: if (WiFi.status() == WL_NO_MODULE) { Serial.println("Communication with WiFi module failed!"); // don't continue while (true) ; } String fv = WiFi.firmwareVersion(); if (fv < WIFI_FIRMWARE_LATEST_VERSION) { Serial.println("Please upgrade the firmware"); } Serial.print("Attempting to connect to SSID: "); Serial.println(WIFI_SSID); // attempt to connect to WiFi network: while (WiFi.begin(WIFI_SSID, WIFI_PASSWORD) != WL_CONNECTED) { delay(10000); // wait 10 seconds for connection: } Serial.print("Connected to WiFi "); Serial.println(WIFI_SSID); // connect to TCP server if (TCP_client.connect(TCP_SERVER_ADDR, TCP_SERVER_PORT)) Serial.println("Connected to TCP server"); else Serial.println("Failed to connect to TCP server"); } void loop() { if (TCP_client.connected()) { // read data from TCP and send them to RS485 interface if (TCP_client.available()) { char c = TCP_client.read(); Serial.write(c); } // read data from RS485 interface and send them to TCP if (Serial.available()) { char c = Serial.read(); TCP_client.write(c); } } else { Serial.println("Connection is disconnected"); TCP_client.stop(); // reconnect to TCP server if (TCP_client.connect(TCP_SERVER_ADDR, TCP_SERVER_PORT)) { Serial.println("Reconnected to TCP server"); } else { Serial.println("Failed to reconnect to TCP server"); delay(1000); } } }

Arduino Code voor Software Serial

/* * Deze Arduino code is ontwikkeld door newbiely.nl * Deze Arduino code wordt zonder enige beperking aan het publiek beschikbaar gesteld. * Voor volledige instructies en schema's, bezoek: * https://newbiely.nl/tutorials/arduino/arduino-rs485-to-wifi */ #include <WiFiS3.h> #include <SoftwareSerial.h> // define the SoftwareSerial object and their pins SoftwareSerial rs485(6, 7); // RX: 6, TX: 7 const char* WIFI_SSID = "YOUR_WIFI_SSID"; // CHANGE TO YOUR WIFI SSID const char* WIFI_PASSWORD = "YOUR_WIFI_PASSWORD"; // CHANGE TO YOUR WIFI PASSWORD const char* TCP_SERVER_ADDR = "192.168.0.26"; // CHANGE TO TCP SERVER'S IP ADDRESS const int TCP_SERVER_PORT = 1470; WiFiClient TCP_client; void setup() { Serial.begin(9600); rs485.begin(9600); Serial.println("Arduino: TCP CLIENT"); // check for the WiFi module: if (WiFi.status() == WL_NO_MODULE) { Serial.println("Communication with WiFi module failed!"); // don't continue while (true) ; } String fv = WiFi.firmwareVersion(); if (fv < WIFI_FIRMWARE_LATEST_VERSION) { Serial.println("Please upgrade the firmware"); } Serial.print("Attempting to connect to SSID: "); Serial.println(WIFI_SSID); // attempt to connect to WiFi network: while (WiFi.begin(WIFI_SSID, WIFI_PASSWORD) != WL_CONNECTED) { delay(10000); // wait 10 seconds for connection: } Serial.print("Connected to WiFi "); Serial.println(WIFI_SSID); // connect to TCP server if (TCP_client.connect(TCP_SERVER_ADDR, TCP_SERVER_PORT)) Serial.println("Connected to TCP server"); else Serial.println("Failed to connect to TCP server"); } void loop() { if (TCP_client.connected()) { // read data from TCP and send them to RS485 interface if (TCP_client.available()) { char c = TCP_client.read(); rs485.write(c); } // read data from RS485 interface and send them to TCP if (rs485.available()) { char c = rs485.read(); TCP_client.write(c); } } else { Serial.println("Connection is disconnected"); TCP_client.stop(); // reconnect to TCP server if (TCP_client.connect(TCP_SERVER_ADDR, TCP_SERVER_PORT)) { Serial.println("Reconnected to TCP server"); } else { Serial.println("Failed to reconnect to TCP server"); delay(1000); } } }

Testen

U kunt een test uitvoeren waarbij data op de volgende manier wordt verzonden:

  • Seriële Software (op uw PC) → RS-485 → Arduino → WiFi → TCP Server Software (op uw PC).
  • TCP Server Software (op uw PC) → WiFi → Arduino → RS-485 → Seriële Software (op uw PC).
Arduino RS485 naar PC communicatie

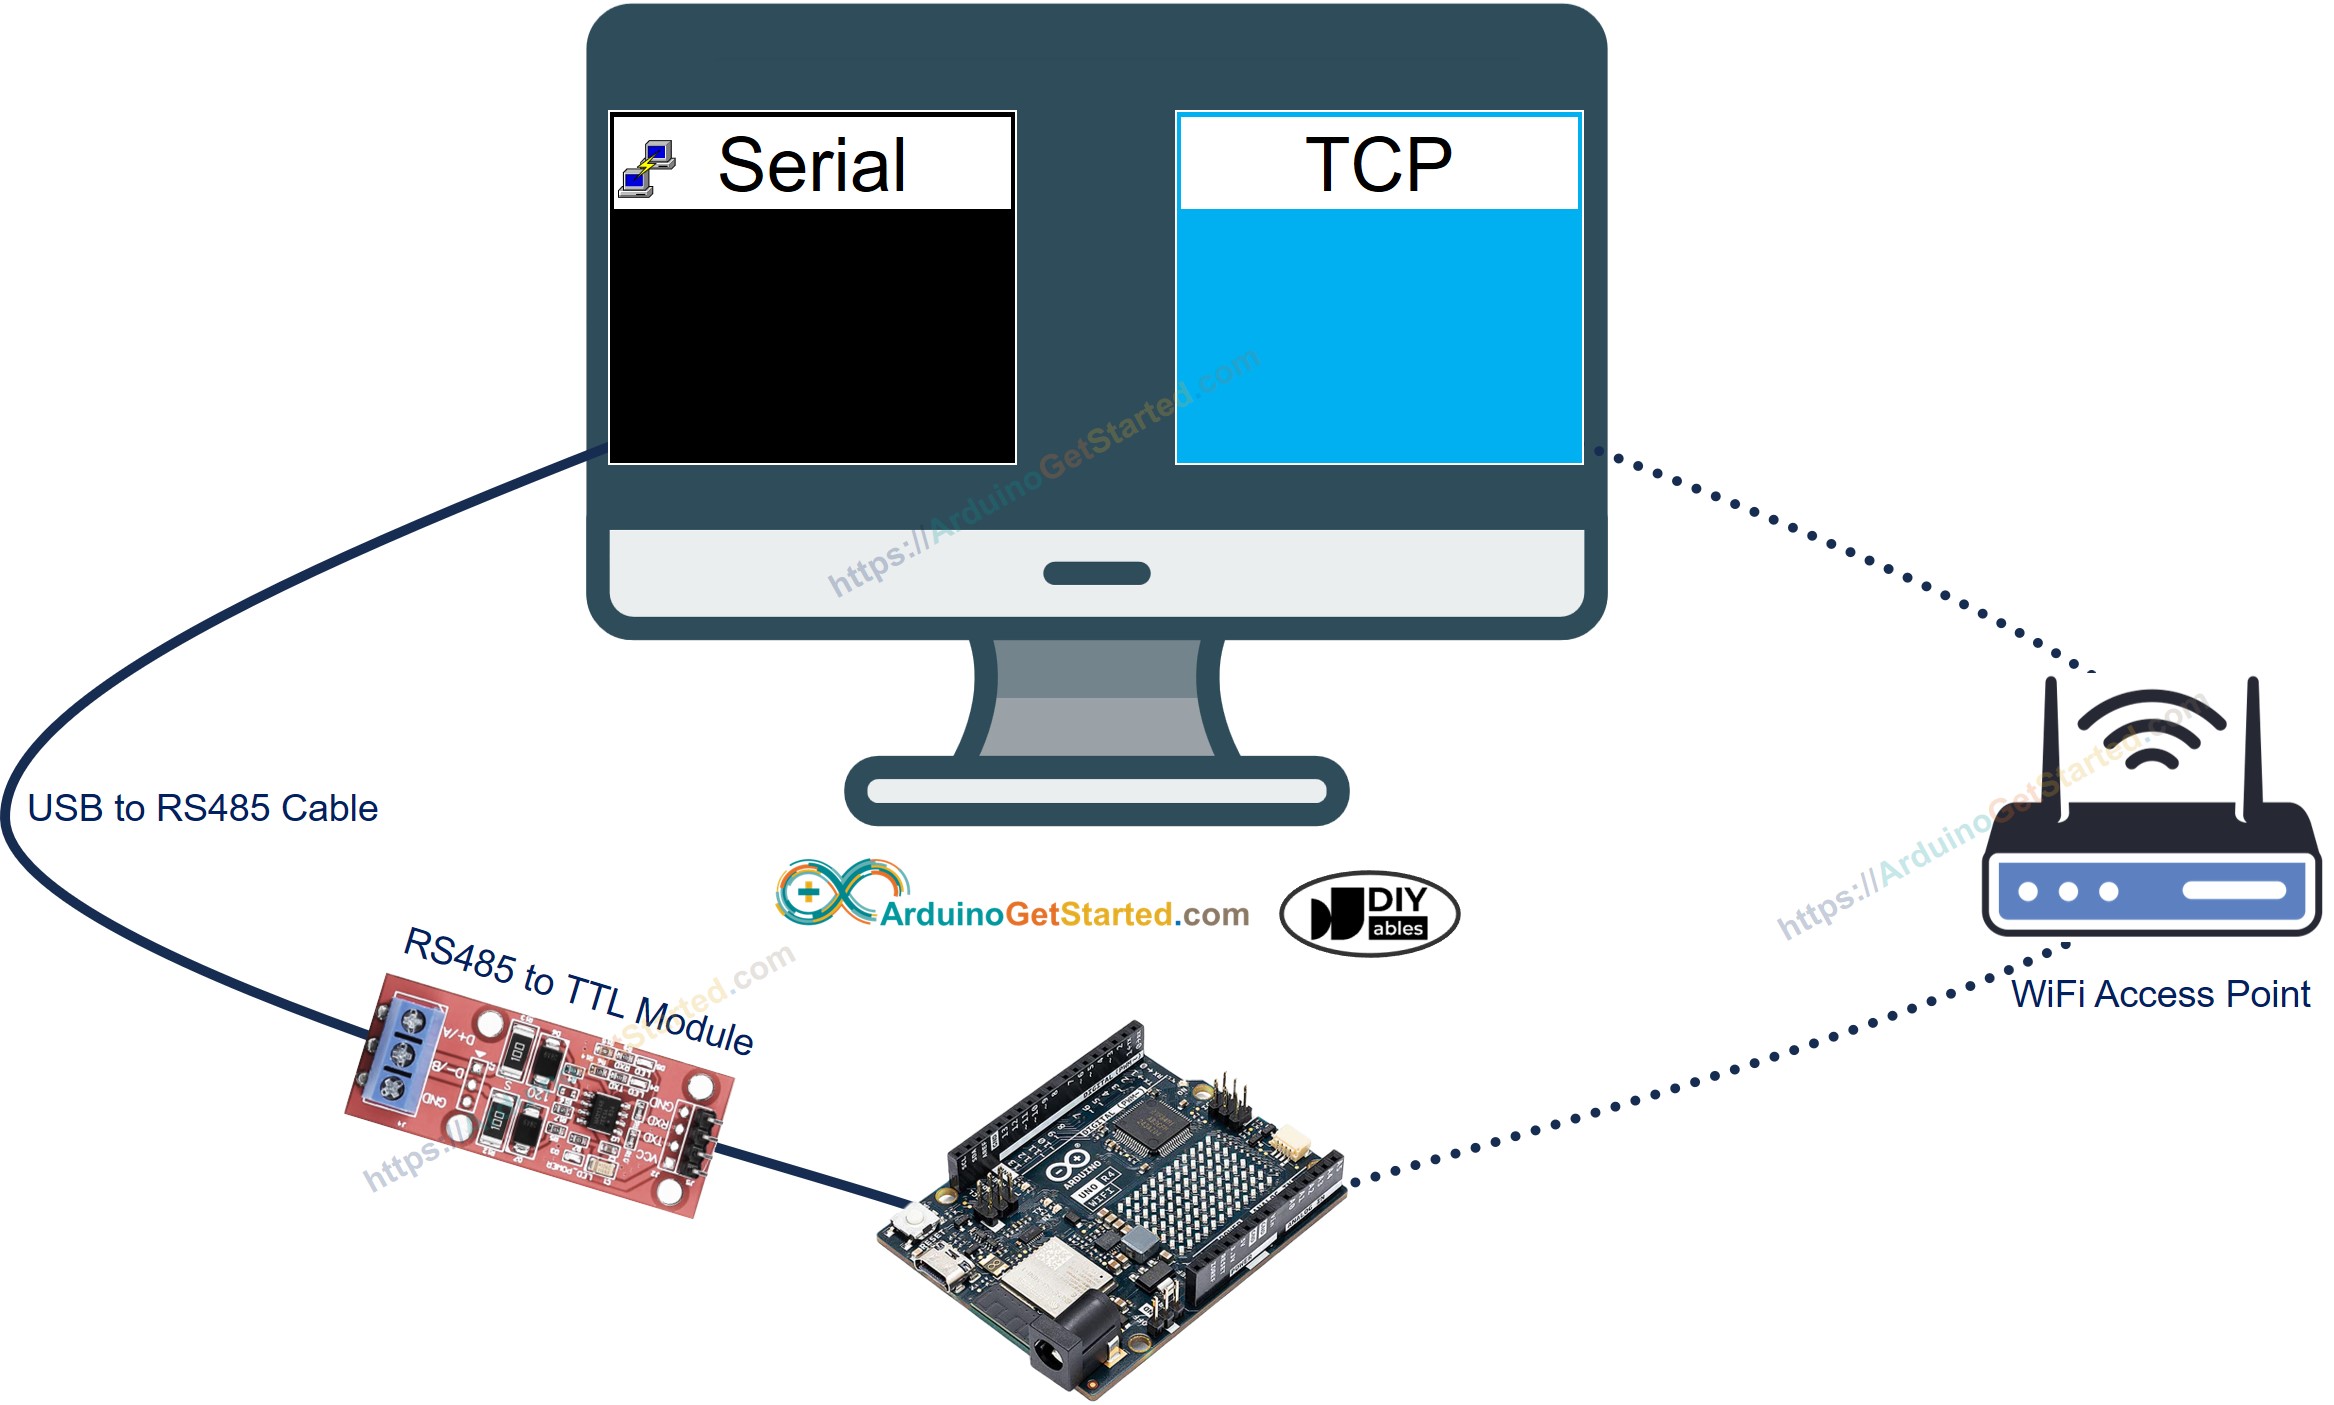
Volg de onderstaande stappen om dit uit te voeren:

  • Als u voor het eerst de Arduino Uno R4 gebruikt, zie dan hoe u de omgeving instelt voor Arduino Uno R4 in de Arduino IDE.
  • Verbind de Arduino Uno R4 WiFi met uw PC via de TTL-naar-RS485 module en de RS485-naar-USB kabel volgens bovenstaand aansluitschema
  • Installeer een seriële terminalprogramma zoals Tera Term of PuTTY
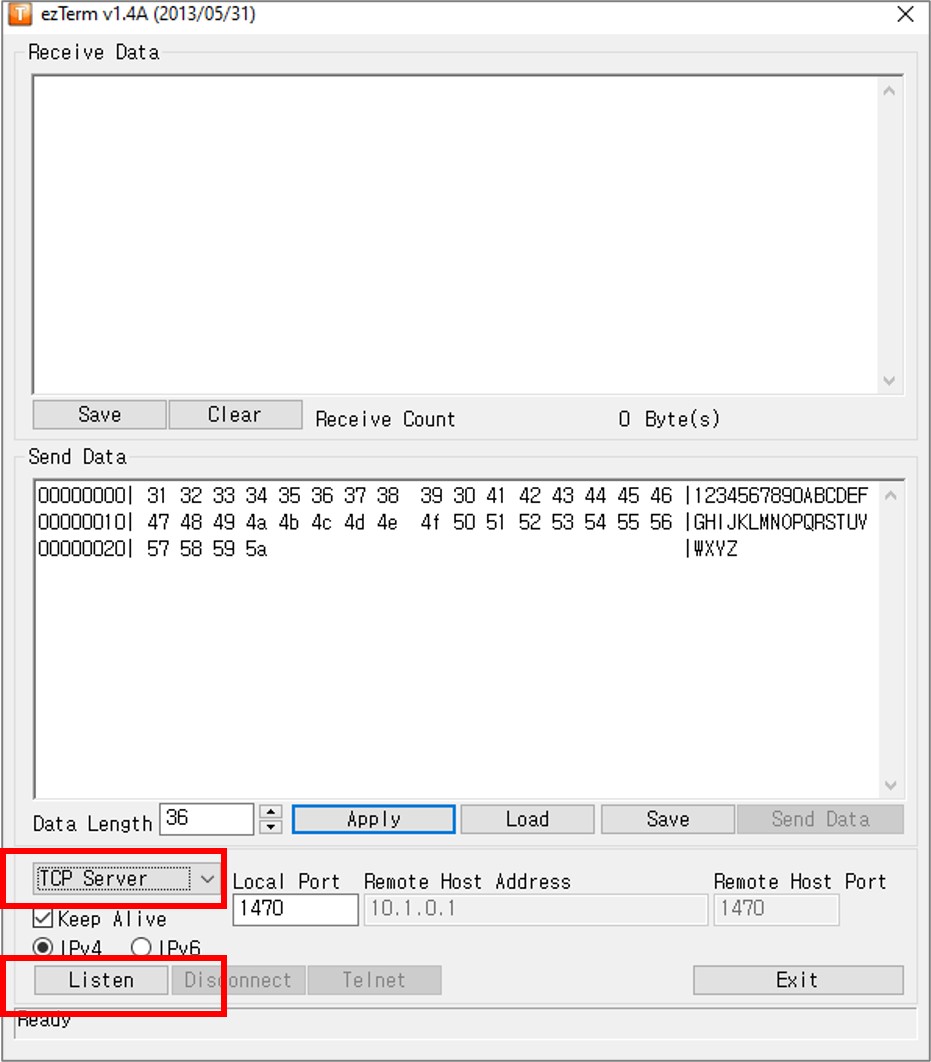
  • Installeer een TCP-server software zoals ezTerm
  • Open het seriële programma en configureer de seriële parameters (COM-poort, baudrate, etc.)
  • Open het TCP-server programma en configureer dit als TCP-server en klik vervolgens op de knop Listen
ezTerm TCP Server
  • Open de opdrachtprompt (Command Prompt) op uw PC
  • Zoek het IP-adres van uw PC op door het volgende commando uit te voeren:
ipconfig
  • De uitvoer ziet er ongeveer als volgt uit:
Command Prompt
C:\WINDOWS\system32>ipconfig Windows IP-configuratie Ethernet adapter: Subnetmasker . . . . . . . . . . : 255.0.0.0 IPv4-adres. . . . . . . . . . . : 192.168.0.26 Subnetmasker . . . . . . . . . . : 255.255.255.0 Standaardgateway . . . . . . . . :
  • Werk in de Arduino-code het IP-adres van de TCP-server (uw PC) bij. In het bovenstaande voorbeeld: 192.168.0.26
  • Compileer en upload de code naar uw Arduino-board door op de knop Upload te klikken in Arduino IDE
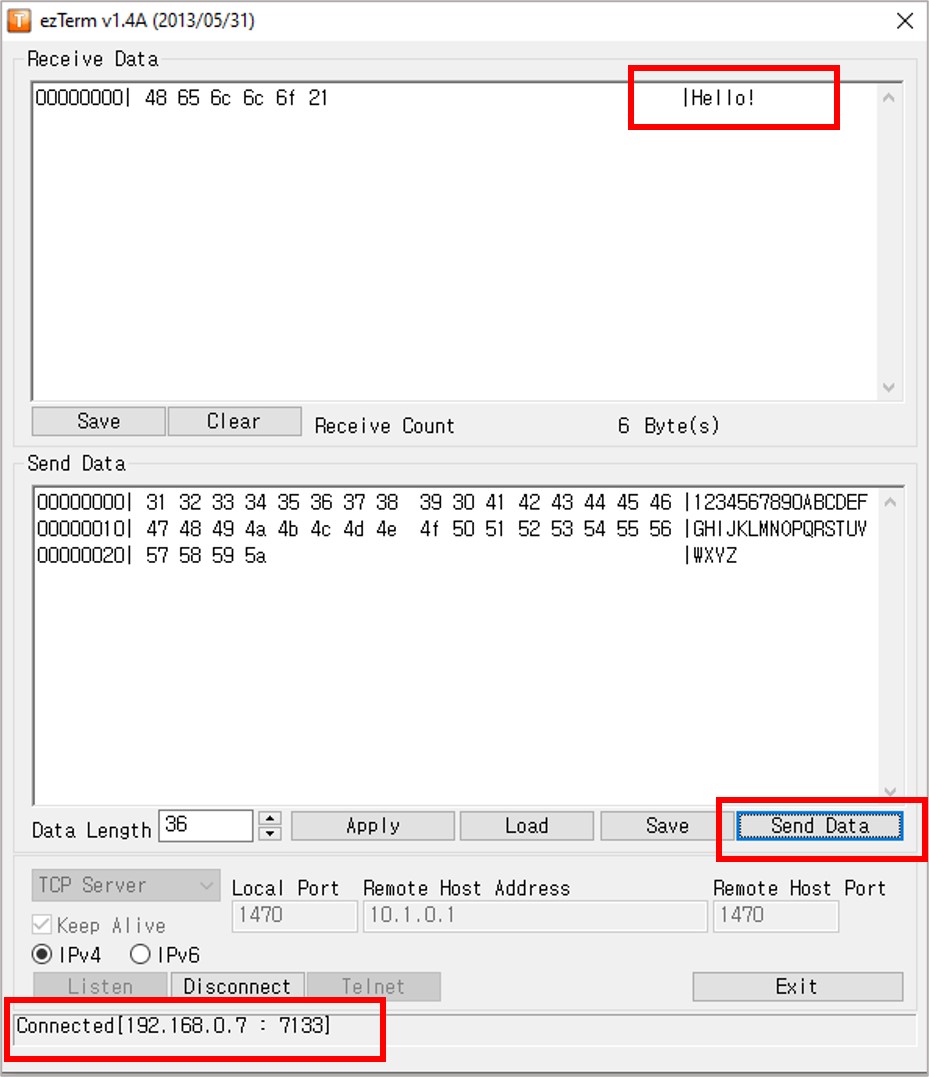
  • Typ wat data in het seriële programma om die naar de Arduino via Serial te sturen
  • Als het werkt, ziet u de echo data in de TCP-server software
  • Typ wat data in het TCP-server programma om die naar de Arduino via TCP te sturen
  • Als het werkt, ziet u de echo data terug in het seriële programma
Arduino Serial naar TCP

Als u liever een commerciële RS485-naar-Ethernet converter gebruikt, kunt u CSE-H55N2 Serial To Ethernet Converter aanschaffen.

Video Tutorial

We overwegen het maken van videotutorials. Als u videotutorials belangrijk vindt, abonneer u dan op ons YouTube-kanaal om ons te motiveren de video's te maken.

※ ONZE BERICHTEN

  • U bent welkom om de link naar deze tutorial te delen. Gebruik onze inhoud echter niet op andere websites. We hebben veel moeite en tijd gestoken in het maken van de inhoud, respecteer alstublieft ons werk!