Arduino - OLED

De OLED (Organic Light-Emitting Diode) display is een alternatief voor het LCD-display. De OLED is superlicht, bijna zo dun als papier, flexibel, en produceert een helderder en scherper beeld.

In deze handleiding gaan we leren:

Hardware Benodigd

1×Arduino Uno R3
1×USB 2.0 kabel type A/B
1×SSD1306 I2C OLED-Display 128x64
1×SSD1306 I2C OLED-Display 128x32
1×Jumperdraden
1×(Aanbevolen) Schroefklem Block Shield voor Arduino Uno
1×(Aanbevolen) Breadboard-Shield voor Arduino Uno
1×(Aanbevolen) Behuizing voor Arduino Uno
1×(Aanbevolen) Prototyping Basisplaat & Breadboard Kit voor Arduino Uno

Of u kunt de volgende kits kopen:

1×DIYables Sensorkit (30 sensoren/displays)
1×DIYables Sensorkit (18 sensoren/displays)
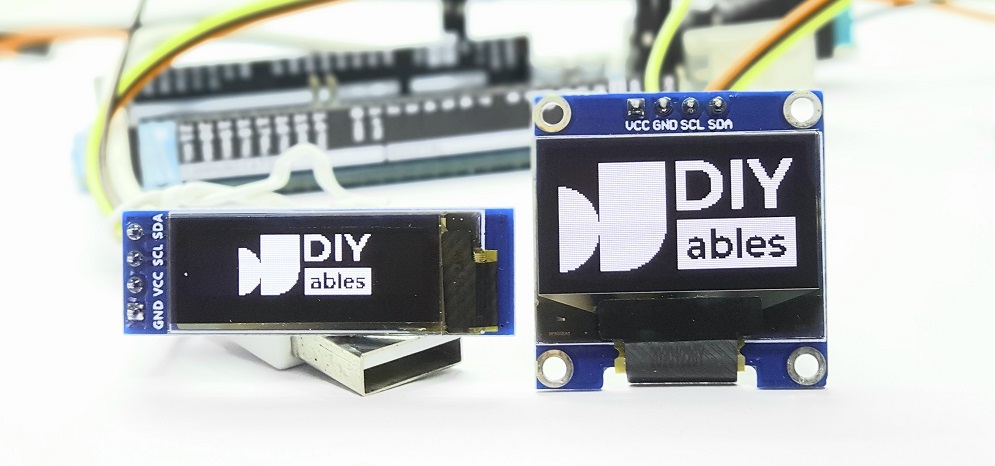
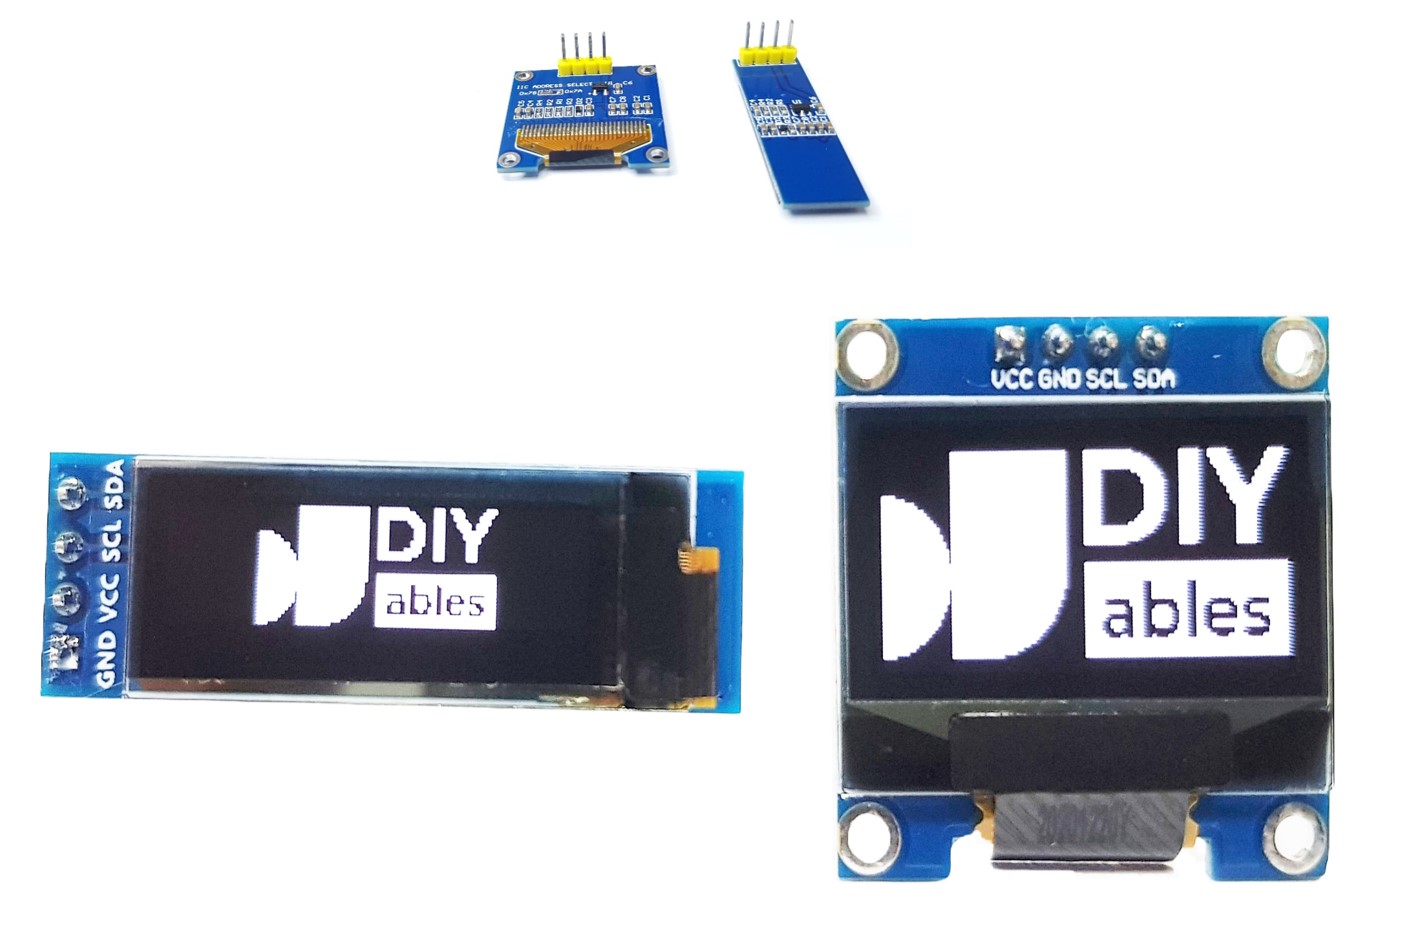
Openbaarmaking: Sommige van de links in deze sectie zijn Amazon-affiliate links. We kunnen een commissie ontvangen voor aankopen die via deze links worden gedaan, zonder extra kosten voor u. We waarderen uw steun.

Over OLED Display

Er zijn vele soorten OLED-displays die verschillen in communicatie-interface, grootte en kleuren:

  • Communicatie-interface: I2C, SPI
  • Grootte: 128x64, 128×32...
  • Kleur: wit, blauw, dual color...
Arduino OLED

SPI is over het algemeen sneller dan I2C, maar vereist meer Arduino-pinnen. I2C gebruikt slechts twee pinnen en kan gedeeld worden met andere I2C-periferieapparaten. Het is een afweging tussen aantal pinnen en communicatiesnelheid. De keuze is aan u. Voor OLED met I2C interface zijn er verschillende soorten drivers zoals SSD1306, SH1106 driver. Deze tutorial gebruikt SSD1306 I2C OLED Display 128x64 en 128x32.

I2C OLED Display Pinout

  • GND pin: moet verbonden zijn met de aarde (ground) van Arduino
  • VCC pin: is de voeding voor het display die we aansluiten op de 5 volt pin van de Arduino
  • SCL pin: is de seriële klokpin voor de I2C-interface
  • SDA pin: is de seriële databpin voor de I2C-interface
OLED Pinout

※ Notiz:

  • De volgorde van pins op het OLED-module kan verschillen per fabrikant en type module. Gebruik ALTJD de labels op het display zelf. Kijk goed!
  • Deze tutorial gebruikt het OLED-display met de SSD1306 I2C driver. Wij hebben getest met OLED-display van DIYables. Dit werkt zonder problemen.
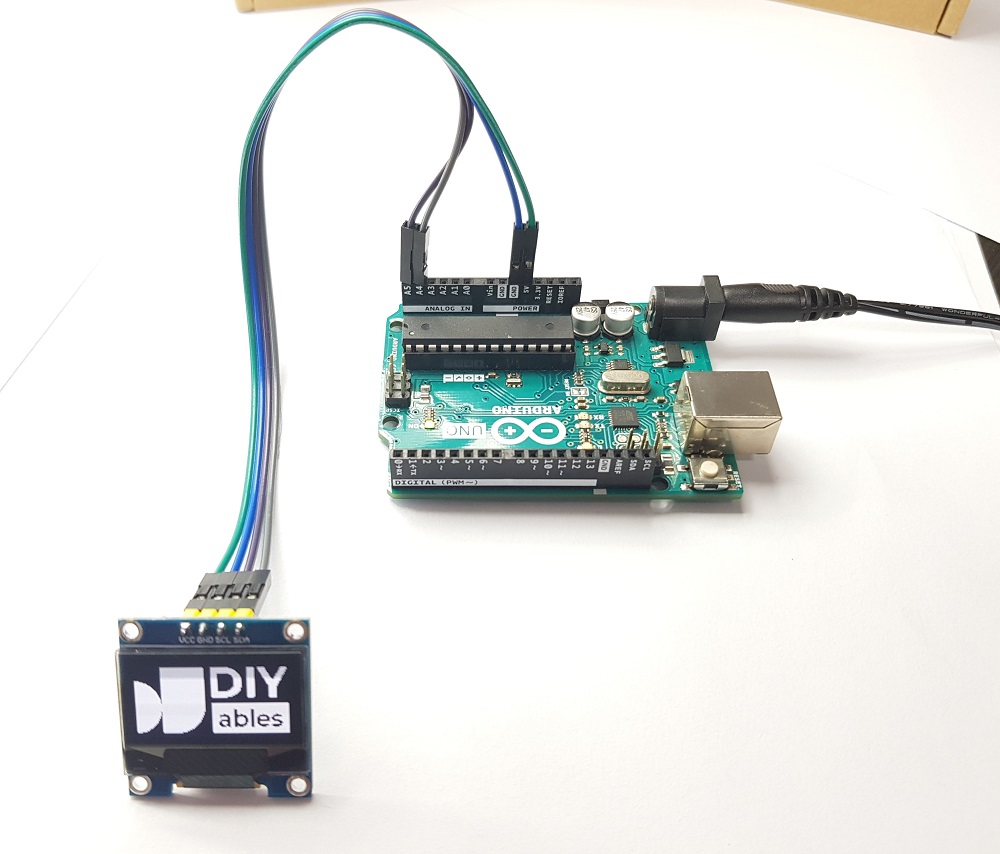
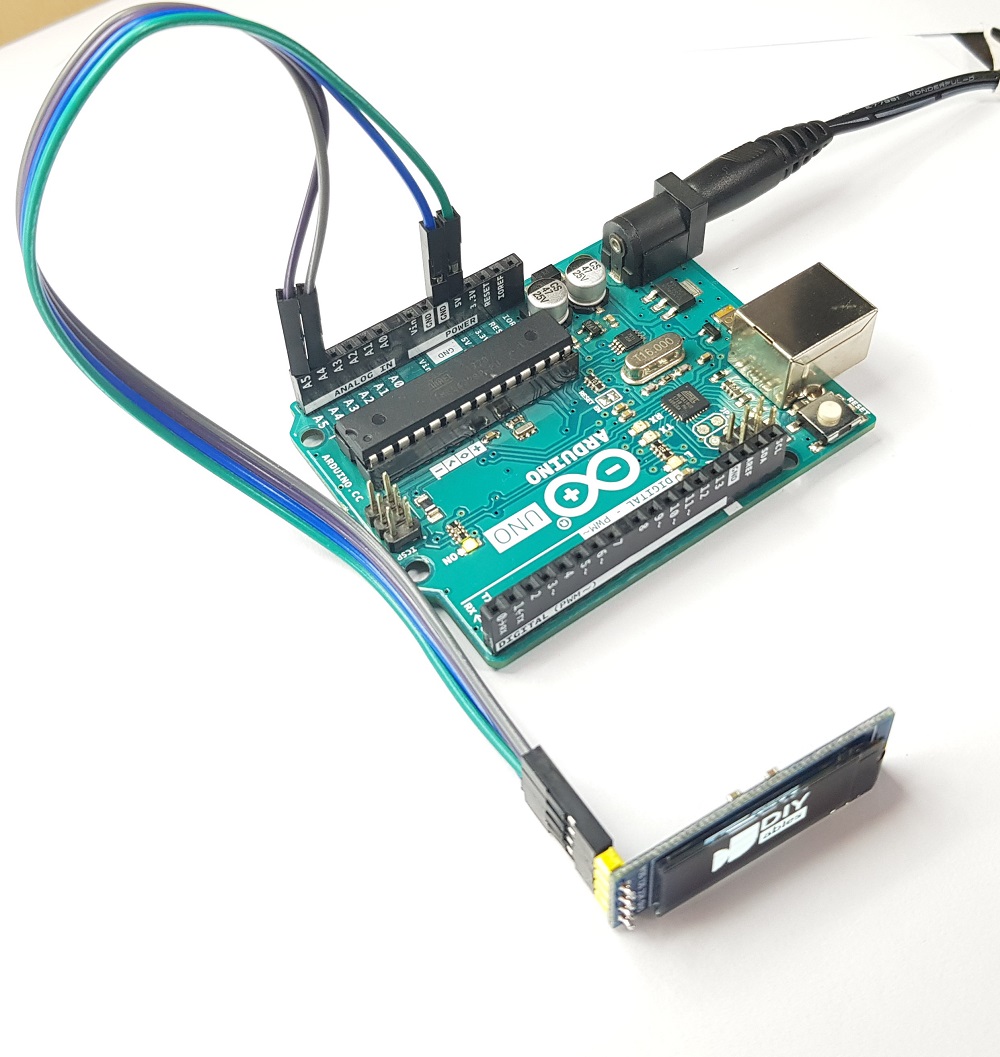
Bedradingsschema

  • Bedradingsschema tussen Arduino en OLED 128x64
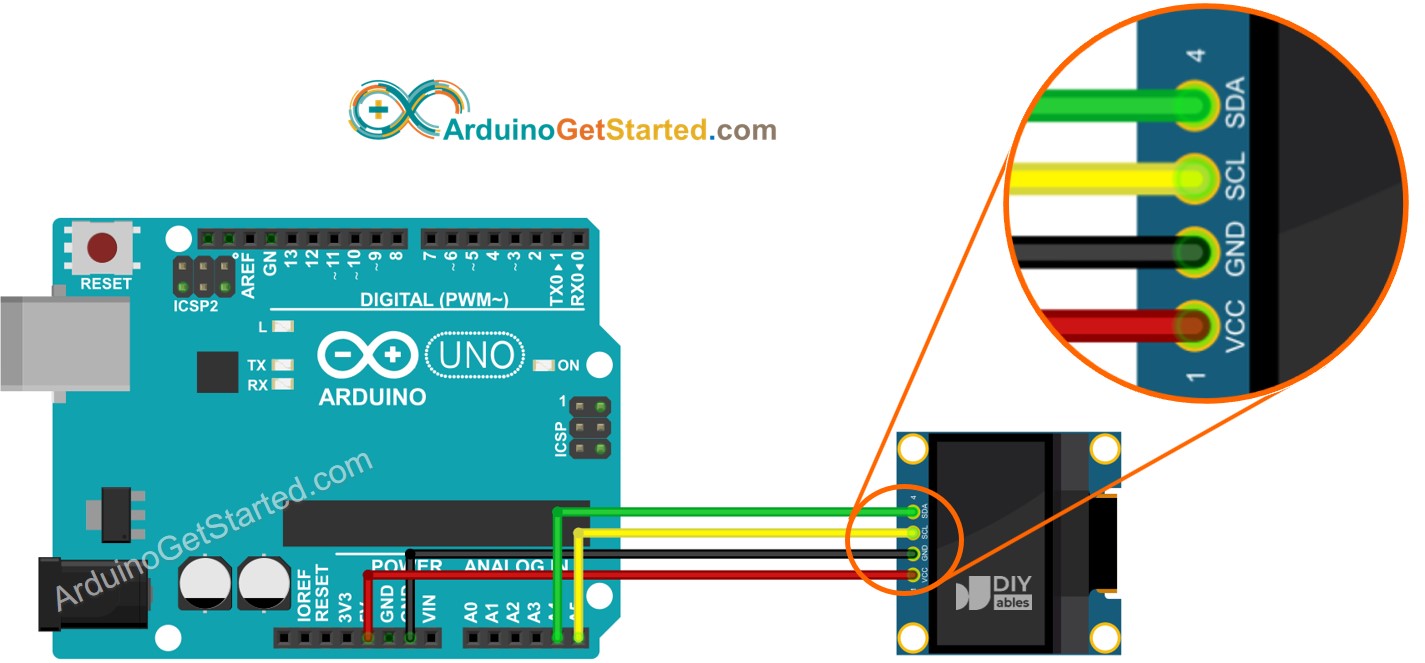
Arduino OLED 128x64 wiring diagram

This image is created using Fritzing. Click to enlarge image

  • Bedradingsschema tussen Arduino en OLED 128x32
Arduino OLED 128x32 wiring diagram

This image is created using Fritzing. Click to enlarge image

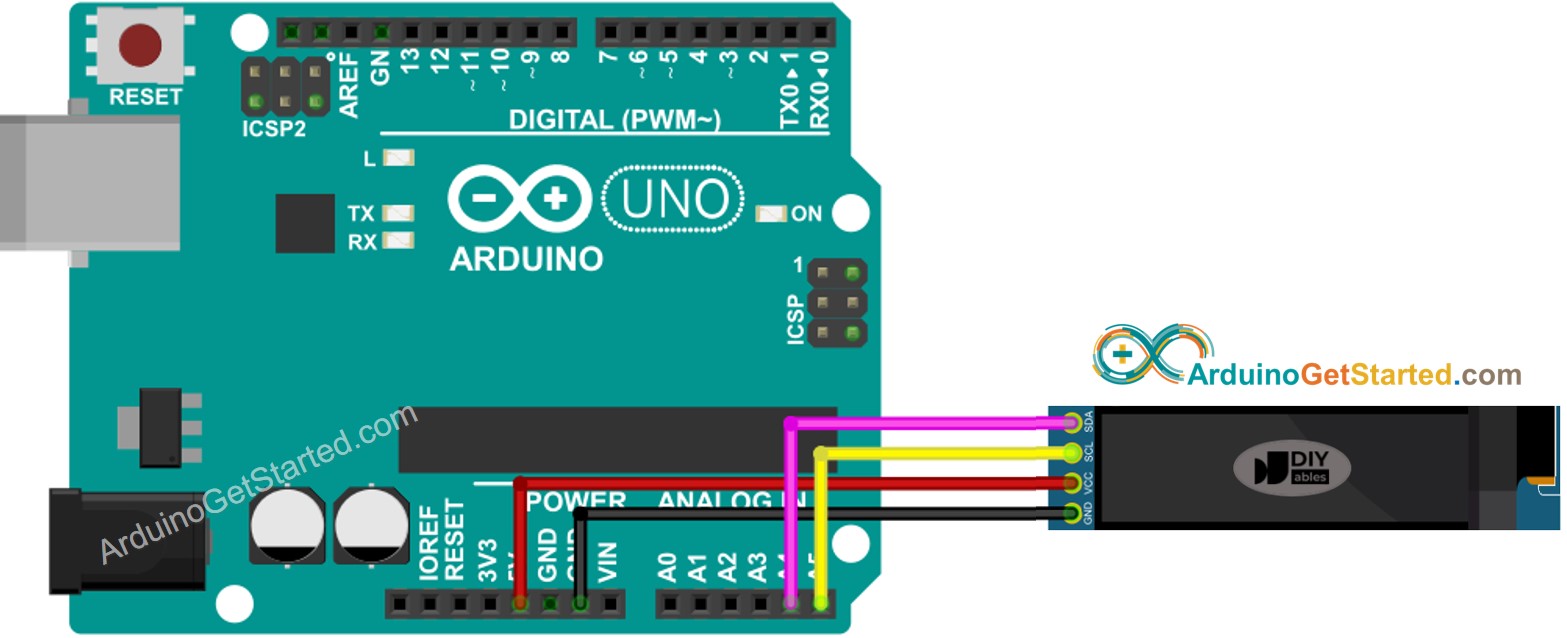
  • Het daadwerkelijke bedradingsschema tussen Arduino en OLED 128x64
Arduino OLED 128x64 wiring diagram

This image is created using Fritzing. Click to enlarge image

  • Het daadwerkelijke bedradingsschema tussen Arduino en OLED 128x32
Arduino OLED 128x32 wiring diagram

This image is created using Fritzing. Click to enlarge image

Als u een ander Arduino bord gebruikt dan Uno, kunnen de pinnen verschillend zijn. Raadpleeg onderstaande tabel voor andere Arduino-borden:

OLED Module Arduino Uno, Nano Arduino Mega
Vin 5V 5V
GND GND GND
SDA A4 20
SCL A5 21

Hoe OLED te gebruiken met Arduino

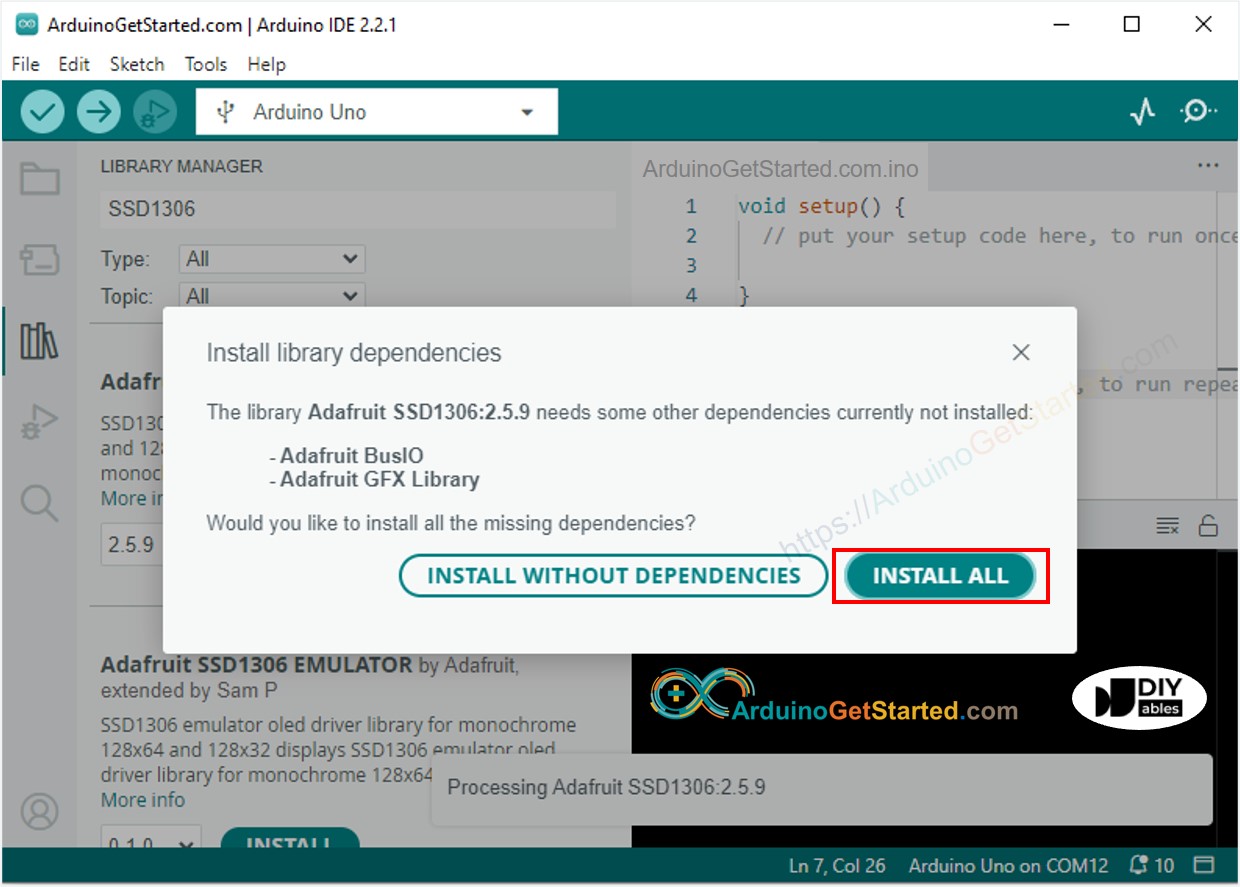
Installeer SSD1306 OLED bibliotheek

  • Navigeer naar het Libraries-icoon in de linkerbalk van de Arduino IDE.
  • Zoek op “SSD1306”, en zoek de SSD1306 bibliotheek van Adafruit
  • Klik op de Installeren-knop om de bibliotheek te installeren.
Arduino OLED library
  • U wordt gevraagd om een aantal andere bibliotheek-afhankelijkheden te installeren
  • Klik op de Alles installeren-knop om alle afhankelijkheden te installeren.
Arduino Adafruit GFX sensor library

Hoe te programmeren voor OLED

  • Bibliotheken includen
#include <Wire.h> #include <Adafruit_GFX.h> #include <Adafruit_SSD1306.h>
  • Schermgrootte definiëren indien OLED 128x64
#define SCREEN_WIDTH 128 // OLED-display breedte, in pixels #define SCREEN_HEIGHT 64 // OLED-display hoogte, in pixels
  • Schermgrootte definiëren indien OLED 128x32
#define SCREEN_WIDTH 128 // OLED-display breedte, in pixels #define SCREEN_HEIGHT 32 // OLED-display hoogte, in pixels
  • Een SSD1306 OLED-object declareren
// declareer een SSD1306 display object dat verbonden is via I2C Adafruit_SSD1306 oled(SCREEN_WIDTH, SCREEN_HEIGHT, &Wire, -1);
  • In de setup() functie initialiseert u het OLED-display
// initialiseert OLED-display met adres 0x3C voor 128x64 if (!oled.begin(SSD1306_SWITCHCAPVCC, 0x3C)) { Serial.println(F("SSD1306 allocatie mislukt")); while (true); }
  • Hierna kunt u tekst en afbeeldingen weergeven, lijnen tekenen ...

※ Notiz:

Vanaf dit punt worden alle codes gegeven voor OLED 128x64, maar u kunt ze eenvoudig aanpassen voor OLED 128x32 door de schermgrootte aan te passen en coördinaten te wijzigen indien nodig.

Arduino Code - Tekst weergeven op OLED

/* * Deze Arduino code is ontwikkeld door newbiely.nl * Deze Arduino code wordt zonder enige beperking aan het publiek beschikbaar gesteld. * Voor volledige instructies en schema's, bezoek: * https://newbiely.nl/tutorials/arduino/arduino-oled */ #include <Wire.h> #include <Adafruit_GFX.h> #include <Adafruit_SSD1306.h> #define SCREEN_WIDTH 128 // OLED display width, in pixels #define SCREEN_HEIGHT 64 // OLED display height, in pixels // declare an SSD1306 display object connected to I2C Adafruit_SSD1306 oled(SCREEN_WIDTH, SCREEN_HEIGHT, &Wire, -1); void setup() { Serial.begin(9600); // initialize OLED display with address 0x3C for 128x64 if (!oled.begin(SSD1306_SWITCHCAPVCC, 0x3C)) { Serial.println(F("SSD1306 allocation failed")); while (true); } delay(2000); // wait for initializing oled.clearDisplay(); // clear display oled.setTextSize(1); // text size oled.setTextColor(WHITE); // text color oled.setCursor(0, 10); // position to display oled.println("Hello World!"); // text to display oled.display(); // show on OLED } void loop() { }

Hieronder enkele functies die u kunt gebruiken om tekst op de OLED weer te geven:

  • oled.clearDisplay(): zet alle pixels uit
  • oled.drawPixel(x,y, color): plot een pixel op de x,y coördinaten
  • oled.setTextSize(n): stelt de lettergrootte in, ondersteunt groottes van 1 tot 8
  • oled.setCursor(x,y): stelt de coördinaten in om tekst te beginnen schrijven
  • oled.setTextColor(WHITE): stelt de tekstkleur in
  • oled.setTextColor(BLACK, WHITE): stelt de tekstkleur en achtergrondkleur in
  • oled.println(“message”): print de tekst
  • oled.println(number): print een getal
  • oled.println(number, HEX): print een getal in hexadecimale notatie
  • oled.display(): roep deze methode aan om de wijzigingen zichtbaar te maken
  • oled.startscrollright(start, stop): scroll tekst van links naar rechts
  • oled.startscrollleft(start, stop): scroll tekst van rechts naar links
  • oled.startscrolldiagright(start, stop): scroll tekst diagonaal van linker onderhoek naar rechter bovenhoek
  • oled.startscrolldiagleft(start, stop): scroll tekst diagonaal van rechter onderhoek naar linker bovenhoek
  • oled.stopscroll(): stopt het scrollen

Hoe tekst/cijfer verticaal en horizontaal te centreren op OLED

Zie Hoe verticaal/horizontaal centreren op OLED

Arduino Code - Tekenen op OLED

/* * Deze Arduino code is ontwikkeld door newbiely.nl * Deze Arduino code wordt zonder enige beperking aan het publiek beschikbaar gesteld. * Voor volledige instructies en schema's, bezoek: * https://newbiely.nl/tutorials/arduino/arduino-oled */ #include <Wire.h> #include <Adafruit_GFX.h> #include <Adafruit_SSD1306.h> #define SCREEN_WIDTH 128 // OLED display width, in pixels #define SCREEN_HEIGHT 64 // OLED display height, in pixels // declare an SSD1306 display object connected to I2C Adafruit_SSD1306 oled(SCREEN_WIDTH, SCREEN_HEIGHT, &Wire, -1); void setup() { Serial.begin(9600); // initialize OLED display with address 0x3C for 128x64 if (!oled.begin(SSD1306_SWITCHCAPVCC, 0x3C)) { Serial.println(F("SSD1306 allocation failed")); while (true); } delay(2000); // wait for initializing oled.setCursor(0, 0); } void loop() { // draw rectangle oled.clearDisplay(); oled.drawRect(0, 15, 60, 40, WHITE); oled.display(); delay(2000); // fill rectangle oled.clearDisplay(); oled.fillRect(0, 15, 60, 40, WHITE); oled.display(); delay(2000); // draw the round rectangle oled.clearDisplay(); oled.drawRoundRect(0, 15, 60, 40, 8, WHITE); oled.display(); delay(2000); // fill the round rectangle oled.clearDisplay(); oled.fillRoundRect(0, 15, 60, 40, 8, WHITE); oled.display(); delay(2000); // draw circle oled.clearDisplay(); oled.drawCircle(20, 35, 20, WHITE); oled.display(); delay(2000); // fill circle oled.clearDisplay(); oled.fillCircle(20, 35, 20, WHITE); oled.display(); delay(2000); // draw triangle oled.clearDisplay(); oled.drawTriangle(30, 15, 0, 60, 60, 60, WHITE); oled.display(); delay(2000); // fill triangle oled.clearDisplay(); oled.fillTriangle(30, 15, 0, 60, 60, 60, WHITE); oled.display(); delay(2000); }

Arduino Code – Afbeelding weergeven

Om een afbeelding op de OLED te tekenen, moeten we eerst de afbeelding (in elk formaat) converteren naar een bitmap-array. De conversie kan worden gedaan met deze online tool. Zie hieronder een voorbeeld hoe u een afbeelding omzet naar een bitmap-array. Ik heb het Arduino-logo geconverteerd naar een bitmap-array.

image to bitmap array

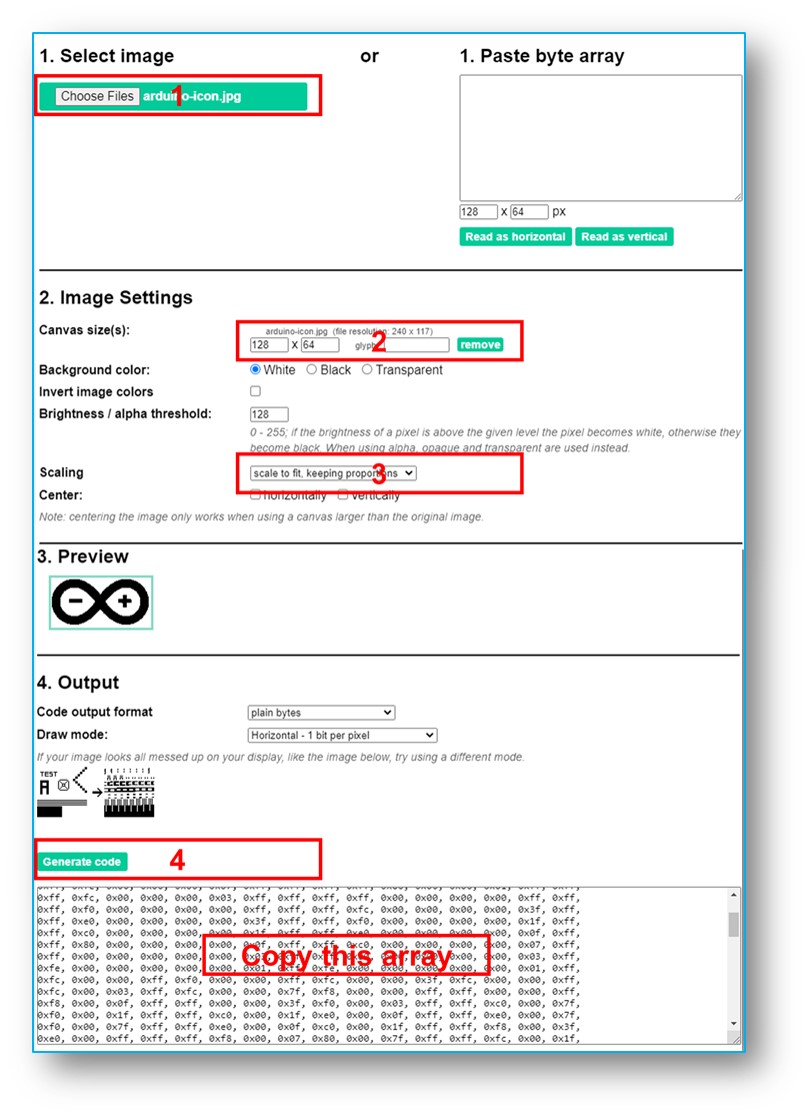
Na het converteren kopieert u de array code en vervangt u de ArduinoIcon-array in onderstaande code.

/* * Deze Arduino code is ontwikkeld door newbiely.nl * Deze Arduino code wordt zonder enige beperking aan het publiek beschikbaar gesteld. * Voor volledige instructies en schema's, bezoek: * https://newbiely.nl/tutorials/arduino/arduino-oled */ #include <Wire.h> #include <Adafruit_GFX.h> #include <Adafruit_SSD1306.h> #define SCREEN_WIDTH 128 // OLED display width, in pixels #define SCREEN_HEIGHT 64 // OLED display height, in pixels // declare an SSD1306 display object connected to I2C Adafruit_SSD1306 oled(SCREEN_WIDTH, SCREEN_HEIGHT, &Wire, -1); // bitmap of arduino-icon image const unsigned char ArduinoIcon [] PROGMEM = { // 'arduino-icon', 128x64px 0xff, 0xff, 0xff, 0xff, 0xff, 0xff, 0xff, 0xff, 0xff, 0xff, 0xff, 0xff, 0xff, 0xff, 0xff, 0xff, 0xff, 0xff, 0xff, 0xff, 0xff, 0xff, 0xff, 0xff, 0xff, 0xff, 0xff, 0xff, 0xff, 0xff, 0xff, 0xff, 0xff, 0xff, 0xfe, 0x00, 0x07, 0xff, 0xff, 0xff, 0xff, 0xff, 0xff, 0x80, 0x01, 0xff, 0xff, 0xff, 0xff, 0xff, 0xe0, 0x00, 0x00, 0xff, 0xff, 0xff, 0xff, 0xff, 0xfc, 0x00, 0x00, 0x3f, 0xff, 0xff, 0xff, 0xff, 0x80, 0x00, 0x00, 0x1f, 0xff, 0xff, 0xff, 0xff, 0xe0, 0x00, 0x00, 0x07, 0xff, 0xff, 0xff, 0xfe, 0x00, 0x00, 0x00, 0x07, 0xff, 0xff, 0xff, 0xff, 0x80, 0x00, 0x00, 0x01, 0xff, 0xff, 0xff, 0xfc, 0x00, 0x00, 0x00, 0x03, 0xff, 0xff, 0xff, 0xff, 0x00, 0x00, 0x00, 0x00, 0xff, 0xff, 0xff, 0xf0, 0x00, 0x00, 0x00, 0x00, 0xff, 0xff, 0xff, 0xfc, 0x00, 0x00, 0x00, 0x00, 0x3f, 0xff, 0xff, 0xe0, 0x00, 0x00, 0x00, 0x00, 0x3f, 0xff, 0xff, 0xf0, 0x00, 0x00, 0x00, 0x00, 0x1f, 0xff, 0xff, 0xc0, 0x00, 0x00, 0x00, 0x00, 0x1f, 0xff, 0xff, 0xe0, 0x00, 0x00, 0x00, 0x00, 0x0f, 0xff, 0xff, 0x80, 0x00, 0x00, 0x00, 0x00, 0x0f, 0xff, 0xff, 0xc0, 0x00, 0x00, 0x00, 0x00, 0x07, 0xff, 0xff, 0x00, 0x00, 0x00, 0x00, 0x00, 0x03, 0xff, 0xff, 0x80, 0x00, 0x00, 0x00, 0x00, 0x03, 0xff, 0xfe, 0x00, 0x00, 0x00, 0x00, 0x00, 0x01, 0xff, 0xfe, 0x00, 0x00, 0x00, 0x00, 0x00, 0x01, 0xff, 0xfc, 0x00, 0x00, 0xff, 0xf0, 0x00, 0x00, 0xff, 0xfc, 0x00, 0x00, 0x3f, 0xfc, 0x00, 0x00, 0xff, 0xfc, 0x00, 0x03, 0xff, 0xfc, 0x00, 0x00, 0x7f, 0xf8, 0x00, 0x00, 0xff, 0xff, 0x00, 0x00, 0xff, 0xf8, 0x00, 0x0f, 0xff, 0xff, 0x00, 0x00, 0x3f, 0xf0, 0x00, 0x03, 0xff, 0xff, 0xc0, 0x00, 0x7f, 0xf0, 0x00, 0x1f, 0xff, 0xff, 0xc0, 0x00, 0x1f, 0xe0, 0x00, 0x0f, 0xff, 0xff, 0xe0, 0x00, 0x7f, 0xf0, 0x00, 0x7f, 0xff, 0xff, 0xe0, 0x00, 0x0f, 0xc0, 0x00, 0x1f, 0xff, 0xff, 0xf8, 0x00, 0x3f, 0xe0, 0x00, 0xff, 0xff, 0xff, 0xf8, 0x00, 0x07, 0x80, 0x00, 0x7f, 0xff, 0xff, 0xfc, 0x00, 0x1f, 0xe0, 0x00, 0xff, 0xff, 0xff, 0xfc, 0x00, 0x03, 0x80, 0x00, 0xff, 0xff, 0xff, 0xfc, 0x00, 0x1f, 0xc0, 0x01, 0xff, 0xff, 0xff, 0xfe, 0x00, 0x03, 0x00, 0x01, 0xff, 0xff, 0xff, 0xfe, 0x00, 0x1f, 0xc0, 0x03, 0xff, 0xff, 0xff, 0xff, 0x00, 0x00, 0x00, 0x03, 0xff, 0xff, 0xff, 0xff, 0x00, 0x0f, 0xc0, 0x03, 0xff, 0xff, 0xff, 0xff, 0x80, 0x00, 0x00, 0x07, 0xff, 0xf0, 0x7f, 0xff, 0x00, 0x0f, 0xc0, 0x07, 0xff, 0xff, 0xff, 0xff, 0xc0, 0x00, 0x00, 0x0f, 0xff, 0xf0, 0x7f, 0xff, 0x80, 0x0f, 0x80, 0x07, 0xff, 0xff, 0xff, 0xff, 0xe0, 0x00, 0x00, 0x1f, 0xff, 0xf0, 0x7f, 0xff, 0x80, 0x07, 0x80, 0x0f, 0xff, 0xff, 0xff, 0xff, 0xf0, 0x00, 0x00, 0x3f, 0xff, 0xf0, 0x7f, 0xff, 0xc0, 0x07, 0x80, 0x0f, 0xff, 0xff, 0xff, 0xff, 0xf8, 0x00, 0x00, 0x7f, 0xff, 0xf0, 0x7f, 0xff, 0xc0, 0x07, 0x80, 0x0f, 0xfe, 0x00, 0x00, 0xff, 0xfc, 0x00, 0x00, 0xff, 0xfc, 0x00, 0x03, 0xff, 0xc0, 0x07, 0x80, 0x0f, 0xfe, 0x00, 0x00, 0xff, 0xfe, 0x00, 0x01, 0xff, 0xfc, 0x00, 0x01, 0xff, 0xc0, 0x07, 0x80, 0x0f, 0xfe, 0x00, 0x00, 0xff, 0xff, 0x00, 0x03, 0xff, 0xfc, 0x00, 0x01, 0xff, 0xc0, 0x07, 0x80, 0x0f, 0xfe, 0x00, 0x00, 0xff, 0xff, 0x00, 0x03, 0xff, 0xfc, 0x00, 0x01, 0xff, 0xc0, 0x07, 0x80, 0x0f, 0xfe, 0x00, 0x00, 0xff, 0xff, 0x00, 0x03, 0xff, 0xfc, 0x00, 0x01, 0xff, 0xc0, 0x07, 0x80, 0x0f, 0xff, 0xff, 0xff, 0xff, 0xfe, 0x00, 0x01, 0xff, 0xff, 0xe0, 0x7f, 0xff, 0xc0, 0x07, 0x80, 0x0f, 0xff, 0xff, 0xff, 0xff, 0xfc, 0x00, 0x00, 0xff, 0xff, 0xf0, 0x7f, 0xff, 0xc0, 0x07, 0x80, 0x0f, 0xff, 0xff, 0xff, 0xff, 0xfc, 0x00, 0x00, 0xff, 0xff, 0xf0, 0x7f, 0xff, 0xc0, 0x07, 0x80, 0x0f, 0xff, 0xff, 0xff, 0xff, 0xf8, 0x00, 0x00, 0x7f, 0xff, 0xf0, 0x7f, 0xff, 0xc0, 0x07, 0x80, 0x0f, 0xff, 0xff, 0xff, 0xff, 0xf0, 0x00, 0x00, 0x3f, 0xff, 0xf0, 0x7f, 0xff, 0x80, 0x07, 0x80, 0x07, 0xff, 0xff, 0xff, 0xff, 0xe0, 0x00, 0x00, 0x1f, 0xff, 0xf0, 0x7f, 0xff, 0x80, 0x07, 0xc0, 0x07, 0xff, 0xff, 0xff, 0xff, 0xc0, 0x00, 0x00, 0x0f, 0xff, 0xff, 0xff, 0xff, 0x80, 0x0f, 0xc0, 0x03, 0xff, 0xff, 0xff, 0xff, 0x80, 0x00, 0x00, 0x07, 0xff, 0xff, 0xff, 0xff, 0x00, 0x0f, 0xc0, 0x03, 0xff, 0xff, 0xff, 0xff, 0x00, 0x00, 0x00, 0x03, 0xff, 0xff, 0xff, 0xff, 0x00, 0x0f, 0xe0, 0x01, 0xff, 0xff, 0xff, 0xfe, 0x00, 0x03, 0x00, 0x01, 0xff, 0xff, 0xff, 0xfe, 0x00, 0x1f, 0xe0, 0x00, 0xff, 0xff, 0xff, 0xfc, 0x00, 0x07, 0x80, 0x00, 0xff, 0xff, 0xff, 0xfc, 0x00, 0x1f, 0xe0, 0x00, 0x7f, 0xff, 0xff, 0xf0, 0x00, 0x0f, 0xc0, 0x00, 0x3f, 0xff, 0xff, 0xf8, 0x00, 0x3f, 0xf0, 0x00, 0x3f, 0xff, 0xff, 0xe0, 0x00, 0x1f, 0xe0, 0x00, 0x1f, 0xff, 0xff, 0xf0, 0x00, 0x3f, 0xf8, 0x00, 0x1f, 0xff, 0xff, 0x80, 0x00, 0x3f, 0xe0, 0x00, 0x07, 0xff, 0xff, 0xe0, 0x00, 0x7f, 0xf8, 0x00, 0x0f, 0xff, 0xff, 0x00, 0x00, 0x7f, 0xf8, 0x00, 0x03, 0xff, 0xff, 0xc0, 0x00, 0x7f, 0xfc, 0x00, 0x03, 0xff, 0xf8, 0x00, 0x00, 0xff, 0xfc, 0x00, 0x00, 0xff, 0xff, 0x00, 0x00, 0xff, 0xfe, 0x00, 0x00, 0x7f, 0xe0, 0x00, 0x01, 0xff, 0xfe, 0x00, 0x00, 0x1f, 0xf8, 0x00, 0x01, 0xff, 0xfe, 0x00, 0x00, 0x00, 0x00, 0x00, 0x03, 0xff, 0xff, 0x00, 0x00, 0x00, 0x00, 0x00, 0x03, 0xff, 0xff, 0x00, 0x00, 0x00, 0x00, 0x00, 0x07, 0xff, 0xff, 0x80, 0x00, 0x00, 0x00, 0x00, 0x03, 0xff, 0xff, 0x80, 0x00, 0x00, 0x00, 0x00, 0x0f, 0xff, 0xff, 0xc0, 0x00, 0x00, 0x00, 0x00, 0x07, 0xff, 0xff, 0xc0, 0x00, 0x00, 0x00, 0x00, 0x1f, 0xff, 0xff, 0xe0, 0x00, 0x00, 0x00, 0x00, 0x0f, 0xff, 0xff, 0xe0, 0x00, 0x00, 0x00, 0x00, 0x7f, 0xff, 0xff, 0xf8, 0x00, 0x00, 0x00, 0x00, 0x3f, 0xff, 0xff, 0xf8, 0x00, 0x00, 0x00, 0x01, 0xff, 0xff, 0xff, 0xfe, 0x00, 0x00, 0x00, 0x00, 0x7f, 0xff, 0xff, 0xfc, 0x00, 0x00, 0x00, 0x03, 0xff, 0xff, 0xff, 0xff, 0x00, 0x00, 0x00, 0x00, 0xff, 0xff, 0xff, 0xff, 0x00, 0x00, 0x00, 0x0f, 0xff, 0xff, 0xff, 0xff, 0xc0, 0x00, 0x00, 0x03, 0xff, 0xff, 0xff, 0xff, 0xc0, 0x00, 0x00, 0x3f, 0xff, 0xff, 0xff, 0xff, 0xf0, 0x00, 0x00, 0x0f, 0xff, 0xff, 0xff, 0xff, 0xf0, 0x00, 0x01, 0xff, 0xff, 0xff, 0xff, 0xff, 0xfe, 0x00, 0x00, 0x3f, 0xff, 0xff, 0xff, 0xff, 0xff, 0x00, 0x0f, 0xff, 0xff, 0xff, 0xff, 0xff, 0xff, 0xc0, 0x03, 0xff, 0xff, 0xff, 0xff, 0xff, 0xff, 0xff, 0xff, 0xff, 0xff, 0xff, 0xff, 0xff, 0xff, 0xff, 0xff, 0xff, 0xff, 0xff, 0xff, 0xff, 0xff, 0xff, 0xff, 0xff, 0xff, 0xff, 0xff, 0xff, 0xff, 0xff, 0xff, 0xff, 0xff, 0xff, 0xff, 0xff, 0xff, 0xff, 0xff, 0xff, 0xff, 0xff, 0xff, 0xff, 0xff, 0xff, 0xff, 0xff, 0xff, 0xff, 0xff, 0xff, 0xff, 0xff, 0xff, 0xff, 0xff, 0xff, 0xff, 0xff, 0xff, 0xff, 0xff, 0xff, 0xff, 0xff }; void setup() { Serial.begin(9600); // initialize OLED display with address 0x3C for 128x64 if (!oled.begin(SSD1306_SWITCHCAPVCC, 0x3C)) { Serial.println(F("SSD1306 allocation failed")); while (true); } delay(2000); // wait for initializing oled.setCursor(0, 0); } void loop() { oled.clearDisplay(); // display bitmap oled.drawBitmap(0, 0, ArduinoIcon, 128, 64, WHITE); oled.display(); delay(2000); // invert display oled.invertDisplay(1); delay(2000); }

※ Notiz:

  • De afbeeldingsgrootte moet kleiner of gelijk zijn aan het schermformaat.
  • Wilt u de code aanpassen voor OLED 128x32, dan moet u de afbeelding herschalen en de breedte/hoogte in de oled.drawBitmap(); functie aanpassen.

OLED Probleemoplossing

Als het OLED-display niets weergeeft, controleer dan onderstaande checklist:

  • Controleer of de bedrading correct is.
  • Controleer of uw I2C OLED de SSD1306 driver gebruikt.
  • Controleer het I2C-adres van de OLED door onderstaande I2C Address Scanner code op Arduino te draaien.
// I2C adres scanner programma #include <Wire.h> void setup() { Wire.begin(); Serial.begin(9600); Serial.println("I2C Scanner"); } void loop() { byte error, address; int nDevices; Serial.println("Scanning..."); nDevices = 0; for(address = 1; address < 127; address++ ) { Wire.beginTransmission(address); error = Wire.endTransmission(); if (error == 0) { Serial.print("I2C device found at address 0x"); if (address < 16) Serial.print("0"); Serial.print(address,HEX); Serial.println(" !"); nDevices++; } else if (error==4) { Serial.print("Unknown error at address 0x"); if (address < 16) Serial.print("0"); Serial.println(address,HEX); } } if (nDevices == 0) Serial.println("No I2C devices found"); else Serial.println("done"); delay(5000); // wacht 5 seconden voor nieuwe scan }

Resultaat op de Serial Monitor:

COM6
Send
Scanning... I2C device found at address 0x3C ! done Scanning... I2C device found at address 0x3C ! done
Autoscroll Show timestamp
Clear output
9600 baud  
Newline  

※ ONZE BERICHTEN

  • U bent welkom om de link naar deze tutorial te delen. Gebruik onze inhoud echter niet op andere websites. We hebben veel moeite en tijd gestoken in het maken van de inhoud, respecteer alstublieft ons werk!